1
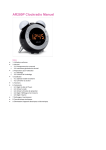
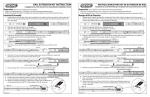
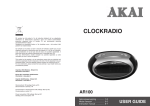
AR280P Clockradio manual Index o o o o o o o o o o o 1. Intended use 2. Safety 2.1. Labels in this manual 2.2. General safety instructions 3. Preparations for use 3.1. Unpacking 3.2. Package contents 4. Installation 4.1. (Optional) Insert the battery 4.2. Connecting to the mains 5. Functions 6. Operation 6.1. Setting the date and time 6.2. Using the radio 6.3. Using the projection function 6.4. Setting the timer and display 6.5. Setting the alarm 7. Cleaning and maintenance 8. Technical data 9. Disposal of used electric and electronic equipment 1.Intended use The AR280P is intended for use as an alarm radio. The AR280P has an FM radio function, a projection function and includes a lamp. The temperature can also be displayed. Read the manual carefully before the first use. 2.Safety 2.1. Labels in this manual WARNING A warning means that injury or death is possible if the instructions are not obeyed. CAUTION A caution means that damage to the equipment is possible. A note gives additional information, e.g. for a procedure. 2.2. General safety instructions CAUTION Do not spill any liquid on the appliance. WARNING Do not put force on the appliance. The appliance can fall and can cause serious injury. 3.Preparations for use 3.1. Unpacking Unpack the appliance carefully. Check the package contents as described below. If any item is missing, please contact your reseller. Remove the labels from the front panel carefully if present. We recommend that you retain the original carton and packing materials in case it ever becomes necessary to return your product for service. This is the only way to safely protect the product against damage in transit. If you do dispose of the carton and the packing materials, please remember to recycle with due care to the environment. 3.2. Package contents The following items are included in the received package: 1 x AR280P Clockradio 1x Quick start guide If any item is missing, please contact your reseller. 4.Installation CAUTION Do not put the appliance near a heat source. CAUTION Do not expose the appliance to direct sunlight. Put the appliance on a horizontal flat surface. Connect the appliance to the mains. 4.1. (Optional) Insert the battery To ensure that your alarm radio remains switched on during a power outage, you can insert a battery (type CR2032). Do this as follows: 1. 2. 3. Remove the battery cover. Insert the batteries matching the (+) and (-) polarity markings. Re-install the battery cover. If you do not use the appliance for an extended period, remove the batteries. Please note: batteries not included. CAUTION Incorrect installation can cause battery leakage and corrosion which will damage the appliance. Corrosion, oxidation, battery leakage and any other gradually acidic defect of this nature will invalidate the guarantee. 4.2. Connecting to the mains Connect the appliance to the mains. 5.Functions 1. 2. 3. 4. Setting the brightness higher Setting the brightness lower Switch the lamp on or off M+/NAP button a. Save a radiostation into the memory b. Setting the timer c. Turn off display 5. 6. Lamp SNOOZE/SLEEP/DIMMER button a. Adjusting the brightness of the display b. To snooze the alarm, press SNOOZE/SLEEP/DIMMER (6). The alarm sounds again after the snooze time has elapsed. c. Dim the light temporary during an alarm 7. Switch between time and temperature 8. button Switch between time and date b. Search frequency 9. 10. 11. 12. Activating the alarm 1 Screen Switch to radiomode button a. Switching between summer and winter time b. Search frequency 13. Activating the alarm 2 14. button a. Adjust the volume (+) Screen Switch between time and date 15. Adjust the volume (-) 16. button a. Turning the projection 180 degrees Projection function b. Switch between time and temperature 17. 18. 19. 20. 21. 22. Turn the projection function on or off Projection dial Loudspeaker Temperature sensor FM antenna Battery cover 6.Operation 6.1. Setting the date and time Note! Turn the radio off before proceding. Keep key (7), pressed for 2 seconds The date is flashing Press the (8) or (12) key to set the desired year. Press (7) to confirm. The month is flashing Press the (8) or (12) key to set the desired month. Press (7) to confirm. The day is flashing Press the (8) or (12) key to set the desired day. Press (7) to confirm. Digital time indication is flashing Press the (8) or (12) key to choose between 24 or 12 hour time display. Press (7) to confirm. The hours are flashing on the display. Press the (8) or (12) key to set the desired hour. Press (7) to confirm. The minutes are flashing on the display. Press the (8) or (12) key to set the desired minutes. Press (7) to confirm. 6.2. Using the radio Switch to radiomode To do this, press the key (11). The frequency is shown on the display Manually adjust the frequency To tune to the station of your choice, press the (8) button or the (12) button repeatedly until the frequency is found. Automatically adjust the frequency Press and hold the (8) Button or the (12) Button to find the desired frequency. Save a radiostation into the memory Keep key (4), pressed for 2 seconds The digits start flashing. Press the (8) or (12) key to select a memory location. Press (4) to confirm. 3 memory locations are available. Activating a stored function Press the button (4) repeatedly until the desired frequency is found. Setting the timer While listening to the radio press the (6) button several times to set the "swith-off" time between 90 and 10 minutes. After the set time, the radio automatically switches off . 6.3. Using the projection function Turn the projection function on or off Press the (17) button . Caution! When the alarm radio is first connected to the power supply, the projection function is immediately activated. Focusing the projection Turn the key (18) until the desired sharpness is achieved. Turning the projection 180 degrees Press the (16) button . Switch between time and temperature Keep key (16), pressed for 2 seconds 6.4. Setting the timer and display Note! Turn the radio off before proceding. Setting the timer Press the (4) button . "N90" appears on the display. This shows after how many minutes the beep is activated. Press the button (4) repeatedly until the desired setting is found. Setting the display Keep key (4), pressed for 3 seconds The display disappears automatically after 15 seconds. When the display timer is set, an orange bar appears in the display. Disable the display timer: Keep key (4), pressed for 3 seconds 6.5. Setting the alarm Note! Turn the radio off before proceding. Caution! You can set and activate two alarms. Press the (9) button . An orange bar appears in the display above AL1, the alarm is now activated. "7:00" appears on the display. Keep key (9) pressed for 2 seconds The hours are flashing on the display. Press the (8) or (12) key to set the desired hour. Press (9) to confirm. The minutes are flashing on the display. Press the (8) or (12) key to set the desired minutes. Press (9) to confirm. "1-5" is flashing on the display. Here you can set which days the alarm goes off. Press the (8) or (12) key to set the desired day. 1-5: Monday to Friday 1-7: Monday to Sunday 6-7: Saturday and Sunday 1-1: Setting one single day. When you choose this option, please indicate which day you want to set. 1 Monday, 2 Tuesday, 3 Wednesday, 4 Thursday, 5 Friday, 6 Saturday and 7 Sunday. Press (9) to confirm. is flashing on the display. Press the (8) or (12) key to choose whether you wish to hear the sound of an alarm or the radio when the alarm goes off. Press (9) to confirm. The volume is flashing Press the (8) or (12) key to set the desired volume. 1 is the minimum volume and 15 is the maximum volume. Press (9) to confirm. The brightness flashes The lights can turn as wake-up light when the alarm goes off. Press the (8) or (12) key to set the brightness for when the alarm goes off. Press (9) to confirm. The light switches on 5 minutes before the alarm goes off. The light becomes increasingly brighter. To snooze the alarm, press (6) . The alarm sounds again after the snooze time has elapsed. The default snooze time is: 9 minutes. 7.Cleaning and maintenance WARNING Before performing any cleaning or maintenance, switch off and unplug the appliance. Clean the outside of the appliance with a soft cloth. When the appliance is very dirty, dampen the cloth slightly with water and a neutral solution. 8.Technical data Specifications Power supply: AC 220-240V ~ 50/60 Hz Frequency range: 87,5-108Mhz 8' LED Display Weight: 460 g Dimensions: 140x140x96mm Projection function Sleep timer Alarm clock Temperature indication Digital FM Radio Accessories Mains cable User manual 9.Disposal of used electric and electronic equipment The meaning of the symbol on the material, its accessory or packaging indicates that this product shall not be treated as household waste. Please, dispose of this equipment at your applicable collection point for the recycling of electrical and electronic equipments waste. In the European Union and Other European countries which there are separate collection systems for used electrical and electronic product. By ensuring the correct disposal of this product, you will help prevent potentially hazardous to the environment and to human health, which could otherwise be caused by unsuitable waste handling of this product. The recycling of materials will help conserve natural resources. Please do not therefore dispose of your old electrical and electronic equipment with your household waste. For more detailed information about recycling of this product, please contact your local city office, your household waste disposal service or the shop where you purchased the product. For more information and warranty conditions, please visit: www.akai.eu Do not dispose of batteries as household waste but take them to a battery recycling facility.