1
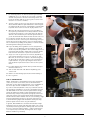
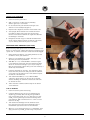
TRADITIONAL
HOMEBREWING
INSTRUCTIONS
INTRODUCTION TO WILLIAMSWARN
2
INTRODUCTION OF OUR BEER AND CIDER KITS
3
BREWING INSTRUCTIONS
6
BREWING ACCESSORIES
10
CONTACT INFORMATION
11
© Copyright 2014 WilliamsWarn NZ Ltd
INTRODUCTION TO
WILLIAMSWARN
In 2011, Master Brewer Ian Williams and Engineer Anders Warn
launched the WilliamsWarn Personal Brewery in New Zealand,
along with award winning malt extract kits. Homebrewing took
a leap forward, allowing the home brewer to make cold, clear,
cleanly fermented, perfectly carbonated beer at home in 7 days,
just like a modern brewery.
This had never been achieved at home anywhere – professional
quality beer in the same time-frame as that of a modern brewery.
The brew kits however can also be brewed using traditional
homebrew equipment.
Each of the 15 WilliamsWarn kits matches a style within
the BJCP Style Guidelines. Recipes are available on the
WilliamsWarn website www.williamswarn.com to produce
a further 52 BJCP styles from these kits by steeping extra
grains and hops and other ingredients.
All of the beer kits consist of liquid and dry malt extract made
in state-of-the-art brewhouses. Included with these are the best
premium yeast strain for each beer style, from either Fermentis
or Lallemand. A hard cider kit made from 100% New Zealand
apples is also available.
The high quality of our ingredients became evident in June
2012, when a home brewer, Santiago Aon, won Gold for his
Pilsner at the Asia Beer Awards using a WilliamsWarn extract
kit. This was the first time a home brewer had ever beaten the
big global brewers in an international beer tasting competition.
The second person to achieve this feat, Nick Koppers, also
accomplished it using a WilliamsWarn extract kit when he won
Silver for his American Pale Ale at the same awards in 2013.
We’re very proud that the only two home brewers to achieve such
success against the big global players in the brewing industry
both did so using WilliamsWarn ingredient kits.
The following information describes our brewing kits and how
to brew with them to make great beer, even if you don’t own
a WilliamsWarn Personal Brewery.
Cheers!
SILVER
This is to certify at the Asia Beer Awards, June 13-16 2013
WilliamsWarn – Best Bitter
was judged
Silver Medal W inner – International Pub Ale
Ian Williams
Anders Warn
2
Leon Mickelson
The Brew, Shanghai
Chairman, Asia Beer Awards 2013
Gareth Hughes
MOA Brewery, N.Z.
Judge, Asia Beer Awards 2013
Ai Tani
Owner of Craft Beer Base, Osaka
Judge, Asia Beer Awards 2013
Henning Swabey
Hops Connect, Canada
Judge, Asia Beer Awards 2013
Tetsuya Kojima
Beer Judge from Craft Beer Association Japan
Judge, Asia Beer Awards 2013
Dave Brough
Indian Ocean Brewery, W.A.
Judge, Asia Beer Awards 2013
DESCIPTIONS OF OUR
BEER AND CIDER KITS
Each kit has all the ingredients required for a homebrewer to make 5 US gallons of
professional quality beverage or an owner of a WilliamsWarn Personal Brewery to
make a 6 gallon brew. When using a kit to make a 5 gallon batch, the final beverage
specifications will be at a slightly higher level compared to when producing a 6 gallon
batch, but at both volumes brewed, the final beverages will be within acceptable
specification range for the beverage style being brewed. You can see the final
beverage specifications for each kit brewered to 5 or 6 gallons in Table 1 below.
TABLE 1
5 US gallons (19 litres)
6 US gallons (23 litres/5 UK Gallons)
OG
SG
Alcohol
Bitterness
Colour SRM/EBC
OG
SG
Alcohol
Bitterness
Colour SRM/EBC
AMERICAN AMBER ALE
1.055
1.014
5.41%
39
15.5/31
1.045
1.011
4.47%
32
13/26
AMERICAN LAGER
1.055
1.011
5.77%
16
3.5/7
1.045
1.009
4.77%
13
3/6
AMERICAN PALE ALE
1.055
1.014
5.41%
36
8/16
1.045
1.011
4.47%
30
7.5/13
APPLE CIDER
1.050
1.008
5.55%
—
—
1.042
1.007
4.55%
—
—
BELGIAN PALE ALE
1.055
1.014
5.41%
36
8/16
1.045
1.011
4.47%
30
6.5/13
BLONDE ALE
1.055
1.014
5.41%
22
4/8
1.045
1.011
4.47%
18
3.5/7
BOHEMIAN PILSNER
1.055
1.011
5.77%
45
8/16
1.045
1.009
4.77%
37
6.5/13
DRY STOUT
1.055
1.014
5.41%
39
60/121
1.045
1.011
4.47%
32
50/100
DUTCH PILSNER
1.055
1.011
5.77%
27
3.5/7
1.045
1.009
4.77%
22
3/6
ENGLISH BROWN ALE
1.055
1.014
5.41%
22
30/60
1.045
1.011
4.47%
18
25/50
ENGLISH PALE ALE
1.055
1.014
5.41%
24
8.5/17
1.045
1.011
4.47%
20
7/14
IRISH RED ALE
1.055
1.014
5.41%
28
15.5/31
1.045
1.011
4.47%
23
13/26
PREMIUM LAGER
1.055
1.011
5.77%
22
4/8
1.045
1.009
4.77%
18
3.5/7
SUMMER ALE
1.055
1.014
5.41%
16
3.5/7
1.045
1.011
4.47%
13
3/6
WHEAT BEER
1.055
1.014
5.41%
18
3.5/7
1.045
1.011
4.47%
15
3/6
AMERICAN AMBER ALE
A bitter beer with full-bodied, speciality malt character.
in a French coffee press. Add approx. 900ml of hot boiled water
to the hops, stir and then steep for 20 minutes. Plunge the solids
and add the green, filtered hop tea to the mix of ingredients
in your fermenter (before adding the yeast). Download the
WilliamsWarn User Manual from our website for more details.
Our American Amber Ale has a deep-amber, light-copper
appearance from crystal and black malts included in the recipe.
These give this beer caramel, raisin and biscuity notes with
a slightly dry finish. The hops provide a prominent level of
bitterness to balance the malt flavours.
AMERICAN LAGER
A refreshing American Lager for those who appreciate one of
the world’s most popular beer styles.
The yeast under the lid is an 11.5g pack of Fermentis US-05
ale yeast.
Our American Lager is straw-coloured in appearance with a low
bitterness. It is crisp, dry and thirst-stopping. The lager yeast
employed will give some slightly fruity notes to add a pinch of
character. The goal is a light-tasting beer with low levels of malt,
hop and yeast character in perfect balance.
Ideally, ferment at 23°C/73°F for 4 days, after which time the
S.G. should be close to the value stated in Table 1.
To elevate the fresh hop aroma of this style, we recommend the
brewer make a hop tea of 1-2 oz. (28- 56g) of any American hops
3
Ideally ferment at 15°C/59°F for 3 days and then increase to
18°C/64°F for a diacetyl rest to complete fermentation after
another 3 days, after which time the S.G. should be close to the
value stated in Table 1.
The yeast under the lid is an 11g pack of Fermentis S-23
lager yeast.
Ideally ferment at 15°C/59°F for 3 days and then increase to
18°C/64°F for a diacetyl rest to complete fermentation after
another 3 days, after which time the S.G. should be close to
the value stated in Table 1.
As an option, hop aroma and taste can be elevated if the brewer
makes a hop tea of 1-2 oz. (28-56 grams) of any Czech (or
German) hops in a French coffee press. Add approx. 900ml of
hot boiled water to the hops, stir and then steep for 20 minutes.
Plunge the solids and add the green, filtered hop tea to the
mix of ingredients in your fermenter (before adding the yeast).
Download the WilliamsWarn User Manual from our website
for more details.
AMERICAN PALE ALE
A flavourful American Pale Ale.
Our American Pale Ale has an amber appearance with a prominent
bitterness. Due to ale and crystal malts used, it has a steady malt
flavour with a touch of bready and toasty notes.
The yeast under the lid is an 11g pack of Fermentis US-05
ale yeast.
APPLE CIDER
A pleasant and appealing Cider.
Ideally, ferment at 23°C/73°F for 4 days, after which time the
S.G. should be close to the value stated in Table 1.
Our Apple Cider is made from the highest quality apples. The
result is a very dry, clean and crisp cider. The apple flavours
are light and pleasant and the overall taste is refreshing.
To elevate the fresh hop aroma of this style, we recommend
the brewer make a hop tea of 1-2 oz. (28- 56 grams) of any
American hops in a French coffee press. Add approx. 900ml of
hot boiled water to the hops, stir and then steep for 20 minutes.
Plunge the solids and add the green, filtered hop tea to the mix of
ingredients in your fermenter (before adding the yeast). Download
the WilliamsWarn User Manual from our website for more details.
The yeast used is an 11g pack of Fermentis S-04 yeast and
we have included a 10g yeast nutrient sachet to assist the
yeast in fermenting the juice.
This cider must should be made up to 5 or 6 US gallons
(19 or 23 litres) by adding water. Stir in the nutrient first
and then pitch the yeast after rehydration in water.
BELGIAN PALE ALE
A flavoursome Belgian Pale Ale.
Ideally, ferment at 23°C/73°F for 6 days, after which time
the S.G. should be close to the value stated in Table 1.
Our Belgian Pale Ale has an amber colour and a decent
bitterness. From ale and crystal malts used in the grain
bill, it has a solid malty and slightly bready taste. The yeast
employed is a true Belgian Ale yeast that will give banana,
spicy and peppery attributes to the beer.
DO NOT CLARIFY. The yeast will settle at the end of
fermentation and the cider will be clear.
The yeast under the lid is an 11g pack of Fermentis T- 58
ale yeast.
Our Dry Stout has a black appearance from the crystal malts,
roasted malts and roasted barley employed in the grain mix.
The result is a great Dry Stout that has liquorice, roasted
coffee and chocolate flavours dominating. The prominent hop
bitterness level helps elevate the dryness, which comes from
the roasted un-malted barley used.
DRY STOUT
A true Dry Stout with a compelling personality.
Ideally, ferment at 23°C/73°F for 4 days, after which time the
S.G. should be close to the value stated in Table 1.
BLONDE ALE
A refreshing, easy-drinking Blonde Ale with a crisp palate.
The yeast under the lid is an 11g pack of Fermentis S-04 yeast.
Our Blonde Ale is yellow in appearance with a moderate bitterness.
It sits in the Hybrid category of the BJCP Style Guidelines and is an
ale version of a lager beer. It therefore ferments warm (23°C/73°F)
with great efficiency with our ale yeast, but with the resulting taste
profile being similar to that of a light lager.
Ideally, ferment at 23°C/73°F for 4 days, after which time the
S.G. should be close to the value stated in Table 1.
The yeast under the lid is an 11g pack of Nottingham ale yeast.
Our Dutch Pilsner is straw-coloured in appearance with
a moderate, lingering bitterness. The yeast employed is
a classic strain that leaves a slightly estery aroma that is
typical of Pilsners from The Netherlands. When used with
our light DME to make an all-malt beer, the combination
of ingredients makes a Pilsner very true to the region.
DUTCH PILSNER
This is a noble brew with a crisp finish.
Ideally, ferment at 23°C/73°F for 4 days, after which time the
S.G. should be close to the value stated in Table 1.
BOHEMIAN PILSNER
A traditional Bohemian Pilsner with a rich, complex maltiness
and a crisp finish.
The yeast under the lid is an 11g pack of Fermentis S-23
lager yeast which is commonly used by large breweries in
Western Europe.
Our Bohemian Pilsner is deep gold in appearance with a high
bitterness and long lasting creamy head. The yeast employed is
a classic German Pilsner yeast that leaves a very clean taste.
Ideally ferment at 15°C/59°F for 3 days and then increase
to 18°C/64°F for a diacetyl rest to complete fermentation
after another 3 days, after which time the S.G. should be
close to the value stated in Table 1.
The yeast under the lid is an 11g pack of Fermentis W34/70
lager yeast.
4
ENGLISH BROWN ALE
An authentic Brown Ale with a dark-fruit character.
SUMMER ALE
A thirst-quenching Summer Ale, perfect for the hot summer
months.
Our English Brown Ale has a dark brown appearance from a
range of speciality malts employed in the recipe. The resulting
beer has an array of flavours that includes raisins, plums, figs,
nuts, biscuits, caramel and toffee, that last into the finish. The
hops provide a moderate level of bitterness that helps balance
the dark-fruit malt flavours.
Our Summer Ale is straw-coloured in appearance with a low
bitterness. Technically it is regarded as a Cream Ale – an ale
version of a lager beer. It therefore ferments warm (23°C/73°F)
with great efficiency with our ale yeast, but with the resulting
taste profile being similar to that of a light lager.
The yeast under the lid is an 11g pack of Fermentis S-04 yeast.
The yeast under the lid is an 11g pack of S-04 ale yeast.
Ideally, ferment at 23°C/73°F for 4 days, after which time the
S.G. should be close to the value stated in Table 1.
Ideally, ferment at 23°C/73°F for 4 days, after which time the
S.G. should be close to the value stated in Table 1.
ENGLISH PALE ALE
A full-bodied English Pale Ale.
WHEAT BEER
A refreshing, smooth-drinking Wheat Beer.
Our English Pale Ale has an amber appearance with a moderate
bitterness. Technically, within the BJCP Style Guidelines it is
a Standard Bitter – the lightest of the English bitter types with
respect to alcohol content, colour and bitterness. This beer has
a firm malty start, a touch of fruitiness from the yeast and a long
dry finish from the hops.
Our Wheat Beer has a straw-coloured appearance with a low
bitterness. The malted wheat in the grain bill gives this beer a
slightly grainy flavour with a creamy fullness that leads to a light
finish. The yeast employed will provide decent levels of phenolic
flavours and so this brew leans towards a fresh, German wheat
beer in style.
The yeast under the lid is an 11g pack of Lallemand
Nottingham ale yeast.
The yeast under the lid is an 11g pack of Fermentis WB-06
wheat beer yeast.
Ideally, ferment at 23°C/73°F for 4 days, after which time the
S.G. should be close to the value stated in Table 1.
Ideally, ferment at 23°C/73°F for 4 days, after which time the
S.G. should be close to the value stated in Table 1.
IRISH RED ALE
An easy drinking pint.
Our Irish Red Ale has a deep-amber, light-copper appearance
from crystal and black malts included in the recipe. The malt
focus gives this beer caramel, toffee and toasty notes and a
slight dry, roasted-grain finish. The hops provide a moderate
level of bitterness. Overall, this is an interesting beer that is a
pleasure to produce and appreciate.
The yeast under the lid is an 11g pack of Nottingham ale yeast.
Ideally, ferment at 23°C/73°F for 4 days, after which time the
S.G. should be close to the value stated in Table 1.
PREMIUM LAGER
A pleasant Premium Lager with a clean taste profile.
Our Premium Lager is yellow in appearance with a moderate
bitterness. It is a satisfying beer that sits in between American
Lagers and European Pilsners in character. The yeast employed
will ferment clean and true-to-style. An agreeable drop that’s
ideal for brewing for social events and therefore to be shown-off
to your friends.
The yeast under the lid is an 11g pack of Fermentis W34/70
lager yeast, the most famous and most widespread German lager
yeast.
Ideally ferment at 15°C/59°F for 3 days and then increase to
18°C/64°F for a diacetyl rest to complete fermentation after
another 3 days, after which time the S.G. should be close to the
value stated in Table 1.
5
BREWING
INSTRUCTIONS
STEP 1: CLEAN AND SANITIZE
Clean your fermenter with any popular homebrewing detergent.
Most detergents are alkaline which helps to dissolve organic
residue such as yeast and beer. They may also contain chemicals
to help clean off mineral scale. Follow the instructions for your
detergent to make a cleaning solution.
Fig. 1
1. For open bucket fermenters, use a non-scratch sponge to
give the surface a good clean. For carboys, soak the carboy
overnight or use a carboy brush to help clean the surfaces.
2. Rinse all detergent thoroughly with water. Detergent
is quite hard to rinse off, so rinse your fermenter well.
3. Then sanitize the surfaces with a no-rinse sanitizer. Follow
the instructions and ensure all surfaces are wetted by the
solution.
4. Drain your fermenter but do not rinse it with water. No-rinse
products such as Sodium Percarbonate break-down into CO2
and Water which are natural components of beer, so there is
no need to flush the residue off.
STEP 2: ADD THE INGREDIENTS
1. Start to boil 1.5 Litres (3.2 US Pints) of water in a
kitchen kettle.
2. While the kettle is boiling, add 250ml (8.5 US fl. oz.)
of water at 25 +/- 5°C (77 +/- 9°F) to a clean cup. Ideally
use a thermometer to get the water temperature correct
and use cold and warm water as required.
Fig. 2
3. Open the yeast sachet with scissors and add the yeast to
this water (see Figure 1). Stir the yeast into the water for
10 seconds to help mix the yeast and then let it sit while
the next steps are taken.
For the WilliamsWarn Apple Cider pouch, add the contents
directly to the fermenter then rinse the package with cold water
and add that to your fermenter. Top up to 5 or 6 U.S. gallons
(19 or 23 liters, depending on your system) with water close to
25 +/- 5°C (77 +/- 9°F). Then add the rehydrated yeast solution.
For WilliamsWarn beer kits, use the following method.
4. Soak the Liquid Malt Extract can in hot water for
10 minutes to make it easier to pour.
5. Add 750ml (25 US fl. oz.) of the boiled water to a jug.
Open the liquid extract with the can opener and add most
of the extract to the water in the jug whilst stirring the water
with a spatula (see Figure 2).
6. Put the can with the residual extract on the table while you
continue to dissolve all the extract well in the jug by stirring.
Then add this dissolved extract in the jug to your fermenter
(see Figure 3).
6
7. Fill the empty extract can with the remaining boiled water
(750ml/25 US fl. oz.) and top the can up with cold water.
Stir with the spatula to dissolve all remaining extract (see
Figure 4) and then add this to the jug (use a cloth to hold
the can if it is too hot to handle).
Fig. 3
8. Stir the contents of the jug to help dissolve any remaining
extract and then add this to your fermenter also. Then using the
jug, add 3 Litres (6 US pints) of cold tap water to your fermenter
to provide more volume to dissolve any dry extracts into.
9. Open the dry malt extract bag with scissors and add it to
the liquid in your fermenter in one dump and then stir with
the spatula (see Figure 5). Some lumps may form that are
difficult to dissolve but they will dissolve by themselves as
you fill the fermenter with water and over the next hour or so.
If you intend to measure the SG of your wort/must to be able
to calculate the alcohol content of your final beverage, then you
need to dissolve all the dry extract to get an accurate reading.
This is better done by adding the dry extract in smaller amounts
and stirring before adding the next amount.
Fig. 4
10.If you are adding more ingredients such as steeped malt
or hops, you can add them now. The example in Figure 6
shows a hop tea being added. In this instance 50g (2 oz.) of
hop pellets were steeped in warm water in a French Coffee
Press and then strained as a liquid into the fermenter.
11.Top up to 5 or 6 US gallons (19 or 23 liters, depending on
your system) with water close to 25 +/- 5°C (77 +/- 9°F).
Once full, stir all the total contents in the fermenter gently
for about 10 seconds with a spatula, to get a homogenous
liquid wort/must. It’s good to try and get a vertical stir so
that any denser liquid at the bottom comes to the top and
mixes.
12.For cider, add the yeast nutrient when you have filled your
fermenter and stir it in.
Fig. 6
13.Then for both beer and cider add the rehydrating yeast
solution now.
See Table 1 for final beverage specifications when brewing to
5 or 6 U.S. gallons.
STEP 3: FERMENTATION
Ideally, fermentation is performed best with some temperature
control. If you have such control, then set the fermenter to
23°C/73°F for ales and for lagers/pilsners set at 15°C/59°F for
the first 3 days and then 18°C/64°F for the next 3 days.
If you do not have temperature control, try to ferment both the
ales and lagers somewhere in a room at a temperature near the
low 20’s°C/70’s°F. This will ensure the yeast ferment strongly.
Lagers are traditionally made at lower temperatures but this
was historically mainly to help prevent spoilage by other microorganisms and the yeast actually prefer warmer temperatures
and will ferment faster if warmer. You will still be making a lager
at these temperatures because you are using lager yeast. Try
to avoid fermenting higher than 26°C/79°F as the yeast may
produce higher alcohols which can give headaches.
In general, WilliamsWarn ales should be finished after 4 days
fermentation and our lagers and cider after 6 days. This can be
checked by measuring the Specific Gravity (SG)—which should
be close to the value stated in Table 1—and/or checking there
is no major activity in the brew, meaning there are no longer
bubbles of CO2 rising constantly.
7
Fig. 5
FOR BOTTLED HOMEBREW
STEP 4: BOTTLING
1. Clean and sanitize your bottles.
Fig. 7
2. Add ½ a teaspoon of table sugar or preferably
dextrose (glucose) to each bottle.
3. Fill each bottle from your fermenter leaving at least
25mm/1 inch of headspace (Figure 7).
4. Cap the bottles (Figure 8) and then invert several times.
5. Store upright above 18°C/64°F for 2 weeks minimum
but ideally 4 weeks. During this time the yeast that
remains in the beer will ferment the sugar and carbonate
the beverage in the bottle.
6. Refrigerate and then enjoy. For bottled homebrew there
will be a yeast sediment layer at the bottom of the bottle,
so pour carefully and leave the yeast in the bottle.
FOR KEGGED BEER HOMEBREW (NOT CIDER)
STEP 4: CLARIFICATION
Beer for bottling needs yeast for the second fermentation in the
bottles so should not be clarified, but beer that is kegged can be
crystal clear. To achieve clarification of beer that will be kegged:
Fig. 8
1. Ideally transfer the brew to a secondary fermenter so that
the brew is off the yeast sediment.
2. Ideally cool the fermenter in a fridge. This step it is not
absolutely essential but preferable.
3. Add 30ml (1 fl. oz.) of WilliamsWarn clarification agent
to the fermenter and stir well but avoid aerating the brew
which will oxidise the beverage. If you can put a layer of
CO2 over the beverage surface while you do this and after, it
would help avoid oxidation.
4. Leave the fermenter for 24 hours. The clarification agent
reacts with both protein haze and yeast and will sediment
so that after one day there will be a new sediment layer at
the bottom of the fermenter.
5. Then add another 30ml (1 fl. oz.) of WilliamsWarn
clarification agent and stir into the top half of the beer
without disturbing the sediment at the bottom and leave
for another 24 hours.
6. There should be a definite sediment layer at the bottom
of the fermenter.
STEP 5: KEGGING
1. Clean and sanitize your Cornelius keg.
2. Using the CO2 bottle you will use for carbonating and
dispensing your brew, add some CO2 through the OUT
port on the Cornelius keg. This is so that there is a layer
of CO2 in the keg before you transfer the beverage from
your fermenter. CO2 is heavier than air so it will sit at the
bottom of the keg.
3. Then transfer the beverage from the fermenter to the
keg, filling from the bottom. Avoid transferring any of
the sediment layer at the bottom of the fermenter.
4. When full, close the keg and place it in a refrigerator. Then
apply pressure via your CO2 cylinder using a low pressure
8
gas line with a grey ball-lock fitting attached to the IN port
on the keg.
Fig. 9
FOR KEGGED CIDER HOMEBREW
For kegging WilliamsWarn cider, the yeast should have settled
extremely well so there is no need for a clarification step. When
fermentation is complete and the yeast has settled, transfer to
your keg.
PRESSURE RECOMMENDATIONS FOR CARBONATING KEGS
Apply the pressure than corresponds to the carbonation
level you desire. A general rule of thumb is 1 bar (14.5 psi) for
5 days at 4°C/39°F to achieve 5.5 gl/L (2.75 volumes) CO2.
To achieve a quicker carbonation, set the pressure at
2.5 bar (36 psi) for 2 days and then your final pressure
level (e.g. 1 bar/14.5 psi) for 1 day.
DISPENSING A KEG
There are 3 basic options to dispense a keg.
5. A fridge set up with draft tap inside (Figure 9): Inside a fridge
you have a CO2 cylinder connected to the keg via the low
pressure line with a grey ball-lock connected to the IN port.
You need a 2m (6ft) line of hose (to slow the beverage flow
down) connected to the OUT port of the keg by a black balllock fitting and with a plastic draft beverage tap at the other
end of the hose to dispense through.
Fig. 10
The entire set up is kept cold in the fridge and you need to
open the door to pour a beer.
6. A fridge set up with draft tap outside (Figure 10): This is the
same set up as above except the tap is a stainless steel
tap that can be mounted through the fridge door.
The tap is therefore on the outside and you can pour a
beer without opening the fridge door (which keeps the keg
colder).
7. A specialised kegerator (Figure11): A dedicated CO2 cylinder
will be attached outside the fridge and kegs inside, with
fittings to attach to the kegs so that beer is poured through
taps on a font on top of the fridge.
Fig. 11
As in (2) above, the fridge door doesn’t need to be opened
to pour a beer so the keg stays colder.
9
BREWING ACCESSORIES
THE COUNTER-PRESSURE BOTTLER
Another WilliamsWarn invention, this counter-pressure bottler
allows you to connect to your WilliamsWarn Personal Brewery or
a pressurised Cornelius keg and fill bottles without losing any
carbonation.
Once the two hoses (gas and beverage) are connected via the
simple push-lock fittings on top of the filling valve, you open the
gas valve for a few seconds to pressurise the bottle and purge
some air out a variable pressure relief valve. You then close
the gas valve and open the beverage valve to allow beverage to
enter. The beverage fills against a back-pressure and so doesn't
foam and doesn't lose any carbonation. Pressure release and
therefore flow rate are controlled by how open the variable
pressure relief valve is set.
A 500ml bottle (1 US pint) can be filled in 40 seconds and the
bottles are ready to consume immediately, as the beer is already
carbonated.
1 LITRE (34 FL. OZ.) CLARIFICATION AGENT
The WilliamsWarn Clarification Agent works very well to
sediment most yeast strains as well as to remove protein
haze in beer.
In WilliamsWarn Personal Breweries we perform a 2-step
clarification over 2 days, once the beer is cold. For homebrewers
using more traditional fermenters, when fermentation is
complete, ideally transfer to a secondary vessel and then add
30ml (1 fl. oz.) of WilliamsWarn clarification agent to the vessel
and stir well but avoid aerating the brew which will oxidise the
beverage. If you can put a layer of CO2 over the beverage surface
while you do this and after, it would help avoid oxidation.
Leave the fermenter for 24 hours. The clarification agent reacts
with both protein haze and yeast and will sediment so that after
24 hours there will be a new sediment layer at the bottom of the
fermenter.
Then add another 30ml (1 fl. oz.) of WilliamsWarn clarification
agent and stir into the top half of the beer without disturbing
the sediment at the bottom and leave for another 24 hours.
After this there should be a definite sediment layer at the
bottom of the fermenter. The result is a crystal clear beverage
in 2 days total clarification time.
For beers, the colder the beer the more protein haze will come
out of solution and react with the agent. It is an inert product
suitable for vegans and a product commonly used in breweries.
You may find you can clear your beers in one step and with less
volume of agent.
The agent does not work on beverages that are produced without
malted barley as an ingredient (i.e. cider, beer, wine).
10
CONTACT
INFORMATION
For brewing questions, please email
WilliamsWarn at [email protected] or call
WilliamsWarn New Zealand: +64 9 5253488
For supply questions within the USA, phone Aaron Hyde
at Briess Malt and Ingredient Co. (504) 699 5436 or
email [email protected]
Ian Williams
Anders Warn
11