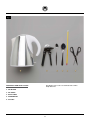
1
THE WILLIAMSWARN
Personal Brewery
USER MANUAL
INTRODUCTION
2
PART ONE: YOUR PERSONAL BREWERY
PART FOUR: APPENDICES
APPENDIX one: CLEANING & SANITISING
44
APPENDIX TWO: ADDING INGREDIENTS
46
BREWERY OVERVIEW
4
THE CONTROL PANEL
5
APPENDIX THREE: TAKING S.G. SAMPLEs AND CALCULATING ALCOHOL %'s
48
SAFETY INFORMATION
6
APPENDIX FOUR: the LID SEAL
51
SETTING UP YOUR PERSONAL BREWERY
10
PART TWO: MAKING YOUR BEVERAGE
WITH THE STANDARD BREWING METHOD
BREWING CYCLE OVERVIEW
15
THE Brewing process:
WHAT YOU NEED
The brewing stages
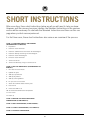
SHORT INSTRUCTIONS
16
19
36
PART THREE: MAKING BEVERAGES
WITH THE ADVANCED METHOD
APPENDIX SIX: SETTING THE TEMPERATURE WITH THE DIGITAL CONTROLLER
55
APPENDIX SEVEN: TYPICAL FERMENTATION CHARTS & WHEN TO COOL THE BEVERAGE
56
APPENDIX EIGHT: CLARIFYING THE BEVERAGE 59
APPENDIX NINE: DISPENSING THE BEVERAGE 62
APPENDIX ten: Descriptions of our
standard Kits & The BJCP style guidelines 63
APPENDIX eleven:
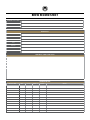
Conversion tables & brew record sheet 69
INTRODUCTION38
Adding extra hop flavour and bitterness
39
ADDING EXTRA MALT FLAVOURS
41
© Copyright 2013 Personal Brewing limited
APPENDIX FIVE: The VPRV AND CARBONATION 52
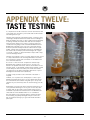
APPENDIX twelve: taste testing
73
TROUBLE SHOOTING THE WILLIAMSWARN PERSONAL BREWERY
75
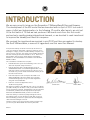
INTRODUCTION
We are very proud to bring you the Generation 2 WilliamsWarn® Personal Brewery.
The development of the first model that we launched with in April of 2011 took over 6
years of effort and determination. In the following 12 months after launch, we sold out
of the first batch of 70 that we had produced. We learnt much from this first model
and we had a rapidly growing international demand, so we decided to seek investment
to improve the brewery and meet this response.
We received the investment we required in mid-2012 and then proceeded to develop
the Gen2 WilliamsWarn, a new set of ingredients and this new User Manual.
Your personal brewery can deliver 23 Litres (6 US Gallons) of
cold, clear, perfectly carbonated, commercial quality alcoholic
beverages in 7 days, just like a modern brewery. It requires only
about 1 hour of your time. The quality of the products produced
was well and truly proven when a brewer on his 3rd brew in his
WilliamsWarn, beat 45 of the world’s biggest and brightest
breweries to win a Gold Medal for his Pilsner at the Asia Beer
Awards in 2012.
This User Manual is divided into four parts:
• Part One describes your Personal Brewery, how to set it up
and some important safety information.
• Part Two describes how to make beverages using our
Standard Method with our Standard Ingredient Kits. The
final page contains our Short Instructions, which is all you
will need once you have made several brews and the process
becomes more intuitive.
• Part Three explains some techniques described as our
Advanced Methods, which will enable you to produce
unlimited beverage styles using some extra ingredients
along with the Standard Kits.
• Part Four contains the Appendices and a
Trouble-Shooting Guide.
Ian Williams
We suggest you read this User Manual from cover to cover before
you start to make your first brew, so that you are familiar with the
process and timings involved. The Appendices are very important
to read before you brew, because they explain the principles
behind the Standard Method that you will use in Part Two.
Never has making a commercial quality beverage at home or
the workplace been so easy. We promise that after using your
Personal Brewery you will be as passionate about making beer,
cider and other beverages as we are.
Thank you very much for your purchase and we sincerely hope
you will love your WilliamsWarn from the very first brew.
Cheers.
2
Anders Warn
PART ONE:
YOUR PERSONAL
BREWERY
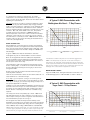
BREWERY OVERVIEW
The following diagram shows an overview of the main components of your personal
brewery. The unit comprises of two main parts: The Brewery Tower and The Brewing
Vessel. The components of the tower and the brewing vessel are described in the
following diagram. You will need to refer to this diagram whilst you are following the
beer making instructions in Part Two.
Fig. 1
DRAFT TAP FONT
VESSEL LID SIGHT GLASS
CONTROL PANEL
VESSEL LID
DIGITAL
TEMPERATURE
CONTROLLER
VESSEL RIM
BREWERY TOWER
BREWERY TOWER DOOR
VESSEL CONE
VESSEL VALVE
GAS CYLINDER BEHIND
BREWERY TOWER DOOR
(SEE FIGURE 4C)
SEDIMENT BOTTLE
STAINLESS STEEL BOWL
4
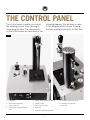
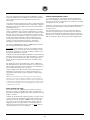
THE CONTROL PANEL
The control panel is where you control
the brewing process from cleaning to
dispensing the beer. The components
on the control panel are described in the
following diagram. You will need to refer
to this diagram whilst you are following
the beer making instructions in Part Two.
Fig. 2
8
9
1
10
2
12
4
3
11
5
6
7
1. 3-WAY VALVE
5. DIGITAL TEMPERATURE CONTROLLER
10. BREWERY FILLING LINE VALVE
2. VESSEL PRESSURE GAUGE
6. ON/OFF BUTTON
11. BREWERY CO2 LINE VALVE
3. CLARIFICATION POT
7. VESSEL LIGHT BUTTON
12. DRIP TRAY
4. VARIABLE PRESSURE RELIEF VALVE (VPRV)
8. DRAFT TAP
9. DRAFT TAP FLOW CONTROL LEVER
5
SAFETY INFORMATION
These instructions for use outline general safety guidelines for the correct operation
of the WilliamsWarn Personal Brewery System
Carefully read and understand this user manual before
attempting to operate.
F. Two stainless steel wheel chocks to prevent
movement of the unit once positioned.
Never use the WilliamsWarn Personal Brewery for any
purpose other than the Intended Purpose. Do not misuse,
modify or force the appliance in any way as damage
may occur that may create potential hazardous risks or
situations.
This user manual and a set of ingredients will be
delivered separately to the brewery.
1.3 Installation, Storage and Operating Conditions
The WilliamsWarn Personal Brewery is suitable for
operating in temperatures of 5°C to 40°C (41°F to
104°F) with a maximum allowable humidity of 90%
(within the prescribed temperature range).
Refer to the Part Two, Stage 1 instructions in this User
Manual for the approved cleaning instructions of product
before use.
Should the WilliamsWarn Personal Brewery appear to
malfunction or observe failure of operation, contact your
local approved service agent to arrange for repair. All
repairs must be carried out by an approved and qualified
service technician.
The WilliamsWarn Personal Brewery wheel chocks
must be engaged to keep the appliance stable while
in use. Do not move the appliance while it is in
operation and only operate on a level surface.
Do not use the brewery if there is damage to the product,
power lead, gas bottle and regulator valve or the system
has changed in performance.
The WilliamsWarn Personal Brewery shall only
be used for human consumption. Do not use for
storing animal product or other potential hazardous
substances that will affect the performance and
hygiene of the product.
Ensure the correct attachments and CO2 regulator valve
are used with the product.
1.1 1.2
1.4Cleaning
Before cleaning the WilliamsWarn Personal Brewery
make sure that the device is turned off.
Intended Purpose and Performance
The intended purpose of the WilliamsWarn Personal
Brewery system is to deliver cold, clear, perfectly
carbonated, commercial quality beer in 7 days, as
in a modern brewery, requiring just over 1 hour of
setup time. The Personal Brewery process involves the
operator performing various tasks at specific times to
produce a commercial quality beer in a domestic home
environment or other establishment. Please note, the
WilliamsWarn is not designed to be used in an outdoor
environment and should be protected from rain and
moisture ingress at all times.
Always clean following the instructions in this
manual. Cleaning Instructions are described in Part
Two, Stage 1.
We recommend the use of WilliamsWarn Brewery
Detergent and WilliamsWarn Sodium Percarbonate
as the detergent and sanitising agents respectively.
If other products are used they should be approved
brands of dishwashing detergent and approved
brands of homebrewing sanitizer that are available
commercially for these purposes.
Components and Accessories
The complete WilliamsWarn Personal Brewery includes:
Always use a non-scratch sponge so that the internal
stainless steel of the vessel does not get scratched.
A. The Personal Brewery
2.0Warranty
WilliamsWarn provides a 1 year warranty on all parts
and sundry equipment.
B. A bag of Sundry Equipment as laid out in Figure 6
in Part Two.
C. 3 of M8 x 20mm stainless steel set screws, to
attach the beer font.
Warranty Disclaimer
D. A funnel to enable the addition of a glycol mixture to
the heating/cooling unit before use.
The WilliamsWarn Personal Brewery is to be used
only for human consumption only in accordance
with the intended purpose 1.1. Use of the appliance
not in accordance with these instructions will void
the warranty and could cause potential harm and
potentially severe health related issues.
E. 4 Litres of 5% food grade glycol mixture to add to
the heating/cooling unit before use.
6
3.0
Manufacturer Details
The WilliamsWarn Personal Brewery is manufactured by:
as replacement, may result in increased emissions
or decreased immunity of the WilliamsWarn Brewery.
Nanobrewing Ltd
1414, Omahu Road
Hastings 4175,
New Zealand.
Check if the voltage indicated on the appliance
corresponds to the local mains voltage before you
connect the appliance.
Do not use the appliance if the plug, the mains cord
or the appliance itself is damaged.
www.williamswarn.com
Importer Client Code: 4023 5041 F
This appliance is not intended for use by persons
(including children) with reduced physical, sensory
or mental capabilities or lack of experience and
knowledge unless they have been given supervision
or instruction concerning use of the appliance by a
person responsible for their safety.
Compliance:
Children should be supervised to ensure that they do
not play with the appliance.
4.0Approvals
C-Tick marked as supplier’s declaration of conformity to
the Radio telecommunications Act 1992 Section 182.
z1696
AS/NZS 60335.1: 2011-A1:2012
IEC 60335.1:2011
Household and similar electrical appliances Safety - Part 1: General requirements.
5.2Caution
This appliance is intended for household use only. If
the appliance is used improperly or for professional
or semi-professional purposes or if it is not used
according to the instructions in the user manual, the
guarantee becomes invalid and WilliamsWarn refuses
any liability for damage caused.
AS/NZS 60335.2.24: 2010
IEC 60335-2-24:2010 A1:2012
Household and similar electrical appliances - Safety Particular requirements for refrigerating appliances,
ice-cream appliances and ice-makers.
AS/NZS 60335.2.21:2002
IEC 60335-2-21 ed6.0
Household and similar electrical appliances - Safety Particular requirements for storage water heaters
AS/NZS 60335.2.34: 2003 A2 IEC 60335.2.34:2012: 2012
Household and similar electrical appliances - Safety Part 2-34: Particular requirements for motor-compressors.
5.3
Adjacent equipment
The WilliamsWarn Brewery should not be used adjacent to, or stacked with, other equipment. If adjacent
or stacked use is necessary, the WilliamsWarn Brewery
should be observed to verify normal operation in the
configuration in which it will be used.
5.4
Operation in wet areas
Keep the WilliamsWarn Brewery clear from wet areas
when it is placed and connected to the mains supply.
Do not attempt to use WilliamsWarn Brewery for other
purposes or move the appliance while operating. Keep
the WilliamsWarn Brewery clear from wet areas.
6.0
Technical Information
1. Product Title / Trademark
WilliamsWarn® Personal Brewery
AS/NZS 3350.2.41:1997
IEC 60335-2-41 Ed 3.2
Safety of household and similar electrical appliances Particular requirements – Pumps
RoHS 2011/65/EU
Restriction of the use of Hazardous Substances Directive
in electrical and electronic equipment
WEEE 2002/96/EC
Waste Electrical and Electronic Equipment Directive
2. Model No. / NB23-1
Food Safety Regulations
3. Vessel Volume (V)
23 Litres (5 Imp. Gallons/6 US. Gallons)
Food hygiene Regulations 1974 AS/NZ
AS/NZS 4020 Products for use in contact with
Drinking Water
AS 2070-1999 Plastic materials food contact use
5.0
4. Mains Input voltage
220~240Vac
5. Mains Frequency
50-60Hz Annex I - Electromagnetic Emissions
For electromagnetic emissions the WilliamsWarn Brewery
has been tested for compliance to AS/NZS CISPR14-1
Ed.5.1 (2009) Class B. 6. Supply Current
0.8 Amps 7. Power Loading
180 Watts
5.1Warnings:
Use of accessories, cables and ingredients other
than those specified and sold by the manufacturer
8. Heating Element
240Vac, 80 Watts, 0.36Amps
7
9. Refrigeration compressor
240Vac, 180 Watts, 0.75 Amps
pressure. Always relieve pressure before opening the
tank. Check the variable pressure relief valve (VPRV)
regularly to ensure that it is not blocked.
10.Insulation classification
Class I
8.0
11.Nett Weight
87 kg
Symbols and Definitions
12.Enclosure IP rating
IP22
Fragile. Handle with care.
13.Humidity
10% - 90%
14.CO2 Max Gas Pressure PS
300kPa – 3Bar
Operate within 5°C to 40°C with a maximum
allowable humidity of 90%
15.CO2 Regulated Pressure
50kPa – 300kPa / 0.5 –3Bar
Store and transport within the temperature range
of 10°C (50°F) to 50°C (122°F) and 70°C (158°F)
for 24 hours.
16.Operating Temperature TS
5°C – 40°C (41°F to 104°F)
17.Refrigerant
R134a
Material can be recycled.
18.Refrigerant mass
131g
19.Refrigerator Climate Class
SN - T
z1696
20.Atmospheric pressure
86kPa – 106kPa
C-Tick marked as supplier’s declaration of
conformity to the Radio telecommunications Act
1992 Section 182
Read instructions before use
21.Fermentation Temperature
10-26°C (50-79°F), 50kPa – 300kPa, 0.5 – 3Bar
7.0 22.Refrigeration Temperature
2°C (35.6°F)
Lot number
23.LED Lamp
12Vdc, 20mA
Product Serial number
Date of manufacture
Other Information
These instructions for use outline general safety
guidelines for the correct operation of the WilliamsWarn
Personal Brewery System
This appliance is compliant to Restriction
Hazardous Substances Directive RoHS 2011/65/
EU in electrical and electronic equipment with
the WEEE Directive.
Place the WilliamsWarn Personal Brewery upright on a
flat, even and stable surface. Make sure it doesn’t block
a passage.
Under the European Directive 2002/96/EC this
electrical appliance must not be disposed of to
normal waste.
Disposal: Extreme care must be taken when
disposing of your old appliances to avoid
hazards. The refrigerant gas must be safely
removed. Your authorised repairer will be able to
give advice on environmentally friendly methods
of disposing of your old appliance.
Take care when moving the brewery. The wheels on the
base allow the user to move the brewery on a flat surface
in a straight line. Take care when moving the machine in
another direction.
The refrigeration system will emit warm air from the
ventilation ducts on the Brewery Tower. Ensure adequate
air flow for the ventilation system so that air is not
blocked or looped back.
Clear all spills from the surrounding floor in order to
maintain hygiene. Clean the drip tray regularly.
ip22
The brewery tower panels may be removed for maintenance.
Ensure only an approved service agent has access to the
internal parts in the brewery tower.
This appliance is compliant to Restriction
Hazardous Substances Directive RoHS
2011/65/EU in electrical and electronic
equipment Ingress protection IP22: Note:
Protected against solid objects greater than
12.5mm, Protected against dripping water from
15° from vertical: limited ingress may occur.
Electrical Hazard, entry by qualified service
personnel is required.
Do not try to open the tank lid or valve (or take sediment
bottle off without closing the tank valve) while under
8
Copyright 2013 © WilliamsWarn Brewery
All rights Reserved
No part of this publication may be reproduced or transmitted, in any form or
by any means, electronic, mechanical, photocopying, recording or otherwise,
or stored in a retrieval system of any nature without the written permission
of WilliamsWarn Brewery Limited.
9
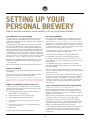
SETTING UP YOUR
PERSONAL BREWERY
Please follow the instructions below carefully to set up your Personal Brewery.
The Ingredients and their storage
You will receive a set of ingredients and this user manual in
a separate delivery to the brewery. You must use this set of
ingredients for your first brew. An example is shown in Figure 5
(Part 2 of this manual).
POSITION THE BREWERY
Position your Personal Brewery in a place where it can remain
for the duration of the brewing process and beer dispensing
period. IMPORTANT: this will need to be on a flat level surface.
The brewery is on four wheels which will enable you to push the
brewery unit in a straight line. They are not castors so in order
to change direction you will need to lift or drag the front or back
around to suit the direction that you require.
Liquid Malt Extract (LME) ages over time and this can affect
the beer flavour. We keep all our LME cold until shipment to
you and ask that you continue this refrigerated storage policy
until the evening before use. So any LME you have needs to be
refrigerated until the evening before brewing, after which time
it should be put on a bench overnight, so that it can warm up to
room temperature before opening the next day. This will make it
easier to pour. You can also warm the can up in hot water for 10
minutes prior to use if you forget to take it out of the fridge.
To fix the brewery into position, please slide the wheel chocks
around the two front wheels, see Figure 4A.
Dry Malt Extract (DME) does not need refrigeration so can be
kept at room temperature indefinitely. Keep it preferably in a
cool and dry area.
For electrical safety reasons the unit must be kept out of the
rain or wet area’s so is not suitable for positioning outside in an
uncovered area.
The clarification agent should not be kept below 5°C (41°F).
It is preferable that the unit is maintained in an ambient
environment between 5°C and 40°C (41°F to 104°F) and less
than 90% humidity.
This will prevent the brewery from being pushed around.
It is preferable to keep the unit away from direct sunlight.
UNPACK THE BREWERY
Remove the protective cardboard packaging when you receive
your brewery.
Remove the white protective wrap from the stainless steel by
pulling it off with your hands. It should peel off easily and reveal
clean stainless steel.
Unscrew the four screws that attach the brewery to the pallet
and remove the brackets from their internal slots.
Position the unit so that there is adequate air-flow through the
air ducts at the base of the brewery tower. This is to enable the
refrigeration system to work properly. It is important that the
ducts are not blocked in some way or that the air flow does not
loop back on itself. The area around the ducts may become
warm at times.
IMPORTANT: Keep the protective packaging, the pallet, the
screws and brackets in a safe place for possible future use if the
brewery needs to be shipped to a service agent for maintenance.
REMOVE THE EQUIPMENT STORED IN THE VESSEL
As well as your Personal Brewery, you have received some
equipment which has been placed inside the vessel during
transportation. This includes:
ACCESS TO MACHINE INTERNAL PARTS AND SERVICING
IMPORTANT: READ THIS SECTION CAREFULLY
We have carefully designed and constructed this machine so
that if necessary the user can access the internal parts of the
brewery if required. On initial set up of the brewery you will be
required to access this area.
A. The Sundry Equipment to help you brew as shown in
Figure 6 (Part 2 of this Manual)
B. The Sediment Bottle and its neoprene cover
Before accessing the rear protective panel you must ensure that
the brewery is not connected to the mains power supply.
C. The Draft Tap Font as shown in Figure 3A
In the future, should you need to access this area after the
gas cylinder is connected, you should also ensure that the CO2
cylinder is turned off at the cylinder and the pressure in the
tubing on the low pressure side has been released.
D. 2 x U-shaped stainless steel wheel chocks as seen in
Figure 4A.
E. An electrical cord to connect to your brewery and your
electrical power source.
For the regulators supplied by WilliamsWarn to release pressure
on the low pressure side, wind the regulator knob out anticlockiwse to its closed position and the low pressure gas will
release itself.
F. The drip tray.
Undo the vessel lid and unpack all these items.
10
Other than installing the components required to make the
brewery functional it is not envisaged that the user will be
required to access this area and you should not attempt to make
any alterations, modifications or repairs to the machine without
the strict guidance of the supplier/manufacturer.
Fig. 3A
All warranties will be void if the above process is not followed.
INSTALL THE DRAFT BEER TAP FONT
Install the draft beer tap font as follows:
1. Remove the draft beer tap font from the bag of sundry items
that is inside the brewery vessel. See Figure 3A
2. At the base of the font are two John Guest fittings and three
M8 bolts, the fittings have been installed and tested with
the unit prior to removal for transport, please do not loosen
or adjust them as it could affect the performance of your
brewery. The three M8 x 25mm bolts can be removed from
the base ready for reinstallation. See Figure 3B.
Fig. 3B
Fig. 3C
Fig. 3D
Fig. 3E
3. Remove the rear protective panel from the unit by turning
the latches with a screwdriver and remove, see Figure 3C.
IMPORTANT: Please ensure that the brewery has not been
connected to the mains before removal of the protective
panel, if it has please turn off and unplug before proceeding.
4. Once the panel has been removed, locate the draft beer
font over the holes provided in the top of the beer tower and
install the three M8 x 25mm bolts back into the base of the
font firmly. See Figure 3D.
5. You are now ready to install the beer line and the CO2 lines
into the beer font. There are two available lines inside the
beer tower. One has an insulated sleeve over it and the other
is a black ¼" tube. The one that has an insulated sleeve is
the beer line and the black tube is the CO2 line.
6. To install the beer line, slide the insulation back to expose
the end of the tube and press it firmly into the centre fitting
on the underside of the beer font, see Figure 3E. Check to
make sure that it is installed properly by pulling it gently to
make sure it is locked in. The beer line is now installed.
7. To install the CO2 line push the black tube firmly into the other
available fitting at the rear of the font, and check by pulling it
gently to make sure that it is locked in. See Figure 3F.
8. Leave the back protective cover off for the next step of
filling the glycol tank for the heating cooling system.
INSTALL THE GLYCOL INTO THE HEATING COOLING UNIT
Install the glycol into the heating cooling tank as follows:
Fig. 3F
1. Remove the large rubber bung in Figure 3G with a
screwdriver or similar so that you can access the slot in the
foam insulation above the glycol tank.
2. Insert the funnel supplied through the slot in the insulation
so that you can pour liquid down the funnel. Figure 3H.
3. Take the 4 Litres of 5% glycol mix supplied and carefully
pour down the funnel into the tank. See Figure 3I.
4. Replace the rubber bung and wipe off any spillage.
5. Replace the rear protective panel and turn the latches back
into position with a screwdriver to secure. See Figure 3C.
11
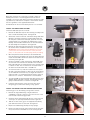
INSTALL THE LARGE GAS CYLINDER
You need to install a large food grade carbon dioxide gas
cylinder inside the Brewery Tower as shown in Figures 4B and
4C. Such bottles can be:
Fig. 3G
A. Bought new from WilliamsWarn
B. Bought from other suppliers new or second hand
C. Rented from a gas supply company.
A gas regulator is supplied with the brewery and is inside the
tower door.
Follow the next steps:
1. Ensure the 3-way valve on top of the control panel is in the
closed position (X-mark).
Fig. 3H
2. Ensure the gas cylinder valve is closed (item 6 in Figure 4C).
Fig. 3I
3. Strap the gas cylinder into the tower as shown in Figure 4B.
4. Take the gas cylinder regulator and check the regulator
is wound right out so that it will not supply pressure
when connected to the cylinder. For the regulator that
WilliamsWarn supplies, turn the knob (item 4 in Figure 4C)
anti-clockwise until the end-point—which is its fully closed
position.
5. Screw the regulator onto the gas bottle tightly with a
crescent (or spanner or wrench).
6. Check the black gas line coming through the stainless
steel back panel is connected into the regulator. For the
regulators supplied by WilliamsWarn, this is a push-lock
fitting on the regulator as shown in Figure 4C. Push the
black line in hard into the push-lock fitting to ensure a good
seal (item 5 in Figure 4C).
Fig. 4A
7. Then open the gas cylinder valve. The high pressure gauge
on the left should then read the pressure of the cylinder.
Check for any sound of leaking gas.
8. Then wind the regulator knob to achieve a reading on the
low pressure gauge (on top of the regulator in Figure 4C) at
1.25 bar. This is the setting we suggest for first-time users.
Check for any sound of leaking gas.
Your gas system is ready for use.
The 3-way valve on the control panel dictates whether this gas
pressure is closed (the X mark), connected to the clarification
pot (in-line with the arrow to the pot) or connected to the vessel
(in-line with the arrow to the vessel pressure gauge).
When you need to replace a bottle:
1. Close the gas cylinder valve
2. Wind out the regulator knob to remove pressure on the low
pressure side.
3. Unscrew the regulator from the gas cylinder and take the
empty bottle to be refilled at your local agent.
4. Reconnect the full bottle as described above.
TESTING THE Font INSTALLATION.
1. Ensure the vessel lid seal is sitting correctly into the vessel
rim groove as shown in Appendix 4 and close the vessel lid
firmly.
12
Fig. 4B
2. Check that the gas cylinder valve is open and check to see
that the CO2 regulator is set to 1.25 bar as read on the
regulator low pressure gauge.
Fig. 4C
3. Check the draft tap is closed and the flow control lever on
the side of the tap is pushed all the way up to its closed
position. The draft tap should be automatically closed by
its spring, which is its central sitting position (Not sitting
forward and not sitting back).
3
2
1
4. Turn the 3-way valve clock-wise to the vessel pressure gauge
arrow and once the vessel low pressure gauge reaches
0.25 bar turn the 3-way valve back to the X position. The
pressure in the tank will drop down once you close the
3-way, and you will need to open and close the 3-way a
few times to get a final steady reading of 0.25 bar with the
3-way valve closed. If the beer and CO2 lines have been
correctly installed then the system should then hold this
pressure. If the gauge drops immediately then it is possible
that one of the connections is not pushed in correctly. This
will need to be checked by firstly following the ACCESS TO
MACHINE INTERNAL PARTS AND SERVICING for your safety
and then removing the rear protective panel again. Re-check
the connections and make sure they are locked in to the
push-lock fittings as described above.
4
6
5
1. High Pressure Gauge
2.safety valve
5. Low pressure gas
coNNection
3.low pressure gauge
6. Gas Cylinder valve
4. regulator knob
connect to electrical mains
Connect the electrical cord supplied into your brewery and
then plug in your unit to a standard 230V 50-60Hz AC mains
and press the green on/off button on the front of the unit. This
will start up the glycol pump and the unit will start heating or
cooling. Check to see that the vessel temperature (the larger
number) on the digital display is similar to the ambient room
temperature and then set the controller temperature (the smaller
number on the digital display) to 2°C using the temperature
adjustment buttons as shown in Figure 66 in Appendix 6. This
will turn on the refrigeration compressor and will start cooling
the cone portion of the vessel. A small yellow indicator will
appear on the display and read, SUB2. Within minutes you
should be able to check this as the vessel temperature, as read
on the display, will start dropping towards the set point.
IMPORTANT: AVOIDING A MAJOR SPILL
During fermentation, the pressure will build up in the vessel.
This is how the beverage becomes carbonated. There is a risk
of a major spill if the draft tap is open and the flow control lever
is open after the ingredients are added and fermentation is
started. In this situation as the pressure builds up just a little,
most of the 23 Litres (5 Imp. gal/ 6 US gal) of beverage will
pour out the tap and onto the floor.
To check the heating, press the temperature adjustment buttons
to increase the temperature set-point to 5°C above the actual
vessel temperature. This will engage the heating element and a
small yellow indicator will appear on the digital screen and read
OUT 1. Within minutes the vessel temperature on the digital
display will start rising towards the set point.
As described clearly in the Instructions, when you are brewing
or when you have finished pouring beverage, you must ensure
the draft tap is in its closed position. When pulled forward, the
tap is open and when pushed back it is also open (the foam
mechanism) so it must sit in its neutral position to be closed.
A new tap should always spring back to its closed position, but
a tap that is not cleaned adequately can start to build up sticky
grime and may stick out from its closed position. Children or
guests can also open the draft tap by accident.
The brewery is now set-up and ready for brewing.
Press the green on/off button and turn the brewery off.
GENERAL AREA CLEANLINESS
It is optimal to maintain a clean area around the brewery. It is
natural and expected that you will spill beverage around the unit
as time goes by. Maintain a clean area around the brewery and
wipe drips from the surface of the brewery as much as possible.
Bacteria will start to grow on spilt beverage and it is always best
to reduce any risk of infection in your beverages by keeping a
tidy and dry brewing area.
In any case, to avoid a major spill, unless you are pouring
beverages as intended, the flow control lever on the side of
the draft tap MUST BE PUSHED UP ALL THE WAY TO ITS
FULLY CLOSED POSITION in order to ensure that there will be
no leaking out of the draft tap, even if it is somehow not fully
closed. In addition, it is important to check the draft tap itself
is also in its closed position. In this way the tap is closed by two
means and the risk of a major spill is reduced.
13
PART TWO:
MAKING YOUR
BEVERAGE WITH
THE STANDARD
BREWING METHOD
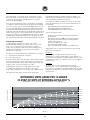
BREWING CYCLE
OVERVIEW
As shown in the overview below, ales (with an alcohol % up to about 6%) will be
ready in 7 days, requiring about 1 hour total work time. Each Stage has its own set
of corresponding instructions within this section of the user manual. The bulk of the
work occurs at the start of the process when you are working through Stages 1 and 2.
Stage 1
clean and sanitise
the brewery
25 MINUTES
stage 6
dispense the beverage
take your time and enjoy
DAY 7
stage 2
add the ingredients
DAY 0
25 MINUTES
DAY 1
stage 5
clarify the beverage
10 MINUTES
stage 3
monitor the pressure
during fermentation
1 MINUTE
DAY 4½
DAY 4
stage 4
cool the beverage
10 seconds
Ales of a higher alcohol content may take a day or two longer
as more fermentation time is required.
to ferment out compared to ales. Standard lagers therefore
require a 9 day process in general.
Lager yeast grow a little slower than ale yeast and are fermented
at colder temperatures also, so lagers take about 2 days longer
For more details see the ale and lager fermentation charts in
Appendix 7.
15
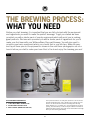
THE BREWing process:
WHAT YOU NEED
Before you start brewing, it is important that you are fully stocked with the equipment
and ingredients you need to make the perfect beverage. To get you started we have
provided you with a starter pack of sundry equipment which will assist you in making
great products. We have also provided you with a starter pack of ingredients for you to
make your first beer with your WilliamsWarn Personal Brewery. You will also need to
provide some basic equipment which you should find in your kitchen. Make life easy
and lay all these pieces of equipment as shown in the next three photographs out on a
bench before you start to make your beer. Best of luck and enjoy the brewing process!
Fig. 5
1
2
WilliamsWarn ingredients
3
The liquid malt extract can and yeast (under the can lid) should
be kept refrigerated until near to brewing time. Ideally the malt
extract can should be removed from the refrigerator the day
before brewing so it can warm up to room temperature for better
pouring, but alternatively a cold can may be soaked in hot water for
10 minutes before opening. The yeast can be removed from the fridge
when you start cleaning your brewery.
1. 1.7kg Liquid malt extract can
2. 1kg Dry malt extract pack
3. yeast sachet (under the can lid)
16
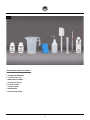
Fig. 6
1
2
3
4
WilliamsWarn sundry Equipment
1. brewery detergent
2. Sodium percarbonate
3. 2 Litre plastic jug
4. non-scratch sponge
5. 500ml rinse bottle
6. a large spatula
7. 100ml cylinder
8. hydrometer
9. Clarification agent
17
5
6
7
8
9
Fig. 7
1
2
equipment from your kitchen
3
4
5
6
You will also need a source of cold water and a sink to
dump waste into.
1. kitchen kettle
2. can opener
3. tea spoon
4. table spoon
5. thermometer
6. scissors
18
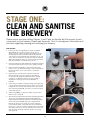
STAGE ONE:
CLEAN AND SANITISE
THE BREWERY
Please ensure you have studied Figures 1 and 2 and are familiar with the names of each
component on your brewery. Please read Appendix 1 first, for background information and
principles regarding cleaning and sanitising your brewery.
PREPARATION
1. Ensure you have the ingredients you need. A standard
WilliamsWarn kit is shown in Figure 5 in the section
“What you need”. Ideally any thick liquid extract you use
for beverages like beer or mead should be removed from
cold storage in your refrigerator the night before. If not, you
can sit the can of extract in hot water, to warm up ahead of
adding the ingredients after this cleaning stage (remove the
yeast from under the can lid before you do so).
Fig. 8
2. Ensure you have the Sundry and Kitchen Equipment required,
as shown in Figures 6 and 7 in the section “What you need”.
3. Ensure the Personal Brewery is switched off (the power
button is not lit up when the brewery is off). Ensure that the
black 3-way valve on the control panel is closed (the
X position).
Fig. 9
4. Inspect the gas cylinder in the tower and ensure that
there is pressure in the gas cylinder as measured by
its high pressure gauge (see Figure 4C). If the cylinder
is empty or not attached, attach a full gas cylinder as
described in ‘Setting up your Personal Brewery’ in
Part One.
5. Ensure the gas cylinder low pressure gauge (see Figure 4C)
is set at the final dispense pressure you want, as discussed
in Appendix 5. First time users should set this at 1.25 bar.
Also check the brewery CO2 line valve is closed at the back
of the draft tap font.
6. Start boiling 500ml (1 US pint) of water in your kitchen
kettle for use in Step 10.
Fig. 11
7. Then remove all pressure from the vessel by pushing the button
on the top of the variable pressure relief valve (VPRV) (see
Figure 8). Release the button when the vessel pressure gauge
on the control panel reads 0 and no gas is being emitted.
Remove the vessel lid (it screws off counter-clockwise).
If the sediment bottle is attached from the last brew then
remove it (it comes off clockwise looking down on the bottle
from above). Put the 2 Litre jug under the vessel valve and
open the valve and dump any vessel residue into the jug
(See Figure 9).
19
Fig. 10
Then close the vessel valve and dump the contents of the
jug down the sink.
Fig. 12
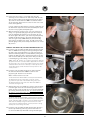
CLEAN THE VESSEL WITH WATER
8. Rinse the jug and fill it with 2 Litres of cold water. Close the
vessel valve and dump the 2 Litres of water into the vessel
cone (Figure 10). Dip the sponge into the water that is in the
cone and give a preliminary scrub of all the internal surfaces
of the vessel, including under the rim, the yeast ring (from any
previous brew), the vessel wall and the cone (see Figure 11).
9. Put the jug under the vessel valve and open the valve to
remove the dirty water from the vessel. Close the vessel
valve and dump the contents of the jug down the sink and
rinse the jug.
CLEAN THE SEDIMENT BOTTLE AND VESSEL LID
WITH DETERGENT
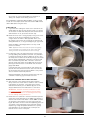
10.Add 1 rounded teaspoon (5g/0.18oz) of WilliamsWarn
Brewery Detergent powder to 1 Litre (2.1 US pints) of warm
water (approx.60°C/140°F as discussed in Appendix 1,
being half boiled water and half cold water or alternatively
1 Litre of water from a hot water system) in the 2 Litre jug
(see Figure 12) and mix well with the spatula. 11.Rinse the sediment bottle well with water under the tap
and then fill up the sediment bottle to the brim with
the detergent solution (this will use about 950ml of the
detergent in the jug, see Figure 13). Let the sediment bottle
soak in warm detergent for a few minutes while you clean
the internal surface of the lid.
Fig. 13
12.Preferably with a protective glove on (although not essential),
dip the sponge into the remaining 50ml of detergent in the
jug and give the internal surface of the vessel lid a scrub
with the detergent (see Figure 14). Rinse the lid under the
tap when finished (see Figure 15).
CLEAN THE DRAFT TAP AND FILLING LINE
WITH DETERGENT
13.Ensure the vessel valve is closed and then add all the
detergent in the sediment bottle to the 2 Litre jug and then
add the 2 Litre jug contents to the cone of the vessel (see
Figure 16).
14.Rinse the sediment bottle well with water from your tap to
remove the detergent residue.
Fig. 14
15.Then close the vessel lid on the vessel (see Appendix 4
for important information on how to ensure a good vessel
lid seal). Then open the 3-way valve partially towards
the arrow pointing to the vessel pressure gauge and slowly
add 0.3bar/5 psi pressure of CO₂ from your gas cylinder
to the vessel (as read on the vessel pressure gauge on the
control panel). Then return the 3-way valve to its closed
(X) position.
16.Put the 2 Litre jug under the draft tap (See Figure 17) and
take out 100ml of detergent by pushing the draft tap flow
controller lever right down to its fully open position and then
alternating between pulling and pushing the draft tap open
every 2 seconds. Then close the draft tap.
20
Fig. 15
17.Put the 2 Litre jug under the filling line valve and open the
valve and allow 100ml to flow into the jug (see Figure 18)
then close the valve.
Fig. 16
For those with the WilliamsWarn counter-pressure bottler,
if you would like to clean your filling line tube and bottler,
for this step you should attach the brewery filling line valve
to the Bottler using the filling line tube. Once the line is
connected, ensure the Bottler dispense valve is closed and
then open the brewery filling line valve. Then put the 2 Litre
jug under the open end of the Bottler filling tube, open the
Bottler dispense valve, collect the 100ml into the jug (see
Figure 19) and then close the bottler dispense valve. Leave
the Bottler connected for the sanitation step.
See WilliamsWarn Bottler Instructions for further information.
Dump the 200ml of detergent in the jug down the sink.
Fig. 17
The draft beverage line and packaging valve/line will now
soak with detergent while you manually clean the vessel.
CLEAN THE VESSEL WITH DETERGENT
18.Check the 3-way valve is in the closed (X) position and
then remove all pressure from the vessel again by pushing
the button on the variable pressure relief valve (VPRV)
(see Figure 8). Release the button when the vessel pressure
gauge on the control panel reads 0 and no gas is being
emitted.
Then remove the vessel lid (it screws off counter-clockwise).
19.Dip the sponge into the cleaning fluid in the cone and scrub
all of the internal surfaces of the vessel, including around the
rim, under the rim, the yeast ring (from any previous brew),
the vessel wall and the cone. (See Figure 20).
Fig. 19
20.When the vessel is clean, place the empty 2 Litre jug under
the vessel, open the vessel valve and dump the contents
of the cone into the jug (See Figure 21). Dump the contents
of the jug down the drain and place the jug under the open
vessel valve again.
RINSE THE VESSEL WITH WATER
21.Fill the 500ml rinse bottle with cold water and rinse the
detergent residue off the vessel by spraying the water around
and under the rim and evenly down the sides of the vessel
from the top (See Figure 22). Ensure a good flow going down
the walls to rinse off the detergent. Repeat this step twice more.
The very top part of the vessel around the vessel seal can be
wiped with a paper towel to avoid water running down the
outside of the vessel.
Fig. 20
Close the vessel valve and dump the contents of the 2 Litre
jug down the drain.
The vessel should now be clean and the stainless steel shiny
and spotless, ready for sanitation.
SANITISE THE VESSEL
22.Add 500ml of cold water to the 2 Litre jug then add ½ a
rounded teaspoon (2.5g) of Sodium Percarbonate and
mix well with the tablespoon until the solids are dissolved.
Add this solution to the 500ml rinse bottle (see Figure 23).
21
Fig. 18
23.Ensure the vessel valve is closed and then spray the
sanitising solution under the rim and evenly down the side
walls so that all surfaces are wetted (See Figure 22 again).
Try to wet all surface with this 500ml of sanitizer and let
all the sanitising agent solution collect into the cone of the
vessel (See Figure 24).
Fig. 21
If not all surface became wetted, collect the liquid back into
the wash bottle (open the vessel valve and dump the liquid
into the 2 Litre jug first) and repeat again.
24.With the sanitising solution in the cone, check the seal is
sitting in its groove properly again like you did in Step 15
(see also Appendix 4) and then close the vessel lid onto
the vessel again. Once more, open the 3-way valve partially
towards the arrow pointing to the vessel pressure gauge
and once again slowly add 0.3bar/5 psi pressure of CO2
from your gas cylinder to the vessel, as read on the vessel
pressure gauge. Then put the 3-way valve back to its closed
(X) position.
SANITISE THE DRAFT TAP, FILLING LINE AND VESSEL LID.
25.Put the 2 Litre jug under the draft tap (See Figure 17) and
take out 100ml of sanitising solution by pushing the draft
tap flow control lever right down to its fully open position
and then alternating every 2 seconds between pulling and
pushing the draft tap open to sanitize both parts of the tap.
Then close the draft tap. The first part of what you take out
is the detergent you left soaking in the line in Step 17.
Fig. 22
NOTE: Every 10 th brew or so it may be necessary to take the
tap apart and clean it as described in Appendix 9. This will
be necessary if you can see any growth of grime or a similar
unwanted film at the front of the tap or if the tap becomes
sticky when being pulled and doesn’t easily return to the
closed position.
26.Put the 2 Litre jug under the filling line valve and open
the valve and allow another 100ml to flow into the
jug (see Figure 18) then close the valve.
Wait 1 minute for the line to soak.
For those with the WilliamsWarn counter-pressure Bottlers,
the Bottler will still be connected, so put the 2 Litre
jug under the open end of the Bottler filling tube, open
the Bottler dispense valve and close when the 100ml is
collected (see Figure 19).
Fig. 24
27.After the filler line has soaked for 1 minute, open the filling
line valve again and collect the remaining solution in the
vessel into the 2 Litre jug and only close the valve when CO2
gas is being emitted out of this line. It is critical to be sure
the valve is closed and holding the pressure and no gas is
being emitted, so as to avoid beverage leaking out this valve
during fermentation.
For those with the WilliamsWarn counter-pressure bottling
device, you will be opening the Bottler dispense valve (See
Figure 19). Once CO2 is emitted, close the Bottler dispense
valve and the brewery filling line valve and for the same
critical reason underlined above, ensure pressure is being
held by the closed filling line valve.
28.Put the 2 Litre jug under the draft tap and open the tap to
remove any remaining sanitising solution from that line
too. Close the draft tap when CO2 is being emitted. Again,
22
Fig. 23
it is critical to be sure the draft tap is closed and holding
the pressure and no gas is being emitted, so as to avoid
beverage leaking out the draft tap during fermentation.
Fig. 25
Keep the sanitizer in the jug, do not dump it down
the drain.
29.Then push the draft tap flow control lever all the way up so
to close this. This is important as it is an additional safety
closure that will help ensure no beverage leaks out of the
draft tap as the pressure rises during fermentation.
30.Check the 3-way valve is in the closed position and then
remove all pressure from the vessel again by pushing the
button on the variable pressure relief valve (VPRV) (see
Figure 8). Release the button when the vessel pressure gauge
on the control panel reads 0 and no gas is being emitted.
Then remove the vessel lid (it screws off counter-clockwise).
Fig. 26
31.Put the 2 Litre jug under the vessel valve, open the vessel
valve and drain all remaining 300ml or so of sanitizer from
the vessel. Close the vessel valve.
32.Take the approximately 500ml of sanitizer that is now in the
jug and pour it into the sediment bottle. Put your hand over
the end of the sediment bottle and shake the bottle for 1
minute to get all internal surfaces wetted with sanitizer (See
Figure 25). If you prefer not to get sanitising agent on your
hands use a glove or just swirl the sanitizer to wet all the
surfaces.
33.Then pour the sanitizer from the sediment bottle into the
upside vessel lid on a table so that the internal lid surface
can also soak with sanitizer. Rinse the sediment bottle well
with water to remove all sanitizer and put it on the table.
Then swirl the upside-down lid gently so that the sanitizer
can wet all surfaces and parts of the lid thread. Take
the seal out of the vessel seal groove and place it in the
sanitizer in the upside down lid. Let the lid and seal soak
in the sanitizer (see Figure 26).
34.Put the empty jug under the vessel valve and open the
vessel valve to remove any final residual sanitizer. Close
the vessel valve and dump any residue in the jug down
the drain and rinse the jug well to remove all sanitizer.
35.Let the upside-down lid and seal soak in sanitizer until
required in the next stage involving adding the ingredients. If you are cleaning the brewery but not going to make
another brew right now, then after the lid and seal have
soaked for 1 minute, put the seal back in its grove on
the vessel rim. Then dump the sanitizer from the upside
down lid and put it back on the brewery. There is no need
to rinse the lid.
THE BREWERY IS NOW CLEANED AND SANITISED AND
READY FOR THE ADDITION OF INGREDIENTS.
You do not need to rinse the sanitizer off the vessel walls. As
explained in Appendix 1, we are using a no-rinse sanitizer.
23
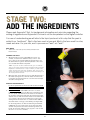
STAGE TWO:
ADD THE INGREDIENTS
Please read Appendix 2 first, for background information and principles regarding the
adding of ingredients and Appendix 6 on how to set the temperature on the digital controller.
For ease of understanding we will refer to the liquid produced in this step that the yeast is
added to as “wort/must”. Wort is the term used in beer and Must is the term used for cider,
mead and wine. For your info, wort is pronounced “wert” not “wart”.
BOIL WATER
1. Start to boil 1.5 Litres (3.2 US Pints) of water in the
kitchen kettle.
Fig. 27
HYDRATE THE YEAST
2. While the kettle is boiling, add 250ml (8.5 US fl. oz.)
of water, as read on the sediment bottle, at 25 +/- 5°C
(77 +/- 9°F) to the cleaned sediment removal bottle. Use
the thermometer to get the water temperature correct and
use cold and warm water as required.
NOTE: If you do not have a thermometer, you can add the
yeast to an empty sediment bottle instead and the yeast will
rehydrate in the wort/must in Step 12 when you attach the
bottle and open the tank valve. However, wait until you are
at that step before opening the yeast packet and adding it to
the empty sediment bottle.
3. Open the yeast sachet with the scissors and add the yeast to
this water (see Figure 27). Swirl the bottle for 10 seconds
to help mix the yeast and then let it sit while the next steps
are taken (See Figure 28).
Fig. 28
ADD ANY LIQUID EXTRACTS
For thick Liquid Extracts like those used for beer and mead
see 4A below. For thin extracts like those used for cider and
wine see 4B below.
4. A) For thick extracts: Add 750ml (25 US fl. oz.) of the
boiled water to the 2 Litre jug. Open the liquid extract with
the can opener and add most of the extract to the water in
the jug whilst stirring the water with the spatula (see Figure
29). Put the can with the residual extract on the table while
you continue to dissolve all the extract well in the jug by
stirring. Check the vessel valve is closed and then add this
dissolved extract in the jug to the brewery (see Figure 30).
Fill the empty extract can with the remaining boiled water
(750ml/25 US fl oz.) and top the can up with cold water.
Stir with the spatula to dissolve all remaining extract (see
Figure 31) and then add this to the jug (use a cloth to hold
the can if it is too hot to handle).
24
Stir the contents of the jug to help dissolve any remaining
extract and then add this to the brewery also.
Fig. 29
Then using the jug, add the first 2 Litres and then 1 Litre of
cold tap water to the brewery (3 Litres Total) to provide more
volume to dissolve any dry extracts into.
B) For thin extracts: Add the contents directly to the brewery
(with the vessel valve closed). Rinse the package with cold
water and add that to the brewery.
ADD ANY DRY EXTRACTS
5. Open the dry extract bag (or other dry products you may be
using) with the scissors and add to the liquid in the brewery
in one dump and then stir with the spatula (see Figure 32).
Some lumps may form that are difficult to dissolve but they
will dissolve by themselves as you fill the brewery with water
and over the next hour or so after the vessel is closed.
If you intend to measure the SG of your wort/must to be able
to calculate the alcohol content of your final beverage, then
you need to dissolve all the dry extract to get an accurate
reading. This is better done by adding the dry extract in
smaller amounts and stirring before adding the next amount.
ADD ANY OTHER INGREDIENTS
6. If you are adding more ingredients as described in
Part 3: Making Beverages with the Advanced Method,
you can add them now.
Fig. 30
FILL UP TO THE 23 Litre MARK
NOTE: Please read Appendix 2 regarding the need to add
some hot water if your cold water source is below 12°C/54°F.
If you have used the 1.5L of boiled water already to dissolve
liquid extract (e.g. making beer or mead) then follow 7A
below. If you have not used the boiled water (e.g. making
cider or wine, follow 7B.
7. A) Have used the 1.5L boiled water from Step 1 (e.g.
making beer or mead): Fill up to the 23 Litre mark with your
main cold water source. You can use the 2 Litre jug to take
the water from the tap to the brewery (see Figure 33) or a
large pot or even a hose depending on your set-up. The 23
Litre mark is a small round dimple on the back wall of the
vessel near the top. As you get close to the mark, you may
need to move foam from the wort/must surface using the
spatula to see where the liquid level is (see Figure 34).
Fig. 31
Once at the 23 Litre mark, stir all the total contents in the
brewery gently for about 10 seconds with the spatula , to
get a homogenous liquid wort/must. It’s good to try and get
a vertical stir so that and denser liquid at the bottom comes
to the top and mixes.
B) Have NOT used the 1.5L boiled water from Step 1 (e.g.
making cider or wine): Fill the tank half way with cold water,
add the 1.5 Litres of hot boiled water from the kitchen
kettle, then continue to top up with cold water and mix as
described in 7A.
SG SAMPLE
8. Once full and if desired, you can take a 100ml sample for a
hydrometer reading of the wort/must initial specific gravity
25
(also known as original gravity (OG)). See Appendix 3:
Taking S.G. samples & calculating alcohol %’s.
Fig. 32
For Standard Kits supplied by WilliamsWarn, you do not need
to take an initial sample as the beers will be SG 1.040 and the
cider 1.036 (when using two cans).
CLOSE THE LID
9. If you have been soaking the vessel seal in sanitizer in the
upside-down lid, take the seal and put it back in its groove
on the vessel rim and then dump the sanitiser from the lid
down the drain. If not, proceed to the next step.
10.Check the vessel seal is sitting properly in the groove of the
vessel rim as discussed in Appendix 4 (it may need
a slight stretch as shown in that appendix). Then close
the lid tight. The lid must be closed tight to hold pressure
during fermentation, so use good strength to get a good seal.
Fig. 33
Check the VPRV is wound right down to its fully closed
position (clockwise).
NOTE: Appendix 4 also discusses the option of applying
some food grade silicon grease to the seal to help with
sealing and also lid removal when the tank is empty.
11.For first-time users, we suggest testing the lid seal at this
point by adding some pressure to the tank. It is preferable
to perform this before the yeast is added. To do this, open
the 3-way valve clockwise to the arrow pointing to the vessel
pressure gauge, add 0.5 bar of pressure to the vessel and
then close the 3-way valve. Wait 1 minute to check the
pressure holds then release all the CO2 from the vessel by
pressing the release button on the VPRV until the vessel
gauge reads 0 bar.
If the pressure does not hold but drops, then release the
pressure from the tank and re-set the seal in the rim and
try the pressure test again (ensure the VPRV is fully closed
also) so that the vessel holds pressure.
Fig. 34
Experienced brewers can skip this pressure test step once
confident of obtaining a good lid seal each time.
ATTACH THE SEDIMENT BOTTLE AND THE YEAST
12.Swirl the yeast in the sediment bottle again and then
firmly screw it onto vessel valve (it screws on anti-clockwise
looking down on the bottle - see Figure 35). For those
without thermometers you can add the dry yeast to the
empty sediment bottle now and attach it to the vessel.
Fig. 35
IMPORTANT: The bottle should be screwed on so that
it is solidly hand-tight to withstand the pressure during
fermentation. If the bottle is not sealed tight there may
be some leakage during fermentation.
13.Check there is no pressure in the vessel and then open the
vessel valve slowly and gently let in 250ml of wort/must so
that the total volume in the bottle is about 500ml (as read
on the bottle scale) and then close the vessel valve (see
Figure 36). Wait 1 minute so that the rehydrating yeast can
acclimatise to the temperature of the wort/must without
experiencing a large temperature differential too quickly
(see Appendix 2 for more details).This technique also
reduces osmotic stress on the yeast.
26
14.Then open the vessel valve again and let the wort/must
gently fill the sediment bottle fully (see Figure 37). Once
the bottle is full, leave the vessel valve fully open so the
bottle contents mix with the vessel during fermentation.
Fig. 36
15.Put the neoprene cover on the sediment bottle to insulate it
from ambient temperatures (see Figure 38).
ENSURE THE VPRV IS SET
16.Set the VPRV to release at 1.5 bar/22psi by opening it 2 ½
turns counter-clockwise. This will enable you to carbonate
to a level typical for the most common beverage types.
However you will need to adjust this over the next few days
once the pressure has built up. See Stage 3 and Appendix 5
for more details about the VPRV and carbonation.
SET THE DESIRED FERMENTATON TEMPERATURE
17.Please read Appendix 6 regarding how to set the digital
controller. Then turn on the brewery and set the desired
temperature for fermentation. We recommend 23°C/73°F
for ales and 15°C/59°F for lagers. See Appendix 7 for more
information on your temperature options.
The temperature control system in the brewery will now bring
the contents of the vessel to the fermentation temperature
you have set, by either warming or cooling the vessel.
FINAL CHECK
18.Check the following:
Fig. 37
A) The 3-way valve is in the closed position (X)
B) The VPRV is set correctly (approximately 2 ½ turns
counter-clockwise from its fully screwed down position).
C) The desired fermentation temperature is set (e.g.
23°C/73°F for ales and cider and 15°C/59°F for lagers).
D) The sediment bottle is attached (and hand tight) and the
vessel valve is fully open.
E) The draft tap flow control lever is pushed all the way up to
prevent any beverage leaking out the tap during fermentation.
F) The brewery filling line valve and CO2 line valve at the
back of the draft tap font are both closed to prevent any
beverage leaking out the taps during fermentation.
Fig. 38
CLEAN UP
19.Discard all waste products in an environmentally friendly
way and clean up.
27
STAGE THREE:
MONITOR THE PRESSURE
DURING FERMENTATION
Please read Appendix 5 first, for background information and principles regarding
carbonation and monitoring the pressure.
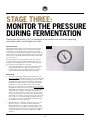
WHAT TO CHECK
After approximately 1 day for ales and a bit longer for lagers
(depending on temperature), there should be many bubbles
rising as seen in the sediment bottle and foam on the wort/
must surface (as seen through lid sight-glass with the light on).
The pressure in the vessel should have built-up to the pressure
release point of the VPRV (Variable Pressure Relief Valve) that
you set in Stage 2.
Fig. 39
When the pressure in the vessel reaches this level, as read
on vessel pressure gauge, the VPRV should release gas. The
beverage is fully carbonated at this point and excess gas you
don’t need, will be emitted out of the valve.
1. Ensure the VPRV setting is correct by checking that gas is
being emitted (heard as a slight hissing and smelt as
a slight aroma) only at the target pressure or just above
it (e.g. within 0.1 bar above target (see Figure 39)).
WHAT TO DO
2. A) If the vessel pressure gauge shows a pressure too far
above your target fermentation pressure (e.g. >0.1 bar above
it as read on the vessel pressure gauge), you need to adjust
the VPRV very slightly counter-clockwise (as described in
Appendix 5) to release the gas to your target or within 0.1
bar above it (so first time users control at 1.5-1.6 bar).
B) If gas is being emitted out of the VPRV below your target
fermentation pressure (as read on vessel pressure gauge) the
VPRV needs to be adjusted slightly clockwise (as described
in Appendix 5) to release at your target or within 0.1 bar
above it (so first time users control at 1.5-1.6 bar. You will
need to wait for the pressure to build up to the new setting
and release to be certain of your new setting. If you have no
time to wait, you can manually add gas pressure from the
gas cylinder to the vessel as described in Appendix 5 and
set the VPRV to release at the target.
3. Once the VPRV is confirmed to be releasing gas at or just
above the set point, it shouldn’t need more attention.
When fermentation is complete, the pressure will still be
maintained in the vessel (and the beverage remains fully
carbonated). We are fermenting at a slight excess pressure
so you only need to be close to the target and not 100%
accurate.
28
what if there is no pressure build up after 1 day?
If the pressure does not build up and the yeast is actively
fermenting as seen in the sediment bottle, you likely have a
leaky seal in the rim/lid or VPRM. See the Trouble Shooting
Section, Problem 2 for a solution.
Fig. 40
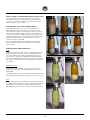
WHAT YOU WILL SEE IN THE SEDIMENT BOTTLE
Figure 40 shows what you will see in the sediment bottle
for Nottingham Ale yeast over the first 4 ½ days for an ale
fermentation. The yeast cells will start to become active after
a few hours and begin to ferment. They will then disperse into
the vessel due to their own CO2 production and consume the
sugars and other nutrient in the wort/must and multiply. When
the sugars are depleted most yeast will settle in a similar
manner as shown in Figure 40.
AFTER 1hr
Day 1
Day 2
Day 3
Day 4
Day 4½ (Cold)
Each yeast behaves differently so the amount of settling of
the yeast and the clarity of the beverage above the settled
yeast will vary.
WHAT to expect from other yeast
S-33
S-33 ale yeast does not settle as well as Nottingham Ale yeast.
By Day 4, before you put the cooling on, there will likely be
1 / 3 of the sediment bottle with settled yeast but the rest of
the bottle quite cloudy with unsettled yeast. See Figure 40A.
Cooling the beverage will settle the yeast a little, but in general
the top half of the bottle will be quite cloudy when you remove
it in Stage 5.
Fig. 40A
W34/70 and S-23
Lager yeast like W34/70 and S-23 used in our lagers and
pilsners, will settle quite well after fermentation, as shown in
Figure 40B.
So by Day 6 there will be quite a well defined boundary between
the yeast and the beverage above, before you put the cooling on.
T-58
For a 4-5% alcohol ale, T-58 Belgian Ale yeast will ferment out
in 4 days and then sediment as shown in Figure 40C. There will
be a definitive line between the yeast and beer but the beer
above the yeast line will be quite cloudy still with unsettled yeast.
Fig. 40C
29
Fig. 40B
StAGE FOUR:
Cool the beverage
Please read Appendix 6 regarding how to set the digital controller and Appendix 7 for
background information on typical fermentations and principles regarding when to
cool the beverage and the effects of cooling the beverage.
In general cooling can be put on at Day 4 for ales and Day 6 for lagers and ciders.
However you should check fermentation is finished before putting on the cooling. As
discussed in Appendix 7 this can be checked by measuring the Specific Gravity (SG)
and/or checking there is no major activity in the sediment bottle, meaning there are no
longer bubbles of CO2 rising constantly.
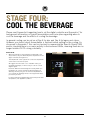
WHAT TO DO
1. When the beverage is fully fermented or fermented to the
SG you desire, set your desired dispense temperature on the
digital controller (see Figure 41).
Fig. 41
The temperature control system will control the temperature
of the vessel to the new set-point.
We suggest first time users cool to 2°C/36°F unless you
like warmer beverages, in which case you can set it a few
degrees higher.
Please be aware that the beverage will actually warm-up a
few degrees as it passes through the draft beverage line,
draft tap, and into your glass. So the final temperature as
you consume the beverage will be a little higher than what
you actually set here.
For more information regarding beer styles and optimal beer
temperatures, See Appendix 5, Table 2.
30
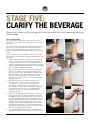
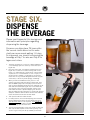
StAGE FIVE:
CLARIFY THE BEVERAGE
Please read Appendix 8 for background information and principles regarding clarifying
the beverage.
FIRST CLARIFICATION
First clarification can take place 12 hours after cooling has
started, so in general, Day 4 ½ for ales and Day 6 ½ for lagers
and ciders.
Fig. 42
Fig. 43
The pressure in the vessel may have dropped slightly due to the
effect that cooling the beverage has on the dissolved carbon
dioxide. Colder temperatures allow more carbon dioxide to
dissolve in a beverage and the pressure reduces a little because
of that.
So for first-time users who fermented at 1.5 bar, you may see
the pressure on the vessel pressure gauge reading between 1.25
and 1.5 bar.
1. Screw the VPRV right down (clockwise) to its fully closed
position. It has done its job and naturally carbonated the
beverage for you. It will now act as a safety relief valve if
someone inadvertently adds too much pressure from the gas
cylinder. However we will use the button on top of the VPRV
in the next steps to release gas manually.
Fig. 44
2. Open the tower door and check that there is gas pressure
from the gas cylinder on the high pressure gauge. If not,
attach a full gas cylinder, as described in ‘Setting up your
Personal Brewery’ in Part One. Check the gas cylinder low
pressure is set at the final dispense pressure you want.
First time users should set this at 1.25 bar as discussed in
Appendices 5 and 7.
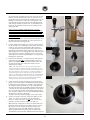
3. Close the vessel valve. Unscrew the sediment bottle
(see Figure 42). It screws off clockwise looking down
on the bottle. It is under pressure so there will be a
small release of pressure as it is unscrewed but it is
full of liquid, so it will be minimal. However it is advisable
to unscrew the bottle with one of your hands wrapped
around the top part of the bottle, to block any small
spraying of beverage.
Fig. 45
4. When you have unscrewed the bottle, place it in the stainless steel bowl under the tank (see Figure 43). Then take
the 500ml spray bottle and spray up into the vessel valve
to remove beverage residue from the under-side of the valve
and valve thread (see Figure 44). Let the water drip onto
the bowl. Then using the removable stainless steel bowl
under the vessel to prevent dripping onto the floor, take the
sediment bottle and bowl to a sink (Figure 45) and dump
the sediment down the drain and rinse the sediment bottle
and stainless bowl both well with water.
5. Then put the bowl back under the tank and take the well
rinsed sediment bottle to the draft tap. Put the bottle under
31
Fig. 46
the tap and push the draft tap flow control lever all the way
down to its fully opened position (see its open position in
Figure 46). Then push the draft tap towards the back of the
brewery to create foam to come out of the tap (this is the
foam mechanism part of the tap). Fill the sediment bottle
with foam by allowing the foam to fall to the middle of the
bottom of the sediment bottle and not roll down the side
(See Figure 46).
Fig. 47
Fig. 48
Fig. 49
Fig. 50
Foam consists of bubbles of CO2 that have a positive
pressure. As we fill the sediment bottle this way, the foam
and its bubbles of CO2 will displace air in the bottle. The
top surface of the foam will retain the positive pressure and
not take in air and as the bottle is filled, we can displace all
air from the bottle.
Fill the sediment bottle to the very top with foam then close
the draft tap and push the draft tap control lever up to its
fully closed position (see Figure 47).
6. Put the sediment bottle (which is now full of foam) back on
the vessel and close it hand-tight as per normal. The bottle
screws on anti-clockwise looking down. Once the bottle
is securely attached, open the vessel valve slowly and let
beverage fill the sediment bottle. Check you have put it on
tight enough and it is not leaking. Once full, leave the vessel
valve fully open so that the sediment bottle is open to the
vessel again, but now has only beverage in it, not yeast and
beverage (see Figure 48).
7. Ensure the 3-way valve is closed (X position) and open the
clarification pot. Add 30ml of WilliamsWarn clarification
agent to the 100ml cylinder and then transfer that to the
pot (see Figure 49). Then screw the lid back onto the
clarification pot tightly.
NOTE: The next sequence of forcing clarification agent
into the beverage is required for first time brewers to use,
in order to create an exact and known pressure differential
and then experience the amount of “vigorous bubbling” of
clarification agent that is required to mix the agent well.
There is an alternative method described for in Appendix 9
that experienced brewers may like to try after a few brews,
which focuses on the amount of bubbling heard without
knowing the exact pressure differential created.
Fig. 51
8. Lower the vessel pressure (as read on the vessel pressure
gauge on the control panel) to 0.50 below your gas cylinder
low pressure set point (that you checked in step 2 above in
this Stage) by pushing the button on top of the VPRV. For
first time user who have set the CO2 cylinder low pressure at
1.25 bar, this will mean releasing the pressure in the vessel
from just under the pressure achieved during fermentation
(e.g. 1.5 bar or under as the cooling of the beverage reduces
the pressure a little bit) to 0.75 bar,
as read on the vessel pressure gauge on the control panel.
9. You are now going to force the clarification agent into the
vessel. It is critical to be able to hear the clarification
process in order to be sure it has occurred, so turn off all
external noise like any music players, the radio etc.
Open the black 3-way valve to the pot for 10 seconds only,
by turning the 3-way valve anti-clockwise from its closed
(X) position to be in-line with the arrow pointing to the
clarification pot (see Figure 50). Allow the clarification
agent to bubble and mix into the vessel for 10 seconds.
The bubbling sound should be audible and must be vigorous
32
enough to imply a good mixing of the clarification agent
with the beverage. The mixing can also be seen through the
vessel lid sight-glass with the help of the vessel light.
Fig. 52
10.After 10 seconds of bubbling, close the 3-way valve
(X position). If clarification is done properly, the pressure
of the vessel should increase by about 0.25 bar or slightly
more. So for first time users, the pressure in the vessel
should be about 1 bar or just above it.
11.You now need to rinse the clarification pot. Open the pot
lid and use the 500ml wash bottle to rinse water down the
sides of the pot wall (see Figure 51). Fill to the level that
the CO2 line enters the pot and then close the lid on the
pot again.
12.The pressure on the vessel should still be lower than the gas
cylinder pressure, so turn the 3-way valve back to the arrow
pointing to the clarification pot and bubble the rinse water
through the lines and into the vessel for a few seconds.
Mixing is not required as this step is just to rinse the
clarification pot and its lines of any clarification agent.
If you do not hear the water bubble into the vessel, you may
have increased the pressure in the vessel too much during
step 8 by bubbling too long. You may then need to release
some pressure from the tank again as you did in step 7, to
create a pressure differential and then repeat step 12.
13.Then turn the 3-way valve clockwise to the arrow pointing
to the tank pressure gauge so that the gas cylinder pressure
(1.25 bar for first time users) will now hold pressure in the
tank at your set point for beverage dispense.
Yeast and haze protein will now have reacted with the
clarification agent and you will be able to see some particles
falling into the sediment bottle.
Fig. 53
After 24 hours the sediment bottle should be about ½ full
of sediment or more (see Figure 52), depending on the
yeast and beverage type.
SECOND CLARIFICATION
A second clarification can take place 24 hours after the first
clarifications so in general, Day 5½ for ales and Day 7½ for
lagers and ciders.
14.Close the vessel valve (to avoid disturbing the settled
yeast) and close the 3-way valve (X position). Then perform
another clarification as described above from steps 7 – 13
with 20ml of clarifying agent. Ensure the last step (step 13)
of turning the 3-way valve to the tank is performed so that
the beverage can equilibrate with the CO2 cylinder pressure.
15.Then open the vessel valve to allow a second lot of new
sediment to settle over another 24 hour period at least, but
36 hours in general.
After this 36 hour period the sediment bottle should be
about ¾ full of sediment (see Figure 53) depending on the
yeast and beverage type and there should be some clear
beverage above that.
As explained in Appendix 8, some yeast are harder to clarify
than other yeast and as you brew more you will gain more
experience in this aspect of brewing.
33
StAGE SIX:
Dispense
the BEVERAGE
Please read Appendix 9 for background
information and principles regarding
dispensing the beverage.
Fig. 54
Dispense can take place 24 hours after
the second clarifications but for extra
clarity we recommend waiting 1 ½ days.
So in general, you should be enjoying the
beverage at Day 7 for ales and Day 9 for
lagers and ciders.
Fig. 32
1. The bottle should be ½ to ¾ full of clarified sediment with
a clear beverage layer seen at the top of the bottle (See
Figure 54).
2. Close the vessel valve. Unscrew the sediment bottle (see
Figure 42). It screws off clockwise looking down on the
bottle. It is under pressure so there will be a small release
of pressure as it is unscrewed but it is full of liquid, so it
will be minimal. However it is advisable to unscrew the
bottle with one of your hands wrapped around the top part
of the bottle, to block any small spraying of beverage.
Fig. 55
3. When you have unscrewed the bottle, place it in the
stainless steel bowl under the tank (see Figure 43). Then
take the 500ml spray bottle and spray up into the vessel
valve to remove beverage residue from the under-side of the
valve and valve thread (see Figure 44). Let the water drip
onto the bowl. Then using the removable stainless steel
bowl under the vessel to prevent dripping onto the floor,
take the sediment bottle and bowl to a sink (Figure 45) and
dump the sediment down the drain and rinse the sediment
bottle and stainless bowl both well with water.
4. Then put the bowl back under the tank.
5. For safety reasons, we recommend putting the rinsed and
empty sediment bottle back onto the brewery but do not
open the vessel valve! It can stay there, empty under the
closed valve, as a safety device should someone or some
child accidently open the vessel valve.
6. To pour your first beverage, hold a glass under the draft tap
and close the draft tap flow control lever by pulling it up
as far as it goes. Then pull the tap towards you and then
34
with one of your fingers, open the flow controller slowly by
pushing it down, to get an optimal flow (see Figure 55).
Fig. 56
If it is the first pour of the day the first 50ml in the line may
be warm and promote a little excess foaming in the glass, so
a slow flow is optimal for the first part of the pour until the
cold beverage exits the tap. Then you can adjust the flow
controller to increase the flow speed and pour a good glass
of your own making (see Figure 56).
When pouring beer, before the glass is full, push the tap
away from you to create some beer foam onto the top of
the glass.
If the beverage is not totally crystal clear don’t worry, it will
keep clearing and in most cases soon be bright. It just may
just need an extra ½ day or so.
However some yeast need an extra clarification as discussed
in Appendix 8.
7. Rinse the draft tap with water from the plastic wash bottle
when you have finished pouring (see Figure 57). This will
help stop bacteria growing inside the tap on any beverage
and we recommend to do this after each pouring session.
Now all that’s left is to sit back relax and enjoy your
beverage.
See Appendix 9 for instructions when the vessel is empty.
Fig. 57
Cheers!
Ian Williams
35
Anders Warn
SHORT INSTRUCTIONS
After some time, these short instructions below are all you will need to help you brew.
However, until the process becomes intuitive, the Standard Instructions in the previous
section will be necessary. So start with the Standard Instructions and then use this one
page when you feel more experienced.
For first time users, these short instructions also serve as an overview of the process.
Stage 1: Clean and Sanitise the Brewery
(approximately 20 minutes)
1.Preparation
2. Clean the vessel with water
3. Clean the sediment bottle and vessel lid with detergent
4. Clean the draft tap and filling line with detergent
5. Clean the vessel with detergent
6. Rinse the vessel with water
7. Sanitise the vessel
8. Sanitise the draft tap, filling line and vessel lid.
Stage 2: Add the Ingredients (approximately 20
minutes)
1. Boil water in kitchen kettle
2. Hydrate the yeast
3. Add any liquid extracts
4. Add any dry extracts
5. Add any other ingredients
6. Fill up to the 23 Litre mark
7. Attach the sediment bottle and the yeast
8. Close the lid
9. Ensure the VPRV is set
10.Set the desired fermentation temperature
11.Final check
12.Clean up
Stage 3: Monitor the pressure during
fermentation (a few minutes).
Stage 4: Cool the beverage (a few seconds).
Stage 5: Clarify the beverage (2 x 5 minutes).
Stage 6: Dispense the beverage.
36
PART THREE:
MAKING BEVERAGES
WITH THE ADVANCED
METHOD
INTRODUCTION
There is much flexibility for brewing many different beverage in your WilliamsWarn.
After you have tried some or all of the Standard Ingredient Kits you may like to add
a little extra flavour. You can do this quite easily using what we call our Advanced
Methods.
Basically the Advanced Methods consists of adding extra
ingredients that dissolve in the wort/must or adding extra water
that has been steeped in the ingredients and then filtered before
adding, to avoid particles blocking the draft tap.
The easiest Advanced technique is to soak hop pellets in a
French coffee press as described in the following pages. This
gives extra hops aroma and flavour to a standard kit.
Another technique is to boil hops for a while to add extra
bitterness.
And the other main technique is to steep crushed specialty
grains and strain them to add extra malt flavours.
A final technique is to add any flavour you want via any method
you want, as long as you don’t add particles to the wort/must
that will block the draft tap and as long as the temperature of
the wort/must when made up to 23 Litres (6 US gallons) is near
25°C (77°F) when the yeast is added.
Recipes for adding extra hops and malt and other ingredients
will be added to our website in 2013 under the title Advanced
Recipes. They will require these techniques to be used to add
the extra flavours. As this will always evolve we are not placing
the actual recipes in this User Manual.
But as long as you follow the techniques described in the next
few pages, you can make other recipes on the BJCP Style
Guidelines (see Appendix 10) from our Standard Kits to match
our Advanced Recipe suggestions as well as any recipes you
can find on the internet or in brewing books. This method we’re
employing is known as “Extract plus Grains” in the USA so any
recipe you can find under that title will work.
Adding a little extra steeped hops and malt “tea” is how
Santiago Aon Ratto won the Gold Medal for his Pilsner at the
Asia Beer Awards in 2012, so it’s definitely something to move
into as you get more brews under your belt.
Good luck and don’t be afraid to experiment.
38
adding extra
hop flavour
and bitterness
Hops can add bitterness, flavour and aroma to any brew.
All beers needs some bitterness to balance the intrinsic
maltiness of beer, but flavour and aroma are optional and
dependent on the beer style being produced.
Fig. 59
To bitter beer, hops need to be boiled at 100°C (212°F) for
a period of time (e.g. 30 minutes to 1 hour). When you make
beer from malt extract, this bitterness aspect is taken care of in
the Liquid Malt Extract. All the bitterness for the style is already
contained in the liquid extract. The dry malt extract contains
no hops and only adds malt sugars, flavours and nutrients.
Hop aroma is derived from essential oils in the hops and
you do not need to boil the hops to extract this. In fact, the
opposite is true; when you boil hops you lose a lot of aroma
in the steam emitted during boiling. For this reason brewers
add hops at three points to get hop aroma in to a beer:
A. The last few minutes of a wort kettle boil
B. In the whirlpool (which is the step after boiling - the
wort is hot but not boiling)
C. In the fermenter or maturation vessel ('dry hopping')
For WilliamsWarn brewers, a good option is mimicking
the whirlpool addition and this is described below.
Adding Hop Aroma
A very easy way to add hop aroma to any brew is to mimic
the whirlpool hop addition in a brewery using what is known
as a French coffee press (or Bodem or coffee plunger or
other name, depending on where you live).
Fig. 60
Purchase hops that are known for a good aroma. These are
usually known as 'aroma hops'. Examples include Motueka,
Riwaka, Hallertau, Amarillo, Cascade, Crystal, Centennial,
Fuggles, Horizon, East Kent Goldings, Liberty, Mt Hodd,
Nugget, Perle, Saaz, Tettnang and Willamette.
Before you start cleaning the brewery, take 50g (1.8oz) of
aroma hops and add to the coffee press. Add 80°C/176°F
water. Stir and let sit a while as you work. Stir a few times as
you progress the cleaning and then let it settle. When you
add the other ingredients during Stage 2, plunger the coffee
press as shown in Figure 59. Be careful not to force too much
pressure on the solids at the bottom in case you break your
coffee press!
Then pour the green hop water into the brewery as shown
in Figure 60. You need to avoid adding solids as hops solids
can block the beer outlet pipe.
39
Then add a dose of cold water to the coffee press to rinse
the hops further, stir the hops again to extract more flavour
compounds, plunger again and add another lot of green
water to the WilliamsWarn.
around 10 for American and Asian lagers to 70 BU’s for
IPA’s and Stouts. Guidelines are given by the BJCP at this
link http://www.bjcp.org/stylecenter.php
If you want to increase hop bitterness levels for your own
personal preference, you can use several web-based tools.
For example,
You can also try leaving the hops in the bodem for a few days
in a fridge to maximise extraction before pressing and adding.
You can, of course, use less or more than 50g (1.8oz). You can
also try combining different hop varieties together. But please
be aware that after the brewery has been filled to the 23 Litre
mark with cold water, we want a wort temperature of about 25°C
(77°F) for the yeast. So do not add too much hot water via the
hop tea. If you want to soak an extreme amount of hops, it would
be preferable to use water near 25°C (77°F). This green hop tea is
full of hop flavours and aromas and will add complexity to any brew.
http://www.hotv.org/tools/hopbitterness.html
http://www.realbeer.com/hops/IBU.html
http://www.brewersfriend.com/ibu-calculator/
You will be asked to insert
Final wort or beer volume: 23 Litres (5 Imp Gallons,
6 US Gallons)
Wort specific gravity: 1.000 (we are boiling in water)
The alpha acid content for each hop used (read the
packet - from 4%-16%)
The amount added (1 oz is 28g)
The time boiled (1-60 minutes)
Note: “Hop Utilisation” should be calculated for you.
Adding Hop Bitterness
To add extra hop bitterness, you need to boil hops.
For WilliamsWarn brewers, the easiest way is to boil some
hops in 1L of water and then transfer that to a French
coffee press to plunger it and filter it before adding to the
brewery (as described in the aroma hop section above
and shown in Figure 59).
Alternatively, you can use the chart below to discern how
long to boil your hops for.
The amount of extra bitterness you add depends on 2 aspects:
Example 1
A. The amount of alpha-acids in the hops
For every 10g of a 10% alpha-acid hops boiled for
30 minutes in 1 Litre of water (which is then filtered in a
French Press and added to the WilliamsWarn with the other
ingredients in Stage 2), 12 bitterness units will be added to
the final beer.
B. How long you boil for
All hops have an alpha-acid level that is measured and stated
on the hop packet. These get converted into iso-alpha acids
when boiled and these are the bitter compounds in beer. The
longer you boil, the more bitterness you make.
Example 2
For every 10g of a 14% alpha-acid hops boiled for
60 minutes in 1 Litre of water (which is then filtered in a
French Press and added to the WilliamsWarn with the other
ingredients in Stage 2), 22 bitterness units will be added to
the final beer.
'Bittering hops' usually have a high alpha-acid content
(e.g. 10-15%) and aroma hops usually a low amount
(e.g. 4-10%). However you can use any hop to add bitterness.
The bitterness level ranges for most beers range from
BITTERNESS UNITS ADDED PER 10 GRAMS
(0.35OZ) OF HOPS OF DIFFERING ALPHA ACID %
(WHEN BOILED IN 1 LITRE OF WATER AND ADDED TO 23 LITRES OF WORT)
Bitterness Units added
30
16.0%
25
14.0%
20
12.0%
10.0%
15
8.0%
10
6.0%
4.0%
5
0
0
5
10
15
20
25
30
Boil Time
40
35
40
45
50
55
60
ADDING EXTRA
MALT FLAVOURS
Background
Along with hops, there are certain types of grains that can also
be steeped in hot water, with the resulting strained water being
added to the brew to add certain characteristics.
Suppliers can crush grain for you or you can set up your own
small mill or a similar system.
6. As long as the grains are strained from the water so no
solids are added to the WilliamsWarn, which can block the
beer tap, any soaking and straining method will work.
When used with extract as a base, steeping specialty grains is a
great way to make different beers styles and add colour, flavour,
body, head-retention and mouth-feel to a brew.
Base Malts vs Specialty Malts
To make wort or the extract (concentrated wort) used in the
WilliamsWarn cans, grains commonly called Base Malts must
go through a 6-8 hour process known as the brewhouse. This
involves crushing, mashing, lautering, boiling, whirlpooling and
cooling before adding yeast to the wort in a fermenter.
This method, known in the US as “Extract plus grains”, offers
a lot of flexibility without the need to go through the 6-8 hour
process of mashing grains, lautering, boiling, whirlpooling and
cooling.
It only requires 30 minutes and a few extra bits of equipment.
This provides the sugars and proteins the yeast needs to make
beer. In the case of extract, the wort is evaporated into extract
form and put into cans.
Important Principles
We have a suggested method below, but as we’ve stated several
times in this manual, there are many ways to make a brew.
Along with the Base Malts, Specialty Malts can be added to
add colour, flavour, body and head retention and some sugars
and proteins.
So it’s important you understand some important principles if
you choose to adopt your own method. These are:
Malt extracts like those supplied by WilliamsWarn have both
Base and Specialty Malts in them. For example, our Dry Stout
has a small amount of Roasted Barley to give the black colour
and typical stout flavours.
1. We are using hot water when we steep so we need to be
careful that the wort is not too hot when we pitch the
yeast. With this method we are using a different method to
the Standard Method, but the volumes and temperatures
are calculated with the same principle so that the final
wort produced will be close to 25°C/77°F to reduce any
temperature shock on the yeast when it is pitched.
However, Specialty Malts have the added bonus that they
don’t need to be mashed to give extra complexity to beer.
You can steep them like when making a tea with a tea-bag
and add the resulting strained water to a brew. In the water will
be an assortment of flavours and colours and other compounds.
2. A standard water to grain ratio used is not more than
1 US gallon to 1 pound of grains. This is 3.8 Litres per
455g of grain or 1 litre per 120g. This ratio is suggested
to ensure a decent extraction of colours and flavours but to
avoid too much extraction of tannins from the grain husks.
Tannins can give a drying, puckering mouth-feel.
This steeping takes 30 minutes rather than 6-8 hours so is
the perfect way to make all sorts of beers while still using
WilliamsWarn or other extracts as the base malts.
Examples of Specialty Grains that may be steeped
3. We suggest to heat the steeping water to 80°C/176°F and
then add the grains. The temperature will then drop 5-10°C
when the grains are added. Steeping above 80°C/176°F
may result in excess tannin extraction and steeping above
70°C/158°F will ensure a pasteurisation of the grain
material to reduce risk of infection so we’re targeting midto-low 70°C’s at the start of steeping.
Roasted Malts
Kilned and Roasted Malts
Carapils/Carafoam/
Dextrine Malt 3°L
Pale Chocolate Malt 200°L
Honey Malt 18°L/25°L
Light Roasted Barley 300°L
4. If the amount of grain used is only 115g or less (1/4 lb),
then we suggest to use a French Coffee Press with about 1
litres (2 US pints) of 80°C/176°F water added as shown for
aroma hops in the previous chapter. Then use the Standard
Method for ingredient addition rather than the method
described below. It will not have too much effect on the
final wort temperature and is simpler.
Crystal/Caramel Malt 10°L
Chocolate Malts 350-475°L
Crystal/Caramel Malt 20°L
Carafa Special II 430°L
Crystal/Caramel Malt 30°L
Black Barley 500°L
Crystal/Caramel Malt 40°L
Black Patent 525°L
Crystal/Caramel Malt 50°L
Black Malt 600°L
5. The grain must be crushed to extract the flavours and
colours and other components. Each grain should be
crushed into at least 5 parts to optimise extraction.
Crystal/Caramel Malt 60°L
Roasted Barleys 450-575°L
41
Fig. 61
Roasted Malts Cont.
Crystal/Caramel Malt 80°L
Crystal/Caramel Malt 120°L
Special B 120-150°L
Meussdoerffer Rost 200°L
Base Malts that must be mashed include: Lager/Pilsner malt
2°L, Pale Ale malt 3°L, Wheat malt 3°L, Rye malt 3°L.
Some Kilned Malts that are kilned hotter than Base Malts and
generally also need mashing but have been used in recipes as
steeped malt include: Vienna malt 4°L, Munich malt 10°L,
Aromatic malt 20°L, Amber malts e.g. (Biscuit malt 25°L,
Victory malt 28°L), Melanoidin malt 28°L, Special Roast 50°L,
Brown malt 70°L, and smoked malts.
As long as you rehydrate the yeast at about 25°C/77°F and add
the water to the sediment bottle in 2 parts as described in the
Standard Method, any temperature shock should be avoided
even if your wort is closer to 17°C/63°F.
As described in the Appendix 2, if your cold water temperature
is between 7-12°C (45-54°F), add 1 Litre (2 US pints) of
boiling water before reaching the 23 Litre mark, in order to
bring the final wort/must temp to about 20°C (68°F).
The negative impact on steeping base malts is that you extract
unconverted starch rather than sugars which can add to beer
haze and infection risk (bacteria that eat starch).
Specialty malts like Crystal/Caramel malts have had the mashing
process occur inside the grain during processing so the starch is
already mostly converted.
If your local water is below 7°C (45°F), add 2 Litres of boiling
water before reaching the 23 Litre mark, to bring your wort/must
temperature to about 20°C (68°F).
If your local water temperature is higher than 35°C (95°F), you
will need to cool the wort/must to 25°C before adding the yeast
to it, by setting the temperature controller to 25°C (77°F).
Our Suggested Methods
Under 115g/ ¼ lb malt
Add the crushed grains to a French coffee press and fill with 1
litre (2 U.S. pints) of 80°C/176°F. Steep for 30 minutes then
plunger and add with other ingredients as per the Standard
Method.
Alternatives to a grain bag
As long as the grain is strained to avoid solids getting into the
wort, you can use any system to extract the colour and flavour.
For example, the grains can be stirred and soaked in water and
then the grains/water strained through a funnel with a strainer or
a good colander to achieve the same effect.
Over 115g/ ¼ lb malt
1. Heat 3.8 litres (1 US gallon) of water to 80°C/176° in a pot.
2. Add the grain in a muslin or nylon bag as shown in Figure 61.
The effect on SG and Alcohol
Soaking specialty grains will also add some small amounts of
sugars to the wort. So the S.G. may increase slightly which will
result in a slightly higher final alcohol %.
3. Dunk the grain bag and swirl it around to get all the grains
wetted and leave to soak for 30 minutes.
4. After 30 minutes remove the bag and let it drain. Do not
squeeze the bag as that can add excess tannins from the
husks. The temperature will be about 60°C/120°F and
the remaining liquid will be about 3 litres (3/4 gallon)
depending on how much grain you are using.
The amount of S.G. increase is usually too small to account
for, but with higher amount of certain specialty malts used it is
something to be aware of if you need accurate measurements of
S.G. and Alcohol.
5. Now add your Liquid Malt extract to the pot and stir it in
to dissolve.
Advanced Recipes
WilliamsWarn will have Advanced Recipes on our website in
2013 using our extract as a base plus the addition of steeped
hops and steeped grains and other ingredients required to make
more beverage styles than the Standard kits we supply.
6. Add some of the liquid in the pot back into the empty can
and then stir the can to dissolve any remaining extract in
the can and add this back into the pot.
7. Add this to the WilliamsWarn and then add the DME to this
as described in the Standard Method.
We adhere to the BJCP Styles Guidelines for most recipes.
8. Add any other ingredients and then top up to the 23L mark
as described in the Standard Method.
Once you have tried some of our Advanced Recipes you will
then be in a good position to try the many thousands of recipes
on the internet. Recipes titled as “Extract plus Grains” are the
recipes types the same as our Advanced Method described here.
Using this method, the final wort temperature in the
WilliamsWarn before pitching the yeast should be similar to that
described in the first table in Appendix 2. For example, for a
20°C/68°F water source the wort should be about 25°C/77°F
and ready for the yeast to be pitched.
WilliamsWarn will also introduce an online database from our
website in 2013 so that brewers can exchange recipes and
communicate together in a forum style platform.
42
PART FOUR:
APPENDICES
APPENDIX one:
CLEANING & SANITISING
Background
The best breweries in the world ensure total cleanliness. As
every brewer knows, brewery fermentations are essentially the
controlled growing of a single strain of yeast. Unfortunately the
conditions for the brewery yeast are also perfect for unwanted
bacterial (and other microbes) growth, which can spoil the
beverage. This is why cleaning and sanitising are so important.
If you have a hot water system close to a temperature of
60°C/140°F this will work well.
Otherwise the easiest way to make approximately 60°C/140°F
water is to mix 50:50 ambient water from the tap with boiled
water from a kitchen kettle. Ambient water will fluctuate with
the seasons and geographical locations but even a range from
10°C to 30°C (50°F to 86°F) tap water will produce warm water
in the range of 55°C to 65°C (131°F to 149°F) once combined
with boiling water, which is fine for the purpose of cleaning
the vessel.
So to ensure it is only the yeast we pitch into the wort/must
that grows, we need to both clean off all organic residues and
then sanitise the cleaned surfaces. The cleaner the surfaces the
easier it is for the sanitiser to do its job on these unseen microorganisms that may be there.
Once the warm water is put in the 2 Litre jug and the detergent
mixed and then added to the cone, the temperature will be
closer to 50°C/122°F, which should be acceptable for contact
with your hand and scrubbing the vessel with. However if
you find this too warm then you should use a colder water
temperature.
As long as we clean and sanitise the brewery well, it’s not so
critical if the utensils are not 100% clean. So use common
sense, but jugs, spoons, scissors, can openers and the table
surface you use do not need to be totally sterile. It is more the
bugs that can hide inside the brewery and create a home for
themselves in some hidden corner that create the problem in
the beverage during fermentation or after it is produced.
The WilliamsWarn sanitising agent: Sodium
Percarbonate
The WilliamsWarn sanitising agent that follows the detergent is
Sodium Percarbonate. Sodium Percarbonate will react in water
to form Sodium Carbonate and Hydrogen Peroxide. It is the
Hydrogen Peroxide that works as an oxidiser on bacteria and
other undesirable microbes.
The WilliamsWarn Brewery Detergent
The detergent used in Stage 1 can be any popular dishwashing
powder, although the WilliamsWarn Brewery Detergent is
formulated to work well with brewery residue and cold water.
It requires a contact time of about 2 minutes after wetting, to
sanitise the cleaned surface.
However, it is optimal to use 1 Litre of water that is as warm as
you can handle on your hands, in order to assist dissolving the
residue from the previous brew.
After this contact time, the bulk liquid should be drained from
all surfaces but there is no need to rinse the sanitizer residue
off. This is because it is a no rinse sanitizer.
Detergent is used to remove solid material off the surfaces
ahead of the sanitising agent that follows in the next step.
WilliamsWarn Brewery Detergent contains a mixture of alkaline
cleaning chemicals, water softener, non-ionic surfactants and a
small measure of sanitising agent as well.
After a short period of time, it breaks down into oxygen and CO2,
both of which are naturally found in beer and other beverages.
The most important part to clean in the brewery is the yeast
ring that is visible after each brew. By dipping the non-scratch
sponge in the liquid detergent and rubbing onto the yeast ring,
it should come off reasonable easily. If parts of the yeast ring
have dried, those areas may need a bit of extra effort to scrub
off. The detergent will get dirty as you clean but it will still have
a good cleaning ability regardless.
Pressurising the vessel during cleaning and
sanitising.
The gas we add to the vessel in Stage 1 is just enough to push
the liquids out the draft tap and packaging line. If you find you
need more or less that that suggested then adjust as required.
We have found that 0.3bar/5psi is about the right level for what
is required, however if you find you need less, that is fine and
will save some gas.
The detergent will then need a good rinse off with water to
remove it from the surfaces.
We want some flow out the draft tap and filling line to help
clean the lines and we also want to have some soaking time in
these lines while we clean the vessel itself.
The Warm Water used
The WilliamsWarn Brewery Detergent can be used in cold water
but warm water is always better to help dissolve organic material
like the yeast ring and beverage residue.
We also want to ensure these lines have a few minutes contact
time with the Sodium Percarbonate solution to sanitise them.
44
The Sponge
Use a non-scratch sponge to prevent scratching the stainless
steel. The sponge provided is non-scratch. If you use a sponge
that scratches the stainless steel, the scratches can be a hiding
place for undesirable microbes that don’t get in contact with the
sanitising agent which then increases the risk of infection.
vessel and then add 0.3 bar/5psi of pressure to the vessel and
push 250ml of this water out the draft tap and filling line. The
water will be somewhere above 70°C/158°F at this stage and
this is enough heat to kill most beverage spoiling microbes in
a few seconds. Allow it to sit for 20 minutes to further heat up
the vessel and under the lid. Then release the VPRV after 20
minutes (as there may be a partial vacuum inside, due to the
water cooling down) and remove the lid and dump the water out
of the vessel and lines.
The Draft Tap Foam Mechanism
The draft tap has a beer-foam mechanism. When pushed
towards the back of the brewery, it will create foam at the end
of a pour into a glass, to give a nice head. Therefore when
we clean, we must both pull and push the tap when allowing
detergent and sanitising agent to flow out the tap, so that the
tap gets a good clean.
This should have killed any undesirables.
Safety Note: Obviously moving a pot of 7 Litres (1.8 US
Gallons) of water at 80°C/176°F requires precautions to ensure
safety requirements are met. Ensure no children are nearby and
take total care moving and pouring the water.
Cleaning the outside of the Brewery
The best way to clean the outside of the brewery is to use
stainless steel wipes used on stainless steel refrigerators and
handles. In New Zealand and Australia there is a product called
Kleenex Viva Stainless Steel Wipes. In the USA there is Weiman
Stainless Steel Wipes. Find a similar brand and you will find it
easy to remove hand marks and keep the brewery looking shiny.
The Sediment Bottle
At the end of the brewing process, the sediment bottle should
be rinsed and put back on the brewery as a safety measure,
in case children open the vessel valve. However just before
the next brewing day, when the beverage is almost gone, as an
alternative to the clean and sanitisation that occurs in Stage 1,
you may instead wash the sediment bottle in a dishwasher. In
addition, an alternative to sanitise is to stand the sediment
bottle in 80°C/176°F hot water for 2 minutes. The heat will
destroy most bacteria even if the bottle isn't cleaned well.
The bottle can handle most cleaning agents as well as hot
temperatures up to 100°C/212°F.
YouR own techniques
You may find your own techniques that are easier for you than
our method. You are the brewer and the owner of the brewery, so
you may find methods that suit you better.
You may prefer to clean less. It is possible to just give the
brewery a decent water scrub and water rinse and brew the next
batch without getting an infection. We know brewers who have
done this many times with their WilliamsWarn. However, the risk
of infection will likely increase over time if you never clean the
brewery with detergent and sanitizer.
Or alternatively you may feel we have not cleaned and sanitised
enough with our method and you’d like to do more or double the
concentrations of chemicals.
Either alternative is fine as long as the beverages you brew
taste good and have no off-flavours caused by an infection of
unwanted micro-organisms. At the end of the day, the brews you
produce will tell you if you are cleaning and sanitising enough.
Emergency Sanitisation
In our first period of selling Personal Breweries, we have had
no reports of infection. However if for some reason you suspect
you have infections (e.g. sour beverage, major off-flavours) over
several brews, the best solution would be to give a good clean
with detergent and then a sanitisation with hot water.
Heat is very effective as killing undesirable micro-organisms as
it penetrates everywhere.
In this case we would recommend heating 7 Litres (1.8 US
Gallons) of water up to 80°C/176°F in a pot and then add this
carefully to the cone of the brewery (vessel valve closed) and
then close the lid. Wait 5 minutes for the heat to heat-up the
45
APPENDIX TWO:
ADDING INGREDIENTS
Important Principles
For ingredient addition, the principles we are adhering to are
as follows:
If your local cold water temperature is lower than 12°C
(54°F) or above 30°C (86°F) you will need to add some
adjustments as follows:
A. The water you use should be drinking water quality. Follow
the principle “If you can drink it you can brew with it”.
Chlorinated water doesn’t need to have the chlorine removed
but if you have a carbon filter commonly used for that purpose,
then that water is also fine.
1. If your cold water temperature is between 7-12°C (4554°F), add 1 Litre (2 US pints) of boiling water before
reaching the 23 Litre mark, in order to bring the final
wort/must temp to about 20°C (68°F). If your local water
is below 7°C (45°F), add 2 Litres of boiling water before
reaching the 23 Litre mark, to bring your wort/must
temperature to about 20°C (68°F).
B. The yeast needs to be rehydrated in 25°C+/-5°C water
(77+/-9°F) This temperature is optimal for dried yeast
rehydration and water is better than wort/must, as water
puts the yeast cells under less osmotic stress during the
hydration phase. Tap water (with its naturally dissolved
mineral content) or deionised or sterile water all work well.
2. If your local water temperature is between 30-35°C
(86-95°F), then dissolve the liquid extract in the 2 Litre
jug and empty can in Stage 2 in 50°C (122°F) water
rather than boiling water. If your local water temperature
is higher than 35°C (95°F), you will need to cool the
wort/must to 25°C before adding the yeast to it, by
setting the temperature controller to 25°C (77°F) and
waiting until temperature is achieved.
C. WilliamsWarn liquid and dry malt extracts do not need to be
boiled. They have already been boiled in a brewery. The hot
water employed is just used to help dissolve the liquid and
dry malt extracts more easily. F.
D. After adding all the ingredients and water, the goal is to achieve
a final wort/must volume of 23 Litres (5 UK Gallons/6
US Gallons) and a temperature of approximately 25+/-8°C
(77+/-14°F) when you pitch the yeast. This is so the wort/
must temperature is within 8°C (14°F) of the yeast that is
rehydrating in the water and therefore any “cold shock” to the
yeast is avoided when the wort/must added to it.
E. The temperature of the water used in the Standard Method can be
adjusted by you in order to achieve this final wort/must target
of 25+/-8°C (77+/-14°F) when the vessel valve is opened to the
yeast in the sediment bottle. You may need to make adjustments depending on the season you are brewing in and the
temperature of your cold water. You can add more hot water
when you fill up the vessel, instead of cold water, if your water
source is too cold. Alternatively you can reduce the temperature
of the hot water the LME is dissolved into if your cold water is
too warm. Using our Standard Method instructions, the final
wort/must temperature will vary as shown in the table below,
depending on your local cold water temperature.
Local cold water
temperature °C (°F)
Final wort/must temperature before pitching
the yeast (using Standard Method) °C (°F)
12°C (54°F)
17°C (63°F)
15°C (59°F)
20°C (68°F)
18°C (64°F)
23°C (73°F)
20°C (68°F)
24°C (75°F)
23°C (73°F)
27°C (81°F)
25°C (77°F)
29°C (84°F)
28°C (82°F)
31°C (88°F)
30°C (86°F)
33°C (91°F)
Avoiding Cold Shock: In any case, no matter what the
difference is between your wort/must and yeast, you can
reduce any cold shock issues by just adding the wort/must
in parts when you open the vessel valve to the sediment
bottle with the rehydrating yeast in it. If you add the wort/
must slowly and once the yeast liquid volume is doubled
(e.g. 500ml) then wait a few minutes. The yeast will get
used to the temperature of the wort/must. Then add the
rest of the wort/must.
Adding wort/must that is 8°C (14°F) colder than the
yeast is more of an issue compared to the opposite.
But the temperature of the yeast and wort/must should
not exceed 35°C (95°F) in general, to avoid overheating
the yeast.
If the temperature of the yeast and wort/must are within
8°C (14°F), you don’t in essence need to add the wort/
must in parts as we have written in Stage 2 and you can
just open the valve and add it all. However it’s a good safety
precaution to do a part fill for 1 minute in any case, to
get the yeast used to any quick temperature difference,
so we‘ve stated it as a standard method in the instructions.
This technique also reduces osmotic stress on the yeast by
allowing the yeast to accustom itself to wort at half strength
for a short period.
G. After the yeast has been added to the wort/must, the
fermentation temperature is then set. In this way, the
yeast has time to fully rehydrate and adjust to its new wort/
must environment at the temperature described above and
the brewery then moves the wort/must, over some time, to
whatever fermentation temperature is set.
46
Your own techniqueS
You may find your own techniques that are easier for you than
our method. You are the brewer and the owner of the brewery, so
you may find methods that suit you better. As long as you meet
the above general principles, you may add ingredients in any
manner.
The table below shows the alcohol content for 5 different final
SG readings.
If in doubt, experiment and find out!
Adding DME
Dry malt extract is very hydroscopic and may form clumps when
added but as long as 90% of it is dissolved, move onto the next
step. Residual clumps will dissolve over time.
If you intent to measure the SG of your wort/must to be able to
calculate the alcohol content of your final beverage, then you
need to dissolve all the DME. This is better done by adding the
DME in smaller amounts and stirring before adding the next
amount.
Final Specific Gravity (SG)
Alcohol % (if original
gravity (OG)) is 1.040
1.006
4.56%
1.008
4.29%
1.010
4.02%
1.012
3.75%
1.014
3.49%
To increase the alcohol content, you need to add more
ingredients. For more information on alcohol calculations, see
Appendix 3 Taking SG samples and calculating alcohol %’s.
If you do not intend to measure the SG then some clumping is
acceptable and it’s easier to just add the DME one bag at a time
and stir it all in, accepting some lumps that will dissolve by
themselves over the next few hours in the vessel. For the Standard Method we have purposely planned the
addition of the DME to be into approximately 45°C (113°F)
water in the cone, as we have found it dissolves well at this midwarm temperature.
Adding LME
Liquid Malt Extract is best stored cold in a refrigerator to avoid
it ageing. However cold extract is difficult to pour, so take it out
of the fridge the night before you use it so it can warm up and
pour more easily. Alternatively you can warm it up in hot water
for 15 minutes before opening. Remove the yeast sachet from
under the can lid if you are going to heat up the LME, as the
heat will damage the yeast.
It is important to dissolve all the liquid malt extract before
adding it. This is to avoid osmotic stress on the yeast should
they come into contact with un-dissolved liquid extract.
The alcohol content of beverages using the
Standard Method
A 1.7kg (3.74 lb) can of LME plus a 1kg (2.2lb) bag of DME
made up to 23 Litres will give a wort/must of 1.040.
The wort/must will then get fermented down to a minimum SG
at the end of fermentation that is dependent on the residual
starch in the ingredients (which cannot be eaten by the yeast)
and the yeast strain used.
47
APPENDIX THREE:
TAKING S.G. SAMPLEs
AND CALCULATING
ALCOHOL %'s
In order to calculate the alcohol content of a brew, you need
to take two samples:
the hydrometer. Let the hydrometer come to a stop and then
measure the SG. An example is shown in Figure 62.
1. The Specific Gravity (SG) of the initial wort/must on Day 0
when it is made. This measurement is also known as the
Original Gravity (OG).
You may need to blow off any bubbles so you can read the
hydrometer better. Then read off the scale at the top point
of the liquid where it rises and touches the hydrometer.
Note: some hydrometers require a slightly different reading
point, so read the instructions of the hydrometer you have.
2. The Specific Gravity (SG) of the final beverage after
fermentation and when cold (preferably after clarification).
This measurement is also known as the Final Gravity (FG).
For a WilliamsWarn Standard Kit consisting of a 1.7kg (3.75
lbs.) can of liquid malt extract and a 1 kilo (2.2 lbs.) pack of dry
malt extract made to 23 Litres (5 UK Gallons/6 US Gallons), the
SG will be 1.040.
From these two measurements we can calculate the alcohol %.
The higher the initial SG, the higher the alcohol % will be and
the lower the final SG, the higher the alcohol % will be.
Specific gravity is a measure of density. Water has a density of
1.000 SG. So 1.040 means the wort/must is denser than water
due to the dissolved matter from the barley grain or other raw
materials that are now in your fermenter along with the water.
This includes various sugars, proteins, amino acids, minerals
and vitamins and other compounds.
Taking an initial SG sample
When the wort/must is full in the vessel and before the yeast
is added, give it a good stir so that all the contents are mixed
well. Take a 100ml sample out of the top surface using a clean
glass and add this to the 100ml measuring cylinder. Then add
the hydrometer to the cylinder and give the hydrometer a spin
as you let go. The spinning helps remove air bubbles from
To get the most accurate reading, the temperature of the sample
should be 20°C (68°F). A few degrees on either side doesn’t
matter too much, but the closer you are to this target the more
accurate the reading. Note: Some hydrometers have different
calibration temperatures than this, so read the instructions of
the hydrometer you have.
Fig. 62
Sampling during Fermentation
Once the pressure has built up in the unit, you can take a sample
out of the draft tap at any time. If you’d like to measure the SG
each day you may do that. However unlike the wort/must sample,
there are now carbon dioxide bubbles in the fermenting beverage
so you need to de-gas it first. Take 50ml of the beverage out of
the draft tap and discard this down the drain, this will clear the
line so that you may sample the fresh beverage. Then take a
150ml sample from the tap and pour it between two glasses for
a minute to create turbulence and remove the CO2. The more
turbulent the pouring between the glasses, the more the removal
of CO2. Then let it settle and ensure it's close to 20°C (68°F) in
temperature and then add it to the measuring cylinder. Add the
hydrometer with a little spin and read the SG.
Different yeast will ferment at different speeds and different
fermentation temperatures also affect the rate. Some graphs
48
of typical fermentation rates, as measured by the drop in SG,
are shown is Appendix 7.
You will note there is a discrepancy between the formulas.
These formulas provide a guideline only as true alcohol is
measured in a lab from the final beverage using equipment
a homebrewer does not possess, so different authors prefer
slightly different formulas.
The yeast is consuming the sugars, amino acids, vitamins and
minerals and excreting alcohol and CO2 from its cells into the
wort/must. The SG reduces each day because these compounds,
which are denser than pure water, are being reduced in quantity.
Most of the resulting CO2 is emitted out the VPRV (we keep
about 10%) and the alcohol stays in the beer. The alcohol is
also less dense than water so the more that is made the lower
the SG becomes as well.
C. A more complex formula which attempts to provide greater
accuracy at higher specific gravities is:
ABV = (76.08 x (Initial SG-Final SG)/(1.775-Initial SG))
x (Final SG/0.794)
You may want to use this for beverages that have an initial
SG above 1.060.
Beers will eventually stop at a certain SG depending on
residual starch in the ingredients and the yeast type. Yeast
cannot eat sugar molecules above 3 sugar units long and
these remain in the beer to give body and some taste. The
amount of these starches (or “dextrins”) depends on how the
malted barley was mashed, the stage in a brewery brewhouse
when crushed grains are mixed with water and starches are
converted into sugars.
Using formula A, you can see the effect of a lower Final
S.G. on the ABV.
For extracts like WilliamsWarn extracts, this is controlled when
the extract is made. All grain brewers can control this themselves
depending on their temperature and time regimes during mashing.
Ingredients made up of mainly sugar, like the musts of cider,
wine and mead, will ferment right down as they have no residual
dextrins because the raw material is fruit or honey, not starchy grains.
Sampling after Fermentation
Once fermentation is complete, the SG will not reduce any
lower and you can take a final SG sample. This could be
before cooling if the yeast has finished fermenting, but the
most accurate reading is at the very end when the beer is
cleared. This is because if fermentation hasn’t stopped during
cooling, the SG will continue to lower, and in addition, the
clarification process mixes that entire tank contents very well
to make sure you get an accurate reading of the total tank SG.
original sg
final sg
abv%
1.040
1.013
3.62%
1.040
1.012
3.75%
1.040
1.010
4.02%
1.040
1.009
4.15%
1.040
1.008
4.28%
1.040
1.007
4.42%
The yeast we use for our extracts all ferment to this range, so for
the same starting point with a Standard WilliamsWarn Kit you
will end up with slightly different alcohol %’s.
S-33 used in several of our ales will ferment very quickly, almost
in 1 day, and stop at about 1.013. We therefore use it for ales
that people may like to make quickly (in less than 7 days by
shortening the fermentation time to 2 days not 4 days) and
that suit some residual body in the beer. If you like to increase
the alcohol content of beers from our Standard Kits made with
S-33, simply add some more DME or dextrose (glucose). See
the next section below for details. You will need to take a sample, ensure it is close to 20°C (68°F)
and de-gas the beverage by pouring 150ml between two glasses
before putting it in the measuring cylinder with the hydrometer.
To increase a cold beverage's temperature, you can hold the
glass of sample under a tap of ambient or slightly warm water
while swirling the glass to get a good heat transfer. Then
measure the SG as described above.
Nottingham Ale yeast will ferment to about 1.010 in 3 days to
make 4% alcohol ales and we use this with our English beer styles.
S-23 and W34/70 are lager yeasts and will ferment slower than
the ales (they are also fermented at lower temperatures which
slows the process down) but they reduce the SG further to about
1.008 in 5 days. They therefore produce 4.3% alcohol lagers for
1.040 initial SG worts.
Calculating % Alcohol by Volume (ABV)
There are various calculations to calculate alcohol by volume
(ABV) from an initial and final SG reading.
For our Belgian Beer we use T-58 which will end at about
1.012.
Here are some options (you may find others on the internet).
A. A basic calculation is:
Our cider when added as two cans will produce a 1.036 must
but it will ferment all the way to 1.000 or just below and
produce a 5% alcohol cider. To leave some residual sweetness in
that cider kit you can put the cooling on before the fermentation
is finished to end at 1.006 which will result in a 4.02% cider.
(Initial SG x 1000) – (Final SG x 1000)/7.46
So for a beer starting at 1.040 and finishing at 1.010, the
alcohol content by this formula will be (1040-1010)/7.46 =
4.02% alcohol by volume.
B. Another simple formula is that is commonly used is:
How to increase the alcohol content of the
Standard Kits
To increase the alcohol content you need to add more
extract or sugar to the wort made up to 23 Litres (5 UK
Gallons/6 US Gallons).
ABV = (Initial SG - Final SG) x 131
So in this example:
(1.040 – 1.010) x 131 = 3.93% abv.
49
For beers it is better to add liquid or dry extract made from
barley but a certain amount of dextrose (glucose) sugar is
acceptable as long as it isn’t more than 20% of the total
ingredients in terms of extract added (liquid malt extract is
80% extract, dry malt extract is about 98% extract and sugar is
100%). Too much sugar makes for a bad flavour for beers.
NOTE: German brewmasters will never add sugar as an
ingredient in beer due to the famous German Beer Purity Law
from 1516 known as the Reinheitsgebot. So only add DME if
you’re making a German style beer and want to increase the
alcohol. Check the BJCP Guidelines as highlighted in Appendix
10 for details on what ingredients are allowed for what beverage
style.
Fruit beverages such as cider, mead and sparkling wines can
handle a higher addition of sugar to boost alcohol or cheapen
the total ingredient cost.
If we assume dry malt extract/sugar is added to a Standard
WilliamsWarn Kit, the approximate increase in initial SG is
shown in the table below. If we assume a resulting final SG of
dme / sugar
added
initial sg
final sg
ABV %
0g/0oz
1.040
1.010
4.02
250g/8.8oz
1.044
1.010
4.58
500g/1.1lbs
1.048
1.010
5.15
750g/1.7lbs
1.053
1.010
5.71
1kg/2.2lbs
1.057
1.010
6.27
1.25kg/2.8lbs
1.061
1.010
6.84
1.5kg/3.3lbs
1.065
1.010
7.40
1.75kg/3.9lbs
1.690
1.010
7.96
2kg/4.4lbs
1.074
1.010
8.53
2.5kg/5.5lbs
1.082
1.010
9.65
3kg/6.6lbs
1.090
1.010
10.78
1.010, the different alcohol %’s can be seen also.
In reality, the higher you go in initial SG, the more alcohol is
produced, but this also has an effect on the yeast and it will
not be the case that a final SG of 1.010 is reached for every
yeast type.
As higher alcohol levels are produced, some yeast will likely
not ferment all the way down and the final SG will finish a bit
higher, but the table serves to show how you can increase the
final % ABV by adding more ingredients to the same 23 Litre
final volume in a WilliamsWarn.
Very roughly, for every 500 grams (17.6 oz) of DME or sugar
to a 23 Litre batch, you will increase the final alcohol by
approximately 1% ABV.
50
APPENDIX FOUR:
THe LID SEAL
SEAL POSITION
It is critical that the tank seal is sitting properly in the groove of
the tank rim. It is important that this seal is sitting in the groove
along the entire circumference, as shown in Figure 63.
Fig. 63
The seal circumference is designed to be slightly smaller than
the groove circumference, in order to give a better seal when
closed.
However if the seal is rising over the lip of the groove towards
the centre of the tank (see Figure 64), take the seal out and give
it a very gentle stretch at a couple of points on its circumference
(see Figure 65). Be careful not to overstretch the seal.
Place the seal back in the groove and check it sits in the groove
entirely (Figure 63).
This step is important as it ensures a build-up of pressure
during fermentation and also cleaning when the tank gets
manually pressurised.
Fig. 65
FOOD GRADE SILICON GREASE
As an extra step, food grade silicon grease can be put on the
seal to assist in both sealing the pressure better (if you feel
there may be a small leak) and also removing the lid more easily
when the brewery is empty.
On occasions, the lid may be hard to remove for one person if
the lid thread and rim thread bind too well. If this happens, ask
another person for assistance and the lid will come off easily. It
comes off counter-clockwise.
Silicon grease applied to the seal as shown in Figure 66 may
help with this lid removal if you find it occurs too often. It is
important however to only apply the grease to the seal surface
as grease (and fat and oil) can be detrimental to beer foam
and cause the foam to collapse too quickly in the glass when
the beer is poured, if somehow it manages to mix with the beer
in the vessel.
Fig. 66
51
Fig. 64
APPENDIX FIVE:
The VPRV AND
CARBONATION
Background
For the average 5% alcohol beverage, the yeast produces during
fermentation about 10 times the carbon dioxide we need in the
final beer. So we only need to keep about 10% (and let the rest
escape) and the beverage is fully carbonated.
These are guidelines only and you may prefer to produce
a highly carbonated English Ale if that is your personal
preference. However in beer competitions, being closer to
what is traditional may be important with regards to the
scoring system beer tasting judges may use.
The WilliamsWarn is designed to be able to retain the required
amount of carbon dioxide for a range of beverages. We control
the amount of retained carbon dioxide by controlling the
pressure during fermentation and this we do by setting the VPRV
(Variable Pressure Relief Valve) at a certain pressure relief point.
Different beverages traditionally have different final temperatures they are consumed at. Some approximate guidelines
can be seen in Table 2 below.
Table 2
The pressure builds during the first day of fermentation for
ales and 2nd day for lagers and then automatically releases
to emit the excess carbon dioxide we don’t need. But by then
the beverage is fully carbonated and that is the advantage
of the WilliamsWarn – there is no need to keg or bottle flat
beer and then go through a specialised carbonation step after
fermentation is over.
beverage
Carbonation Levels for Beverage Styles
Carbonation is a function of temperature and pressure. So when
we chose a brew to make, we need to first choose the carbonation
level we want and the dispense temperature we want and then
we can calculate the correct pressure we need to dispense at.
Different beverages traditionally have different final carbonation
levels. These can be seen in the Table 1 below.
Typical grams per litre Co2
3.0 - 4.0
Porter, Stout
3.5 - 4.5
Belgian Ales
4.0 - 4.5
American Ales
4.5 - 5.5
European Lagers, Belgian Lambics
5.0 - 5.5
Some Lagers, New World Ales
5.5 - 6.0
Cider and Mead
Still - 8.0
American Wheat
5.5 - 6.5
German Wheat Beers
6.5 - 8.0
2 - 7°C / 36 - 45°F
Ales in New World Countries
2 - 8°C / 36 - 46°F
Wheat Beers
6 - 10°C / 43 - 50°F
British and Belgian Ales
7 - 13°C / 45 -55°F
Cider and Mead
5 - 16°C / 41 - 61°F
Strong Dark Ales and Barley Wines
10 - 15°C / 41 - 61°F
Setting your Carbonation Level
Carbonation is a function of temperature and pressure. You can
control the amount of carbonation you want in the final beverage
by the following steps.
Table 1
British Ales
Lagers
These are also guidelines and you as the brewer may choose to
dispense at a temperature not within these ranges, if that is your
personal preference.
This knowledge then tells us what pressure to ferment at and
control to on the first few days with the VPRV.
beverage
typical serving temperature
Step 1: Decide what level of CO2 you want as read from Table 1.
Step 2: Decide what temperature you want to drink the beverage
at as shown in Table 2.
Step 3: Use Chart 1 to determine what final dispense pressure
you need on your gas cylinder (the y-axis on the graph) in order
to achieve this level of carbonation. Start on the x-axis at the
carbonation level you want, take a vertical line up to the line
on the graph for your chosen temperature. The lines on the
chart read off a range from 1°C to 13°C (34-55°F). Then take
a horizontal line left to the vessel pressure you will need when
dispensing the beverage.
Step 4: Set you gas cylinder regulator at this pressure setting.
52
Chart 1
CO2 Levels from Pressure vs Temperature
Temp °C / °F
13 / 55.4
12 / 53.6
11 / 51.8
10 / 50
9 / 48.2
8 / 46.4
Tank Pressure (BAR)
7 / 44.6
6 / 42.8
5 / 41
4 / 39.2
3 / 37.4
2 / 35.6
1 / 33.8
CO2 Level g/L
Step 5: Set the VPRV 0.25 bar higher than the gas cylinder
setting and brew at this pressure (see below for more details on
setting the VPRV).
Chart 2
Example of Vessel Pressure
Example
for of
theVessel
7 DayPressure
Process
for the 7 Day Process
For example, we recommend that first time users carbonate to
the high end of the range for lagers, which is 6 g/l, and set a
drinking temperature of 5°C. Reading from Chart 1, the 5°C
line intersects with 6 g/l (the x-axis) at 1.25 bar on the y-axis.
Therefore the required dispense pressure on the gas cylinder is
1.25 bar. The VPRV must then be set 0.25 bar higher than this
at 1.5 bar which is the pressure during fermentation that you
need to control to.
1.75
Fermentation
PRESSURE (BAR)
1.50
Vessel pressure control during the Brewing
Process to achieve the final Carbonation Level
Chart 2 shows the pressure in the vessel during a typical 7 day
ale brewing as described above.
Cooling
1.25
1.00
0.75
1st
2nd
Clarification Clarification
0.50
0.25
0
During fermentation you will need to fine-tune the VPRV setting to
achieve the vessel pressure required. E.g. 1.5 bar for first-timers.
0
1
2
3
4
5
6
7
DAY
pressure of 0.75 bar, in order to create a 0.5 bar pressure
differential between the vessel and the gas cylinder (which is set
at 1.25 bar in this example for first-timers). You will then turn
the 3-way valve to the clarification pot with clarification agent
in it and this will bubble the agent into the beverage which will
After cooling, the pressure will reduce about 0.25 bar, to about
1.25 bar in this example.
During clarification, you will then release pressure out of the
VPRV by pressing on the release button, to achieve a vessel
53
increase the pressure back to close to 1.25 bar. You will do that
again after a 1 day waiting period.
In either case the principle is the same in that a pressure
differential of 0.25 -0.5 bar is required between the vessel (at
the lower pressure) and the gas cylinder (at the higher pressure)
in order to force the clarification agent in when the 3-way valve
is turned to the clarification pot.
After clarification the vessel will therefore be near the dispense
pressure that the gas cylinder is set at and you can connect the
gas cylinder to the vessel by opening the 3-way valve. You will
then wait 1 ½ more days for a final clearing and then begin to
consume the fully carbonated beverage.
Monitoring the pressure in Step 3 and adjusting
the VPRV set point.
When you brew, you will need to use the pressure in the tank
during fermentation to set the VPRV at the pressure you desire.
We have used a 0.5 bar pressure differential for clarification
to be sure first time users clear their beers, but this can be
reduced to 0.25 bar and clarification also achieved. Any
pressure differential less than this will likely not mix the
clarification agent well enough into the beer.
Winding the screw down (clockwise) will increase the vessel pressure
required to release the spring and winding it out (anti-clockwise) will
lower the vessel pressure required to release the spring.
Note: We describe two methods on how to release the pressure
during a clarification. In the main instruction we use a method
for beginners where they carefully create the pressure differential
before opening the 3-way valve. In Appendix 8 we describe
another method that experienced brewers may like to try, where
they turn the 3-way valve and then release the pressure and
control clarification by the amount of bubbling that is heard. This
method requires experience with regards to knowing the amount
of vigorous bubbling that is heard (for adequate mixing) and what
a successful clarification process is. See Appendix 8 for details.
To test any new setting the vessel will need to be pressurised
and the vessel pressure gauge read when the sound of gas
emitting from the VPRV is heard. This can be done at any time
by adding gas from the gas cylinder to the vessel. However it is
easiest and results in less loss of bottle gas if performed during
fermentation when the yeast is making excess CO2.
So for your first brew, set the VPRV at 2 ½ turns counterclockwise for fermentation. This is approximately the release
point of 1.5 bar. During the first day (for ales and 2nd day for
lagers) the pressure will build up and you can adjust the setting.
pressure control for Low carbonated beers
When you brew beers at a very low carbonation level, another
clarification technique is required. This is because the pressure
is so low, we cannot release gas from the vessel via the VPRV
lower than atmospheric pressure (0 bar) and so the first
clarification method described above cannot work. For example,
if you’re making an English Ale at 5°C and want a carbon
dioxide content of 3 g/l, you only need 0.12 bar pressure in the
vessel, which is very low. So you cannot release 0.25-0.5 bar
out of the vessel as described in the first method when making
well carbonated beers.
If the vessel pressure is below or above the set point, the VPRV
needs to be adjusted. It is important the pressure be near the
target (e.g. 1.5 bar for first time users). You don’t need to be
100% accurate as we’re fermenting at a level slightly higher
than we actually need but get as close to this as possible.
Excess gas will be released manually during the clarification
phase. The yeast makes it for free and we are in fact keeping
about only 10% of what the produce, so it’s no issue to ferment
at a higher pressure and release later.
Therefore, during fermentation, if the pressure in the vessel is
too high above target, unscrew the VPRV slightly (anti-clockwise)
until gas is heard to be emitted at the desired set point.
In this case you need to brew with the VPRV set at about
0.25 bar above the level of carbonation you want (to allow
for the drop in pressure when the cooling is put on) and set
the gas cylinder at 0.5 bar above that (to create the pressure
differential). Then clarify as per normal and the gas bottle
pressure will force the clarification agent in the beer. The
pressure will increase in the vessel and it should release itself
out of the VPRV. When you’ve finished clarifying, you then
should release pressure out of the VPRV to the level you want
in the final beer.
If the VPRV is releasing below target (as heard and smelt off the
VPRV and read on the vessel pressure gauge), then you need to
wind the VPRV down a bit (clockwise) and let the pressure build
up and then adjust further.
If you want to set it there and then without waiting, you’ll need
to add some gas from the gas cylinder to the fermenting brew in
the vessel by turning the 3-way valve to the vessel and adding
e.g. 0.3 bar pressure above the target as read on the vessel
pressure gauge and then close the 3-way again. Then unscrew
the VPRV anti-clockwise until gas is heard to be emitted at the
desired set point.
You will clarify a second time using the same principle.
Once you have finished the second clarification, release the
increased gas in the vessel again to the pressure (and therefore
carbonation level) you want. Then after this, you will finally set
the gas cylinder at the same pressure which is your chosen dispense pressure, and open the 3-way valve to the vessel. When
you dump the sediment bottle after 36 hours, the beer will be at
the correct pressure and carbonation.
After a few brews you will know where to set your VPRV for any
desired target but you’ll likely always need some fine-tuning in
the first few days of any fermentation.
The VPRV during Dispense
When the vessel is being dispensed, it is best to have the VPRV
at maximum to keep its release point as far away from the gas
cylinder setting as possible. So set it at maximum pressure
during dispense by screwing it right down (clockwise). If the
VPRV is set too close to the gas cylinder pressure during dispense, a small amount of gas from the gas cylinder may emit
out the VPRV which is a waste of good carbon dioxide.
The difference with this method is that you cannot set the gas
cylinder at the pressure you want in the final beer during
dispense until after you have clarified. With higher carbonated
beers as described in the first method above, you can set the
gas cylinder pressure at the beginning of the process and not
change it and use the VPRV to make the pressure differential
by releasing pressure from the tank.
54
APPENDIX SIX:
SETTING THE TEMPERATURE WITH THE DIGITAL
CONTROLLER
The WilliamsWarn uses an Omron digital controller to control
the temperature.
Fig. 67
To set the temperature the brewery must be turned on. Then use
the up and down buttons on the front of the controller to set to
the desired temperature (See Figure 67).
The WilliamsWarn uses a glycol jacket to warm or cool the
beverage to achieve set point.
1
You can read both the setting and the actual temperature on the
controller face.
2
Small indicators light up when either cooling or heating is
being used.
It takes a few hours to cool the tank from fermentation
temperature to dispense temperature, but we allow a full half
day to be sure the entire contents are the same temperature.
The temperature range the brewery can be set at is 1°C to 26°C
(34 –79°F).
1. Actual vessel temperature
2.vessel temperature set-point
55
APPENDIX SEVEN:
TYPICAL FERMENTATION
CHARTS & WHEN TO
COOL THE BEVERAGE
Typical Fermentation Charts
Fermentation is a process by which yeast cells consume nutrients
and grow under anaerobic conditions and excrete carbon dioxide,
ethanol, flavours and other bi-products from their cells.
Beers usually have some residual starch or dextrins in them
which the yeast cannot consume but beverages made from fruit
(cider and wine) or mead (made from honey) are made of simple
sugars and the yeast can ferment them right down.
The way brewers typically measure the progress of a fermentation
is by measuring the specific gravity (density) of the wort or must.
Chart 1 shows typical reductions in SG for 3 ale yeast and 2
lager yeast used in WilliamsWarn Standard Kits.
A standard 4% beer typically starts at 1.040 SG and ferments
down to 1.010. The difference in starting and finishing SG is
caused by both the reduction of dense nutrients in the wort/
must by the yeast (sugars and proteins) and the production
of ethanol which is less dense than water (water has an SG of
1.000).
S-33, Nottingham and T-58 are ale yeast that ferment warm
(e.g. 23°C/73°F). Ale yeast ferment faster than lager yeast in
general but also due to the warmer temperatures used.
S-33 ale yeast will ferment to almost its limit in 1 day. It is a
very fast fermenter. S-33 finishes at a higher SG than the other
yeast so is used in ales that can be brewed very quickly and suit
having a decent amount of body. A S-33 ale fermented from
1.040 to 1.013 will have an alcohol content of 3.62% ABV.
Chart 1
If more alcohol is required the best thing to do is add some
more DME or dextrose (glucose) into the mix when the wort
is made on Day 0. For example, adding an extra 500g (17.6 oz.)
will increase the initial SG to 1.048 and increase
the final alcohol to 4.7%, but still with decent body remaining
in the beer.
Specific Gravity Reduction from
1.040 SG During Fermentation –
Specific
Gravity
reduction
1.040
SG during
3 Ale,
2 Lager
& 1from
Cider
Yeast
Fermentation 3 Ale and 2 Lager Yeast
S-33 can tolerate high alcohol fermentations very well.
1.045
Nottingham Ale yeast will be finished fermenting close to Day 3
and we give an extra day warm maturation to be sure. Nottingham
will produce a 4.02% alcohol by volume beer when fermenting
from 1.040 to 1.010. Nottingham can produce higher alcohol
beers when more DME or sugars are added in the mix.
1.040
1.035
1.030
SG
1.025
T-58 ale yeast is used for Belgian Ales and wheat beers and
will ferment quickly and then have a slow end where it takes a
few days to finish. It will produce a 3.75% alcohol beer when
fermenting from 1.040 to 1.012. It also can produce high
alcohol beers when more DME or dextrose (glucose) is added at
the start.
1.020
1.015
1.010
1.005
1.000
0.995
0
1
2
3
4
5
6
7
8
S-23 and W34/70 are lager yeasts which are fermented at
colder temperatures compared to the ales. Lager yeast tend to
grow more slowly than ales in general so therefore take a little
longer to get going. The total fermentation time is longer by two
days but should be finished by Day 6 as shown in the chart.
They will finish at about 1.008 when used in a WilliamsWarn
Standard Kit and therefore produce 4.28% ABV lagers/pilsners
with an initial SG of 1.040.
9
DAY
S-33
S-23
T-58
Nottingham
W34/70
Cider
56
It is important to note that a “diacetyl rest” at a warm
temperature is recommended during fermentation for lager
yeast to achieve the 6 day target. Please see more details below
regarding this (see Chart 3).
Chart 2
AATypical
Fermentationwith
with
Typical 1.040
1.040 Fermentation
Nottingham
Day
Process
NottinghamAle
AleYeast
Yeast –7 7day
process
SG UNITS & TEMPERATURE
When to Cool Ales
WilliamsWarn will continually grow its products and introduce
more yeasts over time, but in general it would be expected that
we’ll chose ale yeast that are finished by Day 4 and lager, cider
and other yeast that will be finished in 6 days for 1.040 initial
SG beverages.
40
2.00
35
1.75
30
1.50
25
1.25
20
1.00
15
0.75
10
0.50
5
0.25
0
PRESSURE (BAR)
The yeast we use for our cider is a yeast from Fermentis called
S-04. It is an ale yeast that sediments very strongly and when
used in our cider, requires no clarification. It will sediment early
after the start of fermentation and ferment from the sediment
bottle. It therefore ferments slower than our other yeast, as seen
in Chart 1. Our cider, when added as two cans, will produce
a 1.038 must but it will ferment to 1.000 (the gravity of
water) and produce a 5% alcohol cider. To leave some residual
sweetness in that cider kit, you can put the cooling on before
the fermentation is finished, to end at 1.008 which will result in
a 4.02% cider. You will need to be taking SG measurements to
control this (See Appendix 3).
0.00
0
1
2
3
4
5
6
7
DAY
SG Units
Temperature
Pressure
A typical 1.040 (initial SG) ale fermentation chart with
Nottingham ale yeast in a WilliamsWarn is shown in Chart 2.
Once all the ingredients have been added, the temperature
will be somewhere near the fermentation temperature of 23°C
(73°F) and once you have set the temperature it will control at
that set point for the first 4 days.
malt extract to make more yeast cells to ferment bigger beers.
NOTE: The sharp drops in pressure in the chart on Day 4.5
and Day 5.5 are indicative of the Clarification Process when we
create a pressure differential of 0.25-0.5 bar between the vessel
and the gas cylinder in order to force clarification agent into the
beverage. This is described in Appendices 5 and 8.
The fermentation starts fast enough that the pressure should
be at 1.5 bar by Day 1, as shown on the chart and the beer will
be fully carbonated, releasing the excess gas you don’t need
through the VPRV.
When to Cool Lagers
A typical 1.040 (initial SG) lager fermentation chart with S-23
or W34/70 lager yeast in a WilliamsWarn is shown in Chart 3.
By Day 3, the final SG has been reached and we then give 1
more day warm maturation.
T-58 will also be finished in about this time frame and S-33 is a
faster fermenter so is finished on Day 2.
So on Day 4, you can put the cooling on for our ale yeast for
1.040 SG beers. If you would like to take SG samples to check
each day, or on Day 4, you can do this by taking a sample out of
the tap (See Appendix 3 for details).
Chart 3
A Typical 1.040 Fermentation with
Lager Yeast – 9 Day Process
However as a rule, WilliamsWarn Standard Kits should reach the
final SG’s each time and you can check fermentation is finished
by looking into the sediment bottle and confirming you have a
decent amount of settled yeast and almost no bubbles rising
anymore.
This 4 day rule will be true probably up to about 1.055 initial
SG made with these 3 ale yeast. However it is a good policy to
take a sample on Day 4 to ensure a higher alcohol fermentation
has finished before you put the cooling on.
Ales at higher initial SG’s will likely need an extra day or two
depending on how high you go. All these 3 ales yeasts can ferment
up to 8% alcohol by volume quite easily, which is a starting SG of
about 1.070 (an extra 1.75kg of DME added to a Standard Kit).
40
2.00
35
1.75
30
1.50
25
1.25
Diacetyl Rest 18°C/65°F
20
1.00
15
0.75
10
0.50
5
0.25
0
0.00
0
NOTE: With increasing initial SG’s, it is quite important to make
sure the largest proportion of what you add is liquid or dry malt
extract and not just sugar. The yeast needs the proteins in the
1
2
3
4
5
6
7
DAY
SG Units
57
Temperature
Pressure
8
9
PRESSURE (BAR)
SG UNITS & TEMPERATURE
A Typical 1.040 Fermentation with Lager Yeast
9 Day Process
The initial temperature will likely be above 20°C/68°F and we
recommend fermenting at 15°C/59°F so it will take a few hours
after pitching the yeast for the temperature of the vessel to
reach target.
Cooling and Beverage Clarity
To a certain extent, the cooling helps some of the remaining
yeast in the beverage to settle down into the sediment bottle,
but the yeast mostly flocculates when it has finished consuming
the sugars that it can consume.
Lager yeast ferment slower than ales and at a lower temperature,
so the start to a lager fermentation takes longer. After 1 day, the
pressure will start to build and a pressure of 1.5 bar should be
reached before Day 2.
However you should notice the layer above the sedimented yeast
to be a bit more settled after cooling compared to before the
cooling is put on.
After 3 days fermentation, you need to change the temperature
setting to 18°C/65°F. This increase in temperature is to speed
up the reduction of a flavour that the yeast has produced, called
Diacetyl. This chemical has a sweet butterscotch flavour and is
normally seen as an off-flavour in lager. The exception is Pilsner
Urquell from the Czech Republic, whose brewmasters like a
little bit of Diacetyl in their famous pilsner. This temperature
increase is called a Diacetyl Rest or Ruh or The Narziss
Fermentation after the famous German Brewing scientist.
The cold temperatures also assists the clarification agent to
combine not only with yeast to clear beer, but also with haze
proteins from the barley that make beers hazy. The colder the
beer the more of a reaction there will be between these proteins
and the clarification agent, which helps make a brighter beer.
The SG for a 1.040 lager should be at 1.008 by Day 5 and we
give one day more extra warm maturation.
So on Day 6, you can put the cooling on for our lager yeast for
1.040 SG beers. If you would like to take SG samples to check
each day or on Day 6 you can do this by taking a sample out of
the tap (See Appendix 3 for details).
However as a rule, WilliamsWarn Standard Kits should reach the
final SG’s each time and you can check fermentation is finished
by looking into the sediment bottle and confirming you have a
decent amount of settled yeast and almost no bubbles rising
anymore.
This 6 day rule will be true probably up to about 1.055 initial
SG made with these 2 lager yeast. However it is a good policy to
take a sample on Day 6 to ensure a higher alcohol fermentation
has finished before you put the cooling on.
Lagers at higher initial SG’s will likely need an extra day or two
depending on how high you go. For lagers at above 8% you
may need an extra packet of yeast pitched at the beginning of
fermentation.
NOTE: As mentioned in the note for ales, the sharp drops in
pressure in the chart on Day 6.5 and Day 7.5 are indicative of
the Clarification Process when we create a pressure differential
of 0.25-0.5 bar between the vessel and the gas cylinder in order
to force clarification agent into the beverage. This is described
in Appendices 5 and 8.
when to cool the cider
The cider should be at 1.008 by Day 7 and we recommend
putting the cooling on then. Once the cider is cold by Day 7.5
the yeast should have stopped and the cider should be clear and
ready to consume.
However, we recommend you determine when to put the cooling
on by the actual S.G. measurement rather than the day. If you
ferment the cider all the way to 1.000 or lower, you may find
the cider to be too thin, dry and tart (sour), which is why we
suggest to put the cooling on before it is fermented right out.
The yeast will settle and leave a clear cider, so do not add any
clarification agent as this is not required.
58
APPENDIX EIGHT:
CLARIFYING THE
BEVERAGE
Clarifying the beverage is important if you want to make a
beverage that looks like most commercial mainstream and craft
beers, ciders and meads. Some beverages styles are supposed to
be cloudy (e.g. some wheat beers, some ciders) and it also a matter
of personal preference whether you clear the beverage or not.
hops components, along with carbon dioxide, that keeps it in
formation for a period of time. We therefore fill the bottle with
foam before we put the bottle back on, to displace the air in the
bottle.
The foam is mainly carbon dioxide and contains no air so as it
fills the sediment bottle it will displace all air out of the bottle.
Fill it right to the top and even have some foam extending out
the top, to reduce adding any oxygen to the tank when you
reconnect the sediment bottle to the tank and open the valve.
What you are Clarifying
When you clarify with WilliamsWarn Clarification Agent, you are
removing two types of haze. The first is yeast cells that make
up most of the cloudiness and the second is (for beers, not fruit
beverages) haze proteins from the barley used to make the extract.
This foaming is achieved by pushing the draft tap handle
towards the back of the unit, which is the foam mechanism
of the draft tap.
The clarification agent binds with both these components and
settles into the sediment bottle under the vessel valve. We
can then close the valve and remove this sediment at the right
moment and are left with a clear beverage in the vessel.
Technically there will be some very slight addition of oxygen
to the beverage at a parts per billion level, but it will not
be significant and will be absorbed by the yeast still in the
beverage. Oxidation is more pronounced after yeast is removed
from the beverage, which occurs when breweries pump filtered
beer around a brewery and when they package the clarified beer.
Removing the naturally sediment yeast first
After fermentation and once the beverage is at the dispense
temperature (cooled), we are ready to clarify the beverage.
There will be an amount of naturally sedimented yeast in the
sediment bottle. It is possible to clarify a new sediment layer
onto this naturally sedimented yeast, however we find that there
is an undesirable reaction between the two that slows down the
clarification process.
Forcing Clarification into the Beverage
Getting a good mixing of the clarification agent into the
beverage is critical. We do this by creating a pressure
differential between the vessel and the gas cylinder of 0.25 to
0.5 bar, whereby the gas cylinder has the higher pressure. We
then have the agent in the clarification pot and open the 3-way
valve on the tower which then connects the gas cylinder to the
pot and forces the agent into the beverage through a one-way
valve under the pot.
So our preferred method is to remove the naturally sediment
layer first to avoid these reactions. There will be some loss of
beverage depending on the yeast used, as not all the contents
of the sediment bottle will be yeast, but in all breweries there
is some “losses” in order to make a great beverage, so a small
amount of beverage loss is typical of the brewing process.
If the gas cylinder is 0.25 bar higher than the tank you will
achieve adequate mixing over 10 seconds, enough to clarify the
beverage. The bubbling that will be heard in the tank would be
termed “vigorous”.
So for this reason we first remove the sediment bottle once the
beverage is cold and dump the naturally sedimented yeast.
However a pressure differential of 0.5 bar will create “very
vigorous bubbling” and that is why for beginners we suggest this
differential, to ensure clarification is achieved well in the very
first brew.
Preventing oxidation
Once we have dumped the naturally sedimented yeast we need
to put the sediment bottle back on to catch the sediment that
will settle when we mix the clarification agent into the beverage.
However we do not want any oxygen to go into the beverage.
There are several ways to reduce air in the empty bottle. You
can add beer (from the bottom of the bottle) from the draft tap,
beverage foam (full of carbon dioxide) from the draft tap or add
carbon dioxide gas from the gas cylinder and purge the air out.
When you clarify for the first time it is important to hear the
bubbling in the tank so you can assess the amount of bubbling
and therefore mixing required for good clarification. The Method for Beginners
The method we have described in the main instructions is for
well carbonated beverages and first-time users. We ferment at
a higher level of carbonation than we will want in the final beer
We prefer to add beverage foam from the draft tap. Beer
foam especially is very stable as it has foam proteins and
59
(since the yeast is making excess carbon dioxide for free) and
then release pressure out of the vessel by depressing the button
on the VPRV to have the vessel at 0.5 bar lower pressure than
the gas cylinder. We then open the 3-way valve and the pressure
differential forces the clarification agent in the pot into the
beverage. We mix for 10 seconds. We then rinse the pot and
force that into the beverage to clear the line and wait 1 day.
However for beginners we need to ensure all first-time users
are creating the identical pressure differential each time until
it is learnt what bubbling amount is required. Therefore in the
main instructions we first create a set differential and then turn
the 3-way only after that is set. This method is the other way
around in that the 3-way is first opened and then the pressure
differential is created.
We repeat this again and wait 1 ½ days before removing the
sediment bottle and then consuming the beverage.
But like most of the steps in our instructions, there are always
alternative methods that can be used and you are welcome to try
any method that results in a clear beverage.
Once you have experienced creating this pressure differential
and have heard what we term as “vigorous bubbling” and
successfully cleared beers, you may like to try the method
described below for experienced brewers.
The Method for Low Carbonated Beers
When you brew beers at a very low carbonation level, another
technique is required. This is because the pressure is so low,
we cannot release gas from the vessel via the VPRV lower than
atmospheric pressure (0 bar) and so the first two methods described above cannot work. For example, if you’re making an
English Ale at 5°C and want a carbon dioxide content of 3 g/l,
you only need 0.12 bar pressure in the vessel, which is very low.
So you cannot release 0.25-0.5 bar out of the vessel as described
in the first method when making well carbonated beers.
The Method for Experienced Brewers
In this method you do not rely on setting an exact pressure
differential before opening the 3-way valve but rather open the
3-way valve first and then release gas out of the vessel quickly
to create the pressure differential.
Once the pressure differential is made, the mixing will begin.
In this case you need to brew with the VPRV set at about 0.25
bar above the level of carbonation you want (to allow for the
drop in pressure when the cooling is put on) and set the gas
cylinder at 0.25-0.5 bar above that (to create the pressure differential). Then clarify as per normal and the gas bottle pressure
will force the clarification agent in the beer. The pressure will
increase in the vessel and it may release itself out of the VPRV.
When you’ve finished clarifying, you then should release pressure
out of the VPRV to the level you want in the final beer.
What you then control to is the vigorous bubbling sound in
the tank rather than an exact pressure differential. For that
reason we suggest it for experienced brewers who know what
is expected. The term “vigorous” is subjective and different
people will have a different idea of what vigorous bubbling is.
However once it is experienced by a set pressure differential,
this bubbling sound, rather than the pressure differential, can
be used to control clarification for those who would like to.
In this method, when the beverage in the tank is for example at
1.25-1.5 bar after cooling and the gas cylinder at 1.25 bar (the
settings recommended in the main instructions for first-time
brewers) you put the agent in the pot and then turn the 3-way
to the pot. No agent will mix into the beer yet as the pressure of
the tank is still higher than the gas cylinder.
You will clarify a second time using the same principle.
Once you have finished the second clarification, release the
increased gas in the vessel again to the pressure (and therefore
carbonation level) you want. Then wind the VPRV down to its
closed position (clockwise). Then after this, you will finally set
the gas cylinder at the same pressure which is your chosen
dispense pressure, and open the 3-way valve to the vessel.
When you dump the sediment bottle after 36 hours the
beverage will be at the correct pressure and carbonation.
Then, to mix the agent in, you simply de-press the button on the
VPRV to release gas out of the tank. You can either watch the
tank pressure gauge reduce or you can perform this “blind” and
rely on the sound of the mixing.
The difference with this method is that you cannot set the
gas cylinder at the pressure you want in the final beer during
dispense until after you have clarified. With higher carbonated
beers as described in the first two methods above, you can
set the gas cylinder pressure at the beginning of the process
and not change it and use the VPRV to make the pressure
differential by releasing pressure from the tank.
If you prefer to watch the vessel pressure gauge, de-press the
VPRV release button and achieve a reduction in pressure 0.5
lower than that of the gas cylinder. In this case you’d reduce the
tank to 0.75 bar. As soon as enough differential is made, you
will hear the mixing begin because the 3-way is already open.
However it is possible to perform this without really knowing
what the pressure in the cylinder or the vessel actually are. In
this “blind” method, you will reply on you sense of hearing and
touch. You simply release pressure in the tank until you hear
bubbling that is required to get the mixing you know is adequate
to get a good clarification. You can also place your hand on the
vessel lid to feel the bubbling to ensure it is vigorous.
In either case the principle is the same in that a pressure
differential of 0.25 -0.5 bar is required between the vessel (at
the lower pressure) and the gas cylinder (at the higher pressure)
in order to force the clarification agent in when the 3-way valve
is opened to the clarification pot.
If the initial mixing doesn’t sound vigorous enough, you just
release more pressure until the bubbling is vigorous and count
the 10 seconds.
Rinsing the pot
It is important to rinse the pot after each clarification and
also bubble that into the beverage in order to clear the line of
clarification agent.
This can work well for experienced brewers but you will in
essence be creating a slightly different pressure differential
each time. This is okay as any differential over 0.25 bar or
thereabouts will create enough mixing.
The clarification agent can form little solid lumps if left over
time and this can get stuck in the one-way valve under the pot.
60
So you MUST rinse the line each time.
Otherwise beverage will start to come back up the pot and
create problems.
You need to hear the bubbling for only 1 second as that means
all the water has been rinsed through the one-way valve and the
clarification line and into the beverage.
If it does block and beverage is seen filling the pot over time,
the panel can be taken off the tower and the one-way removed,
as long as the vessel isn’t under pressure. The solids can be
rinsed, blown or tapped out and the one-way put back.
To remove the one-way valve you need to push the push lock
fitting while pulling the tubing out. You must ensure the lines
are pushed hard back into the ends of the one-way valve when
you replace it. You must also ensure the one-way is put back on
in the correct direction so fluid can flow from pot to vessel.
Difficult Yeast
Some yeast are very difficult to clear and may require extra
clarification. In this case you should add another 30-50ml of
agent and try a 3rd mixing.
The yeast we are using all clear very easily except for T-58
which can sometimes be stubborn. However Belgian Ales can be
a little hazy and still true to style so if T-58 doesn’t quite clear
to what you experience with the other yeast, perhaps enjoy it a
little hazier than you would the other beers.
Other yeast bought through other suppliers may of course be
used in a WilliamsWarn and you will need to see how they react
to our agent. We’d assume 80% of brewing yeasts will clear.
You can also try other finings agents through the pot if our agent
doesn’t seem to work for the beer you are making.
IMPORTANT SAFETY INSTRUCTION
Only use liquids in the clarification pot. The use of solids or
liquids with particles may cause blockage or fault in the one-way
valve that is under the clarification pot.
61
APPENDIX NINE:
DISPENSING THE
BEVERAGE
The Draft Tap
The draft tap opens by pulling the handle towards you. There is
a flow control lever on the side which when pushed fully up is
closed and when pushed fully down is 100% open. If the flow
control lever is closed (pushed up) when you open the draft tap
there will be no flow. If you then slowly press the flow control
lever down, you will see the beverage pour.
if you find the draft tap is sticking when being operated or if you
see any growth coming out the front of the tap.
To disassemble the tap, ensure there is no pressure in the vessel
and ideally the vessel should be empty. Unscrew the tap from
the tap tower first and then unscrew the flow controller and
unscrew the front screw.
The parts can be removed easily.
For the first pour of the day, we recommend having the flow
controller closed when you open the tap, and then slowly open
the controller. This is because the beverage in the line will be
warm and the first pour will foam a little.
You can clean the parts in WilliamsWarn Brewery Detergent or a
similar chemical and sterilise in hot water at 80°C/176°F.
Re-assemble in the same manner.
When cold beverage is coming through (after about 40ml is
poured) you can open the flow controller more to have a faster fill.
The draft tap also has a foaming mechanism. To add foam after
filling a glass, push the draft tap handle away from you, and
foam will pour out of the tap.
Safety
For safety reasons and to avoid loss of beverage, we recommend
to always have the flow control lever push up (closed) when
you are not consuming the beverage. This is in case the tap
accidently is opened (by a guest or child for example) or if the
tap becomes sticky and doesn’t close properly.
The Light
You can press the vessel light button on the front of the tower
and look through the vessel sightless to view the contents and
see how much beverage remains, as you consume your creation.
When the vessel is empty
When the last beverage is poured, simply turn off the power
to the Personal Brewery but leave it under pressure to avoid
contamination.
When you want to make another beverage, start at Stage 1 again
in the main instructions.
If you are going to leave the brewery for an extended period of
time, it is best to clean it after the last use and then let it sit idle
(with the lid closed).
Cleaning the draft tap
The draft tap may periodically need to be taken off the tower
and disassembled and given a hand-clean. This will be required
62
APPENDIX ten:
Descriptions of our
standard Kits & The
BJCP style guidelines
THE WILLIAMSWARN standard KITS
As of the writing of this manual WilliamsWarn has 15 Standard
Kits of differing beer styles. See Figure 68.
Fig. 68
Each of these cans is designed to be used with a 1kg foil bag of
WilliamsWarn Dry Malt Extract (DME), as shown in Figure 69,
except for the Cider which is designed to be used with a second
can of Cider as shown in Figure 70.
The reason the cans are sold separate to the DME is to give
the brewer the option to cheapen the cost of the brew by
using dextrose (glucose) sugar instead, or “Enhancer” or
“Booster” type products that are a mixture of dextrose, DME
and sometimes malto-dextrin to give body. This is the system
currently employed in the homebrew community. It gives the
brewer some flexibility on half the ingredients.
For the beer LME cans, all the malt colour and hop bitterness
you need for the 23 Litre (5 UK Gallons/6 US Gallons) brew
is within the can, so you can chose from a few options for the
second pack of ingredients you may use. This second part is
very necessary however, to ensure the right amount of sugars are
in the wort to get to the alcohol content you desire.
Fig. 69
You should never therefore use 2 cans of beer kits as the
bitterness and colour will be double the intended specification.
Our recommendation however is to just use our WilliamsWarn
DME as the second part of the ingredients for beer kits, as too
much sugar makes a very poor tasting beer. It’s acceptable to
use a little bit of sugar, up to 20% of the ingredients by weight
(LME is 80% extract by weight remember, the rest water), but
above this the yeast starts to produce a lower quality beer. Our
DME is also the best in the world by far (it is supplied to us
from an American company who make it in a modern state-ofthe art brewhouse from US and Canadian 2-row barley).
Fig. 70
For the Cider you can use sugar but the apple flavour will
obviously be much lower, so we suggest you use the two cans to
get a better tasting cider made from 100% apple juice.
So on our website and with our distributers in the future in
different countries, we offer the single cans as well as the
complete kits for you to purchase.
Under each can lid is a premium dried yeast from either
Fermentis or Lallemand, so you know what you are using for
63
each beer style and the thinking behind each yeast type used.
The cider is SC22 yeast from Fermentis re-packaged from bulk
into a 7g sachet.
brewers could use when making certain beer styles. There are
several guidelines published but we have used The BJCP Style
Guidelines as a basis for our beer styles in our Standard Kits.
THE BJCP STYLE GUIDELINES
The craft beer and homebrew revolution in the USA is the best
thing to happen in the brewing world in the last century. As part
of this revolution some of the brewers got together and developed
style guidelines so that there were some agreed standards
We recommend you download the full PDF of these guidelines
so that you become familiar with the list of agreed beer styles
and the specification for these. This PDF can be found at http://
www.bjcp.org/stylecenter.php. The complete list of beverages
that can be found in the BJCP guidelines is displayed below for
your reference.
BJCP BEVERAGE STYLE GUIDE
1. LIGHT LAGER
1A. Lite American Lager
1B. Standard American Lager
1C. Premium American Lager
1D. Munich Helles
1E. Dortmunder Export
2. PILSNER
2A. German Pilsner (Pils)
2B. Bohemian Pilsener
2C. Classic American Pilsner
3. EUROPEAN AMBER LAGER
3A. Vienna Lager
3B. Oktoberfest/Märzen
4. DARK LAGER
4A. Dark American Lager
4B. Munich Dunkel
4C. Schwarzbier (Black Beer)
5. BOCK
5A. Maibock/Helles Bock
5B. Traditional Bock
5C. Doppelbock
5D. Eisbock
6. LIGHT HYBRID BEER
6A. Cream Ale
6B. Blonde Ale
6C. Kölsch
6D. American Wheat or Rye Beer
7. AMBER HYBRID BEER
7A. Northern German Altbier
7B. California Common Beer
7C. Düsseldorf Altbier
8. ENGLISH PALE ALE
8A. Standard/Ordinary Bitter
8B. Special/Best/Premium Bitter
8C. Extra Special/Strong Bitter
(English Pale Ale)
9. SCOTTISH AND IRISH ALE
9A. Scottish Light 60/-
9B. Scottish Heavy 70/9C. Scottish Export 80/9D. Irish Red Ale
9E. Strong Scotch Ale
10.AMERICAN ALE
10A. American Pale Ale
10B. American Amber Ale
10C. American Brown Ale
11.ENGLISH BROWN ALE
11A. Mild
11B. Southern English Brown
11C. Northern English Brown Ale
12.PORTER
12A. Brown Porter
12B. Robust Porter
12C. Baltic Porter
13.STOUT
13A. Dry Stout
13B. Sweet Stout
13C. Oatmeal Stout
13D. Foreign Extra Stout
13E. American Stout
13F. Russian Imperial Stout
14.INDIA PALE ALE (IPA)
14A. English IPA
14B. American IPA
14C. Imperial IPA
15.GERMAN WHEAT AND RYE BEER
15A. Weizen/Weissbier
15B. Dunkelweizen
15C. Weizenbock
15D. Roggenbier (German Rye Beer)
16.BELGIAN AND FRENCH ALE
16A. Witbier
16B. Belgian Pale Ale
16C. Saison
16D. Bière de Garde
16E. Belgian Specialty Ale
17.SOUR ALE
17A. Berliner Weisse
17B. Flanders Red Ale
17C. Flanders Brown Ale/Oud Bruin
17D. Straight (Unblended) Lambic
17E. Gueuze
17F. Fruit Lambic
18.BELGIAN STRONG ALE
18A. Belgian Blond Ale
18B. Belgian Dubbel
18C. Belgian Tripel
18D. Belgian Golden Strong Ale
64
18E. Belgian Dark Strong Ale
19.STRONG ALE
19A. Old Ale
19B. English Barleywine
19C. American Barleywine
20.FRUIT BEER
21.SPICE/HERB/VEGETABLE BEER
21A. Spice, Herb, or Vegetable Beer
21B. Christmas/Winter Specialty
Spiced Beer
22.SMOKE-FLAVORED/
WOOD-AGED BEER
22A. Classic Rauchbier
22B. Other Smoked Beer
22C. Wood-Aged Beer
23.SPECIALTY BEER
24.TRADITIONAL MEAD
24A. Dry Mead
24B. Semi-sweet Mead
24C. Sweet Mead
25.MELOMEL (FRUIT MEAD)
25A. Cyser
25B. Pyment
25C. Other Fruit Melomel
26.OTHER MEAD
26A. Metheglin
26B. Braggot
26C. Open Category Mead
27.STANDARD CIDER AND PERRY
27A. Common Cider
27B. English Cider
27C. French Cider
27D. Common Perry
27E. Traditional Perry
28.SPECIALTY CIDER AND PERRY
28A. New England Cider
28B. Fruit Cider
28C. Applewine
28D. Other Specialty Cider/Perry
All our WilliamsWarn Standard Kits have been developed to
match styles as closely as possible to these guidelines. We have
especially focused on matching colour and bitterness. A summary
of WilliamsWarn Kits colour vs bitterness is shown on Chart 1 below.
WILLIAMSWARN KITS
BITTERNESS vs COLOUR
32;100
Dry Stout
120
100
37;13
Bohemian Pilsner
32;26
American Amber Ale
30;13
American Pale Ale &
Belgian Pale Ale
23;26
Irish Red Ale
22;6
Dutch Pilsner
18;7
Blonde Ale &
Premium Lager
20
15;6
Wheat Beer
40
20;14
English Pale Ale
18;50
English Brown Ale
60
13;6
Summer Ale &
American Lager
COLOUR (EBC)
80
0
0
5
10
15
20
25
30
35
40
BITTERNESS UNITS
THE ADVANCED METHOD
From these Standard Kits you can add extra malt and hops and
make other beer styles via what we call our Advanced Method.
This is what is known in the USA as “Extract plus Grains”. That
name is a little misleading as it is in fact a method using malt
extract plus not only grains but hops and any other ingredient
you want.
In some cases we are very slightly out of the BJCP spec for
either colour or bitterness but that is because we’re choosing
our own specification for technical or historical reasons.
In some cases we are also slightly lower in alcohol content than
the spec, because we have standardised our kits as one can of
LME and one 1kg (2.2 lbs) foil bag of DME to keep it simple
and consistent. However as explained in Appendix 3, you can
very easily increase the alcohol content of a Standard Kit by
adding 250g to 500g of DME or dextrose (glucose) when you
add the ingredients to a brew.
The method of soaking extra crushed malt and hops is described
in Part 3. Advanced recipes to allow you to expand into other
beer styles while using the Standard Kits as a base are available
on our website in 2013.
It is acceptable to add this extra as dextrose (glucose) as the
base kit has so many good nutrients for the yeast that a little
pure sugar is not an issue. So feel free to boost the alcohol a
little with dextrose as it is cheaper than DME and won’t impact
on quality if a 1kg bag of DME is already part of the ingredients
you use.
However be aware that German beers are traditionally made with
100% malted barley so it is better to boost the alcohol content
of these with DME only and not any sugar.
65
DESCRIPTIONS OF OUR Standard KITS
Gravity of about 1.013 (3.3°P), resulting in 3.6-4.7% alcohol
by volume, 30 Bitterness Units and 6.5 SRM/13 EBC colour.
American Amber Ale
A bitter beer with full-bodied, speciality malt character.
Ferment at 23°C/73°F.
To elevate the fresh hop aroma of this style, we recommend the
brewer make a hop tea of 1-2 oz. (28-56g) of any American
hops in a French coffee press. Add approx. 900ml of hot
boiled water to the hops, stir and then steep for 20 minutes.
Plunge the solids and add the green, filtered hop tea to the
mix of ingredients in your fermenter (before adding the yeast).
Download the WilliamsWarn User Manual from our website for
more details.
Our American Amber Ale has a deep-amber, light-copper
appearance from crystal and black malts included in the recipe.
These give this beer caramel, raisin and biscuity notes with
a slightly dry finish. The hops provide a prominent level of
bitterness to balance the malt flavours.
The yeast under the lid is an 11.5g pack of Fermentis S-33
ale yeast.
This product is designed to be used with 1.0-1.5 kg (2.23.3lbs) of WilliamsWarn Light Dry Malt Extract and water to
make 23 Litres (6 US Gallons/5 Imp. Gallons) of wort. Original
Gravity of 1.040-1.048 (10°P- 12°P), fermented to a Final
Gravity of about 1.013 (3.3°P), resulting in 3.6-4.7% alcohol
by volume, 32 Bitterness Units and 13 SRM/26 EBC colour.
Belgian Pale Ale
A flavoursome Belgian Pale Ale.
Our Belgian Pale Ale has an amber colour and a decent bitterness. From ale and crystal malts used in the grain bill, it has a
solid malty and slightly bready taste. The yeast employed is a
true Belgian Ale yeast that will give banana, spicy and peppery
attributes to the beer.
Ferment at 23°C/73°F.
To elevate the fresh hop aroma of this style, we recommend the
brewer make a hop tea of 1-2 oz. (28-56g) of any American
hops in a French coffee press. Add approx. 900ml of hot
boiled water to the hops, stir and then steep for 20 minutes.
Plunge the solids and add the green, filtered hop tea to the
mix of ingredients in your fermenter (before adding the yeast).
Download the WilliamsWarn User Manual from our website for
more details.
The yeast under the lid is an 11.5g pack of Fermentis T-58
ale yeast.
This product is designed to be used with 1.0-1.5 kg (2.2-3.3lbs)
of WilliamsWarn Light Dry Malt Extract and water to make 23
Litres (6 US Gallons/5 Imp. Gallons) of wort. Original Gravity
of 1.040-1.048 (10°P- 12°P), fermented to a Final Gravity of
about 1.012 (3.0°P), resulting in 3.75-4.8% alcohol by volume,
30 Bitterness Units and 6.5 SRM/13 EBC colour.
American Lager
A refreshing American Lager for those who appreciate one of
the world’s most popular beer styles.
Ferment at 23°C/73°F.
Blonde Ale
A refreshing, easy-drinking Blonde Ale with a crisp palate.
Our American Lager is straw-coloured in appearance with a low
bitterness. It is crisp, dry and thirst-stopping. The lager yeast
employed will give some slightly fruity notes to add a pinch of
character. The goal is a light-tasting beer with low levels of malt,
hop and yeast character in perfect balance.
Our Blonde Ale is yellow in appearance with a moderate bitterness. It sits in the Hybrid category of the BJCP Style Guidelines
and is an ale version of a lager beer. It therefore ferments warm
(23°C/73°F) with great efficiency with our ale yeast, but with
the resulting taste profile being similar to that of a light lager.
The yeast under the lid is an 11.5g pack of Fermentis S-23
lager yeast.
The yeast under the lid is an 11.5g pack of Fermentis S-33
ale yeast.
This product is designed to be used with 1.0-1.5 kg (2.23.3lbs) of WilliamsWarn Light Dry Malt Extract and water to
make 23 Litres (6 US Gallons/5 Imp. Gallons) of wort. Original
Gravity of 1.040-1.048 (10°P- 12°P), fermented to a Final
Gravity of about 1.009 (2.3°P), resulting in 4.1-5.2% alcohol
by volume, 13 Bitterness Units and 3 SRM/6 EBC colour.
This product is designed to be used with 1.0-1.5 kg (2.23.3lbs) of WilliamsWarn Light Dry Malt Extract and water to
make 23 Litres (6 US Gallons/5 Imp. Gallons) of wort. Original
Gravity of 1.040-1.048 (10°P- 12°P), fermented to a Final
Gravity of about 1.013 (3.3°P), resulting in 3.6-4.7% alcohol
by volume, 18 Bitterness Units and 3.5 SRM/7 EBC colour.
Ferment at 15°C/59°F.
Ferment at 23°C/73°F.
American Pale Ale
A flavourful American Pale Ale.
Bohemian Pilsner
A traditional Bohemian Pilsner with a rich, complex maltiness
and a crisp finish.
Our American Pale Ale has an amber appearance with a
prominent bitterness. Due to ale and crystal malts used, it has
a steady malt flavour with a touch of bready and toasty notes.
The yeast under the lid is an 11.5g pack of Fermentis S-33
ale yeast.
Our Bohemian Pilsner is deep gold in appearance with a high
bitterness and long lasting creamy head. The yeast employed
is a classic German Pilsner yeast that leaves a very clean taste.
This product is designed to be used with 1.0-1.5 kg (2.23.3lbs) of WilliamsWarn Light Dry Malt Extract and water to
make 23 Litres (6 US Gallons/5 Imp. Gallons) of wort. Original
Gravity of 1.040-1.048 (10°P- 12°P), fermented to a Final
The yeast under the lid is an 11.5g pack of Fermentis W34/70
lager yeast, the most famous and most widespread German
lager yeast.
66
This product is designed to be used with 1.0-1.5 kg (2.23.3lbs) of WilliamsWarn Light Dry Malt Extract and water to
make 23 Litres (6 US Gallons/5 Imp. Gallons) of wort. Original
Gravity of 1.040-1.048 (10°P- 12°P), fermented to a Final
Gravity of about 1.009 (2.3°P), resulting in 4.1-5.2% alcohol
by volume, 37 Bitterness Units and 6 SRM/12 EBC colour.
Dutch Pilsner
This is a noble brew with a crisp finish.
Our Dutch Pilsner is straw-coloured in appearance with a
moderate, lingering bitterness. The yeast employed is a classic
strain that leaves a slightly estery aroma that is typical of
Pilsners from The Netherlands. When used with our light DME
to make an all-malt beer, the combination of ingredients makes
a Pilsner very true to the region.
Ferment at 15°C/59°F for 3 days and then increase to 18°C/64°F
for a diacetyl rest to complete fermentation after another 3 days.
Cooling can be put on at Day 6 when SG should be about 1.009.
The yeast under the lid is an 11.5g pack of Fermentis S-23
lager yeast which is commonly used by large breweries in
Western Europe.
As an option, hop aroma and taste can be elevated if the brewer
makes a hop tea of 1-2 oz. (28-56g) of any Czech (or German)
hops in a French coffee press. Add approx. 900ml of hot boiled
water to the hops, stir and then steep for 20 minutes. Plunge
the solids and add the green, filtered hop tea to the mix of
ingredients in your fermenter (before adding the yeast). Download
the WilliamsWarn User Manual from our website for more details.
This product is designed to be used with 1.0-1.5 kg (2.23.3lbs) of WilliamsWarn Light Dry Malt Extract and water to
make 23 Litres (6 US Gallons/5 Imp. Gallons) of wort. Original
Gravity of 1.040-1.048 (10°P- 12°P), fermented to a Final
Gravity of about 1.009 (2.3°P), resulting in 4.1-5.2% alcohol
by volume, 22 Bitterness Units and 3 SRM/6 EBC colour.
Dry Apple Cider
A pleasant and appealing Cider.
Ferment at 15°C/59°F for 3 days and then increase to
18°C/64°F for a diacetyl rest to complete fermentation after
another 3 days. Cooling can be put on at Day 6 when SG should
be about 1.009.
Our Apple Cider is made from the highest quality apples. The
result is a very dry, clean and crisp cider. The apple flavours are
light and pleasant and the overall taste is refreshing.
The yeast under the lid is a 7g pack of Fermentis cider yeast.
English Brown Ale
An authentic Brown Ale with a dark-fruit character.
This product is designed to be used with a second 1.65kg/3.6lbs
can of WilliamsWarn Dry Cider to make 23 Litres of juice (5
Imperial gal/6 US gal) which should then be pitched with 1
packet of Cider yeast (7g). Alternatively you can pitch both
sachets for a faster fermentation.
Our English Brown Ale has a dark brown appearance from a
range of speciality malts employed in the recipe. The resulting
beer has an array of flavours that includes raisins, plums, figs,
nuts, biscuits, caramel and toffee, that last into the finish. The
hops provide a moderate level of bitterness that helps balance
the dark-fruit malt flavours.
Original Gravity: 1.036 (9°P). Final Gravity: 1.000 (0°P) or just
under. Alcohol by Volume: 5.0%.
The yeast under the lid is an 11g pack of Lallemand
Nottingham Ale yeast.
Ferment at 23°C/73°F.
Alternatively you can also use 1kg of dextrose with one can to
make a very light tasting cider.
This product is designed to be used with 1.0-1.5 kg (2.23.3lbs) of WilliamsWarn Light Dry Malt Extract and water to
make 23 Litres (6 US Gallons/5 Imp. Gallons) of wort. Original
Gravity of 1.040-1.048 (10°P- 12°P), fermented to a Final
Gravity of about 1.010 (2.5°P), resulting in 4.0-5.1% alcohol
by volume, 18 Bitterness Units and 25 SRM/50 EBC colour.
If you would like to produce a slightly sweeter cider for body and
to balance the natural acidity, put the cooling on your fermenter
to at least 4°C (39°F) when the Specific Gravity reads 1.006 or
just above that. This will stop fermentation and lead to a fuller
tasting cider with an alcohol content of about 4% by volume.
Ferment at 23°C/73°F.
Dry Stout
A true Dry Stout with a compelling personality.
English Pale Ale
A full-bodied English Pale Ale.
Our Dry Stout has a black appearance from the crystal malts,
roasted malts and roasted barley employed in the grain mix. The
result is a great Dry Stout that has liquorice, roasted coffee and
chocolate flavours dominating. The prominent hop bitterness
level helps elevate the dryness, which comes from the roasted
un-malted barley used.
Our English Pale Ale has an amber appearance with a moderate
bitterness. Technically, within the BJCP Style Guidelines it is
a Standard Bitter – the lightest of the English bitter types with
respect to alcohol content, colour and bitterness. This beer has
a firm malty start, a touch of fruitiness from the yeast and a long
dry finish from the hops.
The yeast under the lid is an 11.5g pack of Fermentis S-33
ale yeast.
The yeast under the lid is an 11g pack of Lallemand
Nottingham Ale yeast.
This product is designed to be used with 1.0-1.5 kg (2.23.3lbs) of WilliamsWarn Light Dry Malt Extract and water to
make 23 Litres (6 US Gallons/5 Imp. Gallons) of wort. Original
Gravity of 1.040-1.048 (10°P- 12°P), fermented to a Final
Gravity of about 1.013 (3.3°P), resulting in 3.6-4.7% alcohol
by volume, 32 Bitterness Units and 50 SRM/100 EBC colour.
This product is designed to be used with 1.0-1.5 kg (2.23.3lbs) of WilliamsWarn Light Dry Malt Extract and water to
make 23 Litres (6 US Gallons/5 Imp. Gallons) of wort. Original
Gravity of 1.040-1.048 (10°P- 12°P), fermented to a Final
Gravity of about 1.010 (2.5°P), resulting in 4.0-5.1% alcohol
by volume, 20 Bitterness Units and 7 SRM/14 EBC colour.
Ferment at 23°C/73°F.
Ferment at 23°C/73°F.
67
Irish Red Ale
An easy drinking pint.
Wheat Beer
A refreshing, smooth-drinking Wheat Beer.
Our Irish Red Ale has a deep-amber, light-copper appearance
from crystal and black malts included in the recipe. The malt
focus gives this beer caramel, toffee and toasty notes and a
slight dry, roasted-grain finish. The hops provide a moderate
level of bitterness. Overall, this is an interesting beer that is
a pleasure to produce and appreciate.
Our Wheat Beer has a straw-coloured appearance with a low
bitterness. The malted wheat in the grain bill gives this beer
a slightly grainy flavour with a creamy fullness that leads to
a light finish. The yeast employed will provide only low levels
of phenolic flavours and so this brew leans towards a fresh,
American wheat beer in style (rather than the clove-tasting
European wheat beers).
The yeast under the lid is an 11.5g pack of Fermentis S-33
ale yeast.
The yeast under the lid is an 11.5g pack of Fermentis S-33
ale yeast.
This product is designed to be used with 1.0-1.5 kg (2.23.3lbs) of WilliamsWarn Light Dry Malt Extract and water to
make 23 Litres (6 US Gallons/5 Imp. Gallons) of wort. Original
Gravity of 1.040-1.048 (10°P- 12°P), fermented to a Final
Gravity of about 1.013 (3.3°P), resulting in 3.6-4.7% alcohol
by volume, 23 Bitterness Units and 13 SRM/26 EBC colour.
This product is designed to be used with 1.0-1.5 kg (2.2-3.3lbs)
of WilliamsWarn Light Dry Malt Extract (or alternatively a wheatbased extract) and water to make 23 Litres (6 US Gallons/5
Imp. Gallons) of wort. Original Gravity of 1.040-1.048 (10°P12°P), fermented to a Final Gravity of about
Ferment at 23°C/73°F.
1.013 (3.3°P), resulting in 3.6-4.7% alcohol by volume,
15 Bitterness Units and 3 SRM/6 EBC colour.
Premium Lager
A pleasant Premium Lager with a clean taste profile.
Ferment at 23°C/73°F.
Our Premium Lager is yellow in appearance with a moderate
bitterness. It is a satisfying beer that sits in between American
Lagers and European Pilsners in character. The yeast employed
will ferment clean and true-to-style. An agreeable drop that’s
ideal for brewing for social events and therefore to be shown-off
to your friends.
The yeast under the lid is an 11.5g pack of Fermentis W34/70
lager yeast, the most famous and most widespread German lager
yeast.
This product is designed to be used with 1.0-1.5 kg (2.23.3lbs) of WilliamsWarn Light Dry Malt Extract and water to
make 23 Litres (6 US Gallons/5 Imp. Gallons) of wort. Original
Gravity of 1.040-1.048 (10°P- 12°P), fermented to a Final
Gravity of about 1.009 (2.3°P), resulting in 4.1-5.2% alcohol
by volume, 18 Bitterness Units and 3.5 SRM/7 EBC colour.
Ferment at 15°C/59°F for 3 days and then increase to
18°C/64°F for a diacetyl rest to complete fermentation after
another 3 days. Cooling can be put on at Day 6 when SG should
be about 1.009.
Summer Ale
A thirst-quenching Summer Ale, perfect for the hot summer
months.
Our Summer Ale is straw-coloured in appearance with a low
bitterness. Technically it is regarded as a Cream Ale – an ale
version of a lager beer. It therefore ferments warm (23°C/73°F)
with great efficiency with our ale yeast, but with the resulting
taste profile being similar to that of a light lager.
The yeast under the lid is an 11.5g pack of Fermentis S-33
ale yeast.
This product is designed to be used with 1.0-1.5 kg (2.23.3lbs) of WilliamsWarn Light Dry Malt Extract and water to
make 23 Litres (6 US Gallons/5 Imp. Gallons) of wort. Original
Gravity of 1.040-1.048 (10°P- 12°P), fermented to a Final
Gravity of about 1.013 (3.3°P), resulting in 3.6-4.7% alcohol
by volume, 13 Bitterness Units and 3 SRM/6 EBC colour.
Ferment at 23°C/73°F.
68
APPENDIX eleven:
Conversion Tables
Temperature
celsius (°C)
Fahrenheit (°F)
celsius (°C)
Fahrenheit (°F)
celsius (°C)
Fahrenheit (°F)
1
33.8
35
95.0
69
156.2
2
35.6
36
96.8
70
158.0
3
37.4
37
98.6
71
159.8
4
39.2
38
100.4
72
161.6
5
41.0
39
102.2
73
163.4
6
42.8
40
104.0
74
165.2
7
44.6
41
105.8
75
167.0
8
46.4
42
107.6
76
168.8
9
48.2
43
109.4
77
170.6
10
50.0
44
111.2
78
172.4
11
51.8
45
113.0
79
174.2
12
53.6
46
114.8
80
176.0
13
55.4
47
116.6
81
177.8
14
57.2
48
118.4
82
179.6
15
59.0
49
120.2
83
181.4
16
60.8
50
122.0
84
183.2
17
62.6
51
123.8
85
185.0
18
64.4
52
125.6
86
186.8
19
66.2
53
127.4
87
188.6
20
68.0
54
129.2
88
190.4
21
69.8
55
131.0
89
192.2
22
71.6
56
132.8
90
194.0
23
73.4
57
134.6
91
195.8
24
75.2
58
136.4
92
197.6
25
77.0
59
138.2
93
199.4
26
78.8
60
140.0
94
201.2
27
80.6
61
141.8
95
203.0
28
82.4
62
143.6
96
204.8
29
84.2
63
145.4
97
206.6
30
86.0
64
147.2
98
208.4
31
87.8
65
149.0
99
210.2
32
89.6
66
150.8
100
212.0
33
91.4
67
152.6
34
93.2
68
154.4
69
Volume
Weight
Litre (L)
US Fluid
ounce (fl. oz.)
US Pint (pt)
US gallons
Kilogram (kg)
Ounce (oz)
Pound (lb)
0.25
8.45
0.53
0.07
0.25
8.80
0.55
0.50
16.90
1.06
0.13
0.50
17.60
1.10
0.75
25.36
1.58
0.20
0.75
26.50
1.65
1.00
33.81
2.11
0.26
1.00
35.30
2.20
1.25
42.27
2.64
0.33
1.25
44.10
2.76
1.50
50.72
3.17
0.40
1.50
52.90
3.31
1.75
59.17
3.70
0.46
1.75
61.70
3.86
2.00
67.63
4.23
0.53
2.00
70.50
4.41
2.50
84.54
5.28
0.66
2.50
88.20
5.51
3.80
128.49
8.03
1.00
3.00
105.80
6.61
pressure
PSI
BAR
PSI
BAR
PSI
BAR
0.50
0.03
10.50
0.72
20.50
1.41
1.00
0.07
11.00
0.76
21.00
1.45
1.50
0.10
11.50
0.79
21.50
1.48
2.00
0.14
12.00
0.83
22.00
1.52
2.50
0.17
12.50
0.86
22.50
1.55
3.00
0.21
13.00
0.90
23.00
1.59
3.50
0.24
13.50
0.93
23.50
1.62
4.00
0.28
14.00
0.97
24.00
1.66
4.50
0.31
14.50
1.00
24.50
1.69
5.00
0.34
15.00
1.03
25.00
1.72
5.50
0.38
15.50
1.07
25.50
1.76
6.00
0.41
16.00
1.10
26.00
1.79
6.50
0.45
16.50
1.14
26.50
1.83
7.00
0.48
17.00
1.17
27.00
1.86
7.50
0.52
17.50
1.21
27.50
1.90
8.00
0.55
18.00
1.24
28.00
1.93
8.50
0.59
18.50
1.28
28.50
1.97
9.00
0.62
19.00
1.31
29.00
2.00
9.50
0.66
19.50
1.34
10.00
0.69
20.00
1.38
70
brew record sheet
Beverage Style / Name
Brew Number
Start Date and Time
ingredients
Malt Extract
Water
Yeast
Hops
Grains
Sugar
Other
wort/must production notes
fermentation data
Date & Time
DAY
S.G.
Temp °C
Press.
Notes
brew record sheet
80
2.00
70
1.75
60
1.50
50
1.25
40
1.00
30
0.75
20
0.50
10
0.25
0
0.00
0
1
2
3
4
5
6
7
DAY
clarification
final product
taste
taste score / 1-10
(see appendix 12)
clarity
carbonation
alcohol %
other comments
8
9
10
11
12
13
PRESSURE (BAR)
SG UNITS & TEMPERATURE °C
Fermentation Chart
APPENDIX twelve:
taste testing
It is important to record a taste test score for each brew so that
in the future you can refer to your records and see which beers
are working best for you.
Fig. 71
The best tasting system is blind taste testing, in which a series
of beverages are presented and the taster has no knowledge of
what the samples are. Then, in quiet conditions with absolutely
no talking allowed, the taster/s smell and taste the samples
and score them. Figure 72 is a photo of a typical taste test
conducted in the garage in which the WilliamsWarn Personal
Brewery was invented. In this case, one or two beers would
be from a personal brewery and the rest were from the supermarket. Similar types of beverages need to be compared and
the tasters told, for example, that the beverages are “Lagers”
or “Stouts” or “IPA’s” so they know what to expect and to help
score the beverages better.
The best point system to use as a scoring system for this is from
1 to 10, as described in the following Blind Taste Test Sheet.
You can print this sheet from our manual on our website and
use it for blind taste tests.
A score of 7 is like an anchor. It represents “Satisfactory”.
Beverages with no flavour should score a 7, as little or no
flavour is acceptable and not the same as an off-flavour. In the
following sheet, 7’s are already inserted as the answers in order
to have everyone start at the same point. From there tasters
can adjust the score down for beverages with faults or up for
beverages that are better than satisfactory.
To obtain a very accurate score a minimum of 6 tasters is
required.
Fig. 72
However, it is not practical to ask 6 people to come to your
brewery each brew and for you to set up a blind taste testing.
You can therefore ask someone living with you to set up 2-3
samples for you to blind test, with one of them being your own
beer.
Alternatively, it may also be practical and necessary for you to
score your beers knowing it’s one of yours. In this case, take
a sample and use the same scoring system and try to be as
un-biased as possible. Record that score in the Brew Record
sheet and our online database when it is on our website.
Don’t be afraid to test your beers against commercial beers.
You’re making top quality beverages and you’re sure to do
well in blind taste testing if you get some friends around to
participate.
73
Blind Taste Test Sheet
Taste the beers in front of you and give them each an overall
hedonic score from 1 to 10, as described in the box to the right.
score guide
10
exceptional
9
very good
8
good
7
satisfactory
(no off flavors or faults, bland is OK)
6
not quite satisfactory (1 fault)
Beers you love and could drink all night or love the taste of are 8-10.
5
Poor (2 faults)
Beers with a few faults should score 5 or 6.
4
bad (several faults or a major problem)
Beers with major issues are 1-4’s.
3
very bad (wouldn’t drink it)
2
undrinkable (can’t drink it)
1
what the hell is this liquid? Diesel?
The starting point is a score of 7 which is included in the score
box already to anchor you. If the beer is “Satisfactory” in your
opinion, leave the 7 in the box. Beers with no taste or beers
that are bland are “Satisfactory” as they have no faults, so they
should score 7’s. Don’t be afraid to leave all 7’s if you think all
are “Satisfactory”. It’s your opinion.
test sheet
Name
number
score 1-10
1
7
2
7
3
7
4
7
5
7
6
7
7
7
8
7
comments
brand
TROUBLE SHOOTING
THE WILLIAMSWARN
PERSONAL BREWERY
STAGE ONe:
CLEANING
To speed up this test, you can manually add CO2 from your
gas cylinder and pressurise the tank to 1 bar. Firstly, wind
the VPRV down to its fully closed position (clockwise). Then
open the 3-way valve. Close the 3-way valve when the tank
is at 1 bar and watch for a pressure drop. If the seal is in
place properly and the lid is closed, the pressure should
hold. Once the seal is confirmed, you can leave the pressure
in the vessel, but re-set the VPRV to your chosen set-point
e.g. 2½ turns open (anti-clockwise).
Problem 1:
I can't remove the vessel lid
Solution:
Sometimes the vessel lid can be difficult to remove if the
threads become bound together too tightly. In this case all
that is needed is a little extra muscle from another person.
So get help to unwind the lid counter-clockwise and you'll
find the extra torque will allow the lid to be removed easily.
2. It is possible the VPRV could be leaking. Obtain a children’s
party balloon and place over the VPRV. If the balloon
expands, the VPRV is leaking and needs attention. Release
gas from the VPRV by pressing the VPRV release button and
then unwind the VPRV fully. Examine the seal and spring for
faults or obstructions or grit and clean. Examine the VPRV
cavity for any obstructions or grit and remove if need be.
Replace the VPRV with the seal and spring in their correct
positions and monitor the pressure. If pressure still doesn’t
build up, call the local help desk.
STAGE THREE:
DURING FERMENTATION
Problem 1:
The yeast doesn’t seem to start fermenting
Solution:
Problem 3:
I can’t quite get the pressure right with the VPRV.
Solutions:
Dried ale yeast should take ½ a day to show signs of fermenting
and lager yeast about 1 day. If it takes longer than this then
wait one more day for signs of activity. If by Day 2 there is no
activity then it could be possible that the yeast had somehow
died before use. If the yeast was rehydrated in water over 35°C
(95°F) it may have been too hot. In general the dried brewing
yeast WilliamsWarn uses is quite stable and should ferment
even past its use by date unless the sachet has been broken and
oxygen ingress has occurred or if it has been stored in very warm
temperatures.
1. You have a few days to get the pressure right during the first
days of fermentation. Set an excess pressure on the VPRV,
let the pressure in the vessel build up and then turn the
VPRV counter-clockwise to release pressure until your set
point is reached and no more pressure is emitted at that
setting. Check gas is released out the VPRV as the pressure
goes past your desired set-point and then leave the VPRV
set at that mark.
In the case of no activity after 2 days, close the vessel valve,
remove the sediment bottle, dump the non-fermenting yeast
which will likely be sedimented at the bottom and then
rehydrate a new quality yeast in 25°C water (77°F) for 10
minutes. Add the sediment bottle back onto the brewery
with the new quality yeast and open the valve in 2 stages, as
described in the instructions (to avoid temperature shock).
Monitor closely.
2. Just ferment at a pressure higher than your target. The yeast
should ferment all the way even at high pressures and you
can release excess pressure later.
STAGE four:
cooling
Problem 2:
The pressure isn’t building up
Solutions:
Problem 1:
The cooling doesn’t seem to work.
Solutions:
1. Check that there is activity in the sediment bottle and
foam seen on the beverage surface through the sight-glass
and that the vessel valve is open. If fermentation is only
just starting, the amount of carbon dioxide being generated
is small and the pressure will take a while to build up.
If fermentation is vigorous and the pressure is not building
up over a few hours under such fermentation conditions,
then you probably have a leak. Ale yeast should take ¾ of
a day to start to build up pressure and lager yeast about
1 day. Firstly, release any pressure in the vessel via the
VPRV by pressing the VPRV release button and remove the
lid. Check the seal is sitting in the groove properly. It may
need a stretch as explained in Appendix 4. Ensure the seal
sits in the groove as shown in the photos in Appendix 4 and
then re-close the lid tightly. Then monitor pressure build up.
1. Check you have the brewery turned on. If not, turn it on.
2. Check you have set the correct temperature and that it is
lower than the ambient temperature. If not, set the correct
temperature.
3. Check the yellow refrigeration light is lit up on the temperature controller LED readout. This should read SUB2.
If the set-point is more than 1°C lower than the actual
temperature this text should be lit up on the controller
screen. If it is lit up and the temperature is not falling, there
may be an issue with the compressor or a small pump that
circulates the glycol. Call the local help desk.
76
STAGE five:
clarification
2. Ensure you have the tap flow controller fully closed (pushed
up) before you pull the tap handle and then slowly open it
to start with a slow pour. The first pour of the day can be
foamy due to the line being warmer than the vessel and the
carbon dioxide coming out of solution in the line. Problem 1:
I can’t mix the clarification agent into the
beverage
Solution:
3. Ensure the draft tap is pulled out fully when pouring.
Read Appendix 8 carefully for principles regarding clarification.
Ensure that the gas cylinder pressure is 0.5 bar (7 psi) higher
than the vessel pressure. Then ensure there is clarification agent
inside the clarification pot. Then turn the 3-way valve to the
pot and listen for the sound of mixing. If there is still no mixing
either increase the pressure from the gas bottle or decrease the
pressure in the vessel until mixing is heard. It could be one of
the gauges is reading incorrectly.
5. Ensure the beverage wasn’t fermented at an extreme pressure
or is being dispensed at a too high pressure. Release excess
pressure from the vessel via the VPRV button and set at 1 bar
and try pouring again. You may need to wait for excess gas
in the beverage to move out of the beverage over time (e.g.
1 day). Try to control the pour with the control level and
pour slowly.
Other causes could be a blocked one-way valve under the pot
inside the tower or a blocked beer line (if hops or malt has been
added and particles are blocking the lines). Call the local help
desk for advice.
Problem 2:
The pressure in the tank seems to be falling
Solutions:
4. Ensure the beverage is cold.
1. Ensure that the gas cylinder is connected to the vessel
during dispense. The 3-way valve should be turned to the
arrow pointing to the vessel pressure gauge during dispense.
If not, as you pour the pressure in the vessel will reduce.
Problem 2:
The beverage is not 100% crystal clear after 2
clarifications
Solution:
2. Check the gas cylinder has pressure on its high and low
pressure gauges and isn’t empty. If it is then connect a full
gas cylinder.
The clarification agent WilliamsWarn uses should easily
clear S-33, S-23, W34/70 and Nottingham yeasts. If beers
produced by these yeasts do not clear, then check you are
mixing the agent properly and that vigorous bubbling is heard
during the clarification process. If mixing is proper then any
unclear beverage using these yeast may be a random biological
occurrence or extra ingredients added (via the Advanced
Method) are making the beverage harder to clear. The haze in
this case may be small hop or malt particles that are difficult
to clear. Try an extra clarification with 30ml but be aware small
hops or malt particles may not react with our fining agent.
3. Close the 3-way valve (X position), record the vessel
pressure and don’t pour any beer for 24 hours. Read the
pressure again. If there is a major reduction you may have a
leaking seal or VPRV. See solutions 1 and 2 for Problem 2
in Stage 3 above.
Problem 3:
The beverage flow is slow
Solutions:
T-58 yeast may sometimes be difficult to clear so in these cases
you can try:
1. Ensure the tank pressure is adequate. At 1.25 bar a fast
flow can be achieved when the flow control lever is fully
open and the tap pulled fully towards you.
1. An extra clearing with 30ml
2. Give the beverage more time to clear
2. Ensure the flow control lever is pushed down enough to
open and allow a flow.
3. Enjoy a slightly cloudy beverage
3. Ensure the draft tap is being pulled all the way to its fully
open position.
4. Or experiment with an alternative finings agent
Other yeast used will vary in their ability to be cleared with our
finings agent. If crystal clear beer is important to you then chose
yeast that are easy to clear with our agent or find another liquid
agent to dose.
STAGE six:
dispense
Problem 1:
The beverage is foaming too much
Solutions:
1. Ensure you are pulling the tap handle not pushing it. Pushing
the tap handle creates foam (its used for the last part of a beer
pour). Pull the tap handle instead of pushing it.
77