1
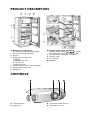
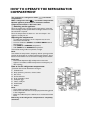
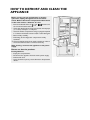
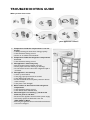
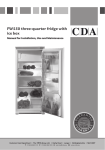
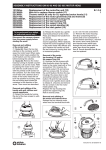
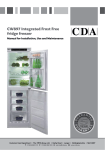
FW550 three-quarter fridge with
ice box
Manual for Installation, Use and Maintenance
Passionate about style
Customer Care Department • The
Group Ltd. • Harby Road • Langar • Nottinghamshire • NG13 9HY
T : 01949 862 012 F : 01949 862 003 E : [email protected] W : www.cda.eu
INSTRUCTIONS FOR USE
PRODUCT DESCRIPTION
CONTROLS
BEFORE USING THE APPLIANCE
SAFEGUARDING THE ENVIRONMENT
PRECAUTIONS AND GENERAL
RECOMMENDATIONS
HOW TO OPERATE THE REFRIGERATOR
COMPARTMENT
HOW TO OPERATE THE FREEZER
COMPARTMENT
HOW TO DEFROST AND CLEAN THE
APPLIANCE
TROUBLESHOOTING GUIDE
AFTER-SALES SERVICE
INSTALLATION
ELECTRICAL CONNECTION
13
PRODUCT DESCRIPTION
A) Refrigerator compartment
(for storage of fresh food and beverages)
1. Shelves (partly height adjustable)
2. Crispers
3. Refrigerator inner door with:
(if supplied)
a. Adjustable door trays
b. Top door tray
c. Bottom door tray
4. Drawer (telescopic extraction) (if supplied)
5. Pull-out defrost water drain
6. Rating plate
B) Freezer compartment (if supplied)
(marked with the symbol
for storing
fresh food, frozen food and making ice cubes)
7. Grid (not shown in the figure, if available)
8. Freezer section
9. Ice cube trays
C) Controls
CONTROLS
A. Thermostat knob
B. Light switch
14
D. Thermostat control reference
E. Light bulb (max 15 W)
BEFORE USING THE APPLIANCE
• Your new appliance is designed exclusively for
domestic use
To get the most out of your new appliance,
read the user handbook thoroughly. The
handbook contains a description of the
appliance and useful tips for storing food.
Keep this handbook for future consultation.
1. After unpacking, make sure that the appliance is
undamaged and that the door closes properly.
Any damage must be reported to your dealer
within 24 hours after delivery of the appliance.
2. Wait at least two hours before switching the
appliance on in order to ensure the refrigerant
circuit is fully efficient.
3. Installation of the appliance and electrical
connections must be carried out by a qualified
electrician, in accordance with the manufacturer's
instructions and local safety regulations
4. Clean the inside of the appliance before using it.
SAFEGUARDING THE ENVIRONMENT
1. Packing
The packaging material is entirely recyclable, and
marked with the recycling symbol. Follow local
regulations for scrapping. Keep the packaging
materials (plastic bags, polystyrene parts, etc.) out
of reach of children, as they are potentially
dangerous.
2. Scrapping
The appliance is manufactured using recyclable
material.
This appliance is marked according to the
European directive 2002/96/EC on Waste
Electrical and Electronic Equipment (WEEE).
By ensuring this product is disposed of correctly,
you will help prevent potential negative
consequences for the environment and human
health, which could otherwise be caused by
inappropriate waste handling of this product.
The symbol
on the product, or on the
documents accompanying the product, indicates
that this appliance may not be treated as
household waste. Instead it shall be handed over to
the applicable collection point for the recycling of
electrical and electronic equipment.
Before scrapping, make the appliance unusable by
cutting off the power cable and removing the
doors and shelves so that children cannot easily
climb inside the appliance.
Disposal must be carried out in accordance with
local environmental regulations for waste disposal.
Deliver the appliance immediately to an authorized
dump; do not leave it unattended even for a few
days, since it is potentially dangerous for children.
For more detailed information about treatment,
recovery and recycling of this product, please
contact your local city office, your household
waste disposal service or the shop where you
purchased the product.
Information:
This appliance does not contain CFC (the
refrigerant circuit contains R134a) or HFC (the
refrigerant circuit contains R600a) (refer to the
rating plate inside the appliance).
Appliances with Isobutane (R600a):
isobutane is a naturally occurring, low
environmental impact gas. Caution is required,
however, because isobutane is flammable.
Therefore, it is essential to ensure that refrigerant
pipelines are not damaged.
This product contains Fluorinated Greenhouse
Gases covered by the Kyoto Protocol, the
refrigerant gas being in a hermetically sealed
system.
Refrigerant gas: R134a has a Global Warming
Potential (GWP) 1300.
Declaration of conformity
• This appliance is designed to store food and is
manufactured in conformity with European
Directive 90/128/EEC, 02/72/EEC and
Regulation (EC) No. 1935/2004
• This appliance is designed, manufactured, and
retailed in compliance with:
- the safety objectives prescribed in the Low Voltage
Directive 2006/95/CE (which replaced Directive
73/23/CEE as amended);
- the protection requirements of the “EMC”
89/336/CEE directive, amended by Directive
93/68/CEE.
• The electrical safety of the appliance can only be
guaranteed if the product is connected to an
approved earth connection.
15
PRECAUTIONS AND GENERAL
RECOMMENDATIONS
• During installation, make sure the appliance
does not damage the power cable.
• Make sure the appliance is not near a heat
source.
• To guarantee adequate ventilation, leave a
space on both sides and above the appliance
and follow the installation instructions.
• Keep the appliance ventilation openings free.
• Power cable modification or replacement must
only be carried out by qualified personnel.
• It must be possible to disconnect the appliance
from the power supply by unplugging it or by
means of a mains two-pole switch installed
upstream of the socket.
• Make sure the voltage indicated on the
appliance rating plate corresponds to that of
your home.
• For the water connection, use the pipe supplied
with the new appliance; do not reuse that of the
previous appliance.
• Install and level the appliance on a floor strong
enough to take its weight and in a place suitable
for its size and use.
• The appliance must be handled and installed by
two or more persons.
• Be careful not to damage the floors when
moving the appliance (e.g. parquet).
• Do not use single/multi-adapters or extension
cords.
• Install the appliance in a dry and well-ventilated
place. The appliance is arranged for operation in
places where the temperature comes within
the following ranges, according to the climatic
class given on the rating plate. The appliance
may not work properly if it is left for a long
period at a temperature outside the specified
range.
Climatic Class
SN
N
ST
T
16
Amb. T. (°C)
From 10 to 32
From 16 to 32
From 16 to 38
From 16 to 43
Amb. T. (°F)
From 50 to 90
From 61 to 90
From 61 to 100
From 61 to 110
• Do not store or use petrol, gas or flammable
liquids in the vicinity of this or other electrical
appliances. The fumes can cause fires or
explosions.
• Do not use mechanical, electric or chemical
means other than those recommended by the
Manufacturer to speed up the defrost process.
• Do not damage the appliance refrigerant circuit
pipes.
• Do not use or place electrical appliances inside
the product if they are not of the type expressly
authorised by the Manufacturer.
• This appliance is not intended for use by
persons (including children) with reduced
physical, sensory or mental capabilities, or lack
of experience and knowledge, unless they have
been given supervision or instruction
concerning use of the appliance by a person
responsible for their safety. Children should be
supervised to ensure that they don't play with
the appliance.
• Do not swallow the contents (non-toxic) of the
ice packs (if provided).
• Use the refrigerator compartment only for
storing fresh food and the freezer compartment
only for storing frozen food, freezing fresh food
and making ice cubes.
• Do not store liquids in glass containers in the
freezer compartment since they may burst.
• Do not eat ice cubes or ice lollies immediately
after taking them out of the freezer since they
may cause cold burns.
• Before carrying out any maintenance or
cleaning operation, unplug the appliance or
disconnect the power supply.
• All appliances equipped with an ice-maker and
water dispenser must be connected to a water
supply that delivers drinking water only (with
mains water pressure of between 0.17 and 0.81
Mpascals (1.7 and 8.1 bar)). Ice-makers and/or
water dispensers not directly connected to the
water supply must be filled with drinking water
only.
• The Manufacturer declines any liability if
the above advice and precautions are not
respected.
HOW TO OPERATE THE REFRIGERATOR
COMPARTMENT
This appliance is a refrigerator with a
star freezer
compartment.
OR is a refrigerator with a
star freezer compartment.
Optimal appliance performance is obtained at ambient
temperatures between +10°C and +38°C.
Switching on the appliance
Once the power plug is inserted in the mains socket, unless the
thermostat (1) is set to symbol z the inside light switches on each
time the door is opened.
Once the temperature has been set – see next chapter – the
appliance is ready for use.
Adjusting the temperature
- To adjust the temperature in the compartment, turn the
thermostat control knob:
• to lower numbers 1-2/MIN for the LEAST COLD internal
temperatures;
• to 3-4/MED for a MEDIUM temperature;
• to 5-7/MAX for the COLDEST temperature.
Thermostat setting on z: no operation, no light.
Note:
The ambient air temperature, frequency of door opening and the
position of the appliance can affect internal temperatures. These
factors must be taken into account when setting the thermostat.
Important
• Thermostat adjustment (1) will depend on where the
appliance is installed, ambient temperature and frequency of
door opening.
How to use the refrigerator compartment:
!Position the food as illustrated in the figure:
1. Cooked food
2. Dairy products, preserves, cheese, butter
3. Fish, meat
4. Sliced cold meat
5. Fruit, vegetables, salad
6. Small jars, eggs
7. Tubes, small jars
8. Small bottles
9. Bottles
Note:
• Cover food to prevent it drying out.
• Hot food must be allowed to cool properly before being placed
in the refrigerator.
• Make sure sufficient space is left for air to circulate around the
food.
Defrosting of the refrigerator compartment is completely
automatic.
!
17
HOW TO OPERATE THE FREEZER
COMPARTMENT
Only for
or
appliances:
" Appliances with the symbol
can be used to
store already frozen food.
Appliances with the symbol
can be used to
store food for months and also to freeze food. The
amount of fresh food (in kg) that can be frozen in 24
hours is indicated on the appliance rating plate
(see paragraph “Product description”, point 6).
Freezing food
• Set the thermostat knob (1) to 3-4.
• Arrange the food to be frozen centrally in the
freezer compartment.
• Avoid contact between already frozen food and food that
has yet to be frozen (approx. 20 mm distance).
• After 24 hours turn the thermostat knob (1) back to the
normal position.
Important:
Wrap and seal the food in:
• Aluminium foil, cling film, watertight plastic bags,
polythene containers with lids or special freezer
containers.
When purchasing frozen food products:
• Ensure that the packaging is not damaged (frozen food in
damaged packaging may have deteriorated). If the package
is swollen or has damp patches, it may not have been
stored under optimal conditions and defrosting may have
already begun.
• Transport products in a thermally insulated cool bag.
• When shopping, leave frozen food purchases until last.
• Once at home, place the frozen foods immediately in the
freezer.
• If food has defrosted even partially, do not re-freeze it.
Consume within 24 hours.
• Avoid subjecting foods to temperature variations.
Observe the "best before" date on the package.
• Always observe the storage information on the package.
Making ice cubes
• Fill the ice cube trays (9) 3/4 with water and place them at
the bottom of the freezer compartment.
• Use a spoon handle to remove ice cube trays which stick
to the compartment.
Do not use sharp or pointed instruments.
18
"
HOW TO DEFROST AND CLEAN THE
APPLIANCE
Before carrying out any maintenance or cleaning
operations, unplug the appliance from the mains
socket. Defrost the freezer compartment when the ice
on the walls reaches a thickness of 3 mm.
• Remove foodstuffs from the
or
freezer and
turn the thermostat knob to z.
• The frozen food must be wrapped in sheets of newspaper
(or a cover) and kept in a cool place.
• Clean the freezer compartment using a sponge dampened
in a solution of lukewarm water and/or neutral detergent.
• Rinse and dry carefully.
• Defrosting of the refrigerator compartment is fully
automatic.
# Clean the defrost water drain outlet regularly in order to
ensure that defrost water is removed correctly.
After cleaning, reconnect the appliance to the power
supply.
Do not use abrasive products.
Prolonged disuse.
• Empty the compartments.
• Disconnect the appliance from the mains power supply.
• Defrost and clean.
• Leave the doors open to prevent formation of unpleasant
odours.
#
19
TROUBLESHOOTING GUIDE
When you hear these noises
..your appliance is alive!!!
1. Temperature inside the compartments is not low
enough.
•Is food preventing the doors from closing properly?
•Is the thermostat setting correct?
•Are the air circulation vents blocked?
2. Temperature inside the refrigerator compartment
is too low.
•Is the thermostat setting correct?
3. The appliance is excessively noisy.
•Has the appliance been installed correctly?
•Are the pipes at the back touching or vibrating?
•It is normal to hear the noise of the refrigerant liquid in
circulation.
4. The appliance is not working?
•Is there a power failure?
•Is the plug properly inserted in the socket?
•Is the double-pole switch on?
•Do the household electrical system protection devices
work correctly?
•Is the power cord damaged?
5. Water collects at the bottom of the refrigerator
compartment.
•Is the thermostat setting correct?
•Is the defrost water drain blocked?
6. The inside light is not working. $ Perform the
checks for point 4, and then:
•Disconnect the appliance from the mains power supply.
•If necessary replace the bulb with a new one
(220÷240V, 15 Watt).
•Removing the light bulb: Unscrew the bulb anticlockwise
as shown in the figure
20
$
AFTER-SALES SERVICE
Before contacting After-Sales Service:
1. See if you can solve the problem yourself with the
help of the “Troubleshooting guide”).
2. Switch the appliance on again to see if the problem
has been solved. If it has not, disconnect the
appliance from the power supply and wait for
about an hour before switching on again.
3. If the problem persists after this course of action,
contact After-sales Service.
Specify:
• the nature of the problem,
• the model,
• the Service number (the number after the word
SERVICE on the rating plate on the inside of the
appliance),
• your full address,
• your telephone number and area code.
Note:
The direction of door opening can be changed.
If this operation is performed by After-sales
Service it is not covered by the warranty.
INSTALLATION
& Install the freezer away from heat sources.
Installation in a hot environment, direct exposure to the
sun or installation near heat sources (heaters, radiators,
cookers) will increase power consumption and should
therefore be avoided.
If this is not possible, the following minimum distances
must be respected:
30 cm from coal or paraffin stoves
3 cm from electric stoves.
• Install the appliance in a dry, well-ventilated place.
• Clean the interior (see “How to defrost and clean the
appliance”).
• Fit the accessories.
• Check the door seal is not damaged or deformed,
especially after installation or reversal of door opening.
Electrical connection
• Ensure that the voltage indicated on the appliance rating
plate corresponds to the domestic supply voltage.
• Regulations require that the appliance is earthed. The
Manufacturer declines all liabilities for injury to persons or
damage to property resulting from failure to observe these
regulations.
• If the plug and socket are not of the same type, have the
socket replaced by a qualified electrician.
• Do not use extension cables, multiple sockets or adapters.
&
21
ELECTRICAL CONNECTION
1) For Great Britain only
Warning - this appliance must be earthed
Fuse replacement
If the mains lead of this appliance is fitted with a BS 1363A 13amp
fused plug, to change a fuse in this type of plug use an A.S.T.A.
approved fuse to BS 1362 type and proceed as follows:
1. Remove the fuse cover (A) and fuse (B).
2. Fit replacement 13A fuse into fuse cover.
3. Refit both into plug.
Important:
The fuse cover must be refitted when changing a fuse and if the
fuse cover is lost the plug must not be used until a correct
replacement is fitted.
Correct replacement are identified by the colour insert or the
colour embossed in words on the base of the plug.
Replacement fuse covers are available from your local electrical
store.
2) For the Republic of Ireland only
The information given in respect of Great Britain will frequently
apply, but a third type of plug and socket is also used, the
2-pin, side earth type.
3) Socket outlet / plug (valid for both countries)
If the fitted plug is not suitable for your socket outlet, please
contact Whirlpool Service for further instruction. Please do not
attempt to change plug yourself. This procedure needs to be
carried out by a qualified Whirlpool technician in compliance with
the manufactures instructions and current standard safety
regulations.
22
9:45
Pagina 1
Montageanweisung
- bitte aufbewahren -
Änderungen vorbehalten
GB
Installations Instructions
F
Instructions de montage
tous droits de
modification réservés
- à conserver -
Montage-aanwijzing
- bewaren a. u. b. -
2
200 cm
min 50
Belüfung nur bei Sondereinbau (nur 12 M)
Ventilation for special installation (12 M only)
Aération pour l’encastrement spécial (12 M seulement)
Ventilatie bij speciale inbouw (alleen 12 M)
Ventilazione (solo per 12 M) attraverso la griglia frontale del prodotto
wijzigingen voorbehouden
Istruzioni per il montaggio
E
Instrucciones de montaje
P
Instruções de montagem
salvo variazioni
- pore favor guardarlas -
reservado el derecho de
indoducir modificaciones
560 +
reservado o direito de
fazer alterações
mi
- e favor guardar -
Montageanvisning
- bedes opbevaret -
ret til ændringer forbeholdes
Monteringsanvisning
N
Monteringsanvisning
- bewara för senare bruh -
rätt till tekniska förändringar
förbehålles
- ta godt vare pa denne -
endringer forbeholders
Asennusohje
- Säilytä huolella -
oikeus muutosiin plätään
falls vorhanden
only sipplied with certain models
si la cas
niet bij alle apparaten aanwezig
se esistente
10
n5
50
2
200 cm
1) 873 (9 M)
- Attenzione: conservare -
S
FIN
min: 50 mm
subjekt to modification
I
DK
1A
3) 1220 (12 M)
2) 1020 (10 M)
NL
- please don’t throw it away -
1
1) 874 + 11 (9 M)
D
3-03-2006
3) 1221 + 11 (12 M)
2) 1021 + 11 (10 M)
5019_102_00230
2
200 cm
1,5 cm
545
adjustable RAIL SYSTEM
with cover screws
9 M/10 M/12 M
RAIL
Printed in Italy
02/06
2
80 cm
120 cm 2
mm
200 cm
~ 120 cm
5019 102 00230
2
3
4
Türanschlagwechsel vor dem Geräteeinbau
Change over door hinging before installation of appliance
Changement de côté des charnières de porte avant la mise en place de l’appareil
De draairichting van de deur wijzigen voor het inbouwen
Il cambio della cerniera della porta prima del montaggio dell’apparecchio
2
3
1
4
6
5
Bei Türanschlagwechsel auch Sternefachtür
wechseln
Change over of star compartement flap
du compartiment
Inversion de la droite vers la gauche du portillion
Verwisselen van de drairichting van
de sterrenvriesvakdeur
Reversibilità della porta comparto congelatore
2
5019_102_00230
3-03-2006
9:45
Pagina 2
5
6
7
0 mm
6x
4 x 15
20 mm
4x
3,9 x 9,5
✤ 12 M
1
2
4x
4 x 15
1
2
1
✤ 12 M
8
9
PR ‹FEN
CHECK
CONTROLER
CONTROLEREN
CONTROLLARE
10
2x
Gerätetür bei Bedarf nachjustieren
Readjust if necessary
Resserrer au besoin
Indien noodzakelijk nastellen
Se necessario, regolare
3,9 x 9,5
3x
4 x 15
20 mm
1
1
2
2
min 1 mm
1
2
✤ 12 M
2
1
2
Nur für geteilte Möbeltür
Only for wooden door realised in two pieces
Uniquement pour portes a plusieurs éléments
Allen voor dubbele meubeldeur
Solo per antine in legno realizzate in due pezzi
To contact our Customer Care Department, or for Service,
please contact us on the details below.
Passionate about style
Customer Care Department • The
Group Ltd. • Harby Road • Langar • Nottinghamshire • NG13 9HY
T : 01949 862 012 F : 01949 862 003 E : [email protected] W : www.cda.eu