1
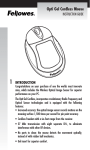
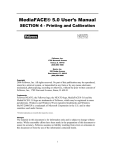
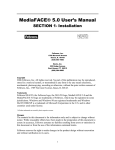
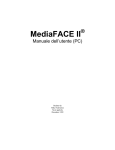
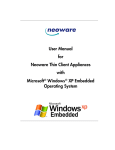
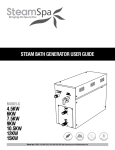
MediaFACE® 5.0 User’s Manual
Section 2 - Design Wizard
Fellowes, Inc.
1789 Norwood Avenue
Itasca, IL 60143
(630) 893-1600
Neato, Inc.
250 Dodge Avenue
East Haven, CT 06512
(800) 984-9800
Copyright
2006 Fellowes, Inc. All rights reserved. No part of this publication may be reproduced,
stored in a retrieval system, or transmitted in any form or by any means electronic,
mechanical, photocopying, recording or otherwise, without the prior written consent of
Fellowes, Inc., 1789 Norwood Avenue, Itasca, IL 60143.
Trademarks
Fellowes/NEATO, the Fellowes logo, the NEATO logo, MediaFACE® 5.0 and the
MediaFACE® 5.0 logo are trademarks of Fellowes, which may be registered in some
jurisdictions. Windows and Windows 98 are registered trademarks and Windows
Me/NT/2000/XP is a trademark of Microsoft Corporation in the U.S. and in other
countries used under license.
*All other trademarks are owned by their respective owners.
Changes
The material in this document is for information only and is subject to change without
notice. While reasonable efforts have been made in the preparation of this document to
assure its accuracy, Fellowes assumes no liability resulting from errors or omissions in
this document or from the use of the information contained herein.
Fellowes reserves the right to make changes in the product design without reservation
and without notification to its users.
1
Welcome/Introduction
Thank you for choosing MediaFACE® 5.0 as your labeling design software. With its advanced
capabilities, MediaFACE® 5.0 is more than just a software package, it’s a complete labeling
design system.
Designed with both the expert and novice in mind, MediaFACE® 5.0 is one of the easiest and
most feature-rich label preparation programs available for Windows. It has the following features
and capabilities:
? Create labels, inserts and sleeves for CD/DVD, Video, MiniCD, and more
? Wizard Mode – Design and Print a Label in minutes!
? 500+ High Resolution Graphic Designs for Backgrounds.
? Unique Digital Fingerprinting feature which automatically downloads and transfers track
information for MP3 and other popular music files - no more typing in track names!
? Import playlists from popular Media Player systems such as MediaPlayer or iTunes.
? Direct import of images from digital camera, scanner, or webcam
? Custom High-End Graphics Design Tools
? Pre-designed Project Templates for special occasions
The approach used in this manual is to guide you through the fundamentals of using the
MediaFACE® 5.0 labeling system to create personalized CD, DVD and additional media labels
and inserts. While the manual uses a CD label as an example, the same design concepts, such as
adding images and text, can be applied to any template used. This Section of the manual covers
using the Design Wizard.
2
Table of Contents
SECTION 2: Design Wizard............................................................................................... 4
Starting the Design Wizard ............................................................................................. 4
Select a Project Template............................................................................................ 4
The Work Area................................................................................................................ 5
Add Image....................................................................................................................... 6
Working with Images...................................................................................................... 9
Move an image:........................................................................................................... 9
Resize an image: ......................................................................................................... 9
Rotate an image:........................................................................................................ 10
Delete an image:........................................................................................................ 10
Edit multiple images: ................................................................................................ 10
Select Text Layout .................................................................................................... 11
Working with Text ........................................................................................................ 12
Text layout formats:.................................................................................................. 12
Add custom text:....................................................................................................... 12
Insert a Playlist from an audio CD via Finger Printing: ........................................... 13
Enter a Playlist from a previously created file:......................................................... 14
Enter a File List:........................................................................................................ 14
Change font or color: ................................................................................................ 14
Move a text field:...................................................................................................... 15
Resize a text field:..................................................................................................... 15
Rotate a text field:..................................................................................................... 15
Delete a text field:..................................................................................................... 16
Modify multiple text fields at the same time: ........................................................... 16
Select Paper and Printing .......................................................................................... 16
Troubleshooting ................................................................................................................ 17
3
SECTION 2: Design Wizard
Starting the Design Wizard
There are two ways to start the Design Wizard. The first is to simply double-click the
program icon on the desktop. This shortcut was created during the program installation.
Please be patient as the Wizard may take several seconds to load. Be sure not to doubleclick the icon multiple times while waiting.
A second way to start the Design Wizard is to click the Windows “Start” button and
select: (All) Programs>MediaFACE 5.0> MediaFACE 5.0 Design Wizard
Select a Project Template
? Once the Design Wizard opens, you will be asked to select a project template.
Since the wizard only allows the design of a single label during each use, you will
be presented with a list of label templates carried on the Neato papers. Select the
particular label you would like to prepare.
We will be creating a standard CD label as an example. Please select the first category by
clicking once on ‘CD/DVD Label (2up)’. Your selection will become highlighted.
Figure 2.1 - Select Project Template screen in Design Wizard
Click ‘Next’ to continue. This will bring us to the background selection screen and the
main work area in the Design Wizard.
4
The Work Area
The work area in the Design Wizard consists of several options that help you edit and
view the labels you create. The main components of the Design Wizard work area are
shown in the diagram below and discussed in detail.
Figure 2.2 – The main work area in the Design Wizard
?
Wizard Step Name
?
Option Display Window and Tabs
?
Label Workspace
?
Action Buttons
?
Advanced Mode Button
– this is a title naming the step of the wizard currently in focus.
Option tabs in the window below will be different for each step
– this is the large area on the left side of the screen.
Custom label design options, such as adding text or adding images are offered and
selected here. As you chose different tabs, you will notice that the tool buttons
immediately below the tab will change. Place your mouse over each of the tool
buttons to learn its function.
– this is the area to the right of the Option Display Window. Labels
are designed, edited and viewed here.
– these allow you to control the details of your actions, such as fitting
an image to your label.
– this button is present on each page of the Design Wizard. It
allows you to jump from Wizard mode into the MediaFACE® 5.0 Advanced Mode.
The Advanced Interface is a more powerful interface that you can use to design your
labels. Your current design will be carried into the Advanced Mode for further work,
but once you choose to go to the Advanced Interface, you cannot return to the Design
Wizard.
5
?
Navigation Buttons
– each screen in the Design Wizard contains a ‘Back’ and ‘Next’
button in the lower right corner of the screen. These buttons allow you to easily move
back and forth between each step in the label design process.
Add Image
Now that we’ve selected our project template and have become more familiar with the
work area, we’re ready to begin designing our CD Label. You should be at the Add
Image step.
In the Options Display Window, you will see six option tabs. These tabs offer six
different ways of creating a background for your label. Clicking on each tab will display
the individual navigation window for that option. A brief description of each tab option is
listed below the diagram:
Figure 2.3 Add Image screen in Design Wizard
By clicking on the buttons directly under the tab name, you can change the window view
to thumbnails, small icons, list or detail view.
The five tabs for selecting images are listed below:
?
Image Library -
MediaFACE® 5.0 (full version) contains over 500 high-resolution
graphic images to choose from. They are in six folders named Library (1-6).
? File – Image files can be selected from directories (folders) on a hard drive or CD.
The Up1level button at the top of the page will help you navigate to the folder
which contains your picture. MediaFACE® 5.0 supports the following graphic
formats:
.JPG, .BMP, .GIF, .TIF, .PCX, .CMP, .DCX, .ICO, .PCD, .CUR, .FPX, .EPS,
.PNG, .PCT, .PSD, .RAS, .TGA, .WMF and .WPG.
6
?
Scanner
– Images can be imported directly from a scanner. Buttons at the top of
the page can be used to activate your scanner software which performs the actual
scan.
? Camera – images can be downloaded directly from a digital camera.
? Webcam - this option allows you to import images directly from a webcam. Action
viewed through a webcam can be paused and captured and imported onto your
label.
? Color Fill - this option allows you to create a color pattern to use as a background
for your label
Click once on the Image Library tab. In the Option Display Window, you will see a list of
folders and image files. The folders are the main groups of images available in the
MediaFACE® 5.0 libraries. We will use some images from Library 2 to create our label.
For our CD label example, we will use image201 from the Library 2 folder. Double-click
the Library 2 folder and find the following image:
Image201.jpg
When you have found the image, there are two ways to actually transfer the image to
your label. The first way is to double-click the image and it will pop onto the label as a
thumbnail. The second way is to highlight the image by clicking on it once, and then
click the “Insert Image” button. Clicking this button once will make the image pop onto
the label as a thumbnail. You can select a “Fit to Image” mode from the drop down mode
list, then hit “Fit to Image” to resize it for your label. You can alternatively control the
way the image transfers by preselecting the mode from the “Fit to Image” mode list.
7
Figure 2.4 Applying an image to the label
After you have inserted the image onto your label, click on the arrow for the dropdown
list that controls the “Fit to Label” mode. Select the desired mode, the click on the “Fit to
Label” button.
Figure 2.4 Fitting an image on the label
For our CD label example, we will be adding two graphics from Library 2. Double-click
the Library 2 folder and scroll down until you find the following images:
8
Please note that when adding more than one image, the thumbnails will overlap when
initially placed on the label. Please refer to the next section, “Working with Images” to
move the images on the label.
Working with Images
Several actions, such as moving, resizing, scaling, rotating and deleting can be performed
on images once they’ve been added to your label. Details of each action are discussed
below.
Move an image:
? Left-click once to select the image. The mouse pointer changes to the
Move/Edit tool as shown here:
? Left-click once on the image, hold down the mouse button and drag the image
to its new location.
? Release the mouse button after you’ve moved the image to its new location on
the label.
Resize an image:
? Left-click once to select the image. The mouse pointer changes to the
Move/Edit tool and sizing handles will be displayed around the border of the
image.
? To scale an image (Resize while retaining the aspect ratio), hold down the
Shift key while dragging a handle. Scaling an image will keep its original
proportions. As you scale the image, the percentage value of its original size
will be displayed as shown here:
? To resize without keeping the aspect ratio, move your mouse to one of the
sizing handles. The mouse pointer will change to a smaller Move/Edit tool, a
tiny 4-way arrow. Left-click and hold the mouse button down while dragging
the handle in any direction. Selecting different handles will have different
stretching or shrinking effects on the image. As you resize the image, the
point position (X and Y values) will be displayed as shown here.
9
Rotate an image:
? Double-click on the image. The mouse pointer changes to a small cross-hair
with a circle in the lower right quadrant.
? Hold down the left mouse button while dragging the mouse in a circular
motion. As you rotate the image, the angle value will be displayed as shown
here:
Delete an image:
? Left-click once to select the image.
? Click on the Delete button, or hit the Delete key on your keyboard.
Multiple selection of image fields is another option offered in the Design Wizard. By
selecting multiple image fields, all of the actions listed in the Working with Images
section can be applied to a group of images at the same time. This is especially useful
when you want to align several images to a specific location on the label.
Edit multiple images:
? Left-click on one of the images.
? Holding down the Ctrl key, left-click another image. A thin light-blue outline
will appear around both of the images. The two images are now grouped
together and will be treated as one image. Any action that is applied - moving,
resizing, rotating or deleting - will be applied to both images simultaneously.
? To ungroup the images, left-click on an open area of the label.
For our CD label example shown below, two images were inserted, moved and resized to
a smaller scale:
10
Figure 2.5 Add Picture screen with additional images
After you have inserted the images onto your label and moved them to a new position,
click the Next button to continue. The next step will be to add text to your label.
Select Text Layout
The next step is to add Text to our label.
Figure 2.6 Select Text Layout screen with Text tabs
The Text Layout screen allows you to add text to your label using one of the text layouts
illustrated by the gold CD thumbnails below the label workspace. It also provides several
text editing and text effect options. Note that the first text layout choice does not display
the block of Sample Text. On the Text Layout screen, you will see the three main tabs:
11
?
?
Custom
– This option allows you to enter and edit your own text on your label.
– This option allows you to load track information using the Playlist or
Digital Finger Printing feature. Artist, album and play list information can be
downloaded from the Internet or Media Player and added to your label.
? File List – This option allows you to choose a directory and add a list of file names
as a text list for your label. Browse to the desired folder by clicking on the ‘Pick
Directory’ button in the upper right corner of the File List page.
Play List
Working with Text
The two types of text that can be added to your label are simple and enhanced. Simple
text is displayed exactly as it is typed in without any major visual changes. Enhanced text
is text displayed in a variety of layout formats. The second layout showing the curved
words “Title” and “Subtitle” is an example of enhanced text.
Text layout formats:
Directly below the Label Workspace where your CD label is displayed, there are several
text layout format options to choose from. Scroll through and select each one to see how
the text differs when displayed with each format. You can always change formats as
you’re creating the text for your label. However, when you switch back and forth
between formats, your text will be reset to the simple text format. You will have to
reapply any enhancements to your text, including font, rotation and angle changes. You
may also need to resize or reposition the text fields when changing formats.
For our CD label example, shown below, the fourth text layout option was selected:
Figure 2.7 – Selecting a text layout format
Next, let’s create our CD label using the ‘Custom’ text tab.
Add custom text:
? Click on the Custom tab.
12
? Highlight the contents of the Title box. Type “Presentations” in the box.
? Highlight the contents of the Subtitle box. Type “Quarterly Reports” in the
box.
? Highlight the contents of the Text box. Type “2005” in the box
Figure 2.8 – Adding custom text
As you type in the text, you will see it instantly appear on the CD label in the Label
Workspace. The text will be displayed in the default font style and size. After predefined
text options are discussed below, we will look at options available to change the
appearance of the text on the label.
In addition to custom text (which you type yourself), MediaFACE® 5.0 also allows you
to add predefined text, such as a play list or file list. Play lists are files of type *.m3u,
*.pls, *.wpl, or *.asx previously created by a program such as Windows Media Player or
iTunes. A Play list can also be added using Neato’s Digital Finger Printing service. This
process samples music from your music CD, queries the music library on the internet to
identify the song, and creates a list of song titles to add to your label. NOTE: You must
be connected to the Internet to us e the Finger Printing feature. File Lists from
directories can be read from a disk or drive and inserted as text on your label. For both
options, the text is entered as a simple text field and can later be edited and manipulated..
Steps for adding predefined text to your label are included below:
Insert a Playlist from an audio CD via Finger Printing:
?
?
?
?
?
Connect to the internet
Insert an audio CD into your drive.
Click on the PlayList tab in the Option Display Window
Click the Choose Directory button (upper right).
Select the drive containing the audio CD from the list and click OK. The
window will show track numbers and times from the CD.
? Click the Finger Print button (bottom row on left). Music tracks will be
sampled and looked up in the music library. When identified, the system will
13
return artist, album name and individual track information (song title and
duration) to display both in the Option Display Window and on your label.
? Song titles and times can be edited in the Option Display Window. Click onc e
on the song title or time field to select it, then double-click to edit the text.
Enter a Playlist from a previously created file:
?
?
?
?
?
?
Click on the Playlist tab.
Click the Choose Playlist button (top row on left).
Select the directory containing the playlist file.
Select the playlist file and click Open.
The playlist will be displayed both in the Display Window and on your label.
Song titles and times can be edited in the Option Display Window. Click once
on the song title or time field to select it, then double-click to edit the text.
Enter a File List:
?
?
?
?
Click on the File List tab.
Click the Choose Directory button (top row).
Select the directory to display and click OK.
The contents of the directory (filenames and dates) will be displayed both in
the Display Window and on your label.
? The file list can be edited in the Option Display Window. Click once on the
text field to select it, then double-click to edit the text.
Now we will look at options available to change the appearance of the text on the label.
As with images, several actions can be performed on text once it has been added to your
label. These actions include font and color changes; moving; resizing or scaling; rotating;
and deleting. Details of each action are discussed below.
Change font or color:
?
?
?
?
Left-click on the label once to select the Title field. (“Presentations”)
Right-click on that text field to open the pop-up menu for that field.
Select Font from the pop-up menu. The Font dialog box will open.
Select the desired font, font style and font size. You can also change the font
color. If you change the font size, you may have to change the size of the text
box on your label to display all of the text.
? Repeat these steps for each text field you want to change.
For our CD label example, shown below, we selected Arial>Bold>18>Black for each
text field:
14
Figure 2.9 change Text properties with the Font button
Move a text field:
? Left-click once to select the text field. The mouse pointer changes to the
Move/Edit tool.
? Left-click once and hold down the mouse button while dragging the mouse.
? Release the mouse button after you’ve moved the text field to its new location
on the label.
Resize a text field:
? Left-click once to select the text field on the label. The mouse pointer changes
to the Move/Edit tool and sizing handles will be displayed around the border
of the text field.
? Next, move your mouse to one of the sizing handles. The mouse pointer
changes to a smaller Move/Edit tool.
? Left-click and hold the mouse button down while dragging the handle in any
direction. Selecting different handles will have different stretching or
shrinking effects on the text field. As you resize the text field, the point
position (X and Y values) will be displayed.
? To scale a text field, hold down the Shift key while dragging the handle.
Scaling a text field will retain its original proportions. As you scale the text
field, the percentage ratio of its original size will be displayed.
Rotate a text field:
? Double-click on the text field. The mouse pointer changes to a small crosshair with a small circle in the lower right quadrant..
? Hold down the left mouse button while moving the mouse in a circular
motion. As you rotate the text field, the angle value will be displayed.
15
Delete a text field:
? Left-click once to select the text field.
? Click on the Delete button or hit the Delete key on your keyboard. Once
deleted, the text field cannot be restored while in the Wizard.
Multiple selection of text fields is another option offered in the Design Wizard. By
selecting multiple fields, all of the actions listed in the Working with Text section can
be applied to a group of text fields at the same time. This is especially useful when
you want to align several text fields to a specific location on the label.
Modify multiple text fields at the same time:
? Left-click on one of the text fields.
? Holding down the Ctrl key, left-click another text field. A thin light-blue
outline will appear around both of the text fields. The two text fields are now
grouped together and will be treated as one text field. Any action that is
applied - moving, resizing, rotating or deleting - will be applied to both text
fields simultaneously.
? To ungroup the text fields, left-click on an open area of the label.
For our CD label example, shown below, the text fields inserted earlier were modified
and moved.
Figure 2.10 – Resizing and moving text fields
Select Paper and Printing
Now that we’ve designed our CD label, it’s time to print it out. Refer to the Calibration
and Printing section of the manual for information on that topic.
16
Troubleshooting
The purpose of this chapter is to help you with any issues concerning your MediaFACE®
5.0 software. If you have a question concerning the software or issues running the
application, please refer to the appropriate section in this manual or consult the Help file.
If you cannot find the answer to your question, contact NEATO Technical Support. You
can email us at [email protected] or call us at 866-775-7860.
Before calling NEATO Technical Support
There are several steps you can take before calling technical support. Performing these
steps can solve many problems and often eliminate the need for telephone assistance.
Reinstall MediaFACE® 5.0 Software
Reinstalling MediaFACE® 5.0 can solve many operational problems. Select “Repair”
when offered by the install program.
Check for a Software Upgrade/FAQ
Fellowes/NEATO is constantly improving upon the MediaFACE® 5.0 software.
Therefore, the version that you are currently using may not be the latest. To obtain a
software upgrade, visit our support page at www.neato.com/support. In many cases,
upgrading the software can solve the problem. While at our site, you may also find it
helpful to refer to the most frequently asked questions (FAQ’s).
Check for Printer and Video Driver Upgrades
Printer and Video graphic manufacturers are constantly updating their products to
conform to the latest advancements in technology. Because of this, you may need to
update your printer or video driver to correct the problem. To do so, contact the
manufacturer of the printer or video graphics card.
NOTE: Most printer/video graphic manufacturers will place driver updates on their
web sites free of charge.
Check for Software Conflicts
It is advised that you disable all running programs before you install MediaFACE® 5.0.
By doing so, you will prevent any software conflicts that may occur. Once the installation
process is complete, you can enable these programs again.
Optimize Your Hard Disk
Use a disk utility such as Scandisk to check whether your hard disk contains bad
sectors that may be causing your system to lock up or crash. You can then use a
utility to defrag the hard drive which will optimize its performance. NOTE: In most
17
cases your operating system will have these tools already installed. If they are not
installed in your system, refer to your operating system manual.
Checklist for Calling Technical Support
When you need to contact technical support, please be in front of your computer and have
the following information ready:
For all issues:
?
Version of MediaFACE® 5.0 you are working with.
?
If uninstalled, check the version of MediaFACE® 5.0 from CD or file name
?
To find the version from a running program:
?
Open MediaFACE® 5.0.
?
Close the Select Project Template window if open
?
Select Help from the Menu Bar.
?
Select About MediaFACE® 5.0. from the dropdown menu
?
The dialog box will list the full version number of the program.
Installation or operational issues:
?
Operating System (i.e. Windows 98SE, Me, XP, 2000)
?
Amount of RAM (i.e. 128MB, 256MB)
?
Amount of Free space on your Hard Drive (in megabytes)
Printing or Calibration issues
?
Printer Style (i.e. Laser, Ink Jet)
?
?
?
Printer Brand (i.e. HP, Epson, Canon, Lexmark)
Printer Model (i.e. HP 940c, Epson 890, Canon S750)
Printer connection (i.e. USB, Cable, Network)
18