1
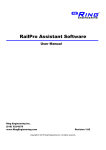
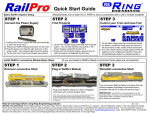
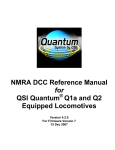
TM
TM
LM-1 RailPro Locomotive Module
INSTRUCTION MANUAL
Thank you for purchasing this RailPro
locomotive Module by Ring Engineering. We take
pride in the products that we produce and hope
you find this locomotive module to be a great
addition to your model train layout.
Please read all warnings and instructions
before installation and use. For the latest
information from Ring Engineering, please visit us
on the web at www.RingEngineering.com.
to the LM-1 through the air by use of RF
transmission! The Direct Radio is very fast giving
your locomotive quick response to your controls.
Further, a controlling device can detect your LM-1
with just a few touches on the screen. Because
of Direct Radio, you can load a picture of your
locomotive to the LM-1! You can also load
Sounds, Light Effects and much more!
TM
REAL
SOUND
TECHNOLOGY
Your LM-1 is equipped with Real Sound
Technology! This is Ring Engineering proprietary
technology that allows your LM-1 to produce
realistic locomotive sounds!
TM
INSTALLATION INSTRUCTIONS CAN BE
FOUND ON THE REVERSE SIDE OF THIS
SHEET.
WARNINGS
• This product contains small parts and is not
recommended for persons under the age of
FOURTEEN (14).
• Maximum voltage is 18 Volts. Only power your
LM-1 module with a Ring Engineering Inc.
RailPro Power Supply designed for the LM-1 or
a DCC power supply that only has the signal
that is described in NMRA DCC standards S9.1 and S-9.2.
• This product contains a chemical known to the
state of California to cause cancer and birth
defects (or other reproductive harm).
• If this module is wired incorrectly, or the
maximum allowed voltage is exceeded, it is
possible that enough heat can be generated to
ignite flammable material, causing a fire. The
use of improper resistors for LED lights is one
possible source of this danger.
• Do not remove enclosure.
Description
The LM-1 is a module that you can install into
a model train locomotive so the locomotive can
be controlled and setup by a Ring Engineering
RailPro Controller, such as the HC-1 Handheld
Controller with a Color Touch Screen! After the
LM-1 is installed in a locomotive, you will be able
to control the locomotive speed, direction, up to 4
light outputs and sounds! The LM-1 has “Direct
Radio” (RF transceiver) built inside. The built in
RF module allows commands and data to be sent
and received to and from the module. You can
install a picture of the locomotive that you will
install the LM-1 into, so you can detect and load
the picture into a RailPro Controller such as the
HC-1. Then you will be able to touch the screen
of the HC-1 to take control of this LM-1 or other
LM-1’s!
The LM-1 is electrically compatible with the DCC
plug found in many locomotives to promote easy
installation. However, the LM-1 responds to
RailPro Direct Radio commands only and DOES
NOT respond to DCC commands and can not
be controlled or setup with any DCC system.
Features of the LM-1
DIRECT
TM
RADIO
Your LM-1 is equipped with Direct Radio! This
allows Ring Engineering Controlling Devices such
as the HC-1, Handheld Controller with Color
Touch screen, to control and configure your
locomotive by sending and receiving data directly
DOC1017 Rev 1.04 © 2012 Ring Engineering, Inc.
Silent
Drive
Silent Drive is a feature of your LM-1 that allows
your locomotive motor to be driven with a signal
that does not cause your locomotive motor to
make any humming noises; so your locomotive
can glide along quietly.
More features of the LM-1:
• Simple setup via a Color Touch Screen
Controller. The setup using a RailPro
controller is so easy many users may find it not
necessary to use a manual to even adjust
more advanced settings like Start Speed or
Acceleration.
• The LM-1 responds to speed settings in 0.1%
increments. Therefore, the LM-1 responds to
1000 different speed steps for smooth and
accurate speed control.
• You can adjust the Start Speed, Top Speed,
Acceleration and Deceleration.
• You can set the Speaker volume in real time!
• You can configure the buttons so any function
can be at any position. You can setup only the
buttons that you want to use.
• Give this module a Password so only the
people you want can control this locomotive
module.
• You can give this module a name so it can be
easily recognized on the screen.
• Your LM-1 has a Low Speed Enhance Setting.
When low speed enhance is turned on, your
locomotive will be able to maintain lower
speeds without prematurely stopping.
• You can change the forward motor direction.
This is useful if the motor wires are connected
backwards. You can change this setting
instead of changing the motor wiring.
• The LM-1 program can be updated to a newer
revision by receiving information through Direct
Radio! It is likely that you will be able to get a
newer version of the Program for this module
from Ring Engineering’s Internet site and add
new capabilities that currently do not exist in
this module! There are two ways to update the
Program in this module. 1) Use a controlling
device like the HC-1 and load a new program
from Ring Engineering’s Internet site
(www.RingEngineering.com). 2) Send the LM-1
back to Ring Engineering and our technician
can do it for you. There will be a fee involved
to send the LM-1 to Ring Engineering for an
update.
See your RailPro Controller Instructions for
details on how to adjust and control your LM-1.
Ring Engineering believes that our locomotive
module is compatible with most HO Scale
locomotives that are DCC ready. However, it is
www.RingEngineering.com
not practical for Ring Engineering to test our
module with all available locomotives. It is your
responsibility to determine if our module is
suitable for your application. Ring Engineering is
not responsible for any damage that may happen
to your equipment from using our LM-1 module.
Limited One Year Warranty
Ring Engineering, Inc. (Ring Engineering) warrants
that for a period of one year from the date of purchase,
this product will be free from defects in material and
workmanship. Ring Engineering, at its option, will repair
or replace this product or any component of the product
found to be defective during the warranty period.
Replacement will be made with new or remanufactured
product or component. If the product is no longer
available, replacement may be made with a similar
product of equal or greater value. This is your exclusive
warranty.
This warranty is valid for the original retail purchaser
from the date of initial retail purchase and is not
transferable. Ring Engineering dealers, distributors, or
retail stores selling Ring Engineering products do not
have the right to alter, modify, or any way change the
terms and conditions of this warranty.
The warranty does not cover normal wear of parts or
damage resulting from negligent misuse of the product.
Further, the warranty does not cover Acts of God, such
as fire, flood, hurricanes, and tornadoes.
Ring Engineering shall not be liable for any incidental
or consequential damages caused by the breach of any
express or implied warranty or condition. Except to the
extent prohibited by applicable law, any implied warranty
of merchantability or fitness for a particular purpose is
limited in duration to the duration of the above warranty.
Ring Engineering disclaims all other warranties or
conditions, express or implied statutory or otherwise.
Some states or jurisdictions do not allow the exclusion or
limitation of incidental or consequential damages or
limitation on how long an implied warranty lasts, so the
above limitation or exclusion may not apply to you. This
warranty gives you specific legal rights, and you may
also have other rights that vary from state to state.
How to Obtain Warranty Service
Send the product with a copy of the original
sales receipt included by UPS or Parcel Post with
insurance prepaid to:
Ring Engineering, Inc.
228 W. Lincoln Hwy. #167
Schererville, IN 46375
Make certain that your Ring Engineering product is
properly packed to avoid damage in transit to the factory.
Please allow four to six weeks for service. Please also
make sure to include return and contact information
(Your name, address, phone number and e-mail address
if you have one).
If your Ring Engineering product is not covered by
warranty, or has been damaged, an estimate of repair
costs or replacement costs will be provided to you for
approval prior to servicing or replacement.
FCC Statement
This equipment has been tested and found to comply
with the limits for a Class B digital device, pursuant to
part 15 of the FCC Rules. These limits are designed to
provide reasonable protection against harmful
interference in a residential installation. This equipment
generates uses and can radiate radio frequency energy
and, if not installed and used in accordance with the
instructions, may cause harmful interference to radio
communications. However, there is no guarantee that
interference will not occur in a particular installation. If
this equipment does cause harmful interference to radio
or television reception, which can be determined by
turning the equipment off and on, the user is encouraged
to try to correct the interference by one or more of the
following measures:
• Reorient or relocate the receiving antenna.
• Increase the separation between the equipment and
receiver.
• Connect the equipment into an outlet on a circuit
different from that to which the receiver is connected.
• Consult the dealer or an experienced radio/TV
technician for help.
TM
Step 1
Installation Instructions
Step 2
Step 3
Solder the two wires to the
speaker.
If your locomotive has an 8 pin
DCC plug, then install an
adapter wiring harness.
S
Remove the locomotive shell.
Check the manufactures directions to
learn how to remove the shell.
Choose a locomotive that is DCC
Ready**
Step 4
It is OK to connect either of the violet
speaker wires to the speaker positive
terminal. Just unplug the speaker
harness if you do not have a speaker.
Step 5
If your locomotive has a 9 pin DCC plug, then you
can skip this step.
IMPORTANT: Be sure pin 1 is oriented correctly.
Insulate any unused wires.
Step 6
Use your RailPro controller,
such as the HC-1, to control
and setup the features of the
locomotive.
Plug in the LM-1 Module.
Reinstall the locomotive shell.
IMPORTANT: This connector is keyed
and will only go in one way.
Tip! If the LM-1 module does not have enough room in the locomotive you may be able to remove or modify a weight to create the required space.
NOTE: **The LM-1 is electrically compatible with the DCC plug found in many locomotives to promote easy installation. However, the LM-1 responds to
RailPro Direct Radio commands only and DOES NOT respond to DCC commands and can not be controlled or setup with any DCC system.
IMPORTANT:
1. You must use a RailPro controller, such as the HC-1, to set the Motor Full Load Current. This will allow the
module to apply the proper amount of power to the motor and if the motor draws too much power, the LM-1 module will
fault and send a message to the controlling device. See your RailPro controller’s user manual for details on how to set
the Motor Full Load Current. This is also important for linked locomotives to run well together.
2. Be sure the motor and all lights are not connected to the chassis or frame. The only electrical connections should be
the ones show in the wiring diagrams below. Isolating the motor and lights is likely to be necessary when converting
non-DCC ready locomotives to use RailPro.
3. When finished, be sure the wiring is not rubbing on the motor weights or axles!
4. Speaker should be rated for at least 1 watt of power handling and 4 to 16 ohms. Speaker should be baffled to achieve
better sound quality.
Wiring Diagram using LED’s for Lights
Wiring Diagram
DOC1017 Rev 1.04 © 2012 Ring Engineering, Inc.
WARNING: Using LED’s without resistors can damage the LED’s!
Use 1k Ohm 1/4 W for 15mA or 750 Ohm 1/2W for 20mA.
WARNING: If you use the wrong resistor, it is possible to generate
www.RingEngineering.com enough heat to ignite flammable material, and possibly cause a fire.