1
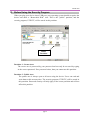
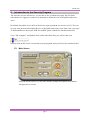
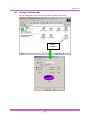
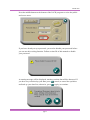
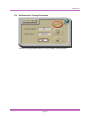
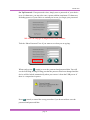
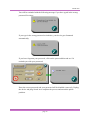
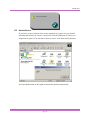
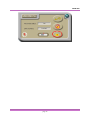
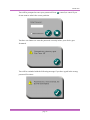
AVB SecureDisk User Manual Ver 1.00 LOCKv200 Table of Contents A. Introduction .................................................................................................. 2 B. General Description ..................................................................................... 2 C. Features ......................................................................................................... 3 D. Before Using the Security Program ............................................................ 4 E. Introduction to the Security Program ........................................................ 5 E1. Main Screen ......................................................................................... 5 E2. Configure Partition Sizes ................................................................... 10 E3. Set Password / Change Password ...................................................... 13 E4. Disable Password ............................................................................... 15 E5. Unlock Device.................................................................................... 16 F. Checking the Security Program’s Version ............................................... 19 G. Running the Security Program as a Privileged User .............................. 19 H. FAQ – Frequently Asked Questions.......................................................... 20 page 1 LOCKv200 A. Introduction The LOCK security program applies to AVB secure series of products only. Usage of this program on other products is prohibited. Plug in only ONE device at a time. DO NOT plug in two or more secure devices at the same time when running this program. Windows 98 users, please install driver first before plugging in your device and running this program. Windows 2000 users, please upgrade to Service Pack 3 (SP3) or Service Pack 4 (SP4) first before using this program. The security program, “Utility”, is only designed for the Windows operating system. B. General Description Thank you for choosing AVB USB Drive. The product you have is a USB flash memory storage device with security function. This security function provides you with high privacy to your personal data. It lets you set your own password, up to 16 characters, with adjustable public and secure areas. Securing your data had never been easier with the LOCK security program. LOCK provides the user with convenience and privacy, as well as high security to data stored on you USB flash memory storage device. Feel safe with the LOCK security function. page 2 LOCKv200 C. Features (a) Disk-free - program stored on device, so you don’t need to carry the program with extra CD-ROM or floppy discs. (b) Easy to Operate – program is pictorial with easy to understand icons and friendly descriptions. (c) Customized Password – users can set their own password up to 16 characters. (d) Tampering Protection – users are only allowed to type in the password five times, when typing in the wrong password for the sixth time, the drive will be formatted to protect the data from being exposed to others. (e) Password Reminder – there is a password hint function available in case the user forgets his/her password. The user can set their own password hint up to 32 characters. (f) Multi-language Support – supports English, Japanese, Simplified Chinese, or Traditional Chinese language interface. The program will auto detect the language used by the operating system. Default interface is set to English page 3 LOCKv200 D. Before Using the Security Program When you plug your device into a USB port, your operating system should recognize the device and show a “Removable Disk” icon. This is the “public” partition, and the security program, UTILITY, will be stored in this partition. Public Partition Partition 1 – Secure Area The secure area is protected by your password and can only be accessed by typing in the correct password. If no password exists, then you cannot use this partition. Partition 2 – Public Area The public area is always open to all users using the device. Users can read and write data to this area any time. The security program, UTILITY, will be stored in this partition. Password security will only apply to the secure partition and will not affect this partition page 4 LOCKv200 E. Introduction to the Security Program The first time you use this device, you are able to use it without any setup, but for future convenience we suggest you take a few moments to define the size of the public and secure areas. By default, the public area is 90% of the device capacity, and the secure area is 10%. You can set your own password and adjust the size of the public and secure areas with a few easy steps. To understand more about your AVB SecureDisk, please read the the introduction below. Go to “My computer” and double click on the removable disk, you will see this icon. Double click on this icon to execute the security program, and you will see the window below. E1. Main Screen Move the mouse cursor over the icons and the friendly description of the button will appear in a second. page 5 LOCKv200 E2. Configure Partition Sizes You can change the sizes of the two partitions (public and secure). Public Partition page 6 LOCKv200 Press the middle button on the bottom of the LOCK program to resize the public and secure areas. If you have already set up a password, you need to disable your password before you can use this resizing function. Follow section E4 of this manual to disable your password. A warning message will be displayed, warning you that data will be destroyed. If (cancel) to cancel the operation you have not yet backed up your data, press and back up your data first; otherwise, press (apply) to continue. page 7 LOCKv200 Move the pointer to the left or right to change the size of the public and secure areas. The minimum capacity that can be set for the public area is 2MB. Press (cancel) to cancel the operation if you do not want to change the current public and secure area sizes; otherwise, press (apply) to continue. Formatting will then take place. Please wait until the “Formatting Completed” message appears. After configuring (resizing and formatting) your USB device, please remember to remove it from USB port and plug it back in before you start using it again. page 8 LOCKv200 You can see the change in capacity for both partitions. Before Configure Size After Configure Size NB : After configuring (resizing) is completed, all data will be erased, but the security program will be restored in the public area automatically. page 9 LOCKv200 E3. Set Password / Change Password Press the top right-hand button to set up or change your password. page 10 LOCKv200 Set Up Password : If no password exists, simply enter a password of your choice up to 16 characters; you may also enter a password hint (maximum 32 characters including spaces) of your choice to remind you in case you forget your password. NB : You can only type in English letters and numbers. Tick the “Show Password” box if you want to see what you are typing. (apply) to save the password and password hint. You will When ready, press see the following message telling you that the password has been changed and the device will be locked automatically when you remove it from the USB port or if there is a suspension in power. (cancel) to cancel the set up procedure if you do not wish to save the Press password and password hint. page 11 LOCKv200 Change Password : If a password is set, you will need to enter the current password before you can make any changes. Enter the current password and a new password of your choice. You may also edit the password hint at the same time. Tick the “Show Password” box if you want to see what you are typing. Press (apply) to save changes to the password and password hint. You will see the following message telling you that the password has been changed and the device will be locked automatically when you remove it from the USB port or if there is a suspension in power. Press (cancel) to cancel the change password procedure if you want to keep the current password and password hint. page 12 LOCKv200 E4. Disable Password Press the second button on the right to disable (remove) the password. You will be prompted to enter your password. Press (cancel) to cancel if you do not want to disable your current password and password hint. You have six chances to enter the password correctly before your device gets formatted. page 13 LOCKv200 You will be reminded with the following message if you have typed in the wrong password five times. If you type in the wrong password a sixth time, your device gets formatted automatically. If you have forgotten your password, click on the password hint and see if it reminds you with your password. Enter the correct password and your password will be disabled (removed). Unplug the device and plug it back in to complete the process and mount the public partition. page 14 LOCKv200 E5. Unlock Device If you have set up a password, the secure partition of your device gets locked automatically when you remove your device from the USB port or if there is a suspension in power. You will not be able to read or write data to this partition. Press the third button on the right to unlock the partition temporarily. page 15 LOCKv200 page 16 LOCKv200 You will be prompted to enter your password. Press do not want to unlock the secure partition. (cancel) to cancel if you You have six chances to enter the password correctly before your device gets formatted. You will be reminded with the following message if you have typed in the wrong password five times. page 17 LOCKv200 If you type in the wrong password a sixth time, your device gets formatted automatically. If you have forgotten your password, click on the password hint and see if it reminds you with your password. Once you have entered the correct password, the secure partition will be available temporarily until you remove your device from the USB port or if there is a suspension in power. You can read and write data to the secure partition once it is unlocked. page 18 LOCKv200 F. Checking the Security Program’s Version In some situation it is necessary to know this information. For example, if you need to upgrade to newer versions of the software or if you have trouble when using this software and are seeking help from our technical staff, our technical staff may ask you which version you are using. ([email protected]) Simply press the top left-hand button and the LOCK version will be displayed. G. Running the Security Program as a Privilege User Some users may see the following screen. Check and make sure that you have plugged in your device and your Windows operating system recognized your device. Otherwise, please check FAQ Q3 for more detail. page 19 LOCKv200 H. FAQ – Frequently Asked Questions Q1 A1 My Windows 98 cannot detect my device, what can I do? Make sure you have installed the latest device driver for your device. If you have already done so, but Windows still cannot detect your device, please try the following. (1) Go to "Safe Mode" => "Device Manager" (2) Remove any devices that's related to USB (3) Remove any "Unknown devices" (4) Remove any device which are not present (5) Remove any devices that's related to your device (6) Restart machine (7) Install driver if necessary (download latest driver from website) (8) Restart machine as requested and then plug in your device Q2 A2 My Windows ME / 2000 / XP cannot detect my device, what can I do? Since there is no driver required for these operating systems, the device uses the built-in driver (USB Mass Storage Class Driver) from these operating systems. If your operating system cannot find the device, then it is very likely that the built-in driver files were missing or corrupted; please try to recover these files from other computer or from the original Windows operating system CD. NB : Windows 2000 users, please upgrade to service pack 3 or later. Q3 When I run the LOCK program, it displayed “Please insert the device or run this utility as privileged user”? This problem may occur in Windows 2000 or Windows XP, under the following two situations. Situation 1 : You have forgotten to insert your device. Situation 2 : The LOCK program requires some security privileges in these Windows operating systems. If you are not the administrator of the computer, these privileges may be restricted. Please check with your MIS or administrator of the computer to open up the privileges for you. (see following method) A3 When logged into the account affected, run GPEDIT.MSC from the run menu (If there is not enough access use the 'Run As' option). We now need to find the security policy "Devices: Allowed to eject removable NTFS media". It is located in Local Computer Policy >> Computer Configuration >> Windows Settings >> Security Settings >> Local Policy >> Security Options. You need to change the access from "Administrators and Power Users" over to "Administrators and Inter Active Users". page 20 LOCKv200 Q4 A4 I cannot resize the partitions, what can I do? The resizing tool only appears when the drive is set to the public partition, and the password must be disabled to start the resizing tool. However, the partition that mounts when the password is disabled is the secure area, and thus the resizing tool cannot appear. Unplugging and re-plugging the drive in will allow Windows to “rediscover” the device configuration and mount the public partition. Q5 The public area is inaccessible when the password is disabled. A5 When the password is disabled, the private partition will mount. Unplugging and re-plugging the drive in will allow Windows to “rediscover” the device configuration and mount the public partition. REMOVING the AVB USB Flash Drive When you plug the device into the USB port of your computer, you will see a “Removable Disk” icon in the file manager window. Double click the “safe removal” icon; the “Unplug or Eject Hardware” window will be pop up. You can select the device you want to remove. Then, click the “Stop” button. After that you can unplug the device from the USB port of your computer. Windows will instruct you to remove the device when it is safe to do so. Warning If you do not follow the safe removal procedure in Windows & Mac OS systems, data loss caused by the “write cache” issue may happen. www.anko-usa.com Tech Support [email protected] page 21