1
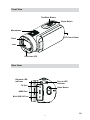
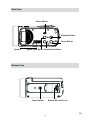
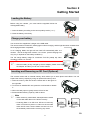
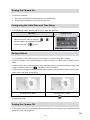
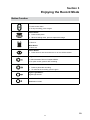
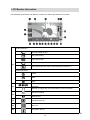
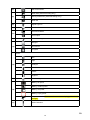
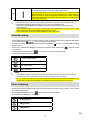
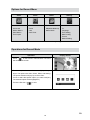
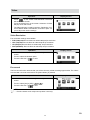
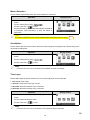
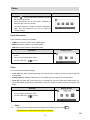
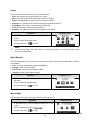
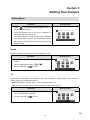
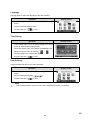
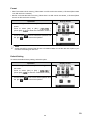
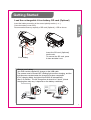
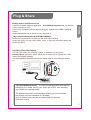
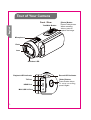
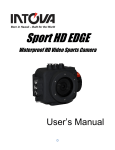
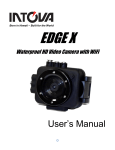
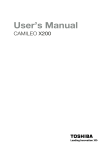
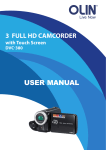
Instruction Manual Model name DZHV595E Precautions Safety Instruction • Do not store the camera in intense heat or cold for long periods of time, as this may result in permanent damage to the camera. • Do not use or store the product in dusty, dirty, or sandy areas, as its components may be damaged. • Do not drop, puncture or disassemble the camera. High-voltage internal components create the risk of electric shock when exposed. • Use the camera with care. Rough handling may damage the internal components. • Do not use harsh chemicals, cleaning solvents or strong detergents to clean the product. Clean only with a slightly damp soft cloth. • Do not ignite the flash close to eyes, or closer than prescribed minimum distances as this may result in damage to vision. When using the flash, the camera should be at least one meter from the eyes of the subject. • Do not open the battery cover while an image is being recorded. Doing so will not only make storage of the current image impossible, it can also corrupt other image data already stored in file. • Test for proper operation before using the camera Operating Environment Conditions • This camera is designed for use in temperatures ranging from 5°C to 35°C (41°F to 95°F). • Do not use or keep the camera in the following areas: - In areas subject to direct sunlight - In areas subject to high humidity or dust - Near air conditioners, heaters, or other areas subject to temperature extremes - Inside of a closed vehicle, especially one parked in the sun. - In areas subject to strong vibration Battery Usage and Power Supply • Use only the type of battery that came with your camera. Do not use batteries of different specifications. Doing so may lead to the potential for serious damage. • Insert the battery according to the instructions. Inserting the battery incorrectly can cause damage to the product and possibly start a fire. • Remove the battery to avoid the fluid leakage if the camera is not going to be used for an extended time. • If the battery is crushed or damaged, remove it immediately to avoid battery fluid leakage and abnormal expansion. • The camera may feel warm after long periods of continuous use which is normal and not a malfunction. Battery will be in high temperature after long time using (about 1hr), Please be careful while taking out the battery. • Please be careful if you may need to take out the battery by finger nail. 2 EN SOME DOS AND DON’TS ON THE SAFE USE OF EQUIPMENT This equipment has been designed and manufactured to meet international safety standards but, like any electrical equipment, care must be taken if you are to obtain the best results and safety is to be assured. ******************************************* DO read the operating instructions before you attempt to use the equipment. DO ensure that all electrical connections (including the mains plug, extension leads and inter-connections between the pieces of equipment) are properly made and in accordance with the manufacturer’s instructions. Switch off and withdraw the mains plug before making or changing connections. DO consult your dealer if you are ever in doubt about the installation, operation or safety of your equipment. DO be careful with glass panels or doors on equipment. DO route the mains lead so that it is not likely to be walked on, crushed, chafed, or subjected to excessive wear and tear or heat. ******************************************* DON’T remove any fixed cover as this may expose dangerous voltages. DON’T obstruct the ventilation openings of the equipment with items such as newspapers, tablecloths, curtains, etc. Overheating will cause damage and shorten the life of the equipment. DON’T allow electrical equipment to be exposed to dripping or splashing, or objects filled with liquids, such as vases, to be placed on the equipment. DON’T place hot objects or naked flame sources such as lighted candles or nightlights on, or close to equipment. High temperatures can melt plastic and lead to fires. DON’T use makeshift stands and NEVER fix legs with wood screws - to ensure complete safety always fit the manufacturer’s approved stand or legs with the fixings provided according to the instructions. DON’T use equipment such as personal stereos or radios so that you are distracted from the requirements of traffic safety. It is illegal to watch television whilst driving. DON’T listen to headphones at high volume, as such use can permanently damage your hearing. DON’T leave equipment switched on when it is unattended unless it is specifically stated that it is designed for unattended operation or has a stand-by mode. Switch off using the switch on the equipment and make sure that your family know how to do this. Special arrangements may need to be made for infirm or handicapped people. DON’T continue to operate the equipment if you are in any doubt about it working normally, or if it is damaged in any way - switch off, withdraw the mains plug and consult your dealer. ABOVE ALL --- NEVER let anyone especially children push anything into holes, slots or any other opening in the case - this could result in a fatal electrical shock; --- NEVER guess or take chances with electrical equipment of any kind --- it is better to be safe than sorry! **************** Contents Section 1 Getting to Know Your Camera.......................................... 5 Section 2 Getting Started................................................................... 9 Section 3 Enjoying the Record Mode............................................. 11 Section 4 Enjoying the Playback Mode.......................................... 22 Section 5 Setting Your Camera ...................................................... 27 Section 6 Viewing Photos and Videos on TV................................. 31 Section 7 Viewing Video & Photo on PC........................................ 32 Section 8 Uploading Files to Internet............................................. 33 Section 9 Specifications and System Requirements.................... 36 Section 10 Troubleshooting.............................................................. 38 Section 11 Additional Information.................................................... 39 Section 1 Getting to Know Your Camera Overview The camera with 5 Mega Pixel sensor can take H.264 videos. By way of using H.264 technology, more videos can be taken within certain amount of memory. High quality images with up to 16 mega-pixels can also be delivered smoothly. With a colour LCD monitor, users can compose images and examine them easily. The camera features 3” (16:9) LCD touch panel which is an ideal platform for you to operate your camera. The menu options are accessible with your finger. With the touch panel, you can select the options directly and quickly. The camera also features video recording at HD resolution of 1920x1080. You can also connect it to an HDTV via an HDMI cable, and easily playback the recorded high-definition videos on the wide screen HDTV. Moreover, the camera has an advanced uploading feature. With the exclusive built-in Internet Direct application, you can upload the videos captured by the camera to the web site more effortlessly . ISO sensitivity and colour balance can either be adjusted automatically or changed manually. A 120x digital zoom helps you to control over the videos and photos you take. The varied effect options, such as Time Lapse and Slow Motion, make recording more fun. The built-in memory allows you to take photos and to record videos without a memory card. The memory card slot allows users to increase the storage capacity. Hitachi cannot compensate for any damages caused when recording is not made normally or recorded contents cannot be played back because of a defect in the digital camera device or memory card. Hitachi cannot be responsible for your recorded video and audio. If you or a third party make a mistake when handling this digital camera device or memory card, etc., the recorded contents may be lost. Hitachi cannot be responsible for compensation for damage due to loss of recorded contents. Note • Partial memory of the built-in memory is used for the camera’s Firmware code and software. • Install the bundled software application on the CD, ArcSoft MediaImpression, for viewing the videos correctly on a PC. Features •• 23X Optical Zoom •• 3” touch LCD (16:9) •• Digital Light •• Stabilization •• Time Lapse •• Slow Motion •• Pre Record •• Pause Record •• ISO 6400 •• Motion Detection •• Internet Direct •• Stereo microphone 5 EN Standard Accessories Unpack the package and make sure all standard accessories listed are included: •• Camera •• USB Cable •• AV Cable •• HDMI Cable •• Adaptor •• Lithium-ion Rechargeable Battery •• Quick Guide •• CD-ROM (Software, User’s Manual) •• Pouch •• Lens Cover Set (Lens cover and Strap) 6 EN Front View Tele/Wide Button Photo Button Microphone LCD Touch Panel Flash Lens Self-timer LED Rear View Playback LED Indicator Record LED Indicator TV Port Video Button HDMI Port Mini USB 2.0 Port 7 EN Side View Power Button Playback Button Pause Button Speaker Digital Light Button Stabilization Button Bottom View Battery/SD card Cover Tripod Socket 8 EN Section 2 Getting Started Loading the Battery Before using the camera, you must load the supplied Lithium-ion rechargeable battery. 1.Insert the battery according to the correct polarity marks ( + or -). 2.Close the battery cover firmly. Charge your battery You must use the supplied AC charger or the USB cable. The camera must be turned OFF; blinking light confirms charging, and the light becomes constant when the charging has been completed. In AC charging Mode, the light will turn itself off automatically after 3~5 minutes . The full charge time is about 4 to 5 hours. (Actual charging time may vary. It depends on the battery conditions.) The full charge battery usage for continuous Full HD (1080p 30) video recording is about 1.5~2 hours. Note • After the battery is fully charged by the AC adapter, please remove the adapter, and then you can turn on the camera. Inserting and Removing an SD Card (Optional) The camera comes with an internal memory which allows you to store photos and videos. You can expand the memory capacity by using an optional SD memory card. 1.Insert the memory card into the slot. Please refer to the figure on the right side. 2.To remove an installed SD card, press the card inwards to release it. 3.When the card pops out, gently remove it from its slot. 4.Recommended memory capacity: 1GB or above. Note • When a memory card is fitted, videos/photos are saved on the card rather than on the built-in memory. • Protecting Data on an SD Card: SD Card is read-only when it is locked. No photos or videos can be recorded when the SD card is locked. Make sure the lock is on the writeable position before recording any media. 9 Writeable position Write-Protected Position EN Turning the Camera On • To turn on the camera: 1. Flip out the LCD panel; the camera will turn on automatically. 2. Or press [Power Button] for one second to turn it on. Configuring the Initial Date and Time Setup • The time setting screen appears to allow you to setup date and time: Operation Display Screen 1. Touch Year, Month, Day, Hour, Minute, and AM/PM to set. 2. Adjust the numeric value by touching / 3. Touch the [OK] icon to validate the setting. 4. Touch the Exit icon ( ) to exit. Getting Started • To record video: Press [Video Button] to record video. To stop recording, press it again. • To pause recording: Press [Pause Button] to pause recording. To continue the recording, press it again. • To take a photo during video recording: When recording video, press [Photo Button] to capture the image. The Dual record icon ( ) appears on the LCD monitor. • To take a photo: Press [Photo Button] halfway down until the focusing frame turns from white to green. Then, press it fully down to take photo. Focusing Frame: White Focusing Frame: Green • To view stored videos and photos: Press [Playback Button] or touch on the screen to switch to the Playback mode. Turning the Camera Off • To turn off the camera: You can either press [Power Button] for one second, or you can place the LCD panel back to its original position. 10 EN Section 3 Enjoying the Record Mode Button Function Video Button: 1.Press to take video. 2.To stop recording, press it again. Photo Button: 1. Press to take photo. 2. When recording video, press to capture the image. Tele Button: 1.Zoom In. Wide Button 1.Zoom out. Power Button: 1. Press down for one second to turn on or turn off the camera. Playback Button: 1.Switch between Record / Playback Mode. 2.For quick review, press it after recording. Pause Button: 1. Press to pause the recording. 2. To continue the recording, press it again. Digital Light Button: Digital Light On/Off. Stabilization Button: Stabilization On/Off. 11 EN LCD Monitor Information The indicators shown below may display on LCD when videos and photos are recorded: Video Resolution Full HD (1080p 30 fps) HD (720p 60 fps) HD (720p 30 fps) VGA (640X480) (1) Slow Motion (Record video at 432x240(QVGA) resolution.) Photo Resolution 16MP 5MP 3MP (2) 00:05:30 Recording time of the video that can still be taken at current resolution Number of images that can still be taken at current resolution (3) Self-timer enabled Dual Record (4) Playback Mode On (5) Menu On (6) Information bar On 12 EN (7) SD Card Inserted Flash Auto (Photo Recording Only) (8) Red Eye Reduction (Photo Recording Only) Flash Off (9) Digital Light On (10) Stabilization Pre-Record Mode (11) Time Lapse (12) Macro Focusing On Daylight (13) Fluorescent Tungsten Scene Skin Night (14) Backlight Black/White Classic Negative (15) Date Printing On Battery: full power Battery: medium power (16) Battery: low power Battery: empty power DC power mode (The camera is turned on and plugged in the AC charger.) (17) Motion Detection 13 EN Zoom meter: 1X~2700X (23X Optical zoom and 120X Digital zoom) The camera will zoom in by optical zoom first. As you continue to hold the [Tele] button, it will zoom in up to 23x.(blue area on the zoom bar.) When you want to zoom in beyond the optical zoom range, hold the [Tele] button again, the digital zoom will be activated up to 120X.(yellow area on the zoom bar.) (18) Note • Stabilization, Time Lapse, and Slow Motion functions can not be used simultaneously. • Stabilization and Night Mode functions can not be used simultaneously. • Pre-Record, Motion Detect, Slow Motion, and Time Lapse functions can not be used simultaneously. • In AC charging mode, you can turn on the camera and it will become DC power mode. In DC power mode, the camera is charged by less electric current. • The camera does not power off automatically in DC power mode. Video Recording • Press [Video Button] to start recording. When a video is being recorded, a time indicator will display on the LCD monitor ( ). To stop recording, press it again. • To pause recording: Press [Pause Button] to pause recording ( 00:00:36 ). To continue the recording, press it again. • Dual record: press [Photo Button] to capture the image.The Dual record icon( ) appears on the LCD monitor. • Press [Playback Button] or touch on the screen to view the recorded video. • Four resolution settings are available: Video Quality Full HD (1080p 30 fps) HD (720p 60 fps) HD (720p 30 fps) VGA (640X480) Note • The image resolution captured during video recording is the same as the video resolution. • The flash can not be used when capturing image during movies recording. • As you record one video clip up to about 4GB, the file system of the camera will split it up into several files, but the recording time and playback time on the camera do not be split. Photo Capturing • Press [Photo Button] halfway down until the focusing frame turns from white to green. Then, press it fully down to take photo. • Press [Playback Button] or touch on the screen to view the photos. • Three resolution settings are available: Image Quality 16 Mega Pixels 5 Mega Pixels 3 Mega Pixels 14 EN Using Zoom Function • The zoom magnifies images when recording video or taking photo. 1.To zoom in/out, press the Tele/Wide Button. 2.It can be set from 1X~2700X (23X Optical zoom and 120X Digital zoom) Using Digital Light Function • The setting allows you to extend the brightness of the objects that are dark or in the shadow. It can extend the dynamic range for backlight and high contrast sense, so that the objects will be brighter and clearer. • To use the Digital Light function: 1.Press [Digital Light Button] in Record Mode. The Digital Light icon( ) appears on the LCD monitor. 2.Press [Video Button] to start recording or press [Photo button] to take photo. Note • To avoid the persistence of image on the screen, please turn off the Digital Light function after you used it in the dark situation. Using Stabilization Function • To record with an effect of reducing camera shake to result in more stable video. • To use the Stabilization function: 1.Press [Stabilization Button] in Record Mode. The Stabilization icon( ) appears on the LCD monitor. 2.Press [Video Button] to start recording. Showing Information on the screen • Touch the on-screen button to show or not to show the indicators on the LCD screen. Operation 1.Touch Screen on the screen. The information bar will show on the screen. 2.Touch again to hide all indicators. 3.Touch to display the indicators. 15 EN Options for Record Menu Video • • • • • Resolution Pre-record Motion Detect Slow Motion Time Lapse Photo • • • • Resolution Flash ISO Self-Timer Effect Setting* • Scene • Sound • WB(White Balance) • TV • Macro Mode • Language • Time Setting • Date Printing • Format • Default Setting * Please refer to Section 5 for the detailed information about [Setting]. Operations for Record Mode Operation Display Screen on the screen in Record Mode. The menu 1.Touch will show on the screen. 2.Touch the option icons on the screen lightly with your finger. The options are Video, Photo, Effect, and Setting. 3.The option submenu will pop up on the screen. 4.Touch to select the specific option you want to adjust. ( The selected option will be highlighted.) 5.Touch the Exit icon ( ) to exit. 16 EN Video Operation Display Screen on the screen in Record Mode. The menu 1. Touch will show on the screen. 2. Touch the [Video] icon on the screen. Submenu of Video will pop out on the screen. 3. The Video submenu contains 5 options-- Resolution, Prerecord, Motion Detect, Slow Motion, and Time Lapse --for you to adjust the camera settings. Video Resolution Four resolution settings are available. • FHD (1080p 30):Record videos at 1920x1080p 30 fps resolution. • HD+ (720p 60):Record videos at 1280x720p 60 fps resolution. • HD (720p 30):Record videos at 1280x720p 30 fps resolution. • VGA (640X480): Record videos at 640x480p 30 fps resolution. Operation Display Screen 1. In the Video menu, touch the [Resolution] icon on the screen. 2. Touch to select the desired option. 3. Touch the Exit icon ( ) to exit. Pre-record The Pre-record function ensures that you will not miss any critical recording opportunities. The videos are recorded 3 seconds more before the [Video Button] is pressed. Operation Display Screen 1. In the Video menu, touch the [Pre-record] icon on the screen. 2. Touch to select [On] or [Off] ( 3. Touch the Exit icon ( ). ) to exit. Note • Aim the camera at the subject and position it securely. 17 EN Motion Detection Record videos automatically when the camera detects a movement. Operation Display Screen 1. In the Video menu, touch the [Motion Detect] icon on the screen. 2. Touch to select [On] or [Off] ( ). 3. Touch the Exit icon ( ) to exit. 4. Camera will start to record video automatically if it detects a movement. Stop recording if it does not detect a movement. Note The motion detection function will be disabled when the battery power is empty ( ). Slow Motion Record videos with slow motion effect. When the video is played, the playback time will be longer than the actual recording time. Operation Display Screen 1. In the Video menu, touch the [Slow Motion] icon on the screen. 2. Touch to select [On] or [Off] ( 3. Touch the Exit icon ( ). ) to exit. Note • Pause function can not be used when Slow Motion function is activated. Time Lapse Record still images at specific intervals you can set and play them as one video file. • Off: Disable Time Lapse. • 1 Second.: Record one frame per second. • 3 Seconds: Record one frame every 3 seconds. • 5 Seconds: Record one frame every 5 seconds. Operation Display Screen 1. In the Video menu, touch the [Time Lapse] icon on the screen. 2. Touch to select the desired option. 3. Touch the Exit icon ( ) to exit. Note • Pause function can not be used when Time Lapse function is activated. 18 EN Photo Operation Display Screen on the screen in Record Mode. The menu 1. Touch will show on the screen. 2. Touch the [Photo] icon on the screen. Submenu of Photo will pop out on the screen. 3. The Photo submenu contains 4 options-- Resolution, Flash, ISO, and Self-Timer --for you to adjust the camera settings. Photo Resolution Three resolution settings are available. • 16MP:Shoot photo at 4608 x 3456, 16MP quality. • 5MP:Shoot photo at 2592 x 1944, 5MP quality. • 3MP:Shoot photo at 2048 x 1536, 3MP quality. Operation Display Screen 1. In the Photo menu, touch the [Resolution] icon on the screen. 2. Touch to select the desired option. 3. Touch the Exit icon ( ) to exit. Flash This camera has three flash settings. • Flash Auto:The flash fires automatically according to light conditions. Use this mode for general photography. • Red Eye Reduct. (Red Eye Reduction) :The pre-flash will fire to reduce the red-eye effect. • Flash Off: The flash will not fire under any circumstances. Use this mode when taking photo in a place where flash photography is prohibited, or when the subject is distant (beyond the range of the flash). Operation Display Screen 1. In the Photo menu, touch the [Flash] icon on the screen. 2. Touch to select the desired option. 3. Touch the Exit icon ( ) to exit. Note • The flash will be disabled automatically when the battery power is low ( ). • The flash will be disabled when the battery is charging. 19 EN ISO The camera adjusts the ISO sensitivity of its images automatically. Four manual ISO sensitivity settings are available. (800/1600/3200/6400). The larger the number is, the higher the ISO sensitivity is set to. Select a small number to shoot a smoother image. Select a large number to shoot an image in a dark location or to shoot a subject moving at high speed. Operation Display Screen 1. In the Photo menu, touch the [ISO] icon on the screen. 2. Touch to select the desired option. 3. Touch the Exit icon ( ) to exit. Note The image may become noisy when the ISO number is large. Self-Timer The self-timer allows you to take photos with a ten-second time delay. The self-timer light on the front of the camera will also blink. The speed of blinking will increase just before the photo is taken. Operation Display Screen 1. In the Photo menu, touch the [Self-timer] icon on the screen. 2. Touch to select [Off] or [On] ( 3. Touch the Exit icon ( ). ) to exit. Effect Operation Display Screen on the screen in Record Mode. The menu 1. Touch will show on the screen. 2. Touch the [Effect] icon on the screen. Submenu of Effect will pop out on the screen. 3. The Effect submenu contains 3 options--Scene, White Balance, and Macro Mode --for you to adjust the camera settings. 20 EN Scene You can select the mode according to the scene condition. • Auto: Shoot without any special effect on the image. • Skin: Shoot with an effect that makes skin tones more natural. • Night: Use Night Mode for night scenes or low light conditions. • Backlight: You can take shots when the bright light is behind the subject. • Black/White: The image is converted to black-and-white. • Classic: The image is converted to a sepia look. • Negative: The image is converted as the negative of the normal. Operation Display Screen 1. In the Effect menu, touch the [Scene] icon on the screen. 2. Touch to select the desired option. 3. Touch the Exit icon ( ) to exit. Note To avoid blurry photos, place the camera on a flat, steady surface, or use a tripod when taking shots in the Night Mode. White Balance The camera adjusts the colour balance of images automatically. Three manual white balance settings are available: • Auto: The clolur automatically adjusts white balance. • Daylight: Under outdoor condition. • Fluorescent: Under fluorescent light condition. • Tungsten: Under tungsten light condition. Operation Display Screen 1. In the Effect menu, touch the [White Balance] icon on the screen. 2. Touch to select the desired option. 3. Touch the Exit icon ( ) to exit. Macro Mode You can select the mode for recording close-up video and photo. Operation Display Screen 1. In the Effect menu, touch the [Macro Mode] icon on the screen. 2. Touch to select [Off] or [On] ( 3. Touch the Exit icon ( ). ) to exit. 21 EN Section 4 Enjoying the Playback Mode Button Function The Buttons have the following functions in Playback Mode. Video Button: 1.Switch to Record Mode. Tele Button: 1.Zoom In. Wide Button 1.Zoom out. Playback Button: 1.Switch between Record / Playback Mode. 2.For quick review, press it after recording. Pause Button: 1. In Video Playback Mode, press to pause the recorded video. 22 EN LCD Monitor Information Indicators on the LCD screen while in Playback Mode: Video Playback Mode Photo Playback Mode Video Resolution Full HD (1080p 30 fps) HD (720p 60 fps) HD (720p 30 fps) VGA (640X480) (1) Slow Motion (432x240(QVGA)) Photo Resolution 16MP 5MP 3MP Dual Record (The image resolution captured during videos recording is the same as the video resolution.) (2) (3) Video playback time counter. 0003/0005 Current number/ Total number of photo/video. Volume Return (4) Video stop (5) Previous video/photo (6) Video fast rewind 23 EN Video play (7) Video pause (8) Video fast forward (9) Next video/photo (10) Delete (11) (12) Slideshow Slideshow stop Magnification Indicator Operations for Playback Mode The Playback Mode is for viewing and managing videos and photos on the built-in memory or on an SD Card. Operation 1. Press [Playback Button] or touch Display Screen on the screen to switch to the Playback mode. 2. Touch to select the specific option. 3. Touch ( ) to back to Record Mode. 24 EN Video Playback Operation Display Screen / to play 1. In the Video Playback mode, touch or pause the videos. 2. Sweep to the right or touch to go to the previous video; sweep to the left or touch to go to the next video. 3. While playing videos, touch / to fast rewind/ forward. 4. Touch to increase the volume; touch to reduce the volume. 5. Touch ( ) to exit. Note • When the LCD is idle for a few seconds, the playback function icons will disappear automatically. Delete Videos Operation 1. Touch Display Screen to go to the Delete option screen. 2. Touch [Yes] to delete the current video or [No] to cancel the operation and to exit; touch [All (Delete All)] to delete all videos. 3. Before all videos are about to be deleted, a confirmation screen will appear; touch [Yes] to execute the operation and [No] to cancel the operation. Note • If a memory card has been inserted, you can only delete those videos stored on the card. • Videos on a written-protected memory card cannot be deleted. 25 EN Photo Playback Operation Display Screen 1. In the Photo Playback mode, sweep to the right or touch to go to the previous photo; sweep to the left or touch to go to the next photo. 2. While the photo is selected, press [Tele Button] to magnify. (The magnification Indicator appears on the screen) 3. To navigate the magnified photo, press on the screen and move as well. (The inner Magnification Indicator turns red) 4. Press [Wide Button] to zoom out or exit the magnification mode. 5. Touch / to start or to stop the slide show. 6. Touch ( ) to exit. Note • When the LCD is idle for a few seconds, the playback function icons will disappear automatically. Delete Photo Operation 1. Touch Display Screen to go to the Delete option screen. 2. Touch [Yes] to delete the current photo or [No] to cancel the operation and to exit; touch [All (Delete All)] to delete all photos. 3. Before all photos are deleted, a confirmation screen will appear; touch [Yes] to execute the operation and [No] to cancel the operation. Note • If a memory card has been inserted, you can only delete those photos stored on the card. • Photos on a written-protected memory card cannot be deleted. 26 EN Section 5 Setting Your Camera Setting Menu Operation Display Screen 1. Touch on the screen in Record Mode. The menu will show on the screen. 2. Touch the [Setting] icon on the screen. Submenu of Setting will pop out on the screen. 3. The Setting submenu contains 7 options for configuring your camera setup. They are Sound (operation sound), TV, Language, Time Setting, Date Printing, Format, and Default Setting. Sound Enable or disable the keypad tone and the operation sound. Operation Display Screen 1. In the Setting menu, touch the [Sound] icon on the screen. 2. Touch to select [On] or [Off] ( 3. Touch the Exit icon ( ). ) to exit. TV Ensure that the appropriate TV standard of your area is selected – either NTSC or PAL. Wrong TV system setting may cause image flickers. • NTSC(60Hz):USA, Canada, Japan, South Korea and Taiwan, etc. • PAL(50Hz):UK, Europe, China, Australia, Singapore and Hong Kong, etc. Operation Display Screen 1. In the Setting menu, touch the [TV] icon on the screen. 2. Touch to select [PAL] or [NTSC]. 3. Touch the Exit icon ( ) to exit. 27 EN Language Use this option to select the language of the user interface. Operation Display Screen 1. In the Setting menu, touch the [Language] icon on the screen. 2. Touch to select the desired option. 3. Touch the Exit icon ( ) to exit. Time Setting Operation Display Screen 1. In the Setting menu, touch the [Time Setting] icon on the screen to enter the time setting screen. 2. Touch Year, Month, Day, Hour, Minute, and AM/PM to set. 3. Adjust the numeric value by touching / 4. Touch the [OK] icon to validate the setting. 5. Touch the Exit icon ( ) to exit. Date Printing Imprint the date and time on the video and photo. Operation Display Screen 1. In the Setting menu, touch the [Date Printing] icon on the screen. 2. Touch to select [On] or [Off] ( 3. Touch the Exit icon ( ). ) to exit. Note • Date Printing function can not be used when Slow Motion function is activated. 28 EN Format • Yes: Format the built-in memory ( When there is no SD card in the camera ) / SD Card (When there is an SD card in the camera). • No: Do not format the built-in memory ( When there is no SD card in the camera ) / SD Card (When there is an SD card in the camera). Operation Display Screen 1. In the Setting menu, touch the [Format] icon on the screen. 2. Touch to select [Yes] or [No] ( (Touch [Yes] ). to enter the confirmation screen.) 3. Touch the [Yes ] icon to execute the operation and the [No ] icon to cancel the operation. Note All the data will be erased if the SD card is formatted. Make sure all the data are copied to your PC before formatting the SD card. Default Setting To restore the default factory setting, select this option. Operation Display Screen 1. In the Setting menu, touch the [Default Setting] icon on the screen. 2. Touch to select [Yes] or [No] ( (Touch [Yes] ). to enter the confirmation screen.) 3. Touch the [Yes ] icon to execute the operation and the [No ] icon to cancel the operation. 29 EN The following table indicates the camera’s default settings Setting Resolution Default Factory Setting FHD (1080p 30) for Video 5MP for Photo Stabilization Off Motion Detection Off Slow Motion Off Time Lapse Off Self-Timer Off ISO Auto Scene Auto White Balance Auto Flash Off Sound On TV Depends on shipping area Language Depends on shipping area Date Printing Off Volume Level 6 30 EN Section 6 Viewing Photos and Videos on TV Connecting to a High-Definition 16:9(Wide) TV 1.Connect the HDMI cable to your camera’s HDMI Out port. 2.Connect the other end of the cable to a television. 3.Set the video input source of your TV to “ HDMI.” 4.The steps for viewing stored videos and photos on HDTV are exactly the same as for viewing them on the LCD monitor. (16:9) Connecting to a non-high-definition 4:3 TV 1.Connect one end of the AV cable to your camera’s AV out port. 2.Connect the other end of the cable to a television. 3.The steps for viewing stored videos and photos on TV are exactly the same as for viewing them on the LCD monitor. (4:3) R 31 EN Section 7 Viewing Video & Photo on PC Installing Bundled Software The CD-ROM supplied with this camera contains 2 pieces of software. • ArcSoft MediaImpression is a user-friendly application that helps you managing your media, burning your video into DVD, and uploading your files to the web sites easily. • Adobe Reader is a popular program that you need to have installed to read the User’s Manual. Many computer users will find they already have this software installed on their computer. To install the bundled software: 1. Insert the CD-ROM into your computer’s CD-ROM drive. The autorun screen appears. 2. Click “Install ArcSoft MediaImpression”. Follow the on-screen instructions to complete the installation. Note • The detailed Instructions for the bundled software can be found within the program once the installation is completed. Click on [Extras] on the title bar and select [Help] to open the instruction manual. • Install the bundled software application, ArcSoft MediaImpression, for viewing the videos correctly on a PC. Transferring Photos or Videos to a Computer You can transfer photos or videos stored on your camera to a computer and send them in e-mails to friends or post them on the web sites. To do this you should: 1. Connect the computer and camera with the supplied mini USB 2.0 cable. 2. The videos and photos can be found on your computer at “My Computer\Removable Disk\ DCIM\100MEDIA”. (On the SD card in the camera) 3. The videos and photos can be found on your computer at “My Computer\DV(X:)\DCIM\100MEDIA”. (On the internal memory of the camera) 4. Under these folders, you can view, delete, move, or copy any video/photo you want. 32 EN Section 8 Uploading Files to Internet The built-in Internet Direct application offers you an easy way to upload your files to Internet instantly. It helps you share them with your family and friends on the web site. To upload files to Internet: 1. Connect the camera to your computer by using the supplied USB cable. 2.After making a USB connection, the AutoPlay window will appear. (It may be different based on OS recognition. If the AutoPlay window does not appear. Please click [My Computer]-->[DVAP]-->[DVAP. exe] to execute the application.) (In Windows XP) 33 EN 3.The main screen appears automatically on the desktop. (To view the recorded clips on Internet Direct, it is necessary to install ArcSoft MediaImpression first. ) Note • The web site may be not allowed to access in certain regions. 4. On the thumbnail screen, click on the up/down icon to change the pages. Click on the file(s) you want to upload. 5. Click on “ UPLOAD” to start uploading. 34 EN 6. Click on “ CANCEL” to stop uploading. To playback the video file: 1. Double click on the video clip on the thumbnail screen. 2. Click on the Play/Pause icon to play/pause. Click on the Return icon to return to the thumbnail preview screen. To setup your account information for the website: 1. Click on to go to the setup screen. 2. Fill in your account information in the blanks. Then click on “Save”. (If you do not have a account, please sign up on the website first.) 35 EN Section 9 Specifications and System Requirements Specification Image sensor 5 Mega pixel CMOS sensor Operation modes Video record, Photo record Lens Auto Focus Lens (F3.5) Focus range Macro Mode:1cm~120cm Normal Mode: 1 cm ~ infinity Zoom 1X~2700X (23X Optical zoom and 120X Digital zoom) Shutter Electronic LCD monitor 3” touch LCD (16:9) Storage media Built-in 128MB memory (partial memory is used for firmware code and software); SD/SDHC/SDXC card slot support (up to 64GB) Image resolution High 4608 x 3456 (16M pixels) (Interpolated) Standard 2592x1944 (5M pixels) Low 2048x1536 (3M pixels) Video resolution FHD (1080p 30) 1920X1080(30fps) HD+ (720p 60) 1280X720(60fps) HD (720p 30) 1280X720(30fps) VGA (640X480) 640X480(30fps) White balance Auto/Manual (Daylight, Fluorescent, Tungsten) ISO Auto/800/1600/3200/6400 Self-timer 10 seconds delay Flash Flash Auto/Red-Eye-Reduction/Flash Off File format Photo: JPG Video: AVI (H.264) Image play Single image/Slideshow PC interface Mini USB 2.0 port TV out NTSC/PAL selectable, HDMI Battery Lithium-ion rechargeable battery Dimension 126mm (L) x 57mm (H) x 60mm (W) Weight 340g ( without battery) 36 EN System requirements • Microsoft Windows XP/Vista/7 • Intel Pentium 4, 2.4 GHz or above • 512 MB RAM • 1 GB free HDD space • Available USB port • CD-ROM Drive • 16-bit Colour Display Note The LCD screen is manufactured using extremely high-precision technology, so over 99.99% of the pixels are operational for effective use. However, some tiny black and/or bright dots (white, red, blue or green) may appear on the LCD screen. These dots are a normal result of the manufacturing process, and do not affect the recording. 37 EN Section 10 Troubleshooting Troubleshooting 111 The flash is not working. The battery power is low. The flash will be disabled when the battery is charging. (The camera is in DC power mode.) In flash auto mode, camera flash fires ONLY when necessary (in dark setting as example). 222 The files on the memory card do not display smoothly when the LCD shows the “!” marking. The “!” means the SD card is low speed or is having wrong content inside. The way to solve this condition is to format SD card by the camera instead of a PC (Please refer to the detailed Format instruction in Section 5). Or please change the SD/SDHC/SDXC card to a high speed one. 333 Why do some of my indoor photos look blurry and dark? The camera extends photo exposure time under low light/ indoor condition. Keep the camera (and the target subject) steady for several seconds when taking photos. The shutter will sound when photos are being taken. 444 How do I charge battery? You must use the supplied AC charger or the USB cable. The camera must be turned OFF; blinking light confirms charging, and the light becomes constant after the charging is completed. In AC charging Mode, the light will turn itself off automatically after 3~5 minutes . The full charge time is about 4 to 5 hours. (Actual charging time may vary. It depends on the battery conditions.) The full charge battery usage for continuous Full HD (1080p 30) video recording is about 1.5~2 hours. 5. After connecting the USB cable to the computer, …… 1. The disk [DV] indicates the internal memory of the camera. (The disk label may be different according to different model and PC OS.) 2. [Removable Disk] indicates the external memory. (On the SD/SDHC/SDXC card in the camera) 3. The disk [DVAP] indicates the built-in Internet Direct application is saved at this disk. It is protected from formatting and deleting. 38 EN Section 11 Additional Information Regulatory Information The above mark is in compliance with the Waste Electrical and Electronic Equipment Directive 2002/96/ EC (WEEE). The mark indicates the requirement NOT to dispose the equipment including any spent or discarded batteries as unsorted municipal waste, but use the return and collection systems available. If the batteries or accumulators included with this equipment display the chemical symbol Hg, Cd, or Pb, then it means that the battery has a heavy metal content of more than 0.0005% Mercury, or more than 0.002% Cadmium or more than, 0.004% Lead. Support In the unlikely event of a problem developing, please contact the store where you purchased your equipment. We continually strive to improve our products; specifications may change with out prior notice. For advice on where to purchase accessories, please contact the store where you purchased your equipment Hitachi cannot compensate for any damages caused when recording is not made normally or recorded contents cannot be played back because of a defect in the digital camera device or memory card. Hitachi cannot be responsible for your recorded video and audio. If you or a third party make a mistake when handling this digital camera device or memory card, etc., the recorded contents may be lost. Hitachi cannot be responsible for compensation for damage due to loss of recorded contents. 39 EN Used correctly, domestic batteries are a safe and dependable source of portable power. Problems can occur if they are misused or abused — resulting in leakage or, in extreme cases, fire or explosion. Here are some simple guidelines to safe battery use designed to eliminate any such problems. ALWAYS BATTERY SAFETY GUIDELINES ALWAYS Store unused batteries in their packaging and away from metal objects which may cause a short-circuit resulting in leakage or, in extreme cases, fire or even an explosion. NEVER Never attempt to recharge ordinary batteries, either in a charger or by applying heat to them. They may leak, cause fire or even explode. There are special rechargeable batteries which are clearly marked as such. ALWAYS Keep loose button cells away from young children. Take care to fit your batteries correctly, observing the plus and minus marks on the battery and appliance. Incorrect fitting can cause leakage or, in extreme cases, fire or even an explosion. ALWAYS Remove dead batteries from equipment and all batteries from equipment you know you are not going to use for a long time. Otherwise the batteries may leak and cause damage. ALWAYS Supervise children if they are replacing batteries themselves in order to ensure these guidelines are followed. ALWAYS Make sure battery compartments are secure. 40 ALWAYS Replace the whole set of batteries at one time, taking care not to mix old and new batteries or batteries of different types, since this can result in leakage or, in extreme cases, fire or even an explosion. NEVER Never dispose of batteries in fire as this can cause them to explode. Please recycle dead batteries; do not put with the normal household waste. ALWAYS Remember that small button cell batteries such as used in some hearing aids, toys, games and other appliances, are easily swallowed by young children and this can be dangerous. ALWAYS Seek medical advice if you believe a cell has been swallowed. EN SD Card Capacity and Approximate Recording Time Memory Card Capacity 1G 2G 4G 8G 16 G 32 G 64 G Video Resolution Approximate Recordable Time (Minutes) FHD(1080p 30) 00:11:08 HD+ (720p 60) 00:11:08 HD(720p 30) 00:16:43 VGA (640X480) 00:33:26 FHD(1080p 30) 00:22:10 HD+ (720p 60) 00:22:10 HD(720p 30) 00:33:15 VGA (640X480) 01:06:30 FHD(1080p 30) 00:43:45 HD+ (720p 60) 00:43:45 HD(720p 30) 01:05:38 VGA (640X480) 02:11:17 FHD(1080p 30) 01:30:33 HD+ (720p 60) 01:30:33 HD(720p 30) 02:15:49 VGA (640X480) 04:31:39 FHD(1080p 30) 02:58:04 HD+ (720p 60) 02:58:04 HD(720p 30) 04:27:07 VGA (640X480) 08:54:14 FHD(1080p 30) 05:58:46 HD+ (720p 60) 05:58:46 HD(720p 30) 08:58:09 VGA (640X480) 17:56:18 FHD(1080p 30) 11:49:29 HD+ (720p 60) 11:49:29 HD(720p 30) 17:44:14 VGA (640X480) 35:28:29 41 EN Memory Card Capacity Photo Resolution Approximate number of Recordable Pictures High (16M pixels) 195 1G Standard (5M pixels) 576 Low (3M pixels) 816 High (16M pixels) 389 Standard (5M pixels) 1145 Low (3M pixels) 1622 2G 4G 8G 16 G 32 G 64 G High (16M pixels) 768 Standard (5M pixels) 2261 Low (3M pixels) 3203 High (16M pixels) 1590 Standard (5M pixels) 4679 Low (3M pixels) 6628 High (16M pixels) 3128 Standard (5M pixels) 9201 Low (3M pixels) 13035 High (16M pixels) 6302 Standard (5M pixels) 18537 Low (3M pixels) 26262 High (16M pixels) 12464 Standard (5M pixels) 36660 Low (3M pixels) 51935 42 EN ARGOS Product Guarantee This product is guaranteed against manufacturing defects for a period of 1 Year This does not cover the product where the fault is due to misuse, abuse, use in contravention of the instructions, or where the product has been the subject of unauthorised modifications or alterations, or has been the subject of commercial use In the event of a problem with the product within the guarantee period please return it to your nearest Argos store If the item is shown to have had an inherent defect present at the time of sale, the store will provide you with a replacement Your statutory rights remain unaffected Guarantor; Home Retail Group 489 - 499 Avebury Boulevard Central Milton Keynes MK9 2NW 43 EN Manual Appendix Smile Detect and 5. The camera will focus on the subject. 6. Then, the camera will capture the photo Face Tracking Function LCD Monitor Information The indicator shown below may display on LCD when movies and pictures are recorded: automatically. Effect Face Tracking Pre-Record Mode (11) The camera can detect human face(s) and focus on the face(s) automatically. This function Time Lapse also works with video recording and photo capturing. It is wonderful for capturing beautiful Smile Detection portraits in backlight situation. Operation Photo 1. Smile Detection In the Effect menu, touch the [Face Tracking] icon on the screen. Capture image automatically when the camera detects a smile. Operation 1. Display Screen Display Screen 2. Touch to select [On] or [Off] ( 3. Touch the Exit icon ( ). ) to exit. In the Photo menu, touch the [Smile Detect] icon on the screen. 2. Touch to select [On] or [Off] ( 3. Touch the Exit icon ( 4. In Record Mode, aim the camera at the smiling ). 4. ) to exit. In Record Mode, aim the camera at the face(s). The face frame(s) will appear around the face. face(s). The face frame(s) will appear around the face with smile. Note When Face Tracking is activated, aim the camera at the human face(s). The face frame(s) will show on the LCD before the [Record Button] /[Photo Button] is pressed. EN EN Getting Started Insert the battery according to the correct polarity marks (+ or -). Close the battery cover rmly. Recommended memory capacity of SD card (Optional) --1GB or above. Li-ion battery Insert the SD card (Optional) into the slot. To remove the SD card, press it down and take it out. Charge your battery You must use the supplied AC charger or the USB cable. The camera must be turned OFF; blinking light conrms charging, and the light becomes constant when the charging has been completed. In AC charging Mode, the light will turn itself off automatically after 3~5 minutes . The full charge time is about 4 to 5 hours. (Actual charging time may vary. It depends on the battery conditions.) English Load the rechargeable Li-ion battery /SD card (Optional) Record & Play English 1 6 LCD Touch Panel 4 5 2 7 3 8 1. Flip to power on • Flip out the LCD panel or hold [Power ] for one second. Button • If no operation is made in 3 minutes, the camera will turn itself off automatically to conserve battery power. 2. To start or stop recording • Press 6. To zoom in or out • Press 7. To review videos/photos • Press or touch (on-screen icon) 8. To operate more advanced options • Touch (on-screen icon) to access 3. To pause recording • Press the option menu. 4. Dual record For more detailed operation • When recording videos, press instructions, please refer to User’s to capture the image. Manual. • Dual record icon( ) appears on the LCD monitor. 5. To capture photo • Press Viewing Videos and Photos on PC Install the bundled software application, ArcSoft MediaImpression , to view the videos correctly on a PC. Connect the computer and the camera using the supplied mini USB2.0 cable as shown. Videos and photos can be found on your computer at “My Computer\Removable Disk\DCIM\100MEDIA” (Under the circumstances of within the SD card in the camera) Under this folder, you can view, delete, move, or copy the recorded videos and photos you want. Uploading Files to the Website You can also share the recorded videos on website via the built-in Internet Direct application which offers you an easy way to upload your video clips to the website instantly. (For more detailed operation instructions, please refer to User’s Manual-Section 8.) ● ArcSoft MediaImpression is a user-friendly application that helps you managing your media, burning your video into a DVD, and uploading your videos to the website easily. The detailed Instructions for the bundled software can be found within the program once the installation is completed. Click on [Extras] on the title bar and select [Help] to open the instruction manual. English Plug & Share Tour of Your Camera Front / Rear English Tele/Wide Button [Photo] Button Press to take photos. When recording videos, press to capture the image. Microphone Flash Lens Self-timer LED Playback LED Indicator Record LED Indicator TV Port [Video] Button Press to take videos. To s t o p r e c o r d i n g , press it again. HDMI Port Mini USB 2.0 Port Tour of Your Camera Power Button [Playback] Button Switch between Record /Playback Mode. For quick review, press it after recording. Speaker Digital Light Button Stabilization Digital Light On/Off. Button Stabilization On/Off. Tripod Socket Battery/SD card Cover Pause Button Press to pause the recording. To continue the recording, press it again. English Side / Bottom Troubleshooting English 1. The flash is not working. The battery power is low. The camera is in DC power mode. In flash auto mode, camera flash fires ONLY when necessary (in dark setting as example). 2. The¿Oes on the memory card do not display smoothly when the LCD shows the “!” marking. The “!” means the SD card is low speed or is having wrong content inside. The way to solve this condition is to format SD card by the camera instead of a PC (Please refer to the detailed Format instruction in User’ Manual - Section 5). Or please change the SD/SDHC/SDXC card to a high speed one. 3. Why do some of my indoor photos look blurry and dark? The camera extends photo exposure time under low light/ indoor condition. Keep the camera (and the target subject) steady for several seconds when taking photo. 4. How do I charge battery? You must use the supplied AC charger or the USB cable. The camera must be turned OFF; blinking light conrms charging, and the light becomes constant after the charging is completed. In AC charging Mode, the light will turn itself off automatically after 3~5 minutes . The full charge time is about 4 to 5 hours. (Actual charging time may vary. It depends on the battery conditions.) 5. After connecting the USB cable to the computer, …… 1. The disk [DV] shows the internal memory of the camera. (The disk label may be different according to different model and PC OS.) 2. [Removable Disk] shows the external memory. (Under the circumstances of within the SD/SDHC/SDXC card in the camera) 3. The disk [DVAP] shows the built-in Internet Direct application is saved at this disk. Please DO NOT format this disk or delete the application inside; otherwise, the Internet Direct application can not function. Regulatory Information Equipment Directive 2002/96/EC (WEEE). The mark indicates the requirement NOT to dispose the equipment including any spent or discarded batteries as unsorted municipal waste, English The above mark is in compliance with the Waste Electrical and Electronic but use the return and collection systems available. If the batteries or accumulators included with this equipment display the chemical symbol Hg, Cd, or Pb, then it means that the battery has a heavy metal content of more than 0.0005% Mercury, or more than 0.002% Cadmium or more than, 0.004% Lead. In the unlikely event of a problem developing, please contact the store where you purchased your equipment. We continually strive to improve our products; specifications may change without prior notice. For advice on where to purchase accessories, please contact the store where you purchased your equipment. Hitachi cannot compensate for any damages caused when recording is not made normally or recorded contents cannot be played back because of a defect in the digital camera device or memory card. Hitachi cannot be responsible for your recorded video and audio. If you or a third party make a mistake when handling this digital camera device or memory card, etc., the recorded contents may be lost. Hitachi cannot be responsible for compensation for damage due to loss of recorded contents. 7 DZHV595E