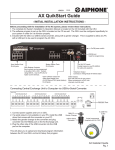
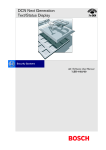
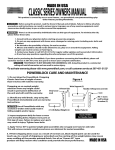
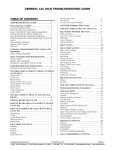
1
acslX
Getting Started Guide
Version 3.0
March 2010
The AEgis Technologies Group, Inc.
410 Jan Davis Drive
Huntsville, AL 35806
U.S.A.
Phone: (256) 922-0802
[email protected]
www.acslx.com
acslX Getting Started Guide
Copyright © 2003 - 2010
The AEgis Technologies Group, Inc.
All Rights Reserved.
Printed in the United States of America.
ACSL, acslXpress, and PowerBlock are registered trademarks of The AEgis Technologies Group, Inc.
acslX and acslXpress are trademarks of The AEgis Technologies Group, Inc.
Microsoft, Windows, Microsoft .NET, and Microsoft Internet Explorer are either registered trademarks or
trademarks of Microsoft Corporation in the United States and/or other countries.
FLEXlm is a registered trademark of Globetrotter Software, Inc., A Macrovision Company
All other brand and product names mentioned herein are the trademarks and registered trademarks of
their respective owners.
Information in this document is subject to change without notice. The software described in this
document is furnished under a license agreement. The software and this documentation may be used
only in accordance with the terms of this agreement.
The AEgis Technologies Group, Inc.
410 Jan Davis Drive
Huntsville, AL 35806
U.S.A.
Phone: (256) 922-0802
[email protected]
www.acslx.com
March 2010
Table of Contents
1
2
Product Overview............................................................................................ 1
Install, Configure, Remove acslX ................................................................... 2
2.1 System Requirements...................................................................................................2
2.1.1 Minimum System Requirements ............................................................................2
rd
2.2 Required 3 Party Components ...................................................................................2
2.3 Installing acslX ..............................................................................................................3
2.4 Additional Information and Updates..............................................................................3
2.5 Configuration.................................................................................................................3
2.5.1 Compiler Support ...................................................................................................3
2.5.2 IDE configuration ....................................................................................................5
2.6 Removing acslX ............................................................................................................5
3
Registration and Licensing............................................................................. 6
3.1 Trial License..................................................................................................................6
3.2 Single User and Multi User License..............................................................................6
3.2.1 Requesting and Saving the License Key File for SUL or MUL ..............................6
3.3 Floating Network License .............................................................................................6
3.3.1 Requesting and Saving the License Key File for FNL ...........................................6
3.3.2 Setting up the License Server for Floating Network License .................................6
3.3.3 Setting up the FLEXlm Directory............................................................................7
3.3.4 Starting the FLEXlm License Server ......................................................................7
4
acslX Examples ............................................................................................... 8
4.1 Starting acslX................................................................................................................8
4.2 Spring Example (CSL language model) ......................................................................8
4.3 Aircraft Arresting Gear Example (Block Diagram Model) ............................................12
5
Working with acslX ......................................................................................... 16
5.1
5.2
5.3
5.4
5.5
5.6
5.7
6
Creating a Workspace ..................................................................................................16
Using the Block Libraries of PowerBlocks ....................................................................18
Creating a New Block ...................................................................................................19
Adding Ports .................................................................................................................22
Setting Constants..........................................................................................................23
Wiring the Block Diagram .............................................................................................24
Building and Running the Model...................................................................................25
Plotting............................................................................................................. 27
6.1 Creating plots................................................................................................................27
6.2 Plot Properties ..............................................................................................................29
7
Additional Information .................................................................................... 30
7.1 acslX User's Guide .......................................................................................................30
7.2 Technical Support .........................................................................................................30
i
Welcome to acslX
1 Product Overview
acslX is a modeling, execution, and analysis environment for continuous
dynamic systems and processes. Simple to learn and easy to use, acslX
provides an intuitive environment for users at all levels and is versatile and
powerful enough to address the most challenging simulation problems.
Ready-to-use code blocks enable quick model assembly, while powerful
analysis capabilities provide quick and accurate results. Industry-specific
toolkits are tailored to the needs of each customer.
Its flexible, open architecture allows acslX models to be easily integrated with
in-house or third-party applications. acslX provides both graphical and textoriented model representation environments that give you full visibility and
control of your models. With acslX, you work easily and efficiently to achieve
quick and accurate results.
acslX improves your modeling and simulation productivity through efficient
development of powerful modeling applications, easy integration with existing
applications and systems, and robust analysis features. Best of all, acslX
helps you present and preserve your findings so you continue to capture
value for your work well into the future.
The predecessor to acslX, ACSL, was one of the first commercially available
modeling and simulation languages designed for simulating continuous systems.
ACSL has been tested and verified with over 25 years of continuous use by the
world's most demanding simulation professionals.
1
2 Install, Configure, Remove acslX
2.1 System Requirements
This section lists the hardware and software requirements for installation of acslX.
2.1.1 Minimum System Requirements
To install and run acslX, the computer system must meet the following minimum
requirements:
Operating System
• Microsoft Vista, Microsoft Windows XP or Microsoft® Windows® 2000
•
Latest Windows service pack and critical updates available from Microsoft
Windows Update Web page
CPU Requirements
• Pentium 4 @ 2 GHZ or equivalent
Minimum RAM Requirements
• 512 MB (or higher recommended)
Hard Disk
• Hard disk space required to install 300 MB
•
Hard disk space required to operate 150 MB
Display
• 1024 x 768, 32 bit color recommended
Network
• Network card required for its unique hostid (MAC address) to enable the
licensing system. Computer system does not have to be connected to a
network.
Input Device
• Microsoft mouse or compatible pointing device
Other
• Microsoft Internet Explorer® 6.0 or later is required
•
Microsoft.NET Framework 1.1 or later is required
2.2 Required 3rd Party Components
acslX is built on top of Microsoft’s .NET framework and thus requires the framework
to be installed prior to operation. The installation and version of Microsoft.NET
Framework is automatically checked when installing acslX.
Internet Explorer version 6 or later is also required by acslX. To download the latest
versions visit the www.microsoft.com.
2
2.3 Installing acslX
To install acslX double click on the axsetup_2.5.x.x.exe file that was either
downloaded from the acslX.com website or found on the acslX CD-ROM.
NOTE: users of Microsoft Windows Vista are strongly encouraged to change
the default installation location of acslX to C:\acslX in order to avoid difficulties
arising from write-protections for the Program Files for standard user accounts.
2.4 Additional Information and Updates
For information about the product, upcoming events and available services please
check the acslX website at www.acslX.com.
As we are continuously improving acslX, it is recommended that you check the
website often for new releases and updates.
2.5 Configuration
2.5.1 Compiler Support
acslX provides and installs GNU C as the default compiler. acslX also supports Visual
Studio.NET C++ (v7), Compaq Digital Fortran (v6.5) and Visual Studio C++ (v6)
compilers.
To access the acslX translator options dialog box, choose the Edit > Options... menu
item in acslX. Select the Translator option. The following dialog box will be
displayed.
3
The default configuration is the GNU C compiler. The paths for this configuration were
setup during installation. To choose a different configuration, scroll down the
configuration list and choose the desired compiler and confirm that the compiler and
linker paths and flags point to the proper locations. GNU C is the only compiler
supplied on the distribution CD with acslX.
acslX uses the command line version of the supported compilers (VS v6, VS.NET,
Compaq Visual Fortran v6.5). Special libraries are required for the command line
version and the path to these libraries are not added by default when the compilers
are installed.
In order to use these specific compiler options, adding the correct path to the system
environmental variables may be required. Listed below is the library each compiler
requires along with the default path to that library.
Compaq Visual Fortran: MSPDB60.DLL
C:\Program Files\Microsoft Visual Studio\Common\MSDEV98\BIN
MS Visual Studio, v6: MSPDB.DLL
C:\Program Files\Microsoft Visual Studio\Common\MSDEV98\BIN
MS Visual Studio .NET, v7: MSPDB70.DLL
C:\Program Files\Microsoft Visual Studio .NET\Common7\IDE
MS Visual Studio .NET 2003: MSPDB71.DLL
C:\Program Files\Microsoft Visual Studio .NET 2003\Common7\IDE
4
See your system administrator for information on how to set system environmental
variables.
2.5.2 IDE configuration
acslX employs a user-friendly Integrated Development Environment (IDE). By the
very nature of the application, acslX is required to manage a large and diverse set of
information requiring multiple windows. acslX's window management and docking
capability allows for management of this information in a friendly manner while
providing instant access to everything required to design, build, execute and analyze
models and simulations. It is important to be familiar with acslX's docking windows
before proceeding with the application.
It is recommended to review the acslX User's Guide prior to working through the
following examples. Please STOP now and review Chapter 2 of the User's Guide.
This guide can be found on the installation CD or in the documentation folder of
acslX's installation directory.
Note that acslX has a default window configuration and this can be customized by the
user and will be saved when exiting acslX.
2.6 Removing acslX
Always use the Add or Remove Programs utility to uninstall the acslX software and
to ensure that all the installed software components are correctly removed. This will
also remove the acslX settings from the Windows Registry.
1. To uninstall the software, click Start > Control Panel
2. Double-click Add or Remove Programs.
3. Select acslX from the list of installed software and select the Remove button.
5
3 Registration and Licensing
acslX has four different license types: Trial License, Single User License (SUL), Multi
User License (MUL), and Floating Network License (FNL). SUL and MUL are
controlled through the same licensing process that is described in chapter 3.2.
3.1 Trial License
acslX is configured with a one-time trial license that will be valid for fourteen (14) days
beginning at the time of the initial installation of acslX.
3.2 Single User and Multi User License
The only step to complete for a Single User or Multi User License is to request a
license key file and to place it into the acslX installation directory (by default
C:\Program Files\Aegis Technologies\acslX).
3.2.1 Requesting and Saving the License Key File for SUL or MUL
Contact License Support via one of the following methods to request a license key
file:
E-Mail:
• [email protected]
Phone:
• (256) 922-0802
Fax:
• (256) 922-0904
3.3 Floating Network License
3.3.1 Requesting and Saving the License Key File for FNL
Contact License Support via one of the following methods to request a license key
file:
E-Mail:
• [email protected]
Phone:
• (256) 922-0802
Fax:
• (256) 922-0904
3.3.2 Setting up the License Server for Floating Network License
The acslX Floating Network License requires FLEXlm® version 8.0 or later to be
installed on the license server.
To review information about FLEXlm, see Macrovision® Software's website at:
6
http://www.macrovision.com
Also, the current version of the FLEXlm End User's Manual can be found in the PDF
format on the acslX installation CD or the latest version can be found at the website
listed above.
In the case of a FLEXlm error message, please refer to the FLEXlm End User's
Manual for complete explanation.
The acslX product CD-ROM provides the FLEXlm distribution files to run a License
Manager on a Windows 32-bit operating system. The required files are located in a
folder called \FLEXlm Server\i86_n3.
The FLEXlm distribution files consist of the following:
lmgrd.exe
The license manager daemon
lmtools.exe
GUI based FLEXlm utility
program
(Windows Version only)
lmutil.exe
Command line based utility
program
aegissim.exe
AEgis' vendor daemon
3.3.3 Setting up the FLEXlm Directory
Before beginning this section, determine whether the license server has FLEXlm 8.0
or higher installed. The following instructions apply to both PC and UNIX installations.
1. For a new installation, create a new directory for the FLEXlm files. If a previous
installation of FLEXlm 8.0 or higher exists, find the folder on the license server where
the lmgrd.exe file is located.
2. Insert the acslX products CD into the CD-ROM drive and access the CD-ROM
drive, and browse to the \FLEXlm Server\i86_n3 folder.
or
2. Download the the FLEXlm files from the Tech Support Download site.
3. Copy all of the files in FLEXlm\i86_n3 to the folder created in step 1 on the server.
If a previous installation of FLEXlm 8.0 or higher exists, copy only the "aegissim.exe"
file from the CD to the folder on the server.
3.3.4 Starting the FLEXlm License Server
Refer to the FLEXlm End User's Manual, Chapter 6, The License Manager Daemon,
for detailed instructions on starting the FLEXlm License Server.
7
4 acslX Examples
This chapter will demonstrate how to open and run several examples provided with
the acslX software. Multiple example files are located in the Example folder located
in the installation directory. It is assumed that the user has reviewed Chapter 2 of the
acslX User's Guide.
4.1 Starting acslX
1. Select Start > Program Files > acslX > acslX or click on the acslX Icon on the
desktop
4.2 Spring Example
(CSL language model)
1. After acslX has started, click on Browse Model Development Examples on the
Start Page.
2. Open the Spring folder by double clicking on the folder icon next to the folder
name.
8
3. Select the Workspace file "Spring.aws", then click the Open button.
4. The tree structure populates with the project and all existing related files. The
Spring model contains both a CSL and block diagram model.
9
5. Double-click on the "Spring.csl" file in the treeview; this will open the file containing
the csl code.
6. Click on the Execute menu and choose the Build Project option
7. Information from the Translation and Build stage can be seen in the Command
Window.
10
8. After the Build Successful message is displayed, click on the start icon
execute the simulation.
to
9. Two plot objects will appear. To view the second plot, click on the non-highlighted
Plot tab located near the spring-csl tab
Editing the plot window is discussed in more detail in the acslX User's Guide.
10. Select File > Close Workspace to exit the spring workspace.
11
4.3 Aircraft Arresting Gear Example
(Block Diagram Model)
1. Click on Browse Model Analysis Examples on the Start page.
2. Select the "Aircraft Arresting Gear" folder.
3. The Open window displays:
4. Select the Workspace file "Aircraft Arresting Gear.aws".
5. Click the Open button or double-click the icon next to the workspace name. The
tree structure populates with the project and all existing related files. This workspace
contains both a CSL and a block diagram project.
12
6. acslX allows multiple projects in each workspace. The active project is currently
Aircraft Arresting Gear-csl, it is highlighted in red. To switch the active project to the
block diagram version, right click on Aircraft Arresting Gear-bd and choose Set As
Active Project.
7. Double click on the "aresting.gmx" file and it will open into the fixed work area.
13
8. Click on the Execute menu and choose the Build Project option
9. Information from the Translation and Build stage can be seen in the Command
window.
10. The Command Window displays the simulation control prompt. From this
command line the user can access and set model variables and run the simulation.
Entering `output T' at the prompt will print out the variable t (time) to the screen while
the simulation is running.
14
11. Type ‘start’ at the command prompt, or press the
icon to run the simulation.
Click on the Command Window tab to see the time increment scroll as the
simulation runs.
12. Now go to the diagram work area for arestg and double click on the Plot block.
Select the Window > Cascade menu item to undock the view and allow the windows
to be moved and resized as desired.
13. Click on File > Close Workspace to exit the Aircraft Arresting Gear workspace.
15
5 Working with acslX
This chapter outlines the basics for maneuvering through acslX to build and run new
models. The following steps will guide the user in the development of a simple
harmonic model.
5.1 Creating a Workspace
1. Start acslX by clicking Start > Programs > acslX > acslX or click on the acslX
icon
on the desktop.
2. On the File menu, select New Workspace. The Project Wizard dialog displays.
3. Select the Block Diagram Project icon and then enter the project name,
Harmonic in the Name field. Enter HarmonicWS for the name and path of the
desired workspace in the Location field and click OK.
16
4. This will create a workspace (HarmonicWS) that contains a block diagram project
(Harmonic) and model file (BlockDiagram1.gmx).
5. Right-clicking on any level in the Project Files tree structure will display actions
that apply to that specific level of the tree.
6. Right-click on BlockDiagram1.gmx and select Save.
7. Right-click on BlockDiagram1.gmx and select Rename to change the name for
the model to HarmonicBD.gmx.
17
8. Double-click on the HarmonicBD.gmx file in the tree. The empty block diagram
window will open in the Start Page work area and is ready for construction of the
model.
5.2 Using the Block Libraries of PowerBlocks
1. acslX has the capability for retractable window views. If the Block Libraries view is
retracted, place the mouse cursor over the Block Libraries tab that is in the upper
right section of the screen; the Block Libraries view will appear. Since this will be
used to create a model, click on the "pushpin" at the top of the view, this will keep the
Libraries open while in use.
2. In the Block Libraries view, click on the Sources bar, locate and click on the
Harmonic block and drag it to the diagram window.
3. From the Block Libraries view, click the Math library. Locate, click and drag the
Multiply block into the diagram window.
18
4. From the Block Libraries view, click the Plots library. Click and drag the Plot
block into the diagram window
5. Click on the "pushpin" to the right of the Block Libraries title bar, this will allow the
libraries view to retract when not in use.
5.3 Creating a New Block
1. Create a new block by right-clicking in the background of the diagram work area
and choosing New > CSL Block.
2. Double-click on the Block that was just created. This will display the code editor.
19
3. Click in the Block Code Editor window, then type the following line: Constant k =
5. Exit the code editor window by clicking the X in the upper-right corner of the
window.
4. Right click the new Block in the diagram and select Properties, the Properties
view containing the properties of the block will appear. All block attributes can be set
from the Properties view including configuration of the block appearance, name,
labels, ports, block type, constants, notes, etc.
20
5. Click on the Block Label in the Properties view and change the text from Block
to Constant. Upon pressing enter, the label that appears under the block in the
diagram view will change to Constant.
6. Click on the Description field under Memo in the Properties view and change the
description to Constant Value.
21
5.4 Adding Ports
1. To add an output port to the Constant Block, right-click on the block, then click
Modify Ports from the pop-up menu. This displays a dialog box that controls the port
assignments and properties.
2. Click on the button Add a New Port. A line with default values displays.
3. First, in the Style column, click on the text, InputPort, to choose the type of port
(input or output) from the drop down list - select Output. This initial selection allows
the variables that are displayed in the Variable(s) column to be filtered by the given
type. Now edit the Variable(s) column to assign the port to a variable contained in the
block code using the pull down selection, choose k. In the Port Name column type
the name of the port, K. Click on the Shape column to change the shape of the
output port to a Triangle.
22
4. Click the OK button. The port displays on the right side of the block.
5.5 Setting Constants
1. Click on the Harmonic block to select its properties. In the Properties window,
click on the Constants field, then click on the "..." to the right of the Constants field.
This will cause the Block Constant Values table to be displayed.
23
2. Change the Model Override of W to 1, Click the Apply button and then click the
OK button. (Refer to the User's Guide for description of CSL Default, Model Override
and Run Override values.)
5.6 Wiring the Block Diagram
1. Click and drag a wire from the output port of the Harmonic block until it connects
to the input port of the Multiply block. Repeat this process and wire the remaining
ports together. Refer to the picture below for connections.
24
5.7 Building and Running the Model
1. To build the model, click on the Build icon
located on the toolbar. Build-related
information is displayed in the Output view as the translation and compilation occurs.
2. To run the model, click on the Run icon
located on the toolbar. The progress
can also be monitored in the Output view. Once the run is complete, double-click on
the Plot block. The Plot displays in a new tab in the workspace.
25
NOTE: The plot is not saved between work sessions. If the workspace is closed and
then later reopened, the plot will need to be recreated after running by clicking on the
plot block.
3. From the File menu, choose Close to close the workspace. At the build step the
workspace was automatically saved. If you have made further changes since that
point, a dialog box will prompt the user to save the workspace.
4. From the File menu, chose Exit to exit acslX.
26
6 Plotting
This chapter shows the basics for creating a plot in the Project File View and then
accessing the plot editing tools. For further information on Plotting, see Chapter 5 in
the acslX User's Guide.
6.1 Creating plots
1. Start acslX by clicking Start > Programs > acslX > acslX or click on the acslX
icon on the desktop
2. Open the "Spring-csl" example (detailed in Section 4.2), then build the model by
clicking the Build icon
3. In the Project Files view, right-click on the Plots folder and choose Add New
Plot.
4. The Provide name and path for new item dialog displays. In the File name field,
type the name of the plot file, Velocity. Click the Open button.
27
5. The Plot Wizard displays and a new node for the plot appears in the tree view.
Follow the prompts. For this example click the Next button to choose the default plot
type.
6. In the Data Mapping dialog box choose the variables you want to plot. In the
Mapped to X box choose the variable `t' and in the Mapped to Y choose the variable
`xd'. Click the Add Mapping button, and then click the Next button. Follow the
prompts and click "Finish" to close the Plot Wizard
28
7. Click the run icon
and the plots will appear during runtime.
6.2 Plot Properties
1. Double-click on the background of the plot. This will display the TeeChart Editor
Properties dialog box.
2. All the properties for the plots can be set from the plot Editing dialog box. Plots
and/or data can also be exported in several standard formats.
3. For example; to change the title on the plot, click the Title tab and edit the text
box. The title on the plot will change as you edit the text.
4. Close the Editing dialog window.
5. Close the workspace by using the menu File > Close Workspace.
6. File > Exit to exit acslX.
29
7 Additional Information
7.1 acslX User's Guide
For detailed information on using acslX refer to the acslX User's Guide. The full
User's Guide is available in PDF format on the installation CD and in the installation
directory under Documentation. It is also available using acslX's Help function under
menu Help > acslX Help and as a Start Page link ‘Open the help contents’.
7.2 Technical Support
Technical Support business hours are Monday through Friday, 9:00 AM to 5:00 PM,
Eastern Time (US & Canada).
E-Mail
Questions can be sent directly via e-mail at [email protected] to the technical
support team.
For Technical Support questions and trouble reports about acslX, send email to:
[email protected]
Telephone
For telephone support, call The AEgis Technologies Group during normal business
hours Monday through Friday, 9:00 AM to 5:00 PM, Eastern Time (US & Canada) at:
(256) 922-0802.
FAX
You can also fax questions directly to the acslX technical support team. For technical
support issues, be sure to list "acslX Support" as the recipient on the cover page. Fax
questions to the following number: (256) 922-0904.
30