1
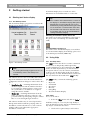
DCN Next Generation
Text/Status Display
en Software User Manual
LBB 4183/00
About this manual
This user manual is divided into four chapters.
Chapters 1 and 2 provide background information
and chapters 3 and 4 provide detailed user
information as follows:
•
Chapter 1 - Text/Status Display - containing a
brief overview of the Digital Congress Network
Next Generation, and an overview of the
functionality of the Text/Status Display
application.
•
Chapter 2 - Getting Started - containing details of
how to start the Text/Status Display application
from the Startup screen and a description of the
Help facility.
•
Chapter 3 - Preparing for a Conference containing details about pre-conference activities
using Text/Status Display, determining the
number of lines from the speakers list and
request-to-speak list to be displayed.
•
Chapter 4 - Altering displays during a
Conference - containing details of Text/Status
Display possibilities during a conference.
Information on altering the display set-up,
clearing the current display, and how to exit
Text/Status Display.
Manual conventions
For clarity this user manual uses consistent styles,
symbols and typographical conventions. They are:
i
Note
General notes are contained within rules and
indicated with this symbol at the left margin.
Notes are used to draw attention to special
actions or information.
i
Caution
A caution is contained within rules and
indicated with this symbol at the left margin.
Cautions are used to draw attention to actions
or commands that could lead to a loss of
information or damage to equipment
i
Tip
A tip is contained within a box and indicated
with this symbol at the left margin. Tips are
used to provide supplementary information that
may make an action quicker or easier to carry
out.
•
An action (to be carried out by the user) is shown
with a larger round bullet mark.
Typographical conventions
The following typographical conventions (text styles)
are used in this manual:
•
Typed input - information to be typed in using
the keyboard is shown as:
Filename
•
•
•
Single key - input via a single key (or keys) on
the keyboard is shown as:
<enter>, <shift>, etc.
Multiple keys - input via a combination of keys
pressed together is shown as:
<ctrl>+<p>, <alt>+<f4>
Screen text - information that appears on screen
is shown as:
‘Choose Startup Modules:’
Hyperlinks
This manual is also available as a digital document in
the Adobe Portable Document Format (PDF). All
references to pages, figures, tables, etc. in this digital
document contain hyperlinks to the referenced location.
DCN Next Generation Text/Status Display
Table of contents
1
1.1
1.1.1
2
2.1
2.1.1
2.2
2.2.1
2.2.2
2.2.3
2.2.4
2.2.5
2.2.6
2.2.7
2.2.8
3
3.1
3.1.1
3.2
3.2.1
4
4.1
4.2
4.2.1
4.2.2
4.2.3
4.2.4
4.3
4.4
4.4.1
4.4.2
Text/Status Display ................................................. 4
About text/status display ...................................... 4
What is Text/Status Display? .............................. 4
Getting started............................................................ 6
Starting text/status display................................... 6
The Startup screen ................................................ 6
Selecting an installation (and a names) file...... 6
The Text/Status Display icon............................... 6
Using Help ............................................................... 6
The Help menu........................................................ 6
Index .......................................................................... 6
Keyboard .................................................................. 7
Commands............................................................... 7
Procedures............................................................... 7
Glossary.................................................................... 7
Using Help ............................................................... 7
About ......................................................................... 8
Preparing for a conference .................................. 9
The main window.................................................... 9
The menu bar........................................................... 9
Configuring displays for microphone
information................................................................ 9
Switching status displays on and off ...............10
Altering displays during a conference......... 11
Viewing displays ...................................................11
Specifying the display settings..........................11
Voting information in the main window............12
Messages in the main window ..........................12
Microphone information in the main window .13
Status display information ..................................13
Clearing the current display...............................13
Exiting Text/Status Display.................................14
Temporarily exiting Text/Status Display ..........14
Permanently exiting Text/Status Display .........14
Bosch Security Systems B.V. | 2005 January | 9922 141 70441
en | 3
DCN Next Generation Text/Status Display
1
Text/Status Display
en | 4
•
Alphanumeric display. Also typically a dot
matrix display. Information can be displayed
using both text and numbers.
Geographic display. This kind of display gives
information on the voting status of each
conference participant (if the vote is non-secret).
A representation of the seating plan and different
coloured LEDs for vote status are used to achieve
this.
•
1.1 About text/status display
1.1.1 What is Text/Status Display?
The Text/Status Display module is one of the
software modules designed for monitoring and
controlling conferences and discussions using the
contribution equipment. The Text/Status Display
module provides a means of displaying conferencerelated information on character displays located in
the conference venue. All the information displayed
is generated by other modules, and it is not possible
to alter this information in Text/Status Display.
However, it is possible to determine which
information (voting results, messages or microphone
information) is shown, and also to specify the length
of the speakers list and the request-to-speak list when
microphone information is displayed.
i
The display possibilities are as follows:
Numeric Display
Total voting
Alphanumeric
Display
Voting results
with results
legends
Geographic
Display
Individual voting
results
Messages
Microphone
information such
as speakers-,
request-to-speak
and response lists
Note
It is not possible to display languages that use
graphic characters e.g. Chinese on LED
displays. However, the Video Display software
LBB 4184 can display these characters on
video displays.
Text/Status Display accepts three different types of
display information:
•
Voting Results display. This information is
generated using the Multi Voting module (LBB
4178) and the Parliamentary Voting module
(LBB 4175) and consists of a voting motion and
the results of the vote on that motion.
•
Messages display. This information is generated
using the Message Distribution module (LBB
4182) and consists of a conference-related text
message (e.g. when and where lunch will be, or
when tomorrow’s session will begin, etc.).
•
Microphone Information display. This
information is generated either using the
Microphone Management module (LBB 4170) or
the Synoptic Microphone Control module (LBB
4171). It consists of a list of delegates whose
microphones are active and those waiting to
speak.
The system supports three different types of
conference venue displays. These are:
•
Numeric display. This is typically a dot matrix
display, and allows only purely numerical
information to be displayed.
i
Note
It is also possible to display conference
information using video displays (PC-driven
monitors or video projectors) showing text,
numbers and graphical elements like bar charts
or pie charts. For more information, please refer
to the user manual for Video Display (LBB
4184).
It is possible to have any combination of these
display types in a conference venue. Each display
type is connected to a separate Data Distribution
Board, which serves as an interface between the
displays and the DCN system. Address numbers are
used on a Data Distribution Board for specific types
of displays, and each address can accommodate more
than one display of the same type. The addresses are
for text-oriented information such as numeric- or
alphanumeric displays. A status-oriented address is
available for geographic displays.
For more information about the Data Distribution
Board and its interface refer the DCN Next
Generation Installation and User Instructions.
Text/Status Display allows you to send two separate
packages of information (voting results, messages or
microphone information) to text-oriented displays
connected to the system. This information is
identified as ‘Text Display #1’ and ‘Text Display #2’.
Both can be shown on-screen, and you can specify
(but not alter) their contents. Clearing this
information from the screen also clears it from all
Bosch Security Systems B.V. | 2005 January | 9922 141 70441
DCN Next Generation Text/Status Display
connected displays. The information sent to
geographic displays cannot be shown on-screen.
Determining what kind of information is shown in
Display #1 and Display #2 is carried out from the
main window. From there you can also specify the
length of the speakers list and request-to-speak list in
the microphone information display.
Bosch Security Systems B.V. | 2005 January | 9922 141 70441
en | 5
DCN Next Generation Text/Status Display
2
Getting started
2.1 Starting text/status display
en | 6
Text/Status Display does not make use of the
information in an installation file or a names file.
i
Tip
Four modules which determine the contents of
the displays in Text/Status Display (Microphone
Management, Synoptic Microphone Control,
Parliamentary Voting and Multi Voting) do make
use of information contained within these files.
The installation file and names files that these
four modules will use can be specified before
starting Text/Status Display.
2.1.1 The Startup screen
The Text/Status Display program is started from the
Startup screen (shown below).
Selecting an installation (and a names) file
For details on selecting an installation (and a names)
file, please refer to the Startup user manual (LBB
4190).
The Text/Status Display icon
For details on the Text/Status Display icon and how
to start Text/Status Display from Startup, please refer
to the Startup user manual (LBB 4190).
2.2 Using Help
Figure 1 The Startup screen.
i
Note
For starting the Startup program from an icon
in the desktop, refer to the Startup user
manual.
The software uses two user-created files that contain
important information about the installed hardware
configuration and about delegates’ names. These files
are:
•
Installation file - containing information about
channel assignment and the numbers that have
been assigned to all microphones connected to
the system. These seat numbers are assigned
using this software module.
•
Names file - containing information about the
name, seat number and other conference and
personal details of participating delegates. Names
files are created using Delegate Database.
The software modules may be started up from the
Startup main window without specifying either an
installation or names file. However, some software
modules will not run without the appropriate
installation or names file.
2.2.1 The Help menu
The ‘Help’ menu in the title bar contains commands
for an on-screen help facility. This help facility
contains information on all commands in the ‘File’
menu, on which keyboard keys are functional, a
description of how to use the software, information
on how to use the help facility itself, plus an index
and a glossary of terms. All information contained in
this user manual is also found in the ‘Help’ facility.
The ‘Help’ facility contains the following options:
•
Index
•
Keyboard
•
Commands
•
Procedures
•
Glossary
•
Using Help
•
About Text/Status Display
2.2.2 Index
To access the index:
•
Select the ‘Help’ menu and click on ‘Index’.
A full list of subjects covered by the help facility is
given in alphabetical order. For more information on
any subject contained in the index:
Bosch Security Systems B.V. | 2005 January | 9922 141 70441
•
Click on the required subject in the index.
DCN Next Generation Text/Status Display
An on-screen page with the requested information
will appear.
en | 7
2.2.6 Glossary
To access the glossary:
•
2.2.3 Keyboard
This gives information on which keys on your
keyboard can be used with the software. This
includes using keys to activate menu items, to move
around in dialogue boxes, for short cuts, and to select
options from the main window. To access the
‘Keyboard’ help facility:
•
Select the ‘Help’ menu and click on
‘Keyboard’.
A list of different key types is given. For more
information on any key type contained in the list:
•
2.2.4 Commands
This gives information on all menu options, covering
the ‘File’, ‘Edit’, ‘View’, ‘Settings’ and ‘Help’ menus.
To access the ‘Commands’ help facility:
•
Select the ‘Help’ menu and click on
‘Commands’.
A list of menu groups is given. For more information
on any menu group contained in the list:
•
A list of terms used in the help facility is given in
alphabetical order. For more information on any
term contained in the glossary:
•
2.2.7 Using Help
This gives information on how to use the help facility.
To access the ‘Using Help’ facility:
•
•
•
Click on the required menu group in the list.
Click on the required option in the list.
Select the ‘Help’ menu and click on
‘Procedures’.
A list of topics is given. For more information on any
topic contained in the list:
Click on the required topic in the list.
A list of options for the selected topic is given. For
more information on any option contained in the list:
•
Click on the required option in the list.
An on-screen page with the requested information
will appear.
2.2.5 Procedures
This gives information on how to use the software.
To access the ‘Procedures’ help facility:
•
Click on the required topic in the list.
A list of options for the selected topic is given. For
more information on any option contained in the list:
An on-screen page with the requested information
will appear.
•
Select the ‘Help’ menu and click on ‘Using
Help’.
A list of topics is given. For more information on any
topic contained in the list:
A list of options in the selected menu group is given.
For more information on any option contained in the
list:
•
Click on the required subject in the index.
A window with the requested information will appear.
Click on the required key type in the list.
An on-screen page with the requested information
will appear.
Select the ‘Help’ menu and click on
‘Glossary’.
Click on the required option in the list.
An on-screen page with the requested information
will appear.
Bosch Security Systems B.V. | 2005 January | 9922 141 70441
DCN Next Generation Text/Status Display
2.2.8 About
This provides software release information. To
display the ‘About...’ window:
•
Select the ‘Help’ menu and click on ‘About
Text/Status Display...’.
The following window appears:
Figure 2 The ‘About Text/Status Display…’ window
To remove this window:
Click on the ‘OK’ push button.
Bosch Security Systems B.V. | 2005 January | 9922 141 70441
en | 8
DCN Next Generation Text/Status Display
3
Preparing for a conference
en | 9
View
Settings
Clear Display
Text Display #1
Display
Config…
Text Display #1 Index…
Text Display #2
Status Display
Text Display #2 Keyboard
3.1 The main window
Status Display
The main window of Text/Status Display shows the
information that will appear on one of the textoriented conference venue displays connected to the
DCN system. It is possible to specify whether ‘Text
Display #1’ or ‘Text Display #2’ is displayed.
Altering the main window display does not influence
the display of information in the conference venue.
From the main window you can also access the menu
bar, which allows you to specify viewing options and
alter settings, clear displays and access the Help
menu.
The main window contains the following elements:
•
‘Display’ static text and the number of the
currently selected display
•
Contents of currently selected display
•
Menu bar
Help
Commands
Procedures
Glossary
Using Help
About Text/Status
Display…
3.2 Configuring displays for microphone
information
If you wish to send microphone information to a
display, you can determine how many lines of the
display are used to show the speakers list, and how
many are used to show the request-to-speak list. To
do so:
•
Select the ‘Settings’ menu and click on ‘Display
Config...’.
The following dialogue box appears:
Figure 3 The main window
3.1.1 The menu bar
All menu options referred to in this user manual are
contained within the menu bar, located underneath
the title bar at the top of the main window. Access to
drop-down menus is gained by clicking on the menu
title, displayed in the menu bar.
The full list of menu options is as follows:
Figure 4 The ‘Display Configuration’ dialogue box
The number of lines are specified by means of edit
fields for both display #1 and display #2. The
number of lines are specified in exactly the same
manner for both displays. The minimum number of
lines for either list is 0, the maximum 10. This means
if the display has more than 10 lines, the extra ones
will not be used for displaying microphone
information. The default values for both displays is 4
for the speakers list and 6 for the request-to-speak list.
To specify the number of lines dedicated to the
speakers list:
•
Bosch Security Systems B.V. | 2005 January | 9922 141 70441
Enter the required number in the ‘Speaker List:’
edit field.
DCN Next Generation Text/Status Display
i
Tip
You can use the up and down arrows located
at the right of the edit field to locate the desired
number of lines. When 10 is reached the up
arrow will be disabled. When 0 is reached the
down arrow will be disabled.
i
Caution
If the number of lines specified for the speakers
list means that the speakers list length +
request-to-speak list length exceeds 10 lines,
then the request-to-speak list will be reduced in
length.
en | 10
permitting or blocking information to be sent to
geographic displays.
•
If this option is enabled, meaning that an output to
geographic displays is possible, a tick mark (√) will be
situated beside the ‘Status Displays’ option.
If the option is not enabled, no tick mark will be
present.
To change the ‘Status Displays’ setting:
•
Enter the required number in the ‘Request To
Speak List:’ edit field.
i
Caution
If the number of lines specified for the requestto-speak list means that the request-to-speak
list length + speakers list length exceeds 10
lines, then the speakers list will be reduced in
length.
Once you have specified the length of the speakers
lists and request-to-speak lists for both displays:
•
Click on the ‘OK’ push button.
i
Note
Although specifying the length of the speakers
list and the request-to-speak list is part of
preparation work for a conference, it can also
be carried out during a conference. However,
the information given here is not repeated in
chapter 4.
i
Click on the ‘Status Displays’ option.
The other option will be enabled.
To specify the number of lines dedicated to the
request-to-speak list:
•
Select the ‘Settings’ menu and click on ‘Status
Displays’.
Note
The other options in the ‘Display
Configuration’ dialogue box are part of
‘Altering Displays During a Conference’, and
are covered in chapter 4..
3.2.1 Switching status displays on and off
The Text/Status Display software sends an output to
the status-oriented address on the Data Distribution
Board, which in turn sends the output to geographic
displays connected to the DCN system. This option
allows you to switch the output on and off, therefore
Bosch Security Systems B.V. | 2005 January | 9922 141 70441
DCN Next Generation Text/Status Display
4
en | 11
Altering displays during a
conference
i
The information shown on conference venue
displays and the main window changes under
the following conditions:
• Delegate action. Delegates alter their
microphone status or cast a vote.
• User action. Another motion is recalled for
voting, the message specified for display is
altered, delegate microphone status is
altered, or the length of the speakers list is
changed.
In both cases the new information is displayed
immediately.
4.1 Viewing displays
Text/Status Display has two separate windows, titled
‘Display #1’ and ‘Display #2’. Each window shows a
separate information package, and each information
package is sent to a separate Data Distribution Board
connected to the system, and thereafter to all displays
connected to that board.
To determine whether ‘Display #1’ or ‘Display #2’
appears in the main window:
•
Select the ‘View’ menu.
There are two items in the ‘View’ menu;
•
Text Display #1
•
Text Display #2
i
Note
Note
4.2 Specifying the display settings
To specify which information is sent to displays in
the conference venue:
•
Select the ‘Settings’ menu and click on ‘Display
Config...’.
The following dialogue box appears:
These displays are called ‘Text Displays’
because they show text-oriented information.
This name distinguishes them from ‘Status
Displays’, which show voting results in a
geographic manner and cannot be viewed
using Text/Status Display.
i
Note
It is not possible to display languages that use
graphic characters e.g. Chinese on LED
displays. However, the Video Display software
can display these characters on video displays.
The currently selected option (i.e. the current display
in the main window) will be indicated by a tick mark
(√). To select the other display:
•
Click on the option without the tick mark.
The main window will be updated to show the new
information. The number beside the ‘Display’ static
text in the main window will change to indicate the
other display has been selected.
Figure 5 The ‘Display Configuration’ dialogue box
The information sent to the conference venue
displays represented by displays #1 and #2 is
determined by means of the three check boxes which
appear at the top of the columns for each display.
These settings are altered in exactly the same manner
for both displays. The settings determine three types
of information:
•
Voting information
•
Messages
•
Microphone information
These three settings can be chosen in any
combination. If more than one is selected, a priority
system determines which setting will be displayed.
Voting information has priority over messages, and
messages have priority over microphone information.
Bosch Security Systems B.V. | 2005 January | 9922 141 70441
DCN Next Generation Text/Status Display
However, there has to be a valid input from the
Parliamentary Voting DCN software module before
voting information can be displayed, and a valid
input from the Message Distribution DCN software
module before messages can be displayed.
en | 12
4.2.1 Voting information in the main window
Voting information is shown in the main window as
follows:
A valid input is created if the following conditions
are met:
Voting information:
•
It has been specified in the currently open
Parliamentary Voting script file that voting
results are to be shown on conference venue
displays.
•
Voting has taken place on at least one motion in
the currently open Parliamentary Voting script
file.
Messages:
A message has been specified using the Message
Distribution program
•
This message has been sent to the Text/Status
Display program
•
To select a setting:
•
Click on the required check box.
Once you have specified all settings and do not wish
to change the number of lines in the microphone
information display:
•
Click on the ‘OK’ push button.
If you do wish to change the number of lines in the
microphone information display (by specifying the
length of the speakers list and the request-to-speak
list), please refer to paragraph 3.2.
The following pages provide information on how
each type of message is displayed in the main
window.
Figure 6 The main window showing voting results
The following information is displayed:
•
Voting description
•
Voting number
•
Number of delegates present
•
Number of ‘Yes’ votes
•
Number of ‘No’ votes
•
Number of abstentions
•
Number of delegates not yet voted
i
Tip
For more information on the creation of votings,
please refer to the user manuals for
Parliamentary Voting and Multi Voting reference
numbers.
4.2.2 Messages in the main window
A message is shown in the main window as follows:
Figure 7 The main window showing a message
Bosch Security Systems B.V. | 2005 January | 9922 141 70441
DCN Next Generation Text/Status Display
The text of the relevant message is displayed. The
maximum number of lines for a message is four, and
the maximum number of characters in each line is
33.
i
en | 13
Fig. 4 The main window showing microphone information
i
Certain parameters specified in Microphone
Management and/or Synoptic Microphone
Control influence the microphone information
display. For more information on these
parameters, and their effect on conferencing,
please refer to the user manual for Microphone
Management or Synoptic Microphone Control.
Tip
For more information on the creation of
messages, please refer to the user manual for
Message Distribution.
4.2.3 Microphone information in the main window
Microphone information is shown in the main
window as follows:
4.2.4 Status display information
Individual voting results can be sent from the
Parliamentary Voting software module and the Multi
Voting software module (in parliamentary voting
mode), via Text/Status Display, to geographic
displays connected to the system. This is known as
‘status display’ information. It is not possible to view
this information in Text/Status Display, nor is it
possible to alter it, but you can determine whether it
is sent to geographic displays or not. To do so:
•
Figure 8 The main window showing microphone
information
Tip
Select the ‘Settings’ menu.
The second item on the ‘Settings’ menu is ‘Status
Display’. If there is a tick mark (√) beside this item, it
means that it is enabled, so status display information
will be sent to geographic displays. If there is no tick
mark, it is disabled, so no information will be sent.
To select the option not currently selected:
•
Click on ‘Status Display’.
The other option will be enabled.
This example shows the following:
•
The first delegate on the speakers list. The
delegates on the speakers list are indicated by an
asterisk (*). The contents of the entry for each
delegate is specified using Delegate Database,
and typically consists of the delegate name and
one other parameter, e.g. country, group or title.
•
A request-to-speak list with two delegates. If
applicable, an 'R' indicates a response request. A
maximum of 10 lines of information can be
shown.
If there are more entries than can be shown, the last
delegate on the request-to-speak list and a number of
other delegates will be shown.
i
Note
The number of lines dedicated to the speakers
list and request-to-speak list can be altered
from the ‘Display Configuration’ dialogue box.
For more details, please refer to paragraph 3.2.
4.3 Clearing the current display
It is possible to clear the information being displayed
on conference venue displays connected to the
system. To do so:
•
Select the ‘Clear Display’ menu.
The ‘Clear Display’ menu contains three items:
•
Text Display #1
•
Text Display #2
•
Status Display
Selecting any of these items clears all conference
venue displays showing that item.
•
Click on the appropriate item.
If you select ‘Text Display #1’, a warning message
with the following text is displayed:
‘Clear Text Display #1?’
If you select ‘Text Display #2’, a warning message
with the following text is displayed:
Bosch Security Systems B.V. | 2005 January | 9922 141 70441
DCN Next Generation Text/Status Display
‘Clear Text Display #2?’
If you select ‘Status Display’, a warning message with
the following text is displayed:
‘Clear Status Display?’
In each case:
•
Click on the ‘Yes’ push button to clear the
display.
•
Click on the ‘No’ push button to cancel the
request to clear the display.
If you click on the ‘Yes’ push button, the selected
display will be removed from all conference venue
displays on which it was present, and also from the
main window if it was displayed there.
A ‘restore’ function automatically removes voting
information one minute after the voting has ended.
The voting information is replaced with a message,
or, if no message is available, microphone
information.
4.4 Exiting Text/Status Display
4.4.1 Temporarily exiting Text/Status Display
It is possible to temporarily leave Text/Status Display
without closing it down completely. To do so:
•
Click on the minimize button situated at the top
right of the application window.
The Text/Status Display program will become
iconized in the Windows taskbar. To re-enter
Text/Status Display:
•
Click on the Text/Status Display module icon.
4.4.2 Permanently exiting Text/Status Display
If you wish to exit Text/Status Display completely:
•
Select the ‘File’ menu and click on ‘Exit’.
i
Tip
By closing the Startup program, all DCN
applications – including Text/Status Display will close.
Bosch Security Systems B.V. | 2005 January | 9922 141 70441
en | 14
For more information please visit www.boschsecuritysystems.com
© 2005 Bosch Security Systems B.V.
Data subject to change without notice
January 2005 | 9922 141 70441