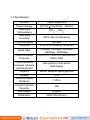
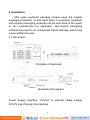
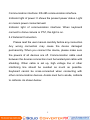
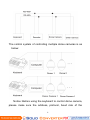
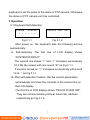
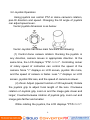
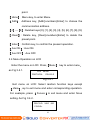
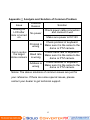
1
This manual might be not accurate technically or contains some minor typo errors. The contents about production description and program in this manual might be updated at any time without notice. Cautions: The LCD is fragile, no crush or long-exposed under strong light. Operation knob is fragile. Please make sure product is packed with original packing material when you send it back for reparation. The keyboard controller should be work in specified range of temperature and humidity. Please follow the connecting method defined in this manual. INDEX 1 Product Introduction ...................................................................... 1 1.1 Package Contents...................................................................... 1 1.2 Main Functions ........................................................................... 2 1.3 Specification................................................................................ 3 2 Installation ........................................................................................ 4 2.1 Dimension ................................................................................... 4 2.2 External Connection .................................................................. 5 3 Operation........................................................................................... 7 3.1 Keyboard Self-detection............................................................ 7 3.2 Joystick Operation ..................................................................... 8 3.3 Key Operation............................................................................. 9 3.4 Menu Operation on LCD......................................................... 10 3.4.1 Menu Operation Mode ............................................................. 11 3.4.2 Index of Menu ........................................................................... 11 3.5 Menu Operation ....................................................................... 12 3.6 Keyboard Short Commands................................................... 14 Appendix Analysis and Solution of Common Problem..... 15 Copyright Statement........................................................................ 16 1 Product Introduction 1.1 Package Contents Keyboard Power supply 4Pin Line Pressing Terminals User manual 1 pc 1pc 1pc 1pc 1 1.2 Main Functions The address range of PTZ or dome camera or decoder can be set from 0 255. At most, 128 devices can be connected in parallel. All input and output communication ports are lightning protection design and the anti-jamming ability is strong. The standard transmission distance is up to 1.2KM. Control all the functions of PTZ or dome camera, such as on / off of back light compensation. Set and run the preset point of PTZ or dome camera. 255 preset points are settable in all. Run PTZ or dome camera scan at a fixed speed or variable speed. Control PTZ or dome camera manually or automatically. Change factory default setting of special camera by adjusting camera menu. Control zoom, focus and aperture of camera manually. Control multiple PTZ or dome cameras at the same time. Built-in protocals are selectable. Built-in multiple languages OSD. Key sound on/off function. 2 1.3 Specification Product Power Supply Operating Temperature Operating Humidity Communication Interface Baud Rate Communication Protocal Communication between Camera and Keyboard Joystick Display Communication Distance Control Camera Quantity OSD Menu Dimension Vector Keyboard DC12V+10%/50HZ 500mA -20 +55 ≤90% Non Condensing RS-485 4PIN Line Pressing Terminals 1200bps, 2400bps, 4800bps, 9600bps, 19200bps PELCO-D, PELCO-P,SAMSUNG, YAAN, SAE One point to multi-points Half-duplex Vector variable speed joystick LCD 1.2Km 128 English 220x130x10(mm) 3 2 Installation After open keyboard package, please keep the original packaging materials, so that when there is a problem, keyboard with original packaging materials can be sent back to the agent or the manufacturer for reparation. Non-original packaging material may lead to an unexpected transit damage, which may cause additional costs. 2.1 Dimension Frontside of Keyboard Backside of Keyboard Power Supply Interface: Connect to external stable voltage DC12V input through this interface. 4 Communication interface: RS-485 communication interface. Indicator light of power: It shows the present power status. Light on means power connected well. Indicator light of communication interface: When keyboard connect to dome camera or PTZ, this light is on. 2.2 External Connection Please read the user manual carefully before any connection. Any wrong connection may cause the device damaged permanently. When you connect the device, please make sure the powers of all devices are off. Communication cable used between the devices connection must be twisted-pair cable with shielding. When cable is set up, high voltage line or other interfering line should be avoided as much as possible. Keyboard cannot be cross-connected when connecting with other communication devices. Anode must be to anode, cathode to cathode. As shown below: 5 The control system of controlling multiple dome cameras is as below: Notice: Before using the keyboard to control dome camera, please make sure the address, protocol, baud rate of the 6 keyboard is set the same to the dome or PTZ camera. Otherwise, the dome or PTZ camera can’t be controlled. 3 Operation 3.1 Keyboard Self-detection SYSTEM < < < STARTUP < < PELCO-D 2400 000 < Fig 3.1.1 Fig 3.1.2 After power on, the keyboard take the following actions automatically: A. Self-detecting: The first line of LCD display shows “SYSTEM STARTUP”. The second line shows “<” and “<” increases successively till it fills the screen with one sound “di” as Fig 3.1.1. If sound is turned on, “<” increases successively with sound “di,di…” as Fig 3.1.1. B. After self-detection finishes: Get the current parameters automatically and clear the contents of the second line on the LCD display. The first line of LCD display shows “PELCO-D 2400 000”. They are communication protocal, baud rate, address respectively as Fig 3.1.2. 7 3.2 Joystick Operation Using joystick can control PTZ or dome camera’s rotation, pan-tilt direction and speed. Changing the tilt angle of joystick can adjust speed even. Vector joystick dimension is as below: Vector Joystick has three main functions as following: (1) Control dome camera rotation: Rocking the joystick in any direction, camera moves in appropriate direction. At the same time, the LCD displays "PTZ <<<<<". Controlling rocker of rotary speed of inclination can control the speed of the camera. More "<" displays on LCD screen, joystick tilts more, and the speed of camera is faster. Less "<" displays on LCD screen, joystick tilts less, and the speed of camera is slower. (2) Zoom Adjust (special function of 3D keyboard): Rotate the joystick grip to adjust focal length of the lens. Clockwise rotation of Joystick grip, zoom in and the image gets closer and larger; Counterclockwise rotation of joystick grip, zoom out and image gets farther and smaller. While rotating the joystick, the LCD displays "PTZ<<<<<". 8 The number of "<" stands for the speed of zoom. More "<", zoom speed is faster. Less "<", zoom speed is slower. (3). The menu setting of controlled object: When setting menu, joystick up is to select previous menu and joystick down is to select the next menu. Joystick left or right can change parameters of the selected menu (as described in the LCD menu operation). 3.3 Key Operation Focus+ : Manual focus on far object. The far objects come clear and the near objects come blurring. Focus- : Manual focus on near object. The near objects come clear and the far objects come blurring. Zoom+ : Zoom in to enlarge object. Zoom- : Zoom out the lens to larger view field. The object becomes smaller. Iris+ : Increase aperture gradually. The picture becomes brighter. Iris- : Downsize aperture. The picture becomes darker. Setup : Set key, [Setup]+number+[Enter] to set the preset point of the camera or set the short commands of the keyboard(See 3.5). Preset : Run key, [Preset]+number+[Enter] to run the preset 9 point. Menu Addr : Menu key, to enter Menu. : Address key, [Addr]+number+[Enter] to choose the communication address. 0 9 : Number keys [0], [1], [2], [3], [4], [5], [6], [7], [8], [9]. Clear : Delete key, [Clear]+number+[Enter] to delete the preset point. Enter : Confirm key, to confirm the present operation. Aux ON : Aux ON. Aux OFF : Aux OFF. 3.4 Menu Operation on LCD Enter the menu on LCD: Press as Fig 3.4.1. LCD Menu key to enter menu MENU PROTOCOL PELCO-D Fig 3.4.1 Exit menu on LCD: Select random function keys except Menu key to exit menu and enter corresponding operation. For example, press Focus+ to exit menu and enter focus setting. As Fig 3.4.2. PELCO-D 2400 FOCUS+ 10 000 Fig 3.4.2 3.4.1 Menu Operation Mode There are two modes of menu operation (1) Joystick operation: Joystick up and down to flip the menu. Joystick left and right + [Enter] to set the parameters of the menu. (2) Key operation: Press [2], [8] to flip the menu. Press [4], [6]+ [Enter] to set the parameters of the menu. Notice: When flipping to address page, [2], [8] can’t flip the menu page, and just function as number keys. [4], [6] can’t set parameters of menu, and just function as number keys. 3.4.2 Index of Menu PROTOCOL PELCO-D LANGUAGE ENGLISH SOUND OFF ADDRESS 000 BAUDRATE 2400 11 The above menus are displayed in the second line on LCD. Only one menu is displayed at one time. The display mode is as below (e.g communication address): LCD MENU ADDRESS 000 Menu Setting Range: PROTOCOL: PELCO-P/ PELCO-D/ SAMSUNG/ YAAN/ SAE LANGUAGE: ENGLISH SOUND: ON/OFF ADDRESS: 000 255 BAUD RATE: 1200/2400/4800/9600/19200 BPS 3.5 Menu Operation When joystick and keys are operated at the same time, joystick operation is preferred. Rotating the joystick to any direction can exit the present setting page (except on menu page). When setting parameters in menu, pressing [Enter] can make the setting effective. The key [Enter] just store the latest changed parameters of menu. For example, if you change 12 protocal, address and baud rate in order, then press [Enter]. Only baud rate is changed successfully. When there is nothing in the second line on LCD as Fig 3.5.1, number keys [2], [8], [4], [6] can be used as up, down, left and right keys to control PTZ or dome camera left and right rotation as the function of joystick. But the rotation speed is the fastest and no grades to select. Show as 3.5.2 (e.g key [2]). PELCO-D 2400 000 PELCO-D 2400 000 PT->UP Fig 3.5.1 Fig 3.5.2 After entering menu, joystick has no function to control PTZ or dome camera. It can only be used as up or down to flip the menu page and left or right to change the parameters of menu. Number keys [0], [1], [3], [5], [7], [9] are invalid. [2], [8], [4], [6] are used as up, down, left and right keys. They are not used as number keys at this time. Their functions are just to flip the menu page but not to control PTZ or dome camera’s up, down, left or right rotation. Only after exiting menu and when there is nothing in the second line on LCD, they can control dome camera’s up, down, left and right rotation. When setting [ADDRESS], number keys [0], [1], [3], [5], [7], [9] restore the number keys’ function. [2], [8], [4], [6] restore the number keys’ function and don’t have up, down, left and right 13 functions. When pressing [Enter] after address setting on menu finishes, it will enter baud rate setting [BAUD RATE 2400]. When go back to [ADDRESS] again, the menu interface displays [ADDRESS 000]. The present set value can’t be seen. When exit menu, the first line on LCD displays the present communication address. Joystick up or down can exit address setting. Address range is 000-255. The number above 255 can’t be set. 3.6 Keyboard Short Commands Combination key: [Setup]+number+[Enter] Number 700 701 812 824 848 896 819 Function Turn off sound Turn on sound Set baud rate to 1200bps Set baud rate to 2400bps Set baud rate to 4800bps Set baud rate to 9600bps Set baud rate to 19200bps 14 Appendix Analysis and Solution of Common Problem Issue Nothing on LCD after item is turned on Can’t control the target dome camera Possible Reason No power Solution Check power cable connection and connect it well Make sure power is DC12V Protocal is wrong Check protocal of keyboard. Make sure it is the same to the dome or PTZ camera. Baud rate is wrong Check baud rate of keyboard. Make sure it is the same to the dome or PTZ camera. Address is wrong Check address of keyboard. Make sure it is the same to the dome or PTZ camera. Notice: The above solutions of common issues are just for your reference. If there are some special issues, please contact your dealer to get technical support. 15 Copyright Statement This copyright merely belongs to the manufacturer. Without permission, please don’t plagiarize or copy the contents of this book in any form or by any means. The company follows the policy of continuous development. Therefore, the company reserves the right to modify or improve the products described in this manual without notice. The content of manual is offered according to the "current state". Unless applicable law specified, otherwise the company does not make any kind of clear or tacit assurance about the accuracy, reliability and contents of this manual. The company reserves the right to revise or recoup this manual at any time without notice. 16