1
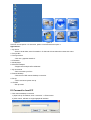
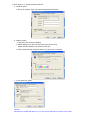
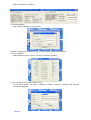
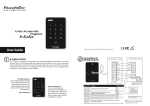
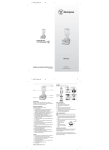
User Manual of N280
Thank you very much for using our N280!
N280 is independent terminal, outward appearance is finer, and the performance is more superior.
Two cases are optional!
N280 port schematic
1.
On /off
2.
Power supply port
3.
LAN port
4.
VGA port
5.
Microphone
6.
Speak in
7.
3 USB port
N280 Accessories
PS / 2 switch interface
Wireless LAN
I. Advantages of N280
1. 64M RMA and 2GB flash, fast speed , three USB ports, convenient use.
2. No need to install software on host PC, enter desktop within 10 second!
3. Support long distance connecting to host PC even in oversea's
4. Support independ operation on thin client sepratedly, when host PC has problem, you can still use
thin client to work. It has installed applications on thin client, you can brower website, use MSN,
SKYPE....ect. Also support to connect to host PC automatically.
5. Multi-language operation system, can customize to chinese, english, germany, arabic …ect.
6. Separated from Ncomputing patent, all softwares are made by our company.
7. Greatly save cost, no need maintenance, easy installation, smart Design and save space, reducing
noise.
8 Suitable for high school, training school, library, cybercafe, office, factory, family use.
9. No maxium limitation on connecting to host pc, as long as host pc configuration can afford!
10. Support system upgrading, monitor video, USB wifi, USB touch screen.
II. Configuration
Data sheet:
1. The specs are: Dimension 115mm*26mm*115mm(L*H*W)
2. Weight 0.5kg
3. Power Input: 100-240V, 50/60Hz; Output: 5V/2A
4. Firmware feature Windows CE intergrated RDP protocals
5. Onboard CPU ARM926EJ 533MHz
6. Memory Onboard 64MB RAM
7. Storage Onboard 2GB Flash
8. Display support Max 1280*1024, 16bit/64K colors; Widescreen 1440*900 support
9. Management Remote management, configuration;
10. Wake terminal remotely(Wake-on-LAN)
11. Onboard LAN 10/100 MB/s
12. Operating range 3k meters
13. Ports: 1 RJ-45 LAN port; 3 USB 2.0 ports; 1 DC in port; 2 Audio jacks: Speaker-out and mic-in;
14. Server OS support Windows Server 2000/2003, Windows NT 4.0-Terminal Server edition, Citrix
Winframe Server/windows XP// Windows 7
Functions on graphical interface
After you turn on the power, thin client run scrollbar and enter into graphical interface. (We can set up
the scrollbar interface to your company logo)
III. WINCE desktop function introduction
-
Connect N280 with display, power, mouse and keyboard
-
Turn on thin client
-
Enter into computer desktop within 10s, there are two options.
-
Option 1:
Enter into thin client desktop directly
Option 2:
Enter into function interface
Option 1
option 2
Here we choose option 1 for intruction, option 2 is almost same as option 1.
Applications:
1. My device
- Enter to local disks, save information in C disk and will not delet when restart thin client
2. Recycle Bin
3. Cloudy terminal
- Click into “graphical interface”
4. IE browser
5. Media player
6. Microsoft wordpad
- Support some simple office softwares
7. My documents
- Save or browse your files
8. Remote desktop
- Click and run RDP remote desktop connection.
9. Set up
- Click it and enter system set up
10. Touhkit
- Set up screen
IV. Connect to host PC
1. Click remote desktop connection
1) Input host pc IP address, click “connection” => Enter server
2) Click cancel, will back to original graphical interface.
3) Click “Option” => setting up below functions
a. “General” option
=> Set up IP address, login user name & password and domain
b. “Display” option
=> Adjust the size of remote desktop.
=> Adjust display bit to 256 color and enhanced color to 16 bit.
(Note: Remote desktop may replace this set up)
=> Add or delet links bar is optional when is on full screen connection
c. “Local resources” option
Caution!
Remember to enable disk drivers, or you can not use flash when connect to thin client.
If you use printer, pls also enable it.
(1). Remote PC sound
- On local PC
- Hide sound
- On remote PC
(2). Keyboard
- On local PC
- On remote PC
- Only full screen mode
(3). Local device (Auto connect to below devices when login remote pc)
- Disk driver
- Printer
- Serial port
- Smart card
How to set up printer?
Click printer => choose correct port of printer “COM2”/ “COM9” / internet =>
model of printer => name printer => continue to set up another printer => choose “Yes” to add
another printer or choose “No” to finish setting.
(4). “Program” Option
- Whether to auto run programs when connect to host pc.
- Set up the files name and route
(5). “Experience” option
- Choose the spead to optimize performance
Moden 28.8kbs / moden 56kbs / broadband 128k~1.5m / Lan 10mbps / User – defined
- Optional
Change desktop background / show contents of window while dragging / Menu and
window animation / themes / btmap cache
- Reconnect if connection is dropped
-
V. System set up
Click system set up => input password (If no password, click ok, if click cancel, it will be back to
graphical interface) => enter into below setting:
1. Control pannel
Enter into:
1). Internet option
- Common (Set up IE home page and search page, adjust cache, clear hostory record and
cache)
- Connection option (Set up whether use LAN or use proxy server visit internet
- Security (Set up confidential or forbidden website, apply the internet acticux control)
- Privacy (Set up cookie)
- Advance (Set up accessibility, browse, multi-media, security…function )
- Pop-up function (Set up web pop-up windows)
2). PC connection
- Change connection mode & connect to desk computer when device is on line.
3). Internet & dailed connection
- Set up IP address and DNS
4). System
- Adjust RAM utilization, optimize system run speed
5). Display
- Wince desktop background and topics
6). Sound
- Adjust the sound
2. Set up IP
- Click control pannel =>IP set up
3. Change password
- Click “change password” enter into below:
Caution! If you forget your password, you can use super password “thinclientadmin”
4. Set up resolution
- Change resolution of thin client or connect to hosp PC’s resolution
5. Auto connect to host pc when start thin client
- Set up “Server name”, “user name”, “password”, “Domain”, whether to relocation disk, and auto
connection during start.
Caution!
Remember to enable disk drivers, or you can not use flash when connect to thin client.
6. Start up setup
1). Local desktop
- Enter into local WINCE system when start
2). Terminal graphical interface
- Enter into orginal graphical interface.
7. MAC address set up
- Support manual set up or get MAC address by random
8. Save setting
Caution!
After finish each setting, you should click “save setting” then restart thin client to save all settings
you made.
VI. Remote control (IPC management system) and wifi
Remote control (IPC management system)
How to use it?
1. Double click“
”,select“Authentication”option => select “No Authentication”
options => OK,
pls return to system up and click save setting, then restart.
2. Install IPC.ext on server
3. “Run IPC Viewer” on server, like below picture:
4. Inter thin client IP address and click OK.
5. Begin to control the thin client.
Wifi
Thin client support USB wifi, if you insert wifi on USB port, thin client will inspect it.
Pls select a network and click “connect”, input password then it can successfully connect.