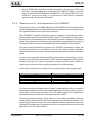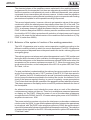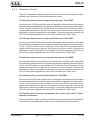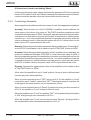
1
HC5-10
User Manual
Volume 1
Manufactured by
Italy
Nome File:
HC5-10_EN.P65
Versione:
1.0
Data:
26/03/2004
Storia del documento
Data
Versione
26/03/04
1.0
Ragione
Prima versione
Autore
J.Berti
HC5-10 - Manuale Utente
Versione 1.0
© Copyright 2004
R.V.R. Elettronica SpA
Via del Fonditore 2/2c - 40138 - Bologna (Italia)
Telefono:
+39 051 6010506
Fax:
+39 051 6011104
Email:
[email protected]
Web:
www.rvr.it
Tutti i diritti sono riservati. Stampato in Italia. Nessuna parte di questo
manuale può essere riprodotta, memorizzata in sistemi d’archivio o
trasmessa in qualsiasi forma o mezzo, elettronico, meccanico, fotocopia, registrazione o altri senza la preventiva autorizzazione scritta
del detentore del copyright.
HC5-10
Table of Contents
1.
2.
3.
3.1
3.2
4.
5.
5.1
5.2
5.3
6.
6.1
6.2
6.3
7.
7.1
7.2
8.
8.1
8.2
9.
9.1
9.2
10.
10.1
Preliminary Instructions
Warranty
First Aid
Treatment of electrical shocks
Treatment of electrical Burns
General Description
Quick reference to instalaltion and use
Preparation
Operation
Software
Controls, Indicators and Connectors
Front Panel
Rear Panel
Connectors Description
Technical Specifications
Dimensional and Environmental Specifications
Electrical Specifications
Electrical description
Modules Identificarion (upper view)
Modules Identificarion (bottom view)
Theory of Operation
Operating Blocks
Phase Regulation between the several Amplifiers
Maintenance Procedures
Routine Maintenance
Manuale Utente
Rev. 1.0 - 26/03/04
1
1
2
2
3
4
6
6
7
14
21
21
23
24
26
26
26
27
28
29
30
30
32
34
34
i
HC5-10
This page was intentionally left blank
ii
Rev. 1.0 - 26/03/04
Manuale Utente
HC5-10
1. Preliminary Instructions
This manual is written as a general guide for those having previous knowledge and experience with this kind of
equipment, well conscious of the risks connected with the operation of electrical equipment.
It is not intended to contain a complete statement of all safety rules which should be observed by personnel in using this
or other electronic equipment.
The installation, use and maintenance of this piece of equipment involve risks both for the personnel performing them and
for the device itself, that shall be used only by trained personnel.
R.V.R. Elettronica SpA doesn’t assume responsibility for injury or damage resulting from improper procedures or
practices by untrained/unqualified personnel in the handling of this unit.
Please observe all local codes and fire protection standards in the operations of this unit.
WARNING: always disconnect power before opening covers or removing any part of this unit. Use appropriate grounding
procedures to short out capacitors and high voltage points before servicing.
WARNING: this device can irradiate radio frequency waves, and if it’s not installed following the instructions contained
in the manual and local regulations it could generate interferences in radio communications. This is a "CLASS A"
equipment. In a residential place this equipment can cause hash. In this case can be requested to user to take the
necessary measures.
R.V.R. Elettronica SpA reserves the right to modify the design and/or the technical specifications of the product and this
manual without notice.
2. Warranty
Any product of R.V.R. Elettronica is covered by a 24 (twenty-four) month warranty.
For components like tubes for power amplifiers, the original manufacturer’s warranty applies.
R.V.R. Elettronica SpA extends to the original end-user purchaser all manufacturers warranties which are transferrable
and all claims are to be made directly to R.V.R. per indicated procedures.
Warranty shall not include:
1
Damage while the equipment is being shipped to R.V.R. for repairs;
2
Any unauthorized repair/modification;
3
Incidental/consequential damages as a result of any defect
4
Nominal non-incidental defects
5
Re-shipment costs or insurance of the unit or replacement units/parts
Any damage to the goods must be reported to the carrier in writing on the shipment receipt.
Any discrepancy or damage discovered subsequent to delivery, shall be reported to R.V.R. Elettronica within 5 (five)
days from delivery date.
To claim your rights under this warranty, you shold follow this procedure
1
Contact the dealer or distributor where you purchased the unit. Describe the problem and, so that a possible easy
solution can be detected.
Dealers and Distributors are supplied with all the information about problems that may occur and usually they can
repair the unit quicker than what the manufacturer could do. Very often installing errors are discovered by dealers.
User Manual
Rev. 1.0 - 26/03/04
1 / 34
HC5-10
2
If your dealer cannot help you, contact R.V.R. Elettronica and explain the problem. If it is decided to return the unit to
the factory, R.V.R. Elettronica will mail you a regular authorization with all the necessary instructions to send back
the goods.
3
When you receive the authorization, you can return the unit. Pack it carefully for the shipment, preferably using
the original packing and seal the package perfectly. The customer always assumes the risks of loss (i.e., R.V.R. is
never responsible for damage or loss), until the package reaches R.V.R. premises. For this reason, we suggest you
to insure the goods for the whole value. Shipment must be effected C.I.F. (PREPAID) to the address specified by
R.V.R.’s service manager on the authorization
DO NOT RETURN UNITS WITHOUT OUR AUTHORIZATION AS THEY WILL BE REFUSED
4
Be sure to enclose a written technical report where mention all the problems found and a copy of your original
invoice establishing the starting date of the warranty.
Replacement and warranty parts may be ordered from the following address. Be sure to include the equipment model
and serial number as well as part description and part number.
R.V.R. Elettronica SpA
Via del Fonditore, 2/2c
40138 BOLOGNA
ITALY
Tel. +39 051 6010506
3. First Aid
The personnel employed in the installation, use and maintenance of the device, shall be familiar with theory and practice
of first aid.
3.1
3.1.1
Treatment of electrical shocks
If the victim is not responsive
Follow the A-B-C's of basic life support
•
Place victim flat on his backon a hard surface.
•
Open airway: lift up neck, push forehead back (Figure 1).
•
clear out mouth if necessary and observe for breathing
•
if not breathing, begin artificial breathing (Figure 2): tilt head, pinch nostrils, make airtight seal, four quick full
breaths. Remember mouth to mouth resuscitation must be commenced as soon as possible
Figure 1
•
2 / 34
Figure 2
Check carotid pulse (Figure 3); if pulse is absent, begin artificial circulation (Figure 4) depressing sternum (Figure
5)
Rev. 1.0 - 26/03/04
User Manual
HC5-10
Figure 3
3.1.2
3.2
3.2.1
Figure 4
Figure 5
•
In case of only one rescuer, 15 compressions alternated to two breaths.
•
If there are two rescuers, the rythm shall be of one brath each 5 compressions.
•
Do not interrupt the rythm of compressions when the second person is giving breath.
•
Call for medical assistance as soon as possible.
If victim is responsive
•
Keep them warm
•
Keep them as quiet as possible
•
Loosen their clothing (a reclining position is recommended)
•
Call for medical help as soon as possible
Treatment of electrical Burns
Extensive burned and broken skin
•
Cover area with clean sheet or cloth
•
Do not break blisters, remove tissue, remove adhered particles of clothing, or apply any salve or ointment.
•
Treat victim for shock as required.
•
Arrange transportation to a hospital as quickly as possible.
•
If arms or legs are affected keep them elevated
If medical help will not be available within an hour and the victim is conscious and not vomiting, give him a weak solution
of salt and soda: 1 level teaspoonful of salt and 1/2 level teaspoonful of baking soda to each quart of water (neither hot
or cold). Allow victim to sip slowly about 4 ounces (half a glass) over a period of 15 minutes. Discontinue fluid if vomiting
occurs.
DO NOT give alcohol
3.2.2
Less severe burns
•
Apply cool (not ice cold) compresses using the cleansed available cloth article.
•
Do not break blisters, remove tissue, remove adhered particles of clothing, or apply salve or ointment.
•
Apply clean dry dressing if necessary.
•
Treat victim for shock as required.
•
Arrange transportation to a hospital as quickly as possible
•
If arms or legs are affected keep them elevated.
User Manual
Rev. 1.0 - 26/03/04
3 / 34
HC5-10
4. General Description
The HC5-10, produced by R.V.R. Elettronica, is a hybrid coupler at 5 way that allows
to join up to 5 R.F. power amplifier. Its function is to split the RF signal coming from a
RF exciter, adjusting the relative phases, to pass them through five external RF power
amplifiers and then to combine the output of the amplifiers into a single RF amplified
signal to be forwarded to the antenna output.
The HC5-10 is produced in the version for five transmitters of 2 kW max output power
everyone (for example PJ2000M-C), for a total nominal power of 10 kW.
Exciter
RF
Amplifier #1
HC5
Spl
Σ
RF
Amplifier #2
RF
Amplifier #3
RF
Amplifier #4
RF
Amplifier #5
The nominal working principle of a FM transmitter based on a hybrid coupler scheme
like HC5-10, foresees that the used amplifiers shall produce the same RF power
that will be added with the same phase. Possible differences in the power level or
phase of the amplifiers generate the so-called unbalancement power that is in part
dissipated inside the coupler. The HC5-10 guarantees the overall working of the
transmitter even if one of the amplifiers is completely off-service. In such case, the
power generated by the surviving amplifier is routed to the antenna anyway; the other
part of the delivered power (that is unbalancement power) is dissipated inside the
combiner.
The HC5-10 is controlled by a microcontroller system, that includes a LCD display
and a series of keys for the interaction with the user, that realizes the following functions:
4 / 34
•
Measurement and visualization of the coupler’s working parameters
•
Activation and deactivation of the power output of the system
•
Protection of the coupler with respect to potentially dangerous situations like
exceeding emitted or unbalancement power, overdrive or overtemperature
•
Detection of user-settable attention thresholds (e.g. output power being below a
certain value), that are made externally available as digital states on the "telemetry"
connector
•
Communications with external devices
Rev. 1.0 - 26/03/04
User Manual
HC5-10
The management software of the HC5-10 is based on a menu system.
The user can navigate through the menu system using four buttons, ESC, move LEFT/
UP, move RIGHT/DOWN and ENTER. A fifth button is used to reset the alarm counters,
if any alarm has been triggered before.
The state of the machine comes indicated from nine LEDs present on the frontal
panel.
A switch on the front panel allows to select the LOCAL or REMOTE working mode:
•
LOCAL mode allows to control the machine using the buttons on the front panel,
while remote control (that is using the telemetry connector) is disabled;
•
In REMOTE mode, remote control is enabled, while the buttons on the front panel
can be used only to read parameters and not to change them
The LOCAL working mode is signalled by a yellow LED on the front panel being lit.
The different working parameters are made available for the remote control
applications on the telemetry connector, as voltage levels that are proportional to the
value of the parameter under consideration. Digital output signals related to alarms
or warnings are also present on the connector, together with the digital input like ON/
OFF switching or alarms reset.
The HC5 can be connected to the exciter of the transmitter using a “interlock” cable,
so that it is possible for it to deactivate RF power emission in case of misfunctioning
of the transmitting system. An analogous effect can be reached also in case the
exciter misses the interlock functionality, connecting the mains supply of the exciter
to the auxiliary mains plug of the HC5-10 “AUX OUT AC LINE”. This plug is in fact
opened using a relay under the same conditions that cause the activation of the
interlock.
User Manual
Rev. 1.0 - 26/03/04
5 / 34
HC5-10
5. Quick reference to instalaltion and use
This chapter is intended to summarize the necessary points for the installation of the
device. In case any of the arguments is unclear, for example when you use the
combiner for the first time, we suggest to carefully read the whole manual.
5.1
Preparation
Unpack the HC5-10 and before any other operation check the unit for any shipping
damage; in particular, check that all the controls and connectors on the front and rear
panels are in good conditions.
Inside the HC5-10 are inclusive:
•
Nr. 1 5-way RF splitter;
•
Nr. 1 5-way RF combiner;
•
Service electronic circuits that control the entire system composed of HC5-10
with Nr. 5 2kW amplifiers connected (for example PJ2000M-C);
•
Connection cables for the RF input signals of each amplifier;
•
Connection cables for the RF output signals of each amplifier;
•
Connection cables for the signals that exchange the HC5-10 combiner and the
PJ2000M-C amplifier. In the case the cable is not in good conditions or doesn't
come connected, the combined system is not able to manage the various
parameters interconnected correctly. This condition involves a high probability to
create permanent damages to the load of HC5-10.
If it is necessary, check the integrity and the value of the fuse inside the voltage changer
block; the required fuse type is:
•
Aux Fuse
10A
•
Mains fuse
10A
Connect the RF output cable of the exciter to the N-type input of the splitting section
of the combiner. Connect five cables between the output N connectors of the splitting
section of the combiner and the RF input of five suitable amplifiers. Connect five
cables between the RF output of the amplifiers and the input connectors of the
combining section of the coupler.
Connect the RF output cable of the exciter to the input connector (N type) of the
splitter section of the combiner. Connect each of the five outputs (N type) of the splitter
section with the RF input of the relative power amplifier. Connect the outputs of the
amplifiers (type 7/ 8") to the inputs of the combiner joining section (type 7/ 16").
6 / 34
Rev. 1.0 - 26/03/04
User Manual
HC5-10
Connect the connector (type 1+5/ 8") of general RF output of the combiner to the
antenna or to a dummy load able to dissipate the power. Connect, through a coaxial
cable, a BNC connectors with a "Alarms/ Interlock"cable to the Interlock connector of
the exciter (you see the scheme included in each station like reference). Connect the
telemetry connector to the "Telemetry" connector of the exciter, if forecasted in the
configuration (see the manual of station).
Connect the feeding cable to the relative MAINS connector on the rear panel.
WARNING: the feeding connector is a bare terminals, make sure that the cable
is not under voltage during the connection.
WARNING: is essential that the machine comes connected correctly to ground
to ensure both the safety of operation as well as the correct working of the
equipment.
5.2
Operation
To perform its intended pourpose, the HC5-10 is always used in a transmitter
comprising an exciter, five RF amplifiers and one RF driver able to furnish an output
power up to 250W, if the exciter doesn't give the output power demand. The HC5-10
verifies the excitation group only for as concern the interruption of RF power and the
power supply.
When the HC5-10 comes put under voltage, verify that the two ON LED are lit. The
LCD display shows a presentatio screen, and after a few seconds it will pass to the
default screen, showing the values of the forward and reflected power.
Switch the exciter on (at its minimum power level) and wait for it to lock on the working
frequency. When the PLL has locked, progressively increase its output power, while
controlling the displays of the exciter, of the amplifiers and of the hybrid coupler.
Keep increasing the exciter output overall output of the combiner reaches the desired
value, that is at most the nominal power rating of the transmitting station.
At this point, it is possible for the user to verify all the working parameters of the
amplifier using the management software.
Normally, the device doesn’t require any human supervision for its normal operation.
If any alarm condition arise, these are automatically managed by the embedded
protection system, and notified to the user with the LEDs on the panel or via messages
on the LCD display.
5.2.1
General behavior with PJ2000M-C
The HC5-10 includes electronic circuits that adjust the complete system of connected
amplifiers, that allows to obtain the following performances:
•
User Manual
Service partial operation, when any connected amplifiers are out of service also.
Rev. 1.0 - 26/03/04
7 / 34
HC5-10
•
Service partial operation, when only the main power phase remains active on
which are connects the monophase devices also.
•
Service total interruption, when the system conditions are incompatible with the
functioning.
The commands that control the system HC5-10 with PJ2000M-C are:
•
"ON" command, switch on the complete system.
•
"OFF" command, switch off the complete system.
•
"Inhibit" command, the system operation is totally suspends until to persists the
signal that drives it.
•
"Reset" command, effect one reset of the protections that is propagated for all
the PJ2000M-C apparatuses.
Of norm the system HC5-10 with PJ2000M-C must work with all the apparatuses
setting in "Remote" position. In the case any apparatus is not in the "Remote"
condition, it doesn't constitute a condition of risk of damages to any electric part of all
the system.
When HC5-10 is set in "Remote", then the complete system accepts commands
only from the remote connections.
When HC5-10 is set in "Local" and all PJ2000M-C apparatuses are in "Remote",
then it’s possible to command the complete system from the HC5-10 frontal panel.
When some apparatus was not connected in "Remote," the behavior of that apparatus
is not conforming to the behavior of the others in answered to the orders operated on
the system.
The operation parameters of each apparatus can be seen, in any moment, navigating
through the settable menu with the keys on the frontal panel. This navigation is possible
with the apparatus in "Remote" or in "Local" position.
The commands through keys on frontal panel, instead, are possible only when the
apparatus is in "Local" position.
The need to effect commands only on the amplifiers apparatuses could have utility of
diagnostic character, the normal operation of the apparatuses foresees that they are
set in position "Remote", therefore in condition of answer to the deriving commands
from the HC5-10. The set of the apparatus HC5-10, instead, could be select on the
base of the option foreseen from the plan of the station. The HC5-10 could be
commanded through telemetry or from the operator, in the first case must be set in
"Remote," in the second case in "Local."
When the system works to regime and regularly, then the following indications are
switched on :
•
8 / 34
On HC5-10 are been switched on the two green LEDs with "ON" label. When the
apparatus is adjusted up to 10KW RF output, it could be alight the yellow LED
with indication "Over" too. The yellow LED, with "Local" indication, it could be
alight or not alight according to the set planned from the operator.
Rev. 1.0 - 26/03/04
User Manual
HC5-10
•
5.2.2
On each PJ2000M-C amplifier are been switched on the two green LEDs with
"ON" label. When the apparatus is adjusted up to 10KW RF output, it could be
alight the yellow LED with indication "Fold Back" too. The yellow LED with "Local"
indication it must be not alight, it is previewed of norm that the amplifiers
apparatuses are always set in "Remote."
General norms of di funzionamento con PJ2000M-C
The normal functioning of the HC5-10 system with PJ2000M-C foresees that the five
amplifiers apparatuses are working with equal output powers and electrical phase of
their signals equalized to the input of the combiner.
Each PJ2000M-C amplifier disposes of power regulation practicable through a
trimmer present on the frontal panel of the RF section. This regulation must be set for
the maximum of the amplifier power adjusting the trimmer completely in clockwise
sense. The equalization of the power of each amplifier comes obtained for effect of
the regulator that it is present on the HC5-10, (trimmer labelled "Power Adjust").
The system is able to distributing a power up to 10KW RF guaranteed in output, but
it has been projected in a such way for work to lower power with an acceptable
electrical efficiency. Each power of output programmed requires a different excitation
power.
In order to use completely the potentialities of the system, it is necessary to make
reference to this small trick: the excitation of RF input must be greater of that it allows
to obtain the regime RF power, this surplus of power must be such to obtain an
output power increased of the quantity described in the following table.
Values table of output power surplus for every regime power value programmed.
Output Power
Output Power Surplus
10kW
8kW
6kW
5kW
4kW
3kW
400W
800W
1000W
1500W
2000W
2000W
The system could be adjusted without danger of damages also with an excitation
power scarcely efficiency to obtain the power final programmed (then without surplus),
in this case it is reduced the stability of the RF power output, and is obtained an
electrical efficiency not optimal for lower powers than 10KW.
The electrical phase regulation of the signals of the combined amplifiers, allows to
obtain a heavy reduction of the RF power wasted on the absorbers resistors. This
operation gives the best results if it comes effected when the apparatuses are been
adjusted to the regime power programmed from the regulator located on the frontal
panel of the HC5-10 (Power Adjust).
User Manual
Rev. 1.0 - 26/03/04
9 / 34
HC5-10
The electrical phase of the amplifiers comes optimized in the working frequency
programmed for the transmitter, but there are operational possibility that foresees
that the transmitter could alternatively work on different frequencies, see systems
composed of more transmitters with common reserve. In these cases the regulation
of the electrical phase must be effected considering to get a compromise with working
parameters acceptable for all the possible working frequencies.
This second signals setup, however, allows to get operation values of the system
combined in which the wasted power stays always lower than 2% of the total. The
systems optimized on a single frequency could arrive to wasted powers lower than
0.5%. Is necessary, however, adjust the phase so that the value of wasted power "Rej
PWR" is inferior always than 200W. In contrary case the condition can be introduced
for which the HC5-10 falls in protection with reduction of output power and it cannot
return to full power for the lacked reenter of the conditions that would allow it ("Rej
PWR" it; lesser than 200W).
5.2.3
Behavior of the system in function of the working parameters
The HC5-10 apparatus puts in action various operation modality according to the
different conditions of work in which it is come to be situated. The HC5-10 apparatus
has two groups of disposed fans on the panels and to the inside: ordinary group and
emergency group.
The ordinary group must always work when the apparatus is set in "ON" position and
during the short moments of post-ventilation, the emergency group enters in function
when the total power on the absorbers resistances exceeds 200W and/or when the
temperature of the warmer resistance exceeds 40 °C. When the emergency fans
group enters in function, on the frontal panel of the HC5-10 an yellow LED, with "Fans
On" label, is lit on.
For post-ventilation is understood that the ordinary fans group continues to work for
around 3 minutes after the set in "OFF" position of the HC5-10. Each hour spent in
“OFF" position, the HC5-10 switched on for around 3 minutes the ordinary fans group,
this to remove the heat accumulated to the inside of the circuits. An electronic circuit
check if the fans are regularly feeding, in case of irregularity comes generated an
"Fault" alarm that interrupts the operation of the apparatus without attempts of restart.
This alarm appears on the display and on a red LED positioned between the fans of
the frontal panel.
An advanced measure circuit checks the power value on each of the absorbers
resistances and carries out the sum. This sum is available as measured parameter
on display as "Rej PWR". When the power of one of the absorbers resistances
exceeds the limit of 800W, the HC5-10 reacts reducing the power of all PJ2000M-C
amplifiers to maximum 1KW.
The power reduction reenters only when the total power on absorbers resistances
returns under the 200W. In case that the phase regulation between the apparatuses
is not optimal, with "Rej PWR" value at regime superior to 200W, the system doesn't
return to full power after a phase of protection that foresees the reduction. The reduction
of power comes signalled on the HC5-10 frontal panel with a yellow LED and with the
"Fold Back" label.
10 / 34
Rev. 1.0 - 26/03/04
User Manual
HC5-10
5.2.4
Protection Circuits
The HC5-10 apparatus disposes of protection circuits that arrest temporarily and/or
definitely the functioning of the whole transmitter system.
1) Protection from excessive output forward power "Fwd PWR".
It intervenes at 12.5KW, and it effect until to 8 attempts in the short period; exhausted
the restoration attempts blocks the apparatus definitely, signalling the status with a
"Fault" red LED placed on the frontal panel. If the total of the 8 attempts doesn't
happen within the period of an hour, the counter of the interventions is reset giving
back again to others 8 possibilities of restoration. During the temporary arrest on the
HC5-10 frontal panel appears the yellow LED indication with "Wait" label.
2) Protection from excessive output reflected power "Ref PWR".
It intervenes at 1800W, and it effects until to 8 attempts in the short period, exhausted
the restoration attempts blocks the apparatus definitely signalling the status with a
"Fault" red LED placed on the frontal panel. If the total of the 8 attempts doesn't
happen within the period of an hour, the counter of the interventions is reset giving
back again to others 8 possibility of restoration. During the temporary arrest on the
HC5-10 frontal panel appears the yellow LED indication with "Wait" label.
3) Protection from excessive excitement input power "Inp PWR".
It intervenes at 250W, and it effects until to 8 attempts in the short period, exhausted
the restoration attempts blocks the apparatus definitely signalling the status with a
"Fault" red LED placed on the frontal panel. If the total of the 8 attempts doesn't
happen within the period of an hour, the counter of the interventions is reset giving
back again to others 8 possibility of restoration. During the temporary arrest on the
HC5-10 frontal panel appears the yellow LED indication with "Wait" label.
4) Protection from excessive Rejected power “Rej PWR”.
It intervenes at 1650W, and it effects until to 8 attempts in the short period, exhausted
the restoration attempts blocks the apparatus definitely signalling the status with a
"Fault" red LED placed on the frontal panel. If the total of the 8 attempts doesn't
happen within the period of an hour, the counter of the interventions is reset giving
back again to others 8 possibility of restoration. During the temporary arrest on the
HC5-10 frontal panel appears the yellow LED indication with "Wait" label.
5) Protection from excessive temperature on at least one of the 5 "Temp"
absorber resistances.
It intervenes at 80°C and it maintains until that the value has exceeded the threshold,
when the value descends again under the limit, the functioning returns normal.
User Manual
Rev. 1.0 - 26/03/04
11 / 34
HC5-10
6) Protection of electric net feeding "Mains."
It intervenes when the mains voltage that feeds the apparatus HC5-10 exceeds the
limits of ± 20% and the value until to that is maintained is outside from the limit interval,
returns normal the operation when the value is within the limits interval.
5.2.5
Functioning Anomalies
Some operational conditions could cause a way of work of the apparatus not optimal.
Anomaly: When at least one of the PJ2000M-C amplifiers doesn't disburse the
same power of the others, the power on "Rej PWR" absorbers resistances could
exceed the threshold value of 200W. If during the operational period of the transmitter,
a situation is verified that involves the intervention of the protection with the power
reduction (es.: one of the amplifiers suspends his operation temporarily, while the
others continues to work), in this case the system with HC5-10 doesn't return to the
power value of RF out precedent to this event.
Remedy: Reduce the power of all the transmitter adjusting the trimmer "Power Adjust",
on the HC5-10 frontal panel, until to obtain a value of "Rej PWR" inferior to 200W.
Anomaly: When the signal phase regulation of the 5 amplifiers is not optimized, the
power on resistances absorbers "Rej PWR" it could exceed the value of 200W. If
during the operating period of the transmitter, a situation is verified that involves the
intervention of protection with power reduction (es.: one of the amplifiers it suspends
its operation temporary, while the others continues to work), in this case the system
with HC5-10 doesn't return to the power value of RF out precedent to this event.
Remedy: Regulate the signals phase of the of the amplifiers until to obtain a value
of "Rej PWR" inferior to 200W.
When one of the amplifiers is set in "Local" position, its way of work is differentiated
from the way of the other amplifiers.
When it comes controled a set of "OFF" acting on HC5-10, the amplifier in "Local"
reacts with a set of "Inhibit", instead that "OFF." The situation doesn't constitute risk
of damage for the whole system, only an imperfection of form.
When it comes controled a set of "Reset" of protections acting on the command of
HC5-10, the amplifier in "Local" it doesn't effect his reset.
When the amplifier set in "Local" is in position "OFF," isn’t possible change its position
to "ON" acting through the commands on HC5-10.
When the amplifier set in "Local" it comes commuted in "Remote", this aligns itself to
the set planned from the commands operated on HC5-10.
12 / 34
Rev. 1.0 - 26/03/04
User Manual
HC5-10
When left one phase of the mains power, that is not what it feeds the HC5-10, the
transmitter reduces its RF output power to a value that doesn't exceed the 5KW. If the
power of programmed regime is inferior to the value of 5KW, doesn't happen any
reduction.
When left two phases of mains power, but stays the phase that feeds the HC5-10, the
transmitter reduces its RF output power to a value that doesn't exceed 1KW. If the
power of programmed regime is inferior to the value of 1KW, doesn't happen any
reduction.
5.2.5
Risks for the HC5-10 system with PJ2000M-C
Some operational situations are potentially harmful for some part of the system.
When the cable of interconnection of the signals of command doesn't connect all the
apparatuses of the system, the amplifiers not connected doesn't react the deriving
commands from the HC5-10 apparatus . This constitutes possible cause of permanent
damages to the HC5-10.
If the connection of the neutral of the mains power stops in any part of the electric
installation, inside or outside of the apparatus, are possible permanent SERIOUS
DAMAGES to all the apparatuses of the system.
The apparatus HC5-10 MUST be connected to its driver/ exciter apparatus through
a cable that allows the interrupt of the oiperation in case of intervention in protection.
This connection could be of two types:
•
Signal of low voltage that cuts off the power of the driver/exciter system.
•
Feeding of the exciter connected to the plug of mains voltage foreseen, and
available on the rear panel.
The first solution is indispensable when HC5-10 system with PJ2000M-C is connected
to the telemetry, whose circuits are install on the exciter.
If at least one of the two connections doesn't come done, are possible permanent
damages to the HC5-10.
The RF power cables that connect the output of each PJ2000M-C amplifier with the
HC5-10 combiner must be well locked. If the contact between the connectors is not
correct, leaks of energy in RF could be verified. This energy has the power to influence
dangerously on the behavior of electric circuits of other apparatuses in the vicinities
of the transmitter beyond that on the same transmitter. The power in game on these
connections is potentially able to generate overheatings with possible fire of the cables.
WARNING: The interconnection cables between amplifiers and HC5-10
contains TEFLON, the combustion of the TEFLON generates HIGHLY TOXIC
GAS for each living being.
The amplifier requires high values of current from the mains. If the cables that furnish
the electric general feeding are not well locked, fires could be verified.
User Manual
Rev. 1.0 - 26/03/04
13 / 34
HC5-10
5.2.6
Risks for the personnel
The system HC5-10 with PJ2000M-C amplifiers could also work when one or
more amplifiers have been physically removed from the system.
For the same nature of the type of combiner, the transmitter in RF power it is
possible [potenzialmente] effect the removal of an apparatus maintaining in
operation the transmitter in RF power, without generated signals come of
overloaded that interrupts the functioning of it. Because the physical removal
of an amplifier happens through the [maneggiamento] of the connectors of
RF power connected to the amplifier, the operator should handle points where
it is present RF energy that doesn't come interrupted from circuits of
protection.
For the nature of the adopted combiner type , the removal of an apparatus is
potentially possible maintaining in function the transmitter in RF power,
without that come generated signals of overload that interrupts the operation.
Because the physical removal of an amplifier happens through the handling
of the RF power connectors connects to the amplifier, the operator would
have handle points where is present RF energy that does not come
interrupted from protection circuits.
In theory the values of RF power in these points are low, but for effect of the
maladjustment of RF impedance that the handling could cause, the power in
the connectors could go up until to very dangerous values.
These operations, therefore, are to AVOID ABSOLUTELY !
5.3
Software
This chapter describes the way the microprocessor system controls the hybrid
coupler, and how the user can interact with it.
Note that the user can give commands to the device only when it's set in LOCAL
mode using the switch on the front panel. Otherwise, the user will only be allowed to
read the parameters, but not to change any of them.
The management of the HC5-10 is performed by a generic software used in different
classes of equipment produced by R.V.R. Elettronica SpA, like the HC combiners or
the RF amplifiers PJ500M-C and PJ1000M.
For this reason, some options that are related to other kinds of devices are deactivated
in the software version that is installed in the HC5-10 (see for example the P.A. menu).
Note that some of the parameters that are measured and can be read may be, in
some circumstances, not available. This situation mostly arises when, for physical
reasons, the measured values are not significant to be used in the control software.
14 / 34
Rev. 1.0 - 26/03/04
User Manual
HC5-10
When the value for a parameter is not available for such reasons, it's substituted with
the symbol “==”.
At power on, the LCD display will show the following presentation screen, indicating
the name of the device and informations regards the actual release software (SW)
and hardware (HW):
After a few seconds, the main screen will be displayed, reporting the values od
Forward power and Reflected power:
The management software will remain indefinitely in this default screen, until the user
pushes the ESC button.
Pushing the ESC button, the user will be presented with the menu selection screen,
from which the other screens can be accessed:
Pushing again the ESC button, the software goes back to the default screen.
To enter into one of the submenus, just select the corresponding name (that will be
indicated by a flashing underscore) with the LEFT and RIGHT buttons, and then push
ENTER.
5.3.1
Function menu (Fnc)
From this menu, the user can “switch” ON and OFF the hybrid coupler.
User Manual
Rev. 1.0 - 26/03/04
15 / 34
HC5-10
The result of this command is that when the HC5-10 is put in OFF mode, the inner
conductor of the “Alarm” connector is shorted to ground, so that the exciter is put in
stand-by mode (this will happen only if provided with an interlock connector, and if
correctly connected with the hybrid coupler). At the same time, the auxiliary mains
output is opened, so that if an exciter is connected to it, il will be shut off.
Whe the hybrid coupler is switched OFF, the software waits a few minutes to permit
the proper cooling of the device, and then sends a signal to the relays of the blowers
to turn them off too.
Each two hours, while the machine is OFF, the software enables the blowers for a
while to dissipate the heat generated by the circuitry and to avoid possible
malfunctions of the blowers due to long inactivity periods.
Switching ON again the hybrid coupler, the interlock circuit is opened, reenabling the
power emission in the connected exciter, the auxiliary mains plug supply is powered
and the blowers are restarted.
5.3.2
Power menu (Pwr)
This multi-line scrollable menu allows the user to read all the measurements related
to the behaviour of the power section of the combiner:
•
Forward Power (Fwd Pwr)
•
Reflected Power (Rfl Pwr)
•
Standing Wave Ratio (SWR) (Not active)
•
Input Power (Inp Pwr)
•
Reject SWR (Rej SWR)
Depending on the configuration of the machine, some of the measures could be
deactivated.
The complete aspect of the screen is the following figure (please note that only two
lines at a time are visible, use the UP and DOWN buttons to scroll):
16 / 34
Rev. 1.0 - 26/03/04
User Manual
HC5-10
5.3.3
Power Amplifier menu (P.A.)
This multi-line scrollable menu reports to the user some internal measurement of the
device:
•
Voltage (VPA) - Not active
•
Current (IPA) - Not active
•
Efficiency - Not active
•
Temperature
•
Mains voltage (Mains - percentage variation with respect to the nominal voltage)
The complete aspect of the screen is the following figure (please note that only two
lines at a time are visible, use the UP and DOWN buttons to scroll):
La seguente figura mostra l'aspetto completo di questa schermata (sono visibili sul
display solo due righe alla volta, utilizzare i pulsanti SU' e GIU' per scorrerla):
Please note that the first three lines of this screen are not active since they are not
meaningful for a hybrid coupler.
5.3.4
Threshold setting menu (Set)
As described in the introduction, the amplifier offers a maximum of three user settable
alarms. For each of them, one of the working parameters is compared against a
threshold value that can be be modified by the user. The results of the comparisons
are available on the telemetry connector or as dry contacts on the optional external
telemetry board, and can be read on the display as "O" (open, i.e. the result is false)
or "C" (closed, i.e. the result is true).
Two of the settable thresholds are related to the RF emitted power (Power Good),
while the third is connected to the amount of reflected power (Reflected Warning).
The thresholds are expressed as percentage of full-scale value of the relevant quantity.
The full scale values for the HC5 are the following:
•
Forward Power
•
Reflected Power 1000 W
User Manual
10000 W
Rev. 1.0 - 26/03/04
17 / 34
HC5-10
To change the values of the thresholds, execute the following procedure:
•
Select the line to modify (UP and DOWN buttons)
•
Push the ENTER button
•
Modify the value of the threshold (UP and DOWN buttons)
•
Push the ENTER button to confirm
The following figure shows an example of configuration for this menu.
In questo esempio, le soglie degli allarmi sono:
5.3.5
•
PwrGd 1
8000 W
(80% X 10000 W)
•
PwrGd2
5000 W
(50% X 10000 W)
•
RflWar
700 W
(70% X 1000 W)
Alarms Menu (Alm)
This screen gives to the user information regarding the status of the protection system
included in the hybrid coupler.
It is constituted by a certain number of lines, each containing the name of a variable
controlled by the system and the kind of intervention that is undertaken by the system
in case the parameter surpasses its limit.
The latter can be of the kind: X - (Y), Wait, or Dis. (Disabled).
The aspect of this multi-line screen is the following (only two lines at a time are visible,
use the UP and DOWN buttons to scroll):
18 / 34
Rev. 1.0 - 26/03/04
User Manual
HC5-10
The function of this menu is essentially a help for the technician to identify the causes
of possible malfunctions of the transmitter.
5.3.6
Various menu
Two operations can be performed using this menu:
•
Setup the address of the I2C serial bus type connection
•
Setup the kind of visualitation in the default menu
The default address of I2C communication is relevant when the coupler is connected
with other RVR’ devices that use this protocol. We raccomend not to change this
parameter if not necessary.
The visualitation mode can be Digital (the default mode described in chapter 5.3) or
Analog:
User Manual
Rev. 1.0 - 26/03/04
19 / 34
HC5-10
In analog mode, a little triangle indicates the reflected power level set in the threshold
set menu (under RflWar), while the bar below shows the in real time level reflected
power.
This last kind of visualitation is best used when the combiner output is connected to
a device that has to be tuned, as a cavity.
5.3.7
Versions menu
This menu shows the hardware (H.V.) and software versions (S.V.) of the machine.
5.3.8
Protection system
The protection system implemented in hybrid coupler is based on two types of
reactions, the “Foldback” and the temporary disabling.
20 / 34
Rev. 1.0 - 26/03/04
User Manual
HC5-10
6. Controls, Indicators and Connectors
This chapter describes the front and rear panels of the HC5-10, with a brief indication
of all the different components.
6.1
Front Panel
[1] ESC
Button to exit from a menu.
[2] LOC/REM
Switch to select the local or remote control modes.
[3] ALARM RESET
Button used to manually reset the protection system (also for the amplifiers,
in the case is correctly connected).
[4] DISPLAY
LCD Display.
[5] ON
Green LED, lit when the hybrid coupler is switched on.
[6] WAIT
Yellow LED indicating that the hybrid coupler is waiting for a condition that
is blocking the power output to be removed.
[7] FAULT
Red LED indicating that a fault that cannot be automatically reverted.
[8] LOCAL
Yellow LED indicating that the hybrid coupler in local control mode.
[9] OVER
Yellow LED, lit when the system have reached the maximum delivery
power.
[10] BRIGHTNESS
Trimmer to regulate the brightness of the LCD display.
[11] ENTER
Button used to accept a parameter's value or to enter into a menu.
[12] RIGHT/DOWN
Button used to navigate in the menu system and to modify the changeable
parameters.
[13] LEFT/UP
Button used to navigate in the menu system and to modify the changeable
parameters.
[14] R.F. TEST
BNC RF monitor output. The output level is -60 dB below the power
output in the band 87.5-108 MHz.
[15] AIR FILTER
Air Filter for Power Splitter and Combiner.
[16] FAULT
Red LED indicating the presence of a malfunction that could not be resolved
automatically after the "RETRY" attempts set up.
User Manual
Rev. 1.0 - 26/03/04
21 / 34
HC5-10
22 / 34
[17] FANS ON
Yellow LED giallo, lit when enters in function the group of emergency fans
caused from excess of temperature (exceeded the 45°C), unbalancement
above the 200 W or post ventilation.
[18] ON
Green LED, lit when the hybrid coupler is sithed on.
[19] RF PWR ADJ
Trimmer for the power adjustment (turn completely in clockwise sense to
have the maximum power)
[21] FOLDBACK
Yellow LED, if lit indicates the intervention of the automatic reduction of
the delivered power to 1000W maximum for each amplifier.
[21] AIR FILTER
Air Filter for Power Splitter and Combiner.
[22] F ADJ.
Phase regulation of the input RF channels of the amplifiers. Don't USE
METALLIC TOOLS FOR THE REGULATION.
[23] AIR FILTER
Air Filter for Power Splitter and Combiner.
Rev. 1.0 - 26/03/04
User Manual
HC5-10
6.2
Rear Panel
[1] MAINS
VDE plug for the mains power supply.
[2] AUX PS
Auxiliary VDE plug for the feeding of external devices (tipically an exciter).
[3] MAINS FUSE
Protection fuse for the input of the mains power supply (10A).
[4] AUX FUSE
Protection fuse for the auxiliary output AUX fuse (10A).
[5-6-7-8-9] SPLITTER OUT 1 to 5
Power Splitter Outputs (N-type connector) to drive Power Amplifiers.
[10] SPLITTER INPUT
Exciter’s R.F. Input connector (N-type).
[11] I2C
DB9 connector for I2C bus networking.
[12] TELEMETRY
DB25 telemetry connector.
[13] RS232
DB9 connector to link the amplifier with external devices.
[14] COM BUS
DB15 connector for interfacing with the five amplifiers.
[15] REM CTRL
Connettore di controllo DB9 per il collegamento dell’apparato a dispositivi
esterni.
[16] INTERLOCK 1
BNC connectors to inhibit an exteral device, as an exciter. In case of fault,
the inner connector is shorted to ground.
[17] INTERLOCK 2
BNC connectors to inhibit an exteral device, as an exciter. In case of fault,
the inner connector is shorted to ground.
[18] HEAT SINK
Heat sink.
[19-20-22-23-25] COMBINER INPUT 1 to 5
Power Combiner Inputs (7/16”) from the Power Amplifiers.
[21] HEAT SINK
Heat sink.
[24] HEAT SINK
Heat sink.
User Manual
Rev. 1.0 - 26/03/04
23 / 34
HC5-10
6.3
6.3.1
Connectors Description
Telemetry Connector
Type: DB25 Female
1
14
1
2
3
4
5
6
7
8
9
10
11
12
13
14
15
16
17
18
19
20
21
22
23
24
25
Rej Pwr T
Ch4 T
GND
Rfl Pwr T
OC_EXC T
OC_SET4 T
GND
IN_ON T
OC_SET1 T
OC_WAIT T
IN_RST T
OC_OFF T
IN_INH T
TEMP T
Ch_5 SDA
FWD PWR T
OC_FAULT T
OC_SET3 T
INP_PWR SCL
IN_OFF T
GND
OC_SET2 T
OC_LOC T
VNS T
OC_ON T
Ana Out
Disabled
GND
Ana Out
Dig Out OC
Dig Out OC
GND
Dig In
Dig Out OC
Dig Out OC
Dig In
Dig Out OC
Dig In
Ana Out
Disabled
Ana Out
Dig Out OC
Dig Out OC
Disabled
Dig In
GND
Dig Out OC
Dig Out OC
+12 Vcc
Dig Out OC
Unbalanced power
Reflected power
Active when interlock is active
Active when SET4 threshold surpassed
“ON” command
Active when SET1 threshold surpassed
Active for “Wait” alarm presence
“Alarms Reset”
Active when OFF
Keep at GND potential to inhibit
Temperature
Forward power
Active for “Fault” Alarm presence
Active when SET3 threshold surpassed
Input power
“OFF” command
Active when SET2 threshold surpassed
Active when in local mode
Unregulated voltage
Active when ON
Notes:
6.3.2
•
To give a command to the HC5 (ON, OFF, Reset), bind the relative pin to ground
for approx 500 ms.
•
OC output (Open Collector) are “Active” when conducing.
RS232 Connector
Type: DB9 Female
1
24 / 34
6
1
2
3
4
5
6
7
8
9
N.C.
TXD
RXD
Internally connected to 7 and 8
GND
N.C.
Internally connected to 4 and 8
Internally connected to 4 and 7
N.C.
Rev. 1.0 - 26/03/04
User Manual
HC5-10
6.3.3
I2C Connector
Type: DB9 Female
1
6.3.4
6
1
2
3
4
5
6
7
8
9
NC
SDA
SCL
NC
GND
NC
NC
NC
NC
Serial Data
Serial Clock
GND
REM CTRL connector
Type: DB9 Male
1
6.3.5
6
1
2
3
4
5
6
7
8
9
GND
485+
485IRQ
IN RST C (Reset Combiner Command)
IN ON C (On Combiner Command)
IN OFF C (Off Combiner Command)
INH PJ (Amplifier’s Inhibit)
EXC ON (On Exciter Command)
Com Bus
Type: DB15 male
1
2
3
4
5
6
7
8
9
10
11
12
13
14
15
User Manual
GND
485ON OFF C (On/Off combiner)
IRQ
PWR REG (Power Regulation)
NC
IN ON PJ (On amplifiers)
IN OFF PJ (Off amplifiers)
485+
GND
ST BY (Stand-by)
GND
GND
INH PJ (Inhibit amplifiers)
RST PJ (Reset Amplifiers)
Rev. 1.0 - 26/03/04
25 / 34
HC5-10
7. Technical Specifications
7.1
Dimensional and Environmental Specifications
Cabinet Dimensions
Panel Dimensions
Weight
Operating Temperature Range
Humidity
7.2
446 mm x 262 mm x 651 mm
483 mm x 266 mm
Approx. 30 Kg
-10 °C ÷ 50 °C
95% Maximum, whithout condensation
Electrical Specifications
Characteristics of the system constituted from nr. 5 PJ2000M-C,
coupled between them with HC5-10
Input Power
Input Power
Input/Output impedance
Input connector
Output connector
Mains Power Supply
220W max for 10kW Output
10kW
50 Ohm
“N” type, female
1”+5/8 type, female
Three-phase Star (350V 430V) 50/60Hz , with
neutral wire.
Alternative Mains Power Supply
Three-phase Triangle (190V 250V) 50/60Hz,
without neutral wire.
Power consumption of PJ2000M-C with PFC
19.5kW; 10kW of RF output (including the
exciter) in the worse situations
Power consumption of PJ2000M-C without PFC
26.5kVA; 10kW of RF output (including the
exciter) in the worse situations
Operation limits of the combiner HC5-10
Maximum power input
250W
Maximum output forward power
12.5kW
Maximum output reflected power
1.8kW
Maximum RF power
1.65kW
RF ouput power in the case of 1 amplifier switched off and 4 amplifiers to 2.1kW
3.1kW
RF ouput power in the case of 2 amplifiers switched off and 3 amplifiers to 2.1kW
1.8kW
RF ouput power in the case of 3 amplifiers switched off and 2 amplifiers to 2.1kW
0.8kW
RF ouput power in the case of 4 amplifiers switched off and 1 amplifier to 2.1kW
0.2kW
Temperature on the cooling device of the absorber resistors
80°C
26 / 34
Rev. 1.0 - 26/03/04
User Manual
HC5-10
8. Electrical description
HC5 is composed of different modules wired between them with connectors, allowing
for easy servicing or module substitution.
RF output
to Amp 1
RF input
from exciter
RF output
to Amp 5
RF Splitter
Display, Keys
CPU
.
RF input
from Amp 1
RF input
from Amp 5
RF Combiner
Telemetry,
RS232,
IIC
Interlock ...
RF output
to antenna
This chapter give the necessary indications to identify the modules and to understand
their functionalities.
User Manual
Rev. 1.0 - 26/03/04
27 / 34
HC5-10
8.1
Modules Identificarion (upper view)
1
2
5
6
7
3
8
4
9
Figure below shows the upper view of the device with the indication of the different
components
[1] Combiner Section
[2] Power Measure Board (not visible)
[3] CPU group
[4] Phase Regulation Board (not visible)
[5] Control card of the absorption resistances
[6] Control Interface Card
[7] Power Measure Board (not visible)
[8] Combiner Output (EIA 1+5/8”)
[9] LEDs Card and trimmer Power Adjust
28 / 34
Rev. 1.0 - 26/03/04
User Manual
HC5-10
8.2
Modules Identificarion (bottom view)
1
2
5
[1]
Unbal Power card
[2]
Temperature Sensor
[3]
Unbal Power card
[4]
Unbal Power card
[5]
Unbal Power card
[6]
Unbal Power card
[7]
Input Splitter Circuit
User Manual
Rev. 1.0 - 26/03/04
3
4
6
7
29 / 34
HC5-10
9. Theory of Operation
The figure shows the block diagrams of HC5-10. A general description of the machine’s
operation has been given in the precedents chapters, while in this chapter comes
described the operation of the various blocks.
9.1
9.1.1
Operating Blocks
Power Supply
It in the HC5 is present only one mains transformer with different secondary winding.
The secondary used are: 18-0-18V/ 0-11,5 V/ 0-17V for the feeding of the control
interface card, that will go to feed all the cards that compose the machine. The rectifiers
and the stabilizers are situated on the mentioned card.
9.1.2
Control Interface Card
All the measure signals of all the cards transit on this card and provides to furnish the
necessary feedings to all the cards of the apparatus.
The circuit also comprises a card with a CPU mounted above that has the function of
serial communication in standard 485.
Are managed some protections of the system too, like for example the power
reduction of the amplifiers in case of anomalies or the intervention of the emergency
fans.
30 / 34
Rev. 1.0 - 26/03/04
User Manual
HC5-10
9.1.3
Input Splitter Circuit
The Power Splitter circuit mounted on the rear part of the equipment in the opposite
side of the input connector to the exciter and of the RF outputs to the amplifiers.
The circuit is realized with strip line plus coaxial cables.
Five resistive termination placed near to the output serves to absorb any unbalanced
powers in case of faulty or performance differences of some amplifier to prevent
excessive power driving on the well functioning (well loaded) outputs.
9.1.4
Phase Regulation Card
Questa scheda è montata sul lato anteriore della macchina. Sulla scheda sono
presenti cinque coppie di capacità variabili che servono per compensare le fasi
delle cinque uscite, provenienti dal circuito divisore, che vengono utilizzate per pilotare
gli amplificatori.
9.1.5
Power combiner Card
The function of the coupler section is to add the RF power portions provided by the
amplifiers and to pass it through the antenna output.
The 5-way combiner circuit is designed with strip-lines technollogies and 50 Ohm
coaxial cables. The strip-line circuits are completely shielded inside the combiner
cover.
9.1.6
Unbalanced Power Measurement Card
Every way of the combiner is connected to its own circuit of unbalanced power
measurement card, mounted on the dissipator. The power resistances are connected
to these measure circuits that serve in order to absorb unbalanced power in case of
performances differences between the amplifiers of the system.
9.1.7
CPU
This subsystem is composed of three cards: the true card CPU, the analogic section
CARD and the card of interconnection and filtering EMI.
The CPU implements all the software functions previously described (measurements,
protections, controls, data visualizations, communications). The analogic circuitry
carries out the normalizations and measures on the various parameters that the
machine holds under control.
The CPU card can be interfaced to external dispositive through a dedicated telemetry
connector, RS232 serial port and one IIC port.
The analogic signals provided from the hybrid coupler are available on a DB25
connector.
User Manual
Rev. 1.0 - 26/03/04
31 / 34
HC5-10
9.1.8
LEDs Card
On this card are present four signalling LED that indicates the general state of
machine’s operation.
Is present also a trimmer for the power regulation (A.G.C.), use a small screwdriver in
order to modify the distributed power.
9.2
Phase Regulation between the several Amplifiers
The hybrid coupler is factory-adjusted so that the transmitter it is included in will work
satisfyingly works over the whole FM band.
Cases may happen, that it is necessary to perform the RF adjustment of the HC5-10,
for example if the RF interconnection cables with the amplifiers have been sustituted
with other of slightly different characteristics or length, or if it is desirable to optimize
the transmitter’s performances on a certain frequency.
Warning: we suggest not to perform the operations described in this chapter
to personnel lacking proper instrumentation and deep knowledge of the
device and its working principles.
9.2.1
Capacitors on the splitter circuit
1)
Identificare i trimmer capacitivi nel pannello frontale del HC5-10. Identify the
capacitive trimmer in the frontal panel of the HC5-10.
2)
Regulate all the variable capacitor in a middle position in this way :
• Turn all the compensators in clockwise sense until to the end.
• Turn all the compensators in counterclockwise sense for 3 turn completely.
32 / 34
3)
Switch on the transmitter, with the exciter set up on the operating frequency and
to regime power.
4)
On the coupler, set up the display on the reading of Rej.Pwr.
6)
Regulate the variable capacitors (1) and (2), related to the first amplifier so as
to diminish Rej.Pwr measured from the coupler.
Rev. 1.0 - 26/03/04
User Manual
HC5-10
1
2
3
4
5
6
7
8
9
10
7)
Regulate the variable capacitors (3) and (4), related to the second amplifier so
as to diminish Rej.Pwr measured from the coupler.
8)
Regulate the variable capacitors (5) and (6), related to the third amplifier so as
to diminish Rej.Pwr measured from the coupler.
9)
Regulate the variable capacitors (7) and (8), related to the fourth amplifier so as
to diminish Rej.Pwr measured from the coupler.
10) Regulate the variable capacitors (9) and (10), related to the fifth amplifier so as
to diminish Rej.Pwr measured from the coupler.
11) Repeat the points from 6 to 10 until that the system power catches up a value
that cannot be diminished further.
Note:
•
The described procedure is adapted to the case tou want optimize the coupler
for a certain operating frequencies. When you may adjusted must itself be regulated
the coupler for the operation on whole band FM, carried out the regulations before
described to the frequency of 98.0 MHz, then repeated at 87.5 MHz and 108.0
MHz, until to finding the point of better compromise.
•
If the compensation comes made because an amplifier is been replaced, it is
generally necessary only to operate on the capacitors relative to the replaced
amplifier.
User Manual
Rev. 1.0 - 26/03/04
33 / 34
HC5-10
10. Maintenance Procedures
This section provides general maintenance information and electrical adjustment for
the HC5-10 hybrid coupler.
Warning! When the coupler is in function, inside are present dangerous voltages,
elevated currents, and are presents RF signals of strongly power.
Don’t remove any cover without switching off the system first and close all covers
before restarting the system.
Ensure all primary power is disconnected from the amplifier before attempting
equipment maintenance.
10.1
Routine Maintenance
The only regular maintenance needed by HC5-10, is the periodic substitution of the
blowers, and the cleaning of dust filters and any dust accumulated inside the amplifier.
The time between overhauling of the blowers depends upon several environmental
factors, temperature, humidity, dust pollution etc.
It’s advisable to check the unit every 6 months, and to substitute noisy blowers.
Blowers should be changed as a matter of course at least not beyond the 35000
hours of job.
34 / 34
Rev. 1.0 - 26/03/04
User Manual