1
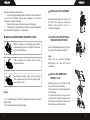
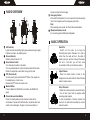
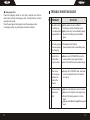
INSTRUCTION MANUAL
PT4200
FM HANDHELD TRANSCEIVER
NOTE
INSTRUCTION MANUAL
PT4200
FM HANDHELD TRANSCEIVER
We are very grateful for your purchasing
brand twoway radios produced by Kirisun Electronics (Shenzhen) Co.,
Ltd.
We believe
two-way radio, which always incorporates
the latest technology, can bring great convenience to your life
and work;
we also believe that the quality and function of
twoway radio can meet your demands for reliable communication.
PRECAUTIONS
Please observe the following precautions to prevent fire,
personal injury, and radio damage.
Do not operate your radio while taking on fuel, or being
charged.
Do not expose the radio for a long period to direct sunlight,
nor place the radio close to heating appliances.
Do not place the radio in excessively dusty areas, humid
17
areas or on unstable surfaces.
Do not modify this radio for any reason.
Refer service to qualified licensed or certificated technicians
only.
Notice to the User:
Government laws prohibit radio communication without
permission in government districts.
Illegal operation is subject to punishment by fine and/or
imprisonment.
Refer service to the well-trained professional technicians only.
Safety
It is important that the user is aware of and understands hazards
common to the operation of any radios.
Warning!
Turn off your radio before entering any area with a potentially
explosive atmosphere (where the air contains gas, dust and
smog, etc.), such as while taking on fuel, or while parking at a
gasoline service station.
Precautions in Use
Please comply with the following attentions to avoid fire, bodily
injury and damage to the radio.
The radio is recommended to transmit for 1 minute and
receive for 4 minutes. Long time transmitting or continuous working in
high power mode will make the rear side of the radio generate heat.
Please don't disassemble or assemble the radio under any
circumstances.
Please don't expose the radio to direct sunlight for a long time;
don't place the radio near any heating devices, either.
Please don't put the radio in extremely dusty, moist or dabbling
places; don't place it on any unstable surfaces, either.
If the radio emits smoke or strange odors, turn it off and remove
the battery from the radio and promptly contact your local authorized
Kirisun dealer.
CONTENTS
UNPACKING AND CHECKING EQUIPMENT..............................1
SUPPLIED ACCESSORIES .........................................................1
PREPARATION..............................................................................2
CHARGING THE BATTERY PACK ... ...........................................2
INSTALLING/REMOVING THE BATTERY PACK..........................3
INSTALLING THE ANTENNA........................................................4
INSTALLING THE OPTIONAL SPEAKER/MICROPHONE...........4
INSTALLING/REMOVING THE BELT CLIP...................................4
RADIO OVERVIEW........................................................................5
BASIC OPERATION......................................................................6
SCAN FUNCTION..........................................................................7
STARTING SCAN...........................................................................7
STOPPING SCAN......................................................................7
AUXILIARY FUNCTIONS............................................................10
TIME-OUT TIMER........................................................................10
BATTERY SAVING.......................................................................10
LOW BATTERY WARNING..........................................................10
MONITOR..................................................................................10
CTCSS/DCS ................................................................................11
VOICE ANNUNCIATION OF CURRENT CHANNEL NUMBER..11
WIRED CLONE.............................................................................12
EMERGENCY ALERT...................................................................13
TROUBLESHOOTING GUIDE ....................................................14
STTINGS .....................................................................................15
UNPACKING AND CHECKING EQUIPMENT
Carefully unpack the radio. We recommend that you
identify the items listed in the following table before dis-carding the
packing material. If any damage has occurred during shipment,
please contact the dealer immediately .
PREPARATION
CHARGING THE BATTERY PACK
A new battery or a battery whose power appears
low (power indicator displays one bar or no bar)
needs charging before using.
SUPPLIED ACCESSORIES
ITEM
QUANTITY
Antenna
1
Hand strap
Belt clip
1
1
Charger
1
Power adapter
Li-ion battery pack
1
1
Instruction manual
1
Antenna
Charger
1
Power Adapter
Hand Strap
1)
Plug the adapter into an AC wall outlet;
connect the power adapter with the battery
charger, and then the indicator lights yellow.
2)
Place the battery or radio into the charger
slot. Make sure the battery is well connected
with the charger. The indicator turns red, and
then the charger gets in the state of charging
automatically. Charging time is about 5 hours.
When battery is fully charged the indicator turns
green.
While in green light state, keep the battery
remain in the charger for 1~2 hours, which will
give you the best battery performance. And then
disconnect the adapter from the AC outlet.
Belt clip
Notice:
Battery
* The battery is not fully charged in the factory, and probably the
new battery is falsely indicated as full charge. Before the initial use,
please charge the new battery.
* Kirisun KB-58L Li-ion battery is supplied.
* When charge the battery for the first time after purchase or longtime storage (over 2 months), please repeat charging several times to
2
resume the battery normal capacity.
* Do not charge the battery again if it has been fully charged or it
is not in the low battery warning state, otherwise, its life will be
shortened or it will be damaged.
* Take the battery away from the charger after charging.
* If the battery is charged after all the power has been exhausted,
the red indicator will light about 1 minute later.
INSTALLING /REMOVING THE BATTERY PACK
Match the guides of the battery pack with the
corresponding grooves in the bottom of the radio,
and insert the battery in.
Press downward the battery pack until the
release latch locks.
To remove the battery pack, push the release
latch upwards and then slide the battery pack
away from the radio.
Notice:
* Do not short-circuit the battery terminals or dispose exhausted
battery in fire.
* Do not disassemble the battery casing.
3
INSTALLING THE ANTENNA
Screw the antenna into the connector at
the top of the radio by holding the
bottom of the antenna and turn it
clockwise until secure.
INSTALLING THE OPTIONAL
SPEAKER /MICROPHONE
Insert the Speaker/Microphone plug into
the jacks of the versatile connector.
Note:
When use the optional Speaker/
Microphone, the radio will not be
waterproof.
INSTALLING /REMOVING
THE BELT CLIP
Match the grooves of the belt clip with
those on the rear of the battery.
Then press the belt clip downwards to
lock it in place.
To remove the belt clip, use your nail or
a tool to lift the metal spring piece in the
belt clip from the topside, and then pull
the belt clip away from the radio.
4
RADIO OVERVIEW
2
7
1
6
4
5
3
8
channel number will be changed.
Emergency Button
Press and hold this button for over 2 seconds to activate warning
tone. Press it again to exit the emergency alert state.
Note:
When warning tone sounds, all of the buttons are disabled.
Microphone/Speaker Jacks
For connecting external Microphone/Speaker.
BASIC OPERATION
LED Indicator
Lights red while transmitting; lights green while receiving a signal.
Flashes red while in low battery power.
Channel Selector
Rotate to select channel 1-16.
Power/Volume Switch
Turn clockwise to switch on the radio.
Turn counterclockwise till a click is heard to switch off the radio.
Rotate it to adjust the volume after turning on the radio.
PTT (Push-to-talk)
To make a call, press and hold the PTT button, then speak into
the microphone in normal voice.
Release the PTT button to receive a call.
Monitor Button
Press to disable the SQUELCH, and enable the SQUELCH
again.
Channel Annunciation Button
Press it in standby state, and the channel number will be
annunciated. If press and hold this button, and at the same time
switch on the radio again, the type of voice annunciation of
5
Switch On
Switch on the radio by turning the
Power/Volume switch clockwise till a click is
heard, then the radio will be in the state of
stand by and you will hear a beep if the dealer
has set it. And then you will hear voice
annunciation of the current channel number.
Adjust Volume
Press the monitor button to listen to the
background noise and rotate the Power/Volume
switch to adjust volume.
Select Channels
Rotate the channel selector to select channels.
You will hear voice from the speaker while
receiving proper signals.
If voice annunciation of channel number has
been set, the radio will annunciate the current
channel number.
6
Make a Call
To make a call, select the desired channel,
press and hold the PTT button, and speak in
normal voice. Please keep your mouth 3~8 cm
away from the microphone.
Receive a Call
Release the PTT button to receive a call. Select the desired
channel, adjust the volume to a proper level, and then you can
receive others' voice.
SCAN FUNCTION
(Your local dealer may prohibit this function.)
Only when there are no less than two channels added in the scan list
and the scan function has been activated, the radio can start scanning.
STARTING SCAN
When switching to channel 16, the radio will begin to scan, and pause
after receiving signals.
STOPPING SCAN
When switching to channel 1-15, the radio will stop scanning.
Introduction:
1. Dealer can set the following two ways to restart scanning after its
pause:
1) Time-control
The radio will restart scanning after pausing for some time while
7
receiving signals. The pausing time can be preset from 0.5 to 5
seconds.
2) Carrier wave control
The radio will pause scanning after receiving signals and will
restart scanning 3 seconds after the signal disappears.
2. The working channel of the radio will respond to the following
channels automatically when pressing PTT button during scanning.
The dealer can select one among the following six ways.
1) Last called
When pressing PTT button, the radio will transmit from the last
channel that received a call.
2) Last used + currently working channel
When pressing PTT button during the scanning, the radio will
transmit from the last channel that received a call. When pressing
PTT button during the scanning pause, the radio will transmit from the
currently working channel.
3) Selected channel
When pressing PTT button, the radio will transmit from the first
channel of the scanning list.
4) Selected channel + currently working channel
When pressing PTT button during scanning, the radio will always
transmit from the first channel in the scanning list. When pressing
PTT button during the scanning pause, the radio will always transmit
from the currently working channel.
5) Priority channel
The radio will transmit signals from the priority channel in the scan
list when pressing PTT button.
6) Priority channel + currently working channel
When pressing PTT button during scanning, the radio will always
transmit from the priority channel. When pressing PTT button during
8
the scanning pause, the radio will transmit from the currently working
channel.
Note:
Currently working channel means the channel in which the radio
holds on under the following four conditions.
1) After receiving the signals, the radio will still stay in the current
channel before restarting the scan.
2) When receiving signals during scanning, the radio will pause on
the current channel and will keep staying on it for 3 seconds after the
signals disappear.
3) Radio will stay on the current channel when pressing PTT during
scanning.
4) When the radio transmitting ends by releasing PTT button, within
the transmitting pause time preset by the local dealer, the radio will
stay in the current channel.
Selected channel: The first channel in the scanning list set by the
dealer.
Priority channel: The prior channel in the scanning list set by the
dealer.
Only when priority channel has been selected, the options of /
priority channel 0and /priority channel + currently working channel 0
in Revert Channel are available.
AUXILIARY FUNCTIONS
TIME-OUT TIMER
Time-out timer can prevent the user from continuously talking
overlong and prevent the radio body heating due to continuous
longtime transmitting.
If you continuously transmit longer than the time limit preset by the
dealer, the radio will stop transmitting and warning tone sounds, and
to stop the warning tone please release the PTT button. Pressing the
PTT button again will resume transmitting.
BATTERY SAVING
The automatic battery saving function decreases the power
consumption when no signal is received and no operation is
conducted.
If the battery saving function is activated, 10 seconds after the radio
doesn't receive any signals or no operation is being conducted, the
radio enters battery saving mode. When a signal is received or any
operation occurs, it exits battery saving mode automatically.
LOW BATTERY WARNING
When the battery power goes below a certain value in transmitting,
LED flashes red and Low battery warning tone sounds and then the
radio stop transmitting. You need to recharge or change the battery.
MONITOR
Off: When this function is selected, no operation is performed.
Monitor Momentary: Press and hold the monitor button to
deactivate the signaling temporarily, and squelch un-mutes. Release
it to return to normal operation and squelch mutes.
9
10
Monitor Lock: Press the monitor button once to deactivate the
signaling, and squelch un-mutes. Press it again to return to normal
operation and squelch mutes.
SQ Off: When there is no signal received, the squelch circuit of the
radio will automatically mute the speaker, so you will not hear the
background noise. Press the MONI key to force the squelch un-mute.
CTCSS/DCS
CTCSS/DCS tones may have been pre-programmed on some
channels. A CTCSS/DCS tone is a sub-audible tone, which allows you
to ignore (not hear) calls from other parties who are using the same
channel. The dealer can set CTCSS/DCS tones on radio channels.
When you receive a signal that has a tone different from the one set
on your radio, you will not hear the signal. Likewise, signals that you
transmit will only be received by the parties whose CTCSS/DCS tones
are the same as yours.
Note:
Using a CTCSS/DCS channel doesn't mean your calls are private. If
other parties' CTCSS/DCS tones are identical with yours, they can
hear your calls.
Voice Annunciation of Current Channel Number
If voice annunciation of current channel number has been activated,
when pressing the channel annunciation button in stand-by mode, the
current channel number will be annunciated in the preset language
through the loudspeaker. If turn on the radio with this button pressed,
the annunciation language will be changed. Repeat turning on the
power with this button pressed, the type of the annunciation language
can be changed in sequence
Chinese Male---English Male--Chinese Female---English Female---No Annunciation .
11
Wired Clone
If wire clone function has been activated, after entering wire clone
mode, the radio will not exit the wire clone mode automatically. You
have to turn on the radio again to enter the user mode. The operating
procedure is as follows:
1)
Press MONI key to turn on the radio. About two seconds later
the red light flashes twice and two beeps sound, and then the radio
enters the wire clone mode.
2)
Press PTT button, and slave radio that is to be sent with
cloning data will be in the Open/Prohibition wire clone mode.
However, the wire clone setting on the master radio will not change.
Press PTT button. If the green light flashes twice and one beep
sounds it is in the Open state; if the red light flashes twice and two
beeps sound it is in the Prohibition state.
When entering wire clone mode, the default setting on the slave
cloned radio is wire clone prohibition.
3)
Press MONI key, the red light flashes and cloning begins.
When cloning is finished, red light turns dim.
Note:
To activate Open/Prohibition Wire Clone mode, short circuit the two
points of SELF to switch on the current and enter model setting mode,
the manually adjustment and wire clone functions are activated
automatically; then to prohibit wire clone function, press MONI key.
You can also open or prohibit the wire clone mode by PC
programming software.
Once the wire clone function is prohibited, the radio cannot enter wire
clone mode. Wire clone prohibition is set as the default when the
radio leaves factory.
12
Emergency Alert
Press the emergency button for more than 2 seconds, and then the
radio enters the state of emergency alert: red light flashes, and loud
warming tone sounds.
Press the emergency button again to exit the emergency state.
In emergency state, any other keys or buttons are inactive.
TROUBLE SHOOTING GUIDE
NO. PROBLEM
The radio cannot
be switched on
1 or no display after
being switched on.
Battery power may be insufficient.
Recharge or replace the battery pack.
Battery pack may not be installed properly.
Remove the battery pack and install it
again.
2
The battery power
consumes quickly
after charging.
The battery life is finished;
please replace it with a new battery pack.
3
Cannot talk to
or hear other
group members .
Make sure the CTCSS/DCS tone is the
same as that of your group members.
Out of the effective communication range.
Other voices
from non-group
members are
heard on the
Channel.
Change the CTCSS/DCS tone, and make
sure to changed the tone of all radios in
your group.
Communication
range is too
short.
Make sure the antenna is well connected.
Make sure the antenna is the original one.
Check if the battery power is in normal
state.
Ask your local dealer to adjust the squelch
level.
4
5
13
SOLUTION
14
SETTINGS (set by the dealer)
Model: ____________
1)
Serial No.: ___________
Channels List
CHANNEL
TRANSMITTING
FREQUENCY
RECEIVING
FREQUENCY
1
2
3
4
5
CTCSS/DCS
Selected channel
Selected channel or currently working channel
Priority channel
Priority channel or currently working channel
4) Squelch monitor:
Open
Close
5) Time-out timer:
Open
Close
6) Automatic scan:
Open
Close
6
7
8
9
10
11
12
13
14
15
16
2) The way to restart scanning after its pause:
Time control
Carrier wave control
3) The way to revert the working channel:
15
16