1
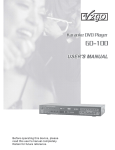
WARNING
Toll fraud is committed when individuals unlawfully gain access to a customer’s
telecommunication system. This is a criminal offense. Currently, we do not know of
any telecommunications system that is immune to this type of criminal activity. 8x8,
Inc. will not accept liability for any damages, including long distance charges, which
result from unauthorized and/or unlawful use. Although 8x8, Inc. has designed
security features into its products and services, it is your sole responsibility to use
the security features and to establish security practices, including training, security
awareness, and call auditing to eliminate security risks.
User Manual
Video Terminal Adapter VTA464
Version 1.1
NOTICE
While every effort has been made to ensure accuracy, 8x8, Inc. will not be
liable for technical or editorial errors or omissions contained within this
documentation. The information contained in this documentation is
subject to change without notice.
This documentation may be used only in accordance with the
terms of the 8x8, Inc. License Agreement.
8x8 Contact Information
• www.8x8.com/support
• Customer Service, toll-free: 1-888.898.8733
• Customer Service, outside of the U.S.: 1.408.727.1885
3151 Jay Street
Santa Clara, CA 95054
1.888.898.8733 Toll-Free
1.408.687.4120 Outside U.S.
1.408.980.0432 Fax
www.8x8.com
The 8x8, Inc. logo are registered trademarks of
8x8, Inc. 8x8, Inc. is a Nasdaq listed company.
© 2009. 8x8, Inc. All rights reserved.
www.8x8.com | 1.866.879.8647
www.8x8.com | 1.866.879.8647
Product Approval Information
I.
FCC DECLARATION OF CONFORMITY
PRODUCT NAME: 8x8 Tango
MODEL NUMBER: VTA464
FCC RULES: TESTED TO COMPLY WITH FCC PART 15, CLASS B
OPERATING ENVIRONMENT: FOR HOME OR OFFICE USE
FCC COMPLIANCE STATEMENT:
This device complies with part 15 of the FCC Rules. Operation is subject to the
following two conditions: (1) This device may not cause harmful interference, and (2)
This device must accept any interference received, including interference that may
cause undesired operation.
INFORMATION TO USER:
This equipment has been tested and found to comply with the limits of a Class B
digital device, pursuant to Part 15 of the FCC Rules. These limits are designed to
provide reasonable protection against harmful interference in a residential installation. This equipment generates, uses and can radiate radio frequency energy and, if
not installed and used in accordance with the instructions, may cause harmful
interference to radio communications. However, there is no guarantee that interference will not occur in a particular installation. If this equipment does cause harmful
interference to radio or television reception, which can be determined by turning the
equipment off and on, the user is encouraged to try to correct the interference
through one or more of the following measures:
1. Reorient/relocate the receiving antenna.
2. Increase the separation between the equipment and receiver.
3. Connect the equipment to an outlet on a circuit different from that to which the
receiver is connected.
4. Consult the dealer or an experienced radio/TV technician for help.
CAUTION: Changes or modifications not expressly approved by the manufacturer
responsible for compliance could void the user’s authority to operate the equipment.
THE PARTY RESPONSIBLE FOR PRODUCT COMPLIANCE:
8x8, Inc.
3151 Jay Street
Santa Clara, CA 95054 USA
Tel: (408) 727-1885
Fax: (408) 980-0432
www.8x8.com
Important Safety and Warranty Information . . . . . . . . . . . . . . . . . . . . . . . 1
8x8 Inc. Limited Warranty Information . . . . . . . . . . . . . . . . . . . . . . . . . . . . . . . . . . . . . . . . 1
Introduction . . . . . . . . . . . . . . . . . . . . . . . . . . . . . . . . . . . . . . . . . . . . . . . . . . . . . . 3
What's Included with Your Tango . . . . . . . . . . . . . . . . . . . . . . . . . . . . . . . . . 4
Getting To Know Tango . . . . . . . . . . . . . . . . . . . . . . . . . . . . . . . . . . . . . . . . . . . 5
Installing Your Tango . . . . . . . . . . . . . . . . . . . . . . . . . . . . . . . . . . . . . . . . . . . . . 7
Connect Your Tango . . . . . . . . . . . . . . . . . . . . . . . . . . . . . . . . . . . . . . . . . . . . . . . . . . . . . . . . . 7
Configure Your Tango . . . . . . . . . . . . . . . . . . . . . . . . . . . . . . . . . . . . . . . . . . . . . . . . . . . . . . . . 8
Installing the Tango with an existing network configuration/router. . . . . . . 8
Installing the Tango as your primary gateway/router. . . . . . . . . . . . . . . . . . . . 8
1. Setting up with DHCP . . . . . . . . . . . . . . . . . . . . . . . . . . . . . . . . . . . . . . . . . . . . . . . . . . . . . . 8
2. Setting up with PPPoE . . . . . . . . . . . . . . . . . . . . . . . . . . . . . . . . . . . . . . . . . . . . . . . . . . . . . 8
3. Setting up with Static IP Address . . . . . . . . . . . . . . . . . . . . . . . . . . . . . . . . . . . . . . . . . . 10
Activate your 8x8 Service . . . . . . . . . . . . . . . . . . . . . . . . . . . . . . . . . . . . . . . . . . . . . . . . . . . . 12
Using Your Tango . . . . . . . . . . . . . . . . . . . . . . . . . . . . . . . . . . . . . . . . . . . . . . . 13
Making Calls . . . . . . . . . . . . . . . . . . . . . . . . . . . . . . . . . . . . . . . . . . . . . . . . . . . . . . . . . . . . . . . . 13
Receiving Calls . . . . . . . . . . . . . . . . . . . . . . . . . . . . . . . . . . . . . . . . . . . . . . . . . . . . . . . . . . . . . . 13
Surveillance Mode . . . . . . . . . . . . . . . . . . . . . . . . . . . . . . . . . . . . . . . . . . . . . . . . . . . . . . . . . . 14
During Calling Session . . . . . . . . . . . . . . . . . . . . . . . . . . . . . . . . . . . . . . . . . . . . . . . . . . . . . . 14
Setup Menu . . . . . . . . . . . . . . . . . . . . . . . . . . . . . . . . . . . . . . . . . . . . . . . . . . . . . 16
Video Settings . . . . . . . . . . . . . . . . . . . . . . . . . . . . . . . . . . . . . . . . . . . . . . . . . . . . . . . . . . . . . . 16
General Display Settings . . . . . . . . . . . . . . . . . . . . . . . . . . . . . . . . . . . . . . . . . . . . . . . . . . . . 16
In-Call Display Settings . . . . . . . . . . . . . . . . . . . . . . . . . . . . . . . . . . . . . . . . . . . . . . . . . . . . . . 18
Network Settings . . . . . . . . . . . . . . . . . . . . . . . . . . . . . . . . . . . . . . . . . . . . . . . . . . . . . . . . . . . 18
Surveillance Mode (Auto Answer) Settings . . . . . . . . . . . . . . . . . . . . . . . . . . . . . . . . . . . 20
Localization Settings . . . . . . . . . . . . . . . . . . . . . . . . . . . . . . . . . . . . . . . . . . . . . . . . . . . . . . . . 20
Phone Keypad Settings . . . . . . . . . . . . . . . . . . . . . . . . . . . . . . . . . . . . . . . . . . . . . . . . . . . . . . 20
Status Menu . . . . . . . . . . . . . . . . . . . . . . . . . . . . . . . . . . . . . . . . . . . . . . . . . . . . . 21
Call Logs . . . . . . . . . . . . . . . . . . . . . . . . . . . . . . . . . . . . . . . . . . . . . . . . . . . . . . . . 22
Phonebook . . . . . . . . . . . . . . . . . . . . . . . . . . . . . . . . . . . . . . . . . . . . . . . . . . . . . . 23
Import Contact . . . . . . . . . . . . . . . . . . . . . . . . . . . . . . . . . . . . . . . . . . . . . . . . . . 24
Appendix A: Navigation Menu . . . . . . . . . . . . . . . . . . . . . . . . . . . . . . . . . . . 25
Appendix B: Icons displayed on the LCD screen . . . . . . . . . . . . . . . . . . . 27
Appendix C: Troubleshooting . . . . . . . . . . . . . . . . . . . . . . . . . . . . . . . . . . . . 29
Important Safety and Warranty Information
Congratulations on the purchase of your 8x8 Tango. This product has been manufactured to meet very high standards for convenient and reliable service.
Always follow these basic safety precautions when using your 8x8 Tango. This will
reduce the risk of fire, electric shock, and injury.
•
•
•
•
•
•
•
Unplug Tango from both the power outlet and the wall jack before performing
care and maintenance.
Should any solid object or liquid fall into the housing, unplug Tango and have it
checked by qualified personnel before operating it again.
Do not use this product near water or when you are wet.
Slots and openings on the Tango are for ventilation to prevent overheating. Do
not cover them up.
Do not place Tango near a heat source or in direct sunlight.
Do not disassemble Tango other than to change the faceplate. Disassembly of
Tango will void your warranty.
Only use the AC power adapter included with Tango. Use of any other power
adapter will void your warranty.
8x8 Inc. Limited Warranty Information
If you purchased this Equipment directly from 8x8 or from an authorized 8x8
reseller or retail reseller, 8x8 warrants to you, the original end user customer, that
the Equipment will be free from defects in materials and workmanship under normal use. This Limited Warranty to you, the original end user customer, continues for
a period of twelve (12) months from the date of purchase from 8x8 or from an
authorized 8x8 reseller.
General Information. The warranties described do not apply: (i) to any Equipment
subjected to accident, misuse, neglect, alteration, Acts of God, improper handling,
improper transport, improper storage, improper use or application, improper
installation, improper testing, or unauthorized repair: or (ii) to cosmetic problems or
defects which result from normal wear and tear under ordinary use, or do not affect
the performance or use of the Equipment. 8x8’s warranties apply only to Equipment that is manufactured by 8x8 and identified by an 8x8-owned trademark, trade
name or product identification logo affixed to the Equipment. 8x8 does not warrant
to you, the end user, or to anyone else, that the Equipment will perform error free or
without bugs. ALL WARRANTIES ARE VOID IF END USER DAMAGES THE CAMERA BY
ROTATING BEYOND WHAT WAS INSTRUCTED BY THE USER MANUAL.
1
NOTWITHSTANDING THE FOREGOING, THE REPAIR OR REPLACEMENT AS PROVIDED
UNDER THIS EXPRESS LIMITED WARRANTY IS THE EXCLUSIVE REMEDY OF THE CONSUMER FOR BREACH OF ANY IMPLIED WARRANTIES. IN NO EVENT SHALL 8X8 BE
LIABLE, WHETHER IN CONTRACT OR TORT (INCLUDING NEGLIGENCE) OR OTHER
LEGAL THEORY, FOR DAMAGES IN EXCESS OF THE PURCHASE PRICE OF THE EQUIPMENT, ACCESSORY, OR SOFTWARE, OR FOR ANY INDIRECT, INCIDENTAL, SPECIAL,
OR CONSEQUENTIAL DAMAGES OF ANY KIND, OR LOSS OF REVENUE OR PROFITS,
LOSS OF BUSINESS, LOSS OF INFORMATION OR DATA, SOFTWARE, OR APPLICATIONS, OR THE ABILITY OR INABILITY TO USE THE EQUIPMENT, ACCESSORIES, OR
SOFTWARE, TO THE FULL EXTENT THESE DAMAGES MAY BE DISCLAIMED BY LAW.
8X8 IS NOT RESPONSIBLE FOR PROBLEMS OR DAMAGE CAUSED BY THE INTERACTION OF THE EQUIPMENT WITH ANY OTHER SOFTWARE OR HARDWARE. ALL WARRANTIES ARE VOID IF THE EQUIPMENT IS OPENED, ALTERED, AND/OR DAMAGED.
2
Introduction
Welcome to 8x8 Tango®, the world's first consumer Video Terminal Adapter (VTA464).
Tango is the easiest way to see and converse with friends and family, whether they live
across town or on the other side of the world. With Tango, staying in touch is more than
just a voice on the other end of the phone line; it's live, full motion video right in front of
your eyes at up to 30 frames per second.
3
What's Included with Your Tango
Everything you need to install your 8x8 Tango is included in the package:
•
•
•
•
•
•
Standard 6-foot phone cord (RJ-11)
Standard 6-foot Ethernet cable (RJ-45)
AC Power Adapter
CD containing the Tango User's Guide
Tango Quick Start Guide
E-911 Postcard
4
Getting To Know Tango
You can use your Tango with any standard analog telephone, including a cordless
phone (UIP160P or UIP165P) or a speakerphone for a hands-free experience.
Below is an illustration of the front and back panel of the 8x8 VTA464
11
6
12
13
14
10
2
1
5
4
3
9
8
7
14
1. Power Port - Connect the included power cord here.
2. Reset Switch - The Reset button is used in rare cases when the Tango may
function improperly. Resetting the Tango will restore the Tango's normal operation while maintaining the programmed settings. We recommend that you
consult a 8x8 customer service representative before using this button.
3. WAN - The WAN port is used to connect Tango to your cable or DSL modem or
to your existing router.
4. LAN - The LAN port is used to connect Tango to your computer or other networking device.
5. Line - The Line port is used to connect Tango to your telephone handset. Use
the included telephone cable to connect your phone to this port.
6. Power/Service Light - The Power/Service Light will glow red to indicate
power or orange to indicate you are registered with a 8x8.
7. WAN Light - The WAN light is green to indicate that your Tango’s WAN interface is connected. It blinks rapidly when information is being sent over the port
to the Tango.
8. LAN Light - The LAN light is green when a PC or other networking device is
connected to the TANGO with a network cable.
5
9. Line Light - The Line light is green when you go off hook to indicate that your
Tango is ready to make a call.
10. *USB Port - The USB port will allow you to plug in an external USB based
device such as keyboard, webcam, and thumb drive.
11. Camera Lens - Swivel the camera to 180 degrees; the software will automatically invert the display.
Warning: The camera lens is designed to rotate up to 180 degrees.
If you force the rotation beyond 180 degrees, the camera DAMAGED
WILL OCCUR.
12. 4 Buttons - Icons display will specify what each button represents.
13. Menu and 4 Arrow Keys - helps you navigate through the Tango menu.
14. Faceplate Latch - Locks and unlocks the faceplate on the Tango body. You can
purchase additional faceplate colors from 8x8 accessories page at
www.8x8.com/about/accessories.
*Currently not available in Ver1.0.
6
Installing Your Tango
Connect Your Tango
1. Plug the power adapter into the Power port and into an AC power outlet.
Caution: The power supply looks very similar to the phone connector.
Please make sure you don't plug the power supply to the LINE port as this
will damage the unit.
2. Plug your home telephone into the Line port on the adapter.
Caution: Do not connect Tango to a regular telephone wall jack.
3. The Power LED will light up (Red) while your Tango boots up and connects to
the 8x8 network. This light will turn orange once your unit is registered with
8x8. When the boot-up process is completed, the LCD screen will display a
background screen with 4 icons.
Note: Boot up time may take up to 10 seconds.
7
Configure Your Tango
The Tango can function as your primary gateway/router or as a client within an
existing network configuration.
If you currently have broadband access and a gateway/router installed at your location, you may add the Tango as a client to your network. If you currently have
broadband Internet access and do not have a router, you may install your Tango as
the primary router to your network.
Installing the Tango with an existing network configuration/router.
Plug one end of the enclosed Ethernet cable into the WAN port on the back of the
Tango. Plug the other end of the Ethernet cable into your router/gateway, which is
connected to your broadband modem. The Tango will automatically obtain an IP
address from your existing router.
Installing the Tango as your primary gateway/router.
The Tango supports the two most common broadband connection protocols:
DHCP (most common connection type found with Cable Modem) and PPPoE (most
DSL providers use this connection type).
Choose on of the following three set up options that follow:
1. Setting up with DHCP
The Tango is configured for use with Dynamic Host Configuration Protocol
(DHCP) by default. If your broadband connection uses DHCP, simply connect
your phone's WAN port to your broadband and then connect the phone's
power cord to an AC power outlet.
2. Setting up with PPPoE
If your broadband connection uses PPPoE, you will need to configure the
Tango built-in router by inputting the user name and password provided by
your Internet Service Provider. Follow the steps below to configure the Tango
for use with PPPoE-based connection.
1. Connect a computer with a web browser directly to the LAN port of your Tango.
2.
Type http://192.168.88.1 (the default IP address of your Tango) into the address
bar of your web browser. Then press the Enter key. You will be prompted to
enter a password (the default password is admin).
8
3.
You should now see your Tango's System Information Screen:
4.
In the menu bar on the left side of the screen, select WAN.
5.
In the top menu bar, select PPPoE. This opens the WAN PPPoE Configuration
screen.
9
6.
Under ENABLE PPPOE, click the drop-down arrow and select YES.
7.
Under Authentication, enter the USERNAME and PASSWORD that were provided by your ISP. User name and password are often case-sensitive, so be sure
to enter upper and lower case letters correctly.
8.
Under Settings, enter the SERVICE NAME and AC NAME required by your ISP. If
you are not sure, leave this blank.
9.
Click APPLY.
3. Setting up with Static IP Address
If your broadband provider has given you a static IP address, you will need to enter
that information in the Tango. Follow the steps below to configure the Tango for
use with a Static IP address...
1. Connect a computer with a web browser directly to the LAN port of your
Tango.
10
2. Type http://192.168.88.1 (the default IP address of your Tango) into the address
bar of your web browser. Then press the Enter key. You will be prompted to
enter a password (the default password is admin).
3. You should now see your Tango’s System Information Screen.
4. In the menu bar on the left side of the screen, select WAN.
11
5. In the top menu bar, select WAN Settings. This will open the WAN Configuration
screen.
6. Select the button labeled SPECIFY STATIC WAN CONFIGURATION.
7. Enter the IP Address, Subnet Mask, and Gateway Address provided by your ISP.
8. Click SAVE WAN SETTINGS.
Activate your 8x8 Service
•
•
•
•
Once you have completed the Tango unit set up, you are ready to activate your
account. You will need your 10-digit activation code from the email titled, “8x8
Order (your number) Updated on xx/xx/200x”, that was sent to your email
address when your 8x8 order shipped. (You can also obtain your activation
code at www.8x8.com by signing in at 8x8's Customer Self Service Portal.)
Dial the Automated Activation Service number: **012-0001.
Follow the voice instructions, and enter your 10-digit activation code. You will
receive an email confirming your account information and your 8x8 telephone
number.
You will also receive a “8x8 Registration Service” confirmation email with your
8x8 telephone number.
12
Using Your Tango
Making Calls
Method 1
1. To call anywhere in the world, dial: country code + area code + number.
Example: the country code for the U.S. and Canada is “1”.
Dial: 1 + area code + number.
Method 2
1. Press the Tango Phonebook icon. Scroll through the list to the name of the
person you wish to call or use the SEARCH function by entering the name using
the number pad.
2. Once the name of the person you wish to call is selected, select Dial to place a
call.
Method 3
1. Press the Tango Call Logs icon. Select Missed Calls, Received Calls, or Dialed
Calls.
2. Scroll through the call records and select the contact number to call.
3. Once the name of the person you wish to call is selected, select Dial to place
the call.
Note: The Tango device will prompt you to remove the handset to initiate
the call if you forget to pick up the handset after hitting the Dial button.
Receiving Calls
When there is an incoming call, your regular attached phone will ring and the LCD
screen will simultaneously display the contact number and name of the caller. To
answer the call, simply pick up the handset.
Tip: An automatic Distinctive Ringing feature helps to identify if the incoming call is video and voice or just voice.
13
Surveillance Mode
User may also enable the Surveillance Mode (Auto Answer) Setting so that the
Tango will automatically display video when called.
To enable this feature:
1. Press the Setup key.
2. Press the Surveillance (Auto Answer) setting.
3. Select Auto Answer and scroll to the number of rings desired.
Note: You may also set up a 6-digit password for security purposes. The
remote party will be required to enter the password before viewing your
Tango.
To disable Auto-Answer feature, select Off.
During Calling Session
Once your call is successfully established with another 8x8 Tango or Videophone,
you will see the image of the person to whom you are talking. There are features
you can adjust to optimize your video conferencing experience.
Three Way Conference
You can initiate another call to start a three way conference call by:
1. Using the Flash key on your handset to place an active call on hole. Then, simply dial the 3rd party and add them to the call by pressing the FLASH key
again.
a. After informing the new participant about the three way call, hit the
FLASH key again to include all callers in the conversation.
-OR2. Selecting the Menu key on your navigation panel. Then select Call Control followed by Start Conference. This will put your current call on hold and dial a
third party
Note: Both operations place the original caller on hold.
To remove a caller from an existing conference call, simply press the Flash key on
your handset to drop the last person on the conference call.
Note: A caller may leave the conference on their own by hanging up. Their
line will then appear as inactive and the rest of the conference will be unaffected.
Privacy Setting
To turn on/off Privacy setting, select Menu, followed by the Privacy on/off button. If
the screen shows Privacy off, this means the privacy mode has been turned off.
14
Self-View Setting
To enable self-view settings, select Menu followed by the Self-View on/off button.
You have the option to adjust the shade of your self-view screen and move the
screen around to your desired location by using the left and right arrow keys.
Bandwidth for Video Streaming
During your call session, you can dynamically adjust the bandwidth download
streaming by using the up and down arrow keys.
Camera Lens Setting
During your call session, you can rotate the camera clockwise and up to 180
degrees to show your caller the opposite view. Tango will automatically invert the
image when you rotate the camera clockwise more than 90 degrees.
Warning: The camera cannot turn 360 degrees. The camera lens will be
damaged if you turn it beyond 180 degrees.
Tip: The “Menu” key can be used as the “back” key in these settings.
15
Setup Menu
Use this menu to configure the following video settings:
Video Settings
Available Bitrate - The upstream bitrate of the Tango user's broadband
connection link.
Send Periodic iFrame - The “On” and “Off” settings for "Send Periodic iFrame"
enable and disable sending INTRA frames at regular intervals. The "Auto" setting
instructs the endpoint to determine if the remote endpoint can request INTRA
frames and, if not, send INTRA frames at regular intervals. This setting controls
whether the Tango sends unsolicited INTRA frames (also known as keyframes or
Fast Updates). These INTRA frames clean up the video when packets are dropped.
It is recommended that this setting be placed on “Auto”, as it may cause a brief
pause in the video.
iFrame Frequency - This setting manages the frequency unsolicited INTRA frames
are sent for “On” and “Auto” settings of “Send Periodic iFrame”. For example, an
“iFrame Frequency” setting of “4 seconds” will cause the Tango to send an INTRA
frame every 4 seconds.
General Display Settings
Color Theme - You can choose different colors for the background and text.
Wallpaper - Choose a preprogrammed background image from your Tango or
upload and personalize with your own pictures/images (See Digital Photo Frame
section below).
Menu Transparency - Choose level of transparency for your menu background.
Screen Saver - Set the amount of time you would like to elapse before starting your
screen saver. You can choose Picture Frame as your screen saver, which will enable
and scroll through your customized images (See Digital Photo Frame on page 17).
Hide Main Menu - Select when you would like the main menu to disappear from
your LCD screen.
Display Brightness - Adjust the brightness of your LCD screen.
16
Digital Photo Frame - With Tango, you can upload up to 16 of your own pictures
and set them up as your wallpaper and/or screen saver.
1. Connect a computer (must have access to a web browser) directly to the LAN
port of your Tango.
2. Enter http://192.168.88.1 (the default IP address for your Tango) in the
address bar of your web browser and press Enter. You will be prompted to
enter a password (the default password is admin).
3. You should now see your Tango's System Information Screen.:
4. Select Image Library from the menu bar on the left side of the screen.
17
5. Use the Browse key to locate the image you would like to upload.
6. Click on Upload new image.
7. If you followed the instructions correctly, you should be presented with a
screen that states, "File upload successful." Click the OK button.
8. The next screen will give you an opportunity to upload additional images and
show you the images you have already uploaded under the section "Images in
Library." Please note that you can delete and/or view images from this screen
as well.
Note: Image files must be in JPEG format with a maximum size of 640x480
pixels. However, for optimal performance, you may want to resize or crop
your images to 320x240 pixels. To resize/crop your images, go to
http://photo.8x8.com.
Tip: Once your favorite images have been uploaded, you can go to "Screen
Saver Settings" under the Setup Menu key to select picture frame as your
screen saver.
In-Call Display Settings
Display Video Preview - This setting will turn on/off your self-view display when
your phone is off hook.
Display Lost Media Icons - This setting will show audio or video loss during your
call session, indicating that you may need to adjust your Bandwidth settings. Use
the up and down arrow keys - or go to the Video Settings menu to adjust Bandwidth settings.
Call Status - Indicates whenever the call is connected or disconnected.
Network Settings
WAN Interface - Select your type of WAN configuration for your Tango. You have the
option of DHCP, Static IP or PPPOE.
DHCP - The Tango is configured for use with Dynamic Host Configuration Protocol
(DHCP) by default. If your broadband connection uses DHCP, simply connect your
phone's WAN port to your broadband modem and then connect the phone's
power cord to an AC power outlet.
Static IP Address - If your provider gave you a static IP address, select this option
and fill out all the information required: IP address, subnet mask, default gateway
and DNS address.
PPPOE - If your broadband connection uses PPPoE, you will need to configure the
Tango by inputting the user name and password provided by your Internet Service
Provider.
18
Tip: Please refer to section “Configure Your Tango” in this User Guide for
details.
LAN Interface - The LAN interface screen controls the IP address of the LAN port on
the Tango. If you have another device controlling IP address assignments on your
local network, you may need to change the Tango's local IP address to place it on
the same network and subnet. The default LAN IP address of Tango is
1928.168.88.1.
DHCP Server - The DHCP Server setting enables the router to automatically assign
an IP address to attached computers using the Dynamic Host Control Protocol. Simply choose On/Off for this option.
VoIP Settings - This is a read only screen. It provides the SIP server, server port and
SIP domain information. No changes can be made on this screen.
19
Surveillance Mode (Auto Answer) Settings
Auto Answer - This will enable the phone to automatically answer after a desired
number of rings.
Video Start Password - For security purposes, you can set a password (up to six
numeric digits) for remote callers to enter before they can view your end of the
Tango.
Localization Settings
The Localization screen controls the time and place settings.
Country - Select the country where the Tango is currently operating.
Time Zone - Select the time zone where the Tango is currently operating.
Daylight Savings zone - Turn On/Off to automatically adjust the time one hour for
Daylight Savings Time (DST). If your area does not observe DST, do not enable this
option.
NTP Server - Enter the Network Time Protocol (NTP) server you want the Tango to
use to automatically update the date and time settings. Leave the field blank if you
do not know the server information.
Phone Keypad Settings
Configure the kaypad to the phone that is connected to your Tango.
Keypad Mapping - Select the style of the keypad that matches the phone that is
connected to your Tango. This will insure Tango has interpreted all dialed numbers
corresponding with the numeric keys to match the phone connected to the Tango.
20
Status Menu
The Status screen displays status information about your Tango.
WAN - the WAN IP address is displayed here.
LAN - The LAN IP address is displayed here.
MAC Address - The MAC address of the Tango unit is displayed here. (You will need
to provide the MAC address when you sign up for 8x8 phone service.)
8x8 Service Status - Shows your connection status.
Firmware Version - This shows the version number of the installed firmware.
21
Call Logs
The Call Logs function keeps track of the last 100 calls missed, received, and dialed (300
total). You can use any of the logs to quickly initiate a call.
Select the Call Logs you wish to view: Missed, Received or Dialed. Then, select the specific phone number you wish to view. You can save or delete the call log from your
Tango phone book.
22
Phonebook
The Tango Phonebook makes it easy to call those with whom you frequently speak. It
can store up to 100 entries.
There are two ways to enter the information:
1. A virtual keypad will display on your screen. Use the navigation arrow keys to
select the letter and number.
2. Enter letters and numbers using the handset keypad. Select Add New and then
Edit.. (Pick up your telephone handset and use the keypad to enter the letters
or numbers.)
To enter letters, press a key once to enter the first letter on that number key.
For example: press 4 once to enter the letter g, press 4 twice to enter letter h.
Press a key two or three times to enter the second or third letters corresponding
to the handset keypad.
To enter a space, press 1, or # key. To correct an error, press * to backspace.
When finished, select Done twice to return to the main menu. It will then
prompt you to save the contact information you just entered. Click on the right
arrow key to save your contact information.
23
Import Contact
Tango allows you to import your contact information from Microsoft Outlook CSV or
any other CSV file format.
1. Connect a computer (must have access to a web browser) directly to the LAN
port of your Tango.
2. Enter http://192.168.88.1 (the default IP address for your Tango) in the
address bar of your web browser and press Enter. You will be prompted to
enter a password (the default password is admin).
3. You should now see your Tango's System Information Screen.
4. Select Import Contacts from the menu bar on the left side of the screen.
24
Appendix A: Navigation Menu
The following chart is an overview of the Navigation Menu:
• Details
Edit
Dial
Delete
Done
• Dial
• Add New
Dial
Done
• Done
• Missed
• Received
• Dialed
Details
Dial
Delete
Done
• Video Settings
Available Bitrate
Send Periodic iframe
iframe Frequency
• General Display Settings
Color Theme
Wallpaper
Menu Transparency
Screen Saver
Hide Main Menu
Display Brightness
Clock Display
• In-Call Display Settings
Display Video Preview
Display Lost Media Icons
Call Status
Display Bitrate
• Network Settings
WAN Interface
LAN Interface
VoIP Settings
• Survelliance (Auto Answer Settings)
Auto Answer
Video Start Password
• Localization Settings
Country
Time Zone
Daylight Savings
NTP Server:
• Phone Keypad Settings
Keypad Mapping
• WAN IP Address
• LAN IP Address
• Add New
• MAC Address
• Packet8 Service Status
• Firmware Version
25
26
Appendix B: Icons displayed on the LCD screen
Tango Icons
Phonebook
Call Logs
Setup
Status
Loading
New Voicemail
27
Tango Icons (Continued)
Lost Audio
Missed Calls
Privacy
Lost Video
28
Appendix C: Troubleshooting
1. The "Configuring Network" message remains on screen.
Make sure the Tango has been configured with the proper network settings,
according to the “Installation” section of the User Guide.
2.
Tango has no self-view.
During your call session, press Menu, followed by Self View settings. Make
sure you set “Self View On”. Press the Menu key again to remove the menu
screen.
Ensure the camera lens is pointing toward you and not toward the bottom of
the Tango.
3.
Tango is unable to call another 8x8 Tango or Videophone.
Make sure the message “Configuring network …” is not shown on the LCD
screen. Check to see if the RJ-45 Ethernet cable is properly connected to the
WAN port of the Tango. If this problem persists, reboot the Tango and try again.
4.
Tango displays a message “Network Unavailable” on the LCD screen when
trying to make an outgoing call.
Make sure the message “Configuring Network …” is not shown on the LCD
screen. Check to see if the RJ-45 Ethernet cable is connected properly to the
WAN port of the Tango. If this problem persists, reboot the Tango and try again.
5.
Cannot see the 8x8 Tango user on the other end.
Ensure the “Privacy” mode of the other end is not activated.
6.
Cannot hear the 8x8 Tango user on the other end.
Ensure the handset is connected properly to the Line port of the Tango.
29
30