1
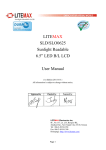
NR710C
External 5-bay USB 3.0, eSATA, FireWire 800 interfaces to SATA RAID Subsystem
1. Overview
3. Panel Layout
2 34
The NR710C is an external 5-drive SATA disk array storage system,
which is fast and cost effective as well as providing high-capacity
RAID solution for SOHO, SMBs (small and medium businesses),
and professionals engaging in video editing, content creation and
various areas. The NR710C features built-in hardware RAID
protection, high transmission rate, and easy setup of the enclosure.
The connection between the NR710C and the host is simply made
by one data cable, compatible with Windows, Mac, and Linux
operating system.
6
7
10 11 12
13
14. Swappable fan
5
15. Power cord receptacle
8
9
4. Enclosure Setup
1. Remove the NR710C from its packaging, and place the
enclosure next to laptop, desktop PC, server, or workstation.
2. Package Checklist
Before the installation of the unit, verify the items below are
included in the package.
If you want to use volume larger than 2 TB, the switch on the
rear of the NR710C enclosure should be turned to number 0 or 1,
and the operating system and the hardware should also support
volume larger than 2 TB. If you want to use volume under 2 TB,
the switch should be turned to number 2.
1
15
14
1. Power switch button
2. Hold one of the drive trays from the enclosure and push its
button leftward for the release of the lever until the lever
emerges.
Note: to power on/off NR710C, press the power switch button for two seconds
2. Buzzer mute button
3. Enclosure power LED
。White – Power On
A
B
Enclosure x 1
HDD tray
(installed in the NR710C) x 5
4. Fan LED
。Green – Normal
。Red – Failure (low frequency of RPM or stop)
5. Temperature LED
3. Place a drive tray on a flat and level surface, and then attach
the hard disk drive into the drive tray.
。Green – Normal
。Red – Overheated (higher than 50°C)
6. LCD display
C
CD containing user manual
and GUI x 1
D
Hard disk drive mounting
screw x 20
7. LCD control keypad
8. Drive presence LED
。White – Power On
9. Activity indicator LED
。Blue – Hard disk drive ready
。Flash Blue – Access
。Flash Pink – Rebuilding
E
Key for HDD tray x 2
F
USB 3.0 data cable x 1
10. USB 3.0 connector
11. eSATA connector
12. FireWire 800 connectors
13. Switch turned to number 0 or 1 (default) –
volume larger than 2 TB
Switch turned to number 2 – volume under 2 TB
G
eSATA data cable x 1
H
FireWire 800 data cable x 1
If any of the items listed above is missing or damaged, please
contact the sales representative.
WARNING:
You must verify the heads of the four screws are level with the drive
tray while the trays are attached to the hard disk drives; otherwise,
a screw could take hold of the tray from the bottom side and prevent
you to pull the drive tray out of the array.
Volume larger than 2 TB
Volume under 2 TB
4. Adopt four of the screws provided, and fasten the tray on the
hard disk drive. Tighten each screw to fasten the drive tray
snugly to the hard disk drive. Do not tighten the screws overly.
NR710C
External 5-bay USB 3.0, eSATA, FireWire 800 interfaces to SATA RAID Subsystem
WARNING: Do not force the levers to close while you insert drive
modules into the NR710C enclosure. If a lever does not close
smoothly, draw out and inlay the drive module again, and then
press the lever to close.
5. Insert the drive module into the NR710C enclosure correctly
until its lever appears to shut, and then press the lever to
close until it clicks to ensure that the drive module is within
the enclosure.
6. Go over steps 2 to 5 again for further drives.
7. Connect one end of USB 3.0, eSATA, or FireWire 800 data
cable to the USB 3.0, eSATA, or FireWire 800 connector on
NR710C. Make sure the connector is fastened to the
enclosure.
8. Connect the other end of USB 3.0, eSATA, or FireWire 800
data cable to the USB 3.0, eSATA, or FireWire 800 connector
on laptop or motherboard/add-on card inside desktop PC,
server, or workstation. Verify the connector is firmly conjoined.
5. Quick RAID Configuration
RAID configuration can be set up via user-friendly GUI or front
comprehensive LCD.
10. After the power cord is connected, you can switch on
NR710C and the computer.
6. Disk Partition and Format
•For RAID configuration via user-friendly GUI on
Windows operating system:
•For Windows operating system
1. Copy the folder RAID_AP_v1.8 from the CD to your computer.
1. Right click My Computer, and then select Manage.
2. Open the folder RAID_AP_v1.8 from your computer, and then
open the sub-folder Netstor_RAID_Server. Execute program
ManagementServerSetup.
2. Click Disk Management from the left column of the
window. If a dialog that reads Initialize and Convert
Disk Wizard shows, click Cancel to close it. All the
hard disk drives will be identified and listed by the
system. Right click the device from Netstor, and then
choose Initialize Disk.
3. Go to folder Netstor_RAID_AP under RAID_AP_v1.8, and
execute RAID_AP_v1.8, and then an interface shows up.
4. After the interface appears, you are required to input data for
three entries: the IP address, the user name, and the
password, and then input localhost for the IP address, admin
for the user name, and 111111 for the password. After you
input the data, click Connect.
3. Right click the bar that indicates the disk for the RAID
system, and then choose New Partition.
5. Click C1 at the left side of the interface, and then click Create
RAID at the top side of the interface.
5. After the partition and the format, go to My Computer
and you will see the newly created volume.
6. Select the disk drives you want to use for RAID, and then
select a RAID level from RAID 0 to RAID 10. After you select
a RAID level, click Apply.
7. A confirmation of RAID configuration shows up, and
click Yes to continue, and then the RAID will be
created.
9. Connect one end of power cord to the power cord receptacle
on rear of NR710C enclosure and the other end of power
cord to the outlet. Verify the power cord is firmly connected.
For detailed information on RAID configuration via GUI or
LCD, please see System Configuration Guide.
•For RAID configuration via front comprehensive LCD:
A control keypad and an LCD are provided in front of the
NR710C enclosure. RAID management can be configured with
the keypad and the front comprehensive LCD.
After NR710C is turned on, the headline “Netstor Hardware RAID”
appears on the LCD. Press any of the four buttons to enter the
main menu. There are four entries, Quick Setup, Disk Manager,
RAID Manager, and System Manager, in main menu, and users
are allowed to use the four buttons provided to configure the
NR710C system.
4. Follow the procedures from the New Partition Wizard
to complete the partition.
Note:
Operating systems that allow disk volume larger than 2
Terabytes (2048 Gigabytes) include:
1.Windows Vista, Windows 7, and Windows Server 2008
2.Mac OS X 10.4 or later versions
3.Linux 2.6.23 or later versions
If you have any questions, please contact your regional
distributor, or Netstor Technology, Taiwan.
Netstor Technology Co., Ltd.
6F, No.1, Alley 16, Lane 235, Baoqiao Rd., Xindian City,
Taipei County 231, Taiwan (R.O.C)
Tel: +886-2-2917-1500 Fax: +886-2-2918-1260
E-mail: [email protected]