1
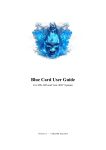
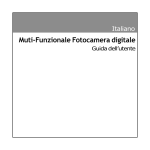
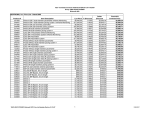
Gateway 3DS User Manual
For New Nintendo 3DS Systems
Version 3.2.1 – © Gateway Team 2015
Table of Contents
2. Prerequisites and Requirements
4. Preparing a Boot Game for New 3DS
5. Entering the Gateway Menu (New 3DS)
6. Updating the Red Cart
7. Backing up SysNAND
8. Restoring SysNAND
9. EmuNAND Setup
10. Updating EmuNAND
12. Creating Game Backups (ROMs)
13. Launching Game Backups (ROMs)
14. Support for .cia Files
15. DS Profile Exploit Setup
16. Using the DS Profile Exploit
17. Troubleshooting and Tips
19. Retail Cartridge Support
20. System Transfer (3DS/2DS to New3DS)
21. Cubic Ninja QR Codes
Page |1
Requirements:
- A New 3DS on a firmware version between 8.x and 9.2
- A MicroSD Card for internal use and a MicroSD card for your Gateway cart(s)
- A Red Gateway flash cart
- A working WIFI connection for your New 3DS to connect to
- The latest Gateway 3DS software package from http://gateway-3ds.com/downloads
Pre-Setup Tips:
- Make sure the WIFI on your New 3DS is kept OFF at all times to avoid the Nintendo Update
dialogue from a pre-downloaded update file unless expressly stated to turn it on.
- Make sure you have a valid wireless profile in your New 3DS system menu
- Format the MicroSD for the Gateway Red cart as exFAT so you can place files over 4GB in
size on them. Windows 7 and higher natively supports this from the Format menu in
Computer/This PC.
Page |2
- The SD card inside your New 3DS should be FAT32, as it will not recognize exFAT.
- If you have files already on your SD cards, it’s recommended that you erase/format them to
remove complications during the setup and potential downgrade of your console
- If you have previously used Gateway 3DS to make a backup of a game cart, place one of your
.3ds or .3dz files (a game ROM) on your MicroSD inside your Red Gateway cart so you can test
it during the setup
Page |3
Preparing a Boot Game for
New 3DS
Game 1) Zelda: Ocarina of Time 3D
This method requires a 3DS/2DS on a firmware capable of entering Gateway Mode (for a onetime use to prepare the cartridge) OR a third-party save game dongle
Step 1: Place the latest Launcher.dat and the correct save file for Zelda: OoT3D (included in
the archive) on the root of the 3DS/2DS internal SD Card.
Step 2: Boot the 3DS/2DS system to the Gateway Menu, insert the original Zelda: OoT3D
cartridge, and choose Restore 3DS Save. Please note that this will erase all of your existing save
slots on the cartridge.
Step 3: You may now power down the 3DS/2DS console and remove the original Zelda:
OoT3D cartridge. It is now ready for future use in booting the New 3DS to the Gateway Menu.
If you are using a third-party save game dongle, follow the manufacturer’s
directions and restore the included save game file to your original cartridge and
proceed to the next step.
Game 2) Cubic Ninja
Step 1: Start up Cubic Ninja regularly and from the Main Menu, choose Create, QR Code,
then finally Scan QR Code.
Step 2: With WIFI Enabled, scan the corresponding QR Code Here for your region and the
exploit will install itself permanently to the cartridge and boot you to the Gateway Menu straight
away. If your game becomes corrupted, press and hold L+R+X+Y at the main Cubic Ninja
menu to clear the Gateway exploit from it.
Page |4
Entering the Gateway Menu
(New 3DS Systems)
Step 1: Copy the latest Launcher.dat to the root of your internal MicroSD card. To save time,
you can use the Wireless SD Management for this step (see the New 3DS User Manual for
instructions).
Step 2: Insert your Boot Game into the New 3DS and start it like normal from the Home
Screen.
Zelda: Ocarina of Time 3D
Step 3: Press Start on the title screen to get to the Save Selection. Choose the First save slot
and it will load the game. If your save shows as corrupted, please watch for the fixed save
files on the Gateway website (coming soon).
Step 4: Once you can see the character (Link) on screen and his “A Check” action button
lights up in the lower right hand corner, press the A button to launch into the Gateway Menu.
Cubic Ninja
Step 3: From the Main Menu, select the Create option, then the QR Code option and the
Gateway Menu should boot right away.
If your system hangs for more than 15 seconds after trying to boot to the Gateway Menu,
you will need to power the unit down by holding the power button for about 10 seconds.
Once it is off, you can power it back on and try booting to the Gateway Menu again.
Page |5
Updating the Red Cart
Step 1: Transfer the latest Gateway 3DS Launcher.dat (located inside the downloaded
archive) onto your New 3DS MicroSD card with your PC, then insert the card into your New
3DS.
Step 2: Place the Gateway 3DS Red cart inside the New 3DS game cart slot
Step 3: From the Gateway Menu, choose the option "Boot Gateway Mode" to be taken to the
update screen where you can get the latest firmware on your Gateway 3DS Red cart. Follow the
steps to begin updating your cart. This process takes about a minute, but you may want to have
your power cord plugged in, just to be safe.
Page |6
Backing up SysNAND
Step 1: Insert a MicroSD card into your New 3DS with at least 2GB of free space, making
sure it is formatted as FAT32
Step 2: From the Gateway Menu, use the Directional Pad to navigate to the “Backup System
NAND” option and select it.
Step 3: Once the SysNAND (System NAND) backup is complete, shut off your New 3DS and
remove the internal MicroSD card, plug it into your PC, and copy the NAND.BIN file that you
have created to your PC for safe keeping. Alternatively, you can use the Wireless SD
Management function, but it is a much slower transfer speed.
Page |7
Restoring SysNAND
- Skip this section if you do not specifically need to perform this operation -
It is very important that you do not attempt to restore the SysNAND from
another console to your New 3DS. You must only restore the SysNAND that was
created from the console you are trying to restore it to. Failure to do this will
cause your New 3DS to no longer be usable.
Step 1: Insert a MicroSD card into your New 3DS with the NAND.BIN you created earlier
with the Backup System NAND feature.
Step 2: From the Gateway Menu, use the Directional Pad to navigate to the “Downgrade
Console” option. Press and hold the Up directional key and press A to enter the “Restore System
NAND” mode.
Step 3: When the process has completed, shut off your New 3DS when prompted. The
process will now be complete and you may turn your console back on.
Page |8
EmuNAND Setup
Step 1: Insert a blank MicroSD card with only the Launcher.dat on it into your New 3DS. It is
recommended you use at least a 16GB capacity or higher, formatted as FAT32, so that you have
plenty of room to install games and downloadable content in the future.
Step 2: From the Gateway Menu, select "Format EmuNAND" -- this will ERASE THE SD
CARD INSIDE YOUR New 3DS -- INCLUDING YOUR GAME SAVES AND DLC and
configure it for EmuNAND use.
Step 3: Once the process has finished, choosing the “Boot Gateway Mode” option will place
you to the EmuNAND (Emulated NAND) Home Screen.
Step 4: Once you have booted into Gateway Mode/EmuNAND, please close the top screen
(Placing the system into Sleep Mode) and open it again to fix the 3D rendering/facial tracking
features. This bug will be resolved in later versions.
DO NOT remove your internal SD card while in EmuNAND mode! Your SD
card is acting like a hard drive for the console, removing it from the system while
it is on will make the New 3DS crash, much like removing the hard drive from a
running computer will.
Page |9
Updating EmuNAND
It is important that you DO NOT EXIT your Settings menu at any point before
or during the setup and updating of your EmuNAND. Doing so will force you out
of Gateway Mode and back to the SysNAND where you MAY ACCIDENTALLY
UPDATE YOUR SYSNAND FIRMWARE.
Step 1: With EmuNAND configured, go to the Gateway Menu and select “Gateway Mode”
Step 2: Enter the System Settings and look for “GW3D” preceding your firmware version:
!!! STOP HERE !!!
DOES YOUR New 3DS SAY "GW3D" BEFORE THE VERSION NUMBER?
IF NOT, START OVER. IF YOU KEEP GOING WITHOUT “GW3D” YOU
WILL UPDATE YOUR SYSNAND AND BE LOCKED OUT OF GATEWAY!
P a g e | 10
Step 3: DO NOT LEAVE THE SETTINGS MENU AT ANY POINT. Choose "Other Settings"
and on Page 4 you will find the "System Update” option. Turn your WIFI on and select this
option. Let it download and apply the update to your EmuNAND.
Step 5: After your system reboots, it will place you back in SysNAND. Return to the Gateway
Menu without holding L and it should automatically place you back into EmuNAND. Check the
System Settings again to verify the update. Leaving settings will always place you in SysNAND.
P a g e | 11
Creating Game Backups
Step 1: Make sure to have a MicroSD card with plenty of free space inside the New 3DS. You
may use the same SD card that your EmuNAND is set up with for this step.
Step 2: Place the original game cartridge that you wish to back up into the cartridge slot on
your New 3DS.
Step 3: From the Gateway Menu, select “Backup 3DS Game Cartridge”. Take note of the
Game Code during this process, which can take up to 20 minutes for very large games.
Step 4: Once the process completes, shut off your New 3DS and remove the internal MicroSD
card. Place the SD card into your computer and you will find a ROM file with the same name as
the Game Code. Move this file to your computer for later use, as it cannot be played from the
internal SD card. Alternatively, you can use the Wireless SD Management for this step, however
it is a much slower transfer speed.
When creating your game backups, it’s a good idea to rename the extension of
your ROM from .3ds to .3dz on your computer – this tells the Gateway system it
is compatible for online play. Note that this will only work for games you have
backed up yourself and does not work for game ROMs you may have obtained
elsewhere.
P a g e | 12
Launching Game Backups
When playing a game backup, you must press Home and then Close the software
to write the save file to the New 3DS MicroSD card. If you skip this step, your
current save games will be lost. Depending on the size of the save file and your
MicroSD card speed, this could take some time. Please be patient while it closes
the software.
Step 1: Place your game ROMs onto a MicroSD card with your computer, they can be either
in .3ds or .3dz format. It is recommended that you format your MicroSD card as exFAT so that it
can hold files larger than 4GB in size. Place this inside your Gateway Red cart and then insert
both into the game cart slot on your 3DS/2DS.
Step 2: From the Gateway Menu, select “Boot Gateway Mode”. Note that while EmuNAND
setup is not required to play game backups, it is recommended so that you can apply game
updates and participate in online features, such as multiplayer.
Step 3: From the New 3DS Home Menu, press the Select button and a ROM selector will
appear on your top screen:
Step 4: Using the Directional Keys, select the game backup you wish to play and press A.
This will change the cartridge panel on your bottom screen to that of the selected game backup.
Choosing this will then take you into the game just like a normal cartridge would.
P a g e | 13
Support for .cia Files
Requirements:
- While EmuNAND setup is not required, it is STRONGLY recommended. A bad write while in
your SysNAND could result in a non-functioning New 3DS unit
- A .cia manager application. While Gateway 3DS supports .cia files, it does not natively contain
a method to install/remove them. There is third party application by BigBlueBox Team called
Title Manager that you can use to do this.
Step 1: Place the .cia manager (in .3ds format) on the root of your Gateway Red MicroSD
card. If it is in .cia format, you need to re-download it as .3ds format.
Step 2: With your New 3DS system off, remove the internal MicroSD card and copy your .cia
file to it with your computer. The .cia file does not need to be in the root of the MicroSD card as
BBM (Big Blue Manager) supports folder browsing. Place the card back inside your New 3DS
when finished. You can use the Wireless SD Management function for this step, however it has
very slow transfer speeds.
Step 3: From the Home Menu in Gateway Mode (EmuNAND recommended) press Select to
open the Multi ROM selector, choose the BBM (called "Title Manager") and press A. This will
change the cartridge tile on your bottom screen to BBM which you can then launch.
Step 4: Using the Directional Keys, navigate to the "SDMC" listing, then navigate to the
folder you placed your .cia in. Highlight your file and press A to "import" (install) it. You may
also remove any installed .cia files from this menu as well.
Step 5: When finished, press the Home button and Close the app. On the Home Screen, you
should now see your .cia app installed and ready to use.
Applications and Games that are installed in Gateway Mode will only function in Gateway
Mode and will produce errors when you try to run the applications from SysNAND or
Classic Mode.
P a g e | 14
DS Profile Exploit Setup
Step 1: Make sure to have the latest Launcher.dat on your internal MicroSD. You will also
need to copy the proper mset_xxx.cia for your region (where xxx is your region code) to your
internal MicroSD.
Step 2: You will need to locate a copy of devmenu.3ds and place it on your Gateway
MicroSD card. (You will need to use Google or ask a friend for a copy of the application)
Step 3: Power on your New 3DS and using your boot game, boot to the Gateway Menu.
Select the “NVRAM INSTALL” option and follow the prompts until it has finished.
Step 4: Place the cursor over “BOOT GATEWAY MODE” and Hold B then Press A, then
Press X by itself to boot to SysNAND Gateway Mode. Caution! Do not use SysNAND
Gateway Mode except to perform this operation as anything done to the New 3DS in this
mode will apply directly to the system itself and could cause damage!
Step 5: Press Select and choose the DevMenu ROM from the list (You MUST use DevMenu,
other .cia installers will NOT work). Boot the DevMenu ROM and Press Right one time to get to
the Import tab. Use the Down Key to navigate to your mset_xxx.cia file and press A to
import/install it.
Step 6: When the import/install has finished, press the Home Key, then Close the software.
Shut off your New 3DS at this point. The DS Profile Exploit has now been successfully installed
on your New 3DS system.
P a g e | 15
Using the DS Profile Exploit
Running a DS ROM or DS application will remove the DS Profile
Exploit from your system and will require you to reinstall it.
Step 1: With the DS Profile Exploit installed and Gateway Red cart in your game slot, turn on
your New 3DS and open the System Settings.
Step 2: Select “Other Settings” followed by “Profile” and finally “Nintendo DS Profile”. This
will cause your New 3DS system to load the Gateway Menu and will automatically load
Gateway Mode if you have it set up already.
To get to the Gateway Menu without launching directly into Gateway Mode,
hold the Left Shoulder button immediately after selecting “Nintendo DS Profile”
P a g e | 16
Troubleshooting and Tips
Problem: 3D won’t activate properly/Facial Tracking does not work (New 3DS Only)
Solution: Please place the system into Sleep Mode by closing the top screen, waiting a moment,
then waking the New 3DS from Sleep Mode by re-opening the top screen. This will re-activate
the 3D features. You only need to perform this once after every fresh boot into Gateway Mode.
Problem: Games won’t download/install Game Updates
Solution: Visit the e-Shop while in EmuNAND and download the update from there. It will
automatically apply the next time you start the game
Problem: “Fragmentation Error” when selecting a ROM on the 3DS/2DS
Solution: This means your ROM file is not stored in consecutive blocks on your MicroSD card
inside your Gateway Red cart. Try deleting the ROM and copying it to the MicroSD card again.
If this fails, try reformatting your MicroSD and copying all your ROM files to it at the same time
to ensure proper alignment. If the problem persists, you can obtain a tool from the Gateway
website to help defragment the ROM files on your MicroSD card.
Problem: Screen becomes garbled or system locks up trying to enter the Gateway Menu
Solution: Unfortunately, this can occur every once in a while due to the nature of the system.
First, make sure you have the latest Launcher.dat on your internal SD Card. If your 3DS/2DS
crashes, you may have to hold the power button for 10-15 seconds for it to shut down
completely. If the problem occurs frequently, please visit the support forums and open a new
discussion with your symptoms.
Problem: After the installation of a .cia file, you must “unwrap” the application after every boot
Solution: Remove your internal SD card and Gateway Red cart. Power the system on and do a
system format from the System Settings menu. Once finished, power the system down and
replace the SD card and Gateway Red cart. Power the system back on and test again.
For additional help, please visit the support forums and open a new topic with
your issue: http://www.maxconsole.com/maxcon_forums/forums/108-OfficialGateway-3DS-Support-Forum
P a g e | 17
- Lending your New 3DS to an unexperienced player or young child? You can set up “dummy”
Access Points so it is impossible to access the internet from SysNAND and accidentally run any
updates. EmuNAND keeps a separate set of Access Points to get online with.
Select a manual setup and type in a random AP name and random 8 character password
- Want an easy way to tell if you are in SysNAND or EmuNAND? Use the Home Screen folders!
4.2 SysNAND
9.4 EmuNAND
P a g e | 18
Retail Cartridge Support
Step 1: From the Gateway Menu, select “Classic Mode”. This will boot your system to the
EmuNAND Home Screen.
Step 2: At the Home Screen, insert your retail cartridge and it will show up and work as
normal.
While in Classic Mode installed .cia applications and ROM files will not work.
You must return to Gateway Mode to use these features.
P a g e | 19
System Transfer
(From 3DS/2DS to New 3DS)
Requirements:
- Your 3DS/2DS AND New 3DS systems must be booted into EmuNAND and be on the latest
firmware version. Refer to the guide for setting up and updating of EmuNAND
- It is best to perform this operation right away after first acquiring your New 3DS system and
setting up Gateway3DS, as having an unlinked EmuNAND may complicate the process
Step 1: On the 3DS/2DS system you want to transfer, boot to EmuNAND and remove the Red
Cart. Use it to boot your New 3DS to EmuNAND as well and then remove the Red Cart from it
too.
Step 2: On both consoles, enter the System Settings, tap Other Settings, and finally choose
System Transfer.
Step 3: Follow the on-screen prompts, being careful to choose Regular SD Card when
prompted on the 3DS/2DS system (do not select MicroSD even if you have one).
- On the 3DS/2DS select as Sending Unit
- On the New 3DS select as Receiving Unit
Step 4: When prompted, choose NOT to format the New 3DS system and continue following
the prompts on both consoles.
Step 5: When the New 3DS reboots and you try to enter EmuNAND again, the System
Transfer will resume and you will most likely be given an error and told to reboot. If this
happens, reboot to SysNAND, disable/enable the WIFI, and boot back to EmuNAND again to
complete the process.
P a g e | 20
Cubic Ninja QR Codes
North America/Europe
P a g e | 21
Japan
P a g e | 22
Easter Eggs/Extras
1. While in the Gateway Menu, you can hold Down on the Directional Pad and Press B to do a
quick shutdown.
P a g e | 23