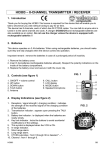
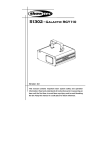
1
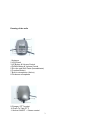
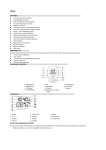
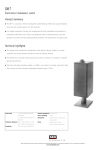
User’s Manual
ALAN PRORADIO FM
ALAN Electronics GmbH
Daimlerstraße 1k
D- 63303 Dreieich
1
Index
Drawing of the Radio................................ ................................ ................................ ... 3
Introduction ................................ ................................ ................................ ................. 4
Active-Function / FM-Radio ................................ ................................ ......................... 4
Coverage ................................ ................................ ................................ .................... 4
Expected battery operating timing ................................ ................................ ............... 4
Battery Charging ................................ ................................ ................................ ......... 4
Cleaning................................ ................................ ................................ ...................... 4
Savety precautions................................ ................................ ................................ ...... 4
Icons on LCD ................................ ................................ ................................ .............. 5
Power Save ................................ ................................ ................................ ................ 5
Key Function................................ ................................ ................................ ............... 6
ON/OFF & Shift ................................ ................................ ................................ ........... 6
Function................................ ................................ ................................ ...................... 6
UP/DOWN & Volume Control ................................ ................................ ...................... 6
PTT (Push To Talk) ................................ ................................ ................................ .... 6
Way Call Ringer(CALL) ................................ ................................ .............................. 6
Key Lock................................ ................................ ................................ ..................... 6
Sub Option Selection Mode................................ ................................ ......................... 7
Call Ringer Melody Selection Mode................................ ................................ ............. 7
Beep Tone Selection Mode ................................ ................................ ......................... 7
Roger Beep Selection Mode................................ ................................ ........................ 7
Channel List................................ ................................ ................................ ................ 7
Basic Channel Selection................................ ................................ .............................. 8
CTCSS (Code Tone Controlled Squelch System) ................................ ....................... 8
CTCSS Frequency List................................ ................................ ................................ 8
VOX Selection Mode................................ ................................ ................................ ... 9
VOX Recovery Time Selection Mode................................ ................................ ........... 9
Active Function ................................ ................................ ................................ ......... 10
Channel Scan Mode................................ ................................ ................................ .. 10
Normal Scan Mode ................................ ................................ ................................ ... 10
Priority Scan Mode................................ ................................ ................................ .... 10
Stopwatch Mode ................................ ................................ ................................ ....... 10
FM-Radio Mode ................................ ................................ ................................ ........ 11
CE – Declaration of Conformity ................................ ................................ ................ 11
Technical Specifications ................................ ................................ ........................... 12
Notes about European Warranty ................................ ................................ ............... 13
If something doesn’t work................................ ................................ .......................... 13
2
Drawing of the radio
1 Antenna
2 LCD-Panel
3 UP Button & Volume Control
4 DOWN Button & Volume Control
5 Ein-Aus und Shift-Taste (Auswahltaste)
6 Function Button)
7 Built-in microphone (Active)
8 Flexboom microphone
9 Charger / PTT-socket
10 Push-To-Talk (PTT)
11 Active ON/OFF – Volume control
3
Introduction
Proradio keeps the advantages of a heavy duty, rigid headset, to ensure the safety of hearing
in noisy working environments, combined with the functions of an modern PMR-transceiver, that
can be used without licence in nearly all European countries (see country list attached).
Active function
Active hearing-protection with electronically Level-Limiting at 83 dB.
With the black rotary-switch on the side of the shell you turn on the active function. Now you
can hear the surrounding-noises and speak again stereophonically. At abrupt rising noise
(hammer-blow, shot etc.) the electronic will limit the level which you hear in the headset
FM-Radio
You can receive the FM Radio (87.5 – 108 MHz)
Coverage
The operating band (446MHz) allows clear communication, virtually free from atmospheric
interferences and – despite the low power – will allow you to communicate up to a distance of
2 to 5 km. The maximum range is obtained operating in a open space.
If you find communication is not possible, many times this can be solved by moving a few
meters to a new location. Range is also reduces while operating in a vehicle or metal building.
Expected Battery Operating Timing
The typical life time of one battery charging cycle assumes that in standard applications during
90 % of the operating time the radio is in standby mode, and transmit and receiving periods with
higher volume are only 10 % of the total time.
In this mode the battery charging will last for about 24 hours max.
An automatic energy saving system will be enabled when the radio does not receive any
incoming signal within the last minute of operation.
With enabled broadcast radio or “active mode” the energy saving system will not be enabled,
thus the maximum operating time may go down to appr. 8 hours, depending on the volume
selected.
Battery Charging
Use the supplied original charger only. The charger is adjusted specially to the batteries of the
unit. Different charger may destroy the battery irreversible
To increase the life of your battery, avoid charging it longer than necessary. Subsequently 12
hours will provide a full charge. Too often overloading effectively reduces the battery capacity
after some time.
Cleaning
Hanger, headset and microphone may be cleaned several times with a damp cloth only.
Do not use alcohol or harsh chemicals !
Safety precautions
• never expose the unit to extreme temperatures or dust
• avoid contact with water
• use the supplied original charger only
• to increase the lifetime of your battery, avoid charging it longer than necessary.
4
ICONS on LCD
RSSI
(Receiving Signal Strength Indicator) or TX Bar Icon Indicates the receiving signal
strength during transmission and it can be indicated the number of bar according to
the strength of receiving signal.
Auto Channel Scan Indicator
Appears in the normal scan mode or when the normal scan mode is activated.
Priority Scan Indicator
Appears in priority scan mode or when the priority scan mode is activated.
Key Lock Indicator
Blinks in auto lock selection mode or when the key lock is activated.
Vox Indicator
Blinks in VOX selection mode or appears when VOX is activated.
Battery Level Indicator
Battery Level Meter indicates the remaining battery strength.
Power Save
Proradio is supplied with an automatic power saving circuit. If the transceiver
receives no signal for longer about 1 minute the „Power Save Function“ automatically
will be activated. Power save is reducing at minimum the consumption extending the
Standby-time. The Display shows „SAVE“. When Proradio is reduced to a minimum
power consumption nevertheless you can receive signals without restriction- it will
switch on immediately after receiving the first signal.
TX Indicator
Appears when a signal is being transmitted.
RX Indicator
Appears when a signal is being received.
CTCSS Indicator
Blinks when the correct CTCSS tone is entered.
Large Segment Display
Indicates the channel number in use at the normal mode. When the Function Button is
pressed, it Displays the function menu in sequence:
Ch / rdo / Sc / Uo / H00 / Sub / CAL / bEP / rog / tAL / [1] / [2] / [3] / P1 / P2 / P3 /
P4 / P5
5
Small Segment Display Displays the FM frequency at the FM mode. Displays the
SUBMENU of each MENU in the function mode.
Key Function
Power ON/OFF & Shift Button
Press this button briefly to turn the unit on. A short confirming melody will play. A momentary
press of this button is not effected to any function in the Function edit mode and stand-by mode
except in the specific mode.
When FM radio is on - Pressing this button allows you to shift to next preset FM radio
Broadcasting.
Press this button for longer than 1.5 seconds to turn the unit off.
A momentary press of this button is also used to shift to the other small segment display during
the function edit mode and reset the stopwatch counter in the stopwatch mode.
Function Button
Short Touch - Press this button briefly to enter function edit mode in standby mode.
Long Touch - Press for longer than 1.5 seconds to activate the KEY LOCK in the
standby mode.
Up Button
Short Touch - In the standby mode, press this button briefly to move to the
next higher main volume level.
In the function edit mode, press briefly to shift from the current option in each submenu to the
next option in the same submenu.
Long Touch - Pressing this button for more than 1.5 seconds will allow you to navigate at a
more rapid rate through different volume level in the standby mode or through different menus
in the function edit mode.
Down Button
Short Touch - In the standby mode, press this button briefly to move to the
previous lower main volume level. In the function edit mode, press briefly to
shift from the current option in each submenu to the previous option in the same submenu.
Long Touch - Pressing this button for more than 1.5 seconds will allow you to navigate at a
more rapid rate through different volume level in the standby mode or through different menus
in the function edit
Push To Talk (PTT) Button
Press it firmly and speak into the Microphone to transmit. The red Tx LED Indicator at the right
side of the LCD Panel will light. Release it to revert to standby mode.
When an incoming call is received, the green Rx LED Indicator on the left side of the LCD Panel
will light.
Way Call Ringer
Press the PTT Button twice quickly to call another party on the same channel and pressing the
button once during and pressing the button once during a calling stops the calling and then
returns to the standby mode. The user selected call ringer melody will play.
6
Key Lock
Press the Function Button for longer than 1.5 seconds to activate the KEY LOCK in the
standby mode
NOTE :Please note all buttons will be disabled except the PTT Button will remain fully
operational.
Setting and Operation
Sub Option Selection Mode
This mode allows you to enter the sub option selection mode.-Press the Function Button until the
word “Sub” appears in the LCD. You can now select between “yes” or “No”.
-If you press the Function Button when “yes” blinks on the CD Panel, you enter into the Sub
Function edit menu.
- Pressing the Function Button when, “no” blinks, returns to standby.Access to following SUB
Menu points is only possible when You have avtivated the SUB menu by setting to “Yes”.
Call ringer melody selection mode
This feature provides 7 user selectable call ringer melodies to alert you of a calling party.
To select your favorite Call Ringer melody,In the Sub option selection mode,
press the Function Button when the “yes” blinks.
Press the Down Button or Up Button to preview the seven available melodies.
Press the PTT Button to confirm your selection.
Beep Tone Selection Mode
This feature allows you to program beeping or not beeping with key selection.
If the Key beep off is chosen no beep sound when you press the button The call signal, power
on/off beep and roger beep make a sound regardless of the beep.
Press the Function Button from the Call selection mode.
Press the Up Button or Down Button to select from on or off.
Press the PTT Button to confirm your selection and return to standby mode.
When you press Enter button or do not press any key within 5 seconds, it returns back to stand-by.
Roger Beep Selection Mode
If Roger Beep option is on, when you finish the transmitting automatically the ProRadio will
produce a beep sound and transmit a sub-code tone to the partner.
To access the Roger Selection Mode :
Press the Function Button from the Key beep selection mode.
Press the Up Button or Down Button to select from Roger on or off.
Press the PTT Button to confirm your selection and return to standby mode.
Channel
Frequency (MHz)
1
2
3
4
5
446.00625
446.01875
446.03125
446.04375
446.05625
7
6
7
8
446.06875
446.08125
446.09375
Basic Channel Selection
In order to communicate with other PMR units, both you and the receiving party must be on the
same channel.
Proradio has 8 channels (1-8) as indicated by the large digits in the LCD Display Panel.
Before, trying to transmit on the selected channel, you should press the PTT Button to check
the activity on that channel.If someone is already on the selected channel, you should try
another channel that is clear.To change the basic channel, In the standby mode, press the Up
Button briefly to move to the next higher main channel number.
Press the Down Button briefly to move to the next lower main channel number.
CTCSS (Coded Tone Controlled Squelch System)
This feature allows you to utilize a subaudio coding channel system (subaudio
codes 00-38) within a main channel. This enables you to communicate with another party on
the same main channel without becoming disturbed by listening to other conversations on the
same channel.
This helps to avoid congestion on the main channel and filters out unwanted noise and static.
There are 38 CTCSS sub-channels for each main channel.
To change the CTCSS sub-channel, press the Function Button until the word “Ch” appears
in the LCD Panel.
Press the Shift Button and the two small number on the right side will blink on the LCD Panel.
Press the Down Button or the Up Button to choose the desired sub-channel to use
The corresponding sub-code frequency will be displayed in the lower right corner.
Press the PTT Button to confirm your selection and return to standby mode.
NOTE: To communicate with other PMR units, they must be switched to the same
channel and CTCSS sub-code.
To communicate with other PMR units that do not have sub-codes, switch your unit to
the same channel with the sub-code set to OFF.
CTCSS Frequency List
SUB Channel
1
2
3
4
5
6
7
8
9
10
11
12
13
14
15
16
Tone Frequency
67,0 Hz
71,9 Hz
74,4 Hz
77,0 Hz
79,7 Hz
82,5 Hz
85,4 Hz
88,5 Hz
91,5 Hz
94,8 Hz
97,4 Hz
100,0 Hz
103,5 Hz
107,2 Hz
110,9 Hz
114,8 Hz
SUB Channel
20
21
22
23
24
25
26
27
28
29
30
31
32
33
34
35
8
Tone Frequency
131,8 Hz
136,5 Hz
141,3 Hz
146,2 Hz
151,4 Hz
156,7 Hz
162,2 Hz
167,9 Hz
173,8 Hz
179,9 Hz
186,2 Hz
192,8 Hz
203,5 Hz
210,7 Hz
218,1 Hz
225,7 Hz
17
18
19
118,8 Hz
123,0 Hz
127,3 Hz
36
37
38
233,6 Hz
241,8 Hz
250,3 Hz
VOX & VOX Recovery Time Selection Mode
1) VOX Selection Mode
The Voice Activated Transmission (VOX) function allows your voice to activate transmission
automatically when the ProRadio is used within not too noisy environments.
It also allows Handsfree use , if You should not have the hands free for presssing PTT knob.
To access the VOX Selection menu,
Press the Function Button until the word “UO” appears in the LCD Panel.
Press the Down Button or the Up Button to select from Hi, nr, Lo or OFF.
The High, normal or low setting determines VOX response sensitivity.
Press the PTT Button to confirm your selection.
To turn off the VOX feature, enter the VOX selection mode and then select OFF.
VOX Recovery Time Selection Mode
This allows the response characteristics of the VOX function to be precisely adjusted to suit
individual needs.
To access the VOX Recovery Time Selection menu,
Press the Function Button until the word “UO” appears in the LCD Panel.
Press the Power/Shift Button to confirm your selection and switch to VOX recovery time
selection.
Press the Down Button or the Up Button to select from 5, 3, 2 or 1 second setting.
This setting determines the delay time between transmitting and receiving.
Press the PTT Button to confirm your selection.
Please note you may need to try different VOX time settings to determine the best value to suit
your speaking habit.
Stufe 1
Stufe 2
Stufe 3
Stufe 4
1 Sekunde
2 Sekunden
3 Sekunden
5 Sekunden
NOTE. Vox modeis deactivated as long as the FM broadcast radio is in use.
We do not recommend to use the VOX function in noisy environments- the voice switching
circuit may detect surrounding sound as voice and may transmit unwanted audio.
9
Active Function
Active hearing-protection with electronically Level-Limiting at 83 dB. Suitable for impulse-noise.
With the black rotary-switch on the side of the shell you turn on the active mode function.
Now you can hear the surrounding-noises and speak again stereophonically. At abrupt rising
noise (hammer-blow, shot etc.) the electronic will limit the level which you hear in the headset.
Channel Scan Mode
Normal Scan Mode
This feature allows you to scan for an active channel and communicate with the party
transmitting.
The power saver is disabled in this mode. To access the Auto Channel Scan menu,
Press the Function Button until the word “SC” appears in the LCD.
Press the Down Button or the Up Button to choose “nr”.
Press the Monitor Button to confirm your selection.
The unit will begin scanning for an active main channel. If a transmission is detected, the Rx
and RSSI icons will appear in the LCD Panel.
To turn off the auto channel scan feature return to the Scan mode by pressing the Function
Button and choose ”OFF”.
You can pause on any channel while in the Auto Channel Scan Mode by pressing the the PTT
Button during the reception of a signal for 5 seconds afterward.
Priority Scan Mode
This feature allows you to monitor two different channels at the same time.
If you pre-set any priority channel other than the current channel in use, the pre-set channel will
be scanned every 0.5 secondand signals you when a call is received.
While in the Priority Channel Scan Mode you may hear transmission from either a primary or
secondary channel when transmitting.
The unit will always transmit on the primary channel unless the PTT Button is pressed during or
immediately following the reception of secondary channel transmission.
The power saver mode is disabled in the Priority channel scan mode and the volume is not
adjustable.
To access the Priority channel scan mode.
Press the Function Button until the word “SC” appears in the LCD Panel.
Press the Up Button or the Down Button to choose “Pr” and then press the Shift Button.
Choose the priority channel by pressing Up Button and Down Button to select the desired
channel number you wish to closely monitor.
Press the PTT Button to confirm your selection.
To turn off the Priority channel scan feature, press the Function Button until the word “SC”
appears on the LCD Panel and then choose “OFF” in the scan mode.
Stopwatch Mode
In this mode you can use the stopwatch to time.
To access the Stopwatch mode :
Press the Function Button until the word “H00” appears on the LCD Panel.
Press the Up Button to start and stop the counter up while the stopwatch is running, pressing
the Down Button allows you to obtain the lap time.
Press the Power/Enter Button to reset the stopwatch time.
Press the Function Button to turn off the stopwatch function.
10
FM Radio Mode
FM Only: You can receive the FM Radio only
FM plus: You can receive the FRS signal even while you listen to the FM Radio.
When the FM only or FM plus is selected on the FM selection mode, FM icon( )appears on LCD
Panel.
And you can choose the channel by pressing the Up Button and the Down Button.
When the FM only or FM plus is selected on the FM selection, you can select the way of channel
selection in seek scan and tune scan by pressing the Enter Button.
If you select seek scan, you can select the FM radio channel by carrier detect way and if you
select tune scan you can select the FM radio channel
CE- Declaration of Conformity
This unit complies to all relevant European Standards and Regulations for PMR 446 radio service.
This radio may be used in many EU countries and some other states
applying the R&TTE directive of the European Community. However,
thereare still some restrictions to use PMR 446 in following countries:
Italy : PMR 446 is allowed, but still requests an operating licence for regular use. Exception: short
time use for travellers in Italy.
Belgium: No restrictions for travellers using the radio in Belgium free of charge and licence for
less than 3 months. Residents of Belgium must apply for a radio operating licence according to
Belgian regulations.
Ireland: CTCSS signalling ( subcodes 01-38) must be switched on for use in Ireland.
Eastern Europe: Please ask the local authorities before using the radio, because only few of the
new EU member states apply already the european R&TTE directive. Following countries still
apply special national approval regulations, not (yet) valid for PMR 446 radio:
Poland, Estonia, Letavia, Lithuania, Ukraine, Russia, Belarus, Slowenia and some others.
This unit fully complies to the following European standards:
Radio& Spectrum engineering:
EN 300 296-2 (2001), EN 55013 +A12, 13, 14 (1990-99) (FM radio part 87.5-108 MHz)
Electromagnetic Compatibility (EMC): EN 301 489-0 and EN 301 489-5 (2000),
Electrical safety: EN 60 065.
The unit is intended to be used in following european (EU and non EU countries):
A, B, CH and FL, D, DK, E, F, FIN, GB, GR, H, I, IS, IR, L, N, NL, P, S
Because the European regulations are in a steady update process, we recommend that You
download our latest issue of the Declaration of Conformity from our internet server
(e.g. http://www.alan-albrecht.de)
11
Technical specifications
Frequency Range
FM-Radio
No. of Channels
Frequency tolerance
TX-Mode
Antenna
Battery
Output power
Modulation capability
Harmonics & Spurious
Receiver sensitivity
Receiver- Audio Output
Consumption Save
Consumption RX
Consumption TX
R&TTE, CE conformity
Coverage
Operating time
Charging time
Weight
446.00625 - 446.09375 MHz
87.5 - 108 MHz
8 in 12.5KHz
+/- 5 ppm (-10°C - +55°C)
F3E
Integrated, semi-rigid rubber antenna
4x battery NIMH 1.2 v Mignon
Max. 0.5 Watt (ERP)
+/- 2.5 KHz max.
Tx : -36 dBm. Rx : -57 dBm
0.5 μV EMF (50Ω) /20 dB SINAD
1.2 VRMS= ca. 180 mV at 8 Ω
25/15 mA
100 mA (vol. max.)
250-300 mA
notified according to European R&TTE
directive in all countries allowing the
PMR446 radio service. Latest country lists
will be published on our service-website.
Max. 2/5 km (open space)
More than 24 hours (5% tx)
More than 15 hours (20% tx)
Max. 12 hours
569 g
12
European 2 years warranty
The distributor, dealer or retail shop warrants to the original retail purchaser of this product that should
this product or any part of it, under normal use and conditions, be proven defective in material or
workmanship within 2 years from the date of original purchase, such defect(s) will be repaired or
replaced with new or reconditioned product (at the company's option) without charge for parts and
repair labor. To obtain repair or replacement within the terms of this warranty, the product is to be
delivered with proof of warranty coverage (e.g. dated bill of sale), specification of defect(s), to the
distributor, dealer or his authorized repair center.
The Company disclaims liability for communications range of this product. The warranty does not
apply to any product or part there of which, in the opinion of the company, has suffered or been
damaged through alteration, improper installation, mishandling, misuse, neglect, accident, or by
removal or defacement of the factory serial number/bar code label(s). The warranty does not apply to
accessory parts or problems caused through not authorized or not recommended accessories like
batteries, external power supplies and over voltage caused through external power supplies, light
bulbs, broken antennas, broken swivel belt clips, broken or damaged acrylic glass windows and
cabinet parts. Rechargeable batteries have a limited life time because of physical reasons, it is normal
and must be accepted that such batteries reduce their capacity steadily when frequently charged and
discharged; these batteries are not covered by the 2 years European warranty regulation.
In case of malfunctions please contact the dealer or person where you have purchased your radio.
If something doesn’t work ...
It’s impossible to connect the partner station:
Did you turn on the unit ?
Did you adjust the right volume level ?
Did you select the same channel like your partner station ?
Aktiv mode doesn´t work:
Did you turn on the Active function ?
Did you adjust the right volume level?
It’s impossible to turn off the unit:
Connect the Proradio to the charger. If now Proradio can be turned on, the batteries are
probably only discharged. Turn off Proradio again and wait, until the batteries are fully charged.
If You should have any other problem, please ask Your distributor for further help.
You will find our full documentation, incl. the latest issues of Declarations of Conformity,
as well as service hints etc. anytime on our download server
http://service.alan-germany.de/PMR446
© 2004 ALAN Electronics GmbH
13