1
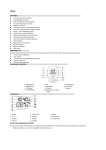
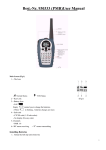
HC883 – 8-CHANNEL TRANSMITTER / RECEIVER
1. Introduction
Thank you for buying the HC883 ! No licence is required for this device that will enable you to
talk to whomever you wish without having to pay for air time.
The device has 8 channels, each of which has 38 CTCSS codes. You can talk to anyone who is
tuned in to the same channel and code. A charger (HC883/CH) and rechargeable batteries are
also available as an option. Do not use the charger unless the device is equipped with
rechargeable batteries !!
2. Batteries
This device operates on 3 AA-batteries. When using rechargeable batteries, you should make
sure they are fully charged when the device comes into operation.
Important remark : remove the batteries in case of a prolonged period of inactivity
1. Remove the battery cover.
2. Insert 3 AA-batteries (rechargeable batteries allowed). Respect the polarity indications on the
inside of the battery compartment.
3. Replace the battery cover and secure it with the cover clip.
FIG. 1
3. Controls (see figure 1)
1.
2.
3.
4.
5.
ON/OFF + volume control
UP button
DOWN button
TALK button
Antenna
6.
7.
8.
9.
CALL button
LCD display
MODE button
Speaker/microphone
4. Display Indications (see figure 2)
1. Reception / signal strength / charging condition : indicates
the strength of the received signal or the charging condition
of the batteries.
2. Transmission indicator : appears upon pressing the TALK
button.
3. Battery-low indicator : is displayed when the batteries are
nearly empty.
4. Key lock indicator : locks the buttons to avoid accidental
modifications of the settings.
5. This symbol is displayed when the VOX is ON.
6. In-range indicator.
7. Short range alarm.
8. Long range alarm.
9. CTCSS subcodes : from1 through 38 or deselect "- -".
10. Channel : from 1 through 8.
HC883
1
FIG. 2
GB
5. Basic Functions
Power ON / OFF
Turn the OFF/VOLUME control (no. 1, fig. 1, p. 1) clockwise until the display (no. 7, fig. 1, p. 1)
lights up. The device will emit a short beep. Turn the OFF/VOLUME control anticlockwise until you
hear a click. The display is no longer lit.
Adjusting the Volume
Rotate the OFF/VOLUME control clockwise to increase the volume or anticlockwise to lower the
volume. When using headphones, you should protect your hearing by limiting the volume.
Selecting the Channel
1. Press the MODE (no. 8, fig. 1, p. 1) button repeatedly until the channel number (no. 10, fig. 2,
p. 1) starts to flash.
2. Select one of the 8 available channels with the UP and DOWN buttons (nos. 2 & 3, fig. 1, p. 1).
3. Device is currently tuned to channel 1 : press DOWN to select channel 8.
4. Device is currently tuned to channel 8: press UP to select channel 1.
5. Hold the UP or DOWN button to scroll through the channels.
6. Press MODE five times or TALK (no. 4, fig. 1, p. 1) 1 x to stop the flashing of the displayed
symbols. The selected channel has now been memorised.
7. Note that communication is only possible between units that are tuned to the same channel.
Transmitting/Receiving
You will be able to hear to hear every transmission on a particular channel once you have
selected that channel. Read "10. Functions of the CTCSS Tones" on page 4 for further details.
Hold the TALK button and speak into the microphone (no. 9, fig. 1, p. 1) in order to transmit a
message on the selected channel. The transmission indicator (no. 2, fig. 2, p. 1) is now
displayed. Release the TALK button in order to receive a message.
6. Voice-Activated Transmission (VOX)
The device has a built-in voice-activated transmission system (VOX), making it possible to
transmit messages without pressing the TALK button. The VOX -transmission is triggered by the
user’s voice or by high-level sounds in the vicinity of the handset.
1.
2.
3.
4.
Press MODE repeatedly until the VOX indicator
(no. 5, fig. 2, p. 1) starts to flash.
Press the UP and DOWN buttons to toggle between VOX ON and VOX OFF.
Press MODE twice to return to the normal mode.
Repeat steps 1 through 3 to deselect the VOX function. The VOX indicator is no longer
displayed.
HC883
2
GB
7. In-Range Test
This function enables you to establish whether you are within communication range of other
people with an identical handset tuned to the same frequency and CTCSS code. The device will
produce an intermittent double beep if other HC883’s are within range.
1. Press MODE repeatedly until the symbol for the in-range test (no. 6, fig. 2, p. 1) starts to flash.
2. Select the Long Range (LR) or Short Range (SR) check function with the UP or DOWN
button (nos. 7 & 8, fig. 2, p. 1). Push UP or DOWN a third time to deactivate this function.
3. Press MODE three times or press TALK 1 x to confirm the setting.
8. Channel Scanning Function
This useful feature allows you to scan all available channels. Selecting this function will switch
off the CTCSS feature and engage the squelch function.
1. Hold MODE and UP simultaneously. The channels will now be scanned in ascending order.
Hold MODE and DOWN simultaneously to switch scanning directions.
2. The scanning is interrupted when a strong signal is picked up.
3. Hold MODE and UP simultaneously to keep scanning despite the received signal.
4. Interrupt the scanning by releasing MODE and UP/DOWN.
Note : Hold the device a couple of inches from your mouth and speak at conversational
volume. Remember that no transmission can be received while the transmission
indicator is displayed.
9. Key Lock Function
This function locks the UP and DOWN buttons so as to prevent accidental changing of the
settings.
1.
2.
3.
4.
Press MODE repeatedly until the key lock indicator
(no. 4, fig. 2, p. 1) starts to flash.
Press the UP and DOWN buttons to toggle between KEY LOCK ON and OFF.
Press MODE again to display the key lock indicator.
Repeat steps 1 through 3 to turn off the key lock and make sure the key lock indicator is no
longer displayed.
Note :
The following functions cannot be used when the key lock function is engaged : changing
channels, VOX ON/OFF, in-range test and changing the CTCSS code number.
HC883
3
GB
10. Function of the CTCSS Tones
The CTCSS tones are used to filter out unwanted messages and interference. The CTCSS
function only allows reception of devices using the same CTCSS code.
1. Press MODE repeatedly until the CTCSS number starts to flash.
2. Select one of the 38 available CTCSS numbers (no. 9, fig. 2, p. 1) with the UP or DOWN
buttons.
3. Select ’- -’ to deactivate the CTCSS function.
4. Hold UP or DOWN to make the CTCSS numbers change faster.
Note that the CTCSS number cannot be changed during transmission.
11. Call Button
Press the CALL button (no. 6, fig. 1, p. 1) 1 x to transmit a three-second audio signal to other
users who are tuned to the same channel / CTCSS code. This function enables you to notify
those within range of a forthcoming message.
12. Beep Sound
Various actions are accompanied by a beeping sound. A low-pitched beep will sound when
pressing a button during the "setup". After the setup, the UP and DOWN buttons will emit a
high-pitched beep when pressed.
1. Hold the DOWN button while switching on the device in order to deactivate the beep sound.
2. Repeat the same procedure to restore the beep sound.
Notes :
- the radio should be turned off before plugging in audio accessories.
- lower the volume before placing the earphones in your ear.
13. Illumination
The LCD is lit by a green LED that will come on when a button is pressed or when the device is
activated. The light automatically extinguishes after two seconds.
14. Field Strength Indication
A four-band indicator indicates the strength of the signal being received. The smaller the
indicator, the worse signal reception will be. If reception is poor you should move to a higher or
less enclosed location. The field strength indicator constantly changes in height when the
device is placed in the charger in order to recharge the batteries. In this case, the indicator
merely refers to the charging condition of the batteries (no. 1, fig. 2, p. 1) and does not indicate
the strength of the signal.
HC883
4
GB
15. Battery-Low Warning
The device will emit a beep and the battery-low symbol (no. 3, fig. 2, p. 1) will be displayed when
the battery voltage is no longer sufficient.
16. Maintenance and Safety
Wipe the device clean with a damp and clean cloth. Do not use solvents on the device : they
might penetrate the housing and cause permanent damage. The battery contacts should be
wiped with a dry cloth. Remove the batteries and deactivate the device immediately in case it
gets wet. Wipe the battery compartment dry with a clean cloth and air the compartment out
overnight to minimise the damage.
Do not use the device until it is completely dry again.
17. Specifications
Frequency
Channels
Max. Range
Output Power
CTCSS subcodes per channel
HC883
:
:
:
:
:
446MHz
8
2 miles / 3.2km
500mW
38
5
GB