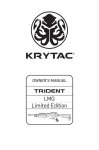
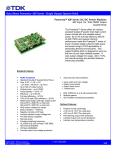
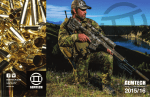
1
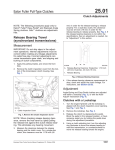
At Daniel Defense we always strive to do the right
thing for our customers, and I stand committed to
offering you the very best firearms and customer
service in the industry. More than just a rifle
manufacturer, Daniel Defense is represented by its
employees, whose hard work and expertise add
character to each and every firearm. Speaking for
everyone at Daniel Defense, I cannot thank you
enough for your business.
You will be satisfied with our products and service.
I guarantee it.
Marty Daniel
Founder & CEO
REV 3.0 9/2015 ©2015 Daniel Defense, Inc. All rights reserved.
1.0 DANIEL DEFENSE FIREARMS
2.0 PRECAUTIONS
3.0 SAFETY INSTRUCTIONS
3.1 CAUTIONS
3.2 TRIGGER GUARD
3.3 SAFETY SELECTOR LEVER
3.4 BOLT-LOCKING SAFETY FEATURES
3.5 DISCONNECTOR
3.6 FAIL-SAFE FIRING MECHANISM
3.7 SEPARATION OF UPPER AND LOWER RECEIVERS
3.8 DD5 MODULAR AMBIDEXTROUS CHARGING HANDLE
3.8.1 CONFIGURING THE DD5 MODULAR AMBIDEXTROUS CHARGING HANDLE
4.0 FUNCTION
4.0.1 DDM4 ISR SOUND SUPPRESSOR FUNCTION
4.1 AMMUNITION SELECTION
4.1.1 300 AAC BLACKOUT FIREARMS
4.1.2 DDM4 ISR AMMUNITION SELECTION
4.2 SIGHTS
4.2.1 FRONT SIGHT
4.2.2 REAR SIGHT (BACK-UP IRON SIGHT)
4.3 SIGHTING-IN/ZEROING THE FIREARM
4.3.1 CONFIRMING ZERO
4.4 TIPS ON AIMING
4.5 FORWARD ASSIST
4.6 ADJUSTABLE BUTTSTOCK
4.6.1 CHANGING BUTTPAD
4.6.2 PISTOL RECEIVER EXTENSION
4.7 LOADING
4.8 UNLOADING
4.9 FIRING
5.0 MAINTENANCE
5.1 STRIPPING FOR CLEANING
5.2 WHEN TO CLEAN
5.3 HOW TO CLEAN
5.4 LUBRICATING/PRESERVATION
5.5 CLEANING THE MAGAZINE
5.6 DDM4 ISR SOUND SUPPRESSOR MAINTENANCE
5.6.1 STRIPPING FOR CLEANING
5.7 STORAGE
5.8 SERVICING AND REPAIRING
6.0 PARTS ILLUSTRATIONS & LISTS
6.1 DDM4 UPPER RECEIVER GROUP PARTS ILLUSTRATION
6.2 DDM4 LOWER RECEIVER GROUP PARTS ILLUSTRATION (CARBINE AND PISTOL)
6.3 DD5 UPPER RECEIVER GROUP PARTS ILLUSTRATION
6.4 DD5 LOWER RECEIVER GROUP PARTS ILLUSTRATION
6.5 DDM4 ISR UPPER RECEIVER GROUP PARTS ILLUSTRATION
6.6 DDM4 BOLT CARRIER GROUP PARTS ILLUSTRATION
6.7 DD5 BOLT CARRIER GROUP PARTS ILLUSTRATION
7.0 WARRANTY STATEMENT
8.0 HEALTH AND ENVIRONMENTAL WARNING
2
4
5
6
8
9
10
10
11
11
11
12
12
13
14
15
15
16
16
16
16
18
18
19
19
20
21
21
24
24
27
27
28
29
31
32
32
33
34
34
35
36
37
38
39
40
41
41
41
41
1.0
DANIEL DEFENSE FIREARMS
FIGURE 1 – DANIEL DEFENSE M4 CARBINE (V1)
FIGURE 2 – DANIEL DEFENSE M4 PISTOL (MK18)
FIGURE 3 – DANIEL DEFENSE M4 ISR
FIGURE 4 – DANIEL DEFENSE AMBUSH 6.8SPCII
FIGURE 5 – DD5™
Figure 2 and Figure 3 shown with Daniel Defense Fixed Front/Rear Sight combo (SKU 19-088-09116), available separately.
LIGHTER. STRONGER. BETTER...®
FIGURE 1
FIGURE 2
FIGURE 3
FIGURE 4
FIGURE 5
DANIEL DEFENSE
P3
2.0
PRECAUTIONS
IMPORTANT: THIS DANIEL DEFENSE PRODUCT IS POTENTIALLY LETHAL! IT
IS CLASSIFIED AS A FIREARM OR DANGEROUS WEAPON BY THE BUREAU OF
ALCOHOL, TOBACCO, FIREARMS AND EXPLOSIVES.
IMPORTANT: READ AND UNDERSTAND THE ENTIRE USER MANUAL BEFORE
REMOVING THE FIREARM FROM ITS PACKAGE. YOUR SAFETY AND THE SAFETY
OF OTHERS REQUIRES YOU TO FOLLOW THE BASIC ADVICE ON THE PROPER
HANDLING AND FUNCTIONING OF THIS DANIEL DEFENSE FIREARM.
WARNING: IF THIS FIREARM IS CARELESSLY OR IMPROPERLY HANDLED,
UNINTENTIONAL DISCHARGE COULD RESULT AND COULD CAUSE INJURY,
DEATH, OR DAMAGE TO PROPERTY.
NOTICE: Daniel Defense shall not be responsible for any injury, death, or damage to
property resulting from any intentional, unintentional or accidental discharge of the
firearm, or from any firearm function when used for any improper purpose for which
it was not designed. Daniel Defense will not honor claims involving the firearm which
resulted from careless or improper handling, unauthorized use and/or adjustment or
unauthorized part(s) replacement, corrosion, neglect, or the use of improper-caliber
ammunition, or the use of ammunition other than original high-grade, commercially
available ammunition in good condition, or any combination thereof. Daniel Defense
will not honor any such claims involving the firearm for any reason or cause when such
claims are made by the second or subsequent owner.
IMPORTANT: BEFORE THE FIREARM LEFT THE DANIEL DEFENSE FACILITY
IT WAS CAREFULLY INSPECTED AT EVERY STAGE OF THE MANUFACTURING
PROCESS, BUILT BY HAND BY A TRAINED DANIEL DEFENSE ARMORER, TESTED
BY A DANIEL DEFENSE QUALITY ASSURANCE INSPECTOR, AND PROPERLY
PACKAGED. DANIEL DEFENSE CANNOT CONTROL THE PRODUCT AFTER
IT LEAVES THE DANIEL DEFENSE FACILITY; AS SUCH, PLEASE CAREFULLY
EXAMINE THE FIREARM, AT THE TIME OF PURCHASE, TO ENSURE THAT
IT IS UNLOADED AND UNDAMAGED. THE AUTHORIZED DEALER AND/OR
DISTRIBUTOR WILL BE PLEASED TO ASSIST YOU IN ANY SUCH EXAMINATION
AND ANSWER ANY FURTHER QUESTIONS THAT YOU MAY HAVE.
The instruction manual should always accompany the firearm. If you lend, give or sell the
firearm, be sure that the manual goes with it. Be sure to comply with all relevant federal
and local regulations governing the firearm’s proper possession and use.
If unfamiliar with firearms, seek further advice through safe-handling courses run by your
local gun clubs, NRA-approved instructor, or similar qualified organizations.
LIGHTER. STRONGER. BETTER...®
3.0
SAFETY INSTRUCTIONS
Regardless of your experience level, we urge you to read this entire instruction manual
carefully.
BASIC RULES FOR FIREARM SAFETY
1. ALWAYS treat every firearm as if it is loaded.
a.Never take anyone else’s word that a firearm is unloaded.
b.Always visually inspect the chamber (and magazine, if equipped) yourself
to ensure that the firearm is completely unloaded even if you just witnessed
someone else perform this safety check.
c.Always remove the magazine and lock the bolt to the rear before laying down
or handing someone a firearm.
d.Do not load your firearm until you are ready to shoot.
2. NEVER point the muzzle of a firearm at anything you do not wish to destroy.
a.Always pay close attention to the direction of your muzzle at all times when
carrying your firearm.
b.Always unload your firearm before navigating difficult terrain (ie. fence
crossings, hills, rocky or loose terrain, tree stands, etc.).
3. ALWAYS keep your finger off the trigger until your sights are on the target.
a.Keep your finger on the receiver or trigger guard until ready to fire.
4. ALWAYS be sure of your target and beyond before firing.
a.Understand what is behind your target should the bullet pass through.
b.Understand where the bullet will go should you miss your target.
c.Make sure your backstop is adequate to stop your bullets and large enough
to accommodate for any misplaced shots.
d.Never shoot at or near rocks, hard surfaces, water, or any other area which
may cause a ricochet or make your bullet go off course and cause injury,
death, or damage.
5. NEVER leave your firearm unattended or unsecured.
a.Someone, including children, may pick up and cause damage, injury, and
death with your firearm.
b.Always instruct children and others in your household to respect firearms,
and stress all aspects of firearm safety.
• Refer to a qualified instructor for help in training, and supervise all
activities closely.
c.YOU ARE RESPONSIBLE FOR YOUR FIREARM!
WARNING: IF YOU TOUCH THE TRIGGER, YOU MUST EXPECT THE FIREARM
TO FIRE. YOUR CAREFUL ADHERENCE TO THE SAFETY RULES CAN AVOID
AN ACCIDENTAL DISCHARGE, AND YOU WILL THEREBY AVOID ACCIDENTAL
INJURY AND DEATH. YOU ARE FULLY RESPONSIBLE FOR THE SAFE USE OF THE
FIREARM AND FOR ANY DAMAGE, INJURY, OR DEATH CAUSED WITH IT.
WARNING: THIS FIREARM MAY DISCHARGE WHEN A ROUND IS FED INTO
THE CHAMBER OR IF IT IS DROPPED/JARRED VIOLENTLY REGARDGLESS OF
THE POSITION OF THE SAFETY SELECTOR AND WITHOUT THE TRIGGER BEING
PULLED. THEREFORE, EXTRA CARE AND STRICT ADHERENCE TO THESE
INSTRUCTIONS BY THE FIREARM USER IS MANDATORY FOR MINIMIZING THE
RISK OF ACCIDENTS, DAMAGE, INJURIES, AND DEATH.
DANIEL DEFENSE
P5
3.1
CAUTIONS
EQUIPMENT CAUTIONS
1. ALWAYS BE SURE CHAMBER, BORE, SUPPRESSOR (IF EQUIPPED), AND
ACTION ARE CLEAN AND CLEAR OF OBSTRUCTIONS. Keep your firearm
clean and well lubricated to ensure it will function correctly and safely.
2. ALWAYS USE HIGH-QUALITY, COMMERCIALLY MANUFACTURED
AMMUNITION THAT IS CLEAN, DRY, IN GOOD CONDITION, AND OF THE
APPROPRIATE CALIBER FOR YOUR FIREARM. Firearm and ammunition
manufacturers design their products within exacting engineering safety limits.
Hand-loaded and remanufactured ammunition are sometimes outside those limits
and can potentially cause malfunctions or damage to the firearm as well as cause
injury, death, or damage to other property.
3. ALWAYS CHECK THAT AMMUNITION IS CLEAN AND UNDAMAGED BEFORE
USING THE FORWARD ASSIST. Forcing damaged ammunition into the chamber
could damage your firearm and could result in injury, death, or damage to
property.
SHOOTING CAUTIONS
1. NEVER consume alcohol or take drugs when handling firearms.
a.Seek the advice of a qualified doctor if you are taking medication to ensure
you are fit to shoot and handle your firearm safely.
2. ALWAYS wear personal protective equipment (PPE), including but not limited to
safety shooting glasses and ear protection, when shooting or near others who are
shooting.
a.Failure to use proper ear protection will cause permanent hearing damage.
b.Failure to use protective shooting glasses can result in damage to eyes and
blindness from flying particles, propellant gasses, ricocheting fragments, and
other debris.
c.Always encourage spectators and others nearby to wear PPE.
3. ALWAYS keep your firearm’s safety selector set to the “SAFE” position until your
sights are on your target and you are ready to fire.
4. ALWAYS be careful of the direction your ejection port is pointed.
a.Spent cartridges are ejected with enough force to cause injury to those
standing near the shooter.
b.If the ejection port is obstructed your firearm will malfunction, becoming
jammed with spent cartridges.
c.Never place fingers in ejection port as they could be burned by hot metal or
injured by the bolt moving forward.
5. NEVER put your finger in the trigger guard until your sights are on the target and
you are ready to shoot.
a.Keep your trigger finger on the receiver, beneath the magazine button, when
you are not ready to fire.
6. ALWAYS be sure of your target and what is beyond it.
a.Bullets can travel great distances and still cause great damage and even
death.
b.If there is any doubt about your target or backstop or anything else, DO NOT
SHOOT!
LIGHTER. STRONGER. BETTER...®
7. NEVER fire a firearm if you suspect water is in the barrel or gas tube.
a.If your firearm is exposed to heavy rain, fog, or other sources of water, open
the bolt and allow water to drain before firing.
b.Be sure to clean and lubricate a wet firearm as soon as possible.
8. NEVER shoot your firearm near any flammable or explosive materials.
a.Understand that flames may exit from your muzzle or ejection port.
9. NEVER fool around or act carelessly when handling or being around firearms.
a.Your carelessness can result in severe damage, injury, or death.
10.NEVER follow another person when your firearm is loaded and ready to fire.
a.Keep the safety selector set to “SAFE.”
b.Always pay attention to and control the direction of the muzzle.
MALFUNCTION CAUTIONS
IF YOU EXPERIENCE A FAILURE TO FIRE:
1. ALWAYS keep the firearm pointed in a safe direction.
2. Wait 30 seconds.
a.If a hangfire (slow ignition) has occurred, the round will fire within 30 seconds.
If round still does not fire after 30 seconds:
• Cycle the bolt to eject the round.
• Examine the primer.
-- If the firing pin indent on the primer is light, off center, or nonexistent,
have your firearm examined by a competent gunsmith before
continuing to fire.
-- If the firing pin indent on primer appears normal (in comparison with
similar previously fired rounds), assume faulty ammunition; segregate
the misfired round from all other live ammunition and empty cases,
reload, and continue firing.
NOTE 1: It is normal for a light firing pin indent to appear on the primer of
cartridges that have been fed into the chamber but not fired.
NOTE 2: Dispose of any misfired rounds in accordance with the ammunition
manufacturer’s instructions.
CLEANING AND STORAGE CAUTIONS
1. ALWAYS make sure your firearm is completely UNLOADED before you attempt to
clean or store your firearm.
2. ALWAYS store your firearm and ammunition SEPERATELY and SECURELY out of
reach of anyone who should not have access to them.
a.Keep it out of reach of children and others who are not trained in the safe
handling of firearms.
b.Keep firearms and ammunition locked securely when not in use to prevent
them entering the wrong hands.
FIREARM ABUSE CAUTIONS
1. NEVER abuse or mistreat your firearm.
a.Keep, carry, and use it carefully.
2. NEVER use it for any purpose other than shooting.
3. NEVER dry fire when the upper is separated from the lower.
a.The hammer can permanently damage the lower receiver.
4. NEVER alter parts.
DANIEL DEFENSE
P7
SUPPRESSOR HANDLING CAUTIONS (DDM4 ISR)
1. ALWAYS ENSURE THAT THE MONOLITHIC BAFFLE IS SECURE IN THE
SUPPRESSOR ASSEMBLY BEFORE SHOOTING.
a.Upon cleaning or performing maintenance on the suppressor assembly,
always ensure that the baffle is securely tightened in place before firing (See
Section 5.6 Suppressor Maintenance for more details).
b.Serious injury may result from improper baffle installation.
2. NEVER DISCHARGE THE FIREARM WITH ANY LIQUID INSIDE OF
SUPPRESSOR ASSEMBLY.
a.The presence of liquid may induce dangerous pressure fluctuations upon
firing.
b.Doing so may result in damage to the firearm, serious injury, or both.
c.Always carefully remove any liquid (oils, solvents, etc.) before shooting.
3. SUPPRESSOR WILL GET EXTREMELY HOT. The suppressor will become
extremely hot when fired and can retain heat for a long time.
4. ALWAYS be cautious of hand placement and the proximity of the barrel
suppressor assembly to others and flammable objects.
5. ALWAYS be careful not to rest the hot suppressor against anything you don’t want
to damage, injure, or melt with heat.
6. ANY MAINTENANCE REQUIRED PAST WHAT IS DESCRIBED IN THIS
MANUAL SHOULD ONLY BE ATTEMPTED BY A QUALIFIED GUNSMITH.
a.Modifying or attempting to remove suppressor components other than the
monolithic baffle may result in illegal modifications to the sound suppressor.
7. Contact Daniel Defense for any questions about repairing damaged components
or further troubleshooting.
3.2
TRIGGER GUARD
The trigger guard is the strip below the trigger to protect it from damage and to help
prevent accidental discharge. The integrated trigger guard on Daniel Defense firearms
features radiused and beveled edges to accommodate shooters wearing gloves.
WARNING: KEEP YOUR FINGER OUT OF THE TRIGGER GUARD UNTIL YOU ARE
READY TO SHOOT.
WARNING: USE EXTRA CAUTION WHEN USING GLOVES TO AVOID AN
ACCIDENTAL/NEGLINGENT DISCHARGE.
LIGHTER. STRONGER. BETTER...®
3.3
SAFETY SELECTOR LEVER
DDM4 Firearms
The safety selector lever is located on the left side of the lower receiver and has two
positions: “SAFE” and “SEMI.” When set to “SAFE,” a cam bears upon the rear portion
of the trigger, blocking the sear surface of the trigger and preventing the hammer from
being released.
When set to “SEMI,” the firearm will fire a single shot each time the trigger is
squeezed, without manually reloading.
DD5 Firearms
The safety selector lever is located on both sides of the lower receiver and has two
positions: “SAFE” and “SEMI.” When set to “SAFE,” a cam bears upon the rear portion
of the trigger, blocking the sear surface of the trigger and preventing the hammer from
being released.
When set to “SEMI,” the firearm will fire a single shot each time the trigger is
squeezed, without manually reloading.
Daniel Defense Machine Guns
Some law enforcement and military platforms feature a three-position safety selector,
“SAFE,” “SEMI,” and a third position for fully automatic.
DANIEL DEFENSE
P9
When set to “SAFE,” a cam bears upon the rear portion of the trigger, blocking the
sear surface of the trigger and preventing the hammer from being released.
When set to “SEMI,” the firearm will fire a single shot each time the trigger is
squeezed, without manually reloading.
When set to the third position, “AUTO,” the firearm will fire continuously until either the
trigger is released or the magazine is empty.
NOTE: The safety featured on Daniel Defense firearms is a mechanical safeguard.
As with all mechanical systems, failures within this system are possible and may
not be visible to the operator. ACTIVATING THE SAFETY SELECTOR LEVER TO
THE “SAFE” POSITION DOES NOT MEAN THE FIREARM IS INCAPABLE OF FIRING
IF MISHANDLED OR DROPPED.
3.4
BOLT-LOCKING SAFETY FEATURES
The firearm can fire only when the bolt is fully locked to the barrel extension, allowing
the firing pin to move forward freely. The bolt carrier is designed in such a way that
the firing pin cannot come in contact with the primer of the cartridge. The bolt carrier
moves forward over the bolt, rotating it to the fully locked position within the barrel
extension, allowing the firing pin to advance forward enough to fire the firearm. This
prevents the cartridge from being fired before it is fully chambered and the bolt is fully
rotated (locked) to the barrel extension. Even with the bolt locked, if you do not use the
proper ammunition or your barrel is obstructed, your firearm could blow up or blow down
through the magazine.
3.5
DISCONNECTOR
The disconnector is part of the firing mechanism that prevents the firearm from firing
more than one time per trigger pull. As the hammer is cocked after each shot by the
rearward movement of the bolt carrier, the disconnector engages the hammer to hold it
rearward until the trigger is released. When the trigger is released, you will hear a “click”
as the retention of the hammer passes from the disconnector to the sear surface of the
trigger, making the rifle ready to fire again with the next trigger pull.
LIGHTER. STRONGER. BETTER...®
3.6
FAIL-SAFE FIRING MECHANISM
In case of any failure of the firing mechanism, the top of the hammer and the underside
of the carrier are machined in such a way that, if the hammer was not held rearward by
the disconnect or trigger sear surface, then the hammer would ride under the carrier and
drop into engagement with the back of the firing pin to stop or prevent firing.
3.7
SEPARATION OF UPPER AND LOWER RECEIVERS
The lower receiver can be separated from the upper receiver by pushing in the takedown
pin and pivot pin from left to right. If the pins are stiff, you can use the supplied chamber
flag as a punch to push them in.
NOTE: The bolt carrier group must be in the full forward position in order to
separate the upper receiver from the lower receiver.
3.8
DD5 MODULAR AMBIDEXTROUS CHARGING HANDLE
The DD5 platform has been designed with a modular, configurable, and latchless
charging handle. Users can easily configure the charging handle, adding longer or
shorter handles to either or both sides. Longer handles are useful on platforms utilizing
magnified optics to avoid the ocular lens of the scope from interfering with your ability
to operate the charging handle. This charging handle uses a
ball detent instead of a traditional latch, allowing it to be easily
manipulated from either side of the platform.
DANIEL DEFENSE
P 11
3.8.1
CONFIGURING THE DD5 MODULAR AMBIDEXTROUS
CHARGING HANDLE
1. Read safety instructions in Section 3 and previous CAUTIONS.
2. Press in the rear takedown pin from the left-hand side of lower receiver and pull
the pin out on the right-hand side of the receiver until it comes to a positive stop.
3. Pivot the lower receiver down and away from the upper receiver.
4. If required for more convenience, completely separate the upper receiver from the
lower receiver by pressing the front takedown pin from the left-hand side of the
lower receiver and pulling out the pin on the right-hand side of the receiver until it
comes to a positive stop.
5. Pull charging handle to rear and remove the bolt carrier group.
6. Remove the charging handle by pulling it backward to the keyway and then down
and out of the upper receiver.
7. Remove socket head screw with 1/16” hex wrench.
8. Remove handle from the bottom of the charging handle assembly.
9. Affix the desired length handle in bottom of the charging handle assembly.
10.Apply Loctite® to socket head screw, then tighten.
11.Re-install the charging handle assembly into the upper receiver by pushing it
forward approximately 1.5” into the keyway and then up into the upper receiver
(You can not insert the charging handle all of the way until it latches).
12.With the bolt fully extended forward, install bolt carrier group into the upper
receiver. Orient the gas key so that it fits into the charging handle; slide entire bolt
carrier group forward and latch the charging handle into the upper receiver.
13.Attach the upper and lower receivers together by orienting the front upper receiver
pivot pin lug into the corresponding recess in the lower receiver. Push the pivot pin
from right to left until fully seated.
14.Pivot the rear end of the receivers together and push the rear takedown pin from
right to left until fully seated.
4.0
FUNCTION
Daniel Defense firearms have semi-automatic actions. With the action cocked, chamber
loaded, and selector lever set to “SEMI,” the firearm may be fired by squeezing the
trigger. The trigger pivots, disengaging the trigger sear surface from the hammer. The
hammer spring drives the hammer forward to strike the firing pin, which in turn strikes
the primer in the base of the cartridge, igniting the priming compound, which ignites the
main powder charge. High-pressure gasses produced by the powder charge push the
bullet down the barrel, where rifling grooves impart a stabilizing spin to the bullet. As
a bullet passes the gas port (a small hole in the top of the barrel below the gas block),
gas escapes through the port, flows through the gas tube into the bolt carrier chamber,
driving the bolt carrier group rearward. As the bolt carrier moves to the rear, the firing
pin is withdrawn into the bolt while the cam track in the bolt carrier acts upon the bolt
LIGHTER. STRONGER. BETTER...®
cam pin, causing the bolt to rotate until its locking lugs are no longer in engagement
with the lugs of the barrel extension. The bolt is now unlocked and is carried rearward
by the bolt carrier. The extractor extracts the spent case and holds it against the face
or bolt until the ejector throws the spent case through the ejection port. The bolt carrier
group continues rearward, compressing the action spring and returning the hammer to
its cocked position until the buffer assembly strikes the bottom of the receiver extension
and stops. The action spring then forces the bolt carrier group forward as the face of
the bolt pushes the next round of ammunition from the magazine and thrusts it into the
chamber. Simultaneously, the extractor snaps into the groove of a cartridge case and
the bolt locks into the barrel. The hammer is now held rearward by the disconnector until
the trigger is released, causing the disconnector to rotate back, releasing the hammer.
Before the disconnector’s hook actually releases the hammer, the trigger sear surface
has rotated in front of the hammer notch so the hammer is held on the trigger sear
surface, making the firearm ready for another shot. Upon cycling the last shot from the
magazine, the bolt catch is pushed upward by the magazine’s follower, catching the bolt
before it travels forward, locking it to the rear. With the bolt now locked open, the user
can remove the empty magazine, replace it with a loaded one, and press the bolt catch
paddle to disengage the bolt catch and load a live round into the chamber (be sure to
follow safe loading procedures).
WARNING: THIS IS A SEMI-AUTOMATIC FIREARM AND IS LOADED AND READY
TO FIRE AFTER EACH SHOT UNTIL THE MAGAZINE IS EMPTY. TO UNLOAD THE
FIREARM, THE MAGAZINE MUST BE REMOVED AND THE BOLT CARRIER GROUP
MUST BE PULLED TO THE REAR WITH THE CHARGING HANDLE TO EXTRACT
ANY REMAINING ROUND FROM THE CHAMBER.
4.0.1
DDM4 ISR SOUND SUPPRESSOR FUNCTION
The Daniel Defense M4 ISR utilizes a specially designed Integral Sound Suppressor
(or silencer) to reduce the noise signature, muzzle flash, and recoil of the discharging
firearm. Upon exiting the muzzle, a fired projectile is followed by extremely hot propellant
gases and unburned powder exiting at a very high velocity. This phenomenon is the
cause for the loud muzzle blast associated with the discharge of a firearm. With the use
of a sound suppressor, the muzzle blast is effectively contained and controlled, resulting
in more gradual pressure reduction and a subsequently less violent muzzle blast. In
addition, the design of the DDM4 ISR fully integrates the suppressor with the barrel and
gas system of the host firearm. By doing so, a larger interior volume can be exploited to
reduce back pressure that would otherwise force more fouling back into the firearm’s
barrel and upper receiver. A proprietary gas block has also been incorporated to allow
functioning of both supersonic and subsonic loads without any additional modifications
to the action of the firearm.
DANIEL DEFENSE
P 13
4.1
AMMUNITION SELECTION
WARNING: NOT ALL AMMUNITION WILL PRODUCE THE SAME RESULTS.
Daniel Defense recommends that you only use high-quality, commercially available
ammunition that is clean, dry, in good condition and of the appropriate caliber for your
firearm. The use of remanufactured or hand-loaded ammunition is not recommended. If
you have any questions about the suitability of a particular type of ammunition, please
contact the ammunition manufacturer or Daniel Defense Technical Support for more
information.
All Daniel Defense firearms are designed to function with a variety of brands and types
of factory-manufactured ammunition in the appropriate caliber. Ammunition, and in
particular, the projectiles the ammunition is loaded with are designed for a particular
task, such as long-range target shooting, frangible target shooting, personal/home
defense, big-game hunting, varmint hunting, etc. It is important to choose ammunition
that is appropriate for the application. Consult with the information provided by the
ammunition manufacturer when choosing the appropriate ammunition.
WARNING: IT IS VERY IMPORTANT TO CHOOSE THE APPROPRIATE
AMMUNITION (VELOCITY AND BULLET DESIGN) FOR THE INTENDED
APPLICATION
Daniel Defense recommends that after you read and understand this manual, you go
to the range and fire different types of ammunition of the appropriate caliber and bullet
design for your firearm and its intended use (target shooting, hunting, etc). Once you find
the ammunition that functions best for your application, keep using it. To protect you and
others from danger, and your firearm from being severely damaged, Daniel Defense does
not recommend the use of any hand-loaded or remanufactured ammunition.
LIGHTER. STRONGER. BETTER...®
4.1.1
300 AAC BLACKOUT FIREARMS
NOT ALL AMMUNITION WILL PRODUCE THE SAME RESULTS.
All Daniel Defense firearms chambered in 300 AAC BLACKOUT are designed to
function with a variety of brands and types of factory-manufactured ammunition in
the appropriate caliber. These platforms were designed to be shot suppressed and
unsuppressed utilizing various types of supersonic and subsonic ammunitions. Many
subsonic types of ammunition are designed to be fired in conjunction with a sound
suppressor. Testing indicates firing certain types of subsonic ammo without a sound
suppressor can lead to failure-to-cycle issues and is not recommended.
4.1.2
DDM4 ISR AMMUNITION SELECTION
RELEVANT TERMS:
SPEED OF SOUND: approximately 1,126 feet per second (depending on altitude,
temperature, humidity, etc.)
SUBSONIC AMMUNITION: Ammunition loaded to travel slower than the speed of
sound.
SUPERSONIC AMMUNITION: Ammunition loaded to travel faster than the speed of
sound.
MUZZLE FLASH: The visible light produced by the combustion of unburned
gunpowder mixing with ambient air.
MUZZLE BLAST: The sound of escaping gasses after bullet leaves the barrel,
produced by the gunpowder, which causes the “report” of a gunshot.
BULLET CRACK: The sound associated with the collision of the shockwaves created
by an object traveling through the air faster than the speed of sound.
WARNING: NOT ALL AMMUNITION WILL PRODUCE THE SAME RESULTS.
The DDM4 ISR chambered in 300 AAC Blackout is designed to function with a variety of
brands and types of factory-manufactured ammunition in the appropriate caliber, loaded
to both supersonic and subsonic velocities. The ISR’s integral suppressor is very effective
at reducing both muzzle blast and muzzle flash. The other sound component sometimes
found in gun shots is the “crack” of a supersonic projectile, which cannot be reduced by
any silencer or suppressor. Ammunition for the 300 AAC Blackout and .300 Whisper can
be purchased, usually around 190-220 grains, which are loaded with a powder charge
that accelerates the projectile to just under the speed of sound. Subsonic 300 AAC
Blackout ammunition often produces the best reduction in perceived sound in the ISR
platform. Supersonic 300 AAC Blackout ammunition generally utilizes projectiles from 110
grains and up, accelerated to speeds faster than that of sound. Supersonic ammunition
often offers a flatter trajectory and delivers more energy to the target.
DANIEL DEFENSE
P 15
4.2
SIGHTS
Depending on the particular platform, your firearm may have a mechanical sighting
system, which allows you to adjust for variations in windage (horizontal adjustment) and
elevation (vertical adjustment). The rear sight is adjustable for windage and the front sight
is adjustable for elevation. The firearm has indexing numbers (T-Marks) on the mounting
rails of the upper receiver and handguard to show locations for mounting accessories
such as sights and optics. These indexing numbers allow the user to safely place the
accessory back in the same location where it was mounted before being removed.
If your Daniel Defense firearm does not include mechanical sights, you can purchase the
Daniel Defense Fixed Front/Rear Sight combo (SKU 19-088-09116).
4.2.1
FRONT SIGHT
The front sight post can be adjusted up or down for elevation to establish the point of
bullet impact (zeroing). You may zero at any range (distance) you like, but after zeroing,
the front sight post should not be moved again. The standard location for the Daniel
Defense Rail Mounted Front Sight is the second-to-last T-Mark. The amount of change in
elevation per click varies depending on the sight radius (distance between front and rear
sight). SEE ADJUSTMENT TABLE ON PAGE 19.
4.2.2
REAR SIGHT
If your firearm is equipped with a Daniel Defense A1.5 Back-Up Iron Sight, the large
aperture can be flipped back to bring the small aperture into use. A windage wheel
on the right side of the sight can be turned to move the aperture to the right or left to
adjust for windage (side to side). The standard location for the A1.5 Rear Sight is with the
mounting screw on indexing mark T-1 of the upper receiver. The amount of change in
windage per click varies depending on the sight radius (distance between front and rear
sight). SEE ADJUSTMENT TABLE ON PAGE 19.
4.3
SIGHTING-IN/ZEROING THE FIREARM
RELEVANT TERMS:
MINUTE OF ANGLE (MOA) = 1/60th of a degree= ~1.047 Inches @ 100 yards
LIGHTER. STRONGER. BETTER...®
1 YARD = 0.91 Meters
1 METER = 1.09 Yards
1 INCH = 2.54 Centimeters
1 CENTIMETER = 0.39 Inches
TRAJECTORY: the path followed by a projectile
ZERO: the distance where the shooter’s line of sight and the bullet’s trajectory meet
The purpose of sighting-in or “zeroing” your firearm is to confirm that your rounds strike
the target where you expect them to. The operator of the firearm must decide at which
distance to zero the firearm, taking into consideration how the firearm is likely to be used.
IMPORTANT: THE TRAJECTORIES WILL VARY DEPENDING ON CALIBER,
AMMO TYPE, WIND, TEMPERATURE, ALTITUDE, ANGLE TO THE TARGET, AND
MANY OTHER VARIABLES.
If you are using any optics, please follow the sighting-in information provided by the
manufacturer of the sighting system. The following is the procedure to sight in your
Daniel Defense mechanical sights:
1. Be sure firearm is clean and properly maintained.
2. Confirm rear sight has small aperture in the up position.
3. Based on preference, decide whether to use “CENTER HOLD” or “6 O’CLOCK
HOLD,” and stick to it while sighting in your firearm.
4. Carefully aim at the target, take your time, and fire five rounds.
5. If the middle of your shot group is not centered on the target in
ELEVATION, measure the distance up or down from the center of the
target. Adjust the FRONT sight post by depressing the sight plunger,
then turn the number of clicks calculated from the following chart:
DANIEL DEFENSE
P 17
6. If your shot group is not centered on the target in WINDAGE,
measure the distance from the center of the target. Adjust the REAR
sight by rotating the windage wheel on the right side the number of
clicks you calculate from the following chart:
7. Repeat firing groups of five rounds and adjust the sights as
described above until you are satisfied that the group is where you
want it on the target. Your sights are now zeroed.
4.3.1
CONFIRMING ZERO
You should confirm zero or re-zero your firearm if you change ammunition, you travel to
areas with new climate or atmospheric conditions, drop your firearm (check for damage
before firing), remove and reattach sights or barrel, or change other parts of your firearm.
After making sure your firearm is clean and in good condition, carefully aim at the target,
take your time and fire five rounds. If your shot group is not where you intended it to be,
re-zero your firearm using the steps described in Section 4.3.
4.4
TIPS ON AIMING
1.
2.
3.
4.
5.
Relax, hold steady, and don’t hold your breath.
Keep firearm level and do not tilt it sideways.
Keep tip of front sight in center of rear sight aperture.
Focus on tip of front sight, not on target.
When sight picture is correct, carefully squeeze trigger.
LIGHTER. STRONGER. BETTER...®
4.5
FORWARD ASSIST
The forward assist allows you to help the bolt lock into the barrel, but it will only be
useful on rare occasions when the bolt fails to lock automatically. When you must use
the forward assist, it is usually time for you to clean your firearm, paying particular
attention to the cleanliness of the chamber and bolt. Hunters may find the forward
assist useful when trying to load their firearms more quietly in the field. This is done by
releasing the bolt slowly with the charging handle and then pushing the forward assist,
forcing the extractor to engage the cartridge rim and locking the bolt into the barrel
extension.
4.6
ADJUSTABLE BUTTSTOCK
Daniel Defense rifles are equipped with a six-position collapsible buttstock. To extend or
collapse the buttstock, press the front end of the release lever up against the buttstock
and slide the buttstock forward or backward and release the lever to lock the buttstock
at the desired position.
DANIEL DEFENSE
P 19
4.6.1
CHANGING BUTTPAD
The buttstock equipped on Daniel Defense rifles can be customized with two different
buttpads or run with no buttpad at all. To change or remove the buttpad, use the
following steps:
REMOVAL
1. Remove the two mounting screws from the buttpad with 1/8” hex wrench.
2. Remove the buttpad, bottom first, sliding down.
ATTACHING BUTTPAD
1. Slide the buttpad up, top first, ensuring its tab fits behind the top of buttstock.
2. Replace the two mounting screws and hand tighten with 1/8” hex wrench.
LIGHTER. STRONGER. BETTER...®
4.6.2
DDM4 PISTOL RECEIVER EXTENSION
Daniel Defense M4 Pistols are equipped with a Daniel
Defense Pistol Receiver Extension.
WARNING: DDM4 PISTOLS ARE NOT DESIGNED TO BE FIRED FROM THE
SHOULDER. MISUSING THE DDM4 PISTOL CAN CAUSE INJURY DUE TO PISTOL
RECEIVER EXTENSION.
IMPORTANT: DDM4 PISTOLS ARE DESIGNED TO BE FIRED EXTENDED AT
ARM’S LENGTH AND ARE COMPATIBLE WITH MANY ARM STRAPS AVAILABLE TO
STABILIZE ONE-HANDED FIRING.
4.7
LOADING
TO LOAD A MAGAZINE:
WARNING: ALWAYS CHECK THAT AMMUNITION IS CLEAN, UNDAMAGED,
AND THE CORRECT CALIBER BEFORE USING THE FORWARD ASSIST. FORCING
DAMAGED OR INCORRECT-CALIBER AMMUNITION INTO THE CHAMBER CAN
DAMAGE YOUR FIREARM AND CAN RESULT IN INJURY, DEATH, OR DAMAGE TO
PROPERTY.
WARNING: ALWAYS CHECK THAT YOU ARE USING THE APPROPRIATE
MAGAZINE FOR THE CALIBER OF THE PLATFORM AND THAT THE MAGAZINE IS
CLEAN AND IN GOOD CONDITION.
FIREARM CHAMBER CORRECT MAGAZINE
5.56x45mm NATO - PMAG for AR15/M16 or equivalent Magazines
300 AAC Blackout - PMAG for AR15/M16 or equivalent Magazines
6.8SCPII, 6.8x43mm -PRI 6.8x43mm or equivalent Magazines
7.62x51mm NATO - PMAG for LR/SR or equivalent Magazines
.308 Winchester -
PMAG for LR/SR or equivalent Magazines
WARNING: READ AND UNTERSTAND ALL SAFETY INSTRUCTIONS
(SECTION 3).
1. Use only ammunition recommended in this instruction manual as suitable for
your firearm and application. The caliber your firearm is chambered in will be
engraved on the barrel near the chamber.
DANIEL DEFENSE
P 21
2. Examine the ammunition, particularly on and around the primer. Look
for dents, scratches, and other signs of damage. Do not load damaged
ammunition.
3. With short end of the magazine facing forward, place a round between the lips
of the magazine with the bullet forward. Press the round down until it is held by
the magazine lips. Place next round on top of previous round and repeat until
desired number is loaded.
WARNING: TO MINIMIZE RISK OF UNINTENTIONAL DAMAGE, LOAD LIVE
AMMUNITION INTO YOUR MAGAZINE ONLY WHEN YOU ARE ABOUT TO SHOOT.
TO LOAD THE FIREARM:
IMPORTANT: READ SAFETY INSTRUCTIONS (SECTION 3) – KEEP YOUR
FIREARM POINTING IN A SAFE DIRECTION AND DO NOT TOUCH THE TRIGGER.
1. Remove empty magazine by depressing magazine catch, which is located
on the right side of the lower receiver (or on both sides of DD5), and extract
magazine from the magazine well.
2. Press in on bottom of thumb piece of bolt catch while grasping and pulling
back on the charging handle to cock the hammer and leave bolt and carrier
latched open to the rear.
LIGHTER. STRONGER. BETTER...®
WARNING: THE BOLT CARRIER GROUP BEING LATCHED OPEN IS
NOT A SAFE CONDITION WHEN A LOADED MAGAZINE IS INSTALLED.
3. Return charging handle fully forward until it locks and remove finger from bolt
catch.
4. Set selector lever (located on left of lower receiver) to “SAFE”; this will lock the
trigger.
5. With bullet points facing forward, insert the loaded magazine into the
magazine well and push upward until it stops and is locked by the magazine
catch. When the magazine is inserted, pull down on the magazine to ensure it
is fully seated in the magazine well.
NOTE: MOST COMMON MAGAZINES LOADED TO FULL CAPACITY
CANNOT BE SEATED IN ANY AR15/M4/M16 PLATFORM IF THE BOLT IS
FORWARD. TO SEAT A FULLY LOADED MAGAZINE, BE SURE THE BOLT
IS LOCKED TO REAR WITH BOLT CATCH.
6. Keeping fingers away from the ejection port and muzzle pointed in a safe
direction, press in on top of the thumb piece of the bolt catch. This will release
the bolt carrier group to move forward and feed a round from the magazine
into the chamber.
WARNING: THE FIREARM IS NOW LOADED WITH A ROUND IN THE
CHAMBER AND THE HAMMER IS COCKED.
7. You may now close the ejection port dust cover if you wish; it is located on the
right-hand side of the upper receiver and will open automatically when the first
round is fired.
WARNING: NEVER LEAVE YOUR FIREARM COCKED AND LOCKED, READY
TO FIRE WITHOUT SELECTOR LEVER BEING SET TO SAFE, AS THIS IS THE
FIRE CONDITION AND IS EXTREMELY DANGEROUS. FIREARMS CAN EASILY
BE ACCIDENTALLY DISCHARGED, CAUSING INJURY, DEATH, OR DAMAGE TO
PROPERTY.
WARNING: THIS FIREARM MAY DISCHARGE ACCIDENTALLY WHEN A ROUND
IS FED INTO THE CHAMBER IF IT IS DROPPED OR RECEIVES A BLOW TO THE
MUZZLE OR FRONT OF THE FIREARM. (THIS CAN OCCUR REGARDLESS OF
THE POSITION OF THE HAMMER OR ANY OF THE VARIOUS SAFETY DEVICES.)
THEREFORE, EXTRA CARE AND STRICT ADHERENCE TO THESE INSTRUCTIONS
BY THE FIREARM’S USER IS MANDATORY FOR MINIMIZING THE RISK OF
ACCIDENTS.
DANIEL DEFENSE
P 23
4.8
UNLOADING
WARNING: ALWAYS UNLOAD YOUR FIREARM IMMEDIATELY AFTER USE AND
PRIOR TO CLEANING AND STORAGE TO MINIMIZE THE RISK OF ACCIDENTAL
DISCHARGE.
TO UNLOAD:
IMPORTANT: READ SAFETY INSTRUCTIONS. KEEP YOUR FIREARM POINTING
IN A SAFE DIRECTION. DO NOT TOUCH THE TRIGGER AND KEEP HANDS AWAY
FROM THE EJECTION PORT.
1. Set the safety selector lever to “SAFE.”
NOTE: THE HAMMER MUST BE COCKED TO PLACE THIS FIREARM ON
“SAFE.”
2. Press the magazine catch and remove the magazine.
3. Pull the charging handle to the rear and push in lower portion of bolt catch. If
a round was in the chamber, it should have been ejected. If the last round was
fired, the bolt carrier group should already be locked to the rear provided a
magazine was in place.
4. LOOK INTO THE CHAMBER THROUGH THE EJECTION PORT TO MAKE
SURE THE CHAMBER IS EMPTY.
5. When the magazine is removed and the chamber is empty, push the top
portion of the bolt catch to allow the bolt carrier group to return forward.
6. Remove remaining live rounds by sliding them forward out of the magazine.
7. Collect live ammunition for safe storage and spent cartridge cases for
disposal.
4.9
FIRING
Before firing, practice your stance, sight picture, and breathing for steady aim with your
firearm UNLOADED. Practice firing on a range before using your firearm for any other
type of shooting.
LIGHTER. STRONGER. BETTER...®
WARNING: ALWAYS WEAR AND ENCOURAGE OTHERS TO WEAR EAR PROTECTION
WHEN SHOOTING, ESPECIALLY ON A RANGE. WITHOUT EAR PROTECTION, THE
NOISE FROM YOUR FIREARM AND OTHER FIREARMS CLOSE TO YOU COULD
LEAVE A “RINGING” IN YOUR EARS FOR SOME TIME AFTER FIRING, WHILE THE
CUMULATIVE LONG-TERM EFFECT COULD BE PERMANENT HEARING LOSS.
WARNING: ALWAYS WEAR AND ENCOURAGE OTHERS TO WEAR PROTECTIVE
SHOOTING GLASSES. FLYING PARTICLES COULD DAMAGE EYES AND CAUSE
BLINDNESS; PROTECTIVE SHOOTING GLASSES SHOULD PREVENT SUCH INJURY.
WARNING: READ SAFETY INSTRUCTIONS IN SECTION 3. KEEP YOUR
FIREARM POINTING IN A SAFE DIRECTION. DO NOT TOUCH THE TRIGGER AND
KEEP HANDS AWAY FROM THE EJECTION PORT.
1. Load the firearm as previously described.
2. Grasp firearm with one hand on handguard and other hand on pistol grip
with index finger resting along outside of trigger guard. Raise firearm and pull
buttstock firmly into shoulder; adjust buttstock as necessary.
WARNING: DDM4 PISTOLS ARE NOT DESIGNED TO BE FIRED FROM
THE SHOULDER. MISUSING THE DDM4 PISTOL CAN CAUSE INJURY
DUE TO PISTOL RECEIVER EXTENSION.
IMPORTANT: DDM4 PISTOLS ARE DESIGNED TO BE FIRED
EXTENDED AT ARM’S LENGTH AND ARE COMPATIBLE WITH MANY ARM
STRAPS AVAILABLE TO STABILIZE ONE-HANDED FIRING.
3. Aim by aligning target with front and rear sights.
4. Move safety selector lever to “SEMI.”
5. Keeping steady aim, place index finger on trigger and squeeze straight back
until trigger releases hammer. Don’t jerk the trigger as you will disturb your aim
and ruin your accuracy. To fire the second and subsequent rounds, all that is
necessary is to release the trigger and squeeze it again after every shot until
you have completed firing or emptied the magazine.
WARNING: THIS IS A SEMI-AUTOMATIC FIREARM AND IS
IMMEDIATELY LOADED AND READY TO FIRE AFTER EACH SHOT UNTIL
THE MAGAZINE IS EMPTY. TO UNLOAD THE FIREARM, THE MAGAZINE
MUST BE REMOVED, AND THE BOLT CARRIER GROUP MUST BE
PULLED TO THE REAR WITH THE CHARGING HANDLE TO EXTRACT ANY
REMAINING ROUND FROM THE CHAMBER.
WARNING: THIS FIREARM CAN ALSO BE FIRED WITHOUT A
MAGAZINE IN PLACE.
DANIEL DEFENSE
P 25
6. Release trigger, remove finger from trigger, and set selector lever to “SAFE.” If
you have fired the last round from the magazine, the bolt will be held to the rear
so that the firearm can quickly be reloaded by replacing the magazine, or the
chamber can be inspected to make sure it is empty.
WARNING: WHILE FIRING, IF YOU NOTICE A DIFFERENCE IN SOUND OR
RECOIL, STOP FIRING. A BULLET COULD BE STUCK IN THE BARREL. IF YOU
FIRE AGAIN BEFORE CLEARING THE BLOCKAGE, THE BARREL MAY BULGE OR
BURST AND CAUSE INJURY. IF THIS OCCURS, RETRACT THE BOLT SLOWLY TO
REMOVE AND IDENTIFY THE FIRED CARTRIDGE CASE. CLEAR THE FIREARM
AND MAKE SURE THE BORE IS CLEAR. ANY UNBURNED PROPELLANT OR
OBSTRUCTION IN THE BORE MUST BE REMOVED BEFORE FIRING AGAIN TO
PREVENT RISK OF DAMAGE AND INJURY.
WARNING: IF YOUR FIREARM FAILS TO FIRE, HOLD IT, KEEPING IT POINTED
TOWARD THE TARGET AND WAIT 30 SECONDS. IF A HANGFIRE (SLOW IGNITION)
HAS OCCURRED, THE ROUND SHOULD FIRE WITHIN 30 SECONDS. IF THE
ROUND DOES NOT FIRE, REMOVE THE MAGAZINE, EJECT THE ROUND AND
EXAMINE THE PRIMER. IF THE FIRING PIN INDENT ON THE PRIMER IS LIGHT,
MISALIGNED OR NONEXISTENT, HAVE YOUR FIREARM EXAMINED BY A
COMPETENT GUNSMITH. IF THE FIRING PIN INDENT ON THE PRIMER APPEARS
NORMAL (IN COMPARISON WITH PREVIOUSLY FIRED ROUNDS) ASSUME
FAULTY AMMUNITION; SEGREGATE THE MISFIRED ROUND FROM OTHER LIVE
AMMUNITION AND EMPTY CASES; RELOAD AND CARRY ON FIRING.
NOTE: On Daniel Defense firearms (or any other AR platform), it is normal for a light
firing pin indent to appear on cartridges which have been fed into the chamber, but
not fired.
NOTE: Dispose of misfired rounds in accordance with ammunition manufacturer’s
instructions.
WARNING: ALWAYS KEEP YOUR FIREARM POINTING IN A SAFE DIRECTION.
WARNING: UNLOAD FIREARM AS DESCRIBED IN SECTION 4.8.
WARNING: IF YOU LOAD YOUR FIREARM BUT DO NOT FIRE IT, KEEP THE
SAFETY SELECTOR LEVER SET TO “SAFE” UNTIL YOU ARE READY TO FIRE.
WARNING: NEVER LEAVE YOUR FIREARM COCKED READY TO FIRE WITHOUT
SELECTOR LEVER SET TO “SAFE,” AS THIS IS THE FIRE CONDITION AND IS
EXTREMELY DANGEROUS. YOUR FIREARM CAN EASILY BE ACCIDENTALLY
DISCHARGED, CAUSING INJURY, DEATH, OR DAMAGE TO PROPERTY.
LIGHTER. STRONGER. BETTER...®
5.0
MAINTENANCE
Your Daniel Defense firearm will perform better, last longer and remain safer when it is
properly maintained. Follow the instructions in this section to keep your firearm in good
condition.
WARNING: MAKE SURE THAT THE MAGAZINE IS REMOVED AND THAT THE
FIREARM IS UNLOADED SO THAT IT CANNOT BE FIRED.
WARNING: ALLOW FIREARM TO COOL TO ROOM TEMPERATURE.
WARNING: ALWAYS WEAR SAFETY GLASSES TO PROTECT YOUR EYES FROM
NOT ONLY SOLVENTS AND OILS BUT ALSO PARTS THAT ARE UNDER SPRING
TENSION WHICH CAN BE PROPELLED WITH ENOUGH FORCE TO CAUSE SEVERE
INJURY.
5.1
STRIPPING FOR CLEANING
IMPORTANT: TO PREVENT LOSS OF SMALL COMPONENTS DURING
STRIPPING AND CLEANING, LAY THEM OUT IN AN ORDERLY FASHION.
1. Read and understand all safety instructions.
2. Press in the rear takedown pin from the left-hand side of lower receiver and
pull the pin out on the right-hand side of the receiver until it comes to a positive
stop.
3. Pivot the lower receiver down and away from the upper receiver.
4. If required for more convenience, completely separate the upper receiver from
the lower receiver by pressing the front takedown pin from the left-hand side of
the lower receiver and pulling out the pin on the right-hand side of the receiver
until it comes to a positive stop.
5. Pull charging handle to the rear and remove the bolt carrier group.
6. Remove the charging handle by pulling it backward to the keyway and then
down and out of the upper receiver.
7. Push in the firing pin retaining pin from right to left of the bolt carrier group and
remove the pin by pulling it out to the left.
8. Tilt the bolt face up and remove the firing pin.
9. Push the bolt in toward the carrier until bolt rotates and comes to a stop, then
turn the bolt cam pin through 90° (not necessary on DD5).
10.Remove the cam pin by lifting it out and away from the bolt and bolt carrier.
11.Pull the bolt forward and remove it from the bolt carrier.
12.Handguard maintenance:
a.If dirt or debris has accumulated in and around the handguard, use
compressed air for removal.
b.Lubricate as needed.
DANIEL DEFENSE
P 27
c. If removal of handguard is deemed necessary, please take firearm to a
qualified and competent gunsmith.
d. Removal/installation instructions and torque specifications are available
from Daniel Defense.
NOTE: Removal is not necessary unless dirt has accumulated in or
around the handguard.
13. Remove the buttstock from lower receiver (if equipped):
a. Push the release lever up and extend the buttstock fully.
b. Pull tabs of buttstock latch, compressing spring completely, and slide
buttstock off the receiver extension.
14. Depress the buffer, maintaining pressure as the buffer is under spring tension,
to prevent it from being ejected when the buffer retainer pin is depressed.
Depress the buffer retainer pin to permit the buffer and the action spring to
move forward. Depress the hammer to allow the action spring and the buffer
assembly to continue moving forward and be completely removed from the
receiver extension.
IMPORTANT: DO NOT STRIP YOUR FIREARM FURTHER THAN PREVIOUSLY
DESCRIBED. IF ADDITIONAL MAINTENANCE IS REQUIRED, SEE “SERVICE AND
REPAIR” LATER IN THIS INSTRUCTION MANUAL. REASSEMBLE YOUR FIREARM
BY REVERSING THE STRIPPING PROCEDURE ALREADY DESCRIBED, AND MAKE
SURE THAT THE CAM PIN IS PROPERLY INSTALLED.
WARNING: IF YOU ATTEMPT TO FIRE WITHOUT THE BOLT CAM PIN
INSTALLED, DAMAGE TO FIREARM OR INJURY MAY RESULT.
5.2
WHEN TO CLEAN
BEFORE FIRING, make sure that the barrel and the chamber are clean and dry.
After firing, clean your firearm as soon as possible so that the job will be easier and there
will be less opportunity for corrosion to start.
PERIODICALLY, when your firearm has not been fired, we suggest you clean it when
necessary and at least once or twice a year in a temperate climate, or as often as once a
week in a tropical climate.
IF YOU CARRY A LOADED FIREARM, UNLOAD it and clean when necessary and at
least once a month. If you get your firearm wet, clean it as soon as possible.
LIGHTER. STRONGER. BETTER...®
5.3
HOW TO CLEAN
Materials:
• Personal Protective Equipment: chemical-resistant gloves, mask, and eye
protection
• Good-quality cleaning rod (coated is preferable for protecting barrel)
• Brass jag or loop of correct caliber (5.56mm = .22 caliber, 6.8mm = .277 caliber,
300BLK = .30 caliber, .308 win = .30 caliber)
• Cotton bore-cleaning patches (cut to size to fit snuggly in bore)
• Nylon bore brush of correct caliber (see above for size)
• Nylon chamber brush of correct caliber (5.56, 300BLK, 6.8 = M16/AR-15 Brush,
308 = 308AR Brush)
• Nylon bristle all-purpose cleaning brush or toothbrush
• Firearm cleaning solution: Use only high-quality firearm cleaning solutions when
cleaning your Daniel Defense firearm. There are many good options when it
comes to cleaning your firearm. Check with the cleaning solution’s manufacturer
to see if it is correct for your application, and be sure to follow their directions
carefully.
WARNING: BE SURE TO REMOVE OR NEUTRALIZE ANY AMONIA-BASED
CLEANING SOLUTIONS FROM THE FIREARM AS THEY CAN CAUSE PERMANENT
DAMAGE.
Optional but recommended equipment:
• Bore guide: this helps to prevent users from damaging the barrel by keeping
cleaning rod in line with the bore.
• Bore light: inserted at muzzle, a bore light will help user inspect rifling from the
rear of receiver while keeping firearm pointed in a safe direction.
• Chamber mop: helps clean chamber and lead more effectively then chamber
brush alone.
Procedure:
WARNING: ENSURE THAT THE FIREARM IS NOT LOADED.
WARNING: ALLOW FIREARM TO COOL TO ROOM TEMPERATURE BEFORE
ATTEMPTING CLEANING/MAINTENANCE.
WARNING: USE PROPER PROTECTIVE EQUIPMENT: GOGGLES, MASK, AND
CHEMICAL GLOVES.
WARNING: IMPROPER CLEANING TECHNIQUES CAN PERMANENTLY
DAMAGE FIREARM AND LEAD TO DEGRADATION IN ACCURACY AND
REDUCED LIABILITY.
WARNING: CLEANING FIREARMS, DISCHARGING FIREARMS IN POORLY
VENTILATED AREAS, OR HANDLING AMMUNITION MAY RESULT IN EXPOSURE
TO LEAD AND OTHER HARMFUL SUBSTANCES WHICH ARE KNOWN TO THE
STATE OF CALIFORNIA TO CAUSE BIRTH DEFECTS, REPRODUCTIVE HARM,
AND OTHER SERIOUS PHYSICAL INJURY. HAVE ADEQUATE VENTILATION
AT ALL TIMES. BE SURE TO ALWAYS WASH HANDS THOROUGHLY AFTER
POSSIBLE EXPOSURE.
DANIEL DEFENSE
P 29
1. Strip for cleaning as previously described.
NOTE: Avoid contact between the cleaning rod and the muzzle as
resultant wear will greatly reduce accuracy.
2. Attach a cotton flannel patch to end of the cleaning rod, insert it in the
chamber and pass the rod and patch down through the barrel and out the
muzzle. Remove used patches at muzzle to avoid pulling it back through the
bore. Repeat, changing patches with each pass through the barrel, until the
last patch comes out clean.
NOTE: Avoid pulling dirty patches back through the barrel.
3. Visually inspect the barrel; if it is clean, proceed directly with step 8, but if it
remains dirty, continue with step 4.
NOTE: Items 4 & 5 should be applicable only after firing.
4. Attach nylon wire-bristle bore-cleaning brush to cleaning rod and dip brush in
firearm-cleaning solution. Thoroughly scrub out barrel, passing the brush all
the way through before reversing the movement. If you try to change direction
with the brush in barrel, the brush can get stuck and cause damage to barrel.
5. Attach the larger chamber-cleaning brush to the cleaning rod, dip the brush in
bore-cleaning solution, and clean the chamber. Use a minimum of five plunge
strokes and three 360° clockwise rotational strokes.
6. Repeat steps 2 and 3 above.
7. Use an all-purpose nylon cleaning brush and firearm-cleaning solution to clean
all carbon and powder residue from around the gas tube in the upper receiver,
bolt locking lugs, bolt rings, firing pin, bolt cam pin, lip of the extractor, and
inside the bolt carrier group.
IMPORTANT: DO NOT USE A WIRE BRUSH ON ALUMINUM SURFACES
SUCH AS THE UPPER AND LOWER RECEIVERS AND THE HANDGUARDS.
IF CLEANING IS NECESSARY, AVOID SCRATCHES AND WEAR BY USING
A SMALL NYLON BRUSH OR FLANNEL PATCH.
8. Wipe all components clean and dry and inspect them for excessive wear,
corrosion or mechanical damage. If any of these conditions are discovered,
have them corrected before firing again. (See Servicing and Repair later in this
section.)
9. Lightly dampen a flannel patch with gun oil and pass it once through the
barrel, leaving a thin film of oil on the inside surface. Leave this film of oil on
the surface if firearm is to be stored. If it is not being stored, or if it is being
removed from storage for use, pass the dry patch through the barrel and
chamber to remove as much oil as possible.
LIGHTER. STRONGER. BETTER...®
10.Check that flannel or brush bristles have not become lodged in any part of
firearm, then lightly lubricate (See Section 5.4).
11.Remove any gun-cleaning solution, oil, and fingerprints from the outside
surfaces of the firearm. (Finger moisture, if left, could start a corrosion
process.)
12.Reassemble the firearm:
a. Insert the buffer/action spring and buffer into the receiver extension/
buffer tube on the rear of the lower receiver. The buffer retaining pin
should prevent any forward movement of the buffer/action spring.
b. Install the buttstock onto the lower receiver. Pull the release lever down
and push the buttstock forward on the receiver extension/buffer tube.
c. Insert the bolt into the bolt carrier. Take care to ensure the chamfered
edge of the bolt body where the cam pin sits is facing downward. The
cam pin should be inserted from the opposite side of the chamfered
edge. Another way to ensure proper bolt installation is to verify that the
extractor is oriented to the right side of the bolt carrier.
d. Insert the cam pin into the bolt and bolt carrier.
e. Rotate the cam pin 90 degrees to allow the firing pin to fully seat into the
bolt (not necessary on DD5).
f. Insert the firing pin.
g. Insert the firing pin retaining pin from the left to right of the bolt carrier.
h. Install the charging handle into the upper receiver by pushing it forward
approximately one inch (1.5” on DD5) into the keyway and then up into
the upper receiver. You will not insert the charging handle all of the way
until it latches.
i. With the bolt fully extended forward, install bolt carrier group into the
upper receiver. Orient the gas key so that it fits into the charging handle.
Slide entire bolt carrier group forward and latch the charging handle into
the upper receiver.
j. Attach the upper and lower receivers together by orienting the front
upper receiver pivot-pin lug into the corresponding recess in the lower
receiver. Push the pivot pin from right to left until fully seated.
k. Pivot the rear end of the receivers together and push the rear takedown
pin from right to left until fully seated.
5.4
LUBRICATING/PRESERVATION
Use only high-quality gun oil when lubricating your Daniel Defense firearm. There are
many good options when it comes to lubricating your firearm. Check with the lubricant’s
manufacturer to see if it is correct for your application.
DANIEL DEFENSE
P 31
Lubrication Points:
• Bolt Carrier Group:
-- Carrier Rails
-- Cam Pin
-- Bolt Lugs
-- Extractor Pin
-- Extractor
-- Gas Rings
-- Firing Pin
-- Firing Pin Retaining
• Fire Control Group:
-- Hammer
-- Trigger
-- Pins
-- Disconnector
-- Selector
• Mag Catch
• Bolt Catch
• Bolt Release (DD5)
• Ejection Port Cover
• Forward Assist
Pin
-- Ejector(s)
• Takedown Pin
• Pivot Pin
• Buffer Retaining Pin
• Buffer Spring
• Buttstock Latch
• Charging Handle
• Sight Aperture Pivot
Point
• Sight Adjustment
Wheel
• Front Sight Detent
Preservation:
IMPORTANT: AREAS WITH EXCESSIVE HUMIDITY, SALT (COASTAL AREAS),
DUST, ETC WILL REQUIRE MORE AGGRESSIVE PRESERVATION EFFORTS.
The use of quality preservatives/corrosion inhibitors can extend the life of the firearm
and make cleaning easier. They provide a barrier between the firearm and contaminants
(dirt, dust, fouling, etc.) and corrosives (moisture, salt, etc.). It is important to protect
areas of your firearm with a high-quality gun oil/lubricant or preservative, especially
the steel components, including the barrel, gas block, muzzle device, pins, forward
assist, ejection port cover, etc. Many commercially available gun oil/lubricants are also
designed to be preservatives. Check with the lubricant’s manufacturer to see if it is
suitable for use as a preservative/corrosion inhibitor.
5.5
CLEANING THE MAGAZINE
For all cleaning, maintenance, and care instruction, please refer to the magazine
manufacturer.
5.6
DDM4 ISR SOUND SUPPRESSOR MAINTENANCE
The suppressor assembly of a DDM4 ISR is designed with minimal maintenance in mind,
and the removal of the monolithic baffle is NOT necessary for normal cleaning of the
firearm. Only after degradation in sound reduction or extreme fouling (i.e., mud or debris
inside the suppressor) should removing the monolithic baffle be required. A simple
preventative maintenance schedule should be all that is necessary to ensure that the
suppressor remains clean and ready for use.
LIGHTER. STRONGER. BETTER...®
Follow the instructions in this section to maintain your firearm’s suppressor in peak
condition.
WARNING: MAKE SURE THAT THE MAGAZINE IS REMOVED AND THAT THE
FIREARM IS UNLOADED SO THAT IT CAN NOT BE FIRED.
WARNING: WEAR SAFETY GLASSES AND CHEMICAL-RESISTANT GLOVES.
5.6.1
STRIPPING FOR CLEANING
1. Follow the instructions presented in Section 5.1 for the stripping procedure of
the upper receiver group.
2. WITHOUT REMOVING HANDGUARD, carefully inspect the outside of the
suppressor assembly that extends underneath the handguard for debris or
corrosion. Clean with compressed air, and lubricate as needed.
NOTE: If removal of handguard is required, please take firearm to a
qualified gunsmith.
3. If removal of the monolithic baffle is deemed necessary:
a. Gently secure the suppressor assembly using a soft-jawed clamp or vise
by the suppressor. Securing by the upper receiver may result in excessive
torque applied to the barrel and is not recommended.
b. Place the two pins on the front face of the DDM4 ISR Removal Tool
(provided with your firearm) into the holes located on the muzzle end of
the monolithic baffle (See Figure 2 below).
c. Using either an 1.25” crescent wrench or a ½” square-drive torquelimiting wrench (preferred), turn the tool clockwise to loosen (the threads
that hold the baffle in place are left-hand oriented).
d. Slowly back the monolithic baffle out of the suppressor assembly until it is
free and clear of outer tube.
e. For reassembly after cleaning, install the baffle in the same manner as
removal, turning the tool counterclockwise. If using a torque wrench,
tighten to 15-20 lb-ft (preferred), or tighten until baffle is held securely
snug with a standard wrench.
WARNING: DO NOT OVER TIGHTEN PAST 20 LB-FT. THIS MAY
DAMAGE THE SUPPRESSOR ASSEMBLY AND RESULT IN THE
PROJECTILE STRIKING THE BAFFLE UPON FIRING.
DANIEL DEFENSE
P 33
5.7
STORAGE
WARNING: ALWAYS UNLOAD YOUR FIREARM FOR STORAGE AND STORE
AMMUNITION SEPARATELY.
Store your firearm and ammunition securely locked in separate locations out of the
reach and sight of children. (Children are naturally curious and do not always believe or
understand the real danger and responsibilities of firearms.)
NOTE: Do not store your firearm in an airtight container, and do not seal or attempt
to seal the barrel to exclude dust, as an internal steel surface is more likely to
corrode.
5.8
SERVICING AND REPAIRING
Should your firearm require adjustment or repair, make sure it is NOT LOADED and call
Daniel Defense for specific instructions on where to send the firearm. For spare parts,
seek advice from your dealer, who should have up-to-date information on how to best
obtain genuine Daniel Defense parts.
An illustration and list of part names are included in the next section of this instruction
manual to help you identify the parts you need, but it is most important to note that all
parts are not available for sale. Those parts that are available should be installed by
Daniel Defense or by a competent gunsmith. When ordering parts, please provide the
part name as it is given on the parts list along with the serial number of the firearm.
IMPORTANT: IF YOU MAKE UNAUTHORIZED ADJUSTMENTS OR USE
UNAUTHORIZED PARTS, DANIEL DEFENSE WILL NOT ASSUME RESPONSIBILITY
FOR THE FUNCTIONING OF THIS FIREARM.
NOTE: THIS FIREARM IS MANUFACTURED TO PERFORM PROPERLY WITH THE
ORIGINAL PARTS AS DESIGNED. IT IS YOUR DUTY TO MAKE SURE ANY PARTS
YOU BUY ARE INSTALLED CORRECTLY AND THAT NEITHER REPLACEMENTS
NOR ORIGINALS ARE ALTERED OR CHANGED. THIS IS WHY SENDING IT BACK
TO THE MANUFACTURER IS HIGHLY RECOMMENDED. YOUR FIREARM IS A
COMPLEX TOOL WITH MANY PARTS THAT MUST RELATE CORRECTLY TO
OTHER PARTS.
PUTTING A FIREARM TOGETHER INCORRECTLY OR WITH MODIFIED PARTS CAN
RESULT IN A DAMAGED FIREARM AND DANGER, INJURY, OR DEATH TO YOU
AND OTHERS THROUGH MALFUNCTION. ALWAYS LET A QUALIFIED GUNSMITH
WORK ON YOUR FIREARM AND CHECK ANY WORK YOU THINK WAS NOT
PERFORMED BY A GUNSMITH. WE AT DANIEL DEFENSE THINK THIS IS A SMALL
PRICE TO PAY FOR FIREARMS SAFETY.
LIGHTER. STRONGER. BETTER...®
NOTE: Various Federal and State laws and local ordinances govern the transfer
and transportation of firearms. Take the advice of the dealer in your state on how
to send your firearm to Daniel Defense. Before shipping your firearm, take note of
some important points to remember:
WARNING: MAKE SURE THE MAGAZINE IS EMPTY AND THE FIREARM IS NOT
LOADED. (SEE PAGE 26)
1. Prior to sending a firearm to Daniel Defense, an RMA (Return Merchandise
Authorization) can be obtained by calling 1-866-554-GUNS (4867).
2. Do not send presentation boxes, accessories, or explosive components.
3. Daniel Defense’s address for receiving packages is:
DDA, INC.
58 FIREFLY DRIVE
RIDGELAND, SC 29936
NOTE: Do not indicate the contents or include “DANIEL DEFENSE” in the
address on the pack so that an inquisitive thief is not attracted to it by such
information.
4. Make sure that the package contents are insured against loss or theft.
FIREARM RECORD
Daniel Defense Product:
Firearm Serial #:
Suppressor Serial #:
Caliber:
Purchased From:
Date Purchased:
Purchase Price:
6.0
PARTS ILLUSTRATIONS & LISTS
These images are provided so you may identify names of parts for
your own interest. However, for adjustment, repair or spare parts
information see, Section 5.8 “Servicing and Repair.”
DANIEL DEFENSE
P 35
LIGHTER. STRONGER. BETTER...®
DDM4 UPPER RECEIVER GROUP
PARTS ILLUSTRATION
DDM4 V1 SHOWN. SOME PARTS VARY BY PRODUCT.
6.1
DANIEL DEFENSE
P 37
6.2
DDM4 LOWER RECEIVER GROUP (CARBINE AND PISTOL)
PARTS ILLUSTRATION
LIGHTER. STRONGER. BETTER...®
DD5 UPPER RECEIVER GROUP
PARTS ILLUSTRATION
DD5 V1 SHOWN. SOME PARTS VARY BY PRODUCT.
6.3
DANIEL DEFENSE
P 39
6.4
DD5 LOWER RECEIVER GROUP
PARTS ILLUSTRATION
LIGHTER. STRONGER. BETTER...®
6.5
DDM4 ISR UPPER RECEIVER GROUP
PARTS ILLUSTRATION
6.6
DDM4 BOLT CARRIER GROUP
PARTS ILLUSTRATION
6.7
DD5 BOLT CARRIER GROUP
PARTS ILLUSTRATION
7.0
WARRANTY STATEMENT
All Daniel Defense products carry a 100% satisfaction guarantee against defects in
original materials and workmanship. If your Daniel Defense product shows evidence of
such defects, Daniel Defense will make every accommodation to fix, repair, or replace your
product expeditiously. Daniel Defense does not warranty products or damage caused to
our products by the correct or incorrect installation of other manufacturer’s products. Be
sure to retain your sales slip as proof of purchase date when making a claim.
8.0
HEALTH AND ENVIRONMENTAL WARNING
Discharging firearms in poorly ventilated areas, cleaning firearms, or handling
ammunition may result in exposure to lead and other substances known to cause birth
defects, reproductive harm, cancer, and other serious physical injury. Have adequate
ventilation at all times. Wash hands thoroughly after exposure.
DANIEL DEFENSE
P 41
This instruction manual should always accompany this firearm. When you
lend, give or sell this firearm, be sure that this manual goes with it.
If your instruction manual becomes lost or destroyed, obtain a replacement
by calling 1-866-554-GUNS (4867) or writing to the address below.
When requesting a manual, make a note of your address and include
the information, which is located on the left side of your firearm,
including its serial number.
DANIEL DEFENSE
101 WARFIGHTER WAY
BLACK CREEK, GA 31308
USA
1.866.554.GUNS (4867)
Daniel Defense, Daniel Defense with the interlocking DD, DDM4, and others are trademarks registered with the United States Patent and Trademark Office.