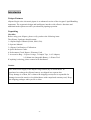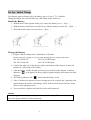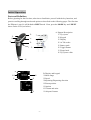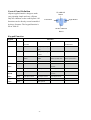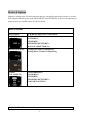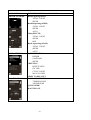
1
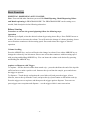
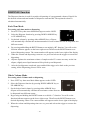
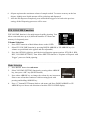
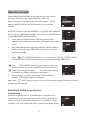
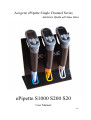
Avegene ePipette Single Channel Series Electronic Pipette with New Vision ePipette S1000 S200 S20 User Manual 371003 Table of Contents 1. Introduction 4 Unique Features 4 Unpacking 4 --------------------------------------------------------------------------------------------------------------2. Set Up/ Initial Charge 5 Install the Battery 5 Charge the Battery 5 Turn On and Turn Off 6 Sleep Mode 6 Tip Selection 6 Tip Immersion Depth 6 --------------------------------------------------------------------------------------------------------------3. Initial Operation 7 Parts and definition 7 Control Panel Definition 8 Keypad Function 8 --------------------------------------------------------------------------------------------------------------4. Modes & Options 9 Basic Function Chart 9 Intensive Function Chart 10 --------------------------------------------------------------------------------------------------------------5. Basic Function Before Starting 11 11 Operation 11 Volume Scrolling 11 Aspirate or Dispense with Trigger 11 --------------------------------------------------------------------------------------------------------------- 6. Pipetting Function Select Sub Function 12 12 Standard 12 Blow 12 Rinse 13 Reverse Pipette 13 Manual Pipette 13 --------------------------------------------------------------------------------------------------------------- -2- 7. Dispense Function 14 Each Time Mode 14 Whole Volume Mode 14 --------------------------------------------------------------------------------------------------------------8. Fix Volume Function 15 Volume Selection 15 Mode Selection 15 --------------------------------------------------------------------------------------------------------------9. Program Mode 16 Mutil-Pipetting 16 Mutil-Dispensing 17 Delute 17 Mutil-Asiprating 18 --------------------------------------------------------------------------------------------------------------10. ePipette Management Mode 19 User Setting 19 Configuration 19 Greeting 20 Pipette Info 20 Reset to Default 20 --------------------------------------------------------------------------------------------------------------11. Calibration 21 --------------------------------------------------------------------------------------------------------------12. Sterilization, Care and Maintenance 22 Cleaning 22 Sterilization 22 Care and Maintenance 23 --------------------------------------------------------------------------------------------------------------13. Decontamination prior to dispatch 23 --------------------------------------------------------------------------------------------------------------14. ePipette Single Channel Performance Specification -3- 24 Introduction Unique Features ePipette Single series electronic pipette is an enhanced version of the Avegene Liquid Handling instrument. The ergonomic design and intelligence interface with effective functions and additional mode options can offer you advanced pipetting operation. Unpacking Checklist Before using your ePipette, please verify you have the following items. The ePipette S package should contain: 1. ePipette Single Channel (S1000, S200, S20). 2. Operator Manual. 3. ePipette Certification of Calibration. 4. Quick Reference Guide. 4. Performance Check Report / Warranty Card. 5. Accessories Bag—2×Spare O-rings, 3×Sample Tips, 1×AC Adaptor, 1×Lithium-ion chargeable Battery, 1×Piston Tool. If anything is missing, please contact local distributors. Caution The Wall Power Supply or the Rapid Charge Stand (any of which MUST be purchased to recharge the ePipette battery) are shipped in a separate box. If any damage is evident, file a claim to the shipping carrier(who is responsible for damage incurred in transit) or local distributors with compeleted warranty card,. Keep the shipping packages when you file a claim. -4- Set Up / Initial Charge Use ePipette approved battery only, the battery type is Li-ion, 3.7V 1100mAh. Charge the battery for at least 8 hours for a full charge before initial use. Install the Battery 1. With the back of the pipettor facing you, remove the battery cover.(fig1a. ) 2. With the battery information written side up, slide the battery into the slot.(fig1b. ) 3. Slide and lock the back cover into place.(fig1c. ) Charge the Battery 1. Plug the ePipette charger into a standard AC wall outlet. Find the wall power supply to a power outlet matching the line voltage on the label. 120 VAC/60 Hz US 220 VAC/50 Hz Europe 240 VAC/50 Hz UK 100 VAC/50 Hz Japan 2. Connect the other end of the charger cable to the bottom of the ePipette. It takes 90 minutes to a full charge of the battery. 3. After the battery is fully charged, press any key to switch on the ePipette. A battery indicator( )will appears on the top right of pipettor display and remains on while charging. 4. The battery indicator will( )flash when the battery is low. 5. After 15 minutes the pipette will store enough power for a typical day’s pipetting, and approximately 90 minutes a full charge will be achieved and can provide (how many times or time) pipetting cycles. 6. You can still use ePipette while the line cord is still connected. Caution After a long period stored, please charge the battery before using. The lower assembly part of the pipette should be placed separately. -5- Turn On and Turn Off Turn on—Press any key or trigger to start the ePipette or go back to the previous setting. Turn off—The system automatically turns off after 5 minutes inactivity. Sleep Mode To extend the battery life, the ePipette will automatically turn into sleepmode after 5 minutes inactivity; (i.e. 5 minutes after the last keystroke or trigger press). All functions will auto-saved before the system switch to sleep mode. Press any key or trigger to activate the system again. Tip Selection ePipette commit to specifications to guarantee you a proper, leak-free fit operation, most tips could perfectly fit with ePipette pipettes. After loading tips, press the ePipette shaft into the end of the tip with only sufficient force to make a positive seal. Tip Immersion Depth Recommended depths for tip insertion into sample are shown below. Model Volume Immersion Depth 20 µL 4 - 10 mm, 22-28mm 200 µL 4 - 10 mm 1000 µL 5 - 11 mm To ensure you get the result precisely, make sure the Tip immersion depth is accurate. If these depths are exceeded, the volume measured might possibly out of specification. Tip angle also affects the accuracy: Always hold ePipette within 20 degrees of vertical when proceeding pipetting. -6- Initial Operation Parts and Definition Before pipetting for the first time, take time to familiarize yourself with the key functions, and practice scrolling through modes and options as described on the following pages. The first time the EPipette is used, it will default to PIPET mode. If not, press the MODE key until PIPET shows on the LCD (see below). A. Pipettor Description Tip ejector Keypad Display AC IN socket Battery pack Trigger button Finger hook Tip ejector collar B. Display and keypad Mode range Speed Aspirating/Dispensing direction Piston position Options Volume and units Aliquots/Counter -7- Control Panel Definition ePipette applied intuitive design to make your pipetting simple and easy, ePipette only has 4 buttons on the control panel. All functions can be directly set and controlled by these 4 buttons. The keypad function is list at Table N UP ARROW Button Left Button Right Button DOWN ARROW Button Keypad Function Keypad Function PIPETTING, FIX DISPENSING PROGRAM VOLUME Right Button Touch OK, into SUB MANU USER SETTING, CALIBRATION Change dispensing EDIT, NEXT, OK, Next count Press Change dispensing function Left Button Touch Cancel, into MAIN Cancel, into MAIN Into MAIN MANU, Into MAIN MANU, MANU MANU Return up level menu Return up level menu Adjust volume Adjust volume Adjust volume, select select function Press UP ARROW Touch Button DOWN function Press Fast adjust volume Fast adjust volume Fast adjust volume Touch Adjust volume Adjust volume Adjust volume, select ARROW select function function Button Press Fast adjust volume Fast adjust volume Fast adjust volume Trigger Touch Start Start Start button Press Reset process -8- Start Modes & Options ePipette is setting ready for basic functions that you can quickly and easily operate or execute. Each ePipette function comes with MAIN MENU and SUB MENU, with several functions per menu to suit your variable needs. See the list below. Basic Functions MAIN MENU PIPETTE(PIP) SUB MENU-OPTIONS AVAILABLE STANDARD(STD) BLOW(BLO) RINSE(RIN) REVERSE PIPETTE(REV) MANUAL PIPETTE(MAN) DISPENSING(DIS) Setting Each Time for Dispensing Setting Whole Volume for Dispensing FIXED VOLUME(FIX) STANDARD(STD) BLOW(BLO) RINSE(RIN) REVERSE PIPETTE(REV) VOLUMEN SETTING Intensive Functions -9- MAIN MENU PROGRAM MODE USER SETTING CALIBRATION SUB MENU-OPTIONS AVAILABLE Mutil-Pipetting(M-PIP) TOTAL COUNT SPEED Mutil-Dispensing(M-DIS) TOTAL COUNT SPEED AUTO Dilute(DILUTE) TOTAL COUNT SPEED MIX Mutil-Asperating(M-ASP) TOTAL COUNT SPEED AUTO CONFIGURATION BEEPER CONTRAST SPEED GREETING PIPETTE INFO FW VER CYCLE COUNT MAX VOLUME RESET TO DEFAULT ENVIRONMENT SET TEMPERATURE AIR PRESURE QUICK MODE MAINTENACE - 10 - Basic Functions PIPETTING, DISPENSING & FIX VOLUME. Note: You can find other functions you need like Mutil-Pipetting, Mutil-Dispensing, Dilute and Mutil-Aspirating in PROGRAM MODE. The PROGRAM MODE can be setting on as needed, find description in the following subsection. Before Starting Learn how to execute the general pipetting follow the following steps. Operation With the tip in liquid, select the desired volume by pressing Arrow Keys. Press DOWN arrow to reduce, UP arrow to increase the volume. You will notice the change of volume pipetting, slower rate at first then continues with increasing speed. Press and release the trigger to start the operation. Volume Scrolling Press the ARROW key, and you will notice the change in volume. Press either ARROW key to change the volume by one increment. Slower rate at first then continues with increasing speed with pressing and holding ARROW key. You can locate the volume scale desired by pressing and holding the ARROW key. Aspirate or Dispense with Trigger To aspirate—Set the desired volume then attach a tip – press the shaft into the end of the tip with sufficient force to make a positive seal. Immerse the tip end into the sample, press and release the trigger to operate. To dispense—Touch the tip end against the vessel side wall, and press the trigger. After a blowout, remove the tip from the vessel, and press the tip ejector button to discard the used tip. Press the trigger once to aspirate, and then press the trigger again to dispense. You can even press trigger once to aspirate and dispense – use the trigger which is most convenient. - 11 - PIPETTING Function Pipetting function is used for simple liquid transfers when aspirate and dispense volumes are equal. Select Sub Function STADARD (STD), BLOW (BLO), RINSE (RIN), REVERSE PIPETTE (REV), MANUAL PIPETTE (MAN). Note: When executing pipetting, you may require different modes to get the best result. ePipette included extensive settings to help you to avoid any inaccuracy happens. After you select the operation mode and set the desired volume, press OPTION (right) key for the extensive setting menu. The detail purposes and features described as below. -------------------------------------------------------------------------------------------------------------STANDARD(STD) The standard mode is recommended for rapidly series pipetting with aqueous solutions. Press the trigger once to get the desired liquid volume, press and hold the trigger to activate all the piston movements. Blow out will be executed automatically when dispensing proceeded. Release the trigger then back to the previous setting. Remove the pipette tip from the solution before releasing trigger to prevent any solution from being aspirated unintentionally. * --------------------------------------------------------------------------------------------------------------BLOW (BLO) BLOW mode is recommended for the use with liquids which easily create foam on agitation and/or aeration. ( e.g. Solutions containing protein). Press the trigger once to get the desired liquid volume, press and hold the * trigger to activate all the piston movements. The residual liquid will be dispensed by pressing the trigger button separately. Release the trigger then back to the previous setting. Remove the pipette tip from the solution before releasing trigger to prevent any solution from being aspirated unintentionally. - 12 - RINSE (RIN) RINSE mode can be used for mixing the dispensing volume and the specimen liquid when large volumes are used. Press the trigger once to get the desired liquid volume, press and hold the trigger to activate all the piston movements. Rinsing takes place 3 times after liquid has been dispensed. Then the trigger can be released to back to the previous setting. Remove the pipette tip from the solution before releasing trigger to prevent any solution from being aspirated unintentionally. ----------------------------------------------------------------------------------- * REVERSE PIPETTE (REV) REVERSE PIPETTE is recommended for solutions with a high viscosity. To prevent the inaccuracy, ePipette will automatically pick up slightly more liquid amount of the sum for the dispensing steps. After dispensing completed, press and release the tip ejector to empty the pipettor. Before releasing trigger button, remove the pipette tip from the solution to prevent any solution from being aspired unintentionally. --------------------------------------------------------------------------------------------------------------MANUAL PIPETTE (MAN, only for PIPETTING) The Manual Pipette used when operator control is more required for aspirating and dispensing unknown volumes. Use this function to measure an unknown amount of liquid. Select MANUAL PIPETTE from SUB MENU then press OK key. Press ARROW keys to set the desired volume, press the trigger once to set the volume registers “Zero” on volume scale display to confirm the selections. Now the system is ready to pick up sample. Press ARROW keys to start the operation. Press UP ARROW key to aspirate until the volume reach the setting volume. Press DOWN ARROW key to dispense the liquid out of tip until all liquid dispensed. Note: Setting lower speed is recommended. The MANUAL PIPETTE option is the equivalent with a mechanical piston-stroke pipette. - 13 - DISPENSE Function The Dispense function is used for repetitive dispensing of a programmed volume of liquid. Set the desired volume and total number of dispenses count needed. The aspirated volume is calculated automatically. Each Time Mode For setting each time mode to dispensing 1. Press LEFT key then enter Main Menu appears on the OLED. 2. Select the Dispense function by pressing DOWN ARROW key or UP ARROW key. 3. Set desired volume by pressing either ARROW keys. ePipette will automatically calculate the maximum number of total volume that can be dispensed into different counts. 4. 5. 6. 7. By pressing and holding the RIGTH button to set multiply “X” function. You will see the function indicator appears on the lower right screen Then Press the RIGHT button to set desired dispensing counts. The counts number will appears on the lower right of the display. When the volume and dispensing counts are set, press and release the trigger to execute the dispensing. ePipette aspirates the maximum volume of sample needed. To ensure accuracy on the last aliquot, slightly more liquid amount will be picked up and dispensed. After the last dispenses completed, press and hold the trigger to be back to the previous setting, all the Dispensing process will be reset. --------------------------------------------------------------------------------------------------------------- Whole Volume Mode For setting whole Volume mode to dispensing 1. Press LEFT key then enter Main Menu appears on the OLED. 2. Select the Dispense function by pressing DOWN ARROW key or UP ARROW key. 3. Set the desired total volume by pressing either ARROW keys. ePipette will automatically calculate the maximum volume that can be dispensed into different counts. 4. By pressing and holding the RIGHT button to set divide “/” function. You will see the function indicator appears on the lower right screen. Then Press the RIGHT button to set desired dispensing counts. The counts number will appears on the lower right of the display. 5. When the volume and dispensing times are set, press and release the trigger to execute the dispensing. - 14 - 6. ePipette aspirates the maximum volume of sample needed. To ensure accuracy on the last aliquot, slightly more liquid amount will be picked up and dispensed. 7. After the last dispenses completed, press and hold the trigger to be back to the previous setting, all the Dispensing processes will be reset. FIX VOLUME Function FIX VOLUME function is for multi-stepped rapidly pipetting. You allow create and store up to (4) different numbers of volume into memory for frequently uses. Volume Selection 1. Press LEFT button in to Main Menu shows on the OLED. 2. Select FIX VOLUME function by pressing DOWN ARROW or UP ARROW key (fix volume are predefined in the pipette and also adjustable). Press the OPTION (right) key until the desired function appears(options: STD, BLO, RIN, REV, VOLUME SETTING). Then follow PIPETTE function’s “Aspirate or Dispense with Trigger” process to finish pipetting. 3. --------------------------------------------------------------------------------------------------------------- Mode Selection 1. 2. 3. 4. Press RIGHT button into sub menu. Select VOLUME SETTING function by pressing either ARROW key, then press “OK” key (RIGHT button). Press either ARROW key to change the volume by one increment. Slower rate at first then continues with increasing speed with pressing and holding ARROW key. Press “C” button(LEFT button) back to sub menu, and Press DOWN ARROW or UP ARROW keys to choose sub function to back the FIX VOLUME display. - 15 - PROGRAM MODE ePipette PROGRAM MODE is a full open function with 4 major functions- Mutil-Pipetting, Mutil-Dispensing, Dilute and Mutil-Asperating. Each function has extensive settings. COUNT number, SPEED, MIX and AUTO functions can be controlled variable. --------------------------------------------------------------------------------------------------------------Press LEFT button to enter MAIN MENU, by pressing either ARROW keys to select the PROGRAM MODE, press “OK” key (RIGHT button) to enter PROGRAM operation display. 1. Set the desired program number needed by pressing either ARROW keys. ePipette have maximum 10 program spaces can be edited. 2. Enter PROGRAM mode by pressing EDIT key (RIGHT button), then press and hold either ARROW keys to select one of major functions in MODE. --------------------------------------------------------------------------------------------------------------- 3. Select EDIT (RIGHT button) then move to sub functions (TOTAL COUNT, SPEED, AUTO) menu then set the desired volume by pressing and holding ARROW key. --------------------------------------------------------------------------------------------------------------- 4. 5. Press EDIT (RIGHT button) to enter volume setting, select Volume function by pressing ARROW key then set the desired volume by pressing and holding key. After all the settings are finished, the display will return to sub function. Press the trigger to activate the program. AUTO and MIX functions will automatic aspirate or dispense. Note: Press (LEFT button) any time, you will save program setting and return to previous program operation display PROGRAM MODE major functions Mutil-Pipetting The Mutil- Pipetting mode is recommended for a sequence series programmed volume pipetting with aqueous solution, maximum 24 counts can be set. Each single setting can set for a different volume separately. The total volume will show by order on the editing display. - 16 - Each time also has basic minimum volume limit (S1000-50µL, S200-20µL, S20-2µL). Note: SPEED set is only for range 1-9 programs (see table N: SPEED LIST). AUTO function can be set the dwell time range between 0~10 seconds. --------------------------------------------------------------------------------------------------------------Mutil-Dispensing The Mutil-Dispense mode is recommended for repetitive dispensing of a series programmed volumes, maximum 24 counts can be set. Each single setting can set a different volume separately. --------------------------------------------------------------------------------------Each setting volume show by order on the editing display. Each time also has basic minimum volume limit (S1000-50µL, S200-20µL, S20-2µL). After selecting the dispensing volume and total number for aspirating needed, the system will automatically calculate the maximum volume amount can be proceeding. If the total volume exceeds the limit, the volume will be locked. Note: SPEED set is only for range 1-9 programs (see table N: SPEED LIST). AUTO function can be set the dwell time range between 0~10 seconds. Dilute The Dilute mode is used to aspirate more than two different liquids in the same pipet tip keeping both liquids separated by an airgap in one pipetting, maximum 24 counts can be set. Each single setting can set a different volume separately. Each setting volume show by order on the editing display. Each time also has basic minimum volume limit (S1000-50µL, S200-20µL, S20-2µL). After selecting the dispensing volume and total number of aspirate needed, the system will automatically calculate the maximum volume amount can be proceeding. If the total volume exceeds the limit, the volume will be locked. Note: SPEED set is only for range 1-9 programs (see table N: SPEED LIST). AUTO function can be set the dwell time range between 0~10 seconds. - 17 - Mutil-Asiprating. The Mutil-Asiprating mode is used for repetitive aspirating of a series programmed volumes, maximum 24 counts can be set. Each single setting can set a different volume separately. Each setting volume show by order on the editing display. Each time also has basic minimum volume limit (S1000-50µL, S200-20µL, S20-2µL). After selecting the dispensing volume and total number of aspirating needed, the system will automatically calculate the maximum volume amount can be proceeding. After the series aspirating completed, the whole volume will be dispensed in one step. If the total volume exceedsthe limit, the volume will be locked. Note: SPEED set is only for range 1-9 programs (see table N: SPEED LIST). AUTO function can be set the dwell time range between 0~10 seconds. - 18 - ePipette Management Mode USER SETTING ePipette provides you custom-made choices, you can find most ePipette information and basic setting in USER SETTING to make your pipetting more personal and individual. Press RIGHT button into MAIN MENU, select USER SETTING mode by pressing and holding ARROW keys. CONFIGURATION Select CONFIGUATION by pressing ARROW keys in user setting mode, press “OK” button then into the function. Press “NEXT” key to select BEEPER, CONTRAST, or SPEED functions. Press and hold the ARROW key to enter the selected function. Press and hold the “BACK” button anytime to save your setting and return to the previous page. BEEPER: The beeper sound can help you to indicate completion of operations or errors. ON—the beep sound will be activated when any button be touched. OFF—the beep sound will be inactivated when any button be touched. CONTRAST: Use CONTRAST to Adjust the OLED display’s brightness, 1(darkest) ~5 (brightest). SPEED: Use SPEED to adjust the speed of Aspirate and Dispense functions in PIPETTING, DISPENSING, and FIXED VOLUME functions to operate Aspirate or Dispenses with these three modes. Refer speed range in Table 1. Table 1. ePipette’s Refer speed range List. SPEED 1 2 3 4 5 6 7 8 9 Full Range Pickup 5.3 S. 4.5 S. 3.8 S. 3.2 S. 2.8 S. 2.4 S. 1.9 S. 1.5 S. 1 S. Full Range Dispense 5.3 S. 4.5 S. 3.8 S. 3.2 S. 2.8 S. 2.4 S. 1.9 S. 1.5 S. 1 S. Hold at end 1.0 S. 1.0 S. 1.0 S. 1.0 S. 1.0 S. 1.0 S. 1.0 S. 1.0 S. 1.0 S. Table applies to ePipette in PIP mode. - 19 - GREETING: Use GREETING for lab manager. You can sign up your personal greeting or you’re your programmed modes. This greeting will show on the default display screen. Select TEXT by pressing and holding ARROW key, there can sign up for maximum 10 letters including space and symbol. By pressing UP ARROW key you can enter the next text setting. By pressing DOWN ARROW key you can go back to the previous text setting. After all the setting completed, press and hold “OK” key to save the setting. Press and hold “C” key to cancel this setting. PIPETTE INFO:(This screen is for read only) PIPETTE INFO is list all of the pipette’s original information including the version of FW VER, the CYCLE COUNT of ePipette and your ePipette’s MAX VOLUME. RESET TO DEFAULT: Use this function to reset your ePipette and return to the default setting. All of your settings will be eliminated after resetting, included PROGRAM MODE, CALIBRATION setting, the system will be return to the original setting. Please carefully use this function! - 20 - CALIBRATION Avegene ePipette is the first electronic pipette has calibration system without PC. Customer can directly execute calibration without anytime and location limits. These breakthrough calibration systems already build-in the Factor Z for distilled water like ISO DIS 8655. Customers only need to prepare a microbalance (ISO 8655 standard) and distilled water then they can easily finish calibration in a very short time. ePipette Calibration Steps 1. Entry environment conditions including temperature and air pressure. Press LEFT button then into MAIN MENU. Select CALIBRATION by pressing either ARROW keys, then press OK to enter CALIBRATION MODE. Select ENVIRONMENT SET by pressing either ARROW keys, then press OK key and set temperature, air pressure and relative humidity in the ENVIORNMENT SET. Temperature range: 15.0~30.0 . Air Pressure: 80~105kpa. 1kpa=10hpa=10mbar. --------------------------------------------------------------------------------------------------------------2. Measure the weight (mg) of 10%, 50% and 100% ddwater of maximum ePipette’s volume by excellence microbalances. After all the environment settings are saved, select QUICK MODE by pressing ARROW key, then press OK key into QUICK MODE. Set the measured 10%, 50% and 100% volume in QUICK MODE, then press key twice to next volume setting. Press key into WARNING screen, then press OK key to calibration or press C key to cancel this setting. ----------------------------------------------------------------------------------After the quick mode calibration completed, record the date in MAINTENACE DATE to be a reference for ePipette manager. - 21 - Sterilization, care and maintenance Cleaning ePipette rarely requires routine maintain ace, it may be necessary to clean the external components under certain circumstances. The outside of the pipette can be wiped with a moist lint-free cloth. The use of water with mild soap solution or are also permitted. Do not clean the display or any of the labeling with acetone or any aggressive solutions. During the cleaning performance, do not allow any liquid enter the device, if liquids ever enters the internals of the ePipette, please contact your local distributor for service advice. Caution Always turn off power and unplug the Universal Power Supply before cleaning the exterior. Fluid seepage can damage internal components. Sterilization Place the components to steam autoclave in an autoclave pouch, only the lower assembly of ePipette can be steam-autoclaved at 121 , 1bar overpressure< for 20 minutes. Follow the steps 1. Remove the tip ejector collar 2. Unscrew the white tip sleeve. S1000 S200 S20 --------------------------------------------------------------------------------------------------------------3. Unscrew the steel piston using the tool key. Tool Key S1000 S200 and S20 --------------------------------------------------------------------------------------------------------------4. Warp the tip ejector collar, tip sleeve and steel piston into autoclave to sterilize. 5. After sterilized, rotate steel piston S1000 S200 S20 and white tip sleeve back to ePipette by tool key. 6. Combine the tip ejector collar back to ePipette then start using ePipette. After autoclaving, lightly lubricate the piston and the O-ring, the autoclaved parts must be dry at room temperature. The lower assembly of the pipette should be rinsed with distilled water and dried. The pipette may be carefully wiped clean with lsopropanol. The individual parts of the lower part must be autoclaved separately with the ePipette. - 22 - Caution If the pipette is severely contaminated or if very aggressive chemicals are dispensed, the lower half of the ePipette should be disassembled. Care and Maintenance Apart from general care and occasional discharging (when the battery symbol becomes empty) and recharging of the pipette, no special maintenance is necessary if the pipette is used correctly. Maintenance on the ePipette may be carried out by the Service Department. If you require maintenance work, send your pipette to your authorized distributor. The current addresses of our marketing partners can be found on our home page at http:// www.avegene.com Decontamination prior to dispatch A form called "Decontamination certificate for return of ePipette" and general notes about decontamination can be found at http:// www.avegene.com A signed decontamination certificate must be enclosed with the pipette when it is returned. The serial number of the Research pro must be entered on the decontamination certificate. The serial number becomes visible on the housing of the ePipette when the ejector is operated. The bottom part of the ePipette can be decontaminated of potentially infectious substances by being steam-autoclaved. The surfaces of the pipette can be disinfected with alcohol (ethanol, propanol) or with a disinfectant containing alcohol. Caution If the ePipette is to be checked, repaired or calibrated by Avegene or another service partner, it must be free of hazardous substances and clean! - 23 - ePipette Single Channel Performance Specification Product Name ePipette S20 ePipette S200 ePipette S1000 Channel 1 1 1 Volune Increment Test Volume Inaccuracy Imprecision Range(µL) (µL) (µL) % % 2 ±7.5 ≦2.00 10 ±1.5 ≦0.50 20 ±1.0 ≦0.30 20 ±2.5 ≦1.00 100 ±0.8 ≦0.25 200 ±0.8 ≦0.15 100 ±3.0 ≦0.60 500 ±0.8 ≦0.20 1000 ±0.8 ≦0.12 2~20 0.1 20~200 1 50~1000 1 ePipette Serial Number: www.Avegene.com - 24 -