1
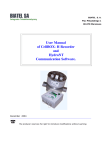
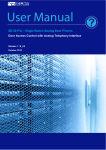
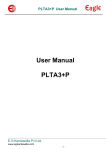
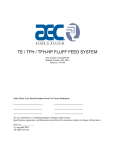
CellBox-Lite Installation and Operation Manual v3.0 NOTICE This is the Installation and Operation Manual for the CellBox-Lite. All rights reserved. No part of this document may be reproduced or transmitted in any form, by any means (electronic, photocopying, recording, or otherwise) without the prior written permission of ITS. The trademark and service marks ITS, including the ITS mark and logo, are the exclusive property of ITS, and may not be used without permission. All other marks mentioned in this material are the property of their respective owners. Additional copies of this manual may be obtained from ITS. ITS reserves the right to modify the hardware and software described in the manual without prior notice. However, changes made to the hardware or software described does not necessarily render this publication invalid. WARRANTY In the event that the product proves to be defective in workmanship or materials within a period of one year from date of shipment, ITS shall repair or replace the product at its discretion. Transportation will be the responsibility of the dealer/distributor. Under no circumstances shall ITS be liable for consequential or special damages, loss of revenue or user/dealer expenses arising out of or in connection with the use or performance of the product, whether based on contract, tort, or any other legal agreement. The following shall void the above warranty: malfunctions resulting from fire, accident, neglect, abuse, or acts of God; use of improper electrical power; or repair of, tampering with or alteration of the product by anyone other than ITS authorized personnel CellBox-Lite i Table of Contents 1. Introduction ............................................................................................................................1 1.1 Manual Audience and Contents .............................................................................................1 1.2 System Description ................................................................................................................2 1.2.1 General Description...........................................................................................................2 1.2.2 Physical Description..........................................................................................................3 1.2.3 Technical Data...................................................................................................................4 1.2.3.1 Programming Cable Specifications ..............................................................................4 1.2.3.2 PBX Cable Specifications.............................................................................................5 1.2.3.3 Technical Specifications...............................................................................................5 2. Installation..............................................................................................................................7 2.1 Unpacking ..............................................................................................................................7 2.2 CellBox-Lite SIM Card Installation and Setup ......................................................................7 2.2.1 Preparation and Requirements...........................................................................................7 2.2.2 SIM Card Insertion in the CellBox-Lite Unit....................................................................8 2.3 CellBox-Lite Physical Installation .........................................................................................9 3. CellBox-Lite LED Status Indicators ....................................................................................10 4. CellBox-Lite Usage..............................................................................................................11 4.1 Call Back (Remote Extension).............................................................................................12 4.2 Call Through (VPN Users)...................................................................................................13 4.3 Extension Gateway (Internal Users) ....................................................................................13 5. The CellBox Utility Program (CUP)....................................................................................14 5.1 Installation of the CellBox Utility Program .........................................................................15 Copyright 2004 by ITS Cellbox-Lite 5.2 5.2.1 5.3 ii CUP Startup Screen..............................................................................................................16 Menu and Toolbar Description........................................................................................17 The File Menu ......................................................................................................................18 5.3.1 New..................................................................................................................................18 5.3.2 Open ................................................................................................................................19 5.3.3 Save .................................................................................................................................19 5.3.4 Save As............................................................................................................................20 5.3.5 Print Settings Menu .........................................................................................................20 5.3.6 Print .................................................................................................................................21 5.3.7 Print Preview ...................................................................................................................22 5.3.8 Print Setup .......................................................................................................................23 5.3.9 Exit ..................................................................................................................................23 5.4 The Communication Menu...................................................................................................24 5.4.1 Read Parameters ..............................................................................................................24 5.4.2 Send Parameters ..............................................................................................................25 5.4.3 Password..........................................................................................................................27 5.4.4 COM Port ........................................................................................................................28 5.5 The Users Menu ...................................................................................................................29 5.5.1 Creating New Users.........................................................................................................30 5.5.2 Editing Users ...................................................................................................................32 5.5.3 Deleting Users .................................................................................................................32 5.6 The Parameters Menu...........................................................................................................32 5.6.1 Control Parameter............................................................................................................33 5.6.2 Date & Time ....................................................................................................................34 5.6.3 Restrictions (Users) .........................................................................................................35 5.6.4 Restrictions for the Extension Gateway ..........................................................................38 5.7 Call Divert ............................................................................................................................40 5.8 Advanced Settings................................................................................................................42 5.9 GSM Parameters ..................................................................................................................42 5.10 SMS Notification.............................................................................................................44 Copyright 2004 by ITS CellBox-Lite iii 5.11 Help .................................................................................................................................45 5.11.1 Help Topics .....................................................................................................................45 5.11.2 About CUP ......................................................................................................................45 5.11.3 Firmware Version............................................................................................................46 6. CellBox Utility Program Quick Reference Guide................................................................47 6.1 Create New User ..................................................................................................................47 6.2 Edit User...............................................................................................................................48 6.3 Delete User ...........................................................................................................................48 6.4 Restriction Settings (Users)..................................................................................................49 6.5 Restriction Settings (Extension Gateway)............................................................................49 6.6 Date&Time Setting ..............................................................................................................51 6.7 Control Parameter Setting ....................................................................................................51 6.8 Call Divert Setting................................................................................................................52 6.9 Advanced Settings................................................................................................................52 6.10 GSM Parameter Settings .................................................................................................53 6.11 SMS Notification Settings...............................................................................................53 7. CellBox-Lite Access Quick Reference Guide......................................................................54 7.1 Accessing the CellBox-Lite .................................................................................................54 7.1.1 From your mobile phone by dialing ................................................................................54 7.1.2 From your mobile phone with SMS (1) ..........................................................................54 7.1.3 From your mobile phone with SMS (2) ..........................................................................55 7.1.4 From the telephone in the Office.....................................................................................55 Copyright 2004 by ITS iv Cellbox-Lite This page has been left blank intentionally Copyright 2004 by ITS 1. Introduction 1.1 Manual Audience and Contents The CellBox-Lite Installation and Operation Manual is intended for System Installers and Administrators, responsible for the installation, setup and programming of the CellBox-Lite. Notes: Please read this manual before the installation, programming and operation of the CellBox-Lite. This manual contains the following: Chapter Heading Chapter Heading 1 Introduction 5 CellBox Utility Program (CUP) 2 Installation 6 CellBox Utility Program Quick Reference Guide 3 CellBox-Lite LED Status Indicators 7 CellBox-Lite Access Quick Reference Guide 4 CellBox-Lite Usage Cellbox-Lite Installation and Operation Manual v3.0 1 Introduction 1.2 1.2.1 System Description General Description The CellBox-Lite unit is a new member of the ITS GSM family of Products. The CellBox-Lite unit is: A GSM Call Back system A Call Through system A GSM Extension Gateway on the analog extension The Call Back and Call Through functions give the users outside the office a possibility to make phone calls as if they are in the office, reducing their mobile phone costs. The Extension Gateway function gives the users in the office a possibility to contact GSM mobile phone users as if they are calling within a mobile network, eliminating the fixed connection costs. The following picture shows a basic configuration: Figure 1-1: Basic Configuration CellBox-Lite Installation and Operation Manual v3.0 2 Introduction Main Features Dual band GSM module (900/1800 or 850/1900 MHz) Programmable via Windows-based utility program (CUP) Signal strength indicator Supports up to 50 registered users per unit Prefix restrictions per user Minutes per month usage limitations per user Extension Gateway 1.2.2 Physical Description Figure 1-2: Front Panel View The four LEDs on the front panel indicate the signal level in 4 steps (each step 25%) and provide an error indication (see Chapter 3 CellBox-Lite LED Status Indicators). Cellbox-Lite Installation and Operation Manual v3.0 3 Introduction Description of the Side Panel: Antenna Antenna connection 9VDC Power Supply connection Sim SIM card holder Monitor Green LED for Cellular engine status RS-232 RS-232C cable connection Line Connection to Analog Extension of PBX The serial connector in the CellBox-Lite provides the user with the interface to program and administrate the unit via a PC. 1.2.3 1.2.3.1 Technical Data Programming Cable Specifications Figure 1-3: RS-232 cable for connection between CellBox-Lite and PC CellBox-Lite Installation and Operation Manual v3.0 4 Introduction 1.2.3.2 PBX Cable Specifications Figure 1-4: RJ-11 cable for connection between PBX and CellBox-Lite 1.2.3.3 Technical Specifications Model CellBox-Lite GSM Network Type GSM Phase II GSM Module Integrated Dual Band (900/1800 or 850/1900 MHz SIM card Plug-in, 3V or 5V, small Transmission Power Max. 2W / 850 MHz Max. 2W / 900 MHz Max. 1W / 1800 MHz Max. 1W / 1900 MHz Receiver Sensitivity -104 dBm Line Voltage 24 to 72V DC DC Leakage Current <10µA On-hook Insulation, resistance between Line Terminal and the ground 0 to 100V DC > 5M 100 to 200V DC > 30K 500 VAC / 50Hz > 20K 100 VAC / 25Hz > 100K Ring Capacitor 0.47µF ± 10% On-hook Impedance @ 50V DC, 40 VAC / 25Hz > 3000Ω Ring Detect 27 to 100 VAC / 16 to 60Hz DC Resistance_(off-hook) 24 to 66V DC @ 20 to 100mA 100 to 350Ω Impedance_(off-hook) 300 to 3400Hz 500 to 700Ω Cellbox-Lite Installation and Operation Manual v3.0 5 Introduction Connectors Power Supply Input: Output RS-232 Connector – D-Type 9 pin Power Supply Connector – DC Power Jack Antenna Connector – SMA Female Line Interface Connector – RJ-11 110VAC, 60Hz 220VAC, 50Hz 9VDC, 800mA Temperature Range 0°C-45ºC /32ºF-113ºF Maximum Relative Humidity 95% Dimensions (HxWxD) 200x220x30mm 7.9x8.7x1.2 inch CellBox-Lite Installation and Operation Manual v3.0 6 2. Installation 2.1 Unpacking The following table describes the contents of the CellBox-Lite package. Note: Should the package be damaged or should items from the packing list be missing, contact your distributor directly. Nr. Item Quantity 1 CellBox-Lite 1 2 Installation CD with CUP software and Manual in PDF format 1 3 Power Supply (Input: 110VAC, 60Hz or 220VAC, 50Hz)(Output 9VDC, 800mA) 1 4 Antenna (with cable) 1 5 RS-232C cable (D-Type 9 pin male – D-Type 9 pin female) 1 6 PBX connection cable (RJ-11 – RJ-11) 1 7 Screws and plugs for wall mounting 2 8 Template for wall mounting 1 2.2 2.2.1 CellBox-Lite SIM Card Installation and Setup Preparation and Requirements The CellBox-Lite unit can be seen as a GSM cell phone. It therefore needs a SIM card from the local GSM network provider on the main board. Its registration to the GSM operator is similar to the registration of a mobile GSM phone. The PIN code request must be off. Is this not the case, use any GSM mobile phone to modify the SIM card setup or contact the local GSM operator. Cellbox-Lite Installation and Operation Manual v3.0 7 Installation The PIN code can also be inserted with the CUP program. (See Chapter 5.6) Note: We recommend disabling all call forwarding modes (in the events of busy, absence, unavailability, etc.) and Call Waiting from the GSM operator, before installing the SIM card. Additionally, all existing SMS messages in the SIM card need to be deleted, before inserting the card into the unit. 2.2.2 SIM Card Insertion in the CellBox-Lite Unit Caution To avoid damage to the CellBox-Lite unit, the 9V adapter should be disconnected from the electric power-outlet. Carefully remove the side panel from the CellBox-Lite unit. Use a pointed screwdriver to push the yellow SIM release lever, so that the SIM card tray moves towards you. Take out the tray. You will see that the SIM card will fit in the tray in one way. Now carefully place the tray with the SIM card in the slot and slide it in with the SIM card contacts facing down. CellBox-Lite Installation and Operation Manual v3.0 8 Installation 2.3 CellBox-Lite Physical Installation • Place the CellBox-Lite unit on the wall. • Connect the external Antenna via the external antenna cable into the Ant. connector on the side panel of the CellBox-Lite unit. * • Connect the analog extension interface of the PBX to the RJ-11 connector on the side panel of the CellBox-Lite unit. • Connect the power supply to the CellBox-Lite unit. • The unit will start the initialization and registration. At the end of the process, the LEDs on the front panel of the CellBox-Lite unit will display the GSM signal status**. Notes: *Experiment with the location of the antenna. The LEDs gives an indication where you get the best GSM reception. **During the initialization process, the LEDs will light up one after another for a few times. Should after the initialization process the LEDs Flash, an error has occurred (see Chapter 3 CellBox-Lite LED Status Indicators). 1 or 2 LEDs lit indicate a bad reception. An additional green LED on the side panel will provide the installer/administrator with information on the status of the Cellular engine: LED on Engine powered up, without network registration LED flashing slowly Registration OK - Idle mode LED flashing fast Conversation active Cellbox-Lite Installation and Operation Manual v3.0 9 3. CellBox-Lite LED Status Indicators Led 1 Led 2 Led 3 Led 4 Error description Flashing Flashing Flashing Flashing GSM engine problem Solution Power off and on the unit. Refer to your local supplier. Check your antenna Flashing Off Off Off No Signal or connection. Signal low (less Move your antenna to than 25%) a location with a better reception. Check with your GSM operator. Flashing Off Off Flashing Registration denied Contact your local GSM operator. Off Flashing Off Off PIN error Disable PIN code on SIM Card (see section 2). Contact your local GSM operator. Off Off Off Flashing No SIM card Insert SIM card. inserted* Check the Call Off Off Flashing Flashing Call Center/Service Center/Service Center Number with Center Number your local operator. error Enter the correct number in SIM card. Note: * Turn off the CellBox-Lite when the SIM card is not inserted. Cellbox-Lite Installation and Operation Manual v3.0 10 4. CellBox-Lite Usage The administrator will define the users in the CellBox-Lite database and provide him with the number of the CellBox-Lite unit (e.g. the SIM Card number). As another pre-condition, the Caller ID information (CLIP) needs to be activated on the GSM cell phone. This enables the CellBox-Lite unit to check the CLI of the incoming call with the authorized users in the database and respond with the correct reaction. Should the CellBox-Lite unite receive a call without a CLI or with an unauthorized CLI, it will not answer. The remote user can connect to the CellBox-Lite unit by calling or sending an SMS message to the number, provided by the local operator. Both methods will be described in the following paragraphs. The CellBox-Lite unit maintains a user authorization database, in which the following information is stored: User name SMS password User phone number Prefix restrictions – limitations to unit usage Number of minutes per month – limitations to unit usage Answer to CLI – for Call Through (VPN users) Call Back Authorized GSM Mobile phone users will be able to activate the Call Back or Call Through function as defined in the database. The CellBox-Lite can also be used as an extension gateway. Restriction for this usage can be inserted via the CUP program. Cellbox-Lite Installation and Operation Manual v3.0 11 CellBox-Lite Usage 4.1 Call Back (Remote Extension) Option A: When an authorized GSM mobile phone user calls the CellBox-Lite, the CellBox-Lite: Checks for the Caller ID information Verifies the Caller ID with the information in the database. “Disconnects without answer” Calls back the user Provides the user with the internal dial tone from the PBX (Remote Extension) Now the user can dial to any destination, as if he is calling from his office telephone. Option B1: When an authorized GSM mobile phone user sends an SMS message to the CellBox-Lite, the CellBox-Lite: Analyzes the SMS message (password). If the user is permitted to use the CellBox-Lite, then the CellBox-Lite: Calls the user Provides the user with the internal dial tone form the PBX (Remote Extension) Now the user can dial to any destination, as if he is calling from his office. Option B2: When an authorized GSM mobile phone user sends an SMS message and a telephone number to the CellBox-Lite, the CellBox-Lite: Analyzes the SMS message (password). If the user is permitted to use the CellBox-Lite, then the CellBox-Lite: Calls the user Automatically dials the telephone number specified in the SMS message The format is: SMS code + Number Notes: Should the CellBox-Lite be busy at the time you are initiating the Call Back function, the unit will automatically send you an SMS message, indicating that it is busy and to try later. When sending the SMS message (with or without telephone number) to the CellBox-Lite, it is not important whether you use uppercase or lowercase characters. CellBox-Lite Installation and Operation Manual v3.0 12 CellBox-Lite Usage 4.2 Call Through (VPN Users) When an authorized GSM Mobile phone user calls the CellBox-Lite, the CellBox-Lite: Checks for the Caller ID information Verifies the Caller ID with the information in the database. Answers and provides the user with a dial tone Now the user can dial to any destination, as if he is phoning from his office telephone. 4.3 Extension Gateway (Internal Users) When a user in the office wants to call a GSM mobile phone user: The user dials the extension number of the CellBox-Lite The CellBox-Lite answers and provides the user with a dial tone The CellBox-Lite checks the dialed digits (DTMF) and analyses them. If the prefix appears in the restricted numbers list, the call is terminated. If not, the user is connected to the requested number. Cellbox-Lite Installation and Operation Manual v3.0 13 The CellBox Utility Program (CUP) 5. The CellBox Utility Program (CUP) The CellBox Utility Program provides the administrator with a user-friendly interface to program and update the CellBox-Lite unit. Before installing the software, connect the laptop or PC via the RS-232 cable to the CellBox-Lite unit. After programming the CellBox-Lite, the laptop or PC can be disconnected from the unit. CellBox-Lite Installation and Operation Manual v3.0 14 The CellBox Utility Program (CUP) In this chapter you will come across references to default parameters. The following is a list of those default parameters: Description Default Setting Print Setup Based on the printer setting made in Windows. Administrator Password 1234 Communication Port COM1 Control Parameter ### DTMF level 8 User List Empty Allow only registered users Marked Call Limitations None Call Divert None Show CLIR Yes Roaming No Extension Gateway Restrictions Deny all SMS Notification Disabled 5.1 Installation of the CellBox Utility Program Place the installation CD in the CD-ROM drive of the computer Click on the CUP software installation option in the menu Follow the instruction on your screen After the installation, start the CUP program via Start/Programs Cellbox-Lite Installation and Operation Manual v3.0 15 The CellBox Utility Program (CUP) 5.2 CUP Startup Screen The initial window of the CUP (CellBox Utility Program) provides the administrator with a menu bar and a toolbar. This window is the starting point for all maintenance (e.g. adding, editing, deleting users, setting up schedules, setting up system parameters, etc.). CellBox-Lite Installation and Operation Manual v3.0 16 The CellBox Utility Program (CUP) 5.2.1 Menu and Toolbar Description Menus Function Description File Provides functions to Create (New), Open, Save, Save As, Define what to Print, Print, Print Preview a CellBox-Lite configuration file. This menu also contains the Print Setup, The Recent File and the Exit function. Communication Provides the Communication window with Read and Send parameters, Password and COM Port selection. Users Provides the Users List window. Parameters Provides the Parameters window with Control Parameter, Date & Time, Restrictions (Users & Extension Gateway), Call Divert, Advanced Settings, GSM Parameters and SMS Notification Help Provides the functions for Help Topics, About CUP and Device Version. Toolbar Function Description New – Creates a new CUP configuration file, based on the default settings. Open – Opens a CUP configuration file. Save – Saves a CUP configuration file. Print – Prints the contents of the current CUP configuration file. Cellbox-Lite Installation and Operation Manual v3.0 17 The CellBox Utility Program (CUP) 5.3 The File Menu The File Menu provides you with the following options: Function Description New Creates a new CUP configuration file, based on the default parameters. Open Opens a CUP configuration file. Save Saves a CUP configuration file. Save As Saves a CUP configuration file with a different name and/or in a different directory. Print Settings Menu Gives a choice of specific parameters that can be printed (e.g. All, Users List, Control Parameter). Print Prints the contents of the current CUP configuration file. Print Preview Shows a preview of the information to be printed. Print Setup Gives a screen to setup the printer for printing. Recent File Shows the recently used files. Exit Exits the CUP program. Note The File Menu contains standard functions, which will be described briefly in the following paragraphs. This is contrary to the functions in the other menus, which are described in more detail. 5.3.1 New The File/New function (or the New button on the Toolbar) automatically creates a new CUP configuration file in which defaults have been filled in. Though before replacing the current file, an opportunity is given to save changes made. CellBox-Lite Installation and Operation Manual v3.0 18 The CellBox Utility Program (CUP) 5.3.2 Open The File/Open function (or the Open icon on the Toolbar) gives a standard File/Open window, in which the file can be browsed for and/or selected. The Open button will load the CUP configuration file into the CUP program. 5.3.3 Save The File/Save function (or the Save icon on the Toolbar) saves the current file in the location it was opened from. Should the file be a new file, pressing the File/Save function (or the Save icon on the Toolbar) will automatically provide the Save As window. Cellbox-Lite Installation and Operation Manual v3.0 19 The CellBox Utility Program (CUP) 5.3.4 Save As The File/Save As function opens a standard File/Save As window, in which the file location can be determined and the name of the file can be defined. The Save button will save the CUP configuration file with the specified name in the specified directory. 5.3.5 Print Settings Menu The File/Print Settings Menu function gives another menu, from which the parameters that need to be printed can be chosen. After marking the required parameter, the File/Print function will give the chosen printout. CellBox-Lite Installation and Operation Manual v3.0 20 The CellBox Utility Program (CUP) 5.3.6 Print The File/Print function opens a standard File/Print window, in which a number of parameters can be changed for the current print job. Parameters are: Printer selection, what to print, number of copies, method of printing multiple copies, etc. Clicking on OK will give you a printout. The Print icon on the Toolbar prints a file with the default parameters defined in the CellBox Utility Program. Cellbox-Lite Installation and Operation Manual v3.0 21 The CellBox Utility Program (CUP) 5.3.7 Print Preview The File/Print Preview function shows a Preview of the CUP configuration file’s printable information. In this window the standard functions, like zoom, can be used. CellBox-Lite Installation and Operation Manual v3.0 22 The CellBox Utility Program (CUP) 5.3.8 Print Setup The File/Print Setup function provides a window, in which the default settings for the printer and the standard printer can be chosen. This information will then be used as default in the CUP program. 5.3.9 Exit The File/Exit function closes the CUP program. Though before closing the current file and the program, an opportunity is given to save CUP configuration file. Cellbox-Lite Installation and Operation Manual v3.0 23 The CellBox Utility Program (CUP) 5.4 The Communication Menu The Communication Menu provides you with the following options: Function Description Read Parameters Reads the current parameters of the CellBox-Lite and downloads them to the CUP program. Send Parameters Sends the defined parameters to the CellBox-Lite. Password Provides the possibility to change the administrator’s password. COM Port Provides the possibility to choose the Serial port through which you are communicating with the CellBox-Lite. The administrator’s password has to be filled in when reading or sending parameters. 5.4.1 Read Parameters The current parameters in the CellBox-Lite unit will be downloaded into the CUP program by activating Communication/Read Parameters. The following window appears: Button Description OK Start reading the current parameters from the CellBox-Lite and load them into the CUP program. Cancel Cancel the Read Parameters function and return to the main screen. Help Start the Help. CellBox-Lite Installation and Operation Manual v3.0 24 The CellBox Utility Program (CUP) 5.4.2 Send Parameters With Sending Parameters, the current information in the CUP program will be uploaded to the CellBox-Lite unit. Use Communication/Send Parameters and the following screen will appear: Field Details Enter Password Enter the current password. Button Description OK Show the Send Parameters screen after positive verification of the password entered. Cancel Cancel the Send Parameters function and return to the main screen. Cellbox-Lite Installation and Operation Manual v3.0 25 The CellBox Utility Program (CUP) After filling in the password and clicking on OK, the input is checked. The following screen will be shown: Button Description OK Start sending the current parameters from the CUP program to the CellBox-Lite. Cancel Cancel the Send Parameters function and return to the main screen. Help Start the Help Click on OK to start the Send process. CellBox-Lite Installation and Operation Manual v3.0 26 The CellBox Utility Program (CUP) 5.4.3 Password By selecting the Password function from the Communication menu, you can change the current password for the CellBox-Lite unit (default is 1234). Field Details Current password The password currently in use (will be * (stars)) New password The new password you want to insert. Confirm new password A repeat of the new password for confirmation. Button Description Send Send the changes made in this screen to the CellBox-Lite unit. Cancel Cancel the changes made in this screen and return to the main screen. Help Starts the Help. Cellbox-Lite Installation and Operation Manual v3.0 27 The CellBox Utility Program (CUP) 5.4.4 COM Port The administrator has to define the communication port, through which the PC sends his commands to the CellBox-Lite unit. This has to be done in the Communication Settings screen. Communication Settings Function Description OK Accepts the Communication Settings and returns you to the CUP main screen. Cancel Returns you to the CUP main window, without accepting changes made. Port drop down list Select the used communication port from the list. (Default = COM1) Help Starts the Help. CellBox-Lite Installation and Operation Manual v3.0 28 The CellBox Utility Program (CUP) 5.5 The Users Menu In the Users Menu there is the option to define who is allowed to use the CellBox-Lite (incoming call). The administrator can allow only registered users (users defined in the list below). This window is the starting point for all user maintenance (e.g. adding, editing, deleting users). The Users List window shows the users that have been defined in the CellBox-Lite database. Cellbox-Lite Installation and Operation Manual v3.0 29 The CellBox Utility Program (CUP) Button Description New Creates a new User. Edit Edits an existing user. Delete Deletes a user. Close Closes the Users List window and returns to the CUP main window. Help Starts the Help. 5.5.1 Creating New Users When clicking on the New button in the Users window, the following screen will appear: In this window, a new user is defined. After entering all information and marking all necessary fields, the user can be added to the database by clicking on the OK button. You will automatically return to the Users List window. Clicking the Cancel button will return you to the Users List window, without updating the database. CellBox-Lite Installation and Operation Manual v3.0 30 The CellBox Utility Program (CUP) The fields, radio buttons and buttons have been described in the following table: Details User Name Enter the full name of the user. SMS Password (Lowercase) Enter the SMS Password for the user. This is the key for any SMS operation. The user can’t request an operation from the system without this code (Max. 16 digits and/or characters). User Phone Number Enter the mobile phone number of the user. The CellBox-Lite unit will compare this number in case it receives a CLIP from the user and initiate the Call Back function from the PBX. (Use digits only!!!) Permissions Prefix Restriction Select the prefix restrictions scheme to which a call can’t be made (Schemes are defined in the Parameters menu). Max. number of minutes per month* Mark the box, should you want to limit the number of minutes per month, the user is allowed to use the CellBox-Lite unit. Left Time (Displayed only after “Read Parameters) Field, which shows the remaining time per month when the maximum has been set. Activities (not for SMS) Call Through CellBox-Lite unit will initiate a dial tone from the PBX after analyzing the CLIP. Call Back CellBox-Lite unit will analyze the CLIP, not answer and initiate Call Back from the PBX, if user is allowed to use the system. OK Accepts the information for the user and adds him to the database. Cancel Returns you to the main window, without adding a new user to the database. Cellbox-Lite Installation and Operation Manual v3.0 31 The CellBox Utility Program (CUP) Notes: *Every first of the month, the minutes per month parameter is automatically reset. The minimum value is 100 minutes and can be increased by steps of 100 to a maximum value of 1000 minutes. The User Phone Number is unique in the Users List. It can only be used once. 5.5.2 Editing Users From the Users List window, select the required user and click on the Edit button. The Edit User window will appear. All fields can be changed. After clicking on the OK button, the changes will be accepted and you will return to the Users window. 5.5.3 Deleting Users From the Users List window select the required user(s) (you can use Shift+click and Ctrl+click) and click on the Delete button. 5.6 The Parameters Menu The Parameters Menu provides you with the following options: Function Description Control Parameter Parameter, which is used to get a dial tone after finishing a call, to continue with a new call. Date&Time Setting the current Date and Time. Restrictions (User & Extension Gateway) Setting up dialing restrictions for users (incoming calls) and Extension Gateway (outgoing calls). Call Divert Setting up a call diversion route. Advanced Settings Setting the DTMF audio level. GSM Parameters Setting up Network ID, CLIR, Roaming and PIN code. SMS Notification Setting up using of SMS Notification and “unit busy” message. CellBox-Lite Installation and Operation Manual v3.0 32 The CellBox Utility Program (CUP) 5.6.1 Control Parameter After finishing the conversation via the CellBox-Lite, the control parameter (default = ###) can be used to get a dial tone for a new call. The user does not have to initiate the connection procedure with the CellBox-Lite again. Control Parameter Buttons OK Accepts the PBX Parameters and returns you to the CUP main screen. Cancel Returns you to the CUP main screen, without accepting changes made. Control Parameter New call key Cellbox-Lite Installation and Operation Manual v3.0 Code to enable the user to continue to make calls via the PBX, without having to contact the Cellbox-Lite unit between each call (default = ###). 33 The CellBox Utility Program (CUP) 5.6.2 Date & Time In the Date & Time window the system Date and Time is set. Date & Time OK Accepts the System Parameters and returns you to the main screen. Cancel Returns you to the main window, without accepting changes made. CellBox-Lite Installation and Operation Manual v3.0 34 The CellBox Utility Program (CUP) 5.6.3 Restrictions (Users) Prefix Restrictions for incoming calls can be set in the Restrictions window. The administrator can setup 10 different Prefix Restriction definitions in the following window. Button Description Restriction 1-10 Activates a window, in which a prefix restriction can be setup. OK Returns you to the main window, accepting the made changes. Cancel Returns you to the main window, without making changes. Help Starts the Help. Cellbox-Lite Installation and Operation Manual v3.0 35 The CellBox Utility Program (CUP) Clicking on a Restriction button provides the following window: Button Description Add Activates a window, in which a prefix can be added. Delete Deletes a selected prefix. OK Returns you to the Restrictions window, accepting the made changes. Cancel Returns you to the Restrictions window, without making changes. CellBox-Lite Installation and Operation Manual v3.0 36 The CellBox Utility Program (CUP) Clicking the Add button will provide you with the following window: Button Description OK Returns you to the Prefix Restriction Numbers window, accepting the made changes. Cancel Returns you to the Prefix Restriction Numbers window, without making changes. Cellbox-Lite Installation and Operation Manual v3.0 37 The CellBox Utility Program (CUP) 5.6.4 Restrictions for the Extension Gateway Prefix Restrictions for outgoing calls can be set in the Extension Gateway Restrictions window. The administrator can make 3 initial major decisions: Deny the use of the unit as an extension gateway; Open the unit as an extension gateway for all prefixes; Open the unit as an extension gateway, but use a prefix list. In the last case the prefix list can be a restriction (you cannot use certain prefixes) or a limitation (you can use only certain prefixes). The prefix lists are also called white and black lists. CellBox-Lite Installation and Operation Manual v3.0 38 The CellBox Utility Program (CUP) Function Description Deny All Denies the usage of the unit as an extension gateway. Allow All Allows the usage of the unit as an extension gateway for all prefixes. By Prefix List Allows the usage of the unit as an extension gateway for certain prefixes. Deny Only Restricts the usage of certain prefixes (only when By Prefix List is marked). Allow Only Allows the usage of certain prefixes only (only when By Prefix List is marked). Button Description Add Activates a window, in which a prefix can be added. Delete Deletes a selected prefix. OK Returns you to the Restrictions window, accepting the made changes. Cancel Returns you to the Restrictions window, without making changes. Help Provides Help about this topic. Cellbox-Lite Installation and Operation Manual v3.0 39 The CellBox Utility Program (CUP) Clicking the Add button will provide you with the following window: Button Description OK Returns you to the Prefix List window, accepting the made changes. Cancel Returns you to the Prefix List window, without making changes. 5.7 Call Divert In the Call Divert screen you can define an alternative call route, should this CellBoxLite be busy. The following screen is used for this: Call Divert Buttons OK Accepts the Call Divert information and returns you to the CUP main screen. Cancel Returns you to the CUP main screen, without accepting changes made. CellBox-Lite Installation and Operation Manual v3.0 40 The CellBox Utility Program (CUP) Call Divert Parameters International Format Marking this will allow you to use the plus sign before the number. Call Divert Number The number to divert to (+123 4 5678901. when the International Format has been marked) Notes: When using the Call Divert, you will manually have to duplicate the database, so that the user will have the same restrictions in both CellBoxes. Keep in mind that when using the Call Divert option, the user may have used all his time with the first CellBox, but not with the second!!! The Call Divert function provides the CellBox-Lite with information on how to reach the alternative number. The information is sent in string format. When marking International Format, the string is different from when it is not marked. Cellbox-Lite Installation and Operation Manual v3.0 41 The CellBox Utility Program (CUP) 5.8 Advanced Settings In the Advanced Settings screen, you can define the DTMF audio level. The change can be done in the following screen: Advanced Settings Buttons OK Accepts the DTMF Level setting and returns you to the CUP main screen after confirming the change. Cancel Returns you to the CUP main screen, without accepting changes made. Help Starts the Help Function. Factory Settings Changes settings back to original. DTMF Level Parameters DTMF Level 5.9 Changes the audio level of the DTMF. (Default = 4). GSM Parameters In the GSM Parameters screen you can define the following optional parameters: the network operator to which the SIM in the unit belongs (Network Lock), to set the CLIR (Caller Line Interface Restriction), to set the Roaming and PIN code. CellBox-Lite Installation and Operation Manual v3.0 42 The CellBox Utility Program (CUP) GSM Parameter Buttons OK Accepts the GSM parameter settings and returns you to the CUP main screen. Cancel Returns you to the CUP main screen, without accepting changes made. Help Starts the Help Function. Function Description Network ID Insert 5 digits, indicating the Network Operator to registrate to. During the registration the SIM card will be locked to that network. (Optional) CLIR Calling Line Interface Restriction. Don’t show the SIM telephone number in the outgoing call. (Default on – Yes) Roaming Allows the system to register with another GSM operator. (Default off – No) PIN Number Marking this will allow you to enter a PIN code automatically to the unit during every power-up (max. 8 digits) (Optional) Cellbox-Lite Installation and Operation Manual v3.0 43 The CellBox Utility Program (CUP) 5.10 SMS Notification In the SMS Notification screen you can define to activate the SMS notification and what the message will be. SMS Notification Buttons OK Accepts the SMS notification parameter setting and returns you to the CUP main screen. Cancel Returns you to the CUP main screen, without accepting changes made. Help Starts the Help Function. Function Description Enable SMS notification Activate the SMS notification option. Enter SMS message Enter a message that will be sent to a user requesting a call back via an SMS message when the system is busy. (Max. 64 characters.) CellBox-Lite Installation and Operation Manual v3.0 44 The CellBox Utility Program (CUP) 5.11 Help The Help Menu provides you with the following options: Function Description Help Topics The Help function in the CUP. About CUP Version information about the CUP software. Device Version Unit Firmware version information. 5.11.1 Help Topics By clicking on Help and then on Help Topics, you will start the help engine for the CUP program and you will be able to search the database by using the Find tab, Index and Context. 5.11.2 About CUP By clicking on Help and then on About CUP, you will get the version information of the CellBox-Lite Utility Program. Cellbox-Lite Installation and Operation Manual v3.0 45 The CellBox Utility Program (CUP) 5.11.3 Firmware Version By clicking on Help and then on Firmware Version, you will get the unit’s firmware version information. Firmware Version Buttons OK Returns you to the CUP main screen. Cancel Returns you to the CUP main screen. CellBox-Lite Installation and Operation Manual v3.0 46 6. CellBox Utility Program Quick Reference Guide Notes: First create a simple configuration file by going over Chapter 5. Save the simple configuration file locally and upload the file to the CellBox-Lite (using Communications/Send Parameters). Always update the local file after making changes to the CellBox-Lite configuration file. 6.1 Create New User Start CUP program Click on Communication Click on Read Parameters Click on Users Click on New Enter information and make selections in this window Click on OK Click on Close When finished making changes to the configurations file: Click on Communication Click on Send Parameters Enter Password Click on OK Cellbox-Lite Installation and Operation Manual v3.0 47 CellBox Utility Program Quick Reference Guide 6.2 Edit User Start CUP program Click on Communication Click on Read Parameters Click on Users Select user to be edited Click on Edit Make changes in this window Click on OK Click on Close When finished making changes to the configurations file: Click on Communication Click on Send Parameters Enter Password Click on OK 6.3 Delete User Start CUP program Click on Communication Click on Read Parameters Click on Users Select user to be deleted Click on Delete Click on Close For selecting multiple users, use Shift+Click or Ctrl+Click. When finished making changes to the configurations file: Click on Communication Click on Send Parameters Enter Password Click on OK CellBox-Lite Installation and Operation Manual v3.0 48 CellBox Utility Program Quick Reference Guide 6.4 Restriction Settings (Users) Start CUP program Click on Communication Click on Read Parameters Click Parameters Click Restrictions Click on Users Click on required Restriction (1-10) Add restricted prefix Click on OK Repeat for other prefixes Click on OK Repeat for other Restrictions Click on OK Click on OK When finished making changes to the configurations file: Click on Communication Click on Send Parameters Enter Password Click on OK 6.5 Restriction Settings (Extension Gateway) Start CUP program Click on Communication Click on Read Parameters Click Parameters Click Restrictions Click on Extension Gateway Decide on whether to Allow All or By Prefix List When choosing Allow All Click on OK Click on Communication Cellbox-Lite Installation and Operation Manual v3.0 49 CellBox Utility Program Quick Reference Guide Click on Send Parameters Enter Password Click on OK When choosing By Prefix List Decide on whether to create a Deny Only or Allow Only Prefix list Add restricted prefix Click on OK Repeat for other prefixes Click on OK When finished making changes to the configurations file: Click on Communication Click on Send Parameters Enter Password Click on OK CellBox-Lite Installation and Operation Manual v3.0 50 CellBox Utility Program Quick Reference Guide 6.6 Date&Time Setting Start CUP program Click on Communication Click on Read Parameters Click Parameters Click on Date&Time Insert Date and Time Click on OK When finished making changes to the configurations file: Click on Communication Click on Send Parameters Enter Password Click on OK 6.7 Control Parameter Setting Start CUP program Click on Communication Click on Read Parameters Click on Parameters Select Control Parameter Enter New call key Click on OK When finished making changes to the configurations file: Click on Communication Click on Send Parameters Enter Password Click on OK Cellbox-Lite Installation and Operation Manual v3.0 51 CellBox Utility Program Quick Reference Guide 6.8 Call Divert Setting Start CUP program Click on Communication Click on Read Parameters Click on Parameters Select Call Divert Enter Call Divert Number Click on OK When finished making changes to the configurations file: Click on Communication Click on Send Parameters Enter Password Click on OK 6.9 Advanced Settings Start CUP program Click on Communication Click on Read Parameters Click on Parameters Select Advanced Settings Click on Yes Enter DTMF level Click on OK Click on Yes When finished making changes to the configurations file: Click on Communication Click on Send Parameters Enter Password Click on OK CellBox-Lite Installation and Operation Manual v3.0 52 CellBox Utility Program Quick Reference Guide 6.10 GSM Parameter Settings Start CUP program Click on Communication Click on Read Parameters Click on Parameters Click on GSM Parameters Fill in the Network ID Decide on whether Roaming should be on (Yes) or off (No) Decide on whether CLIP should be on (Yes) or off (No) Mark and Enter the PIN number if appropriate Click on OK When finished making changes to the configurations file: Click on Communication Click on Send Parameters Enter Password Click on OK 6.11 SMS Notification Settings Start CUP program Click on Communication Click on Read Parameters Click on Parameters Mark SMS notification Accept or change the current message Click on OK When finished making changes to the configurations file: Click on Communication Click on Send Parameters Enter Password Click on OK Cellbox-Lite Installation and Operation Manual v3.0 53 7. CellBox-Lite Access Quick Reference Guide 7.1 Accessing the CellBox-Lite There are 3 methods to access the CellBox-Lite: 1) Dialing from your mobile phone 2) Sending an SMS message from your mobile phone 3) Dialing the extension number from the office phone The different methods are described in the following paragraphs. Note: Before dialing from your mobile phone, make sure that you have activated your Caller ID (Check your mobile phone manual for more information on this subject.). 7.1.1 From your mobile phone by dialing Call the CellBox-Lite number You will receive the internal dial tone and you can dial the telephone number of the person you want to contact. 7.1.2 From your mobile phone with SMS (1) Write a predefined SMS message. Send this message to the CellBox-Lite The CellBox-Lite will call you back within a few seconds and provide you with a dial tone. Should, at that time, the CellBox-Lite be busy, you will receive an SMS message advising you to contact the CellBox-Lite later. Cellbox-Lite Installation and Operation Manual v3.0 54 CellBox-Lite Access Quick Reference Guide 7.1.3 From your mobile phone with SMS (2) Write a predefined SMS message. Add the required destination telephone number to your SMS code in the message Send this message to the CellBox-Lite The CellBox-Lite will call you back within a few seconds and at the same time calls the destination telephone number specified in the SMS message. Should, at that time, the CellBox-Lite be busy, you will receive an SMS message advising you to contact the CellBox-Lite later. 7.1.4 From the telephone in the Office Call the CellBox-Lite extension number within your office You will be provided with a dial tone. Dial the required mobile phone number The CellBox-Lite will dial the required mobile number. 55 Cellbox-Lite User Manual