1
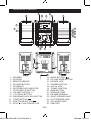
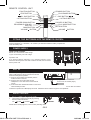
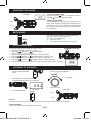
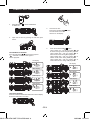
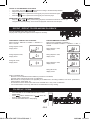
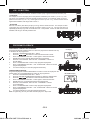
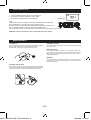
DEUTSCH
ENGLISH
FRANÇAIS
NEDERLANDS
ČEŠTINA
MAGYAR
Slovenčina
MCD 800
ENVIRONMENTAL PROTECTION
Do not dispose of this product with the normal household waste at the end
of its life cycle. Return it to a collection point for the recycling of electrical
and electronic devices. This is indicated by the symbol on the product,
user manual or packaging.
The materials are reusable according to their markings. By reusing, recycling or
other forms of utilization of old devices you make an important contribution to
the protection of our environment.
Please contact your local authorities for details about collection points.
CLASS 1 LASER PRODUCT
KLASSE 1 LASER PRODUKT
LUOKAN 1 LASER LAITE
KLASS 1 LASER APPARAT
PRODUCTO LASER CLASE 1
CAUTION - INVISIBLE LASER RADIATION WHEN OPENING
THE COVER OR PRESSING THE SAFETY INTERLOCK. AVOID
EXPOSURE TO THE LASER BEAM.
This symbol indicates the presence of dangerous
voltage inside the enclosure, sufficient enough to
cause electric shock.
WARNING
Risk of electric shock
Do not open!
Caution: To reduce the risk of electric shock, do not remove the cover (or back). There
are no user serviceable parts inside. Refer servicing to qualified service personnel.
This symbol indicates the presence of important
operating and maintenance instructions for the
device.
Safety, Environmental and Setup Instructions
•
Use the device in dry indoor environments only.
•
Protect the device from humidity.
•
Do not open the device. RISK OF ELECTRIC SHOCK! Refer opening and servicing to qualified personnel.
•
Connect this device to a properly installed and earthed wall outlet only. Make sure the mains voltage corresponds with
the specifications on the rating plate.
•
Make sure the mains cable stays dry during operation. Do not pinch or damage the mains cable in any way.
•
A damaged mains cable or plug must immediately be replaced by an authorized service center.
•
In case of lightning, immediately disconnect the device from the mains supply.
•
Children should be supervised by parents when using the device.
•
Clean the device with a dry cloth only.
Do NOT use CLEANING AGENTS or ABRASIVE CLOTHS!
•
Do not expose the device to direct sunlight or other heat sources.
•
Install the device at a location with sufficient ventilation in order to prevent heat accumulation.
•
Do not cover the ventilation openings!
•
Install the device at a safe and vibration-free location.
•
Install the device as far away as possible from computers and microwave units; otherwise radio reception may be
disturbed.
•
Do not open or repair the enclosure. It is not safe to do so and will void your warranty. Repairs only by authorized
service/ customer center.
•
The device is equipped with a “Class 1 Laser”. Avoid exposure to the laser beam as this could cause eye injuries.
•
Only use mercury and cadmium-free batteries.
•
Used batteries are hazardous waste and NOT to be disposed of with the household waste!!! Return the batteries to your
dealer or to collection points in your community.
•
Keep batteries away from children. Children might swallow batteries. Contact a physician immediately if a battery was
swallowed.
•
Check your batteries regularly to avoid battery leakage.
Used batteries are hazardous waste and NOT to be disposed
of with the household waste! As a consumer you are legally
obligated to return all batteries for environmentally responsible
recycling – no matter whether or not the batteries contain harmful
substances*).
Return batteries free of charge to public collection points in your
community or to shops selling batteries of the respective kind.
Only return fully discharged batteries.
*) marked Cd = cadmium, Hg = mercury, Pb = lead
LOCATION OF CONTROLS
2
5
3
1
4
1
26
6
10
7
11
8
13
9
16
14
15
20
18
17
12
19
22
24
23
21
1. SPEAKER
2. CD DOOR
3. REMOTE SENSOR
4. CD OPEN BUTTON
5. CD DISPLAY
6. FM STEREO LED INDICATOR
7. CD FOLDER UP BUTTON
8. VOLUME CONTROL + / -
9. + 10 TRACK BUTTON
10. PROGRAM/CLOCK-ADJ. BUTTON
11. F-SKIP BUTTON
12. PLAY/PAUSE BUTTON
13. STOP / FUNCTION BUTTON
CD1C-USB-NEW ONE TCD13-ENG.indd 3
25
14.
15.
16.
17.
18.
19.
20.
21.
22.
23.
24.
25.
26.
21
B-SKIP BUTTON
CD PLAY MODE BUTTON
PHONES JACK
STANDBY BUTTON
AUX. IN JACK
TUNING CONTROL
BAND BUTTON
SPEAKER CORD
FM WIRE ANTENNA
RIGHT SPEAKER JACK
LEFT SPEAKER JACK
AC POWER CORD
USB PORT
GB 1
19/9/2008 15:29:11
REMOTE CONTROL UNIT
STANDBY BUTTON
FUNCTION BUTTON
PLAY/PAUSE BUTTON
STOP BUTTON
B - SKIP BUTTON
F - SKIP BUTTON
+ 10 TRACK BUTTON
- 10 TRACK BUTTON
FOLDER DOWN BUTTON
PROGRAM/CLOCK-ADJ
BUTTON
BAND BUTTON
VOLUME
FOLDER UP BUTTON
PLAY MODE BUTTTON
MUTE BUTTON
VOLUME
BUTTON
BUTTON
FITTING THE BATTERIES INTO THE REMOTE CONTROL
Remove the battery cover.
Insert the batteries ( 2 x AAA SIZE , not included ) as described inside the battery compartment.
Close the battery door.
POWER SUPPLY
USING HOUSE CURRENT
Before use, check that the rated voltage
of your unit matches your local voltage.
Important note
If an abnormal display indication or an operating problem occurs,
disconnect the AC power cord. Wait at least 5 seconds, then reconnect
the AC power cord.
To AC outlet
AUX. IN
An external (auxiliary) audio source (i.e., personal CD
player or MP3 player) can be connected to this unit
and heard through the speakers.
1) Plug one end of cable (not included) into the
AUX IN socket on the unit.
2) Plug the other end of the cable into the
Headphone or Line Out socket of the external source.
3) Press the STOP / FUNCTION button on the unit to select Auxiliary function.
(Plug other end into external
source such as an MP3 player.)
Aux-in cable is included.
Continue to operate CD or MP3 player as usual. Selections will be heard through the unit's speakers.
1.
2.
AUDIO CONTROL
Power is on/off by pushing standby button.
The function is selected cyclically by pressing
STOP / FUNCTION button :
CD
USB
TUNER
AUX
STANDBY
FUNCTION
NOTE: When standby light is lit, unit is in OFF (standby) mode.
CD1C-USB-NEW ONE TCD13-ENG.indd 4
GB 2
19/9/2008 15:29:18
ADJUSTING THE SOUND
TO ADJUST THE VOLUME
VOLUME
STEREO HEADPHONES
For private listening, headphones ( not included ) of not
less 8 ohms impedance and fitted with a standard 3.5mm
diameter jack plug, may be fitted to the front PHONES
jack. Insertion of the plug here automatically switches-off
the loudspeakers.
VOL. +
VOL. -
Mute On/Off
The mute on/ off is changed by pushing MUTE button.
The “mute” mark is on when mute is on.
The mute on is cancelled when:
a. The power is off/on
b. The Volume is adjusted by the VOL +/- button.
Mute
TO ADJUST THE VOLUME
Press the VOLUME
button to increase the volume or
VOLUME button to decrease the volume.
CLOCK ADJUSTMENT
program/CLOCK-ADJ.
The clock is displayed on CD display at standby mode.
1. Press the PROGRAM / CLOCK-ADJ. button,
2. Press the
F-SKIP/UP or
B-SKIP/DOWN
to select 12 hours or 24 hours display.
3. Press the PROGRAM / CLOCK-ADJ. button, the hour digit flash.
4. Press the F-SKIP/UP or B-SKIP/DOWN to adjust hour digit.
5. Press the PROGRAM / CLOCK-ADJ. button, the minute digit flash.
6. Press the F-SKIP/UP or B-SKIP/DOWN to adjust minute digit.
7. Press the PROGRAM / CLOCK-ADJ. button again, the correct time is shown on display.
LISTENING TO THE RADIO
4 . Tune to the desired radio station by using TUNING
knob and frequency is displayed.
1 . Turn on the unit by
pressing POWER STANDBY
button.
TUNING
LCD display
2 . Press the STOP / FUNCTION button
to select the radio and frequency is displayed.
LCD display
3 . Press the BAND button.
5 . Adjust the sound.
VOLUME
BAND
VOL. +
VOL. -
Antenna
For FM reception fully unwind the external FM wire antenna and adjust direction, for optimum reception.
AFTER LISTENING
Turn off the unit by pressing POWER STANDBY button.
CD1C-USB-NEW ONE TCD13-ENG.indd 5
GB 3
19/9/2008 15:29:28
COMPACT DISC PLAYBACK
1 . Press POWER STANDBY button.
2 . Press the STOP
to select CD.
4 . Insert a disc with the label side facing up.
/ FUNCTION button
5.
Close the CD door.
Press the PLAY/PAUSE
The total tracks of the disc
will show on the display.
button.
3 . Open the CD door by pushing the CD door Open
button.
6. TO INTERRUPT PLAYBACK
Press the Play/Pause
button and the symbol
" " will flash. Press the button again to
resume playback.
CD display
Press the PLAY/PAUSE
button.
Track number "01" ," CD "& the symbol "
" will
be shown during normal compact disc playback.
Track number "001"," CD ", the symbol "
"&
"MP3"will be shown during MP3 playback.
Track number "001"," CD ", the symbol "
"&
"WMA" will be shown during WMA playback.
Track number "001"," CD ", the symbol "
"&
"USB" will be shown during USB playback.
CD display
MP3 display
MP3 display
WMA display
WMA display
USB display
USB display
TO STOP PLAYBACK
Press the STOP/CLEAR/FUNCTION button and the display
shows the total tracks of the disc.
CD1C-USB-NEW ONE TCD13-ENG.indd 6
GB 4
19/9/2008 15:29:41
TO SKIP TO THE BEGINNING OF A TRACK
•
Press either one of the skip buttons according to the desired skip direction.
•
Playback resumes from the selected track.
•
When the button is pressed once during play, the previous track starts again.
•
When the button is pressed once during play, the next track plays.
SEARCHING FOR A PASSAGE WITHIN A TRACK
•
Keep the or button pressed during playback, and release the button as soon as you
recognize the desired passage. Then normal CD playback will resume from this point.
REPEAT , REPEAT FOLDER AND MIX PLAYBACK
Press PLAYMODE button during stop mode.
CD plays with a single track repeat, all tracks repeat or randomly.
FOR NORMAL COMPACT DISC PLAYBACK
Mode sequence REPEAT flashed >> REPEAT >>
MIX >> CLEAR.
During Repeat 1 mode,
display shows
During Repeat 2 mode,
display shows
During Mix mode,
display shows
FOR MP3/WMA/USB PLAYBACK
Mode sequence REPEAT flashed >>
REPEAT FOLDER FLASHED >> REPEAT >> MIX >>
CLEAR.
During Repeat 1 mode,
display shows
During Repeat 2 mode,
display shows
During Repeat 3 mode,
display shows
During Mix mode,
display shows
Note on CD-R/RW discs
- Because of non-standardized format definition/ production of CD-R/RW,
playback quality and performance are not guaranteed.
- Manufacturer is not responsible for the playability of CD-R/RW due to recording conditions, such as PC performance, writing software, media ability, etc.
- Do not attach a seal or label to either side of the CD-R/RW disc. It may cause a malfunction.
- It is recommended to record only audio files on CD-R/RW discs for easy reading.
FOLDER UP / DOWN
-
-
Press FOLDER UP or FOLDER DOWN button to select
desired folder.
Press
B-SKIP / DOWN button or
F-SKIP / UP button to select desired track.
- Press PLAY/PAUSE button to start playing.
CD1C-USB-NEW ONE TCD13-ENG.indd 7
GB 5
19/9/2008 15:29:51
+10 / -10 BUTTON
These buttons allow you to advance 10 tracks at a time (+10) or go back 10 tracks at a time (-10).
+10 BUTTON
For example, if Track 1 is playing and +10 is pressed, it will take you to Track 11 (1+10 = 11). You
may press +10 repeatedly to advance forward 10 tracks at a time. (For example, when on Track 1,
press once to Track 11 (1+10 = 11). Press again to Track 21 (11+10 = 21).) If there are less than 10
higher tracks available, CD will go back to Track 1.
-10 BUTTON
Same as +10 button (see above) except you can go back 10 tracks at a time. For example, if Track
12 is playing and -10 is pressed, it will take you back to Track 2 (12-10 = 2). You may also press -10
repeatedly (as above) to go back 10 tracks each time -10 is pressed. If there are less than 10 tracks
available, CD will go to the last possible track.
PROGRAM PLAYBACK
FOR NORMAL COMPACT DISC PLAYBACK
Programmed playback enables tracks on a disc to be played in the desired order. Up
to 20 tracks can be programmed.
1.
Press the “ PROGRAM/CLOCK-ADJ. “ button.
2.
Press the
skip buttons to select the desired track number.
3.
Press “ PROGRAM/CLOCK-ADJ. “ button again to memorize the track.
4.
Repeat steps 2 and 3 until all desired tracks are programmed.
5.
Press the “ PLAY/PAUSE “ button to start. “ PROGRAM “ is shown on
the CD display.
6.
Press “ STOP/FUNCTION “ button to stop programmed playback.
7.
Press “ PROGRAM/CLOCK-ADJ. “ and “ PLAY/PAUSE “ buttons to resume
programmed playback.
8.
Turn off the CD player to clear the programmed memory.
FOR MP3/WMA PLAYBACK
Programmed playback enables folders/albums or tracks on a disc to be played in the
desired order. Up to 20 folders/albums or tracks can be programmed.
1.
Press the “ PROGRAM/CLOCK-ADJ. “ button.
2. Press the FOLDER DOWN/FOLDER UP button to select the desired folder.
3.
Press the
skip buttons to select the desired track number.
4.
Press “ PROGRAM/CLOCK-ADJ. “ button again to memorize the track.
5.
Repeat steps 2 to 4 until all desired tracks are programmed.
6.
Press the “ PLAY/PAUSE “ button to start. “ PROGRAM “ is shown
on the CD display.
7.
Press “ STOP/FUNCTION “ button to stop programmed playback.
8.
Press “ PROGRAM/CLOCK-ADJ. “ and “ PLAY/PAUSE “ buttons to resume programmed playback.
9.
Turn off the CD player to clear the programmed memory.
Note : Programming can only be made when the player is in stop mode.
CD1C-USB-NEW ONE TCD13-ENG.indd 8
CD display
MP3/WMA display
GB 6
19/9/2008 15:29:58
USB OPERATION
1. Connect USB disk or MP3 player into the USB port.
2. Press STOP / FUNCTION button to select USB.
3. Press PLAY / PAUSE button to start playback.
USB display
note:
USB connector does not support connection with USB extension cable and
it is not designed for communication with computer directly.
Manufacturer is not responsible for the playability of USB disk or MP3 player
due to recording condition, capacity, interface compatibility, etc.
Due to different formats, some USB disks or MP3 players may take longer time to be read.
USB stick is direct connected or with a cable with max. 0,5 m length.
MAINTENANCE
CLEANING CD
If the CD skips or will not play , the disc may need cleaning . Before
playing, wipe the disc from the center outward with a
cleaning cloth. After playing, store the disc in its case.
CLEANING THE UNIT
Do not use volatile chemicals on this unit. Clean by lightly wiping
with a soft cloth.
IMPORTANT NOTE
If an abnormal display indication or an operating problem occurs, disconnect the AC power cord and remove the batteries.
Wait at least 5 seconds, then reconnect the AC power cord or
reinstall the batteries.
WARNING
Should the CD door be opened before the reading of the CD
is completed, a jamming noise may occur. This is resolved by
closing the CD door.
CLEANING THE CD LENS
If the CD lens is dusty, clean it with a brush-blower. Blow several
times on the lens and remove the dust with the brush. Finger prints
may be removed with a cotton swab moistened with alcohol.
CD1C-USB-NEW ONE TCD13-ENG.indd 9
GB 7
19/9/2008 15:30:01