1
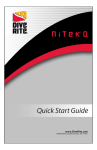
175 NW Washington Street
Lake City, Florida 32055, USA
Web: www.diverite.com
Phone: 386.752.1087
Fax: 386.755.0613
175 NW Washington Street
Lake City, Florida 32055, USA
Web: www.diverite.com
Phone: 386.752.1087
Fax: 386.755.0613
EX2744EQ
Balanced Relief Valve
EX2744EQ
Balanced Relief Valve
Product description
Product description
The Relief Valve is a hands-free urination internally
balanced relief valve. The Relief Valve is made from
heavy-duty delrin plastic for maximum durability. The
Relief Valve comes standard with 24-inches (30 cm) of
kink-resistant black tubing with a barbed end allowing
easy connection to most condom-style male catheters
(found in most medical supply stores, drug stores, or
your local Dive Rite dealer).
Installing the Relief Valve
Installing the Relief Valve
Note: Failure to follow installation instructions can permanently damage your drysuit. Read all
of the instructions before attempting installation. Consult your drysuit manufacturer if installation
service is requested.
Note: Failure to follow installation instructions can permanently damage your drysuit. Read all
of the instructions before attempting installation. Consult your drysuit manufacturer if installation
service is requested.
To install the Relief Valve:
To install the Relief Valve:
1.
Determine the location where you want the Relief Valve on your drysuit.
1.
Determine the location where you want the Relief Valve on your drysuit.
2.
Using a 5/8-inch (16 mm) punch, puncture a hole in your drysuit in the desired location.
2.
Using a 5/8-inch (16 mm) punch, puncture a hole in your drysuit in the desired location.
3.
Disassemble the Relief Valve.
3.
Disassemble the Relief Valve.
4.
Remove the two rubber gaskets that fit between the valve halves. Using sandpaper make
one side of each seal slightly rough. This will give the adhesive a better surface.
4.
Remove the two rubber gaskets that fit between the valve halves. Using sandpaper make
one side of each seal slightly rough. This will give the adhesive a better surface.
5.
Apply sealing adhesive (please consult your drysuit manufacturer for proper adhesive to
use) to the rough sides of sealing gaskets.
5.
Apply sealing adhesive (please consult your drysuit manufacturer for proper adhesive to
use) to the rough sides of sealing gaskets.
6.
Place a sealing gasket on the outside and inside of your suit around the hole created so
that the adhesive contacts drysuit material. Be sure that the gaskets are aligned equally
with the hole.
6.
Place a sealing gasket on the outside and inside of your suit around the hole created so
that the adhesive contacts drysuit material. Be sure that the gaskets are aligned equally
with the hole.
7.
Use a clamp to apply pressure to seals and allow time for it to thoroughly cure.
7.
Use a clamp to apply pressure to seals and allow time for it to thoroughly cure.
TIP: Use a bolt (1/2-inch diameter), nut and two washers (1.5-inch to 2-inch diameter, same size
as the seals). This makes a good clamp for Relief Valve installation. Each washer goes on
the outside of the seals. DO NOT USE THE RELIEF FOR THIS PURPOSE.
TIP: Use a bolt (1/2-inch diameter), nut and two washers (1.5-inch to 2-inch diameter, same size
as the seals). This makes a good clamp for Relief Valve installation. Each washer goes on
the outside of the seals. DO NOT USE THE RELIEF FOR THIS PURPOSE.
User Product Data Sheet
EX2744EQ
User Product Data Sheet
EX2744EQ
7APR09
1/2
7APR09
1/2
Pre-dive preparation
Pre-dive preparation
Before going diving with you Relief Valve, follow these instructions:
Before going diving with you Relief Valve, follow these instructions:
1. Connect one end of the supplied kink-resistant tubing to the valve nipple.
1.
Connect one end of the supplied kink-resistant tubing to the valve nipple.
2.
Obtain a condom-style male catheter (from you local Dive Rite dealer or most
drug/medical supply stores).
3.
Slide the catheter over the barbed end of the kink-resistant tubing.
2. Obtain a condom-style male catheter (from you local Dive Rite dealer or most
drug/medical supply stores).
3. Slide the catheter over the barbed end of the kink-resistant tubing.
Post dive maintenance
Post dive maintenance
To keep your Relief Valve clean and in good condition, follow these instructions.
To keep your Relief Valve clean and in good condition, follow these instructions.
1.
Remove the Relief Valve from your drysuit
Disassemble the outer-half of the valve (a slot is available to hold the threaded end.
Do not use any tools on the threads to hold the valve).
2.
Disassemble the outer-half of the valve (a slot is available to hold the threaded end.
Do not use any tools on the threads to hold the valve).
3.
Soak the three components in a mild disinfectant solution overnight. Be sure your
disinfectant choice does not harm rubber components.
3.
Soak the three components in a mild disinfectant solution overnight. Be sure your
disinfectant choice does not harm rubber components.
4.
Remove the valve pieces from the solution and allow them to fully dry.
4.
Remove the valve pieces from the solution and allow them to fully dry.
5.
Reassemble the outer half of the valve.
5.
Reassemble the outer half of the valve.
6.
Install the valve back into your drysuit as specified.
6.
Install the valve back into your drysuit as specified.
1.
Remove the Relief Valve from your drysuit
2.
User Product Data Sheet
EX2744EQ
7APR09
1/2
User Product Data Sheet
EX2744EQ
7APR09
1/2
Sin
User Product Data Sheet
EX2744EQ
7APR09
1/2
User Product Data Sheet
EX2744EQ
7APR09
1/2