1
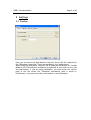
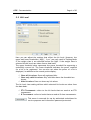
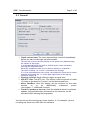
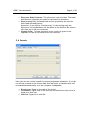
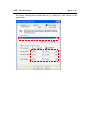
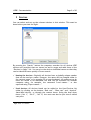
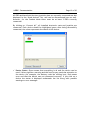
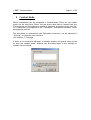
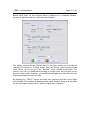
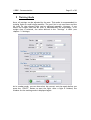
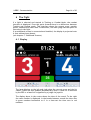
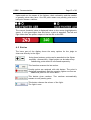
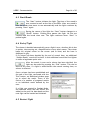
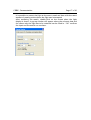
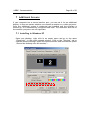
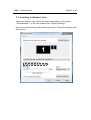
Electronic Body
Protector (EBP)
Documentation
User Manual
EBP - Dokumentation
Seite 1 von 20
Contents
1
Main User Interface ................................................................ 2
2
Settings ............................................................................... 3
2.1
Combat ................................................................................................................ 3
2.2
Hit Level ............................................................................................................. 4
2.3
General ................................................................................................................ 5
2.4
Sounds ................................................................................................................. 6
2.5
Bluetooth™ ......................................................................................................... 7
2.6
Power Settings and Screen Saver ........................................................................ 7
3
Devices ............................................................................... 9
4
Combat Mode ....................................................................... 11
5
Training Mode ...................................................................... 13
6
The Fight ............................................................................ 14
7
6.1
Display .............................................................................................................. 14
6.2
Entries ............................................................................................................... 15
6.3
Start/Break: ....................................................................................................... 16
6.4
End of Fight ...................................................................................................... 16
6.5
Restart Fight ...................................................................................................... 16
Additional Screens ................................................................ 18
7.1
Installing in Windows XP ................................................................................. 18
7.2
Installing in Windows Vista.............................................................................. 19
Seite
2 EBP - Documentation
Page 2 of 20
1 Main User Interface
The most important functions for fast access to the individual programme parts
are situated on the clearly structured graphic user interface.
The “Combat” and “Training” buttons make up the two main parts of the
software. The actual fight can be initiated, displayed and monitored by
pressing either of these two buttons. The main difference is in the way single
or several fights progress. (see chapters: 4. Combat Mode (p.11) and 5. Training
Mode (p.13)).
Pressing the “Devices” button connects the EBPs and joysticks for the head hits
to the software, and will also display the current status of the connected
devices.
(see chapter: 3. Devices (p.9))
General adjustments can be made under “Settings”.
(see chapter: 2. Settings (p.3))
If an internet connection is available, you can check for the newest programme
updates via “Updates”.
3 EBP - Documentation
Page 3 of 20
2 Settings
2.1 Combat
Here you can select the data bank for the pool list or the file required for
the Taekoplan connection. These are mandatory for Combat Mode.
When using the data bank, the pool list is prepared and drawn for Combat
Mode by the CTM software and has to be selected at this point to carry out
the tournament. If you are using Taekoplan, you must enter the correct
path of the file where the Taekoplan tournament data is saved in.
Furthermore, you must enter the court number to use Taekoplan.
4 EBP - Documentation
Page 4 of 20
2.2 Hit Level
Here you can adjust the settings that affect the hit level. However, the
upper and lower thresholds (“High”, “Low”) are only used in Training Mode
if the weight class is not selected before the fight. If the weight class is
selected the hit levels are taken from a data bank.
The upper threshold value represents the power threshold for approving a
technically correct hit. The lower threshold indicates the power required
for a hit to be registered. You can also set when the power of a hit is
displayed, in addition to the normal points display.
Show all hit values: Shows all registered hits.
Show only valid hit values: Only valid hits above the threshold are
shown.
Hide hit values: Does not show any hit values.
The hit level class setting defines which selected hit levels are taken from
the data bank.
ETU Tournament: refers to the hit levels that are used at an ETU
tournament.
B-Tournament: refers to levels that are used at B-class tournaments.
This menu is reserved for use by authorised technicians for
service purposes and is therefore password-protected.
5 EBP - Documentation
Page 5 of 20
2.3 General
Check vests at start: The vests must undergo a test hit immediately
before the start of the fight and after breaks.
The only way to show the functionality of the system is by demonstrating
the impact on the target.
It is recommended that the check is fulfilled by the coach and before
entering the competition mat.
Otherwise complaints could occur if done by referee or competitor.
The check in Round 1 is a “must” if marked in the settings.
If it is not required before every round, the window for check can be closed
manually by pressing the “X” in the upper right corner of the pop-up
window in round 2-4.
Signal for valid hit: Each valid hit triggers a signal tone.
Use WTF rules: The WTF rule “The winner is the first person to reach
12 points or be ahead by 7 points” can be deactivated here.
Mirror Red/Blue: Here the display can be mirrored on the main
monitor
or
on
an
additionally
connected
screen.
(see chapter: 7. Additional Screens)
Check for updates at start-up: Here the standard check for software
updates (only possible when connected to the Internet) can be
activated when starting the programme.
You can also set the scoring type in this window, if, for example, you are
not using any electronic vests with the software.
6 EBP - Documentation
Page 6 of 20
Electronic Body Protector: The electronic vests are used. The handheld devices (joysticks) are used for the head hit valuations.
Hand scoring: Only the hand-held devices (joysticks) are used for
both head and body points.
Attention: If you choose “Hand scoring” in the settings only the
Electronic Scoring Machines will be shown in the devices! No sensors
will show up or can be connected.
Olympic Style: To keep a positive score a point is given to the
opponent in case a full minus point was received.
2.4 Sounds
Here you can set certain sounds for various programme situations. If you do
not choose a sound or the chosen data does not exist, a standard tone will
be sounded automatically over the computer loudspeaker.
Round over: Signal at the end of the round.
Countdown: Signal tone in the last few seconds before the end of a
break or a time-out.
Valid hit: Signal for a valid hit.
7 EBP - Documentation
Page 7 of 20
2.5 Bluetooth™
It is recommended to use the given Bluetooth™ stick or the integrated
Bluetooth™ on your computer to guarantee the correct functionality of the
system.
In case the Bluetooth™ stick is used make sure that the integrated
Bluetooth™ is turned off or enabled. Otherwise this could cause transmission
problems with the sensors.
2.6 Power Settings and Screen Saver
The Screensaver and the Power Settings must be switched off during the
usage of the EBP and/or ESM. Otherwise the connection between laptop and
sensor could be interrupted.
Open the menu “Properties” and select the tab Screen Saver.
As Screen saver should be selected “None”.
8 EBP - Documentation
Page 8 of 20
The Power Settings below should be set on “Always On” and “Never” in all
given fields.
9 EBP - Documentation
Page 9 of 20
3 Devices
You can select and set up the relevant devices in this window. This must be
done before you start the fight.
By pressing the “Search” button the computer searches for all devices (EBP
sensors and joysticks) that are turned on and in range and adds them to the
“Devices in range” list. You can give the devices individual names so that they
can be identified more quickly in a new search.
Naming the devices: Originally all devices have a globally unique number
that can be used as a name. However, the name can be changed either in
the context menu1 or by pressing F2 on your keyboard. All names set up by
users are saved in an individual file that can be accessed via another
computer using, for example, the command "Load names..." or also
exported using "Export names...”
Used devices: All devices found can be added to the Used Devices list
either by clicking on the buttons “Red vest”, “Blue vest” and “Joystick”
(hand-held device), or through the context menu. Using the drop down
menu (“Set 1”, “Set 2”, “Set 3”) the vests can also be put into so-called
vest pairs.
1
Right click on a device
10 EBP - Documentation
Page 10 of 20
All EBPs and hand-held devices (joysticks) that are currently connected are also
displayed in the “Used devices” list, and can be disconnected here as well.
However, for the Combat Mode there must be at least 2 EBPs correctly
connected.
By clicking on “Connect all”, all installed electronic vests and joysticks are
connected. Each device should be highlighted green after being successfully
connected; the colour represents the status of the device.
Device Status: Green means that everything is ok and the device can be
used. Yellow signifies a warning and the need to pay particular attention to
the device (for example, the battery could be running low); Red means
error and that the device was not connected correctly. If you click on a
device the status is displayed underneath the list along with possible
warnings or error messages.
11 EBP - Documentation
4
Page 11 of 20
Combat Mode
Whole tournaments can be completed in Combat Mode. There are two modes
which can be used here. Either the pre-drawn data bank is loaded from the
CTM software and the fights are opened in sequence according to the pool list,
or a connection is configured to the “Taekoplan” tournament software, which
manages the pool list.
The data bank, or alternatively the Taekoplan connection, can be adjusted in
“Settings” on the main user interface.
(see chapter: 2. Settings)
If there is no connection adjusted, a message window will pop-up when trying
to start the combat mode. Without any according input in the settings no
combat can be started.
12 EBP - Documentation
Page 12 of 20
Before each fight, all the relevant data is displayed in a separate window,
where the fight can then be confirmed and initiated:
The display contains all the relevant data for the fight, which can no longer be
changed (in contrast to Training Mode). Only the pair of vests currently being
used, which can be set up in the “Devices” menu, should be selected. The
correct vest size is preselected according to weight class and can also be set
here at a later point. However, you should always make sure that the vest size
selected matches the real vest size.
By pressing the “FIGHT!” button the fight user interface and the current fight
are initiated. This window is displayed after each combat, along with the data
for the next fight in the pool list, until all fights are completed.
13 EBP - Documentation
Page 13 of 20
5 Training Mode
Here, all settings can be adjusted by the user. This mode is recommended for
training fights or small single matches. The pool list is not used here and the
hit level for the relevant fight can be adjusted manually. However, if you
select the weight class the hit level is automatically set accordingly. If no
weight class is selected, the value defined in the “Settings” is used. (see
chapter: 2. Settings)
As in combat mode, you can also select the correct vest size again before you
press the “FIGHT!” button to start the fight. After a fight is finished, the
window for the training mode is displayed again.
14 EBP - Documentation
Page 14 of 20
6 The Fight
If a fight is selected and started in Training or Combat Mode, the combat
interface is displayed. From this point forward there is no difference between
Training and Combat mode. This interface shows the current score, penalty
points, cautions and other data. Furthermore, the main judge has the option to
intervene in the fight.
If an additional screen is connected and installed, the display is projected onto
it (but without input boxes).
(see chapter: 7. Additional Screens)
6.1 Display
The large displays to the left and right show the current score and the hit
values. These are also updated automatically when a valid hit is detected
by the EBP or a head hit is signalled by a judge via joystick.
The display above in the centre shows the time of the round. To the right
the court number is displayed. In the breaks between rounds the time runs
in green numbers backwards to 0. In a time-out the time runs in red
numbers.
15 EBP - Documentation
Page 15 of 20
Underneath are the names of the fighters, their nationality and the number
of penalty points they have. One full point means one penalty point and a
half point means a caution.
The current threshold value is displayed below in the centre (highlighted in
green). If a hit goes higher than this value, a point is awarded. The left and
right sides show the power output of the last hit on the EBP.
6.2 Entries
The lower part of the display shows the entry options for the judge to
intervene directly in the fight:
Using these buttons, points can be awarded to the fighter
manually. Alternatively, illegal points can be taken away.
Subtracting points must be confirmed separately.
This function reverses the last action.
Penalty points are assigned with this button. The point is
displayed immediately and the opposing fighter receives an
additional point on the score table.
This button gives cautions. Two cautions automatically
amount to one penalty point.
This button chooses the winner of the fight.
The fight is over.
16 EBP - Documentation
Page 16 of 20
6.3 Start/Break:
The “Start” button initiates the fight. The time of the round is
now counted as well as the hits to the EBPs. After one round is
over the break time starts to run automatically and the fight continues by
pressing “Start” again.
During the course of the fight the “Start” button changes to a
“Break” button. Clicking here pauses the fight. No hits are
counted and the break time runs. The fight continues when “Start” is
pushed again.
6.4 End of Fight
The winner is decided automatically once a fight is over, whether this is due
to points, time running out, disqualification or any other reason. The winner
keeps his original colour on the screen (red or blue) and the loser is
displayed in grey.
If no winner has been decided by the end of normal time, an additional
“Sudden Death” round will be held. In this additional round the first fighter
to strike a legitimate point wins.
After the match is over and a winner has been decided, the
fight can be ended by pressing the “End” button. This can be
done at any time. If a fight is ended before the normal running time, no
winner is selected.
Once a winner has been established and
the end of the fight confirmed with the
"End" button, an additional window pops
up to select the result. There is the
choice of a number of prepared results
or an individual result defined by the
user.
If a fight was started in Combat Mode,
the selected result and the winner are
added to the pool list data bank and the
next fight can be loaded and initiated.
6.5 Restart Fight
17 EBP - Documentation
Page 17 of 20
It is possible to restart the fight at the exact round and time with the exact
amount of penalty points where the fight was interrupted.
After restarting the match, double-click on the screen when the fight
display is shown. A pop-up window will appear where the relevant data and
the reason why the fight has to be restarted can be filled in. “OK” confirms
the input and the match can continue.
18 EBP - Documentation
Page 18 of 20
7 Additional Screens
If your computer has a second monitor port, you can use it for an additional
display. It does not matter whether you connect a monitor or a video projector.
Once the additional screen is connected and installed and the software is
started up, it is automatically recognised and used. The resolution and size of
the monitor/projector are not important.
7.1 Installing in Windows XP
Open your desktop, right click in an empty space and go to the menu
“Properties”. In the newly opened window, click on the “Settings” tab to
find the monitor settings. Select the second monitor and activate the option
“Extend the desktop onto this monitor”:
19 EBP - Documentation
Page 19 of 20
7.2 Installing in Windows Vista
Open your desktop, right click in an empty space and go to the menu
“Personalization”. In the next window open “Display Settings”:
Select the second monitor and activate the option “Extend the desktop onto
this monitor”: