1
User Manual
3.
SHOCK 1997
USER MANUAL
4.
2.
This manual contains all the information necessary to properly rig all
of the Neil Pryde Shock Sails. Careful attention to the instructions and
suggestions presented here will help to ensure that you get the most
fun and best possible service from your sails.
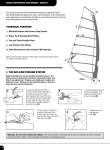
TECHNICAL FEATURES
1. Bat-Cam Tensioning System
1.
2. Mini Head Batten
3. Fixed Head System
4. Adjustable Head Fitting (small and medium size sails)
5. Quick Rig Clew Pulley
7.
6. Low Friction Tack Fitting
7. Leech Cord
5.
Please see the specific instructions which apply to each of these features before you rig
your sails for the first time.
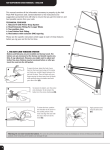
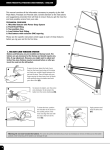
1. BAT-CAM INSTRUCTIONS
Correct batten tension is obtained by adjusting
the screw. Tension the battens before you
insert the mast into the luff pocket.
A.
6.
First, be sure that the batten is all the way into
the pocket (A).
Then turn the screw clockwise so that it is all
the way into the tube, and close the lever (B).
B.
To close the lever, position the shoulder of the
screw in the socket portion of the lever and
align the tube with the clip at the front of the
handle (C).
C.
Apply pressure and snap the lever shut (D).
To remove any wrinkles along the batten
pocket, open the Bat-Cam and turn the screw
counter-clockwise, then close the Bat-Cam
again as above.
To open place the heel of your hand on the
lower leech edge of the clamp and hook your
middle fingers between the sail and the lever.
Next pull back with your fingers prying the
lever away from the leech, while pushing
down on the batten itself with your other
hand. (E).
Warning: do not over tension the
batten.
The screw should be extended only as much
as necessary to remove wrinkles across the
batten pockets. Over tensioning of the batten
can damage the sail.
D.
E.
3
2
THE MINI HEAD BATTEN
FIXED HEAD FITTING
The Mini Head Batten can be adjusted by means of the allen key provided. The
Batten is pre-tensioned at the factory and should require very little if any
adjustment. Tension only until wrinkles disappear. Do Not Overtension.
The fixed head fitting is designed to remain attached to the sail. Never
attempt to remove the fitting from the webbing at the sail head. When
rigging, ensure that the finger at the bottom of the plastic fitting is
seated correctly in the cup at the top of the mast.
4
ADJUSTABLE HEAD FITTING (Smaller Sails)
Fit the mast cup and sail head fitting to the top of the mast . Preset the webbing so that the tack is just above the cleat when the
sail has been fully downhauled. For guidance in setting the
adjustment webbing, see the specifications printed near the tack of
the sail. Allow at least 15-25 cm. between the tack and the cleat
for downhaul tension.
5
The quick rig
clew pulley is
easily rigged by
following the
ATTENTION: Always be sure to secure the tail of the head
adjustment webbing using the safety knot shown.
6
LOW FRICTION
TACK RING
7
The Low Friction Tack must be
rigged properly to ensure
maximum downhauling
efficiency. Always rig the tack
ring according to the diagram.
QUICK RIG
CLEW
PULLEY
THE LEECH CORD
The leech cord is intended only to prevent unwanted
flutter of the aft edge of the leech and head. The cord
should never be tensioned more than necessary to prevent
excessive flutter. An over tight leech cord will result in
greatly reduced sail performance. A simple guide to
setting the leech cord: with the sail fully rigged (boom
attached), press down on the mast base and mast tip until
the leech appears firm, but not tight. While pushing down
lightly on the outboard end of the top batten, tension the
cord very lightly, securing the loose end around the button
provided. This exercise will ensure that leech flutter is
discouraged without over tensioning the cord.
RIGGING
Cam Rigging Tips:
A. Set your boom and mast base to the approximate dimensions of the sail, as
printed near the tack. For sails with adjustable head fittings, set the webbing
to the specified dimension, adding this to the luff length to obtain the required
mast length.
Grab the cams (through the luff pocket) and work them down the
mast one by one. This is easier and works better than trying to pull
the luff pocket over the mast from the sail tack. For the 5.3 through
7.0, keep the two cams opposite the boom cut-out close together as
you work them down the mast. The boom cut-out area of the luff
pocket should be compressed and wrinkled looking during this
process. This method reduces cam pressure on the mast and makes
rigging a lot easier. Use the tack handle to help pull the tack fitting
close to the mast base. Do not pull on the neoprene tack fairing.
B. Check that all the battens are fully inserted into their pockets.
C. Tension the battens according to the instructions.
D. Insert the mast into the luff pocket. Use the tack handle to help pull the tack
fitting close to the mast base. Do not pull on the neoprene tack fairing.
E. Partially tension the downhaul using the low friction tack fitting.
F. Attach the booms to the mast, allowing space above them in the cut-out so
that the sail can be fully downhauled later.
G. Outhaul the sail, until it is quite flat.
H. Downhaul the sail again to within the range of dimensions printed near the
tack. Re-position the cams if needed. Re-set the mast base so that the tack
fitting is within two centimeters of the cleat.
DE-RIGGING PROCEDURES
Fold the neoprene tack fairing back over any mast base fittings before
releasing the downhaul. To de-rig, just brace the mast tip against a solid
object, and slide the cams up the mast one at a time, reversing the initial
process.
I. Re-tension any battens - only as necessary until any wrinkles across the batten pockets disappear. Be sure not to over tension the battens.
1. CAREFULLY EASE THE OUTHAUL until it is completely loose.
J. Ease the outhaul tension until the sail has the desired foil shape, and re-adjust
the boom length so that the clew is within two centimeters of the boom end.
3. THEN CAREFULLY EASE THE DOWNHAUL a little at a time.
K. To ensure correct tuning for your specific sail, please consult the trim instructions that follow.
2. NOW REMOVE THE BOOM COMPLETELY.
4. CAREFULLY remove the mast from the sail, taking care that the cams
remain correctly positioned on the batten pocket ends.
SAIL MAINTENANCE
SAIL SAFE, HAVE FUN
Always store your sail rolled and dry in its sailbag. Try to prevent the sail
from being crushed or badly creased. Washing the sail in fresh water before
storage increases its life considerably. If the foot batten is not roughly
parallel with the upper battens, remove it before rolling the sail. This helps
to prevent wrinkles developing in the foot and window area. The leech
battens should be left in their pockets.
Sail carefully and thoughtfully around other sailors and beach users.
Before leaving the beach check all your equipment thoroughly for
signs of wear or breakage. Always check the weather forecasts and
take note of local conditions and potential hazards before sailing.
Check for dangerous currents, and consider carefully where you
might land in the event of an emergency.
Do Not leave the sail exposed to strong or direct sunlight. Do not use any
solvents or chemicals to clean it. If the sail becomes dirty, use fresh water
For further information on this or other NEILPRYDE sailing
equipment contact your AUTHORIZED NEILPRYDE DEALER or our
distributor in your country.
TUNING THE SHOCK SAILS
When correctly rigged on the beach, the Shock sails will not look identical from one size to another. Each size requires
slightly different tuning and will exhibit slightly different visual queues indicating correct trim. First set the sail to within
the dimensions printed at the sail tack. Then follow the steps below to correctly fine tune each of the four Shock sails.
Note: Over tensioning the downhaul can hinder rotation.
Shock 4.6
Downhaul until the leech is loose to the second batten.
Then add outhaul - at least 2 - 4 cm of positive outhaul beyond the point at which you begin to feel resistance.
When over-powered, increase outhaul tension by 1 - 2
cm. If the sail feels stiff and “pitchy”, it is probably
over-downhauled. If the sail feels unstable or
difficult to sheet in, it is probably underouthauled.
3
2
1
Shock 4.6 correctly tuned at near
maximum downhaul.
Shock 5.3
This sail has the firmest leech of any of the Shock range.
Downhaul until the sail is just loose at the first batten, with
perhaps just a little loosness (but not a floppy edge),
between battens # 1 and 2. Then add outhaul - between
2 and 4 centimeters beyond the point where you
begin to feel tension. When over-powered, increase
outhaul tension by 1 - 2 cm. If the sail feels stiff
and “pitchy”, it is probably over-downhauled. If
the sail feels unstable or difficult to sheet in, it
is probably under-outhauled.
3
2
1
Shock 5.3 correctly tuned at near
maximum downhaul.
Shock 6.1
The 6.1 also features a relatively firm leech. Downhaul
until the leech is slightly loose at the first batten and
perhaps just a little soft between battens 1 and 2.
Then outhaul 2 -4 cm beyond the “0” (no
tension) point depending on wind
conditions. When over-powered,
increase outhaul tension by 1 - 2 cm.
If the sail feels stiff and “pitchy”, it is
probably over-downhauled. If the
sail feels unstable or difficult to
sheet in, it is probably underouthauled.
3
Shock 6.1 correctly tuned at
near maximum downhaul.
2
1
Shock 7.0
The 7.0 has the loosest leech of any of the four Shock sizes.
Downhaul until the sail is loose to the second batten and a bit
soft to batten # 3. As winds increase beyond the minimum
required for planing, go ahead and downhaul until the sail is
a bit looser between battens 2 and 3. Add outhaul
between 2 and 4 cm past the “0” point --- more
outhaul for improved control as wind speeds
increase. When over-powered, increase outhaul
tension by an extra 1 - 2 cm. If the sail feels stiff
and “pitchy”, it is probably over-downhauled.
If the sail feels unstable or difficult to sheet
in, it is probably under-outhauled.
3
2
Shock 7.0 correctly tuned at
near maximum downhaul.
1
A NOTE ON RIG DIMENSIONS
CHOOSING THE RIGHT MAST
The rig dimensions printed on the tack of all Neil Pryde collection sails
show the following information:
The Shock range of sails have been designed specifically around the
Carbon 30/460 mast, and this spar is therefore recommended for best
results. Other masts from the Neil Pryde collection can also be used, as
can earlier Neil Pryde masts having the correct diameter to fit the luff
pocket. Check with your Neil Pryde retailer if you are in doubt.
• Top setting (where relevant): The distance between the bottom of the
mast head fitting (top of the mast) and the sail head (the intersection
of luff pocket and upper leech).
• Minimum luff length: The distance from the sail head to the bottom
of the tack fitting at the lightest useful downhaul setting.
• Maximum luff length: The distance from the sail head to the bottom
of the sail tack fitting at the hardest downhaul setting.
• Minimum boom: The distance from the forward edge of the mast (at
the center of the boom cutout) to the sail clew at the fullest (lightest)
useful outhaul setting.
• Maximum boom: The distance from the forward edge of the mast (at
the center of the boom cutout) to the sail clew at the flattest (hard
est) useful outhaul setting.
These figures are intended as a guide to proper sail trim, and,
depending on the rig components you choose, may not always
correspond perfectly to the settings which are best for you.