1
RAF SUPERNOVA USER MANUAL - ENGLISH
This manual contains all the information necessary to properly rig the Neil
Pryde RAF Supernova sails. Careful attention to the instructions and
suggestions presented here will help to ensure that you get the most fun and
best possible service from your sails.
2
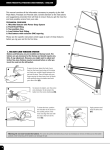
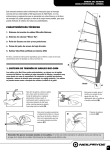
TECHNICAL FEATURES
1. Batcam III with Power Snap System
2. Head Extension Fitting For Longer Masts
3. Two position clew
4. Low Friction Tack Fitting
5. Rod battens with exclusive CNC tapering
1
Please see the specific instructions which apply to each of these features
before you rig your sail for the first time.
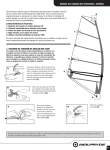
1. THE BAT-CAM TENSION SYSTEM
5
Battens and Batcams are pre-installed and factory tuned. The
battens are pre-tensioned at the factory and should require very
little, if any adjustment. However, you might want to adjust and
further fine-tune. Battens may be tensioned before or after you
insert the mast into the luff pocket.
A
B
C
To open the lever, place the heel of your
hand on the lower leech edge of the clamp
and hook your middle fingers between the
sail and the lever. Then pull back with your
fingers prying the lever away from the leech,
while pushing down the batten itself with
your other hand (A).
3
To tension the batten, turn the screw
anti-clockwise. To de-tension the
batten turn the screw clockwise (B).
To close the lever, position
the shoulder of the screw in
the socket portion of the
lever and align the tube with
the clip at the front of the
lever (C).
4
D
Apply pressure and
snap the lever shut
(D).
Warning: Do not over tension the battens. The screw should be extended only as much as necessary to remove wrinkles across the batten
pockets. Over tensioning of the battens can damage the sail.
2
RAF SUPERNOVA USER MANUAL - ENGLISH
2. HEAD FITTING When used with the recommended mast, the
Neil Pryde fixed length head fitting offers a very clean and aerodynamic
profile, with no unnecessary and heavy webbing flying around. By
following the printed specifications at the tack of the sail, you will obtain
the best tuning for your sail. However, in some cases (different length
mast or different extension system), you may need to use the adjustable
strap that is supplied with your sail (in the pocket of the sail bag).
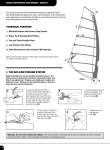
Remove the male plug (A) from the webbing (B) that is sewn into the
luff pocket. Take the adjustable strap (C) and loop it through the
webbing (B) and the male plug (A), and position the buckle behind
the mast. Adjust to desired length.
3
3. TWO POSITION CLEW Select the clew
ring that’s best suited to your requirements. Most
riders like the boom to be roughly perpendicular to
the mast, so start by setting the clew according to
your preferred boom height. Many riders prefer a
higher clew position in onshore conditions where
putting the rig forward helps in staying up wind as
well as in making backside maneuvers easier. Try a
lower clew ring in side shore, down-the-line conditions for a softer leech and a more powerful
bottom turn.
2
A
C
B
4
A
4. LOW FRICTION TACK
FITTING The Low Friction Tack Fitting
D
must be rigged properly to ensure
optimum downhauling efficiency. Always
rig the tack fitting according to the
diagram.
B
C
CHOOSING THE RIGHT MAST
A NOTE ON RIG DIMENSIONS
Every Neil Pryde sail is designed around a specific
recommended mast. To get the optimum performance from
your Neil Pryde sails, use the recommended mast. In many
cases an alternative mast is specified and this will also
provide good performance. For a lighter and more responsive
feel, you can choose to use the upgrade masts which are
specified.
The rig dimensions printed on the tack of all Neil Pryde
collection sails show the following information:
■ Base setting This is the number at which you should set
the ring on your Neil Pryde aluminum or carbon mast base.
Rigged on the correct mast and with a Neil Pryde mast base,
you will be able to perfectly downhaul your sail by following
the printed instructions at the tack of the sail.
■ Boom dimensions are stated at the best average tuned
dimensions plus or minus 1 cm. This is measured from the
forward edge of the mast (at the center of the boom cut out)
to the sail clew between the eyelets.
These figures are intended as a guide to proper sail trim and,
depending on the rig components you use, may not always
correspond perfectly to the settings which are the best for you.
RIGGING
A. Set your boom and mast base to the dimensions printed near the
tack. The sail is designed to be perfectly trimmed on the correct mast at
the recommended settings. For sails with adjustable head fittings, set
the webbing to the specified dimensions.
B. Check that all the battens are fully inserted into their pockets. The
battens are pre-tensioned at the factory and should require very little, if
any adjustment.
C. Insert the mast into the luff pocket working the sail down the mast a
bit at a time. When you have the mast almost all the way in, use the
tack handle to help pull the remaining distance to the mast base.
D. Thread the downhaul line according to the instructions and partially
tension the luff using the low friction tack fitting.
E. Attach the boom to the mast,
allowing space above it in the
cut-out so that the sail can be
fully downhauled later.
F. Downhaul the sail to
approximately 1 cm above the
cleat base as shown in diagram.
Fine-tune around this position. A
small sticker has been provided
with your sail which you can
wrap around your mast base and
use as a reference when you find
your best tuning. All 1998 Neil
Pryde mast bases already carry this trim zone. When in the correct
tuning range, the tack pulley will be as shown.
G. If necessary, re-tension the battens until wrinkles at the batten
pockets disappear. Be sure not to over-tension the battens.
H. Adjust the outhaul to the recommended dimensions and make the
boom length so the clew is within two centimeters of the boom end.
Use a tape measure to ensure accuracy and repeatability of the
settings.
I. To ensure correct tuning for your specific sail, please consult the trim
instructions that follow:
RIGGING TIPS
Pure RAF sails have no cams, so putting the mast into the luff pocket is
easy. Grab the sail by using the handle located inside the fairing. Our
MPR model has one intercam, but putting the mast into the luffpocket
is almost as easy as on RAF sails. Just make sure that the Intercam is
properly seated on the mast.
DE-RIGGING
A. Be sure that the tack fairing is clear of the mast base rings and
other rig components.
B. Carefully ease the outhaul until it is completely loose.
Remove the boom.
C. Carefully release the downhaul a little at a time. Remove the mast.
3
RAF SUPERNOVA USER MANUAL - ENGLISH
TUNING RAF SUPERNOVA SAILS
When correctly rigged on the beach, the Neil Pryde RAF Supernova
sails will show little looseness in the upper leech. Modern sails require
firm (although properly twisted) foil forms and positive outhaul tension.
It is a mistake to try to tune today’s sails with extremely loose leeches
from extreme downhaul, and negative outhaul.
First set the mast base to the setting printed at the sail tack. Then
follow the steps below to correctly fine tune your sail. Use a tape
measure to check and record your favorite trim settings.
Downhaul: until the tack pulley is within the prescribed setting and
the leech should just begin to appear loose in the area of the top
batten. Do not over downhaul.
Outhaul: set the boom so the sail can be tensioned to the
recommended dimension with less than 2cm space between the clew
and the boom end. Using a tape measure will guarantee accuracy. Fine
tune the outhaul around the recommended dimension, using less when
you are looking for more power and more when you are fully powered.
At these settings, there will always be solid tension on the clew.
TUNING TIP
EXPERIMENT AND CHECK YOUR TUNING: Experiment to
find the settings that work best for you. Big sailors (over 80kg/ 180
lbs) may wish to go for maximum power, using slightly less
downhaul and outhaul than lighter riders. When over-powered
increase outhaul tension. Changes in outhaul and downhaul tension
of a few millmieteres can make a difference. If the sail feels stiff and
“pitchy”, it is probably over-downhauled. If the sail feels unstable or
difficult to sheet in, it is probably under outhauled. A “twitchy” on &
off feel probably means the sail is over-outhauled.
4
SAIL MAINTENANCE
SAIL SAFE, HAVE FUN
Always store your sail rolled and dry in its sail bag. Try to prevent the
sail from being crushed or badly creased. Washing the sail in fresh
water before storage increases its life considerably. If the foot batten
is not parallel with the upper battens (as in wave sails) remove it
before rolling the sail. The leech battens should be left in their
pockets. They need not be de-tensioned.
Do not leave the sail exposed to strong or direct sunlight. Do not use
any solvents or chemicals to clean it. If the sail becomes dirty, clean it
using fresh water and mild soap. Should the sail become holed or
torn, have it repaired by a qualified sailmaker before using it further.
This is especially important if the damage is in K-Film panels.
Sail carefully and thoughtfully around other sailors and beach users.
Before leaving the beach check all your equipment thoroughly for
signs of wear or breakage. Always check the weather forecasts and
take note of local conditions and potential hazards before sailing.
Check for dangerous currents, and consider carefully where you
might land in the event of an emergency.
For further information on this or other NEILPRYDE sailing
equipment contact your AUTHORIZED NEILPRYDE DEALER or
our distributor in your country.