1
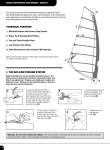
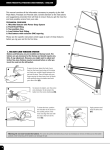
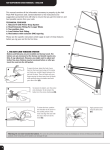
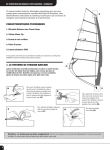
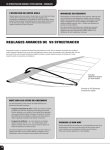
User Manual
Neil Pryde
User Manual
This manual contains all the information necessary to properly rig your Neil Pryde sail. Careful attention to the
instructions presented here will help to ensure that you get the most fun and best possible service from your sails.
TECHNICAL FEATURES
1. MicroLight Batcam with Power Snap System
2. Shear Tip Rotating Head Fitting on V8 Streetracer
3. Fixed or Extension Head System on RAF Supernova and V6 Freeride
4. Two position clew
5. Low Friction Tack Fitting
6. Tube/Rod battens with exclusive CNC tapering
7. Trim Zone
Please see the specific instructions which apply to each of these features before you rig your sail for the first time.
3
2
7
1
7
1
6
6
4
4
5
5
1. THE BAT-CAM TENSION SYSTEM
Battens and Batcams are pre-installed and factory tuned. The
battens are pre-tensioned at the factory and should require very
little, if any adjustment. However, you might want to adjust and
further fine-tune. Battens may be tensioned before or after you
insert the mast into the luff pocket.
A
C
To open the lever, place the heel of
your hand on the lower leech edge of
the clamp and hook your middle
fingers between the sail and the lever.
Then pull back with your fingers prying
the lever away form the leech, while
pushing down the batten itself with
your other hand (A).
To tension the batten, turn the
screw anti-clockwise. To detension the batten turn the
screw clockwise (B).
B
To close the lever, position the
shoulder of the screw in the
socket portion of the lever and
align the tube with the clip at the
front of the lever (C).
D
Apply pressure and
snap the lever
shut (D).
Warning: Do not over tension the battens. The screw should be extended only as much as necessary to remove wrinkles
across the batten pockets. Over tensioning of the battens can damage the sail.
2. THE SHEAR TIP FITTING ON V8 STREETRACER
Before inserting the mast, make sure that you have installed
the correct mast tip plug for the Shear Tip Rotating Fitting.
This plug is supplied with the sail (in the sail bag pocket). You
will need to remove the plug which is currently in the tip of
your Neil Pryde mast and replace it with the correct mast tip
plug for the Shear Tip Rotating Fitting. After inserting the mast
into the sail, take care that the fitting is seated correctly in the
socket. Once the rig is tensioned, you may adjust the tension
on the Shear Tip sleeve using a screwdriver, but only until
smooth. Do not over tension.
Note: The Shear Tip Fitting has been designed in such way
that it is possible to push down the tip of the arm (see
diagram), eg when the tip catches a rock or the ground.
When pushed down, the tip will automatically spring back to
its initial position.
3. FIXED OR EXTENSION HEAD FITTING (ON RAF SUPERNOVA AND V6 FREERIDE)
RAF Supernova The smaller sizes (3.9/4.4/5.9) are designed to be used with a 430 cm long mast, but thanks to an extension head fitting, they can
also be used with 460 cm long masts. The bigger sizes are designed to be used with 460 or 490 cm long masts and therefore have fixed head fittings.
V6 Freeride The 5.0 and 5.5 are designed to be used with a 430 cm long mast, but thanks to an extension head fitting, they can also be used with
460 cm long masts. The bigger sizes are designed to be used with 460 or 490 cm long masts and therefore have fixed head fittings.
FIXED HEAD FITTING
All the fixed head fittings are designed to remain attached to the sail. Never attempt to remove the
fitting from the webbing at the sail head. When rigging, ensure that the finger at the bottom of the
plastic fitting is seated correctly in the cup at the top of the mast. To ensure optimum rotation, please
be sure to use the hard mast cup provided.
EXTENSION HEAD FITTING (SMALLER SAILS)
A
B
B
To allow the use of a 30cm longer mast, a fixed length extension with a special
mast tip plug are provided. In order to use the extension, remove the gray plastic
mast tip plug (A) from the webbing loop (B) that is sewn to the luff pocket (a
small screwdriver is a helpful tool). Save this part (A) in case you ever want to
use the recommended mast. Take the extension webbing, pry off the plastic cap,
take the “U” shaped metal clip out of one of the loops, pass the extension
webbing through the loop that is sewn to the luff pocket (B). Then re-hook the
“U” clip, press on the plastic cap, and you are ready to rig. When you insert the
mast, pass the tip between the loop (B) and the front of the pocket. Put the tip
cap into the mast and tension the downhaul as necessary.
4. TWO POSITION CLEW
Select the clew ring that’s best suited to your requirements. Most sailors like the boom
to be roughly perpendicular to the mast, so start by setting the clew according to your
preferred boom height; then adjust according to mast rake, wind conditions, and your
own sailing style. One tip is to use the highest hole in light winds and/or very smooth
water conditions to develop the best power. Use the lower hole when overpowered or
in rough water when you want to tune the sail flatter without closing off the twist.
5. LOW FRICTION TACK RING
A
D
The Low Friction Tack Fitting must be rigged
properly to ensure maximum downhauling
efficiency. Always rig the tack fitting according
to the diagram.
B
C
RIGGING
A. Set your boom and mast base to the dimensions printed
near the tack. The sail is designed to be perfectly trimmed on
the correct mast at the recommended settings.
B. Check that all the battens are fully inserted into their
pockets. The battens are pre-tensioned at the factory and
should require very little, if any adjustment.
C. Insert the mast into the luff pocket working the sail down
the mast a bit at a time. When you have the mast almost all
the way in, use the tack handle to help pull the remaining
distance to the mast base.
D. Thread the downhaul line according to the instructions
and partially tension the luff using the low friction tack fitting.
E. Attach the boom to the mast, allowing space above it in
the cut-out so that the sail can be fully downhauled later.
F. Downhaul the sail to approximately 1cm above the cleat
base as shown in diagram. Fine-tune
around this position. A small sticker has
been provided with your sail which you can
wrap around your mast base and use as a
reference when you find your best tuning.
All 1999 Neil Pryde mast bases already
carry this trim zone. When in the correct
tuning range, the tack pulley will be as
shown.
G. If necessary, re-tension the battens until wrinkles at the
batten pockets disappear. Be sure not to over-tension the
battens.
H. Adjust the outhaul to the recommended dimensions
and make the boom length so the clew is within two
centimeters of the boom end. Use a tape measure to
ensure accuracy and repeatability of the settings.
I. To ensure correct tuning for your specific sail, please
consult the trim instructions that follow:
RIGGING TIPS
Pure RAF sails have no cams, so putting the mast into the
luff pocket is easy. Grab the sail by using the handle
located inside the fairing.
DE-RIGGING
A. Be sure that the tack fairing is clear of the mast base
rings and other rig components.
B. Carefully ease the outhaul until it is completely loose.
C. Remove the boom.
D. Carefully release the downhaul a little at a time.
E. Remove the mast.
SAIL MAINTENANCE
SAIL SAFE, HAVE FUN
Always store your sail rolled and dry in its sailbag. Try to prevent the sail from
being crushed or badly creased. Wash the sail in fresh water after use if
possible, but do not store wet. The battens may be left in their pockets.
Sail carefully and thoughtfully around other sailors and beach users.
Before leaving the beach check all your equipment thoroughly for
signs of wear or breakage. Always check the weather forecasts and
take note of local conditions and potential hazards before sailing.
Check for dangerous currents, and consider carefully where you
might land in the event of an emergency.
Do not leave the sail exposed to strong or direct sunlight.
Do not use any solvents or chemicals to clean it. If the sail becomes dirty, use
fresh water and mild soap.
Make sure that you always keep the Shear Tip Rotating Head Fitting as free of
sand as possible and flush the head area and fitting with fresh water regularly.
7. THE TRIM ZONE - TUNING THE SAIL
First set the sail to the base recommendations printed at the sail tack.
Then, if necessary, tune the downhaul as follow (see Trim Zone), then add
outhaul until the leech makes a straight line from the first batten above the
boom right up to the head. This should normally require between 2 - 4 cm
of "positive" outhaul (beyond the point where you start to feel resistance).
If in doubt add an additional 5 - 10 mm to be sure the sail is sufficiently
outhauled.
In order to help you with the tuning of your sail, we have incorporated a
simple graphic into the upper leech area which serves as an indicator of
trim. These symbols relate to the area of sail which becomes loose at
different downhaul settings. They are designed to show this best when the
sail is rigged with boom and the head area is touching the ground or just
picked up slightly, as you would be doing while trimming. They are meant
to be a guide, not an absolute, and a reference to enable you to attain
consistent tuning results.
When softness edge is on the left of Trim Zone
sail is downhauled too much
For further information on this or other NEILPRYDE windsurfing
equipment contact your AUTHORISED NEILPRYDE DEALER or our
distributor in your country.
To begin, place your base at the recommended setting and downhaul to
within a centimeter or so of maximum. Observe the loose area and its
relationship to the graphic and experiment with increasing and decreasing
the tension until you can see the setting you are after. The boom should
be on the sail with the outhaul at the medium setting printed on the tack
of the sail.
For maximum downhaul
Loose area in the second panel should reach
the larger and most forward line. This is the setting which most racers
use since they are almost always nearly overpowered.
For medium downhaul
Loose area in the second panel should be around the mid point between
the two lines. This setting will result in a tighter leech and
a feeling of more power but reaching higher speeds will be more difficult.
For minimum downhaul
Loose area in the second panel should be forward of the smaller line.
This is an indicator that you are at the least amount of downhaul you
might ever use. The leech will be tight and the twist at a minimum.
A NOTE ON RIG DIMENSIONS
Max. Downhaul
Strong Wind
When softness edge is in the
middle of the Trim Zone
Ideal Downhaul
Moderate Wind
The rig dimensions printed on the tack of all Neil Pryde
collection sails show the following information:
■ Base setting: this is the number which you should set
your Neil Pryde aluminum or carbon mast base ring. Rigged
on the correct mast you will be able to downhaul perfectly
with the carbon base. You will have to interpolate the setting
for using the aluminum base since the dimensioning is
different.
■ Boom dimension is stated as the best average tuned
dimension plus or minus 1 cm. This is measured from the
forward edge of the mast (at the center of the boom cutout) to
the sail clew at the center eyelet.
These figures are intended as a GUIDE to proper sail trim and
depending on the rig components you choose may not always
correspond perfectly to the settings which are best for you.
When softness edge is on the right of Trim Zone
sail is not downhauled enough
Min. Downhaul
Lightwind
CHOOSING THE RIGHT MAST
Every Neil Pryde sail is designed around a specific
recommended mast. To get the optimum performance from
your Neil Pryde sails, use the recommended mast. In many
cases an alternative mast is specified and this will also
provide good performance. For a lighter and more responsive
feel, you can choose to use the upgrade masts which are
often specified.