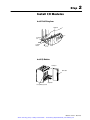
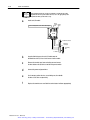
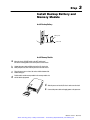
1
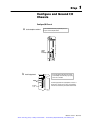
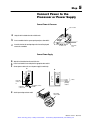
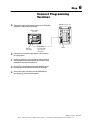
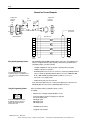
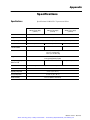
Artisan Technology Group is your source for quality
new and certified-used/pre-owned equipment
• FAST SHIPPING AND
DELIVERY
• TENS OF THOUSANDS OF
IN-STOCK ITEMS
• EQUIPMENT DEMOS
• HUNDREDS OF
MANUFACTURERS
SUPPORTED
• LEASING/MONTHLY
RENTALS
• ITAR CERTIFIED
SECURE ASSET SOLUTIONS
SERVICE CENTER REPAIRS
Experienced engineers and technicians on staff
at our full-service, in-house repair center
WE BUY USED EQUIPMENT
Sell your excess, underutilized, and idle used equipment
We also offer credit for buy-backs and trade-ins
www.artisantg.com/WeBuyEquipment
InstraView REMOTE INSPECTION
LOOKING FOR MORE INFORMATION?
Visit us on the web at www.artisantg.com for more
information on price quotations, drivers, technical
specifications, manuals, and documentation
SM
Remotely inspect equipment before purchasing with
our interactive website at www.instraview.com
Contact us: (888) 88-SOURCE | [email protected] | www.artisantg.com
AllenBradley
MiniPLC2 Family
Programmable
Controllers
Quick Start
for Experienced
Users
product icon
Artisan Technology Group - Quality Instrumentation ... Guaranteed | (888) 88-SOURCE | www.artisantg.com
Important User
Information
Because of the variety of uses for the products described in this
publication, those responsible for the application and use of this
control equipment must satisfy themselves that all necessary steps
have been taken to assure that each application and use meets all
performance and safety requirements, including any applicable laws,
regulations, codes and standards.
The illustrations, charts, sample programs and layout examples
shown in this guide are intended solely for purposes of example.
Since there are many variables and requirements associated with any
particular installation, Allen-Bradley does not assume responsibility
or liability (to include intellectual property liability) for actual use
based upon the examples shown in this publication.
Allen-Bradley publication SGI-1.1, Safety Guidelines for the
Application, Installation, and Maintenance of Solid-State Control
(available from your local Allen-Bradley office), describes some
important differences between solid-state equipment and
electromechanical devices that should be taken into consideration
when applying products such as those described in this publication.
Reproduction of the contents of this copyrighted publication, in
whole or in part, without written permission of Allen-Bradley
Company, Inc., is prohibited.
Throughout this manual we use notes to make you aware of safety
considerations:
!
ATTENTION: Identifies information about practices
or circumstances that can lead to personal injury or
death, property damage or economic loss.
Attention statements help you to:
• identify a hazard
• avoid the hazard
• recognize the consequences
Important:
Identifies information that is critical for successful
application and understanding of the product.
Artisan Technology Group - Quality Instrumentation ... Guaranteed | (888) 88-SOURCE | www.artisantg.com
Table of Contents
Preface . . . . . . . . . . . . . . . . . . . . . . . . . . . . . . . . . . . . . . .
P-1
Using this Quick Start . . . . . . . . . . . . . . . . . . . . . . . . . . . . . . . . .
What You Need to Do . . . . . . . . . . . . . . . . . . . . . . . . . . . . . . . . .
System Components used in this Quick Start . . . . . . . . . . . . . . . .
If You Need Help ... . . . . . . . . . . . . . . . . . . . . . . . . . . . . . . . . . .
P-1
P-1
P-2
P-2
Configure and Ground I/O Chassis . . . . . . . . . . . . . . . . . .
1-1
Configure I/O Chassis . . . . . . . . . . . . . . . . . . . . . . . . . . . . . . . .
Ground I/O Chassis . . . . . . . . . . . . . . . . . . . . . . . . . . . . . . . . . .
1-1
1-2
Install I/O Modules . . . . . . . . . . . . . . . . . . . . . . . . . . . . . . .
2-1
Install Field Wiring Arms . . . . . . . . . . . . . . . . . . . . . . . . . . . . . . .
Install I/O Modules . . . . . . . . . . . . . . . . . . . . . . . . . . . . . . . . . . .
2-1
2-1
Install Backup Battery and Memory Module . . . . . . . . . . . .
3-1
Install Backup Battery . . . . . . . . . . . . . . . . . . . . . . . . . . . . . . . . .
Install Memory Module . . . . . . . . . . . . . . . . . . . . . . . . . . . . . . . .
3-1
3-1
Install Processor and Power Supply . . . . . . . . . . . . . . . . .
4-1
Install Processor . . . . . . . . . . . . . . . . . . . . . . . . . . . . . . . . . . . .
Install Power Supply . . . . . . . . . . . . . . . . . . . . . . . . . . . . . . . . . .
4-1
4-1
Connect Power to the Processor or Power Supply . . . . . . .
5-1
Connect Power to Processor . . . . . . . . . . . . . . . . . . . . . . . . . . . .
Connect Power Supply . . . . . . . . . . . . . . . . . . . . . . . . . . . . . . . .
5-1
5-1
Connect Programming Terminal . . . . . . . . . . . . . . . . . . . .
6-1
Connect to a Personal Computer . . . . . . . . . . . . . . . . . . . . . . . . .
Specifications . . . . . . . . . . . . . . . . . . . . . . . . . . . . . . . . . . . . . .
6-2
-1
Artisan Technology Group - Quality Instrumentation ... Guaranteed | (888) 88-SOURCE | www.artisantg.com
Preface
Preface
Using this Quick Start
This quick start is designed to help you quickly install and connect a
basic mini-PLC-2 family programmable controller system. Use this
guide if you are knowledgeable about mini-PLC-2 family products
but may not have used one or more of the products for a period of
time. The information we provide is geared to “jog your memory.”
What You Need to Do
step 1
Install I/O chassis
step 2
Install I/O
a
b
Configure I/O chassis
(page 11)
Ground I/O chassis
(page 12)
a
b
Install field wiring arms
(page 21)
Install I/O modules
(page 21)
step 3
Install Memory Module
a
b
step 4
a
b
For more
information...
For more information, see the MiniPLC2/02, 2/16, 2/17
Processor User Manual, publication 17726.5.8.
Install backup battery
(page 31)
Install memory module
(page 31)
Install Processor and Power Supply
Install processor
(page 41)
Install power supply
(page 41)
Publication 177210.2 - March 1996
Artisan Technology Group - Quality Instrumentation ... Guaranteed | (888) 88-SOURCE | www.artisantg.com
P–2
Preface
step 5
a
b
step 6
Make power connections
Connect power to processor
(page 51)
Connect power supply
(page 51)
Connect programming terminaal
(page 61)
System Components
used in this Quick Start
If You Need Help ...
AB
Product name:
Catalog number:
I/O chassis
1771A1B, A2B, A3B, A3B1, A4B, A1, A2, A4
power supply
1771P3, P4, P5, P7
I/O modules
1771 product line
programming terminal
1770T3 series C, IBM PCcompatible computer
using 6200 series or AI PLC2 programming software
processors
1772LZ, LZP, LX, LXP, LW, LWP, LS, LSP
memory modules
1775MJ, 1772MJ
If you need additional assistance in installing or connecting your
mini-PLC-2 family programmable controller system, call
1-800-9-NEWLIT to order one of the publications suggested below
or contact your Allen-Bradley service representative.
Publication title:
Publication number:
MiniPLC2/15 Programmable Controllers Assembly and Installation Manual
17726.6.1
MiniPLC2 Programmable Controllers Assembly and Installation Manual
17726.6.3
MiniPLC2/05 Programmable Controllers Assembly and Installation Manual
17726.6.6
MiniPLC2/05 Programmable Controllers Assembly and Installation Manual
Documentation Update
17726.6.6DU1
MiniPLC2/02, 2/16, 2/17, Processor User Manual
17726.5.8
1772MiniPLC2/05 Processor Programming and Operations Manual
17726.8.6
MiniPLC2 Programmable Controllers Programming and Operations Manual
17726.8.4
MiniPLC2/15 Programmable Controllers Programming and Operations Manual
17726.8.2
Publication 177210.2 - March 1996
Artisan Technology Group - Quality Instrumentation ... Guaranteed | (888) 88-SOURCE | www.artisantg.com
Step
1
Configure and Ground I/O
Chassis
Configure I/O Chassis
a
Set the backplane switches.
See the installation manual for your particular processor
for specific switchsetting information.
Switch
Group
Assembly
b
Install keying bands.
Keying
Bands
Backplane
Socket
See the appropriate product data for the module
you are installing to determine the proper keying
positions for each module.
24
68
10
12
14
16
18
20
22
24
26
28
30
32
34
36
Insert two keying bands in the top backplane connectors of
the I/O chassis. For the processor, place one keying band
in the leftmost slot between pins 46 and 48 and 54 and 56.
10170-I
Publication 177210.2 - March 1996
Artisan Technology Group - Quality Instrumentation ... Guaranteed | (888) 88-SOURCE | www.artisantg.com
1–2
Configure and Ground I/O Chassis
Ground I/O Chassis
enclosure wall
grounding
electrode
conductor
ground bus
to grounding
electrode system
equipment grounding
conductor
PLC2/30
processor
8 AWG
1771P7
power supply
I/O chassis wall
14 AWG
miniprocessor with
builtin power supply
ground lug
power supply
module
nut
star washer
ground lug
14 AWG
ATTENTION: If you use this grounding configuration, do not
make connections to EQUIP GND on the power supply terminal
strips or ground loops could result.
Publication 177210.2 - March 1996
Artisan Technology Group - Quality Instrumentation ... Guaranteed | (888) 88-SOURCE | www.artisantg.com
Step
2
Install I/O Modules
Install Field Wiring Arms
wiring arm
horizontal
bar
Cshaped
bracket
remove
install
Install I/O Modules
locking bar
I/O module
card guides
corresponding keyed slot
Publication 177210.2 - March 1996
Artisan Technology Group - Quality Instrumentation ... Guaranteed | (888) 88-SOURCE | www.artisantg.com
2–2
Install I/O Modules
For more
information...
a
Specific wiring information for each type of I/O module is contained in the product
data publication for that specific module. Therefore, refer to the appropriate product
data publication when you follow these steps.
Install each I/O module.
Use the locking latch to secure the module in place.
Module
Locking Modules
Guides
Latch
32 I/O
Module Extraction Tab
Wiring Arm
Locking Tab
Field Wiring
Arm
I/O Module
b
Snap the field wiring arms for each I/O module onto the
horizontal bar of the I/O chassis and connect it to the module.
c
Remove the terminal cover from each wiring arm and connect
the wires between the I/O devices and the wiring arm terminals.
d
Connect the power and ground wires.
e
Use tie wraps to gather the wires at each wiring arm, then bundle
the wires so the arms can pivot freely.
f
Replace the terminal covers and label the terminal status indicators appropriately.
Publication 177210.2 - March 1996
Artisan Technology Group - Quality Instrumentation ... Guaranteed | (888) 88-SOURCE | www.artisantg.com
Step
3
Install Backup Battery and
Memory Module
Install Backup Battery
+
battery cover
-
lithium battery
cover screw
Install Memory Module
a
Move the chassis POWER switch to the OFF position and
turn off the incoming power source to the processor and chassis.
b
Unplug the power cable and lift the latch of the I/O chassis that
holds your processor, then slide the processor out of the chassis.
c
Place the processor on a clean, flat surface with the bottom of the
module facing you.
d
Position and insert the memory module in the memory module slot
with its label facing upward.
d
e
Slide the processor into the I/O chassis and secure the latch.
Connect the power cable and reapply power to the processor.
Publication 177210.2 - March 1996
Artisan Technology Group - Quality Instrumentation ... Guaranteed | (888) 88-SOURCE | www.artisantg.com
Step
4
Install Processor and Power
Supply
Install Processor
locking bar
MiniPLC2/17
processor
leftmost slot
Install Power Supply
If you have a processor with a power supply, and do not need
additional current for your I/O modules, skip this step. If you need
additional current, use an ac powered supply because we recommend
that you use the same input voltage source for two paralleled power
supplies.
ATTENTION: Do not parallel a 1771-P5 power supply and
a processor with a power supply because of power-up and
power-down timing difference.
Publication 177210.2 - March 1996
Artisan Technology Group - Quality Instrumentation ... Guaranteed | (888) 88-SOURCE | www.artisantg.com
Step
5
Connect Power to the
Processor or Power Supply
Connect Power to Processor
place tool here
a
Strip 3/32 inch insulation from the end of the wire.
b
Insert screwdriver into the square opening and press down with it.
c
Insert the wire into the round opening on the front of the plug and
remove the screwdriver.
insert wire
here
Connect Power Supply
a
b
c
Strip 3/8 inch insulation from the end of the wire.
Loosen each terminal screw and place the appropriate wire under it.
Connect power cable to the ac or dc power supply's terminal strip.
ac
dc
1.5A 125V
SLOW BLOW
5A 32V
NORM BLO
120V
AC
L1
N
GN
24V
DC
+DC
COM
GND
power wire
connects to
L1
neutral wire
connects to N
e
positive
negative
equipment
grounding
conductor
ground bus connects
to GND
Set the input voltage selector switch.
24V dc
input voltage
selector switch
Publication 177210.2 - March 1996
Artisan Technology Group - Quality Instrumentation ... Guaranteed | (888) 88-SOURCE | www.artisantg.com
Step
6
Connect Programming
Terminal
a
Turn the power switch on the front of the terminal to the OFF position
and plug the ac power cord into the terminal.
MiniPLC2/02, 2/16, 2/17
Industrial Terminal
(rear view)
Channel A
PLC2 Family
b
Program Panel
Interconnect Cable
cat. no. 1772TC
10 ft (3.05 cm)
Interface
If your processor has a power supply, plug the ac power cord into
the ac power source.
c
Connect one end of the 1772TC Interconnect Cable to Channel A
at the back of the terminal and connect the other end to the socket
labelled INTFC at the front of the processor.
d
Place the PLC2 family keytop overlay onto the keyboard and turn
the power switch on the front of the terminal to the ON position.
e
Turn the power switch of the processor to the ON position and
press the keys [1] [1] on the terminal keyboard.
Publication 177210.2 - March 1996
Artisan Technology Group - Quality Instrumentation ... Guaranteed | (888) 88-SOURCE | www.artisantg.com
6–2
Connect to a Personal Computer
62pin Dshell
Connector
Pin Male
10.2 cm
(4 in.)
22
43
1
62
21
15pin Dshell
Connector
Pin Female
3.2 m
(10.50 ft.)
10.2 cm
(4 in.)
1784CP2 cable
8
15
1
9
PLC2 Processor
Industrial Terminal
4
1
5
2
7
3
6
4
26
5
27
6
47
7
48
8
62pin
Dshell
Using 6200 Programming Software
For more
information...
For specific information about using 6200
programming software, see the MiniPLC2/02,
2/16, 2/17 Processor User Manual, publication
17726.5.8.
Cable shield
tied to chassis
PLC2
Any AllenBradley or IBM and IBMcompatible machine can be used as a programming device
using 6200 or Application Interface (AI) programming software. Before you install the PLC2
programming software, you need the following:
- 640 KBytes of RAM as base memory (extended or expanded memory not required
- 10 MBytes of disk space for storing files.
- AllenBradley DOS version 3.2x if you use a 1784T50 or 1784T45 programming terminal. If
you use a 1784T47 programming terminal use DOS 4.01. If you use an IBM PC/XT, IBM
PCAT, or IBMcompatible programming terminal, use DOS 3.2, 3.3, 4.x, or 5.0.
- monochrome or color graphics monitor
- installed 1785KL, KTP, KT, KT2, KTK1 card
If your 1784T50 has DOS version 2.11 or earlier, you must upgrade to the current version of
AllenBradley DOS. The current version of AllenBradley DOS is version 3.21.
Using AI Programming Software
Before you install the AI PLC3 programming software, you need
the following:
- IPM PC XT, AT or compatible computer with DOS 2.1 or later
For more
information...
For specific information about using AI
programming software, see the PLC2
Ladder Logistics Manual, publication
9399L2man07.05.89.
- monitor and graphics board. These display types are supported:
monochrome display system
CGA display system
EGA display system
VGA display system
- 640K RAM of system memory
- a floppy drive and a hard drive
Publication 177210.2 - March 1996
Artisan Technology Group - Quality Instrumentation ... Guaranteed | (888) 88-SOURCE | www.artisantg.com
Appendix
Specifications
Specifications
Specifications for Mini-PLC-2 processors follow.
MiniPLC2/02 Processor
without a power supply
(1772LZ)
Location
MiniPLC2/16 Processor
without a power supply
(1772LX)
MiniPLC2/17 Processor
without a power supply
(1772LW)
1771 I/O chassis left most slot
Backplane Current
1.25 A Requirement
Battery Backup
Selfcontained lithium battery maintains memory for 1 year with no AC applied to the processor
Data Table Size
481920 Floating words
483968 Floating words
487808 Floating words
Memory Size
16bit words RAM
2K
4K
7.75K
I/O Scan
0.82 ms (2slot addressing)
2.00 ms (1slot addressing)
2.15 ms (1/2slot addressing)
Program Scan
I/O Capacity (Typical)
Bulletin 1771 I/O
Mode Selection
7.5 ms/K (minimum)
12 ms (typical application program)
128
256
256512 (maximum)
Key switch on the front panel and from the keyboard of the 1770T3 terminal
Environmental Conditions
Operating Temperature
Storage Temperature
Relative Humidity
0 to 60o C (32 to 140o F)
40 to 85o C (40 to 185o F)
5% to 95% (without condensation)
Publication 177210.2 - March 1996
Artisan Technology Group - Quality Instrumentation ... Guaranteed | (888) 88-SOURCE | www.artisantg.com
A-2
Specifications
MiniPLC2/02 Processor
with a power supply
(1772LZP)
MiniPLC2/16 Processor
with a power supply
(1772LXP)
MiniPLC2/17 Processor
with a power supply
(1772LWP)
These processors have the same features as above and they also have a selfcontained power supply.
Input Voltage
120/220 V ac (switch selectable)
Input Voltage Range
97 to 132 V ac 194 to 264 V ac
Nominal Input Power
96 VA
Frequency
Output Current to
Backplane
Keying
(top connector)
47 to 63 Hz
4A
Between 46 and 48
Between 54 and 56
Publication 177210.2 - March 1996
Artisan Technology Group - Quality Instrumentation ... Guaranteed | (888) 88-SOURCE | www.artisantg.com
I–2
AllenBradley, a Rockwell Automation Business, has been helping its customers improve
productivity and quality for more than 90 years. We design, manufacture and support a broad
range of automation products worldwide. They include logic processors, power and motion
control devices, operator interfaces, sensors and a variety of software. Rockwell is one of the
world's leading technology companies.
Worldwide representation.
Argentina • Australia • Austria • Bahrain • Belgium • Brazil • Bulgaria • Canada • Chile • China, PRC • Colombia • Costa Rica • Croatia • Cyprus • Czech Republic •
Denmark • Ecuador • Egypt • El Salvador • Finland • France • Germany • Greece • Guatemala • Honduras • Hong Kong • Hungary • Iceland • India • Indonesia •
Ireland • Israel • Italy • Jamaica • Japan • Jordan • Korea • Kuwait • Lebanon • Malaysia • Mexico • Netherlands • New Zealand • Norway • Pakistan • Peru •
Philippines • Poland • Portugal • Puerto Rico • Qatar • Romania • Russia-CIS • Saudi Arabia • Singapore • Slovakia • Slovenia • South Africa, Republic • Spain •
Sweden • Switzerland • Taiwan • Thailand • Turkey • United Arab Emirates • United Kingdom • United States • Uruguay • Venezuela • Yugoslavia
AllenBradley Headquarters, 1201 South Second Street, Milwaukee, WI 53204 USA, Tel: (1) 414 3822000 Fax: (1) 414 3824444
Publication 177210.2 - March 1996
Supercedes
17722.23
October 1985
, 17722.27
Publication
177210.2
- March
1996April 1988, 17722.15
August 1984, 17722.16 February 1986
PN 95512462
Copyright 1996 AllenBradley Company, Inc. Printed in USA
Artisan Technology Group - Quality Instrumentation ... Guaranteed | (888) 88-SOURCE | www.artisantg.com
Artisan Technology Group is your source for quality
new and certified-used/pre-owned equipment
• FAST SHIPPING AND
DELIVERY
• TENS OF THOUSANDS OF
IN-STOCK ITEMS
• EQUIPMENT DEMOS
• HUNDREDS OF
MANUFACTURERS
SUPPORTED
• LEASING/MONTHLY
RENTALS
• ITAR CERTIFIED
SECURE ASSET SOLUTIONS
SERVICE CENTER REPAIRS
Experienced engineers and technicians on staff
at our full-service, in-house repair center
WE BUY USED EQUIPMENT
Sell your excess, underutilized, and idle used equipment
We also offer credit for buy-backs and trade-ins
www.artisantg.com/WeBuyEquipment
InstraView REMOTE INSPECTION
LOOKING FOR MORE INFORMATION?
Visit us on the web at www.artisantg.com for more
information on price quotations, drivers, technical
specifications, manuals, and documentation
SM
Remotely inspect equipment before purchasing with
our interactive website at www.instraview.com
Contact us: (888) 88-SOURCE | [email protected] | www.artisantg.com