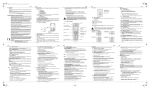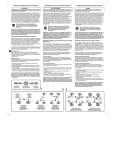
1
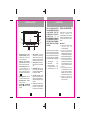
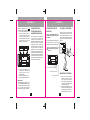
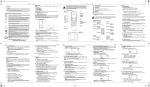
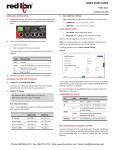
Special Features
6.5" x 2.25" Large Liquid Crystal
Display - displays three full lines of
information including time of the call.
ML-300ad
Jumbo LCD Display
Caller ID on Call Waiting
Name & Number
Delete Button - allows you to delete
one or all Caller ID record.
DIAL VM Button*** - dials to your
Caller ID Record* - stores up to 90
Caller ID records each of which up
to 14 digits number and 15
characters name.
voice mail access number.
Languages - English, Spanish or
French display prompts.
Caller ID on Call Waiting** - allows
you to view incoming Caller ID even
when you are on the phone. The
waiting caller's name and number
are shown on the LCD display.
90 Name & Number Memory
Owner's Manual
Installation and operation instruction
Real Time Clock - shows the current
time on the LCD display.
LCD Display Contrast Control allows you to adjust the display
contrast.
Area Code Setting - sets your local
area code.
MSG
NEW
Wall Mountable - allows you to
mount your ML-300ad on the wall.
New Call Light Indicator (Green
LED)* - lights up steadily when there
is a new call.
Backlit LCD Display
Note:
*
You must subscribe to the Caller
ID service from your local
telephone company.
** You must subscribe to the Caller
ID on Call Waiting service from
your local telephone company.
*** You must subscribe to the Voice
Mail service from your local
telephone company to retrieve
voice mail messages.
Message Waiting Light Indicator
(Red LED)*** - lights up steadily
when there are voice mail messages
in your mailbox.
Review Scrolling - easily scroll
through the Caller ID records.
DELETE
Please read
this manual
carefully
before use.
Keep for
your reference.
DIAL VM
REVIEW
DIAL
FLASH
Dial Button - dials the number
shown on the LCD display.
IMPORTANT :
a) THE AC POWER ADAPTOR (INCLUDED) MUST BE CONNECTED
TO OPERATE ML-300ad.
b) 4 X AAA BATTERIES ARE RECOMMENDED TO BE INSTALLED TO
RETAIN ML-300ad's MEMORY.
2
Control Location
1
MSG
NEW
Installation
2
3
6
4
5
7
DELETE
DIAL VM
9
REVIEW
10
1.
M e s s a g e Wa i t i n g L i g h t
Indicator (red LED) - lights up
steadily when you have new
voice mail messages.
2.
New Call Light Indicator
(green LED) - lights up steadily
when new calls are received.
3.
DIAL
[DIAL VM] Buttons - dials to
your voice mail access number.
5.
[DELETE] Button - deletes
Caller ID records.
6.
[REVIEW ] / [REVIEW ]
Buttons - views the Caller ID
records.
8
11
Visual Display Panel - shows
the caller’s name and / or
number, incoming call time &
date, Call Counter, New Call
icon (NEW) and Voice Mail icon
(
).
4.
FLASH
7.
[DIAL] Button - dials the
number shown on the display.
You also use this button to set
language, area code, time and
date and LCD display contrast.
8.
[FLASH] Button - activates 3way conference or Call Waiting
calls.
9.
TELEPHONE Jack - connect
line cord from your telephone
into the jack labeled PHONE at
the back of ML-300ad.
THE AC POWER ADAPTOR
THAT COMES WITH ML-300ad
IS REQUIRED FOR THE
OPERATION OF THE UNIT.
HOWEVER,
IT
IS
RECOMMENDED TO INSTALL
4 X AAA SIZE BATTERIES TO
PREVENT LOSS OF MEMORY
WHEN THERE IS A POWER
FAILURE.
INSTALLING BATTERIES
Please install 4 x AAA batteries
(alkaline batteries are
recommended) to retain the Caller
ID records and keep real time clock
running in case there is a power
failure.
IMPORTANT :
a) Use only fresh batteries of the
required
size
and
recommended type.
b) Do not mix old and new
batteries, different types of
batteries (standard, alkaline or
rechargeable) or rechargeable
batteries of different capacities.
c) When replacing the batteries, if
you do not install the new
batteries within one minute after
removing the old ones, you may
lose all information stored in
your unit.
d) If you do not plan to use your
unit with batteries for a month
or longer, remove the batteries.
Batteries can leak chemicals
that can destroy electronic parts.
e) Dispose of old batteries
promptly and properly. Do not
burn or bury them.
Please check to be sure all supplied
accessories come with ML-300ad.
If there is anything missing or visible
damage, please contact the original
place of purchase. Do not attempt
to operate ML-300ad if it is damaged.
a)
b)
c)
d)
e)
ML-300ad unit
Stand studs
AC power adaptor
Long phone line cord
Short phone line cord
1 pc
2 pcs
1 pc
1 pc
1 pc
10. TEL LINE Cord Jack - insert
one end of the telephone line
cord into the jack labeled TEL.
LINE and the other end into your
wall jack.
11. DC Jack - the AC adaptor must
be connected for the ML-300ad
to operate. Plug the adaptor
into the DC 9V jack at the back.
3
4
Installation
When the Low Battery icon (
)
appears, replace the batteries.
1. Disconnect the telephone line.
2. Open the batteries cover by
inserting a sharp object (such
as a clip or a pencil) into the
two slots at the top of the battery
compartment cover on the
bottom of the ML-300ad.
CONNECTING TO A
TELEPHONE AND/OR
ANSWERING MACHINE
After installing 4 x AAA batteries,
connect one end of the line cord
provided into ML-300ad’s jack
labeled TEL. LINE and connect the
other end of the line cord into the
telephone wall jack. Connect the
existing line cord on your telephone
into ML-300ad’s jack labeled
PHONE. If you have a telephone
answering machine, connect a line
cord from ML-300ad’s PHONE jack
to the answering machine LINE jack.
Connect another line cord from the
answering machine PHONE jack to
the jack on your telephone.
+ AAA - + AAA - AAA + - AAA +
Installation
CONNECTING THE AC
ADAPTOR
-
!
TEL. LINE
Insert the slots of the two Stand
Studs into the matching tabs on the
bottom cabinet respectively. Then
slide the Stand Studs along the tabs
until they are locked to the bottom
cabinet.
THE AC ADAPTOR MUST BE
CONNECTED FOR ML-300ad TO
OPERATE.
Plug the adaptor’s barrel plug into
ML-300ad’s DC 9V jack and plug
the adaptor into a standard AC outlet.
!
The AC adaptor must be a
Class 2 Power Source, 9V DC,
200mA
DC 9V
+
DC 9V
+
PLACING ON THE DESK
-
!
TEL. LINE
TEL. LINE
PHONE
PHONE
PHONE
Connected to AC Power Adaptor
3.
4.
5.
Place the new batteries in the
compartment following the
polarity symbols (+ and -)
marked inside.
Replace the batteries cover.
Reconnect the telephone line.
Connected to the wall jack
MOUNTING ON THE WALL
Connected to telephone
1.
IMPORTANT :
When replacing the batteries, if you
do not install the new batteries within
30 seconds after removing the old
ones, you may lose all Caller ID
records stored in your ML-300ad.
2.
5
6
Drill two 1/8-inch diameter
holes, 5-1/8 inches (130 mm)
apart, into the wall. Thread a
screw (not included) into each
hole, letting the heads extend
1/8 inch from the wall.
Align the keyhole slots (on the
bottom of ML-300ad) with the
mounting screws and slide ML300ad downward to secure it.
Operation
IDLE MODE
2.
When ML-300ad is in idle mode, the
calls status and clock are shown on
the LCD display :
3.
Real time clock
Date
4.
You have new
voice mail
message(s)
5.
12:00AM 01/01
TOTAL 80 NEW 10
Press [REVIEW ] button until
“SET LANGUAGE” appears.
Press [DIAL] button again. The
LCD display shows "ENGLISH".
Press [REVIEW ] or [REVIEW
] button to select English,
French or Spanish.
Press [DIAL] button to save
your setting and [REVIEW ]
button to go to the next setting
option SET AREA CODE.
Set Area Code
Area codes of all incoming calls will
be compared with the area code you
entered to determine if it is a local
call.
1. Press [DIAL] button when “SET
AREA CODE” appears on the
LCD. The first digit of the 3digit area code will blink.
2. Press [REVIEW ] or [REVIEW
] button to scroll digits to enter
the first digit of your area code.
3. Press [DIAL] button to move on
to the second digit.
4. Repeat steps (2) and (3) until
you have entered your local
area code.
5. Press [DIAL] button to save
your setting and [REVIEW ]
button to go to the next setting
option SET TIME / DATE.
You have 80 Caller ID
records including 10 calls
you have not reviewed yet.
SETUP MENU
There are five options in the setup
menu.
Set Language
Allows you to select the LCD display
prompts in English, Spanish or
French. It is set at English when exfactory.
1. During idle mode, press and
hold [DIAL] button for about 3
seconds. The LCD display
shows "SETUP MENU
".
Note : If you want to change your
area code, repeat the steps
1~4.
7
Operation
Set Time / Date
Allows you to set the clock (hour
and minute) and date (month and
day). The clock will also be updated
by incoming Caller ID, if you have
subscribed to Caller ID service. The
clock is set at “12:00AM 01/01” when
ex-factory.
1. Press [DIAL] button when “SET
TIME / DATE” appears on the
LCD. The hour digit will blink.
2. Press [REVIEW ] or [REVIEW
] button to scroll digits to set
the hour. After the hour is set,
press [DIAL] button to move on
to set the minute.
3. Repeat step 2 until you have
set the hour, minute, month and
day.
4. Press [DIAL] button to save
your setting and [REVIEW ]
button to go to the next setting
option SET CONTRAST.
3.
4.
Press [DIAL] button to save
your setting.
Press [REVIEW ] button to go
to the next setting option SET
DIAL VM.
Set Dial VM
Allows you to set your own voice
mail access number.
1. Press [DIAL] button when “SET
DIAL VM” appears on the LCD.
The first digit of the voice mail
access number will blink.
2. Press [REVIEW ] or [REVIEW
] button to scroll digits to enter
the first digit of the access
number.
3. Press [DIAL] button to move on
to the second digit.
4. Repeat steps (2) and (3) until
you have entered your voice
mail access number. You are
now ready to dial your voice
mail access number by pressing
the [DIAL VM] button.
5. Press [DIAL] button to save
your setting and [REVIEW ]
button to go to the next setting
option EXIT and press [DIAL]
button to leave the setup menu.
Set Contrast
Allows you to adjust the LCD display
contrast at 8 different levels. It is
set at level 4 when ex-factory.
1. Press [DIAL] button when “SET
CONTRAST” appears on the
LCD.
2. Press [REVIEW ] or [REVIEW
] button to decrease or
increase the LCD display
contrast.
Note : If you want to change your
voice mail access number,
repeat the steps 1~4.
8
Operation
Sequence
number of this
incoming call
CALLER ID MEMORY
If you have subscribed to the Caller
ID service from your local telephone
company, your ML-300ad will receive
and display incoming caller’s name
(if applicable) and number together
with the date and time of the call. It
stores up to 90 records, each of
which contains up to 14-digit number
and 15-character name.
It is a new call
12:00AM 01/01 CALL #80 NEW
C.W.
249-342-363
JOHN SMITH
It is a waiting call
Caller's number
You have new
voice mail
message(s)
Caller's name
Note :
a) In some areas, Caller ID
information may not be available.
“UNKNOWN NAME” or
“UNKNOWN CALL” will be
shown on the LCD display in
such cases.
b) Callers have the option to block
their Caller ID information.
“PRIVATE NAME” or “PRIVATE
CALL” will be shown on the LCD
display in such cases.
c) If the area code of a caller’s
number matches your pre-set
local area code, only the last 7
digits will be shown on the LCD
display. (refer to the “Set Area
Code” section on page 8)
REVIEWING CALLER ID
2.
NEW CALL LIGHT
INDICATOR (Green)
Time and date
when this call was
received.
When the Caller ID memory is full,
the oldest Caller ID record will be
deleted automatically to make room
for the new one.
1.
Operation
Press [REVIEW ] button to
view the Caller ID record from
the newest call (i.e. #90) to the
oldest (#01)..
Press [REVIEW ] button to
view the Caller ID record from
the oldest (#01) to the newest
(i.e. #90).
9
VOICE MAIL
If you have subscribed to Voice Mail
service from you local telephone
company, the Message Waiting Light
Indicator lights up steadily when you
have voice mails in your mailbox, and
the LCD icon ( ) appears on the LCD
display. After you have listened to your
voice mails, the Message Waiting
Light Indicator and the LCD icon ( )
will turn off.
When ML-300ad receives a new
incoming call, the new call icon
“NEW” appears on the LCD display
and the New Call Light Indicator
(Green LED) lights up steadily.
Besides, the LCD display shows the
information of the new incoming call
for about 10 seconds and then
returns to the idle mode.
To listen to your voice mails, press
[DIAL VM] button to dial your voice
mail access number. The LCD display
shows "PICK UP HANDSET". Then,
lift the Handset to dial the access
number.
Note :
a) You or your answering machine
must answer the new incoming
call only after the first ring.
Otherwise, the information of
the new incoming call will not
be registered.
b) If the AC adaptor is not
connected, the New Call Light
Indicator will flash every 3
seconds when there is new call
not yet reviewed.
c) The New Call Light Indicator
does not stop lighting up unless
you have reviewed ALL new
incoming calls by pressing
[REVIEW ] or [REVIEW ]
button.
Refer to the "Set DIAL VM" section on
page 9 to set the voice mail access
number.
IMPORTANT :
a) If the AC adaptor is not connected,
the Message Waiting Light
Indicator will flash every 3
seconds when you have new voice
mail(s).
b) If there is more than one phone
connected to the line in your
house, ML-300ad will not receive
Call Waiting information when any
of the other phones are off-hook
at the same time.
c) If the Message Waiting Light
Indicator keeps on lighting up and
the LCD icon ( ) still appears
after you have listened to all your
voice mails, press [DELETE]
button to turn off the light and the
LCD icon.
10
Operation
3.
LONG DISTANCE CALL
If there is a long distance incoming
call, "LONG DISTANCE" apears
alternatively with the caller's name.
12:00AM 01/01 CALL #80 NEW
249-342-363
LONG DISTANCE
4.
IMPORTANT :
a) You must pre-store an area
code before you can adjust the
number format. Refer to the
“Set Area Code” section on
page 8.
b) If you have set your local area
code, area code of all incoming
numbers will be compared
against your pre-set local area
code to determine if it is a local
call.
c) Only the last 7 digits of the
incoming number will be shown
on the LCD display if it is a local
call. If it is not a local call, 11
digits (1 + area code + phone
number) will be shown when
dialing back.
DIALING FROM
CALLER ID
1.
2.
Press [DIAL] button again to
change number format among:
a) 7 digits (phone number)
b) 10 digits (area code +
phone number)
c) 11 digits (1 + area code +
phone number)
Lift the Handset to dial the
number shown.
When reviewing a Caller ID
record, press [DIAL] button to
dial the number shown on the
LCD display. If the number
format of the Caller ID is not
adjustable, the LCD display
shows “PICK UP HANDSET”.
Lift the Handset to dial the
number.
If you have pre-stored an area
code, the number format of the
Caller ID is adjustable (see the
"Important" section on page 12).
The LCD display shows “PICK
UP OR ADJ” after you press
[DIAL] button.
Operation
DELETING CALLER ID
RECORD
CALLER ID ON CALL
WAITING
When the Caller ID record is full, it
automatically deletes the oldest
Caller ID record as a new call comes
in. You can also delete individual
call or all calls in the Caller ID record.
If you have subscribed to the Caller
ID on Call Waiting service, ML-300ad
allows you to read the information
of the new caller from the LCD
display when you are on the phone.
To Delete A Caller ID Record
1. While reviewing a Caller ID
record, press [DELETE] button
and the LCD display shows
“DELETE CALL?”.
2. Press [DELETE] button again
to delete.
IMPORTANT :
If there is more than one phone
connected to the line in your house,
ML-300ad will not receive Call
Waiting information when any of the
other phones are off-hook at the
same time.
To Delete All Caller ID Records
1. While reviewing a Caller ID
record, press and hold
[DELETE] button for about 3
seconds. “DEL ALL CALLS?”
appears on the LCD display.
2. Press [DELETE] button again
to delete all records.
1.
12:00AM 01/01 CALL #80 NEW
C.W.
2.
3.
11
When you are on the line and
hear a Call Waiting tone, the
new caller’s name and/or
number appear on the LCD
display. An icon “C.W.”
indicates it is a waiting call.
12
249-342-363
JOHN SMITH
Press [FLASH] button to switch
to talk with the new caller and
put the first caller on hold.
Press [FLASH] button again to
resume the phone conversation
with the first caller and to put
the new caller on hold.
Troubleshooting
LCD Prompts
ENGLISH
FRANCAIS
ESPANOL
SETUP MENU
SET LANGUAGE
SET AREA CODE
SET TIME / DATE
SET CONTRAST
SET DIAL VM
EXIT
AREA CODE
TIME / DATE
CONTRAST
DIAL VM
TOTAL XX NEW XX
NO CALLS
END OF LIST
DELETE CALL?
DEL ALL CALLS?
PICK UP OR ADJ
PICK UP HANDSET
DIALING ...
NO NAME
UNKNOWN NAME
PRIVATE NAME
UNKNOWN CALL
PRIVATE CALL
LONG DISTANCE
DATA ERROR
Symptoms
The display is blank
Solutions
a)
b)
No French and Spanish translations.
All displayed in English.
The display is faded
a)
Adjust the LCD display contrast (refer to “Set
Contrast”, page 9)
Caller ID doesn’t work
a)
Make sure you have subscribed to the Caller
ID service.
Wait until the phone rings twice before
answering a call.
Make sure telephone line cords are connected
correctly (refer to “Connecting to a Telephone
and/or Answering Machine”, page 6).
b)
c)
XX TOTAL XX NOU
AUCUN APPEL
FIN DE LISTE
EFF. UN APPEL?
EFF. TOUT APPELS
DECROCH OU ADJ
DECROCH COMBINE
COMPOSER ...
AUCUN NOME
NOME NON DISP
NOME RISERV
APPEL NON DISP
APPEL RISERV
INTERURBAIN
ERREUR DONNEE
13
XX TOTAL XX NUE
NO LLAMADAS
FIN DE LA LISTA
BORRAR LLAM?
BORRAR TODO?
LEVANTE / AJUSTAR
LEVANTE TELEFON
MARCAR ...
NO NOMBRE
NOM DESCONOCIDO
NOMBRE PRIVADO
LLAM DESCONOC
LLAMADA PRIVADO
LARGA DISTANCIA
DATO INCOMPLETO
Make sure the AC adaptor is connected to the
jack labeled DC 9V at the back of ML-215ad
and plugged into a wall socket that is not
controlled by a wall switch.
Adjust the display contrast (refer to “Set
Contrast”, page 9)
Caller ID with Call Waiting is
not received
a)
b)
c)
Make sure you have subscribed to Caller ID
on Call Waiting service.
Make sure you are using the phone attached
to unit when a Call Waiting call is received.
Make sure any other extension phones is not
off hook when the Call Waiting call is received.
No caller’s name
a)
Make sure you have subscribed to the Caller
ID service including the CALLERS NAME
DELIVERY feature?
The New Call Light
Indicator (green) lights up
a)
Make sure you have reviewed all the new calls.
The New Call Light
Indicator (green) doesn’t
light up if there is new call.
a)
Make sure you have connected the power
adaptor properly.
Make sure you have subscribed to the Caller
ID service.
The Message Waiting Light
Indicator (red) doesn’t light
up if you have voice
messages
a)
The Message Waiting Light
Indicator (red) lights up
a)
b)
b)
Make sure you have subscribed to the Voice
Mail service.
Make sure you have connected the power
adaptor properly.
Make sure you have accessed your voice mail
message(s)
14
Care And Maintenance
The following suggestions will help you care for the system so you can enjoy it
for years.
Keep the phone dry. If it gets
wet, wipe it dry immediately.
Liquids might contain
minerals that can corrode the
electronic circuits.
Use only fresh batteries of
the required size and type.
Always remove old or weak
batteries. They can leak
chemicals which can destroy
electronic circuits.
Use and store the phone only
in normal temperature environments. Temperature
extremes can shorten the life
of electronic devices, and
distort or melt plastic parts.
Keep the phone away from
excessive dust and dirt,
which can cause premature
wear of parts.
Handle the phone gently and
carefully. Dropping it can
damage circuit boards and
cases and can cause the
phone to work improperly.
BE
LNNE
Wipe the phone with a damp
cloth occasionally to keep it
looking new. Do not use
harsh chemicals, cleaning
solvents, or strong detergents
to clean the system.
Modifying or tampering with the phone's internal components can cause a malfunction and might invalidate the phone's warranty and void your FCC authorization
to operate it. If your phone is not performing as it should, call someone with
qualifications for assistance.
Warranty
Manufacturers 1-Year Limited Warranty
Who Is Covered?
You must have proof of purchase to exchange the product. A sales receipt
of other document showing the date that you purchased the product is
considered proof of purchase.
What Is Covered?
Coverage begins the day you buy your product. For one year thereafter, a
defective or inoperative product will be replaced with a new, renewed or
comparable product at no charge to you. A replacement product is covered
only for the original warranty period. When the warranty on the original
product expires, the warranty on the replacement product also expires.
What Is Excluded?
Your warranty does not cover:
labor charges for installation or setup of the product and adjustment
of customer controls on the product.
product replacement because of misuse, accident, unauthorized repair
or other cause not within the control of ClassCo Inc.
a product that requires modification or adaptation to enable it to operate
in any country other than the country for which it was designed,
manufactured, approved and/or authorized, or repair of products damaged
by these modifications.
Incidental or consequential damages resulting from the product. (Some
states do not allow the exclusion of incidental or consequential damages,
so the above exclusion may not apply to you.)
FOR CUSTOMER SERVICE
CALL CLASSCO
TOLL FREE : (888) 252 - 7726
or visit product support on-line at
www.classco.com
Copyright © 2005 ClassCo Inc.
All Rights Reserved
15
16
30-151901-00
0305
Printed in China