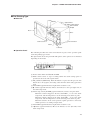
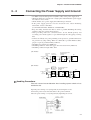
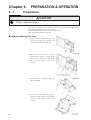
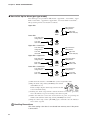
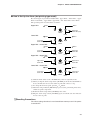
1
No. CP-SP-1048E
CQ
Compact Recorder
User’s Manual
Thank you for purchasing the CQ
Compact Recorder. This manual
contains information for ensuring
correct use of the CQ Compact
Recorder. This manual should be read
by those who design and maintain
control panels and devices that use the
CQ Compact Recorder.
It provides necessary information not
only for installation, but also
maintenance and troubleshooting. Be
sure to keep this manual nearby for
handy reference.
RESTRICTIONS ON USE
This product has been designed, developed and manufactured for general-purpose
application in machinery and equipment.
Accordingly, when used in applications outlined below, special care should be taken to
implement a fail-safe and/or redundant design concept as well as a periodic
maintenance program.
• Safety devices for plant worker protection
• Start/stop control devices for transportation and material handling machines
• Aeronautical/aerospace machines
• Control devices for nuclear reactors
Never use this product in applications where human safety may be put at risk.
REQUEST
Make sure that this User's Manual is handed over to the user before the
product is used.
Copying or duplicating this User's Manual in part or in whole is forbidden. The information and specifications in this User's Manual are subject to change without notice.
Considerable effort has been made to ensure that this User's Manual is
free from inaccuracies and omissions.
If you should find any inaccuracies or omissions, please contact
Yamatake Corporation.
In no event is Yamatake Corporation liable to anyone for any indirect,
special or consequential damages as a result of using this product.
© 1998 Yamatake Corporation ALL RIGHTS RESERVED
The Kim Wipe® is a registered trademark of Crecia Co., Ltd.
SAFETY PRECAUTIONS
■ About Icons
The safety precautions described in this manual are indicated by various icons.
Please be sure you read and understand the icons and their meanings described
below before reading the rest of the manual.
Safety precautions are intended to ensure the safe and correct use of this product, to prevent injury to the operator and others, and to prevent damage to property. Be sure to observe these safety precautions.
WARNING
Warnings are indicated when mishandling this
product might result in death or serious injury.
CAUTION
Cautions are indicated when mishandling this
product might result in minor injury to the user, or
only physical damage to the product.
■ Examples
Use caution when handling the product.
The indicated action is prohibited.
Be sure to follow the indicated instructions.
i
WARNING
Before removing/mounting the CQ, be sure to turn the power OFF.
Failure to do so might cause electric shock.
Before wiring the CQ, be sure to turn the power OFF.
Failure to do so might cause electric shock.
Do not touch electrically charged parts on the CQ such as the power terminals.
Doing so might cause electric shock.
Do not allow lead clippings, chips or water to enter the CQ case.
Doing so might cause fire or faulty operation.
Be sure to attach the terminal cover after wiring the CQ.
Failure to do so might cause electric shock.
Firmly tighten the terminal screw at the torque listed in the specifications.
Insufficient tightening of terminal screws might cause electric shock or fire.
Do not use unused terminal on the CQ as relay terminals.
Doing so might cause electric shock, fire or faulty operation.
Before connecting the CQ to the measurement target or external control circuits, make sure that the FG terminal is properly grounded (100 Ω max.).
Failure to do so might cause electric shock.
Be sure to ground the FG terminal properly (100 Ω max.).
Failure to do so might cause electric shock or fire.
Use the relays on the CQ within the service life listed in the specifications.
Continued use of the relays after the recommended service life might cause
faulty operation or fire.
Before changing the chart feed speed, be sure to turn the power OFF.
Failure to do so might cause electric shock.
To prevent danger before you replace the fuse, turn the power OFF, and disconnect the CQ from its power supply.
Failure to do so might cause electric shock.
Use only the specified fuse. Do not use other fuses.
Doing so might cause fire.
ii
CAUTION
Use the CQ within the operating ranges recommended in the specifications
(temperature, humidity, voltage, vibration, shock, mounting direction, atmosphere, etc.).
Failure to do so might cause faulty operation.
When using mounting brackets, tighten screws pushing brackets firmly
against the panel so that there is no space between the bracket and the
panel.
Failure to do so might cause the CQ to fall from the panel or wobble, which is
dangerous.
When wiring terminals, be sure to use crimped terminals.
Maintain a distance of at least 50 cm between I/O signal leads, communications leads and power leads of 100 V or more. Also, do not pass these leads
through the same piping or wiring duct.
To protect terminals and cables even when wiring cable is pulled, be sure to
keep all wiring cables fixed behind the mounting panel.
Do not connect any wiring to unused-channel terminals or connection-inhibited
terminals. Do not use unused terminals as relay terminals.
Doing so may result in faulty operation or unfavorable influence on the measurement of the used-channel.
Do not touch moving parts during operation.
Doing so might cause injury.
When disposing of the CQ unit, observe local bylaws.
iii
Screw for Transportation
The inner mechanism is fixed by screw for transportation to protect the CQ from vibration and shock during
transportation. Remove this screw as shown below. The screw for transportation is located on the left side of the
unit. After removing the screw using a Phillips screwdriver, store it in a safe place for when the CQ is next
transported.
The Role of This Manual
This manual describes both pen type and dot printing type models.
Functions and operation might differ according to the model you use.
Read the sections corresponding to your model. “Pen type” or “Dot printing type” is indicated if there is a
difference according to the models.
iv
Organization of This User’s Manual
This manual is organized as follows.
Chapter 1. INTRODUCTION
This chapter describes CQ applications and features, and gives a list of model
Nos.
Chapter 2. NAMES & FUNCTION OF PARTS
This chapter describes the names and functions of parts of the CQ.
Chapter 3. INSTALLATION & WIRING
This chapter describes precautions, sitting conditions and installation method
when installing the CQ into devices, and how to connect to peripheral equipment.
Chapter 4. PREPARATION & OPERATION
This chapter describes checks to carry out before operating the CQ and daily
operational procedures.
Chapter 5. BASIC CONFIGURATION
This chapter describes how to set the power frequency and how to set the alarms.
Chapter 6. MAINTENANCE & INSPECTION
This chapter describes inspection items and how to replace maintenance parts to
ensure prolonged use of the CQ.
Chapter 7. TROUBLESHOOTING
This chapter describes points to check when the CQ is not working properly and
how to remedy trouble that might occur.
Chapter 8. SPECIFICATIONS
This chapter describes the general specifications, performance specifications and
external dimensions of the CQ.
v
Contents
SAFETY PRECAUTIONS
Screw for Transportation
The Role of This Manual
Organization of This User’s Manual
Conventions Used in This Manual
Chapter 1. INTRODUCTION
■
■
■
■
■
Features . . . . . . . . . . . . . . . . . . . . . . . . . . . . . . . . . . . . . . . . . . . . . . . . . . . . . 1
How the Model Nos. are Configured . . . . . . . . . . . . . . . . . . . . . . . . . . . . . . 1
Consumables . . . . . . . . . . . . . . . . . . . . . . . . . . . . . . . . . . . . . . . . . . . . . . . . 10
Optional Parts . . . . . . . . . . . . . . . . . . . . . . . . . . . . . . . . . . . . . . . . . . . . . . . 11
Maintenance Parts . . . . . . . . . . . . . . . . . . . . . . . . . . . . . . . . . . . . . . . . . . . . 12
Chapter 2. NAMES & FUNCTIONS OF PARTS
■ Pen Type . . . . . . . . . . . . . . . . . . . . . . . . . . . . . . . . . . . . . . . . . . . . . . . . . . . . 13
■ Dot Printing Type . . . . . . . . . . . . . . . . . . . . . . . . . . . . . . . . . . . . . . . . . . . . . 15
■ Material . . . . . . . . . . . . . . . . . . . . . . . . . . . . . . . . . . . . . . . . . . . . . . . . . . . . . 16
Chapter 3. INSTALLATION & WIRING
3-1 Installation Site. . . . . . . . . . . . . . . . . . . . . . . . . . . . . . . . . . . . . . . . . . . . . . . . . . 17
3-2 Installation . . . . . . . . . . . . . . . . . . . . . . . . . . . . . . . . . . . . . . . . . . . . . . . . . . . . . 18
■ Installation Dimensions. . . . . . . . . . . . . . . . . . . . . . . . . . . . . . . . . . . . . . . . 18
■ Procedure . . . . . . . . . . . . . . . . . . . . . . . . . . . . . . . . . . . . . . . . . . . . . . . . . . . 18
3-3 Wiring Precautions . . . . . . . . . . . . . . . . . . . . . . . . . . . . . . . . . . . . . . . . . . . . . . 19
■ Noise Countermeasures . . . . . . . . . . . . . . . . . . . . . . . . . . . . . . . . . . . . . . . 20
3-4 Connecting Power Supply and Ground . . . . . . . . . . . . . . . . . . . . . . . . . . . . . . 21
3-5 I/O Signal Leads . . . . . . . . . . . . . . . . . . . . . . . . . . . . . . . . . . . . . . . . . . . . . . . . . 22
■ Wiring Inputs . . . . . . . . . . . . . . . . . . . . . . . . . . . . . . . . . . . . . . . . . . . . . . . . 22
■ Wiring Alarm Output (optional function) . . . . . . . . . . . . . . . . . . . . . . . . . . 24
■ Wiring External Switch Input (optional function) . . . . . . . . . . . . . . . . . . . 25
Chapter 4. PREPARATION & OPERATION
4-1 Preparation . . . . . . . . . . . . . . . . . . . . . . . . . . . . . . . . . . . . . . . . . . . . . . . . . . . . . 26
■ Loading (replacing) the Chart. . . . . . . . . . . . . . . . . . . . . . . . . . . . . . . . . . . 26
■ Loading (replacing) the Pen (pen type model) . . . . . . . . . . . . . . . . . . . . . 28
■ Loading (replacing) the Ink Pad (dot printing type model) . . . . . . . . . . . 30
4-2 Operation . . . . . . . . . . . . . . . . . . . . . . . . . . . . . . . . . . . . . . . . . . . . . . . . . . . . . . 31
■ Turning the Power ON . . . . . . . . . . . . . . . . . . . . . . . . . . . . . . . . . . . . . . . . . 31
■ Starting and Stopping Recording. . . . . . . . . . . . . . . . . . . . . . . . . . . . . . . . 31
■ External Switch Input Function (optional function) . . . . . . . . . . . . . . . . . 32
vi
Chapter 5. BASIC CONFIGURATION
5-1 Alarm Setting (optional function) . . . . . . . . . . . . . . . . . . . . . . . . . . . . . . . . . . . 33
■ Alarm Operation. . . . . . . . . . . . . . . . . . . . . . . . . . . . . . . . . . . . . . . . . . . . . . 33
■ How to Set Up the Alarm (pen type model) . . . . . . . . . . . . . . . . . . . . . . . . 35
■ How to Set Up the Alarm (dot printing type model) . . . . . . . . . . . . . . . . . 35
5-2 Changing the Chart Feed Speed. . . . . . . . . . . . . . . . . . . . . . . . . . . . . . . . . . . . 36
5-3 Changing the Power Frequency (pen type AC model only). . . . . . . . . . . . . . 37
Chapter 6. MAINTENANCE & INSPECTION
6-1 Periodic Inspection . . . . . . . . . . . . . . . . . . . . . . . . . . . . . . . . . . . . . . . . . . . . . . 38
6-2 Cleaning . . . . . . . . . . . . . . . . . . . . . . . . . . . . . . . . . . . . . . . . . . . . . . . . . . . . . . . 39
6-3 Replacing the Fuse . . . . . . . . . . . . . . . . . . . . . . . . . . . . . . . . . . . . . . . . . . . . . . 40
Chapter 7. TROUBLESHOOTING
Chapter 8. SPECIFICATIONS
■ General Specifications . . . . . . . . . . . . . . . . . . . . . . . . . . . . . . . . . . . . . . . . 44
■ Performance Specifications . . . . . . . . . . . . . . . . . . . . . . . . . . . . . . . . . . . . 45
■ External Dimensions . . . . . . . . . . . . . . . . . . . . . . . . . . . . . . . . . . . . . . . . . . 46
Index
Conventions Used in This Manual
The following conventions are used in this manual.
Handling Precautions
: Handling Precautions indicate items that the user should pay attention
to when handling the CQ.
Note
: Notes indicate useful information that the user might benefit by
knowing.
(1) (2) (3)
: The numbers with the parenthesis indicate steps in a sequence or
indicate corresponding parts in an explanation.
vii
Chapter 1.
INTRODUCTION
The CQ Compact Recorder accommodates 100 mm wide chart, and comes in two types, pen type or dot printing
type. The user can also choose from four available input types, thermocouple, resistance temperature detector, DC
voltage or DC current.
■ Features
• Five recording modes are provided: 1-pen, 2-pen, 2-dot printing, 3-dot printing
and 6-dot printing.
• The CQ is designed compact and has a depth of only 150 mm. This responds to
customers’ needs for shallower panels.
• Recording start and stop, and servo lock enable and disable can be controlled by
external switch inputs.
• Alarm and burnout functions can be added depending on the model No.
• The carrying handle kit allows the CQ to be installed later on site, and makes it
ideal for portable applications.
• Light weight (1-pen type: 1.8 kg)
• The pen can be raised using a lever. (pen type only)
• The chart feed speed can be changed by replacing the gear (provided).
• The pen can be replaced easily. (pen type only)
• Refilling of ink is not necessary, and the ink pad can be replaced easily. (dot
printing type only)
■ How the Model Nos. are Configured
● Example of Model No.
123
4567
8 9 10 11
12
13
14
15
16
CQ1
K041
0 0 0 0
1
X
2
A
0
1-pen type
Additional treatment:
Not available
Thermocouple K
0 to 400°C
Enter “0000”.
Alarm: upper limit
External switch: Stops recording
Burnout: OFF
Chart feed speed
10 mm/h (20, 40 mm/h)
Power supply: 100 Vac 50 Hz
CQE
C671
X 0 1 5
3
X
2-dot printing
1-type input
Double scale
D
External switch, alarm: Not supported
Chart feed speed: 10 mm/h (20/40 mm/h)
Power supply: 200 Vac 50/60 Hz
No.2 scale: 0 to 100%RH
K061
M 0 1 4
6-dot printing
2-type input
Double scale
Thermocouple K
0 to 600°C
0
Additional treatment:
Inspection Certificate provided
4 to 20 mA
0 to 50°C
CQA
0
1
A
J
0
Y
Additional treatment:
Traceability Certificate provided
Alarm support cannot be selected.
0 to 10 mV
0 to 100%
External switch: Stops recording
Burnout: Channels 1 to 3, upper limit
Power supply: 100 Vac 50/60 Hz
Chart feed speed: 20 mm/h (40, 80 mm/h)
1
Chapter 1. INTRODUCTION
● 1-pen Type
123
4567
Basic Input type
model Range
Unit
No.
CQ1
8 9 10 11
12
Power
voltage
13
Chart
feed
speed
14
15
Additional function
External
Alarm
16
switch/burnout
1-pen
Input type, range, unit
Enter “0000”.
Select from Table 4.
Table 1 to 3
0000
Table 4
*1 The chart feed speed can
be changed by replacing
the gear (provided).
X
A
C
D
10 mm/h (changeable to 20 or 40 mm/h)*1
20 mm/h (changeable to 40 or 80 mm/h)*1
10 mm/min (changeable to 20 or 40 mm/min)*1
20 mm/min (changeable to 40 or 80 mm/min)*1
Table 6
Table 7
Table 10
● 2-pen Type
123
Basic
model
No.
CQ2
4567
8 9 10 11
Input type
Range
Unit
12
Power
voltage
13
Chart
feed
speed
14
15
Additional function
External
Alarm
16
2-pen
Input type, range and unit of channel 1
Input type, range and unit of channel 2
Table 4
*1 The chart feed speed can
be changed by replacing
the gear (provided).
Select from Table 4.
X
A
C
D
10 mm/h (changeable to 20 or 40 mm/h)*1
20 mm/h (changeable to 40 or 80 mm/h)*1
10 mm/min (changeable to 20 or 40 mm/min)*1
20 mm/min (changeable to 40 or 80 mm/min)*1
Table 6
Table 7
Table 10
● Dot Printing Type/1-type Input Model
4567
8 9 10 11
12
Power
voltage
Basic Input type
Range
model
Unit
No.
13
Chart
feed
speed
14 15
16
Additional function
Additional
treatment
External
switch/burnout/alarm
CQ3
CQ6
CQB
0000
Table 5
*1 The chart feed speed can
be changed by replacing
the gear (provided).
X
A
4567
8
9 10 11
12
No.2 scale
Range
Unit
Power
voltage
Descriptions
10 mm/h (changeable to 20 or 40 mm/h)*1
20 mm/h (changeable to 40 or 80 mm/h)*1
Table 8
● Dot Printing Type/1-type Input Double-scale Model
Basic Input type
Range
model
Unit
No.
Select from Table 6.
Select from Table 7.
Select from Table 10.
3-dot printing, 1-type input
6-dot printing, 1-type input
2-dot printing, 1-type input
Input type, range, unit
Enter “0000”.
Select from Table 5.
Table 1 to 3
13
Chart
feed
speed
Table 10
14 15
16
Additional function
Additional
treatment
External
switch/burnout/alarm
CQC
CQD
CQE
Select from Table 8.
Select from Table 10.
Descriptions
3-dot printing, 1-type input, double-scale
6-dot printing, 1-type input, double-scale
2-dot printing, 1-type input, double-scale
Input type, range, unit
Enter “X”.
Table 1 to 3
X
Table 2, 3
Specify range and unit of the No.2 scale range.
Table 5
*1 The chart feed speed can
be changed by replacing
the gear (provided).
2
Descriptions
switch/burnout
Table 1 to 3
123
Select from Table 6.
Select from Table 7.
Select from Table 10.
Additional
treatment
Table 1 to 3
123
Descriptions
Additional
treatment
Select from Table 5.
X
A
10 mm/h (changeable to 20 or 40 mm/h)*1
20 mm/h (changeable to 40 or 80 mm/h)*1
Table 8
Table 10
Select from Table 8.
Select from Table 10.
Chapter 1. INTRODUCTION
● 6-dot Printing Type/2-type Input Double-scale Model
123
Basic
model
No.
CQA
4567
8 9 10 11
Input type
Range
Unit
13
Chart
feed
speed
12
Power
voltage
14
15
Additional function
External
Alarm
16
Descriptions
Additional
treatment
switch/burnout
6-dot printing, 2-type input, double-scale
Table 1 to 3
Input type, range and unit of channels 1 to 3
Table 1 to 3
Input type, range and unit of channels 4 to 6
Table 5
Select from Table 5.
X
A
10 mm/h (changeable to 20 or 40 mm/h)*1
20 mm/h (changeable to 40 or 80 mm/h)*1
Table 9
Select from Table 9.
0
Alarm function cannot be selected.
Table 10
*1
Select from Table 10.
The chart feed speed can be changed by replacing the gear (provided).
● Model Configuration of Input Type, Range and Unit
Input 1
4
5 6
Input 2
7
8
9 10 11
Input type
Range
Unit
Range
Input type *2
Unit
Model
1-pen type
2-pen type
Dot printing type, 1-type input
Dot printing type, 1-type input,
double-scale
6-dot printing type, 2-type input,
double-scale
*2
Input 1
Input type, range and unit of channel 1
Input type, range and unit of channel 1
Input type, range and unit of all channels
Input type, range and unit of all channels
Input type, range and unit of channels 1 to 3
Input 2
“0000”
Input type, range and unit of channel 2
“0000”
Range and unit of No.2 scale *2
Input type, range and unit of channels
4 to 6
When using 1-type input double-scale model, enter “X” in the input 2 input type box.
Example: K 04 1 0000
No Input 2
Unit: °C
Range: 0 to 400
Input type: thermocouple K
Table 1 Input type
Model No. Code
T
E
J
K
R
P
Q
C
V
G
M
L
Input type
Thermocouple T (JIS C 1602-1981)
Thermocouple E (JIS C 1602-1981)
Thermocouple J (JIS C 1602-1981)
Thermocouple K (JIS C 1602-1981)
Thermocouple R (JIS C 1602-1981)
Resistance temperature detector Pt 100 Ω
(JIS C 1604-1989)
Resistance temperature detector JPt 100 Ω
(JIS C 1604-1989)
DC current 4 to 20 mA
DC voltage 1 to 5 V
DC voltage 0 to 10 V
DC voltage 0 to 10 mV
DC voltage -5 to +5 mV
3
Chapter 1. INTRODUCTION
Table 2 Range
Model
No. Code
00
01
02
03
04
05
06
07
08
09
10
11
12
13
14
15
16
17
18
19
20
21
22
23
24
25
26
27
28
29
30
31
32
33
34
35
36
37
38
39
40
41
42
43
44
45
46
47
48
49
50
Thermocouple
Thermocouple
Thermocouple
Thermocouple
Thermocouple
T
E
J
K
R
0 to 300
0 to 400
0 to 200
0 to 300
0 to 400
0 to 600
0 to 600
0 to 200*
0 to 300
0 to 400
0 to 500
0 to 600
0 to 800
0 to 800
0 to 200
0 to 300
0 to 1000
0 to 1200
0 to 1200
0 to 1400
0 to 1600
-50 to +150
-50 to +150*
-50 to +100*
-50 to +100*
-100 to +200
* : Display accuracy (recording accuracy) ±1.0%FS (Standard conditions,
without burnout)
4
Chapter 1. INTRODUCTION
Model
No. Code
00
01
02
03
04
05
06
07
08
09
10
11
12
13
14
15
16
17
18
19
20
21
22
23
24
25
Resistance
Resistance
Temperature Temperature
Detector
Detector
Pt100
JPt100
0 to 100
0 to 200
0 to 300
0 to 400
0 to 500
0 to 50
0 to 150
0 to 250
0 to 100
0 to 200
0 to 300
0 to 400
0 to 500
0 to 50
0 to 150
0 to 250
100 to 200 100 to 200
50 to 100
50 to 150
50 to 100
50 to 150
Model
No. Code
26
27
28
29
30
31
32
33
34
35
36
37
38
39
40
41
42
43
44
45
46
47
48
49
50
Resistance
Resistance
Temperature Temperature
Detector
Detector
Pt100
JPt100
-20 to +40
-20 to +40
-25 to +25
-40 to +80
-50 to +50
-25 to +25
-40 to +80
-50 to +50
-50 to +150 -50 to +150
-20 to +60
-20 to +80
-10 to +40
-20 to +60
-20 to +80
-10 to +40
-50 to +100 -50 to +100
-50 to +200 -50 to +200
-100 to +50 -100 to +50
-100 to +100 -100 to +100
-100 to +200 -100 to +200
5
Chapter 1. INTRODUCTION
Model
No. Code
00
01
02
03
04
05
06
07
08
09
10
11
12
13
14
15
16
17
18
19
20
21
22
23
24
25
26
27
28
29
30
31
32
33
34
35
36
37
38
39
6
DC Current/
Voltage
Range
(Blank)
0 to 100
0 to 200
0 to 300
0 to 400
0 to 500
0 to 600
0 to 700
0 to 800
0 to 900
-1 to 0
-1 to +1
-1 to +5
-1 to +10
-1 to +20
-1 to +35
-1 to +50
15 to 25
16 to 26
-25 to +25
-5 to +55
-5 to +60
-5 to +5
-4 to +4
-10 to +10
50 to 150
-30 to +10
-2 to +2
-3 to +3
-20 to +40
-20 to +85
-25 to +25
-40 to +80
-50 to +50
-50 to +150
-20 to +60
-20 to +80
-50 to 0
-45 to +70
Model
No. Code
40
41
42
43
44
45
46
47
48
49
50
51
52
53
54
55
56
57
58
59
60
61
62
63
64
65
66
67
68
69
70
71
72
73
74
75
76
77
78
79
DC Current/
Voltage
Range
-200 to +100
-50 to +100
-50 to +200
-80 to +100
-100 to +50
-100 to +100
-100 to +200
-200 to 0
-200 to +50
-150 to +200
2 to 10
1 to 5
17 to 27
2 to 12
2 to 14
4 to 20
0 to 760
-760 to 0
800 to 1200
0 to 14
0 to 1
0 to 2
0 to 5
0 to 10
0 to 20
0 to 30
0 to 40
0 to 50
0 to 60
0 to 70
0 to 80
0 to 90
0 to 1000
0 to 2000
0 to 3000
0 to 4000
0 to 5000
0 to 6000
0 to 7000
0 to 8000
Model
No. Code
80
81
82
83
84
85
86
87
88
89
90
91
92
93
94
95
96
97
98
99
A0
A1
A2
A3
A4
A5
A6
A7
A8
A9
B0
B1
B2
B3
B4
B5
B6
B7
B8
B9
DC Current/
Voltage
Range
0 to 9000
0 to 3
0 to 4
0 to 6
0 to 7
0 to 8
0 to 12
0 to 15
0 to 16
0 to 18
0 to 25
0 to 35
0 to 45
0 to 150
0 to 250
0 to 350
0 to 450
0 to 1500
0 to 2500
0 to 3500
0 to 4500
0 to 0.1
0 to 0.2
0 to 0.3
0 to 0.4
0 to 0.5
0 to 0.6
0 to 0.7
0 to 0.8
0 to 0.9
0 to 1.5
0 to 2.5
0 to 3.5
0 to 4.5
0 to 1200
0 to 1400
0 to 1600
100 to 300
200 to 400
50 to 100
Chapter 1. INTRODUCTION
Table 3 Unit
Model
No. Code
0
1
3
4
5
6
7
8
9
A
Unit
(No unit)
°C
pH
%
%RH
ppm
min-1
mg/r
mV
m3
Model
No. Code
B
C
D
E
F
G
H
J
K
L
Unit
m3/min
m3/h
3
m /h [Normal]
Hz
Ω
kΩ
MΩ
µs/cm
mm
cm
Model
No. Code
M
N
P
Q
S
T
V
W
Y
Z
Unit
m
t/h
r/min
r/h
hPa
Pa
kPa
MPa
r
A
Table 4 Power Supply (pen type model)
Model
No. Code
1
2
3
4
5
6
Power Supply
Specification
100 Vac 50 Hz
100 Vac 60 Hz
200 Vac 50 Hz
200 Vac 60 Hz
110 Vac 50 Hz
110 Vac 60 Hz
Model
No. Code
7
8
9
A
B
C
Power Supply
Specification
115 Vac 50 Hz
115 Vac 60 Hz
120 Vac 50 Hz
120 Vac 60 Hz
220 Vac 50 Hz
220 Vac 60 Hz
Model
No. Code
D
E
F
G
R
S
Power Supply
Specification
230 Vac 50 Hz
230 Vac 60 Hz
240 Vac 50 Hz
240 Vac 60 Hz
12 Vdc
24 Vdc
Table 5 Power Supply (dot printing type model)
Model
No. Code
1
3
5
7
Power Supply
Specification
100 Vac 50/60 Hz
200 Vac 50/60 Hz
110 Vac 50/60 Hz
115 Vac 50/60 Hz
Model
No. Code
9
B
D
F
Power Supply
Specification
120 Vac 50/60 Hz
220 Vac 50/60 Hz
230 Vac 50/60 Hz
240 Vac 50/60 Hz
Model
No. Code
R
S
Power Supply
Specification
12 Vdc
24 Vdc
7
Chapter 1. INTRODUCTION
Table 6 External Switch and Burnout (pen type model)
Model
No. Code
0
1
2
3
A
B
C
D
E
F
G
H
J
K
L
M
N
P
Q
R
4
5
6
7
8
9
S
T
External Switch Function
None
Servo lock
Recording stop
Servo lock, recording stop
None
None
None
None
Servo lock
Servo lock
Servo lock
Servo lock
Recording stop
Recording stop
Recording stop
Recording stop
Servo lock, recording stop
Servo lock, recording stop
Servo lock, recording stop
Servo lock, recording stop
None
None
Servo lock
Servo lock
Recording stop
Recording stop
Servo lock, recording stop
Servo lock, recording stop
Burnout *3
Channel 1 Channel 2
None
None
None
None
None
None
None
None
Upper limit
None
Lower limit
None
Upper limit Upper limit
Lower limit Lower limit
Upper limit
None
Lower limit
None
Upper limit Upper limit
Lower limit Lower limit
Upper limit
None
Lower limit
None
Upper limit Upper limit
Lower limit Lower limit
Upper limit
None
Lower limit
None
Upper limit Upper limit
Lower limit Lower limit
Upper limit Lower limit
Lower limit Upper limit
Upper limit Lower limit
Lower limit Upper limit
Upper limit Lower limit
Lower limit Upper limit
Upper limit Lower limit
Lower limit Upper limit
Applicable Model
(basic model No.)
CQ1, CQ2
CQ1, CQ2
CQ1, CQ2
CQ1, CQ2
CQ1, CQ2
CQ1, CQ2
CQ2
CQ2
CQ1, CQ2
CQ1, CQ2
CQ2
CQ2
CQ1, CQ2
CQ1, CQ2
CQ2
CQ2
CQ1, CQ2
CQ1, CQ2
CQ2
CQ2
CQ2
CQ2
CQ2
CQ2
CQ2
CQ2
CQ2
CQ2
*3 One of “none”, “lower limit” and “upper limit” can be selected for burnout only when a thermocouple input is used. The burnout function is not available when resistance temperature detector and DC current inputs are used. When these inputs are used, select “none”.
Table 7 Alarm (pen type model)
Model No. Code
0
A
B
C
D
E
Alarm Type
None
Upper limit
Lower limit
Upper limit + lower limit
Upper limit + upper limit
Lower limit + lower limit
Note: Alarms for pen type models can be
installed only on channel 1.
8
Chapter 1. INTRODUCTION
Table 8 External Switch, Burnout and Alarm (dot printing models excluding 2-type input)
Model
No. Code
00
0A
0B
0C
0D
0E
20
A0
AA
AB
AC
AD
AE
B0
BA
BB
BC
BD
BE
J0
K0
External Switch
Function
None
None
None
None
None
None
Recording stop
None
None
None
None
None
None
None
None
None
None
None
None
Recording stop
Recording stop
Burnout *4
Alarm Type
None
None
None
None
None
None
None
Lower limit
Lower limit
Lower limit
Lower limit
Lower limit
Lower limit
Upper limit
Upper limit
Upper limit
Upper limit
Upper limit
Upper limit
Lower limit
Upper limit
None
Upper limit
Lower limit
Upper limit + lower limit
Upper limit + upper limit
Lower limit + lower limit
None
None
Upper limit
Lower limit
Upper limit + lower limit
Upper limit + upper limit
Lower limit + lower limit
None
Upper limit
Lower limit
Upper limit + lower limit
Upper limit + upper limit
Lower limit + lower limit
None
None
Applicable Model
(basic model No.)
CQ3, CQ6, CQB, CQC, CQD, CQE
CQ3, CQ6, CQB, CQC, CQD, CQE
CQ3, CQ6, CQB, CQC, CQD, CQE
CQ3, CQ6, CQB, CQC, CQD, CQE
CQ3, CQ6, CQB, CQC, CQD, CQE
CQ3, CQ6, CQB, CQC, CQD, CQE
CQ3, CQ6, CQB, CQC, CQD, CQE
CQ3, CQ6, CQB, CQC, CQD, CQE
CQ3, CQ6, CQB, CQC, CQD, CQE
CQ3, CQ6, CQB, CQC, CQD, CQE
CQ3, CQ6, CQB, CQC, CQD, CQE
CQ3, CQ6, CQB, CQC, CQD, CQE
CQ3, CQ6, CQB, CQC, CQD, CQE
CQ3, CQ6, CQB, CQC, CQD, CQE
CQ3, CQ6, CQB, CQC, CQD, CQE
CQ3, CQ6, CQB, CQC, CQD, CQE
CQ3, CQ6, CQB, CQC, CQD, CQE
CQ3, CQ6, CQB, CQC, CQD, CQE
CQ3, CQ6, CQB, CQC, CQD, CQE
CQ3, CQ6, CQB, CQC, CQD, CQE
CQ3, CQ6, CQB, CQC, CQD, CQE
*4 One of “none”, “lower limit” and “upper limit” can be selected for burnout only when a thermocouple input is
used. The burnout function is not available when resistance temperature detector and DC current inputs are
used. When these inputs are used, select “none”.
Table 9 External Switch and Burnout (6-dot printing, 2-type input double-scale)
Model
No. Code
0
2
A
B
C
D
J
K
L
M
4
5
8
9
External Switch
Function
None
Recording stop
None
None
None
None
Recording stop
Recording stop
Recording stop
Recording stop
None
None
Recording stop
Recording stop
Burnout *5
Channels 1 to 3
Channels 4 to 6
None
None
None
None
Upper limit
None
Lower limit
None
Upper limit
Upper limit
Lower limit
Lower limit
Upper limit
None
Lower limit
None
Upper limit
Upper limit
Lower limit
Lower limit
Upper limit
Lower limit
Lower limit
Upper limit
Upper limit
Lower limit
Lower limit
Upper limit
Applicable Model
(basic model No.)
CQA
CQA
CQA
CQA
CQA
CQA
CQA
CQA
CQA
CQA
CQA
CQA
CQA
CQA
*5 One of “none”, “lower limit” and “upper limit” can be selected for burnout only when a thermocouple input is
used. The burnout function is not available when resistance temperature detector and DC current inputs are
used. When these inputs are used, select “none”.
Table 10 Additional Treatment
Model
No. Code
0
D
T
B
Y
1
2
3
4
Mask Color
Black
Black
Black
Black
Black
Gray
Gray
Gray
Gray
Inspection
Certificate provided
X
O
X
O
X
X
O
X
O
Tropical Treatment
X
X
O
O
X
X
X
O
O
Traceability
Certificate
X
X
X
X
O
X
X
X
X
9
Chapter 1. INTRODUCTION
■ Consumables
Model No.
CRHL
*6
CRP100R
CRP100B
81446688-001
81446689-001
81446690-001
*6
Name
Folding chart (length: 16 m)
No.1 pen (red)
No.2 pen (blue)
Ink pad (for 2-dot printing)
Ink pad (for 3-dot printing)
Ink pad (for 6-dot printing)
Applicable model
All models
CQ1, CQ2
CQ2
CQB, CQE
CQ3, CQC
CQ6, CQA, CQD
Remarks
1 set (10 packets)
1 set (10 pens)
1 set (10 pens)
1 set (5 p’ces)
1 set (5 p’ces)
1 set (5 p’ces)
is configured as followed using “Table 1 Input Type” and “Table 2 Range.”
CRHL
K 04
Select 0 to 400 from “Table 2 Range”.
Select thermocouple K from “Table 1 Input Type”.
CRHL
V 01
Select 0 to 100 from “Table 2 Range”.
Select DC voltage 1 to 5 V from “Table 1 Input Type”.
When the input type is DC current or DC voltage, the scale, number of sections and
chart paper unit are as shown below.
Model No. Code
00
01
02
03
04
05
06
07
08
09
10
11
12
13
14
15
16
17
18
19
20
21
22
23
24
25
26
27
28
29
30
31
32
33
34
35
36
37
10
DC Current/Voltage Range
(Blank)
0 to 100
0 to 200
0 to 300
0 to 400
0 to 500
0 to 600
0 to 700
0 to 800
0 to 900
-1 to 0
-1 to +1
-1 to +5
-1 to +10
-1 to +20
-1 to +35
-1 to +50
15 to 25
16 to 26
-25 to +25
-5 to +55
-5 to +60
-5 to +5
-4 to +4
-10 to +10
50 to 150
-30 to +10
-2 to +2
-3 to +3
-20 to +40
-20 to +85
-25 to +25
-40 to +80
-50 to +50
-50 to +150
-20 to +60
-20 to +80
Scale
(None)
0 to 5, 0 to 10
0 to 2, 0 to 20
0 to 30, 0 to 60
0 to 4, 0 to 8
0 to 5, 0 to 10
0 to 6, 0 to 12
0 to 35, 0 to 70
0 to 4, 0 to 8
0 to 90
(None)
(None)
(None)
(None)
(None)
(None)
(None)
(None)
(None)
(None)
(None)
(None)
(None)
(None)
(None)
(None)
(None)
(None)
(None)
(None)
(None)
(None)
(None)
(None)
(None)
(None)
(None)
No. of sections
50
50
40
60
40
50
60
70
40
45
50
40
60
50
50
50
50
50
50
50
60
50
50
40
40
50
40
40
60
60
50
50
60
50
40
40
50
Unit
(None)
(None)
(None)
(None)
(None)
(None)
(None)
(None)
(None)
(None)
(None)
(None)
(None)
(None)
(None)
(None)
(None)
(None)
(None)
(None)
(None)
(None)
(None)
(None)
(None)
(None)
(None)
(None)
(None)
(None)
(None)
(None)
(None)
(None)
(None)
(None)
(None)
Chapter 1. INTRODUCTION
Model No. Code
38
39
40
41
42
43
44
45
46
47
48
49
50
51
52
53
54
55
56
57
58
59
60
61
62
63
64
65
66
67
68
69
70
71
72
73
74
75
76
77
78
79
80
81
82
83
84
85
86
87
88
89
90
91
92
93
94
95
96
DC Current/Voltage Range
-50 to 0
-45 to +70
-200 to +100
-50 to +100
-50 to +200
-80 to +100
-100 to +50
-100 to +100
-100 to +200
-200 to 0
-200 to +50
-150 to +200
2 to 10
1 to 5
17 to 27
2 to 12
2 to 14
4 to 20
0 to 760
-760 to 0
800 to 1200
0 to 14
0 to 1
0 to 2
0 to 5
0 to 10
0 to 20
0 to 30
0 to 40
0 to 50
0 to 60
0 to 70
0 to 80
0 to 90
0 to 1000
0 to 2000
0 to 3000
0 to 4000
0 to 5000
0 to 6000
0 to 7000
0 to 8000
0 to 9000
0 to 3
0 to 4
0 to 6
0 to 7
0 to 8
0 to 12
0 to 15
0 to 16
0 to 18
0 to 25
0 to 35
0 to 45
0 to 150
0 to 250
0 to 350
0 to 450
Scale
(None)
(None)
(None)
(None)
(None)
(None)
(None)
(None)
(None)
(None)
(None)
(None)
(None)
(None)
(None)
(None)
(None)
(None)
(None)
(None)
(None)
0 to 14
0 to 5, 0 to 10
0 to 2, 0 to 20
0 to 5, 0 to 10
0 to 5, 0 to 10
0 to 2, 0 to 20
0 to 30, 0 to 60
0 to 4, 0 to 8
0 to 5, 0 to 10
0 to 6, 0 to 12
0 to 35, 0 to 70
0 to 4, 0 to 8
0 to 90
0 to 5, 0 to 10
0 to 2, 0 to 20
0 to 30, 0 to 60
0 to 4, 0 to 8
0 to 5, 0 to 10
0 to 6, 0 to 12
0 to 35, 0 to 70
0 to 4, 0 to 8
0 to 90
0 to 30, 0 to 60
0 to 4, 0 to 8
0 to 30, 0 to 60
0 to 35, 0 to 70
0 to 4, 0 to 8
0 to 6, 0 to 12
0 to 15
(None)
0 to 6, 0 to 12
0 to 5, 0 to10
0 to 35, 0 to 70
(None)
0 to 15
0 to 5, 0 to10
0 to 35, 0 to 70
(None)
No. of sections
50
50
50
50
50
60
50
40
60
40
50
70
40
40
50
50
60
50
50
50
40
70
50
40
50
50
40
60
40
50
60
70
40
45
50
40
60
40
50
60
70
40
45
60
40
60
70
40
60
75
40
60
50
70
50
75
50
70
50
Unit
(None)
(None)
(None)
(None)
(None)
(None)
(None)
(None)
(None)
(None)
(None)
(None)
(None)
(None)
(None)
(None)
(None)
(None)
(None)
(None)
(None)
pH
(None)
(None)
(None)
(None)
(None)
(None)
(None)
(None)
(None)
(None)
(None)
(None)
(None)
(None)
(None)
(None)
(None)
(None)
(None)
(None)
(None)
(None)
(None)
(None)
(None)
(None)
(None)
(None)
(None)
(None)
(None)
(None)
(None)
(None)
(None)
(None)
(None)
11
Chapter 1. INTRODUCTION
Model No. Code
97
98
99
A0
A1
A2
A3
A4
A5
A6
A7
A8
A9
B0
B1
B2
B3
B4
B5
B6
B7
B8
B9
■ Optional Parts
DC Current/Voltage Range
0 to 1500
0 to 2500
0 to 3500
0 to 4500
0 to 0.1
0 to 0.2
0 to 0.3
0 to 0.4
0 to 0.5
0 to 0.6
0 to 0.7
0 to 0.8
0 to 0.9
0 to 1.5
0 to 2.5
0 to 3.5
0 to 4.5
0 to 1200
0 to 1400
0 to 1600
100 to 300
200 to 400
50 to 100
Scale
0 to 15
0 to 5, 0 to 10
0 to 35, 0 to 70
(None)
0 to 5, 0 to 10
0 to 2, 0 to 20
0 to 30, 0 to 60
0 to 4, 0 to 8
0 to 5, 0 to 10
0 to 6, 0 to 12
0 to 35, 0 to 70
0 to 4, 0 to 8
0 to 90
0 to 15
0 to 5, 0 to 10
0 to 35, 0 to 70
(None)
0 to 6, 0 to 12
(None)
(None)
(None)
(None)
(None)
No. of sections
75
50
70
50
50
40
60
40
50
60
70
40
45
75
50
70
50
60
70
40
40
40
50
Model No.
81446695-001
Name
Carrying handle kit
Applicable model
All models
81446696-001
Power supply cable set
(carrying handle kit)
Unit
(None)
(None)
(None)
(None)
(None)
(None)
(None)
(None)
(None)
(None)
(None)
(None)
(None)
(None)
(None)
(None)
(None)
(None)
(None)
(None)
(None)
(None)
(None)
Remarks
Power supply lead
set (sold separately)
One cable provided
(for 100 Vac)
■ Maintenance Parts
Model No.
81446691-001
81446691-002
81446691-003
Fuse
Fuse
Fuse
81446691-004
81446691-005
Fuse
Fuse
81446692-001
81446694-001
CRN 50
CRN 30
81446697-001
81446698-001
Mounting bracket
Flathead screwdriver
Tag plate
Allen key
Chart cassette
Chart guide
81446699-001
81446700-001
81446701-001
All models
All models
CQ1, CQ2
81446702-001
81446703-001
81446704-001
Chart holding spring
Power terminal cover
Analog input terminal cover
(pen type)
Analog input terminal cover
(dot printing type)
Alarm terminal cover
Door unit
Chart drive gear
81446705-001
Screws (M4)
All models
81446701-002
12
Name
Applicable model
100 to 120 Vac model
200 to 240 Vac model
12 Vdc 1-pen model
and dot printing model
24 Vdc 2-pen model
12 Vdc 2-pen model
24 Vdc 1-pen model
and dot printing model
All models
Pen type with alarm
All models
CQ1, CQ2
All models
All models
CQ3, CQ6, CQA, CQB,
CQC, CQD, CQE
Model with alarm
All models
All models
Remarks
1 set (5 p’ces)
1 set (5 p’ces)
1 set (5 p’ces)
1 set (5 p’ces)
1 set (5 p’ces)
1 set (2 brackets)
1
1 for each of all models
1
Plastic formed component (transparent)
Stainless component
With screw
With screw
With screw
With screw
W/pin and spring
1 set (large 1, middle
2, small 1)
10 pieces
Chapter 2.
NAMES AND FUNCTION OF PARTS
■ Pen Type
● Main unit
Scale
Pen for Channel 2 (blue)
Input terminal
Alarm output terminal
Power terminal
Pen for Channel 1 (red)
Door
Case
Pen-up lever
Inner mechanism
Chart cassette
Platen
Lock lever
Scale for Channel 2
Blue pen for Channel 2
Scale for Channel 1
Red pen for Channel 1
Offset: 4 mm
Platen
The pen can be raised and lowered using the pen-up lever.
This lever is useful for pausing recording.
Power switch
Operation panel
13
Chapter 2. NAMES AND FUNCTION OF PARTS
● Operation panel
The following describes the names and functions of parts on the operation panel
on the pen type model.
The figure below shows the panel with full options. Some options are not mounted
depending on the model.
7
6 5
4 3
2
1
(1) Power switch: Turns the CQ ON and OFF.
(2) Mode switch: Starts or stops recording. When the alarm setting option is
provided, it also starts and stops the alarm.
(3) Alarm LED (optional function): Lights when an alarm occurs.
(4) Alarm setup trimmer (optional function): Sets the alarm set point in the alarm
setup mode.
(5) Alarm setup switch [ALARM] (optional function): Used to set up the alarm.
When this switch is flipped to the left, alarm setup trimmer 6 and alarm
LED 7 are set to the setup mode, and the pen moves to the currently preset
alarm set point.
When this switch is flipped to the right, alarm setup trimmer 4 and alarm
LED 3 are set to the setup mode, and the pen moves to the currently preset
alarm set point.
When this switch is in the center position, regular operation is carried out,
and the pen moves according to input values.
(6) Setup trimmer (optional function): Sets the alarm set point in the alarm setup
mode.
(7) Alarm LED (optional function): Lights when an alarm occurs.
● Terminals on Rear Panel
The following shows the arrangement of the terminals on the rear panel.
There are three sets of terminals on the rear panel of the main unit: power
terminals, alarm output terminals and input terminals.
14
Chapter 2. NAMES AND FUNCTION OF PARTS
■ Dot Printing Type
● Main Unit
Scale
Indicator
Input terminal
Alarm output terminal
Power terminal
Ink pad
Door
Case
Chart cassette
Inner mechanism
Platen
Lock lever
● Operation Panel
The following describes the names and functions of parts on the operation panel
on the dot printing type model.
The figure below shows the panel with full options. Some options are not mounted
depending on the model.
7 8 6 5 4 3
2
1
▲
(1) Power switch: Turns the CQ ON and OFF.
(2) Mode switch: Starts or stops recording. When the alarm setting option is
provided, it also starts and stops the alarm.
(3) Ink pad button [INK PAD]: Push this button to replace the ink pad. Use this
button also to fix (register) the setting value when the alarm setting optional is
used.
(4) Alarm LED (optional function): Lights when an alarm occurs.
(5)
button (optional function): Moves the indicator to the span (right side) in
the alarm setup mode.
(6) Alarm setup switch [ALARM] (optional function): Used to set up the alarm.
When this switch is flipped to the left, alarm LED 7 is set to the alarm
setup mode, and the ink pad moves to the currently preset alarm set point.
When this switch is flipped to the right, alarm LED 4 is set to the alarm
setup mode, and the ink pad moves to the currently preset alarm set point.
When this switch is in the center position, regular operation is carried out,
and the pen moves according to input values.
(7) Alarm LED (optional function): Lights when an alarm occurs.
(8)
button (optional function): Moves the indicator to zero (left side) in the
alarm setup mode.
▼
15
Chapter 2. NAMES AND FUNCTION OF PARTS
● Terminals on Rear Panel
The following shows the arrangement of the terminals on the rear panel.
There are three sets of terminals on the rear panel of the main unit: power
terminals, alarm output terminals and input terminals.
Handling Precautions
On some dot printing models, the alarm output terminal plate is used as
the external switch input terminal plate.
■ Material
The following table is for plastic parts that weigh more than 50 g.
Item
16
Material Code
Material Name
Case
m-PPE
Deformed Polyphenylen ether
Chart cassette main part
PC-GF10
Polycarbonate (containing 10% glass
fiber)
Chapter 3.
3-1
INSTALLATION & WIRING
Installation Site
CAUTION
Use the CQ within the operating ranges recommended in the specifications
(temperature, humidity, voltage, vibration, shock, installation direction,
atmosphere, etc.).
Failure to do so might cause faulty operation.
Install the CQ at a location that satisfies the following conditions:
• Locations that are not subject to excessive temperature and humidity changes.
• Locations that are not subject to direct sunlight, wind and rain.
• Locations that may not splashed with water, oil or chemical mist.
• Locations that are not subject to corrosive and flammable gasses.
• Locations that are hardly subject to dust or oil smoke.
• Locations that are hardly subject to vibration or shock.
• Locations that are not subject to strong electrical and magnetic fields.
• Locations that are hardly subject to the influence of electrical noise (near by
high-voltage ignition equipment, welding equipment, etc.).
Keep the mounting angle to within 0 to 30 degrees from the bottom rear.
Panel thickness 2 to 10 mm
Panel
Door
0 to 30° bottom rear angle
from horizontal position
17
Chapter 3. INSTALLATION & WIRING
3-2
Installation
WARNING
Before removing or mounting the CQ, be sure to turn the power OFF.
Failure to do so might cause electric shock.
CAUTION
When using mounting brackets, tighten screws pushing brackets firmly
against the panel so that there is no space between the bracket and the
panel.
Failure to do so might cause the CQ to fall from the panel or wobble, which is
dangerous.
■ Installation Dimensions
Use a metal sheet 2 mm or more thick or equivalent as the panel.
The panel cutout dimensions are as follows:
+1
0
(Unit: mm)
175 min.
138
+1
0
138
175 min.
Handling Precautions
The CQ cannot be gang-mounted.
■ Procedure
1. Insert the main unit case
from the panel front.
2. Install the CQ into the
panel using the mounting
brackets.
Handling Precautions
The recommended tightening torque for the mounting bracket is 0.5 to 0.8
N•m. Tightening the mounting bracket at a torque higher than this might
deform or damage the case.
18
Chapter 3. INSTALLATION & WIRING
3-3
Wiring Precautions
WARNING
Before wiring the CQ, be sure to turn the power OFF.
Failure to do so might cause electric shock.
Do not touch electrically charged parts on the CQ such as the power terminals.
Doing so might cause electric shock.
Do not allow lead clippings, chips or water to enter the CQ case.
Doing so might cause fire or faulty operation.
After wiring the CQ, attach the terminal cover.
Failure to do so might cause electric shock.
Firmly tighten the terminal screws at the torque listed in the specifications.
Insufficient tightening of terminal screws might cause electric shock or fire.
Do not use unused terminal on the main unit as relay terminal.
Doing so might cause electric shock, fire or faulty operation.
Be sure to ground the FG terminal with grounding resistance 100 Ω max.
Failure to do so might cause electric shock.
Before connecting the CQ to the measurement target or external control circuits, make sure that the FG terminal is properly grounded (100 Ω max.).
Failure to do so might cause electric shock or fire.
Use the relays on the CQ within the service life listed in the specifications.
Continued use of the relays after the recommended service life might cause
faulty operation or fire.
CAUTION
When wiring terminals, be sure to use crimped terminals.
Maintain a distance of at least 50 cm between I/O signal leads,
communications leads and power leads of 100 V or more. Also, do not pass
these leads through the same piping or wiring duct.
To protect terminals and cables even when wiring cable is pulled, be sure to
keep all wiring cables fixed behind the mounting panel.
19
Chapter 3. INSTALLATION & WIRING
Handling Precautions
• Before wiring the CQ, check the model Nos. of instruments and terminal
Nos. on the affixed labels.
• After wiring the CQ, be sure to check the wiring for any mistakes before
turning the power ON.
• When installing the CQ in locations subject to vibration or impact, be sure
to use round crimped terminals.
• Use round crimped terminals with insulation shield.
• When wiring with round crimped terminals, take care to prevent contact
with adjacent terminals.
• Connect the CQ by one-point grounding using the FG terminal (terminal
No. 27). Do not perform any jump wiring.
• When there are many shielded cables grounded, prepare a separate
ground terminal (earth bar).
Grounding type: Resistance 100 Ω max.
Grounding conductor: Annealed copper wire more than 2 mm2 (AGW 14)
Grounding conductor length: Max. 20 m
• Wiring analog input wiring to other equipment in parallel may adversely
affect mutual measurement values. The burnout function may not
function for thermocouple inputs. If this happens, set the burnout function
to “none”. Alternately, if the power of one of the connected equipment is
turned OFF during operation, this may also adversely affect the
measurement values on the other equipment.
• Resistance temperature detectors cannot be connected in parallel.
■ Noise Countermeasures
● Noise generating sources
Generally, the followings generate electrical noise:
(1) Relays and contacts
(2) Solenoid coils, solenoid valves
(3) Power lines
(4) Induction loads
(5) Motor commutators
(6) Phase angle control SCR
(7) Wireless communications equipment
(8) Welding equipment
(9) High-voltage ignition equipment
● Noise reducing countermeasures
If the influence of electrical noise cannot be eliminated, we recommend using a
CR filter for fast-rising noise, and varister for noise with a high wave height.
Note
• Recommended CR filter Model No.: 81446365-001
• Recommended varister Model No.: 81446366-001 (100 V)
81446367-001 (200 V)
Handling Precautions
The varister may be short-circuited when trouble occurs. Pay attention to
this when providing a varister on the CQ.
20
Chapter 3. INSTALLATION & WIRING
3-4
Connecting the Power Supply and Ground
• Use 600 V vinyl-insulated power lead (JIS C 3307) as the power supply lead.
• Obtain the CQ power supply from a single-phase instrumentation power supply
not subject to excess noise.
• On DC models, use a power supply unit within the specification.
• If the power supply generates excessive electrical noise, add an insulating
transformer, and use a line filter.
(recommended line filter: Model No. 81446364-001)
• Keep the wiring from the line filter as short as possible. Bundling this wiring
together is effective against electrical noise.
• After providing anti-noise countermeasures, do not bundle primary and
secondary power leads together, or pass them through the same piping or wiring
duct.
• Connect the CQ by one-point grounding to the protective ground terminal. Do
not perform any jump wiring. When it is difficult to ground shielded cables,
prepare a separate ground terminal (earth bar).
• Grounding type: Resistance 100 Ω max.
• Grounding conductor: Annealed copper wire more than 2 mm2 (AGW 14)
• Grounding conductor length: Max. 20 m
(AC model)
Instrument
power
supply
Single-phase
AC
50/60 Hz
Recommended product
81446364-001
Line filter
Insulation
transformer
1
CQ
3
25
4
27
26
E
2
GND
GND
Other circuits
(DC model)
Instrument
power
supply
Single-phase
AC
50/60 Hz
200/200 V
100/100 V
Insulation
transformer
Recommended product
81446364-001
Line filter
1
3
E
2
4
Power
supply
unit
CQ
25
26
27
GND
Other circuits
Other circuits
GND
Handling Precautions
Take rush current into consideration when installing a power switch or fuse
outside the CQ.
Open the power wiring cover (transparent) by loosening the screws.
Connect the power leads and earth cables to the power terminals.
Close the power wiring cover (transparent) by tightening the screws.
21
Chapter 3. INSTALLATION & WIRING
3-5
I/O Signal Leads
CAUTION
Do not connect any wiring to unused-channel terminals or connection-inhibited
terminals. Do not use unused terminals as relay terminals.
Doing so may result in faulty operation or unfavorable influence on the measurement of the used-channel.
● Thermocouple input signal lead
In the case of thermocouple input, connect the bare thermocouple lead to the
terminal. If the thermocouple is located a long way from the CQ, or the
thermocouple is connected to a terminal, extend the connection using a
compensating lead and then connect to the terminal.
Use shielded compensating leads only.
● Resistance temperature detector input signal lead
• Use three conductors.
• For the conductor, use JKEV-SB (JCS4364) instrument cable or equivalent
product. (This is generally referred to as “twisted shielded cable for instruments”.)
• The wiring resistance is 10 Ω max.
• Balance the resistance of the three conductors so that they are the same values.
● Digital I/O leads other than thermocouple and resistance temperature detector
• Use twisted shielded cable for instruments.
• Shielded, multi-core microphone cord (MVVS) can be used if there is relatively
little electromagnetic induction.
■ Wiring Inputs
Set the power switch to OFF.
Remove the screws of the terminal cover (transparent) to remove the cover.
Connect the input leads to the input terminals.
Attach the terminal cover (transparent) and tighten the screws.
● Input terminal positions (pen type model)
Handling Precautions
The number of terminal screws and wiring labels differ between 1-pen type
model and 2-pen type model. This figure shows the 2-pen type without
optional functions supported.
22
Chapter 3. INSTALLATION & WIRING
● Input terminal positions (dot printing type model)
● Wiring inputs
Shunt resistor: 250 Ω (provided)
Voltage input
Note
Current input
Thermocouple input
Resistance temperature
detector input
Since an over-swing protection limiter is incorporated to prevent the
occurrence of any problems caused by input opening, short-circuiting of
the unused-channel input terminals is not required.
23
Chapter 3. INSTALLATION & WIRING
■ Wiring Alarm Output (optional function)
Set the power switch to OFF.
Remove the screws of the terminal cover (transparent) to remove the cover.
Connect the output leads to the input terminals.
Attach the terminal cover (transparent) and tighten the screws.
The specifications of output relays are as follows:
Output type: relay contact output (both normally open and normally closed)
Output capacity: 250 Vac, 3 A 30 Vdc, 3 A (resistive load)
● Terminal positions of alarm outputs
Function
Model
Upper limit + Upper limit + Lower limit +
lower limit
upper limit
lower limit
Upper limit
Lower limit
Upper limit
None
Upper limit
Upper limit 2 Lower limit 2
None
Lower limit
Lower limit
Upper limit 1 Lower limit 1
C
NC
NO
C
NC
NO
Handling Precautions
The alarm output relays are not compatible with switching of minute loads.
Min. applicable load: 5 Vdc 100 mA, 24 Vdc 50 mA
24
Chapter 3. INSTALLATION & WIRING
■ Wiring External Switch Inputs (optional function)
Set the power switch to OFF.
Remove the screws of the terminal cover (transparent) to remove the cover.
Connect the external switch input leads to the input terminals.
Attach the terminal cover (transparent) and tighten the screws.
For the external switch, use a contact (switch) which satisfies the following
specifications:
• Servo lock function (pen type only)
Type: dry contact
Capacity: 20 Vdc, 500 mA min.
• Recording stop function
Type: dry contact
Capacity: 20 Vdc, 100 mA min.
Handling Precautions
For external switch inputs, be sure to use dry contacts such as relays.
External switch inputs do not function on open collectors.
● Pen type
Connect external switch inputs to the terminal for the respective function.
● Dot printing type
25
Chapter 4.
4-1
PREPARATION & OPERATION
Preparation
CAUTION
Do not touch moving parts during operation.
Doing so might cause injury.
This section describes how to load the chart, pen (for pen type) and ink pad (for
dot printing type) before you start operation.
Be sure that the mode switch is set to “recording stop”.
This can be done with the power ON.
■ Loading (replacing) the Chart
(1) Open the door, pull down the lock
lever on the right side, and draw out
the inner mechanism towards you.
(2) Remove the chart cassette from the
main unit by lightly pressing in the
chart cassette stoppers located on the
left and right edges of the chart
cassette.
(3) Open the chart cassette by lifting up
the chart holder.
(4) Lower the chart guide (transparent
plastic) towards you. The chart guide is
located on the front of the chart
cassette.
26
Chapter 4. PREPARATION & OPERATION
(5) Before you load the chart, lightly
fan the chart.
(6) Insert the chart into the chart
holder making sure that it is
facing the direction of the arrow.
Handling Precautions
Load the chart delivery section so that the chart is fed from the front.
Loading the chart delivery section so that the chart is fed from the
inside may cause malfunction.
(7) Draw out the leading edge of the
chart by approx. 15 cm (2 to 3
folds), and align the chart so that
the sprockets fit into the holes on
both sides of the chart.
Handling Precautions
Load the chart correctly. Make sure that the square holes are located
on the left side and the oblong holes are located on the right side.
(8) Make sure that the chart is not
lifting up from the platen, and
then return the chart holder to its
original position.
Also, close the chart guide
(transparent plastic) on the front
side.
27
Chapter 4. PREPARATION & OPERATION
(9) Turn the chart feed dial a few times to
make sure that the chart is fed correctly.
Also, make sure that the chart is loaded in
the cassette correctly.
(10) Hook the protrusions of the chart
cassette into the grooves on the main
unit and push the chart cassette in.
Make sure that the chart cassette is
locked and fixed in place.
(11) Turn the chart feed dial a few times to
make sure that the chart is fed correctly.
Handling Precautions
The chart is not fed immediately due to gear backlash (play between
pairs of engaging gears). To reduce backlash, turn the chart feed dial,
and then turn it lightly again in the opposite direction until the dial
comes to a stop. We recommend this operation to align the chart time
axis line.
28
Chapter 4. PREPARATION & OPERATION
■ Loading (replacing) the Pen (pen type model)
Read this section when using a pen type model.
If you are using a dot printing type model, see “■ Loading (replacing) the Ink
Pad (dot printing type model)”.
(1) Open the door.
(2) Set the power switch to OFF.
(3) Pull down the lock lever on the right side and draw out the inner mechanism.
(4) With the pen holder facing up, align the groove
on the uncapped pen with the claw on the
holder, and lightly push in. When you are using
a 2-pen type model, attach the red pen for
channel 1 on the lower holder and the blue pen
for channel 2 on the upper holder.
Handling Precautions
Match the indicator color with the pen color.
(5) Insert the pen into the pen holder as far as possible, and gently bring the pen tip
into contact with the recording paper.
Handling Precautions
• Do not forcibly move the holder to the left or right. Doing so might
cause faulty operation.
• Do not grab the pen tip. Applying excessive force might deform the
pen.
• Do not attach the pen with its cap still attached. Doing so might
cause a damage.
• When you are not using a pen, remove it from the CQ, and store it
with its cap attached to prevent the pen tip from drying.
(6) Return the inner mechanism to its original position, and make sure that the
lock lever is firmly locked.
Note
Model No. of pen (red): CRP100R (one set, 10 pieces)
Model No. of pen (blue): CRP100B (one set, 10 pieces)
The service life of pens is generally 800 meters or more of chart paper.
29
Chapter 4. PREPARATION & OPERATION
■ Loading (replacing) the Ink Pad (dot printing type model)
Read this section when using a dot printing type model.
If you are using a pen type model, see “■ Loading (replacing) the Pen (pen
type model)”.
In the case of a model with the alarm function, conduct the following operation
after setting the alarm setting switch [ALARM] to the center position:
The ink pad is replaced with the power ON.
(1) Open the door.
(2) Set the power switch to ON.
(3) Push in the ink pad button [INK PAD] once to move the indicator to the center
of the scale. When the indicator comes to a stop, the ink pad can be replaced.
Handling Precautions
Keeping the ink pad button [INK PAD] held down continuously moves
the indicator.
(4) Pull down the lock lever on the right side
and draw out the inner mechanism.
(5) Align the protrusion on the ink pad with
the groove on its holder, and lightly push
in.
Ink pad
Rear side
Ink pad
Front side
Protrusion
Groove
Handling Precautions
• An error in operation may occur if
the ink pad has been mounted or
dismounted under conditions other
than those listed for ink pad
replacement.
• An error in operation may occur if a ink pad is forced into the holder
in revese.
(6) Return the inner mechanism to its original position, and make sure that the lock
lever is firmly locked.
(7) Press the ink pad button [INK PAD] again to enable recording.
Handling Precautions
• Ink pads differ according to model No.
• Do not replace ink pad until the indicator is moved to the center of the
scale by pressing the ink pad button [INK PAD].
• Do not move the holder forcibly to the left or right. Doing so might
cause faulty operation.
• Do not fill the ink pad with ink. Doing so might cause faulty operation.
Note
Model No. of ink pad (for 2-dot printing): 81446688-001
Model No. of ink pad (for 3-dot printing): 81446689-001
Model No. of ink pad (for 6-dot printing): 81446690-001
The service life of ink pad is generally two rolls of chart paper (16 m).
30
Chapter 4. PREPARATION & OPERATION
4-2
Operation
■ Turning the Power ON
The recorder’s power switch is located at the right bottom of the front inside when
you open the door.
Pressing the power switch turns the power ON, and pressing it again turns the
power OFF.
Handling Precautions
• The CQ’s warm up time is approx. 30 minutes.
• If input wiring is connected in parallel to other equipment, avoid turning
the power ON or OFF during operation. Doing so might adversely
influence measurement values.
■ Starting and Stopping Recording
Start and stop recording by sliding the mode switch.
● Standard model
Mode Switch
Recording
Chart is not fed.
Chart is fed and
recorded.
● Model with alarm (optional function)
Mode Switch
Recording
Alarm
Chart is fed and
recorded.
Does not operate.
Chart is not fed.
LED lights and relay is actuated when
alarm conditions are satisfied.
Chart is fed and
recorded.
LED lights and relay is actuated when
alarm conditions are satisfied.
31
Chapter 4. PREPARATION & OPERATION
■ External Switch Input Function (optional function)
This function is disabled if the external switch input option is not supported.
● Servo lock function (pen type model)
The pen motor can be controlled externally.
The servo lock is enabled and disabled by opening and closing the dry contacts
connected to the external switch input terminals across 0 and " (1-pen type) and
across # and % (2-pen type).
Contact open: Servo lock is enabled, and the pen does not move even if PV
input changes.
Contact closed: Normal recording is carried out.
● Recording stop function (pen type/dot printing type)
Chart feed can be stopped by external switch inputs.
Recording is started and stopped by opening and closing the dry contact connected
to the external switch input terminals across & and ( (pen type) and across )
and
(dot printing type).
Handling Precautions
This function is valid only when the mode switch on the operation panel is
set to “recording stop” (REC OFF).
Mode Switch
32
External Switch Input
Recording
REC ON
Open
Recording starts.
REC ON
Closed
Recording starts.
REC OFF
Open
Recording stops.
REC OFF
Closed
Recording starts.
Chapter 5.
5-1
BASIC CONFIGURATION
Alarm Setting (optional function)
Read this section if you have selected the model with the alarm display option.
On pen type models, two alarms can be set only on 1-pen type models.
On dot printing models, two alarms can be set common to all channels.
When the alarm set points are set, the LED lights when the measurement value reaches this preset value, and the
alarm relays are actuated.
■ Alarm Operation
Lower limit alarm (LOW): The LED lights when the measurement value falls
below the set point, and alarm relay is actuated.
Upper limit alarm (HIGH): The LED lights when the measurement value rises
above the set point, and alarm relay is actuated.
The figure below shows the concept of alarm operation.
Control output differential
1%F.S.
Control output differential
1%F.S.
Alarm ON
Alarm OFF
Lower limit setting point
Operation Status
Alarm ON
LED
Lights
Upper limit setting point
Alarm output terminal
C
NO
NC
Alarm OFF
Goes out
C
NO
At power OFF
Goes out
NC
Handling Precautions
When the CQ is turned ON/OFF, alarm output is sometimes switched to
the alarm mode momentarily. When controlling other equipment directly
with alarm outputs from the CQ, use a delay timer.
33
Chapter 5. BASIC CONFIGURATION
■ How to Set Up the Alarm (pen type model)
Five alarm types are provided on CQ models: “upper limit”, “lower limit”, “upper
limit + lower limit”, “upper limit + upper limit”, and “lower limit + lower limit”.
The operation panel of each model is as follows:
Upper limit
Upper limit alarm
setting trimmer
Upper limit
alarm LED (red)
ALARM
MEAS.
Lower limit
HIGH
Lower limit alarm
setting trimmer
Lower limit
alarm LED (green)
Upper limit + Lower limit
LOW
ALARM
MEAS.
Lower limit alarm
setting trimmer
Upper limit alarm
setting trimmer
Lower limit
alarm LED
Upper limit + Upper limit
LOW
ALARM
MEAS.
Upper limit
alarm LED (red)
HIGH
Upper limit alarm 1
setting trimmer
Upper limit alarm 2
setting trimmer
Upper limit
alarm 1 LED
Lower limit + Lower limit
HIGH1
Upper limit
alarm 2 LED
ALARM
MEAS.
HIGH2
Lower limit alarm 1
setting trimmer
Lower limit alarm 2
setting trimmer
Lower limit
alarm 1 LED
LOW1
Lower limit
alarm 2 LED
ALARM
MEAS.
LOW2
(1) Slide the mode switch to “ALARM ON” (center or right side) mode.
(2) Flip the alarm setup switch [ALARM] to the desired
alarm LED to be set.
In this example, flip the alarm setup switch to the left
to use lower limit setting.
(3) Turning the alarm setup trimmer with the flathead screwdriver (provided)
moves the indicator of pen 1 and changes the alarm set point.
(4) When the indicator reaches the desired alarm set point, stop turning the
trimmer and return the alarm setup switch [ALARM] to the center.
(5) Flip the alarm setup switch [ALARM] again, and make sure the indicator
moves to the set point.
Handling Precautions
The alarm setting value data is not cleared from memory even if the power
is turned OFF.
34
Chapter 5. BASIC CONFIGURATION
■ How to Set Up the Alarm (dot printing type model)
Five alarm types are provided on CQ models: “upper limit”, “lower limit”, “upper
limit + lower limit”, “upper limit + upper limit,” and “lower limit + lower limit”.
The operation panel of each model is as follows:
Upper limit
Button
Button
Upper limit
alarm LED (red)
ALARM
MEAS.
Lower limit
HIGH
Button
Button
Lower limit
alarm LED (green)
Upper limit + Lower limit
ALARM
MEAS.
LOW
Button
Button
Lower limit
alarm LED
Upper limit + Upper limit
LOW
ALARM
MEAS.
Upper limit
alarm LED
HIGH
Button
Button
Upper limit 1
alarm LED
Lower limit + Lower limit
HIGH1
ALARM
MEAS.
Upper limit 2
alarm LED
HIGH2
Button
Button
Lower limit 1
alarm LED
Lower limit 2
alarm LED
ALARM
MEAS.
LOW1
LOW2
(1) Slide the mode switch to the “ALARM ON” (center or right side) mode.
(2) When you flip the alarm setup switch [ALARM] to the desired alarm LED to
be set, the indicator moves to the alarm set point and comes to a stop.
(3) To change the alarm set point, press the t or s button.
(4) When the ink pad button [INK PAD] is pressed, the print head prints twice,
and the set point is registered.
(5) Return the alarm setup switch [ALARM] to the center.
(6) Flip the alarm setup switch [ALARM] again, and make sure the indicator
moves to the set point.
Handling Precautions
The alarm setting value data is not cleared from memory even if the power
is turned OFF.
35
Chapter 5. BASIC CONFIGURATION
5-2
Changing the Chart Feed Speed
WARNING
Before changing the chart feed speed, be sure to turn the power OFF.
Failure to do so might cause electric shock.
The chart feed speed can be changed to 2X or 4X the factory setting by changing
the combination the gears. Three gears are provided: large, medium-sized and
small gears.
● Items to prepare
Phillips screwdriver
● Changing procedure
(1) Make sure that the power switch is set to OFF.
(2) Open the door.
(3) Pull down the lock lever and draw out the inner mechanism.
(4) Remove the chart cassette from the main unit.
(5) Loosen the inner mechanism fixing screw as shown in the figure and remove
the inner mechanism.
Inner mechanism fixing screw
Spare gears
Handling Precautions
The screw need not be removed completely. It can be removed
loosening halfway.
(6) Remove the spare gear if necessary.
(7) Change the combination of the gears on the left panel of the chassis. Gears can
be removed by pulling them towards you. When inserting gears, push them in
with the gear shaft aligned with the shaft chamfer.
Small
gear
Large gear
Factory setting
Middle-sized
gear
2X speed of factory setting
Large
gear
Small gear
4X speed of factory setting
(8) Make sure that gears are properly engaged.
(9) Return the unused gear to the spare gear storage space.
(10) Return the inner mechanism to its original position, and tighten the inner
mechanism fixing screws.
36
Chapter 5. BASIC CONFIGURATION
5-3
Changing the Power Frequency (pen type AC model only)
If you are using a pen type AC model at a frequency different from the one specified on the nameplate, the gear
combination must be changed.
● Items to prepare
Allen key (provided)
● Procedure
(1) Open the door and draw out the chart cassette.
(2) Set the power switch to OFF.
(3) Lift up the switching gear with your finger so that the fixing screw of the
frequency switching gear can be seen.
Handling Precautions
If the frequency switching gear fixing screw is not facing the front, turn
the power ON, and set the CQ to the recording mode until the fixing
screw faces the front. Then, turn the power OFF again.
(4) Loosen the frequency switching gear fixing screw on the left inside of the
inner mechanism with an Allen key so that the frequency switching gear can
be moved to the left and the right.
(5) Tighten the frequency switching gear fixing screw at the 50 Hz or 60 Hz
position at a tightening torque of 0.2 to 0.3 N•m.
After you have changed the frequency setting, we recommend entering the
power frequency on the nameplate.
Handling Precautions
• Tightening at a torque higher than the recommended torque might
damage the gears.
• When a frequency different from the power frequency is set, a feed
error occurs in the chart feed amount.
37
Chapter 6.
6-1
MAINTENANCE & INSPECTION
Periodic Inspection
To ensure prolonged use of the CQ, periodically inspect the operating status of the CQ and maintain it in proper
working order. Perform the following inspections, and replace consumables and maintenance parts as required.
● Do display and recording operate normally?
If trouble occurs, see Chapter 7. Troubleshooting.
● Is the chart fed correctly without paper jamming, etc.?
If trouble occurs, see “■ Loading the Chart” in Chapter 4. Preparation and
Operation.
● Are recorded lines faint?
For details on how to replace the pen, see “■ Loading the Pen” in Chapter 4.
Preparation and Operation.
For details on how to replace the ink pad, see “■ Loading the Ink Pad” in
Chapter 4. Preparation and Operation.
● Is there remaining chart?
When the CQ begins to run out of chart paper, a red warning mark is printed on
the right side of the recording paper. Replace with new chart referring
“■ Loading the Chart” in Chapter 4. Preparation and Operation.
● Is the shaft dirty?
If the shaft is dirty, see “6-2 Cleaning”.
Note
• The periodic inspection cycle is dependent on the installation environment and
operating conditions. Perform the periodic inspection every six months in dusty
environments or when changes in indicator movement are excessive, and once
every year in environments that are hardly subject to dust or when there is little
change in indicator movement.
• Clean the unit every month.
38
Chapter 6. MAINTENANCE & INSPECTION
6-2
Cleaning
To maintain the CQ in proper working order, clean the shaft every month. The procedure is as follows:
Wipe the shaft with a soft cloth or paper that does not produce any fluff.
Wipe the shaft with soft cloth or paper moistened with ethyl alcohol only when it
is difficult to remove dirt or stains from the shaft.
(Note) The figure above shows a pen type model. On dot printing type models,
the printing section is different.
Handling Precautions
Do not apply lubrication oil to the shaft. Doing so might cause faulty
operation.
Do not use paint thinner, benzene or other volatile solvents, or wipe parts
with a cloth moistened with these solvents. Doing so might cause discolor
or deform parts.
Note
Recommended cleaning cloth: Kim Wipe® made by Crecia Co., Ltd.
39
Chapter 6. MAINTENANCE & INSPECTION
6-3
Replacing the Fuse
WARNING
To prevent danger before you replace the fuse, turn the power OFF, and disconnect the CQ from its power supply.
Failure to do so might cause electric shock.
Use only the specified fuse. Do not use other fuses.
Doing so might cause fire.
Model No. of maintenance parts:
Model No.
Item
Remarks
Applicable Model
81446691-001
Fuse
100 to 120 Vac model
1 set (5 pieces)
81446691-002
Fuse
200 to 240 Vac model
1 set (5 pieces)
81446691-003
Fuse
12 Vdc 1-pen type and dot printing type
24 Vdc 2-pen type
1 set (5 pieces)
81446691-004
Fuse
12 Vdc 2-pen type
1 set (5 pieces)
81446691-005
Fuse
24 Vdc 1-pen type
1 set (5 pieces)
Handling Precautions
Replace fuses periodically (about every two years) to prevent unexpected
fusing.
● Items to prepare
• Phillips-head screw driver
• Flat-whead screw driver
• Maintenance parts Fuse: Differs according to the power supply.
● Replacement procedure
(1) Draw out the chassis. For details on how to draw out the chassis, see “5-2
Changing the Chart Feed Speed”.
(2) The fuse holder is located at the bottom right of the transformer. Turn the
screw counterclockwise to remove the fuse.
Case
Transformer
Fuse holder
(3) Insert the new fuse in the fuse holder, and turn the screw clockwise to fasten
the fuse holder.
(4) Return the chassis to its original position, fasten the chassis with the screw and
turn the power ON.
40
Chapter 7.
TROUBLESHOOTING
This section describes possible causes when trouble occurs and how to remedy trouble.
If the CQ is not working properly even though a remedy has been carried out, a probable cause is that the CQ is
malfunctioning.
Turn the power OFF and contact us for repair.
● No operation at all
Remedy
Check item
Is the power switch on the main unit ON?
Set the power switch at the top right on the
main unit to ON.
Does the power switch operate normally?
Is power supply correctly connected?
Connect the power correctly.
Is power supplied correctly?
Check the power and frequency
specifications, and supply the power
correctly.
Has the fuse blown?
Remove the cause of the fuse blowing, and
replace the fuse. ( See “6-3 Replacing the
Fuse”.)
● No indicator operation
Remedy
Check item
Is the power switch on the main unit ON?
Set the power switch at the top right on the
main unit to ON.
Is power supply correctly connected?
Connect the power correctly.
Is power supplied correctly?
Check the power and frequency
specifications, and supply the power
correctly.
Has the fuse blown?
Remove the cause of the fuse blowing, and
replace the fuse. (See “6-3 Replacing the
Fuse”.)
Is the input correctly wired?
• Wire correctly.
• Tighten the terminal screw correctly.
• Make sure that the resistance temperature
detector is insulated from the earth.
• Replace the broken thermocouple.
Close the external switch inputs.
Does the servo lock operate? (pen type)
Is the unit in alarm setup status? (with alarm
option)
Set the alarm setup switch to the center
position.
41
Chapter 7. TROUBLESHOOTING
● The chart is not being fed
Remedy
Check item
Is the power switch on the main unit ON?
Set the power switch at the top right on the
main unit to ON.
Is power supply correctly connected?
Connect the power correctly.
Is power supplied correctly?
Check the power and frequency
specifications, and supply the power
correctly.
Has the fuse blown?
Remove the cause of the fuse blowing, and
replace the fuse. (See “6-3 Replacing the
Fuse”.)
Is the mode switch set to “REC=ON”?
Set the mode switch to “REC=ON”.
Is the chart cassette correctly inserted?
Insert the chart cassette correctly.
Is the chart loaded correctly? Has the chart
come loose from the sprockets?
Load the chart correctly.
Has the chart feed gear come loose?
Make sure that the chart feed gear is
correctly attached in place.
● Recording is not carried out
Remedy
Check item
Is the power switch on the main unit ON?
Set the power switch at the top right on the
main unit to ON.
Is power supply correctly connected?
Connect the power correctly.
Is power supplied correctly?
Check the power and frequency
specifications, and supply the power
correctly.
Has the fuse blown?
Remove the cause of the fuse blowing, and
replace the fuse. (See “6-3 Replacing the
Fuse”.)
Is the mode switch set to “REC=ON”?
Set the mode switch to “REC=ON”.
Is the chart cassette correctly inserted?
Insert the chart cassette correctly.
Is the pen-up lever up? (pen type)
Lower the pen-up lever.
Is the pen filled with a sufficient amount of
ink? (pen type)
Replace with a new pen.
Is the ink pad loaded correctly? (dot printing
type)
Load the ink pad correctly.
Does the ink pad have enough ink? (dot
printing type)
Replace with a new ink pad.
● Ink pad cannot be moutned (dot printing type model)
Remedy
Check item
42
Are the conditions for ink pad replacement
met?
Refer to page 28.
Is the ink pad positioned correctly?
(Verify right and left sides and the top and
bottom.)
Refer to page 28.
Chapter 7. TROUBLESHOOTING
● The indicator is at the “zero” or “span” positions
Remedy
Check item
Is the input within the specification?
Connect an input within the specification.
Have electrical noise countermeasures
been adopted?
• Separate the input wiring from the
electrical source of the noise.
• Ground the CQ.
• Ground the measurement target.
• Make sure that the thermocouple and the
measurement target are insulated.
• Use a shielded cable for the input signal
lead.
• Use an input filter.
Have external temperature change
countermeasures been adopted?
Attach the input terminal cover correctly.
Is the input wiring correct?
• Wire correctly.
• Tighten the terminal screw correctly.
• Make sure that the resistance temperature
detector is insulated from the earth.
• Replace the broken thermocouple.
● Chart feed timing is incorrect
Remedy
Check item
Is the power frequency correct? (pen type
AC model)
• Supply power with the appropriate
frequency.
• Change power supply frequency or chart
feed speed as necessary.
Has the chart feed gear been changed?
• Change the chart feed speed as
necessary.
● No alarm operation
Remedy
Check item
Is the mode switch set to “ALARM=ON”?
Set the mode switch to “ALARM=ON”.
Is the alarm setting value set correctly?
Set the alarm setting point correctly.
Is the alarm output wiring correct?
• Wire correctly.
• Tighten the terminal screw correctly.
● External switch inputs do not operate
Remedy
Check item
Is the external switch input wiring correct?
• Wire correctly.
• Tighten the terminal screw correctly.
Is the contact (switch) within the
specification?
Use a contact (switch) within the
specification.
43
Chapter 8.
SPECIFICATIONS
■ General Specifications
Insulation resistance
Min. 20 MΩ across power terminal and GND terminal (by 500 Vdc megger)
Min. 20 MΩ across input terminal and GND terminal (by 500 Vdc megger)
Dielectric strength
Across power terminal and GND terminal
1500 Vac for 1 minute (AC power supply model, leak current 5 mA max.)
Across input terminal and GND terminal
1000 Vac for 1 minute (AC power supply model, leak current 5 mA max.)
Across power terminal and GND terminal
500 Vac for 1 minute (DC power supply model, leak current 5 mA max.)
Across input terminal and GND terminal
500 Vac for 1 minute (DC power supply model, leak current 5 mA max.)
Induction resistance
Common mode rejection rate: 120 dB, 250 Vac max.
Normal mode rejection rate: Max. 2X of 40 dB span
Standard conditions
Operating conditions
Transportation/storage
conditions
Temperature
23±2°C
Humidity
55±10%RH
Voltage fluctuation
±1% of rated power voltage
Power frequency fluctuation
±1% of rated power frequency (AC power supply model)
Vibration, electrical noise, surge
voltage
Not allowed
Influence from other equipment
Not allowed
Mounting
Horizontal
Temperature
0 to 50°C
Humidity
30 to 85%RH (condensation not allowed)
Power voltage
±10% of rated power voltage
Power frequency fluctuation
±2 Hz of rated power frequency (AC power supply
model)
Vibration, electrical noise, surge
voltage
0.2 m/s2 max. (10 to 60 Hz)
Mounting
Bottom rear angle to 30° from horizontal
Ambient temperature
-20 to +60°C
Ambient humidity
10 to 95%RH (no condensation allowed)
Shock resistance
300 m/s2 max. (continuously for 11 ms max.)
Vibration resistance
5 m/s2 max. (10 to 60 Hz, for two hours in each of X, Y
and Z axes)
Rated power
voltage/frequency
According to the model No. specification
100, 110, 120, 200, 220, 240 Vac 50 Hz or 60 Hz, and 12 and 24 Vdc (pen type)
100, 110, 120, 200, 220, 240 Vac 50/60 Hz, and 12 and 24 Vdc (dot printing model)
Power consumption
7 VA max. (1-pen type, AC power supply model)
11 VA max. (2-pen type, AC power supply model)
13 VA max. (dot printing type, AC power supply model)
7 W max. (1-pen type, DC power supply model)
11 W max. (2-pen type, DC power supply model)
13 W max. (dot printing type, DC power supply model)
Rush current
8 A max.
Material
Door
Deformed PPE, glass window
Case
Deformed PPE
Door frame
Black (standard)
Case
Black (standard)
Color
(10 ms max.)
Mounting
Imbedded in indoor panel (changeable to a carrying type using carrying handle kit)
Mass
Approx. 1.8 kg (1-pen type), approx. 2.0 kg (2-pen type and dot printing type)
Standard accessories
Folding chart: 1 roll, mounting bracket: 1 set, User’s manual (CP-SP-1048E): 1, pen: 1 set
(pen type) or ink pad: 1 (dot printing type), Allen key: 1 (pen type), screwdriver: 1 (pen type
with alarm)
44
Chapter 8. SPECIFICATIONS
■ Performance Specifications
Input
Input type
Range
Allowable wiring resistance
Input impedance
Burnout
Input bias current
Display
Scaling method
Scaling characteristics
Display accuracy
Recorder
Dead band
Recording method and
recording color
Pen speed (pen type)
Recording cycle (dot printing
type)
Recording accuracy
Chart type
Chart feed speed
Alarm (option)
Alarm setting accuracy
Control output differential
Alarm relay
Alarm type
External switch
inputs (option)
Function
Switch type
Contact capacity
Other
Pen-up function
Limitter function
Thermocouple, resistance temperature detector, DC voltage, DC current
(See the model listing table.)
See the model listing table.
Thermocouple/DC voltage input: 2 kΩ or less. However, 250 Ω or less
in case of thermocouple input with
burnout upper limit or lower limit.
Resistance temperature detector: 10 Ω per lead (However, resistance of
three leads must be balanced.)
1 MΩ min. (thermocouple, resistance temperature detector and DC
voltage input)
250 Ω
(DC current input)
Selectable from none, upper limit and lower limit according to the model
No. (only thermocouple input)
Thermocouple/DC voltage input: ±50nA max. (±100nA max. for a thermocouple input with burnout)
Resistance temperature detector: Approx. 2mA
Horizontal scale, eff. width of overal scale 100 mm
Thermocouple/resistance temperature detector input:
Scaling of temperature characteristics
DC voltage/DC current input:
linear scaling
±0.5%FS (standard conditions, without burnout)
See Table 2 Range (page 4) for exceptions to the above.
0.3%FS (standard conditions)
1-pen:
red
2-pen:
Channel 1 (red), Channel 2 (blue)
2-dot printing: Channel 1 (red), Channel 2 (blue)
3-dot printing: Channel 1 (red), Channel 2 (blue), Channel 3 (green)
6-dot printing: Channel 1 (red), Channel 2 (blue), Channel 3 (green),
Channel 4 (pink), Channel 5 (purple), Channel 6 (brown)
Approx. 1 s/FS or less
2-dot: 12 s
3-dot: 18 s
6-dot: 36 s
±0.5%FS (Standard conditions, without burnout)
Except the range with an asterisk (*) on page 4.
Folding type, eff. width of recording area 100 mm, length 16 m
Specify according to the model No.
10 mm/h
(changeable to 20 or 40 mm/h)
20 mm/h
(changeable to 40 or 80 mm/h)
10 mm/min (changeable to 20 or 40 mm/min, applicable only on pen type)
20 mm/min (changeable to 40 or 80 mm/min, applicable only on pen type)
±0.85%FS
1.0%FS max.
SPDT (NO/NC) 250 Vac 3A/30 Vdc 3A max. (at resistive load)
Min. applicable load: 5 Vdc 100 mA, 24 Vac 50 mA
Can be specified from one upper limit, one lower limit, one upper limit +
one lower limit, two upper limits and two lower limits.
On dot printing models, operation is carried out without the channel
recognized.
Note: Alarms are not supported on 6-dot printing 2-type input model.
On pen type models, only 1-channel models are recognized, and
alarms are not supported on 2-channel models.
Recording start/stop (dot printing type/pen type) and servo lock
enable/disable (pen type only)
(Note: The “servo lock” is a function for latching the pen at the current
recording pen position regardless of PV input.)
Only dry contacts (Note: Open collector cannot be used.)
Servo lock:
20 Vdc, 500 mA min.
Recording start/stop: 20 Vdc, 100 mA min.
Pen can be raised by the lever. (pen type only)
Connecting false inputs to unused channels is not necessary.
45
Chapter 8. SPECIFICATIONS
■ External Dimensions
(Unit: mm)
46
Index
-A-
-M-
Additional treatment ・ ・ ・ ・ ・ ・ ・ ・ ・ ・ ・ ・ ・ ・ ・ ・ 9
Alarm LED ・ ・ ・ ・ ・ ・ ・ ・ ・ ・ ・ ・ ・ ・ ・ ・ ・ ・ ・ 14,15
Alarm operation ・ ・ ・ ・ ・ ・ ・ ・ ・ ・ ・ ・ ・ ・ ・ ・ ・ ・ 33
Alarm setup switch ・ ・ ・ ・ ・ ・ ・ ・ ・ ・ ・ ・ ・ ・ ・ 14,15
Alarm setup trimmer ・ ・ ・ ・ ・ ・ ・ ・ ・ ・ ・ ・ ・ ・ ・ ・ 14
Maintenance ・ ・ ・ ・ ・ ・ ・ ・ ・ ・ ・ ・ ・ ・ ・ ・ ・ ・ ・ ・ 18
Maintenance parts ・ ・ ・ ・ ・ ・ ・ ・ ・ ・ ・ ・ ・ ・ ・ ・ ・ 12
Material ・ ・ ・ ・ ・ ・ ・ ・ ・ ・ ・ ・ ・ ・ ・ ・ ・ ・ ・ ・ ・ ・ 16
Mode switch ・ ・ ・ ・ ・ ・ ・ ・ ・ ・ ・ ・ ・ ・ ・ ・ ・ 14,15,31
Mounting bracket ・ ・ ・ ・ ・ ・ ・ ・ ・ ・ ・ ・ ・ ・ ・ ・ ・ 12
-C-
-N-
Carrying handle kit・ ・ ・ ・ ・ ・ ・ ・ ・ ・ ・ ・ ・ ・ ・ ・ ・ 12
Changing the chart feed speed ・ ・ ・ ・ ・ ・ ・ ・ ・ ・ ・ 36
Changing the power frequency ・ ・ ・ ・ ・ ・ ・ ・ ・ ・ 37
Chart feed dial ・ ・ ・ ・ ・ ・ ・ ・ ・ ・ ・ ・ ・ ・ ・ ・ ・ ・ ・ 28
Cleaning ・ ・ ・ ・ ・ ・ ・ ・ ・ ・ ・ ・ ・ ・ ・ ・ ・ ・ ・ ・ ・ ・ 39
Connecting the power supply ・ ・ ・ ・ ・ ・ ・ ・ ・ ・ ・ 21
Consumables ・ ・ ・ ・ ・ ・ ・ ・ ・ ・ ・ ・ ・ ・ ・ ・ ・ ・ ・ ・ 10
CR filter ・ ・ ・ ・ ・ ・ ・ ・ ・ ・ ・ ・ ・ ・ ・ ・ ・ ・ ・ ・ ・ ・ 20
-EExternal switch inputs
・ ・ ・ ・ ・ ・ ・ ・ ・ ・ ・ ・ ・ ・ ・
25
-FFrequency switching gear ・ ・ ・ ・ ・ ・ ・ ・ ・ ・ ・ ・ ・ 37
Fuse ・ ・ ・ ・ ・ ・ ・ ・ ・ ・ ・ ・ ・ ・ ・ ・ ・ ・ ・ ・ ・ ・ ・ 12,40
-GGear
・ ・ ・ ・ ・ ・ ・ ・ ・ ・ ・ ・ ・ ・ ・ ・ ・ ・ ・ ・ ・ ・ ・ ・
36
-HHow the model nos. are configured ・ ・ ・ ・ ・ ・ ・ ・ ・ 1
How to setup the alarm ・ ・ ・ ・ ・ ・ ・ ・ ・ ・ ・ ・ ・ 34,35
-IInstallation ・ ・ ・ ・ ・ ・ ・ ・ ・ ・ ・ ・ ・ ・ ・ ・ ・ ・ ・ ・ ・ 17
Installation dimensions ・ ・ ・ ・ ・ ・ ・ ・ ・ ・ ・ ・ ・ ・ 18
Installation site ・ ・ ・ ・ ・ ・ ・ ・ ・ ・ ・ ・ ・ ・ ・ ・ ・ ・ ・ 17
Inner mechanism ・ ・ ・ ・ ・ ・ ・ ・ ・ ・ ・ ・ ・ ・ ・ ・ 13,15
Input type ・ ・ ・ ・ ・ ・ ・ ・ ・ ・ ・ ・ ・ ・ ・ ・ ・ ・ ・ ・ ・ ・ 3
Input terminals ・ ・ ・ ・ ・ ・ ・ ・ ・ ・ ・ ・ ・ ・ ・ ・ ・ 22,23
Noise countermeasures
・ ・ ・ ・ ・ ・ ・ ・ ・ ・ ・ ・ ・ ・
20
-OOperation panel ・ ・ ・ ・ ・ ・ ・ ・ ・ ・ ・ ・ ・ ・ ・ ・ ・ 14,15
Optional parts ・ ・ ・ ・ ・ ・ ・ ・ ・ ・ ・ ・ ・ ・ ・ ・ ・ ・ ・ 12
-PPen ・ ・ ・ ・ ・ ・ ・ ・ ・ ・ ・ ・ ・ ・ ・ ・ ・ ・ ・ ・ ・ ・ ・ ・ ・ 29
Pen-up lever ・ ・ ・ ・ ・ ・ ・ ・ ・ ・ ・ ・ ・ ・ ・ ・ ・ ・ ・ ・ 13
Power supply cable set ・ ・ ・ ・ ・ ・ ・ ・ ・ ・ ・ ・ ・ ・ ・ 12
Power switch ・ ・ ・ ・ ・ ・ ・ ・ ・ ・ ・ ・ ・ ・ ・ ・ ・ ・ 14,15
-RRange ・ ・ ・ ・ ・ ・ ・ ・ ・ ・ ・ ・ ・ ・ ・ ・ ・ ・ ・ ・ ・ ・ 4 to 6
Recording stop function ・ ・ ・ ・ ・ ・ ・ ・ ・ ・ ・ ・ ・ ・ 32
-SServo lock function ・ ・ ・ ・ ・ ・ ・ ・ ・ ・ ・ ・ ・ ・ ・ ・ 32
Spare gears ・ ・ ・ ・ ・ ・ ・ ・ ・ ・ ・ ・ ・ ・ ・ ・ ・ ・ ・ ・ ・ 36
Starting and stopping recording ・ ・ ・ ・ ・ ・ ・ ・ ・ ・ 31
-TTag plate ・ ・ ・ ・ ・ ・ ・ ・ ・ ・ ・ ・ ・ ・ ・ ・ ・ ・ ・ ・ ・ ・ 12
Terminals on rear panel・ ・ ・ ・ ・ ・ ・ ・ ・ ・ ・ ・ ・ 14,16
Terminal position of alarm output ・ ・ ・ ・ ・ ・ ・ ・ ・ 24
-UUnit
・ ・ ・ ・ ・ ・ ・ ・ ・ ・ ・ ・ ・ ・ ・ ・ ・ ・ ・ ・ ・ ・ ・ ・ ・
7
-VVarister ・ ・ ・ ・ ・ ・ ・ ・ ・ ・ ・ ・ ・ ・ ・ ・ ・ ・ ・ ・ ・ ・ ・ 20
-LLoading the chart ・ ・ ・ ・ ・ ・ ・ ・ ・ ・ ・ ・ ・ ・ ・ ・ ・ 26
Loading the ink pad ・ ・ ・ ・ ・ ・ ・ ・ ・ ・ ・ ・ ・ ・ ・ ・ 30
Loading the pen ・ ・ ・ ・ ・ ・ ・ ・ ・ ・ ・ ・ ・ ・ ・ ・ ・ ・ 29
Lock lever ・ ・ ・ ・ ・ ・ ・ ・ ・ ・ ・ ・ ・ ・ ・ ・ ・ ・ ・ 13,15
-WWiring alarm output ・ ・ ・ ・ ・ ・ ・ ・ ・ ・ ・ ・ ・ ・ ・ ・ 24
Wiring inputs・ ・ ・ ・ ・ ・ ・ ・ ・ ・ ・ ・ ・ ・ ・ ・ ・ ・ ・ ・ 23
1
Revision History
Printed
Date
Manual Number
Edition
Revised pages
Description
Nov. 1998 CP-SP-1048E 1st Edition
Feb. 2002
2nd Edition
iii,20
4
5
9
21
28
40
43
Oct. 2005
3rd Edition
4th Edition
July 2006
5th Edition
Mar. 2007
6th Edition
7th Edition
Nov. 2003
Apr. 2008
3
4, 5
20
10
10,11
ii
45
RESTRICTIONS ON USE changed
Safety precautions added "Do not wiring unused
terminals"
Range code T30 added "-50 to +150"
Range code T40,E40,J40,T43,K43,T44,E44,J44,
K44 deleted
Range code B40 changed "0 to 1800"
Display accuracy changed "*" marked range
Range code 32 changed "-25 to +25"
CQC model added for all code in Table 8
Note added in Wiring inputs
Description on loading the ink pad changed,
Handling precautions added
Trouble shooting added "Ink pad cannot be
mounted"
Input bias current added, Display accuracy
changed, refer to Table 2 Range (page 4)
RESTRICTIONS ON USE changed
Model No. code S, B, W, N deleted
Table 2 Range changed
Instrument cable changed
Model No. 81446699-001, Model name changed
Chart holder to Chart holding spring
■ Consumables discription added
SAFETY PRECAUTIONS changed.
Recording accuracy added.
Specifications are subject to change without notice.
Advanced Automation Company
1-12-2 Kawana, Fujisawa
Kanagawa 251-8522 Japan
URL: http://www.azbil.com
Printed on recycled paper.
(07)
Printed in Japan.
7th Edition: Issued in Apr. 2008 (A)