1
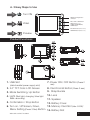
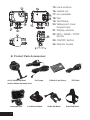
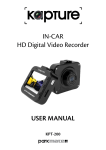
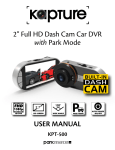
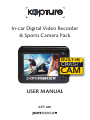
In-car Digital Video Recorder
& Sports Camera Pack
BUILT-IN
CRAS H
CAM
USER MANUAL
KPT-600
In order to ensure better use of each function of your Kapture
In-Car Digital Video Recorder & Sports Camera Pack, it
is recommended that you read these product instructions
carefully before using this product.
Note:
1.Please abide by the relevant laws in your local area;
please do not use this product for illegal purposes.
2.Please insert your Micro SD memory card before
recording video.
3.Please install the memory card in the correct orientation in
order to avoid damage to the card or the camera.
4.To avoid losing important footage, it is suggested that you
back-up footage on a weekly basis to your computer.
5.Please ensure the windscreen mounting bracket is
installed securely.
6.Battery charge will diminish over time. If the camera is not
used for a long period of time, please ensure the battery
is charged fully before use.
7.The working temperature of the camera is 0 to 40º
degrees Celsius.
8.Please do not leave the camera in an excessively humid
environment as it is not water resistant without its
waterproof case.
9.Please avoid shooting footage directly into the sun so as
to avoid damage to the camera.
10.Please avoid using the camera in an excessively dusty
environment so as to not obstruct the camera lens.
11.The lens can be cleaned by wiping gently with a soft glass
cleaning cloth.
12.This camera is a precision electronic product; please do
not expose it to strong shock, vibration, magnetic fields or
heavy current fields.
2
A. 3 Easy Steps to Use
1
Turn ON
MODE Switching Button
UP Button
2
REC / SNAP / STOP Button
Video
MENU (Press 3 sec),
SCREEN SAVER ON/OFF,
DOWN Button
ON / OFF Button (Press 2 sec)
F
3
FORMAT Button (Press 3 sec)
Preview
Product Functions:
1. USB Slot
(data transfer/power supply slot)
7.Power ON / OFF Button (Press 2
sec)
2. 2.0” TFT Color LCD Screen
8.Card Format Button (Press 3 sec)
3.Mode Switching, Up Button
9. Strap Buckle
4. Light (Red light: charging /blue light
10. Lens
flash: recording)
11. Speaker
5.Confirmation / Stop Button
12. Battery Cover
6.Turn on / off Screen, Down,
13. Memory Card Slot (Max. 32GB)*
Menu Setting (Press 3 Sec) Button 14. Battery Slot
*Micro SD card NOT included
3
15. Lens window
16. Helical rod
17. Arc pedestal
18. Nut
19. 3M Sticker
20. Waterproof cover
lanyard loop
21. Display window
22. REC / SNAP / STOP
Button
23. ON/OFF Button
24. Wrench buckle
B. Product Pack Accessories:
In-Car Suction Cup Mount
(mounts without waterproof case)
Waterproof Case
4
Car Charger
Flat Adhesive Mount
650mAh Li-ion Battery
Handle Bar Mount
USB Cable
Head Strap Mount
OPERATION
C. Camera Operating Instructions
1. Setup: Insert the battery and charge your camera until
it is fully charged.
2. Charging: The camera will charge when either
connected to the car charger and your car or when
connected to the USB cable and your computer.
During charging the light will display red and change to
no light when the battery is fully charged.
3. Memory Card: Insert the Micro SD card (not supplied)
in the storage slot (13) position before you use the
camera. The first time you use a new Micro SD card
it must be formatted by the camera to function. Press
the FORMAT Button (8) for 3 seconds to format the
Micro SD card. [Supports 4GB - max 32GB]
Please NOTE: Please be careful when you choose to
format your Micro SD card. If it already has any files on
it they will be deleted permanently.
4. Power: Press the ON / OFF Button (7) for 2 seconds to
turn turn the camera on or off.
5. Mode: Press the MODE Button (3) to switch between
Video (Car DVR), Video (Sport), Photo and Preview
Mode.
Please NOTE: MODE Button does not work during
recording. When you power off the camera it will
remember the most recent Mode it was operating in
and will resume this same mode when the camera is
powered back up again.
5
6. Video (Car DVR) Mode: Turn on the camera and press
MODE Button (3) to switch to Car DVR Mode.
a) Please note, when your camera is in Car DVR
mode, it will begin recording automatically when
you power on the camera.
b) In Car DVR video mode your camera will record
video in file blocks of 2 minutes
c) In Car DVR mode, your camera will continually
record video using “Loop Recording” method. If the
memory on your Micro SD card becomes full the
camera will begin to write over the oldest Car DVR
files on the camera
d) Your camera can automatically protect video file
blocks when it senses an incident or accident by
utilising its built in G-Sensor. Files saved using this
method will continue to record for 10 seconds then
auto lock the current 2 minute video block which
will then be protected from being overwritten by
the camera’s Loop Recording function, allowing
it to be reviewed at a later date. The sensitivity
of the G-Sensor can be manually adjusted in the
camera’s Menu settings
7. Video Mode: Turn on the camera and press MODE
Button (3) to switch to Video Mode. Once you have
selected Video Mode, press the REC Button (5) to start
recording video. Press the REC Button (5) again to
stop recording video. When recording video in regular
Video Mode, the camera will record video in one file
block until you press the REC Button (5) again or until
the Micro SD card is full.
6
8. Photo Mode: Turn on the camera and press MODE
Button (3) to switch to Photo Mode. Once you have
selected Photo Mode, press the SNAP Button (5) to
capture still images.
9. Preview Mode: Turn on the camera and press
MODE Button (3) to switch to preview mode. Press
DOWN Button (6) to select the files that you want
to preview. If the file is a video file you can press
the CONFIRMATION Button (5) to play the file.
During playback, to preview other files press the
CONFIRMATION Button (5) to Pause the current video
and then press DOWN Button (6) to select the file that
you want to preview. Press CONFIRMATION Button (5)
to play the selected file.
10. Waterproof Case instructions for use: Please open
the wrench buckle (24) of the waterproof camera
case. Make sure that the camera lens is in line with
the case lens window (15) to ensure a proper fit.
Fasten the wrench buckle (24) to ensure the case is
sealed properly and the camera is waterproof.
Please NOTE: When used in water, DO NOT open
the waterproof case. Opening the case while
the camera is submerged will render the camera
permanently disabled and void its warranty.
11. Menu Items
a) Resolution – 1920 x 1080 (25 Frames Per Second) /
1280 x 720 (30 Frames Per Second)
b) Audio (record) – Off / On
c) G Sensor – Low Sensitivity / Middle Sensitivity /
High Sensitivity / Off
d) LCD Backlight (Auto Off) – 15sec / 30sec / 60sec
/ On
e) Date Setup – Set the date and time
f) Language – English, French, Spanish, Portuguese,
German, Italian, Chinese, Russian, Japanese
g) Default Setting – Return to factory settings
h) Firmware Version – Confirms version
7
Specifications
In-Car DVR & Sports Camera
Lens
120° for both Video & Photo
Mode
Car DVR / Video / Photo / Preview
Video Resolution
1920 x 1080 (25fps) / 1280 x 720 (30fps)
Photo Resolution
2592 x 1944 pixels - 5MP
Video Format
AVI
Photo Format
JPEG
Audio Recording
Built-In Audio Recorder
Media
Micro SD Card [Supports 4GB - 32GB - Not Included]
Storage
Approx. 4-5 hours average recording time (32GB)
Battery
Rechargeable 650mAh Li-ion (approx. 1.5hrs
Camera Housing
Heavy Duty Steel
Waterproof Casing
Waterproof to 10 metres
recording)
Warranty Terms & Conditions
Our goods come with guarantees that cannot be excluded under the Australian Consumer Law. You are entitled to a
replacement or refund for a major failure and for compensation for any other reasonably foreseeable loss or damage.
You are also entitled to have the goods repaired or replaced if the goods fail to be of acceptable quality and the failure
does not amount to a major failure.
This warranty is provided in addition to your rights under the Australian Consumer Law.
Directed Electronics warrants that this product is free from defects in material and workmanship for a period of 12
months from the date of purchase or for the period stated on the packaging. This warranty is only valid where you
have used the product in accordance with any recommendations or instructions provided by Directed Electronics.
This warranty excludes defects resulting from alterations of the product, accident, misuse, abuse or neglect.
Directed Electronics Address: 44 Translink Drive, Keilor Park Victoria 3042
Ph: +61 03 8331 4800
Email: [email protected]
www.parkmate.com.au
www.directed.com.au
© Parkmate 2014
In order to claim the warranty, you must return the product to the retailer from which it was purchased or if that
retailer is part of a National network, a store within that chain, along with satisfactory proof of purchase. The retailer
will then return the goods to Directed Electronics. Directed Electronics will repair, replace or refurbish the product at
its discretion. The retailer will contact you when the product is ready for collection. All costs involved in claiming this
warranty, including the cost of the retailer sending the product to Directed Electronics, will be borne by you.