1
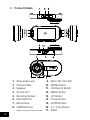
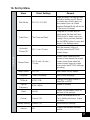
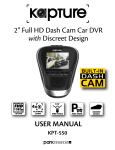
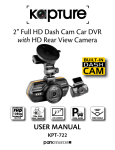
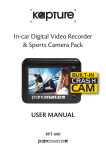
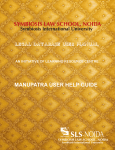
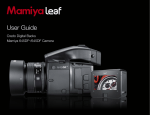
2” Full HD Dash Cam Car DVR
with Park Mode
USER MANUAL
KPT-500
Before attempting to use or install your Kapture KPT-500,
please ensure you have read and understood all of the
safety notes below.
• Avoid leaving your KPT-500 in direct sunlight for extended
periods of time in an unventilated space.
•
Do not expose your KPT-500 to liquids, excessive dusty
conditions or temperatures exceeding 60°C.
• Only use the included cables to power and charge the KPT500.
•
Please do not attempt to adjust the KPT-500 position or
settings whilst you are operating your vehicle.
• Ensure you are using your KPT-500 within your countries’ road
laws. Please make sure you are familiar with your local road
legislation before use.
1. Package Contents
KPT-500 Car DVR
USB Cable
Car Charger
User Guide
Window Mount
3
2. Product Details
1. Wide angle Lens
2. Infrared LEDs
3.Speaker
4. AV Out Port
5. Mounting Socket
6. Mini USB Port
7.Microphone
8.HDMI Mini Port
(Adapter required for HDMI not included)
4
9. Micro SD Card Slot
10. MODE Button
11. OK/Record Button
12. MENU Button
13. UP Button
14. Power Button
15. DOWN Button
16. 2.7” LCD Screen
17.Reset
3.General
a.Insert your Micro SD Card (not included) into the Micro
SD Card slot under the protective rubber flap on the
underside of the camera, ensuring it is inserted in the
correct direction.
b.The Auto On/Off feature will power the KPT-500 up and
begin recording as soon as it receives power from the
USB Mini connection (eg. when you start your car)
4.Installation
a.Clean the interior of your windscreen ensuring that the
desired point of installation is free of dust and is not
obstructing the drivers’ view.
b.Attach the KPT-500 to the included mount by inserting
the mount’s lock peg into the mounting socket on the
KPT-500, firmly sliding the mount from right to left along
the mount connection locking the DVR in place.
c. Remove the protective stickers on the suction cup of the
mount, the 2.7” LCD Screen and the lens.
d. With the mount’s suction mount lock switch in the up
position, press the suction cup onto the desired position
on your windscreen.
e. Lock the mount in place by pressing the lock switch in the
down position.
f. Use the nut to adjust the angle and position of the KPT500 and tighten to lock your positioning.
g. Connect the KPT-500 to power using the included USB
Mini power supply.
5
5. Product Operation
a. Once the camera is set up with the included Mini USB
power supply and a Micro SD Card has been installed,
the KPT-500 will automatically power on and start
recording when the car is started.
6
b. The KPT-500 is designed to be primarily powered by your
car’s DC power. The on board battery is for short use only
and mainly serves to power the cars Park mode and brief
use for documenting external damage in the case of an
incident.
c. While recording you will not be able to access the menus
or change modes, to stop a recording push the OK
button.
d. The KPT-500 is optimised for Micro SD Cards class 4 and
above with a capacity up to 32GB.
e.The on board ‘G- Sensor’ registers any activity that could
be an accident and saves the footage as a ‘Locked’ file
ensuring that the footage cannot be accidently recorded
over. To remove ‘Locked’ files you must first unlock them
using the ‘Protect’ menu (navigating to PLAYBACK mode
using the MODE key, selecting the ‘Locked’ file, pushing
the MENU button and selecting ‘Protect’).
f.Footage can be manually ‘Locked’ by pressing the MENU
button while recording.
g. The built in microphone can be quickly muted or unmuted in VIDEO mode by pushing the UP button (the
microphone cannot be muted or un-muted while when
the KPT-500 is recording).
h. To quickly activate ‘Park Mode’, quickly push the power
button while in VIDEO mode.
i. While recording you can quickly switch between ‘Night’
and ‘Day’ lighting modes by pushing the DOWN button.
6. Computer Connection:
Videos and Photos can be retrieved from the KPT-500 by either
connecting the camera directly to your computer using the
included Mini USB Cable or by connecting the Micro SD Card
using a Micro SD Card adapter (not included).
a. When you connect the KPT-500 to your computer, your
KPT-500 will give you the option of ‘Mass Storage’, or
‘PC Camera’. Select ‘Mass Storage’.
b. The KPT-500 will now appear on your computer as a
Removable Disk drive.
c. Open the file explorer on your computer and find the
camera listed as a removable disk under “Devices”
d. Videos and Photos will be stored in the file named
“DCIM”.
e. For smoother video playback, save videos files to your
computer.
Mac users may need to download a third party player such
as ‘VLC’ to play these files as AVI is not natively supported on
Apple computers.
7. Interface:
The KPT-500 has three modes, VIDEO, STILL and PLAYBACK.
You can cycle through these modes using the MODE button.
Each modes’ respective menu can be accessed by pushing the
MENU button.
While in the menu, the UP and DOWN buttons are used to
navigate and the OK button is used to select and confirm. The
MODE button is used to exit the menu.
In any mode pressing the MENU button twice will display the
SETUP menu which contains all of the general settings for the
KPT-500.
7
8. Set Time & Date
It’s important to have your time and date set correctly as it will
record directly onto your video stream and is critical information
to prove your case to insurance companies etc. To set the time
on your KPT-500 follow the directions below.
a. Ensure you are not currently recording. If the red record
indicator is flashing at the top left of the KPT-500’s
screen, push the OK button to stop recording.
b. Push the MENU button twice, taking you to the SETUP
menu.
c. Using the DOWN button highlight the setting named
Date/Time and push OK.
d. Use the Up and Down buttons to cycle through the
numbers and use the OK button to confirm and move
between fields.
e. Time is set and displayed in a 24 hour format.
f. After setting the date and time the bottom DD/MM/YY
fields are used to change format that the date will be
displayed.
g. Once the date and time have been set, the MENU button
can be used to save and exit back to the SETUP menu.
9. Set Loop Recording
Your KPT-500 has the ability to record in a Loop mode, which
means older blocks of video files will be overwritten once the
memory card becomes full. You can set the amount of video
block time the KPT-500 will record for before a new video file
is started.
To change the length of the videos that the KPT-500 records
follow the directions on the next page:
8
a. Use the MODE button to make sure you are in VIDEO
mode (Video camera icon will be displayed in the top left
corner of the screen).
b. Ensure you are not currently recording. If the red circle
record indicator is flashing at the top left of the KPT-500’s
screen, push the OK button to stop recording.
c. Push the MENU button taking you to the VIDEO menu.
d. Use the DOWN button to highlight the setting named
Loop Recording and push OK.
e. Use the UP and DOWN buttons to highlight the required
video length (The OFF setting will record the longest
possible loops keeping the file size under 2GB, which is
around 7 minutes at 1080P resolution).
f. To confirm selection push the OK button, the KPT-500
will take you back to the VIDEO menu.
10. Set G-Sensor
The G-Sensor monitors any unnatural bumps or shakes and
logs the associated footage as Locked ensuring any footage
of potential crashes is not recorded over with the regular loop
footage.
To set the G-Sensor follow the directions below:
a.Use the MODE button to make sure you are in VIDEO
mode (Video camera icon will be displayed in the top left
corner of the screen).
b.Ensure you are not currently recording. If the red circle
record indicator is flashing at the top left of the KPT-500’s
screen, push the OK button to stop recording.
c.Push the MENU button taking you to the VIDEO menu.
d.Use the DOWN button to highlight the setting named
G-Sensor and push OK.
9
e.Using the UP and DOWN button, highlight the required
sensitivity of the G-Sensor (2G is the most sensitive
setting only requiring small bumps to log footage as
Locked, and 8G is the least sensitive requiring a larger
amount of activity to log footage as Locked).
f.To confirm selection push the OK button, the KPT-500
will take you back to the VIDEO menu.
11. Set Park Mode
Park Mode will monitor for activity using the G-Sensor after
the car is parked, even if your ignition is turned off. If activity is
detected, the KPT-500 will record 60 seconds of footage.
To set park mode on your KPT-500 follow the directions below:
a.Ensure you are not currently recording. If the red record
indicator is flashing at the top left of the KPT-500’s
screen, push the OK button to stop recording.
b.Push the Menu Button twice, taking you to the SETUP
menu.
c.Using the DOWN button highlight the setting named Park
Mode and push OK.
d.Using the UP and DOWN button, highlight the required
sensitivity of the G-Sensor (2G is the most sensitive
setting only requiring small bumps to trigger recording,
and 8G is the least sensitive requiring a larger amount of
activity to trigger recording).
e.To confirm selection push the OK button, the KPT-500
will take you back to the SETUP menu.
12. Set Motion Detection
Motion Detection monitors on screen movement and will start
recording when movement is detected. Motion Detection will
also stop recording after 10 seconds of no on screen movement.
10
To set up Motion Detection on your KPT-500 follow the
directions below:
a. Use the MODE button to make sure you are in VIDEO
mode (Video camera icon will be displayed in the top left
corner of the screen).
b. Ensure you are not currently recording. If the red circle
record indicator is flashing at the top left of the KPT-500’s
screen, push the OK button to stop recording.
c. Push the MENU button taking you to the VIDEO menu.
d. Using the DOWN button Highlight the setting named
Motion Detection and push OK.
e. Use the UP and DOWN buttons to highlight either OFF or
ON.
f. To confirm selection push the OK button, the KPT-500
will take you back to the VIDEO menu.
11
13. Video
This is the default start up screen and is how all recording is
triggered.
From this screen you can manually start and stop recording
using the OK button. Footage can be manually locked by
pressing the MENU button protecting it from being recorded
over.
When the KPT-500 is not recording in this mode, the UP
button can be used to quickly mute and un-mute the on board
microphone.
‘Park Mode’ can be turned on and off with a quick press of the
power button.
‘Day’ and ‘Night’ lighting mods can be toggled with the DOWN
button.
1
2
3
4
7
9
10
11
12
8
13
5
12
1. VIDEO Mode
2. Loop length
3. Motion Detection
4.Exposure
5.Date
6.Time
7. ‘Day’/’Night’ Lighting
6
14
8. G-Sensor Sensitivity
9. Recoding Timer
10.Resolution
11. ‘Park Mode’
12.Microphone
13. Micro SD Card
14.Power
Video Menu
Menu
Resolution
Select Settings
FHD 1080P 1920x1080
1080P 1440x1080
720P 1280x720P
WVGA 848x480
VGA 640x480
Off / 1 Min /
2 Mins / 3 Mins / 5 Mins
/ 10 Mins
Loop Recording’ defines the
length of time the KPT-500
records before creating a new
file. Using the Off setting will
record the longest possible
loops under the file size of 2GB
(around 7 mins at 1080P).
-+2.0, +5/3, +4/3,
+1.0, +2/3, +1/3, +0.0,
-1/3, -2/3, -1.0, -4/3,
-5/3, -2.0
Adjusting the exposure will
counter balance high or low
light conditions. To brighten
your footage, adjust to a
higher exposure. To make your
footage darker change to a
lower exposure. The default
setting for this is balanced
at +0.0.
Off / On
When activated, the Motion
Detection feature allows visible
movement to trigger recording.
Off / On
Turning this setting off mutes
the built in microphone.
Off / On
Date stamps the footage.
Off / 2G / 4G / 8G
Setting to adjust the sensitivity
of the G sensor. 2G is the
highest sensitivity 8G is the
lowest.
Video
Loop recording
Exposure
Compensation
Motion
Detection
Record Audio
Date Stamp
G-Sensor
Remark
Higher resolution gives your
footage more detail but uses
more storage space. Lower
resolution saves storage
space.
13
14. Still
• This screen is used to take still photos.
• In this screen the down button is used to toggle the Day/
Night lighting mode.
1
2
3
5
7
8
6
9
10
4
11
1. STILL Mode
2.Exposure
3. White Balance
4.ISO
5. Anti Shaking
6. Day/Night Mode
7. Photo Number
8.Resolution/MP
9.Quality
10. SD Micro Card
11.Power
Still Menu
Still
Menu
14
Resolution
Select Settings
12M 4032 x 3024
10M 3648 x 2736
8M
3264 x 2448
5M
2592 x 1944
3M
2048 x 1536
2M
1920 x 1080
1.3M 1280 x 960
VGA 640 x 480
Remark
Higher resolution gives your
footage more detail but uses
more storage space. Lower
resolution saves storage
space.
Menu
Sequence
Image Quality
Sharpness
Still
White Balance
ISO
Exposure
Anti-Shake
Quick Review
Date Stamp
Select Settings
Off / On
High quality / Normal / Fine
Strong / Standard / Soft
Remark
The Sequence setting will
set the KPT-500 to take a
sequence of 3 photos every
time the shutter is triggered.
Sets the quality of the image.
Lower quality images are more
space efficient.
Sharpness determines how
bold the camera focus is.
Auto / Daylight
Cloudy / Tungsten /
Fluorescent
White balance gives the option
of 4 pre-set lighting settings
to easily allow you to optimise
your KPT-500 for your lighting.
Auto / 100 / 200
The lower the ISO, the lower
the sensitivity of the image will
be. Higher ISO will capture
more light and reduce motion
blur.
+0.0, -1/3,-2/3, -1.0, -4/3,
-5/3, -2.0, +2.0, +5/3,
+4/3, +1.0, +2/3, +1/3
Adjusting the exposure will
counter balance high or low
light conditions. To brighten
your photos, adjust to a higher
exposure. To make your
photos darker change to a
lower exposure. The default
setting for this is balanced
at +0.0.
Off / On
This feature reduces the
amount of blur caused by
shaking when taking hand held
photos.
Off / 2 secs / 5 secs
Quick Review sets the amount
of time a photo will display on
the screen after being taken.
Off / On
Date stamps the footage.
15
15. Playback
In this screen the UP and DOWN buttons are used to navigate your
videos and photos, and the OK button is used to play and pause
selected videos.
1
2
5
6
7
4
1. PLAYBACK Mode
2. Video/Photo Name
3.Resolution
4. Recording Date/Time
3
5. Current Date
6. Current Time
7.Power
Playback Menu
Play Back
Menu
Delete
Protection
16
Select Settings
Remark
Delete Current / Delete All
Allows you to delete either the
selected or all photos and video
stored on the inserted Micro
SD Card.
Lock Current / Unlock
Current / All Lock /
Unlock All
Allows you to lock or unlock the
selected, or all videos and photos
stored on the inserted Micro
SD Card.
16. Set Up Menu
Menu
Remark
Off / 2G / 4G / 8G
When activated, this feature uses
the built in battery and G Sensor
to monitor any activity after you
have parked your car. When
triggered Parking Mode will record
10 seconds of footage.
Date/Time
*Set Time and Date*
Using the UP DOWN and OK
button enter the date and time
(24Hr clock) to stamp onto your
footage. Once you have finished
use the MENU button to save and
return to the Settings menu.
Automatic
Power Off
Off / 1 min / 3 mins
Sets the amount of time of
inactivity before the KPT-500
powers down.
Screen Saver
Off / 3 mins / 5 mins /
10 mins
Screen Saver determines the
amount of time before the screen
powers down (even when the
screen powers down in screen
saver mode the KPT-500 will keep
recording).
Beep Sound
Park Mode
Settings
Select Settings
Off / On
Mute control for key beeps.
Language
*Select Language*
Select Menu language.
TV Mode
NTSC / PAL
Changes the output format to
either PAL or NTSC.
Optical
Frequency
50Hz / 60Hz
Screen Hz setting
On/Off
Control for the infrared LEDs on
the front of the camera.
Format
Cancel / OK
Format the inserted Micro SD
Card, deleting all photos, videos
and data.
Default Setting
Cancel / Ok
Restore factory settings.
Ok
Displays the installed firmware
version.
Flash
Version
17
17.Product Specification
Screen
2.7"
Lens
120°
Imaging Sensor
3.0MP
Camera Rotation
180°
Minimum Light
1 Lux
Video Resolution
FHD 1080P / HD 1080P / HD 720P / 480P
Video Format
.AVI
Frames
30 Fps
Image Resolution
12M / 10M / 8M / 5M / 2M / 1.3M / VGA
Photo Format
.JPG
Motion Detection
Supported
Cycle Recording
Off / 1min / 2min / 3min / 5min / 10min
Memory Card Type
Micro SD Card (up to 32GB)
Capacity
Support up to 32GB / class 4 upward
USB Port
USB 2.0
Power Port
USB 5V / 1000mAh
Frequency
50Hz / 60Hz
Battery Capacity
300mAh
Microphone/Speaker
Built-In
Languages
English / French / Spanish / Deutsch / Italian / Traditional
Chinese / Simplified Chinese / Japanese
Please Note: W
e do our best to reflect accurate specifications, however periodic
updates and changes may occur after this manual was printed. We
reserve the right to change the parameters without prior notification.
18
Warranty Terms & Conditions
Our goods come with guarantees that cannot be excluded under the Australian
Consumer Law. You are entitled to a replacement or refund for a major failure and for
compensation for any other reasonably foreseeable loss or damage. You are also entitled
to have the goods repaired or replaced if the goods fail to be of acceptable quality and
the failure does not amount to a major failure.
This warranty is provided in addition to your rights under the Australian Consumer Law.
Directed Electronics warrants that this product is free from defects in material and
workmanship for a period of 12 months from the date of purchase or for the period
stated on the packaging. This warranty is only valid where you have used the product in
accordance with any recommendations or instructions provided by Directed Electronics.
This warranty excludes defects resulting from alterations of the product, accident,
misuse, abuse or neglect.
In order to claim the warranty, you must return the product to the retailer from which it
was purchased or if that retailer is part of a National network, a store within that chain,
along with satisfactory proof of purchase. The retailer will then return the goods to
Directed Electronics. Directed Electronics will repair, replace or refurbish the product
at its discretion. The retailer will contact you when the product is ready for collection.
All costs involved in claiming this warranty, including the cost of the retailer sending the
product to Directed Electronics, will be borne by you.
Directed Electronics Address: 44 Translink Drive, Keilor Park Victoria 3042
Ph: +61 03 8331 4800
Email: [email protected]
19
© Parkmate 2015
www.kapturecam.com.au
www.kapturecam.co.nz