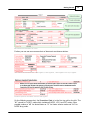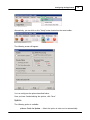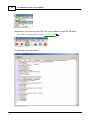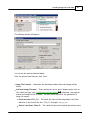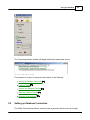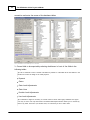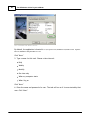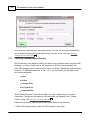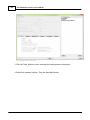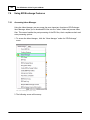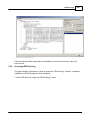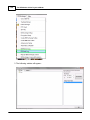
1
HIPAA Claim Payment
Master Manual
Copyright Martin Scholl Consulting, Inc.
I
The HIPAAsuite Claim Payment Master
Table of Contents
Foreword
0
Part I Introduction
1
1 About HIPAA
...................................................................................................................................
Claim Payment Master
1
Part II Getting Started
4
1 Starting...................................................................................................................................
the Application
4
2 Processing
...................................................................................................................................
a Payment Advice File
5
3 Opening
...................................................................................................................................
a Folder Containing EDI Files
9
4 Explaining
...................................................................................................................................
HIPAA Claims
12
5 Requesting
...................................................................................................................................
a Trial Extension
15
Part III Configuring the Application
18
1 Configuring
...................................................................................................................................
Program Options
18
2 Selecting
...................................................................................................................................
a Code Set
21
3 Accessing
...................................................................................................................................
Logs
25
4 Using ...................................................................................................................................
the EDI Editor
27
5 Using ...................................................................................................................................
Command Line Arguments (CLI)
30
6 Running
...................................................................................................................................
the Application via Scheduler
32
7 Troubleshooting
...................................................................................................................................
Badly Formatted EDI File
38
Part IV Creating Image Files and PDFs
38
1 Creating
...................................................................................................................................
Image Files from EDI
38
2 Doing ...................................................................................................................................
Image Setup
40
3 Adjusting
...................................................................................................................................
Image Options
42
4 Configuring
...................................................................................................................................
Image Index
44
5 Creating
...................................................................................................................................
the Image Index Table
49
Part V Using the Database
53
1 Exporting
...................................................................................................................................
the Data
53
2 Setting
...................................................................................................................................
up Database Connection
55
3 Creating
...................................................................................................................................
Tables
62
4 Viewing
...................................................................................................................................
the Database Schema
70
5 Selecting
...................................................................................................................................
Fields to Export
71
6 Browsing
...................................................................................................................................
Exported Data
76
7 De-Identifying
...................................................................................................................................
Data
78
Part VI Autoprocessing
83
© 2012
Contents
II
1 Running
...................................................................................................................................
the Application from the Command Line
83
2 Processing
...................................................................................................................................
with the EDI Exchange Module
84
3 Working
...................................................................................................................................
with the Database
86
4 Changing
...................................................................................................................................
the Default Company
87
5 Running
...................................................................................................................................
the Application via Scheduler
88
Part VII EDI Exchange
91
1 Getting
...................................................................................................................................
Started
91
About EDI Exchange
.......................................................................................................................................................... 91
Requesting EDI
..........................................................................................................................................................
Exchange License
94
Registering EDI
..........................................................................................................................................................
Exchange
96
2 Configuring
...................................................................................................................................
EDI Exchange (Obligatory Settings)
98
1 Setting up Database
..........................................................................................................................................................
Connection
98
2 Creating Database
..........................................................................................................................................................
Tables
98
2b Creating 999
..........................................................................................................................................................
File Tables
104
3 Defining Auto-Processing
..........................................................................................................................................................
Options
110
4 Defining Com
..........................................................................................................................................................
m unications Directory
112
5 Initializing EDI
..........................................................................................................................................................
Exchange
114
3 Configuring
...................................................................................................................................
EDI Exchange (Optional Settings)
120
Setting up Em
..........................................................................................................................................................
ail Notifications
120
Setting up Incom
..........................................................................................................................................................
ing and Outgoing Files Options
126
Running the ..........................................................................................................................................................
Application via Scheduler
128
Using the Com
..........................................................................................................................................................
m and Line Argum ents (CLI)
130
4 Working
...................................................................................................................................
with Trading Partners
130
Setting up Trading
..........................................................................................................................................................
Partners
130
Using Built-in..........................................................................................................................................................
FTP Client
144
Creating a Trading
..........................................................................................................................................................
Partner Autom atically
149
Certificate based
..........................................................................................................................................................
authentication in SFTP
150
5 Using...................................................................................................................................
Encryption
153
About Encrytion
.......................................................................................................................................................... 153
Setting up Encryption
.......................................................................................................................................................... 153
Using PGP Desktop
.......................................................................................................................................................... 157
Using GnuPG.......................................................................................................................................................... 158
6 Using...................................................................................................................................
EDI Exchange Features
160
Accessing Inbox
..........................................................................................................................................................
Manager
160
Checking EDI..........................................................................................................................................................
Files
161
Dow nloading..........................................................................................................................................................
EDI Files From FTP Server
163
Processing EDI
..........................................................................................................................................................
Files
165
Accessing EDI
..........................................................................................................................................................
Receive Log
166
Accessing EDI
..........................................................................................................................................................
Send Log
169
Listing SEF Files
.......................................................................................................................................................... 171
Part VIII Creating 835 EDI Files
172
1 Setting
...................................................................................................................................
up Company
172
2 Creating
...................................................................................................................................
Company Setup Table
176
3 Creating
...................................................................................................................................
834 EDI Files from the Attached Database
178
Part IX Bug Reporting and Program Update
180
© 2012
II
III
The HIPAAsuite Claim Payment Master
1 Reporting
...................................................................................................................................
an Issue
180
2 Updating
...................................................................................................................................
the Program
183
Index
0
© 2012
Introduction
1
Introduction
1.1
About HIPAA Claim Payment Master
1
Electronic Data Interchange (EDI) plays an ever increasing role in the exchange of
information between healthcare providers and healthcare payers and/or clearing houses.
Most people don't know EDI when asked about it, but have an intuitive understanding
when told that EDI makes ATM transactions possible. When you swipe your bank card at
any ATM in the world, an EDI transaction is created in the ATM machine and sent through
a network to your bank. Your bank in turn takes the ATM transaction and sends back a
response EDI transaction releasing the funds to you. The banking system in the world has
been working on EDI for a much longer time then the healthcare industry but we will see
in our lifetime that healthcare transactions will be similarly smooth, fast and reliable.
HIPAAsuite has software applications for all 12 HIPAA mandated transactions. The HIPAA
Claim Payment Master is designed to display, print and save the data of EDI X12 files
that are likely to come from a payer back to the provider such as the 835 Electronic
Remittance report. EDI is a very non-intuitive format and designed around computer
efficiency and not human readability. Below is an example of an EDI file; you can
recognize only few words in this garble. The HIPAA Claim Payment Master takes the
cryptic EDI files, parses out the information, translates the codes back to English and
allows one to print and display the information, so that it can be viewed, understood,
interpreted and entered into an accounting system. The software can also export the
payment information contained in 835 Remittance Advice files into any ODBC aware
database such as Microsoft SQL Server, Microsoft Access, MySQL, Oracle and so on. This
way the information is searchable and it will be easy to write programs to import the
data into existing systems.
EDI is increasingly adopted in the health care industry and mandated by the HIPAA act of
1996. EDI is ideal to exchange information between computers but it is inherently hard to
read for humans. Many complex properties are represented as two-letter abbreviations.
© 2012
2
The HIPAAsuite Claim Payment Master
The beginning of an 835 EDI file
The above is an example of an 835 file. One can easily see bits of information but a lot
of it is translated into codes that are not intelligible. Most often EDI files have no
carriage returns so that the information looks even more confusing.
© 2012
Introduction
3
The display of the Remittance advice for a single claim
Here you can see that the information resembles the paper EOB's or EOP's that were
traditionally sent by mail. The HIPAA Claim Payment Master translates the code sets and
orders the information so that you can see exactly what payments were made and which
deductions taken.
Summary information is displayed upfront, and each claim listed with the adjudication
information and service line information structured with all the details found in the EDI
file. Read more in Identifying the Information 12 .
© 2012
4
The HIPAAsuite Claim Payment Master
2
Getting Started
2.1
Starting the Application
Once the HIPAA Claim Payment Master is installed, you can launch it from the "Start"
menu:
Start Programs (All Programs) HIPAASuite HIPAA Claim Payment Master.
The HIPAA Claim Payment M aster is launched from the "Start" menu
The following screen will appear:
© 2012
Getting Started
5
The HIPAA Claim Payment M aster main window
Tip: If the left pane is not displayed, then select View
Info Bar to show it.
Once the main program window is opened, the normal operation now would be to open
an EDI file. See:
Processing a Payment Advice File
5
Opening a Folder Containing EDI Files
2.2
9
Processing a Payment Advice File
Follow the instructions below to open a single EDI file and display its details on screen in
© 2012
6
The HIPAAsuite Claim Payment Master
easy-to-read table format.
1. Go to File Open in the main menu.
The "Open" menu
Alternatively, click on the "Open Document" icon shortcut located on the program
toolbar.
The "Open Document" button
2. Browse through the folders and select a file with .edi extension. Click "Open."
Note: Only claim files in "ANSI 835" format can be opened via the Claim Payment M aster. The program
will display an error message if you select a file in a different format.
Reference: ANSI 835 is the American National Standards Institutes Health Care Claims Payment and
Remittances Advice Format.
© 2012
Getting Started
7
The "Choose EDI File" window
3. Make sure the program tool bar is displayed in the left area. To display the left
program bar with options, select View Info Bar.
4. Select one of the following modes in the "Output Mode" box. The Output mode defines
the destination where the result file will be sent to.
Printer — Select this option to print the opened EDI file.
Screen — This is a default mode. select this option to display the EDI file on screen
in a preview window.
Image File — Select this mode to create TIFF or PDF file. You should have the
settings configured to print the file to image. Read more in Creating Image Files
from EDI 38 .
© 2012
8
The HIPAAsuite Claim Payment Master
The "Output M ode" options
5. Click on the "Run" button.
The "Run" buttons
6. When you click on the "Run" button, the file will be parsed and the information
displayed. The HIPAA Claim Payment Master recognizes the type of the EDI transaction
and displays Payment Advice and Claim Status information separately. The following
pertains to the X12 835 Electronic Payment Advice.
As in our example the output mode is "Screen," the claim is displayed in a separate
window.
© 2012
Getting Started
9
The display of an 835 Payment Advice
2.3
Opening a Folder Containing EDI Files
The "Open Directory" function works only when the output mode is not "Screen" but "Data
Export" or "Image File".
Follow the instructions below to open a batch of EDI files located in one folder.
© 2012
10
The HIPAAsuite Claim Payment Master
1. Make sure the "Printer" or "Image File" mode is selected in the "Output Mode" box. The
Output mode defines the destination where the result file will be sent to.
Note: You cannot display a batch of EDI files on screen in a preview window, it is possible only for one
file. See Processing a Payment Advice File 5 .
The "Output M ode" options
Note: If you select the "Image File" format for the first time, you need to define the image options.
See Doing Image Setup 40 .
2. Go to File Open Directory in the main menu.
The "Open Directory" menu
3. Browse for the folder containing EDI files. Click on that folder and then click "OK."
Note: Only claim files in "ANSI 835" format can be opened via the Claim Payment M aster. The program
will display an error message if you select a file in a different format.
Reference: ANSI 835 is the American National Standards Institutes Health Care Claims Payment and
Remittances Advice Format.
© 2012
Getting Started
11
The "Browse for Folder" popup
4. Click on the "Run" button to send all files from the folder to the destination.
Note: The pre-defined settings will be applied. To print the files to image, configure the settings. See
also: Configuring Program Options 18 , Doing Image Setup 40 .
The "Run" buttons
5. The displayed "Processing Results" popup will report about operation results.
© 2012
12
2.4
The HIPAAsuite Claim Payment Master
Explaining HIPAA Claims
The HIPAA Claim Payment Master enables you to understand electronic remittance
advices by translating HIPAA code sets into meaningful words. The HIPAA Claim Payment
Master translates the code sets and orders the information so that you can see exactly
what payments were made and which deductions taken.
The top part of the form contains:
The sender and receiver of the transaction, that is the payer who paid the claim.
The sender and receiver information of the 835 transaction located at the top
Further, you can find the following data:
Patient information
Provider information
The claim level information
The claim line adjudication
Service line information
Summary information is displayed upfront, and each claim listed with the adjudication
information and service line information structured with all the details found in the EDI
file.
© 2012
Getting Started
13
835 transaction information structure
Further you can see more screen-shots of electronic remittance advices.
The claim level information with 1 REF segment, 3 DTP segments, 1 AM T segment and 1 QTY segment
M edicare Inpatient information from the M IA segment
On the following screen-shot, the Procedure Code is in the first top cell on the left. The
"HC" stands for "HCPCS" codes which includes all HCPCS, ICD-9 and CPT codes. Other
possible codes are "AD" for dental claims or "IV" for Home infusion codes and "N4" for
NCPDP drug codes.
© 2012
14
The HIPAAsuite Claim Payment Master
Adjustment Codes are translated into their descriptions, making it easy to understand
the reasons behind any adjustments.
The line level information for a claim with 3 lines
Summary information contained in TS3 and TS2 segments can extend over multiple
claims. The HIPAA Claim Payment Master will begin a summary range with a bracket and
then show the summary information before listing the claims.
Beginning of the summary information block
Summary information is started with a bracket. At the end of a summary range is
another bracket.
© 2012
Getting Started
15
End of Summary information block
2.5
Requesting a Trial Extension
Once your trial period has expired the application will stop working. If you need to
continue your trial of the product, then you will need to send your request to the support
team. Follow the instructions below.
1. Launch the application.
2. Click on the "Ask for trial Extension" link on the displayed window.
© 2012
16
The HIPAAsuite Claim Payment Master
The "Ask for trial extension" link
3. Clicking on the "Ask for trial Extension" link will create an email to HIPAAsuite with the
registration number so they can then create the extension key. For example, this will
open Outlook with the following data inserted:
To: [email protected]
Subject: [HIPAA Claim Payment Master][123456789]: Request for trial extension
key
Message: Volume ID: 123456789
The trial extension request email
4. The response from the support team should includes an activation key.
5. Once you have the activation key, click "Register" on the program welcome window.
© 2012
Getting Started
The "Register" button
6. Paste the activation key into the field on the Registration Form and then click
"Register."
The "Registration Form" window with entered license key and highlighted "Register" button
7. The success message will appear in the "Result" border.
© 2012
17
18
The HIPAAsuite Claim Payment Master
The license activation result
Click "Close."
8. Once the license key has been entered, click "Try" on the welcome window to continue
using the program for another 15 days.
The "Try" button
3
Configuring the Application
3.1
Configuring Program Options
To configure the program options, select Setup Options in the main menu.
© 2012
Configuring the Application
The "Options" menu
Alternatively, you can click on the "Setup" button located on the main toolbar.
The "Setup" button
The following screen will appear.
The "Options" window
You can configure the options described below.
Once you have finished editing the options, click "Save."
Update
The following option is available:
Never Check for Update — Select this option in order not to automatically
© 2012
19
20
The HIPAAsuite Claim Payment Master
connect to HIPAAsuite.com server and check for program updates.
Log All File Processing
The HIPAA Claim Payment Master has the ability to keep a log of EDI file processing. The
log writing is mandatory in the program. See Log 25 .
The following option is available:
Log All Processing Except Viewing — Manual operations other than viewing on
screen will be logged.
Display Option
The following option is available:
One Page per Claim — Select this option to put the image of a single claim on
one page or a single image file. In the following image, you can see the second
claim of a payment. The header information is repeated on each page. If this
option is selected, then you can specify the rule for giving the names to your
image files (see Doing Image Setup 40 , "Individual Image Filename" options).
One Claim after Another - Select this option to list the claims one after the
other. In the following image, you can see that one claim is displayed after the
other.
"The One Page per Claim" mode
"The One Claim after Another" mode
© 2012
Configuring the Application
21
Document Color
You have the choice to render the form in red or in black. The following options may be
defined:
Note: The data is always black.
On Screen - Choose a color for the form when displaying claims on screen.
On Paper - Choose a color for the form when printing claims.
On Images - Choose a color for the form when saving claims to image files.
Processed Files
Since the HIPAA Claim Payment Master program can be launched by the Window's
scheduler (see Running the Application via Scheduler 32 ), it is important to either move
or delete processed files, so that they will not be picked up again. You have the choice to
either do nothing, move the processed files to a specific folder or delete the files:
Leave in Place - Select this option to do nothing with processed files.
Note: Not recommended.
Move - Select this option to move the processed files to a specified folder.
Delete - Select this option to delete the processed files.
Outbox Directory Path
Specify the place where the result files (images, PDFs) will be located.
3.2
Selecting a Code Set
EDI relies on transaction code sets. A transaction code is a basic EDI message type. The
HIPAA Claim Payment Master translates HIPAA code sets into meaningful words (a
corresponding longer explanation or description). For example, facility code "25" means a
Birthing Center, gender code "M" means Male.
At the onset of EDI one of the main design ideas was to make the EDI files as short as
possible and to allow different languages to use the same descriptions by reducing long
verbose explanations to 2-3 byte long codes. Computer storage was incredibly expensive
and making any file larger than it absolutely had to was considered wasteful.
The code sets are stored in the file
Windows XP:
© 2012
codesets.xml
in the
Configuration
subdirectory:
C:\Documents and Settings\All Users\Application Data\HIPAAsuite\HIPAA
22
The HIPAAsuite Claim Payment Master
Claim Payment Master\Configuration\
Windows 7, Vista:
C:\ProgramData\HIPAAsuite\HIPAA Claim Payment Master\Configuration\
The Configuration folder in Windows XP
Tip: The folder is hidden.
To view/edit transaction code sets in HIPAA Claim Payment Master, follow the
instructions below.
1. Go to the "Code Sets" item in the main menu.
The "Code Sets" menu
2. From the sub-menu, select a code set name. The following menu items are available
via the "Code Sets" menu:
© 2012
Configuring the Application
A to E
AdjustmentReason
AdjustmentReasonCode
AdjustmentReasonGroup
AmountQualifier
ClaimStatusCategoryCode
ClaimStatusCode
CommCode
DateQualifier
EntityCode
F to P
FacilityTypes
Filing
Frequency
GenderCode
ID
PaymentMethod
PlaceOfService
Q to Z
Quantity Qualifier
RDMCode
REFCode
RemarkCodes
ServiceID
Status
TransType
© 2012
23
24
The HIPAAsuite Claim Payment Master
The following screen-shot illustrates how to select the "PaymentMethod" code set for
display.
The "PaymentM ethod" sub-menu
3. The Code Set configuration window will be displayed. Double-click the field to edit it
and type in the new value.
Below you can see such window for PaymentMethod.
The window provides the following information:
Number of records in codeset — The total number of codes. For example, for
PaymentMethod it is equal to 5.
Codes and their corresponding descriptions. The codes are indicated in the source EDI
files. The descriptions are displayed instead of codes in the result easy-to-read files.
For example, for PaymentMethod there are the following codes and corresponding
descriptions:
ACH — Automated Clearing House
BOP — Financial Institution Option
CHK — Check
FWT — Federal Reserve Funds
NON — Non Payment Data
© 2012
Configuring the Application
25
The "PaymentM ethod" code set configuration window
4. Click on the "Save" button to save the changes.
The "Save" button
3.3
Accessing Logs
The HIPAA Claim Payment Master can log its activities. This is especially helpful when
running the program automatically through the scheduler (see Running the Application via
Scheduler 32 ).
Notice: To start logging the activity, activate the "Log All Processing Except Viewing" option. See
Configuring Program Options 18 .
In case of any problem, the first thing is checking the log, where all actions and all error
messages related to an EDI file are written down and saved.
Follow the instructions below to access the log files for your HIPAA Claim Payment
Master.
© 2012
26
The HIPAAsuite Claim Payment Master
Click View Log in the main menu.
The "Log" menu
Log files are simple text files, one for each day that are stored in date hashed folders.
Alternatively, access the Logs folder in the following directory:
Windows XP:
C:\Documents and Settings\All Users\Application Data\HIPAAsuite\HIPAA
Claim Payment Master\Logs
Windows 7, Vista:
C:\ProgramData\HIPAAsuite\HIPAA Claim Payment Master\Logs
The Logs folder in Windows XP
Tip: The folder is hidden by default.
Tip: The ProgramData folder contains all your application data, like program settings, user data, etc,
for all of the installed programs on the computer. The ProgramData folder holds the same files that
were contained in the \Documents and Settings\All Users and \Documents and Settings
\All Users\Application Data folders in XP.
© 2012
Configuring the Application
27
Within the directory, find a folder for the year you are looking log for. Then find a subfolder for the necessary month with files for each day. Double-click a file which has the
name equal to the necessary date. The log will look like this:
The transaction log for a specific day
3.4
Using the EDI Editor
EDI files are often hard to read, especially if they have no carriage returns and line feeds
to put each segment on a line of its own.
The EDI Editor available in the HIPAA Claim Payment Master replaces all Element
separators with a star "*", all sub element separators with a colon ":" and all segment
separators with a tilde "~" even if the original file uses different delimiters.
To Open EDI Editor
To access the EDI Editor, select the "EDI Editor" option under "View" menu item.
© 2012
28
The HIPAAsuite Claim Payment Master
The "EDI Editor" menu
Alternatively, you can click on the "EDI" icon on the toolbar to invoke the EDI Editor.
This option is only enabled when you have opened an EDI file
5
.
The "EDI Editor" button
The following screen will appear:
The EDI Editor window
© 2012
Configuring the Application
29
To Cut, Copy, Paste
When you right-click anywhere in the text, a context menu will appear with typical test
edit options such as cut, copy and paste.
Context menu
To Find and Replace
The "Find" and "Replace" utilities work as in a common text editor. To use them, rightclick somewhere in the document and then from the displayed context menu select the
"Find" or "Replace" command. Alternatively, you can press Ctrl F simultaneously on your
keyboard to bring the text search utility.
The "Find" pop-up
Pressing Ctrl H simultaneously will bring up the Replace utility.
© 2012
30
The HIPAAsuite Claim Payment Master
The "Replace" popup
To Save the Changes
As long as you don't save, there will be no changes to the file.
If you make changes to the file, the "Save" button becomes enabled and you can save any
changes. The HIPAA Claim Master will further work with those changed files, so you don't
have to open the file again.
Notice: Changing EDI files can be a tricky undertaking. You should be experienced in the format of the
835 and understand that an 835 claim file could be a legal document that should not be altered
without the consent of the originator.
The "Save" button
3.5
Using Command Line Arguments (CLI)
In order to run the HIPAA Claim Payment Master from the command line or have it
invoked through another program, it is necessary to pass command line arguments to the
program to instruct it to perform the desired tasks.
Command line arguments are separated by commas.
1. The first command line argument is the filename or the directory path. The program
will automatically decide if this argument denotes a directory or a single file.
2. The second argument is concerned with data export to another database. If the
argument is "Y", then the data will be exported according to the settings.
3. The third argument decides whether image file will be created. A "Y" will cause the
program to create image files.
© 2012
Configuring the Application
31
4. The fourth argument will send the images to the printer.
5. The fifth argument can contain the printer name, if a printer other than the default
printer is specified. It is important to use exactly the same name as it is listed in
Windows under printers.
Example
A typical command line would be for example:
"C:\Program Files\HIPAAsuite\HIPAA Claim Payment Master\HIPAAClaimPaymentMaster.exe"
C:\EDI\Inbox\835,Y,,Y,Lexmark X500 Series
1. In Quotes you can see the path to the executable. The quotes are necessary in
Windows whenever you have a file name with a blank space in it, such as "Program
Files".
Tip: Sometimes you need quotes for the file name, so it is easiest to change directory to C:\Program
Files\HIPAAsuite\HIPAA Claim Payment Master and then call the executable.
2. The first command line argument is the path to a directory. Alternatively you could
have the path to a specific file. The program will see if the argument pertains to a file
or a directory.
3. The second argument is a "Y", indicating that the data will be exported.
4. The third argument is blank. It would instruct the program to create image files in
accordance to the setup. See Doing Image Setup 40 .
5. The forth argument is a "Y". This instructs the program to print the images of the
payments.
6. The fifth argument is the name of the printer to which the output is to be directed.
Using Command Prompt
Follow the instructions below to use the command-line arguments in Windows Command
Prompt.
1. Start a Windows Command Prompt. Go to Start Programs Accessories Command
Prompt.
Alternatively, you can go to Start Run type "cmd" without quotes and press <Enter>.
2. Type your command and click Enter.
© 2012
32
The HIPAAsuite Claim Payment Master
The Windows Command Prompt screen
The command returns a system code which is not displayed to the users:
-1
0
means error
means everything went okay
So, testing the command line requires that you check the log
a message like following:
25
. In the log, you may see
Processing of 'C:\EDI\Inbox\835' started at 3/12/2012 9:21:11 AM
Printer is not found in system
Processing stopped at 3/12/2012 9:21:11 AM
So, the log will help you to debug the command line.
3.6
Running the Application via Scheduler
The HIPAA Claim Payment Master can be automated through a scheduler. A scheduler is
software that can be programmed to execute a certain task at a certain time
repeatedly. Windows has such a scheduler built in.
The Windows scheduler can be used to let the HIPAA Claim Payment Master execute in
regular intervals without user intervention. Usually one would let the HIPAA Claim
Payment Master scan a directory and then print, create image files or export the data
and remove the files to prevent duplicate processing.
1. If the task scheduler is installed on your system, you will find it in the "Control Panel".
To open Scheduled Tasks, click Start Control Panel Scheduled Task s .
Note: In different Windows versions, the way to access the Task Scheduler can differ. Consult your
Windows version documentation.
© 2012
Configuring the Application
33
The Windows Task Scheduler
2. Click on "Add Scheduled Task" and the "Scheduled Task Wizard" will guide you through
the setup process.
3. In the first window, read the welcome message and click "Next."
The "Scheduled Task Wizard" window
4. Browse to the
© 2012
HIPAAClaimPaymentMaster.exe
executable file.
34
The HIPAAsuite Claim Payment Master
The "Scheduled Task Wizard" window
By default, the application is located in
C:\Program Files\HIPAAsuite\HIPAA Claim Payment
Master\HIPAAClaimPaymentMaster.exe
Selecting a program to schedule
Click "Next."
5. Type a name for this task. Choose a time interval:
Daily
© 2012
Configuring the Application
35
Weekly
Monthly
One time only
When my computer starts
When I log on
Click "Next."
The "Scheduled Task Wizard" window
6. Enter the name and password of a user. The task will run as if it were started by that
user. Click "Next."
© 2012
36
The HIPAAsuite Claim Payment Master
The "Scheduled Task Wizard" window
7. In the last screen, make sure you have specified all data correctly. Click "Finish" to
save your task.
The "Scheduled Task Wizard" window
8. The scheduled task has been added to the system. Now lets edit the new task and add
the desired command line arguments with the appropriate options. Double-click the newly
created task in the "Scheduled Tasks" window.
© 2012
Configuring the Application
37
The Windows Task Scheduler
9. Enter parameters to the "Run" field after the application path and click "OK." Refer to
Command Line Arguments 30 for more information.
Example:
"C:\Program Files\HIPAAsuite\HIPAA Claim Payment Master\HIPAAClaimPaymentMaster.exe"
C:\EDI\Inbox,Y,,Y
The "HIPAAClaimPaymentM aster" task window
You can see, the path to the executable is in quotes and then the arguments follow. In
this example, the directory C:\EDI\Inbox will be processed. The first "Y" indicates that
the data will be exported. The second "Y" in 4th position indicates that the images will be
printed.
© 2012
38
The HIPAAsuite Claim Payment Master
Tip: Logs may be helpful when running the program automatically through the scheduler. See Log
3.7
25 .
Troubleshooting Badly Formatted EDI File
After clicking on the "Process" button, you see a message with the following error
message:
This is most likely caused by a badly formatted EDI file. Processing will stop.
There are a few reasons why this can happen:
1. The file is not an EDI file. You can open the file in Notepad and check if it starts with
"ISA". When the first 3 characters are not ISA, then it is not an EDI file.
2. The file could still be encrypted.
3. The file is an EDI file, but has extra blocking characters in it. You can instruct the
HIPAA Claim Payment Master to remove them. See Configuring Program Options 18 .
4
Creating Image Files and PDFs
4.1
Creating Image Files from EDI
The HIPAA Claim Payment Master displays the EDI document in a page that makes it easy
to read the 835 transactions. You can create image files containing the data that you see
in Screen mode. The following formats are supported:
TIFF
PDF
You can create image files manually or automatically using the command line arguments
and Windows Scheduler. Read more in:
Running the Application via Scheduler
Using Command Line Arguments (CLI)
32
30
Before creating image files, make sure all settings are defined correctly. Read more in:
Doing Image Setup
40
Adjusting Image Options
42
Configuring Image Index
44
Creating the Image Index Table
49
© 2012
Creating Image Files and PDFs
39
Follow the instructions below to create an image file from EDI file.
Notice: The image file will be created based on the pre-defined settings. Read more in Doing Image
Setup 40 , Adjusting Image Options 42 , Configuring Image Index 44 .
1. Open an EDI file or directory containing the EDI files in the HIPAA Claim Payment
Master. Read more in Processing a Payment Advice File 5 , Opening a Folder
Containing EDI Files 9 .
The "Open document" button
The "Open Directory" menu
2. Select the "Image File" option in the "Output Mode" block.
The "Image File" option
3. Click on the "Run" button.
© 2012
40
The HIPAAsuite Claim Payment Master
The "Run" buttons
4. The "Processing Results" window displays the report. You can find the resulting TIFF or
PDF files in the specified folder.
The "Processing Results" window
4.2
Doing Image Setup
Before proceeding with image export, do the image setup as described below.
Select Image Image Setup in the main menu to access the "Image Setup" window.
© 2012
Creating Image Files and PDFs
41
The "Image Setup" menu
The following window will appear:
The "Image Setup" window
You can set the options described below.
Once the options have been set, click "Save."
Image File Location — Determine the destination folder where the images will be
stored.
Individual Image Filename — These settings are active only if display option is set to
"One Claim per Page" (see Configuring Program Options 18 ). Otherwise, the program
creates one image file for all claims. You have three choices for the generation of
image file names:
Claim Identifier (CLP_01) — The result file name will be comprised of the Claim
Identifier in the format like this: "CLP_01." Example:
835I1_4.pdf .
Patient Last Name *Claim ID — The result file name will combine the patient name
© 2012
42
The HIPAAsuite Claim Payment Master
with Claim ID. Example:
SMITH_985019.pdf .
Bill Provider ID * Claim ID — The result file name will combine the billing provider's
ID with Claim ID.
Image Format — Choose whether to create PDF or TIFF files.
Color on Images
You can select red or black color.
Image Folder Options — When you create a lot of images, it is important not to place
them all in the same folder. Microsoft Windows has issues handling more than 1000 files
in a folder. That is the reason why the HIPAA Claim Payment Master can hash the
image files over many sub-folder. You have the following choice to use:
None — Default value.
Sub-folders for Year-Month and Day — The sub-folders will be created within the
Image File Location. Example:
\2012\February\29\ .
The folder structure in "Year, M onth and Day" mode
Sub-folders for Year and Week — The sub-folders will be created within the Image
File Location. Example:
2012\9\ .
Sub-folders for Year and Day — The sub-folders will be created within the Image
File Location. Example:
4.3
2012\20120229\ .
Adjusting Image Options
The size of image files is largely determined by the image quality. The better the quality,
the more information is stored in the image file. You can define the quality of the image
and the image size in the "Image Options."
Select Image Image File Options in the main menu to access the "Image Options"
window.
© 2012
Creating Image Files and PDFs
43
The "Image File Options" menu
You can define the image options described below.
Once the options have been set, click "Save."
Options for TIFF
Color Depth — You can change color depth of the image (black / white, 4 bpp /
8bpp / 24bpp / 32bpp).
Note: TIFF in Window's GDI library does not work with 16 bpp (bits per pixel). Color depths set lower
then 16 bpp results in some losses in image quality.
Reference: The black-and-white (bi-level) image means that for each pixel (picture element) in the
image we do not need three bytes as in the true color image (over 16.7 million colours), but only one
bit that is 1/24 part of the pixel size from the true colour image. The one-bit pixel can express only
black or white colors, nothing more.
Compression Algorithm — You can use compression with TIFF files: LZW and
Packbits are used for all Colors, CCITT4 for black-and-white.
Photometric Interpretation — For the black-and-white and grayscale images (when
"Black/White" or "4 bpp" options are selected as color depth), you can specify the
intended interpretation of the image pixel data. Select one of the following options:
White is Zero — The minimum sample value is displayed as white.
Black is Zero — Default value. The minimum sample value is displayed as black.
Image Resolution — You can change horizontal and vertical resolution of images
from 96 to 300 dpi (dots per inch). Default resolution is 200 dpi.
Note: Theoretically we could use even higher resolutions, but it will slow down processing significantly
result in approximately the same result in quality.
Options for PDF
Use Content Compression — Checking this option does result in considerably smaller
© 2012
44
The HIPAAsuite Claim Payment Master
files.
The "Image Options" window
4.4
Configuring Image Index
Document Management Systems with image libraries often require some basic
information together with the file path to the image. The HIPAA Claim Payment Master
can create such an index through ODBC into any database, independent of the database
used for file downloads.
Select Image Image Index File Options in the main menu to access the "Image Index
Configuration" window.
The "Image Index File Options" menu
You can define which fields to include and configure your database settings. Here are all
options:
Create Image Index
Check this option to create the image index. Select one of the following options to
specify the format:
© 2012
Creating Image Files and PDFs
45
ASCII Text File — The image Index File is an ASCII text file that can be created
together with claim images. It will contain tab-delimited fields and have one line
per claim.
In the "Text File with Image Files Path" field specify the output directory for image
index. Click "Browse" to select the destination place.
Note: The image index ASCII file currently works only when you save individual images for each claim.
The "ASCII Text File" option
Then click "Save."
Database Export — Select this option to save the image index through ODBC into
any database, independent of the database used for file downloads. The database
setup is similar to the database setup for the export of claim payment data. Specify
the following database connection parameters:
Database Type
Database Server Name or DSN
Database
Username
Password
Image Index Table Name
© 2012
46
The HIPAAsuite Claim Payment Master
The "Database Export" option
Once all database connection parameters have been specified, click "Test Connection"
to verify the connection.
The "Test Connection" button
The configuration is correct if you receive a message like this. Click "OK."
The success message
Then click "Save Database Connection."
© 2012
Creating Image Files and PDFs
47
The "Save Database Connection" button
To create the image index table, click on the "You can create the Image Index Table
through a separate screen." See Creating the Image Index Table 49 .
Fields to be included in Image Index File
You can select the fields that get imported into the image index by selecting the checkboxes in front of the field names.
The fields to be included in Image Index File
Tip: As with the other field selectors, you can change the field names by clicking on them. This is
© 2012
48
The HIPAAsuite Claim Payment Master
helpful if you have an existing database that you want to access.
Changing the field names
For Database export, you can test the fields configuration by clicking on the "Test Field
Configuration" button.
The "Test Field Configuration" button
You will receive a message like this. Click "OK."
The success message
When ready, click on the "Save Field Configuration" button.
© 2012
Creating Image Files and PDFs
The "Save Field Configuration" button
Once all image index options have been defined and saved, click "Close."
The "Close" button
4.5
Creating the Image Index Table
To create the table for the image index, follow the instructions below.
1. Select Image Create Image Index Table in the main menu.
The "Create Image Index Table" menu
2. The following window will appear.
© 2012
49
50
The HIPAAsuite Claim Payment Master
The "Create Image Index Table" window
3. Select one of the necessary options:
Microsoft SQL Server
MySQL/Genetic
4. Then make sure the image index table script is correct.
© 2012
Creating Image Files and PDFs
The "Create Image Index Table" window with the "M icrosoft SQL Server" option selected
© 2012
51
52
The HIPAAsuite Claim Payment Master
The "Create Image Index Table" window with the "M ySQL/Generic" option selected
5. Click on the "Execute Script" button.
The "Execute Script" button
Then you will receive a notification like this. Click "OK."
The success message
6. Then click "Save."
Example
© 2012
Creating Image Files and PDFs
53
You can use the following MySQL/SQL script:
CREATE TABLE `edi_835imageindex` (
`ID` bigint(20) NOT NULL AUTO_INCREMENT,
`EDIFilename` varchar(100) DEFAULT NULL,
`ImageFilename` varchar(100) DEFAULT NULL,
`ClaimNo` varchar(35) DEFAULT NULL,
`TradingPartnerID` char(15) DEFAULT NULL,
`PayDate` date DEFAULT NULL,
`PayorID` varchar(25) DEFAULT NULL,
`PayorName` varchar(60) DEFAULT NULL,
`PayeeID` varchar(25) DEFAULT NULL,
`PayeeLast` varchar(60) DEFAULT NULL,
`SubscriberID` varchar(15) DEFAULT NULL,
`SubscriberLast` varchar(60) DEFAULT NULL,
`SubscriberFirst` varchar(35) DEFAULT NULL,
`PatientID` varchar(15) DEFAULT NULL,
`PatientLast` varchar(60) DEFAULT NULL,
`PatientFirst` varchar(35) DEFAULT NULL,
`AmountCharged` decimal(10,2) DEFAULT NULL,
`AmountPaid` decimal(10,2) DEFAULT NULL,
`ServiceDateFrom` date DEFAULT NULL,
`ServiceDateTo` date DEFAULT NULL,
UNIQUE KEY `ID` (`ID`)
) ENGINE=InnoDB AUTO_INCREMENT=4 DEFAULT CHARSET=utf8;
Tip: M ake sure you use a correct symbol ` and not ' in the script.
Tip: If you encounter errors running the script on M ySQL or other database systems, then modify it
until it works or consult with your database administrator to make the modifications. SQL Scripts share
over all platforms a lot of syntax, but still each flavor demands its own adjustments.
5
Using the Database
5.1
Exporting the Data
The HIPAA Claim Payment Master can export the data contained in a 835 Payment Advice
to any ODBC aware database such as Microsoft SQL Server, Oracle, AS400, etc. The
structure of the 835 transaction is quite nested and in order to truly export the data in a
© 2012
54
The HIPAAsuite Claim Payment Master
normalized manner it is necessary to create 6 different tables with the following
relationships:
The relationship of the tabes involved in the 835 transaction
The data is written to the database once the "Run" button has been clicked and only if
the "Data Import" checkbox is activated.
© 2012
Using the Database
55
The "Data Import" check-box
The "Processing Results" window will display notification about data export.
The "Processing Results" window
The sequence of actions to setup the data export is the following:
Setting up Database Connection
Creating Tables
62
Viewing the Database Schema
Selecting Fields to Export
Browsing Exported Data
5.2
55
70
71
76
Setting up Database Connection
The HIPAA Claim Payment Master natively treats a payment advice record as a single
© 2012
56
The HIPAAsuite Claim Payment Master
object. The application extracts the complete payment from an EDI file into its
proprietary data object. It can translate and export this data into any ODBC-compliant
database such as Microsoft SQL Server, Oracle, etc.
Tip: The default fields that come with the product can be extended; customizations are possible.
1. Select Data Export 835 Connection and Data Fields in the main menu.
The "835 Connection and Data Fields" menu
2. You will be confronted with the following screen where you can set up the database
connection and enter the names of the database tables.
The "Data and Field Setup" window
Connection Properties
Tip: If you use ODBC for the connection, you will need to set up the ODBC connection first in the
© 2012
Using the Database
Windows
Control Panel
Administrative Tools
Data Sources (ODBC) setup screen. Setting up the
ODBC connection varies from database to database.
The ODBC Administration screen in Windows
Define the database connection properties:
Database Type
MS SQL Server
MS SQL Server Integrated Security
ODBC Connection
ODBC Connection for Oracle
Database Server Name
Database
Username
Password
Payment Table
Claim Table
Line Table
© 2012
57
58
The HIPAAsuite Claim Payment Master
Claim Adjustments
Line Adjustments
Provider Level Adjustments
The connection properties fields
To create tables in your database, click on the "You can create the tables through a
separate screen" link. For instructions, refer to Creating Tables 62 .
© 2012
Using the Database
59
A link to create tables
Once the connection parameters have been entered, click "Save Connection Information."
© 2012
60
The HIPAAsuite Claim Payment Master
The "Save Connection Information" button
To verify if the entered parameters are correct, click on the "Test Connection" button.
© 2012
Using the Database
The "Test Connection" button
If the test has passed successfully, you will see the following notification:
The success message
© 2012
61
62
The HIPAAsuite Claim Payment Master
Once the test has passed successfully, the "Connection not checked" message changes to
"Connection chеcked."
The "Connection not checked" checkbox
Once you have the database connection defined and tested, you can enter the table
names. See Selecting Fields to Export 71 .
If you need to create the tables first, then see Creating Tables
5.3
62
.
Creating Tables
Before data export 53 , you need to create the tables through SQL table statements. You
can do this using the built-in function of the HIPAA Claim Payment Master. Creating
these tables is a quite intimidating task. Once you have your connection defined 55 and
tested, follow the instructions below.
1. Select the Data Export 835 Table Creation in the main menu.
The "835 Table Creation" menu
2. The following window will be displayed.
© 2012
Using the Database
The "Create Tables" window
3. Define the following options:
Database
Microsoft SQL Server
MySQL/Genetic
Tabs
On the following tabs there are SQL scripts used to create the appropriate tables:
Payment
Claims
Claim Level Adj
Claim Lines
© 2012
63
64
The HIPAAsuite Claim Payment Master
Claim Line Adj
Provider Level Adj
Tip: You can modify the scripts so that they run on your specific database.
On each tab, click "Save."
The "Save" button
On each tab, click "Execute Script" to create the corresponding table in the database.
The "Execute Script" button
Once the table has been created successfully, you will see the following notification:
The success message
The following screen-shots displays MySQL script to create tables.
© 2012
Using the Database
The "Payments" tab
© 2012
65
66
The HIPAAsuite Claim Payment Master
The "Claims" tab
© 2012
Using the Database
The "Claim Level Adj" tab
© 2012
67
68
The HIPAAsuite Claim Payment Master
The "Claim Lines" tab
© 2012
Using the Database
The "Claim Line Adj" tab
© 2012
69
70
The HIPAAsuite Claim Payment Master
The "Provider Level Adj" tab
5.4
Viewing the Database Schema
To access the database schema, select the Data Export 835 Database Schema in main
menu.
© 2012
Using the Database
71
The "835 Database Schema" menu
You will see the following window.
The "Database Schema to Electronic Remittance Advice (835)" window
This window shows how the tables are inter related.
5.5
Selecting Fields to Export
Once you have created your tables and tested connection and table names, you can select
which fields to export. Follow the instructions below.
1. Select Data Export 835 Connection and Data Fields in the main menu.
The "835 Connection and Data Fields" menu
2. You will be confronted with the following screen where you can set up the database
© 2012
72
The HIPAAsuite Claim Payment Master
connection and enter the names of the database tables.
The "Database and Field Export" window
3. Choose fields to be exported by selecting checkboxes in front of the fields in the
following tables:
Tip: We recommend to select all fields. This makes it possible to reassemble all the information in the
EDI file and create the image of the claim payment.
Payment
Claims
Claim Level Adjustments
Claim Lines
Provider Level Adjustments
Line Level Adjustments
Tip: Sometimes it might be necessary to rename a field or fields. Some legacy database want upper
case only or lower case only field names. The HIPAA Claim Payment M aster allows you to rename any
field in any table. Click twice (not double-click) on a field and you are in "Edit" mode.
© 2012
Using the Database
73
The field selection list in "Edit" M ode
4. Once you have made your selection or selected all you have to test your setup, click on
the "Test Configuration" button. The program will go through each table and check if the
selected field exists.
The "Test Configuration" button
5. You should receive a message like this. Click "OK."
© 2012
74
The HIPAAsuite Claim Payment Master
The success message
6. Only after the configuration checks out are you allowed to save it. Click the "Save Field
Configuration" button.
The "Save Field Configuration" button
Troubleshooting Data Fields
Once you have made your selection or selected all you have to test your setup. Click on
© 2012
Using the Database
75
the "Test Configuration" button.
If the program finds errors, the ODBC Error screen will come up and tell you exactly
which fields caused errors.
The ODBC error window
You can study the errors and the message usually is precise enough to understand what is
wrong. In the above case an access database is missing the fields in error. When you click
the "Uncheck Fields in Error" button, then all those fields will be unchecked and excluded
from the data export.
© 2012
76
The HIPAAsuite Claim Payment Master
Fields that caused problems are unchecked now and excluded from export
Now you can test the configuration again. You should get the success message:
The success message
Only after the configuration checks out are you allowed to save it. Click on the "Save
Field Configuration" button.
5.6
Browsing Exported Data
The HIPAA Claim Payment Master can take the records in the database to which it
exports and reassembles the information so that it can be viewed just like the images
© 2012
Using the Database
77
from the EDI file.
Select the Data Export 835 Payments and Paid Claims in the main menu.
The "835 Payments and Paid Claims" menu
You will see the following screen. When you click on a payment on the left, the claims
associated with this payment get loaded on the right side.
The "835 Payments and Paid Claims" window
Double clicking on a claim will load this claim in a preview window.
© 2012
78
The HIPAAsuite Claim Payment Master
Claim details assembled from the database
If you have previously selected all fields to be exported, then you will have all the
information from the source EDI file. But for the largest part you can completely
reassemble the payment details as they came in on the EDI file.
5.7
De-Identifying Data
"De-identifying Utility" can be used to "de-identify" X12 HIPAA transactions. You can
replace Private Medical Information (PMI) with random numbers and names. This should
facilitate the testing of the HIPAA transactions without compromising individuals' privacy.
The software is free for all users. Read more on http://www.claredi.com.
It is your responsibility to make sure the configuration file meets your de-identification
requirements.
1. Go to Help De-identifying Utility in the main menu.
© 2012
Using the Database
79
The "De-identify Utility" menu item
2. Look through the information on the Introduction screen. Optionally check the "Do not
show this message again" option. Click OK.
The introductory window
3. Familiarize yourself with the information. Click OK.
The information window
4. Specify the following:
File to de-identify - Click on "Dots" button to browse for a resource HIPAA file on
© 2012
80
The HIPAAsuite Claim Payment Master
your local PC.
Save de-identified file to - Click on "Dots" button to select a destination file on your
local PC.
The "X12 De-Identification Utility" window
5. Click on the "De-identify now" button to process the file. As the result, you will receive
a sucess message like this, click OK.
The "De-Identification Result" popup
You may be informed about error/notification messages generated by the utility. Click
"Yes" to access them.
The "De-Identification Information" popup
Changing Configuration
To change the De-identifying Utility configuration, click on the "Configuration" button.
The "Setting" button on the utility window
© 2012
Using the Database
81
Click on "Edit" to open a configuration file.
The "Edit" button
This configuration file has a lot more than what you need, and in most cases all you have
to do is remove the "#" at the beginning of a line in order to put that line into effect. At
first time, only patient and subscriber information is de-identified, and provider
information is left intact. That is easily changed by removing the "#" at the beginning of
some of the lines.
© 2012
82
The HIPAAsuite Claim Payment Master
The configuration file
The lines have two parts separated by one or more spaces (or tabs):
The first part is the "tag" for the segment to replace or de-identify.
The second part is the replacement data.
In the replacement data, any "empty" data element will indicate that the data is not to
be replaced and the original data must remain intact. Otherwise, if there is replacement
data in that element, the replacement data will be used instead of the original, and if
the replacement data is a single tilde "~" then the element will be blanked out. Blanking
out with tildes should rarely be used, as it distorts the original data.
If the original did not have data in an element, the output will not have data in that
element even if the replacement data exists.
If the replacement data starts with "?" then the replacement only takes place if there was
no data for that element. If there was any data in it, the replacement does not take
place.
If the replacement data starts with "+" then the replacement takes place every time,
even if there was no data for that element.
© 2012
Using the Database
83
The configuration file accepts only "*" as the element delimiter, and does not use
segment terminators. Composite data elements are replaced as a whole at this time,
and individual components of a composite are not replaceable at this time. The BIN
segment is not handled yet. Even though the configuration file only accepts the "*" as the
delimiter, the data itself may have any valid X12 delimiter.
6
Autoprocessing
6.1
Running the Application from the Command Line
The HIPAA Claim Payment Master can also accept command line arguments. This is a very
important feature if you want to put the HIPAA Claim Payment Master on a scheduler
and automate the processing of files or directories.
The following is the list of the command line arguments; they must be separated by
commas.
1. The first command line argument is the filename or the directory path. If not
applicable, leave blank.
2. The second through fourth arguments following a filename or directory path are
reserved for processing options and are triggered by a "Y" as followss:
2nd argument — Export to database.
Using the Export to Database option as a Command Line Argument
3rd argument — TIFF/PDF File. The payment order/remittance advice will be saved
as a TIFF image file.
See Creating Image Files from EDI
printing capabilities.
38
for details on how to set up the Image
Be sure that you have tested the Image printing, before trying the command line
mode.
Using the TIFF/PDF Image option as a Command Line Argument
4th argument — Print. If the fourth argument following a filename or directory
© 2012
84
The HIPAAsuite Claim Payment Master
path is filled with a "Y", the 820 file will be printed without ever being displayed
Using the Print option as a Command Line Argument
Again, be sure that you have tested the Image printing before trying the command
line mode.
Using Several Arguments
You can have a combination of the above arguments. For example,
will both export the "820_1.edi" file to the Database and print the file.
Excerpt from HIPAA Claim Payment M aster log after command line processing.
6.2
Processing with the EDI Exchange Module
Processing EDI Files with the EDI Exchange Module Enabled
The only argument you need in this case is "Auto". The directory to look for new files and
the processing options are defined in the setup screens for EDI Exchange. No further
arguments are needed.
To setup autoprocess options, go to EDI Exchange -> Autoprocess Setup
© 2012
Autoprocessing
Autoprocess Setup option in EDI Exchange menu
Any options selected for autoprocessing will carry over to the command line.
EDI Exchange Automatic Processing options
© 2012
85
86
6.3
The HIPAAsuite Claim Payment Master
Working with the Database
To generate an 834 file using the Database, the following command line arguments are
needed in order:
1. "EDI" - To flag the command for EDI file creation.
2. "QE" - Indicates the EDI file is to be built form a query.
3. Resulting filename - A filename for the resulting file. A fully qualified path may be
used. A relative address (ex: "\834forTradingPartner\834.edi") will result in the file
being written to the EDI Root directory.
4. Query - The query to be used to build the EDI file.
5. Trading Partner - The trading partner to be used to build the ISA and GS segments. If
this argument is left blank, the last Trading Partner used to build an EDI file in
Creating 834 EDI Files from the Attached Database 178 will be used.
Example of creating an EDI file from a database query:
EDI file creation command specifying records with a query
The above example has:
"EDI" as the first argument, flagging this command as a file creation command.
The second argument is "QE", meaning that an EDI file is to be created using the
results from a SQL query.
Argument 3 is the filename for the resulting file. Since D:\EDI\834TEST.edi is a fully
qualified path, the file is not written to the EDI Root directory and instead uses the
specified path.
The fourth argument is the query whose results will be used to create the file.
The fifth argument is the receiving Trading Partner.
and will result in an EDI file named "834TEST.edi" in "D:\EDI\" containing the results of
database query "SELECT * FROM edi_claimpayment". The following is the log entry
created by this command:
© 2012
Autoprocessing
87
Excerpt of HIPAA Claim Payment M aster log.
6.4
Changing the Default Company
The default company is the identity you assume as the sender when creating EDI files.
This affects the ISA, GS, and NM1 sender segments. A single entity may have a need to
act as multiple sender identities and so has a need to change the information in the EDI
envelopes.
The default company can be changed using command line arguments, affecting the ISA
and GS sender ID segments.
Sender ID segments in Company Setup
To change the default company, a single argument is needed. "Setcompany" followed by
the company ID of the company you wish to set.
"setcompany <ID>"
The Company's ID in this case is not its EDI identifier, but the value of the ID row in the
COMPANY_SETUP table. It can also be found in the Company Setup window:
Company selection in Company Setup
© 2012
88
The HIPAAsuite Claim Payment Master
Example
The command argument
setcompany 3
will set the default company to ID = 3, which is HIPAASUITE2 in the example picture
above. The log entry for this command will be
Excerpt from log. Default company changed.
6.5
Running the Application via Scheduler
The HIPAA Claim Payment Master can be automated through a scheduler. A scheduler is
software that can be programmed to execute a certain task at a certain time
repeatedly. Windows has such a scheduler built in.
The Windows scheduler can be used to let the HIPAA Claim Payment Master execute in
regular intervals without user intervention. Usually one would let the HIPAA Claim
Payment Master scan a directory and then print, create image files or export the data
and remove the files to prevent duplicate processing.
Note: Please consult Windows help files for further information on setting up the scheduler.
1. If the task scheduler is installed on your system, you will find it in the "Control Panel".
To open Scheduled Tasks, click Start Control Panel Scheduled Tasks.
Note: In different Windows versions, the way to access the Task Scheduler can differ. Consult your
Windows version documentation.
© 2012
Autoprocessing
89
The Windows Task Scheduler
2. Click on "Add Scheduled Task" and the "Scheduled Task Wizard" will guide you through
the setup process.
3. In the first window, read the welcome message and click "Next."
The "Scheduled Task Wizard" window
4. Browse to the
© 2012
HIPAAClaimPaymentMaster.exe
executable file.
90
The HIPAAsuite Claim Payment Master
The "Scheduled Task Wizard" window
By default, the application is located in
C:\Program Files\HIPAAsuite\HIPAA Claim Payment
Master\HIPAAClaimPaymentMaster.exe
Click "Next."
5. Type a name for this task. Choose a time interval:
Daily
Weekly
Monthly
One time only
When my computer starts
When I log on
Click "Next."
6. Enter the name and password of a user. The task will run as if it were started by that
user. Click "Next."
© 2012
Autoprocessing
91
The "Scheduled Task Wizard" window
7. In the last screen, make sure you have specified all data correctly. Click "Finish" to
save your task.
8. The scheduled task has been added to the system. Now lets edit the new task and add
the desired command line arguments with the appropriate options. Double-click the newly
created task in the "Scheduled Tasks" window.
9. Enter parameters to the "Run" field after the application path and click "OK."
Tip: Logs may be helpful when running the program automatically through the scheduler. See
Accessing Logs 25 .
7
EDI Exchange
7.1
Getting Started
7.1.1
About EDI Exchange
EDI Exchange is a module available in most HIPAAsuite EDI applications. It is an option
that you can purchase for an additional cost. Some of our products, such as HIPAA Claim
Master, process EDI files but do not receive or send EDI files to and from your trading
partners. EDI Exchange is created to do that. EDI Exchange is designed for those
organizations that have a large volume of EDI files, need more order and automation and
adhere to tougher compliance rules. The EDI Exchange is an EDI pre-processor that
handles FTP transport, encryption, HIPAA compliance check, trading partner
management, etc. Outgoing EDI files can be checked for compliance; individual records
that do not pass the check can be withheld.
© 2012
92
The HIPAAsuite Claim Payment Master
HIPAAsuite products with EDI Exchange module have a main menu item called "EDI
Exchange" with sub-menus to call the module's functions.
The "EDI Exchange" menu in HIPAA Enrollment M aster
EDI Exchange performs the following functions:
Trading Partners Management — The following Trading Partner's parameters can
be stored and transparently managed with the help of EDI Exchange: name,
address, EDI identifiers, delivery methods, encryption parameters, FTP servers,
CORE-Compliant server addresses and credentials, communication numbers and
folders to keep files separated, special requirements specific to this trading
partner. Read more in Setting up Trading Partners 130 .
File Transport — EDI Exchange has a built-in FTP client that can securely connect to
your trading partner's FTP servers. If you employ your own FTP server, you can
utilize the folder structure that EDI Exchange uses to manage incoming files, users,
home directories and permissions so that your Trading Partners can drop off and
pick up EDI files. Supported are:
Simple FTP
FTP Secure
© 2012
EDI Exchange
93
Implicit FTPS
Explicit FTPS
Secure Shell FTP or sFTP
Read more in Using FTP Client
144
.
Encryption — Many healthcare-related companies use encryption to cloak the
content of their EDI files. The prevalent method of encryption is PKI (Private Key
Infrastructure) that uses the product of two incredibly large prime numbers as
cipher. EDI Exchange supports PGP (Pretty Good Privacy), the leader in PKI products
as well as the open source GPG project with its Windows sub project PGP4Win. Both
are implementations of the same encryption mechanism. Read more in Using
Encryption 153 .
File Management — EDI Exchange uses a clear directory structure to store EDI files.
The structure is based on root directories for incoming files, outgoing files,
processed files and suspended files. Below these root directories, there are
subdirectories for each trading partner and then each transaction set. Read more
in Defining Root Directory 112 and Initializing EDI Exchange 114 .
EDI Compliance Check — EDI standards are strict and precise; adherence to the
standards is very important so that any organization can work with them regardless
of their backend system software. EDI Exchange has a built-in compliance engine
that checks incoming files for compliance. The engine also generates a report listing
each problem with the exact location. Outgoing EDI files can also be checked and
you have an option to withhold individual records that violate the rules. Read more
in Checking EDI Files 161 .
EDI Control for Transactions — The EDI protocols have a few supporting transaction
sets that are useful to the smooth functioning of EDI exchanges. They provide the
sender with an instant feedback on receipt. The following transaction sets are
available:
TA1 Acknowledgment
997/999 Functional Acknowledgment
277U/277CA Unsolicited Claim Status Response (in case of Claims)
Logging — EDI Exchange has several logs that are instrumental to keep processing in
order and allows to forensically investigate mishaps. There are three logs in EDI
Exchange:
Incoming file log — See Accessing EDI Receive Log
© 2012
166
.
94
The HIPAAsuite Claim Payment Master
Outgoing file log — See Accessing EDI Send Log
169
.
Daily transaction log
7.1.2
Requesting EDI Exchange License
If your trial has expired, you can request an extension to the trial.
If you purchased the product and need a final license key, you should request an EDI
Exchange license.
Follow the instructions below to request a trial or final license key.
1. Select "Request EDI Exchange license" under the "EDI Exchange" menu item.
A menu item to request a license key
2. Once you have clicked this menu item, your default email application appears. In our
case, it is Microsoft Outlook. All information necessary to produce the key is
automatically filled out.
© 2012
EDI Exchange
95
Email message created by EDI Exchange
3. You can add a trial extension or a final key after purchasing or relocating the
software.
Once you receive the response with the key for EDI Exchange, you can bring the
"Registration Form" screen up again and click on "Register". Enter the key to unlock EDI
Exchange. In the Result area, you will see that EDI Exchange has been registered.
Entering the license key
© 2012
96
7.1.3
The HIPAAsuite Claim Payment Master
Registering EDI Exchange
EDI Exchange is licensed separately from the host application, HIPAA Claim Master, for
example. The reason is that EDI Exchange will work on all HIPAAsuite Products that are
installed on your particular computer. For example, if you have HIPAA Claim Master and
HIPAA Enrollment Master licensed, only one license of EDI Exchange is needed and the
module will work across two products.
When you first install a HIPAAsuite product of your choice, a 15-day EDI Exchange trial is
included. Once the trial expires, EDI Exchange loses its functionality. The menu items
under "EDI Exchange" become disabled except the last ones that allow you to license and
enable the product.
The "EDI Exchange" menu with menu items disabled
You can register the product by clicking on the "EDI Exchange License Information" option
under the "EDI Exchange" menu.
© 2012
EDI Exchange
"EDI Exchange License Information" option under the "EDI Exchange"
Then the license screen appears. In the lower left corner you can find the unique
registration number needed to create either trial extensions or final licensing.
The license information screen
© 2012
97
98
The HIPAAsuite Claim Payment Master
Once you click on "Register," you can enter the license key that you have previously
received via email from us (see Requesting EDI Exchange License 94 .) Click on "Register"
and you will see the registration message in the "Result" area.
Extending the trial by entering a license key
Close the "Registration Form" and continue using the EDI Exchange.
7.2
Configuring EDI Exchange (Obligatory Settings)
7.2.1
1 Setting up Database Connection
EDI Exchange work is based on the database connection that you define under Database
Connection and Data Fields in the main menu of the HIPAA host application. Make sure
the connection has already been set up and tested before proceeding with EDI Exchange.
Then proceed to the next step: Creating Database Tables
7.2.2
98
.
2 Creating Database Tables
Once you have configured the database connection (Setting up Database Connection
follow the instructions below.
98
),
1. Select EDI Exchange Create EDI Exchange Tables in the main menu.
© 2012
EDI Exchange
The menu item to create the necessary tables.
2. The "Create Tables for EDI_Exchange" screen will appear. Table creation and/or
modification for your database is handled here.
© 2012
99
100
The HIPAAsuite Claim Payment Master
The screen to create the tables
3. Select the database type you use for your host HIPAA application.
Database
Microsoft SQL Server (SQL Server 2008 and above)
MySQL
Note: In case your database is not listed, modify the scripts or ask your database administrator to
make the necessary modifications.
4. The following tables are part of EDI Exchange:
TradingPartner — SQL statements to create the "TradingPartner" table in your
database. This table contains information about trading partners.
Trans_Log — SQL statements to create the "TRANS_LOG" table in your database.
This table contains incoming file information, keeps track of all EDI files that you
receive and the compliance check report.
Trans_Log_Errors — SQL statements to create the "TRANS_LOG_ERRORS" table in
© 2012
EDI Exchange
101
your database. This table collects the results of the compliance check and keeps
track of all sent files.
Send_Log — SQL statements to create the "SEND_LOG" table in your database.
The table contains information about EDI files created and sent to trading
partners.
Company_Setup — SQL statements to create the "COMPANY_SETUP" table in your
database. This table collects information about you, the sender of EDI
information.
5. You can modify the scripts so that they run on your specific database. Once you have
you modified the script, click "Save."
Tip: Every database system has their own little syntax idiosyncrasies and the scripts might require
tweaking. You can edit the table scripts in this screen and save your modified scripts. One example
are 'date' and 'time' or 'money' data types that do not exist in SQL Server 2005. You can just rename
those types to 'datetime' and save you script and it will run fine.
The "Save" button
6. For each script on every tab, click "Execute Script" to create the corresponding table
in the database.
© 2012
102
The HIPAAsuite Claim Payment Master
The "Execute Script" button
Notice: Creating tables means clicking the "Execute Script" button in all five tabs of the "Create Tables
for EDI_Exchange" window. Then close this window.
7. Once the table has been created successfully, you will see the following notification:
The Create Table script success message
Warning: Double-execution of a script wipes out the previous table you have created. A prompt will
warn you before deleting an existing table. To Add/Remove fields use the "Compare Script..."
button. Remove the script files once you have created the tables so nobody can destroy the tables
© 2012
EDI Exchange
103
by accident.
The double-execution warning message.
Make sure there are no error messages and the table creation has been completed
successfully.
Compare Script with existing Table
HIPAAsuite products go through continual development and improvements. Often these
changes lead to new fields in the database. While it is easy to drop a table and
regenerate it with the new fields, you will loose all the data in the table. To avoid this
trouble there is the button "Compare Script with existing Table". I you click this, the
table structure in your database will be compared with the script. There are two possible
outcomes. Your table is up to date
Table is up to date
or if your table is missing recently added fields, you will see a window pop up that shows
an 'Alter Table' script with which you can add those fields to the table without interfering
with existing data.
© 2012
104
The HIPAAsuite Claim Payment Master
The 'Alter Table' script that shows as a result of missing fields
You can now click the "Execute Script" button and the field will be added and a message
will confirm your changes
Alter Table statement successfully executed.
Once you have created the tables, you can start setting up the other application options.
See the next step: Defining Auto-Processing Options 110 .
7.2.3
2b Creating 999 File Tables
Once you have configured the database connection (Setting up Database Connection
follow the instructions below.
98
),
1. Select EDI Exchange Create 999 Files Tables in the main menu.
© 2012
EDI Exchange
The menu item to create the necessary tables
2. The "Create Tables for 999 Files" screen will appear. Table creation and/or
modification for your database is handled here.
© 2012
105
106
The HIPAAsuite Claim Payment Master
The screen to create the tables
3.Select the database type you use for your host HIPAA application.
Database
Microsoft SQL Server (SQL Server 2008 and above)
Oracle
MySQL
Note: In case your database is not listed, modify the scripts or ask your database administrator to
make the necessary modifications.
1. The following tables are part of EDI Exchange:
ImplementationAck — SQL statements to create the "ImplementationAck" table in
your database. This table contains information about Acknowledgments.
TransactionResponse — SQL statements to create the "TransactionResponse" table
in your database. This table contains individual transactions contained in 999 files.
© 2012
EDI Exchange
107
SegmentErrors — SQL statements to create the "SegmentErrors" table in your
database. This table contains individual segments in error contained in 999
transactions.
ElementNotes — SQL statements to create the "ElementNotes" table in your
database. The table contains the elements in error in a specific segment.
5. You can modify the scripts so that they run on your specific database. Once you have
you modified the script, click "Save."
Tip: Every database system has their own little syntax idiosyncrasies and the scripts might require
tweaking. You can edit the table scripts in this screen and save your modified scripts. One example
are 'date' and 'time' or 'money' data types that do not exist in SQL Server 2005. You can just rename
those types to 'datetime' and save you script and it will run fine.
The "Save" button
6. For each script on every tab, click "Execute Script" to create the corresponding table
in the database.
© 2012
108
The HIPAAsuite Claim Payment Master
The "Execute Script" button
Notice: Creating tables means clicking the "Execute Script" button in all four tabs of the "Create
Tables for 999 Files" window. Then close this window.
7. Once the table has been created successfully, you will see the following notification:
The Create Table script success message
Warning: Double-execution of a script wipes out the previous table you have created. A prompt will
warn you before deleting an existing table. To Add/Remove fields use the "Compare Script..."
button. Remove the script files once you have created the tables so nobody can destroy the tables
by accident.
© 2012
EDI Exchange
109
The double-execution warning message.
Make sure there are no error messages and the table creation has been completed
successfully.
Compare Script with existing Table
HIPAAsuite products go through continual development and improvements. Often these
changes lead to new fields in the database. While it is easy to drop a table and
regenerate it with the new fields, you will loose all the data in the table. To avoid this
trouble there is the button "Compare Script with existing Table". I you click this, the
table structure in your database will be compared with the script. There are two possible
outcomes. Your table is up to date
Table is up to date
or if your table is missing recently added fields, you will see a window pop up that shows
an 'Alter Table' script with which you can add those fields to the table without interfering
with existing data. In the latter case, you can click the "Execute Script" button and the
field will be added and a message will confirm your changes
© 2012
110
The HIPAAsuite Claim Payment Master
Alter Table statement successfully executed.
7.2.4
3 Defining Auto-Processing Options
In the "Auto-Process Setup" you can instruct the program on what to do after analyzing
and decrypting the received files in the Inbox Manager. The auto processing enables you
to combine and run multiple fulfillment steps together (for example, export, saving,
printing.) These options are important for the hand-over from EDI Exchange to the other
HIPAAsuite program that hosts EDI Exchange.
Follow the instructions below to specify the Auto Process Options.
1. Select EDI Exchange Autoprocess Setup in the main menu.
© 2012
EDI Exchange
111
The "Autoprocess Setup" menu item
2. The following screen will appear if the host HIPAA application is Enrollment Master.
Defining the Auto Processing Options
3. The following options can be specified:
Check Path Options
Check FTP servers for new files — If checked, EDI Exchange automatically looks for
new files for all trading partners that have FTP connection set up. Then the program
gets all the waiting files and puts them into the Inbox. In the second step, it goes
through every file.
Default Automatic Processing Options
Export in Database — If selected, the module exports new files to the database.
Print — If selected, the module prints files using the selected printer.
Create Auto-Response — If selected, the module creates an auto-response to the
received files.
Save to — If selected, the system automatically saves files as:
Image
Excel
ASCII
4. Click "Save."
© 2012
112
The HIPAAsuite Claim Payment Master
The "Save" button
Once you have saved the auto-processing options, the files will not only be analyzed but
also processed according to the defined settings. Proceed to the next step: Defining
Communications Directory 112 .
7.2.5
4 Defining Communications Directory
EDI file directory is an obligatory setting you need to set up before starting using the EDI
Exchange. In order to keep track of the thousands of EDI files that accumulate over
time, EDI Exchange uses a folder structure which we call the "HIPAAsuite Communications
Directory" or "HIPAAsuiteCommDir" in short. In it, you will find all your EDI files sorted
into several categories:
Inbox
Outbox
ProcessedFiles
EncryptedFiles
SuspendedFiles
Within these directories, there will be folders for each Trading Partner and type of
transaction. The location and names of the sub-folders are handled in the "Trading
Partner Setup." See Setting up Trading Partners 130 .
Follow the instructions below to specify EDI communications root directory.
1. Select "EDI Exchange Setup" under the "EDI Exchange" menu item.
© 2012
EDI Exchange
113
The "EDI Exchange Setup" menu item
2. The following window will appear.
The "EDI Exchange Setup" window
Note: The icon in the lower left corner indicates that EDI Exchange has not been initialized yet.
3. Under "EDI Exchange Directory Setup" specify the following setting:
© 2012
114
The HIPAAsuite Claim Payment Master
Root Directory Path — Define the root path in the "Root Directory Path" text field.
The root path is the folder where all your EDI files reside. EDI Exchange will later
create sub-directories required to operate.
The root communications directory setup
4. Click "Save."
The "Save" button
After setting the root directory, you can click the "Initialize EDI Exchange" button. Read
more in Initializing EDI Exchange 114 .
7.2.6
5 Initializing EDI Exchange
Before you can use EDI Exchange, and after you have configured the obligatory settings,
you have to perform the initialization. Follow the instructions below.
1. Select "EDI Exchange Setup" under the "EDI Exchange" menu item.
© 2012
EDI Exchange
115
The "EDI Exchange Setup" menu item
2. The following window will appear.
The "EDI Exchange Setup" window
Note: The icon in the lower left corner, indicating that EDI Exchange has not been initialized yet.
3. After setting the root directory (see the previous step Defining Communications
© 2012
116
The HIPAAsuite Claim Payment Master
Directory 112 ), you can initialize EDI Exchange module. Click the "Initialize EDI
Exchange" button to accomplish the process.
The "Initialize EDI Exchange" button
Once the "Initialize EDI Exchange" button is clicked, the system checks if all settings have
been configured correctly.
1. The first thing the initialization process checks is the connection to the database and
the presence of the necessary tables. EDI Exchange relies on the database connection
that is part of the HIPAAsuite application that you are using. EDI Exchange needs
Database Connectivity licensed and enabled. If this part is not yet set up, then you will
get an error like this:
Initialization failed because of SQL connection problems
Read more in Setting up Database Connection
98
.
2. Once the connection is established, the program checks if the correct tables exist in
the database. See Creating Database Tables 98 . Once the SQL part checks out, you will
see the following message.
© 2012
EDI Exchange
117
Checking SQL settings and tables:
Connection settings are checked. Trading Partners table is checked.
TRANS_LOG table is checked.
TRANS_LOG_ERRORS table is checked.
SEND_LOG table is checked.
3. The next step of the initialization processes — the program checks and, if necessary,
creates the root directory and five sub-directories. Within these root directories, there
will be folders for each Trading Partner and type of transactions. The location and
names of the sub-folders are handled in the "Trading Partner" setup. The root folder is
specified via the "EDI Exchange Setup" screen. Read more in Defining Root Directory 112
.
The sub-directories that EDI Exchange creates are as follows:
The directory structure of EDI Exchange
4. The next step of the initialization — the program checks if the HIPAA EDI compliance
engine is properly installed.
5. The last thing checked by the system is if the Automatic File Processing options have
been set up. Read more in Defining Auto-Processing Options 110 . The options are
important for the hand over from EDI Exchange to the other HIPAAsuite program that
hosts EDI Exchange.
Once all verifications have been completed successfully, you will see the following
message:
© 2012
118
The HIPAAsuite Claim Payment Master
Successful initialization of EDI Exchange
After that your EDI Exchange is initialized.
The "EDI Exchange is successfully initialized" message on the bottom of the "EDI Exchange Setup" window
Troubleshooting Initialization
© 2012
EDI Exchange
119
When you are going through the Initialization process of the EDI Exchange, you can
encounter the following message in the "Processing Results" window:
Checking for EDIDev:
EDIDev is not installed!
The EdiDev component is not installed
To resolve this issue, do the following.
1. Go to the http://www.edidev.com/ediregis.htm site.
2. Some systems may require Microsoft Redistributable Package to be installed first. In
this case, download one of the following components according to your OS' bit depth.
© 2012
120
The HIPAAsuite Claim Payment Master
3. Download one of the following components you need according to your OS' bit depth:
Framework EDI Enterprise evaluation 32-bit
Framework EDI Professional evaluation 64-bit
4. Install downloaded components and start again the EDI Exchange initialization
procedure.
7.3
Configuring EDI Exchange (Optional Settings)
7.3.1
Setting up Email Notifications
EDI Exchange can send emails to operators and trading partners to notify them about files
and processing results. This functionality of EDI Exchange lies beyond the most basic
setup that the initialization checks for. For this feature to work properly, you need to set up
an email server which EDI Exchange communicates with. You can do this in the "Email
Server Information" frame of the setup screen. Follow the instructions below.
1. Select "EDI Exchange Setup" under the "EDI Exchange" menu item.
© 2012
EDI Exchange
The "EDI Exchange Setup" menu item
2. The following window will appear.
The "EDI Exchange Setup" window
3. Specify the following email options:
© 2012
121
122
The HIPAAsuite Claim Payment Master
Email Server Information
SMTP server
Sender's email address
SMTP server requires logon
Username
Password
Connect to the SMTP server via the SSL protocol
Use port
Setting up the email server
Note: If you do not have this information, please ask your administrator to set this portion up for you.
4. To configure email notifications, specify the following options:
Email Notification
Send email notice of newly arrived files? — Use this checkbox to define if you want
to send email notice once new files have arrived.
Recipients — You can add your staff's email(s) and the processing messages will be
sent to these emails.
Enter an email address and click "Add."
© 2012
EDI Exchange
Setting up the email recipients
The email address will appear in the list.
© 2012
123
124
The HIPAAsuite Claim Payment Master
Added email recipient
5. Click on the "Test" button to verify your settings.
6. Click on the "Save" button.
The "Save" button
© 2012
EDI Exchange
125
Troubleshooting Email Settings
If you have problems with setting up the email server, please contact your administrator. He/
She should know values to specify and how to test the settings.
Below is an example of what happens when the email server does not respond.
After a time out, you get a failure notice
After acknowledging the failure, you get a more detailed error message in the process
result screen.
The process result screen with a detailed error message
© 2012
126
7.3.2
The HIPAAsuite Claim Payment Master
Setting up Incoming and Outgoing Files Options
To check if your files are HIPAA-compliant, EDI Exchange can run a compliance check on
outgoing EDI files. For incoming files, you can specify an acceptable error level. These
settings are especially important with new trading partner relationships or with new
processes since it always takes a while until an EDI process runs without issues and
problems.
Follow the instructions below.
1. Select "EDI Exchange Setup" under the "EDI Exchange" menu item.
The "EDI Exchange Setup" menu item
2. The following window will appear.
© 2012
EDI Exchange
127
The "EDI Exchange Setup" window
3. Specify the following outgoing files options:
Outgoing Files
Validate outgoing files — Select this checkbox to validate if the outgoing files are
HIPAA-compliant.
Halt records if EDI compliance warnings are found — Select this checkbox to
suppress the sending of files with warnings or errors.
Validating outgoing files
4. Specify the following incoming files options:
Other Options
© 2012
128
The HIPAAsuite Claim Payment Master
Reject incoming files with more errors than (set count below) — If checked, the
incoming files with more errors than defined will not be placed into the "Inbox"
folder.
The "Reject incoming files with more errors than" option
5. Click on "Save."
7.3.3
Running the Application via Scheduler
EDI Exchange integrates with the Windows Scheduler to allow the automation of the EDI
file exchange process. You can set up EDI Exchange to go out to the trading partner's
FTP server, download files, decrypt and compliance check them and further process them
with the appropriate HIPAAsuite application, for example load claims into a SQL
© 2012
EDI Exchange
database.
Follow the instructions below to schedule the EDI files exchange process.
1. Select "Automatic Scheduler" under the "EDI Exchange" menu.
The "Automatic Scheduler" menu item
2. In the opened window, right click and choose the "Scheduled Task" menu item.
Task Scheduler in Windows Vista onwards.
© 2012
129
130
The HIPAAsuite Claim Payment Master
In Windows XP, the Scheduled tasks directory looks like this:
The "Scheduled Task" menu item in Windows XP.
See "Running the Application via Scheduler" in the help of the host HIPAA application for
detailed instructions on how to schedule a task.
7.3.4
Using the Command Line Arguments (CLI)
The only EDI Exchange specific command line argument is "Auto"
The Auto processing options are defined in another screen 110 and, with the command
line argument "Auto," they will be exercised. Make sure that you have configured them
according to your needs.
7.4
Working with Trading Partners
7.4.1
Setting up Trading Partners
With EDI Exchange you can keep track of your trading partners. You can set up their
identifiers to send them EDI files or 999 acknowledgment, send email notifications and
compliance check results, encryption keys and file transport mechanisms.
Once you have created the trading partner table (see Creating Database Tables
initialized EDI Exchange (see Initializing EDI Exchange 114 ), you can set up the
relationships with your trading partner. Follow the instructions below.
98
) and
1. Select "Trading Partners" under the "EDI Exchange" menu.
© 2012
EDI Exchange
The "Trading Partners" menu item
2. The following screen will appear.
© 2012
131
132
The HIPAAsuite Claim Payment Master
The "Trading Partners" window
3. Click the "New" button to start entering the trading partner information.
4. Define the necessary options. They are described further.
© 2012
EDI Exchange
133
5. Click on "Save."
The "Save" button
6. The newly added Trading Partner's name will appear in the right pane.
Trading Partner Options
The company information of a trading partner can be specified on the top of the form.
© 2012
134
The HIPAAsuite Claim Payment Master
Top area of the "Trading Partners" window
Name and Type
Name — Trading partner's company name. Required field.
Address — Trading partner's company address.
City
State
Zip
Status — Trading partner's status. Choose one of the available options:
Inactive — No upload into a database system through ODBC will be done.
Test Only — All outgoing EDI messages will be stamped with "Test" (ISA_15).
Records will only be exported to the test environment.
Approved — All outgoing EDI messages will be stamped with
"Production" (ISA_15). Records will be exported to the Live system with ODBC.
Type — There are five types of trading partners, select the necessary one:
Providers — Hospitals, doctors or other health care providers.
VANs — Value Added Networks like clearing houses or EDI Networks.
Service bureaus — Third party entities such as repricing organizations.
Sponsors — Entities that sponsor the benefits of subscribers such as MedicAid,
government agencies or large employers.
© 2012
EDI Exchange
135
Payers — Entities that pay for health care benefits such as health insurers.
The next block on the form lists the communication methods and preferences.
EDI File Exchange Method — Obligatory setting. HIPAAsuite supports three
communication methods. Choose a preferred mode of sending EDI communications
to the trading partner:
FTP — Allows you to transmit files actively to the Trading Partner or his
Clearinghouse.
Outbox — All files for Trading Partner are stored locally. The Trading Partner is
responsible for picking up files in his special directory of the local FTP or HTTP
server.
Email Addresses — Enter the email address(es) into the text field.
EDI Identifiers Tab
This tab relates to the EDI identifiers and EDI Version.
The "EDI Identifiers" tab
EDI Version — There are two standards for HIPAA:
4010 — This standard was introduced in the original transaction from 2003 to
2011.
5010 — From 2012 on all HIPAA transactions must be conducted in the 5010
version.
EDI Identifiers and Qualifier
ISA Identifier and Qualifier (Record Key) — The ISA Identifier and Qualifier are
the unique key to the trading partner database file. The ISA identifier can be up
© 2012
136
The HIPAAsuite Claim Payment Master
to 15 bytes long, the qualifier has to be 2 bytes. Approved qualifiers are:
01 — Duns (Dun and Bradstreet)
14 — Duns Plus Suffix
20 — Health Industry Number (HIN)
27 — Carrier Identification Number as assigned by HCFA
28 — Fiscal Intermediary Identification Number as assigned by HCFA
29 — Medicare Provider and Supplier Identification Number as assigned by
HCFA
30 — U.S. Federal Tax Identification Number
33 — National Association of Insurance Commissioners Company Code (NAIC)
ZZ — Mutually Defined. Many organizations use the ZZ qualifier with their
name as the ID, for example ZZ and HIPAASUITE.
ETIN number — The Electronic Transmitter Identification Number established by
a Trading Partner Agreement. This number occurs only in the 837 transactions.
Often, the ETIN is same as the ISA ID.
Application Receiver Code (GS_02) — A code identifying a part that sends a
transmission or the specific application within the sender's organization. Codes
are agreed by Trading Partners. Again, usually this code is same as the ISA ID.
This code is placed in the GS_02 element in the Functional Group Header (GS).
Some Trading Partners want to send a specific code in GS_03, the application
receiver code. You can enter it into the corresponding field. Most of the time it
is not necessary.
Assigned ID - Some trading partners, like health insurance exchanges will give a
plan an ID that is different from the ISA identifier defined in the Company Setup
screen of the application. Especially in the creation of filenames is this Assigned
ID important.
Options Tab
© 2012
EDI Exchange
137
The "Options" Tab
You can choose one of the following options:
Send EDI Acknowledgment (997 or 999) — This check-box allows sending
Functional Acknowledgment transactions to the Trading Partner.
Send e-mail with compliance check and process results — This option allows
sending the compliance check results back to your contact at the Trading Partner
via email. No PMI will be transmitted. Adding an email address is important, even
when the Communication method is not "Email."
Send e-mail notification when receiving files — This option allows sending an
acknowledgment email of EDI files. This option is not necessary when you choose
997 or 999 acknowledgments.
Send e-mail notification when sending files — This option allows sending a file to
the Trading Partner notifying them that a file has been created for them.
Reject Files with Compliance Errors - This option will reject files that have
compliance warnings and move them into the suspended files directory. It also
determines whether the TA1 and 999 indicate acceptance or the 999 lists all the
errors and warning.
Create a 277CA for 837 claims — This option only applies to 837 Claims. Checking
this option will produce a 277CA Claims Acknowledgment report for received 837
Claim files.
One ST-SE loop per claim - This option separates all claims into individual
transactions enclosed by their own ST and SE segments.
Remote FTP Tab
If your trading partner has an FTP Server, then you can set up here the connection
© 2012
138
The HIPAAsuite Claim Payment Master
information. Read more in Using Built-in FTP Client
144
.
The "Remote FTP" tab
The file transfer protocol (FTP) is one of the first internet protocols and goes back to
the 1960's. Transporting electronic files was one of the great achievements of the
internet. During the last 50 years a lot of improvements to this protocol have been
made, mainly to increase the security of the transfer.
FTP — For security reasons, EDI Exchange supports secure FTP or FTPs.
Explicit FTPS Connection — The explicit method is a legacy compatible
implementation where FTPS aware clients can invoke security with an FTPS
aware server without breaking overall FTP functionality with non-FTPS aware
clients. In explicit mode (also known as FTPS), an FTPS client must "explicitly
request" security from an FTPS server and then step-up to a mutually agreed
encryption method. If a client does not request security, the FTPS server can
either allow the client to continue insecure or refuse/limit the connection.
Implicit FTPS Connection — The implicit method requires that all clients of
the FTPS server be aware that SSL is to be used on the session, and thus is
incompatible with non-FTPS-aware clients. Negotiation is not allowed with
implicit FTPS configurations. A client is immediately expected to challenge the
FTPS server with a TLS/SSL ClientHello message. If such a message is not
received by the FTPS server, the server should drop the connection. In order
to maintain compatibility with existing non-TLS/SSL aware FTP clients,
implicit FTPS was expected to listen on the IANA Well Known Port 990/TCP for
the FTPS control channel and 989/TCP for the FTPS data channel. This allowed
administrators to retain legacy compatible services on the original 21/TCP FTP
© 2012
EDI Exchange
139
control channel.
SFTP — also known as FTP over SSH is deemed the most secure form of FTP and
uses encryption certificates. There are 3 different ways to authenticate a SFTP
connection,
With user name and password, just like a regular FTP connection,
User name and a certificate
User name, certificate and password
Remote Connection and Directories
You need the FTP address, the user name and password to establish the connection
and the directory information where files are picked up and where dropped off. Fill in
the following fields:
FTP Address - This is usually the IP address of the server
User Name
Password
Put Directory - This is the directory where you drop off files
Get Directory - This is the directory where you download files from
It is possible that a trading partner has two FTP servers, one for 'put' and another
one for 'get'. If so, check "Different Download Server" and additional fields will
become visible so you can specify the those connection parameters.
After Download: You have two choices. Files on the server will be either deleted or
moved to another folder of your choice
.
Contact Tab
The Contact Tab stores contact information for your selected Trading Partner.
© 2012
140
The HIPAAsuite Claim Payment Master
The "Contact" tab
Contact Information
Enter the name and the number into the corresponding fields and select the
communication type from the drop-down list.
Contact Name
Communication Numbers — Valid Communication number qualifiers are:
TE — Stands for Telephone.
FX — Stands for Fax.
EX — Stands for Extension.
EM — Stands for email.
Click the "Add" button and the contact will appear in the "Communication
Numbers" table.
Note: The information that you fill in goes also into EDI files in the "PER" segment.
Local Access for FTP and HIPAAsuite Web
To register a user, enter the user name and the password into the corresponding fields
and click the "Add" button. The user will appear in the "Registered Users" table.
User Name
Password
© 2012
EDI Exchange
141
Registered Users
Encryption Tab
EDI Exchange supports PKI encryption. Encryption keys are defined by the email address
of the owner. Both supported products, PGP and GnuGP use this logic. Read more in
Using Encryption 153 .
You can set up the encryption parameters for a Trading Partner on the "Encryption" tab.
The "Encryption" tab
Encryption Setup
Asymmetrical Encryption
Private Key Infrastructure (PGP)
Key (email address of key owner)
No Encryption
Folders Tab
Within the HIPAAsuite Communications Directory, each Trading Partner has his own
folder. This keeps files finely separated and in order. Here is where you can set this up.
Read more in Defining Communications Directory 112 .
© 2012
142
The HIPAAsuite Claim Payment Master
The "Folders" tab
Outgoing Files Root — This field has a pre-generated path. You can change this
path by changing the EDI Root Directory.
Trading Partner's Outbox — Mandatory setting. Click on the three-dots button to
access the "Select Folder" window. There you choose an existing folder or create a
new one.
Processed Files Root — This field has a pre-generated path. You can change this
path by changing the EDI Root Directory.
Trading Partner's Repository — Mandatory setting. Click on the three-dots button
to access the "Select Folder" window. There you choose an existing folder or create
a new one.
Once you have specified the directory settings, click on the "Create Folders Using Trading
Partner ID."
The "Create Folders Using Trading Partner ID" button
File Naming Convention - Health Insurance Exchanges (HIX) demand that a carrier
adheres to more or less complex File naming conventions. Since these conventions
are often really complicated we decided to hard code several schemes. California,
© 2012
EDI Exchange
143
Maryland, DC and the CMS scheme are currently configured and we will add other
schemes if needed.
CORE Tab
This tab stores settings for the use of CORE-Compliant SOAP- and MIME-enveloped
transactions. When using a Requester or similar application, these settings apply to the
information source. When using a Responder or similar application, these settings apply
to the information requester/receiver.
CORE settings tab
UserName - UserName portion of the username authentication token. Used to verify a
Trading Partner's Username token's Username or in your own Username token
authenticate yourself to a Trading Partner's CORE-compliant servi e.
Password - Password portion of the username authentication token. Used to verify a
Trading Partner's Username token's Password or in your own Username token to
authenticate yourself to a Trading Partner's CORE-compliant service.
SSL Certificate - Instead of Username tokens, use an SSL certificate to verify a
Trading Partner's identity or access a Trading Partner's CORE-compliant service. Not
currently implemented.
RealTime
© 2012
144
The HIPAAsuite Claim Payment Master
o MIME Address - Trading Partner's web address for MIME Real-Time transactions.
o SOAP Address - Trading Pertner's web address for SOAP Real-Time transactions.
Batch
o MIME Submission Address - Trading Partner's web address for MIME Batch
transactions.
o MIME Retrieval Address - Some Trading Partners may use a different address to
submit or retrieve batch transactions. Use this field for a retrieval-specific address.
o SOAP Submission Address - Trading Partner's web address for SOAP Batch
transactions.
o SOAP Retrieval Address - Some Trading Partners may use a different address to
submit or retrieve batch transactions. Use this field for a retrieval-specific address.
7.4.2
Using Built-in FTP Client
EDI Exchange has a built-in FTP client. This utility allows you to drop-off and pick-up files
from a trading partner that you have defined in the "Trading Partners" menu (see Setting
up Trading Partners 130 .)
Follow the instructions below to exchange EDI files with your Trading Partner.
1. To access the FTP client, select "FTP Client" under the "EDI Exchange" menu item.
© 2012
EDI Exchange
The "FTP Client" menu item
2. The following window will appear.
© 2012
145
146
The HIPAAsuite Claim Payment Master
The built-in FTP client
3. Click the "Connect to Trading Partner" button on the FTP client window.
The "Connect to Trading Partner" button
4. The following screen opens.
Selecting a Trading Partner for FTP transfer
5. Highlight the trading partner that you want to connect to.
6. Click on the "Upload" button to connect to the "Put" directory that you set up in the
trading partner screen.
The "Upload" button
Or click on the "Download" button to connect to the "Get" directory that you set up in
the trading partner screen.
© 2012
EDI Exchange
147
The "Download" button
5. Once you have chosen a trading partner, the following fields will contain values derived
from the trading partner's properties. You can change them manually if you need.
FTP server — IP Address or URL of the FTP server.
Username
Password
Directory — If you leave this value blank, the FTP root directory will be opened.
Secure FTP — If you enable this option, then you can select between implicit
and explicit FTPs. See Setting up Trading Partners 130 for an explanation of the
two secure methods:
Explicit FTPS Connection
Implicit FTPS Connection
Note: You can also fill in the connection information manually. In this case, the entered credentials
will not be saved once you close the FTP client window. Click on the "Connect" button to establish
connection to the FTP server.
4. Once connected, the content of the folder on the server is displayed. On the right
© 2012
148
The HIPAAsuite Claim Payment Master
side, you can browse your local PC.
5. To upload a file to the server, select the file on your local PC and click on the "Put"
button.
The file will appear in the remote folder. You will receive the "File <filename>
successfully uploaded" message on the bottom status bar of the FTP client.
6. To download a file from the server, select a file in the left side, and then click on the
"Get" button.
The file will appear in the local folder. You will receive the "File <filename> successfully
© 2012
EDI Exchange
149
downloaded" message on the bottom status bar of the FTP client.
7.4.3
Creating a Trading Partner Automatically
When you process a file with EDI Exchange the sender's ID is compared to the trading
partners on file. If the trading partner does not exist you have the opportunity to create
a rudimentary new trading partner record. Now you have the choice to either create this
new record, process the file without the trading partner record or to abort the
operation.
The "New Trading Partner" dialog box
If you abort the process, you still will get the EDI file analysis.
© 2012
150
The HIPAAsuite Claim Payment Master
EDI compliance check results after further processing was aborted.
Files without a valid trading partner will be placed into the "suspended files" directory.
The final action taken after the analysis is recorded at the end of the results.
This file's processing was aborted. The file was moved to the suspended files folder
7.4.4
Certificate based authentication in SFTP
SFTP or FTP over secure shell as it is also known is deemed to be the most secure method
of file transport. There are 3 methods of authentication in Sftp.
1. with a user name and password
2. with a user name and a private key cryptographic certificate and
3. with a user name, a certificate and a password
© 2012
EDI Exchange
151
When you select SFTP as the FTP protocol, you will see two check boxes appear.
The sub choices when you select SFTP
Leaving both check boxes unchecked will result in the first option: Authentication with
user name and password. You can also check just the user name and password with the
same result.
In order to use the certificate based authentication you need to create and link to your
own certificate. The certification module that HIPAAsuite employs uses a so called private
key SSH2 certificate in pem format.
How do you create such a certificate? Here is one way:
The free secure shell program putty has the necessary tools. Download putty from
www.putty.org When you install the program you will see several program installed on
your computer.
The programs and files that come with putty
One of the programs is puttygen.exe. This program creates the necessary keys. When
you start it up, you can generate a key pair.
© 2012
152
The HIPAAsuite Claim Payment Master
Creating a public/private key pair with puttygen
You can save the public and private keys separately as .ppk files but that is not what we
need. But puttygen has also tool to convert the keys to pem files. The top menu has a
tab "Conversions"
Converting the SSH key into a pem certificate
When we click on "Export OptnSSH key" we can then save the key with an .pem ending
and that is it.
© 2012
EDI Exchange
7.5
Using Encryption
7.5.1
About Encrytion
153
EDI Exchange supports the Private Key Infrastructure (PKI) encryption method. This
type of encryption is the most generally accepted method of protecting EDI Files from
being pried upon by unauthorized persons. Without going further into the details of PKI,
Public-key encryption is a cryptographic technique which enables users to securely
communicate on an insecure public network, and reliably verify the identity of a user via
digital signatures. Read more in Private Key Infrastructure.
A public-key infrastructure (PKI) is a system for the creation, storage, and distribution of
digital certificates which are used to verify that a particular public key belongs to a
certain entity. The PKI creates digital certificates which map public keys to entities,
securely stores these certificates in a central repository, and revokes them if needed.
A PKI consists of:
A certificate authority (CA) that both issues and verifies the digital certificates.
A registration authority which verifies the identity of users requesting information
from the CA.
A central directory is a secure location to store and index keys.
A certificate management system.
EDI Exchange relies on other software to establish the PKI. It only uses the capabilities of
these programs through their Application Programming Interface (API). You need to
separately install either PGP Desktop 157 or the open source GPG4Win programs and set
them up with the public keys of your trading partners and your own private key.
7.5.2
Setting up Encryption
EDI Exchange allows you to set up the encryption for your EDI files. Follow the steps
below.
1. Access the "Encryption Setup" window by selecting "Encryption Setup" under the "EDI
Exchange" menu.
© 2012
154
The HIPAAsuite Claim Payment Master
The encryption setup menu
2. The following window will appear.
© 2012
EDI Exchange
155
The encryption setup screen
3. In this window define the following options:
General Encryption Options
Original Unencrypted Outbound Files
Keep a Copy in an 'Unencrypted' Folder — When the HIPAAsuite program
creates an EDI file for a trading partner that has selected encryption, you can
keep an unencrypted copy in the "Outbox/[trading partner]/Unencrypted"
folder. This is useful when you need to go back to the file and check on
problems.
Note: Once you encrypt a file with the public key of your trading partner, you will not be able to
open it again. Only the owner of the private key can decrypt it and read it.
Delete the Original File — If you do not want to keep the unencrypted copy,
select this option.
Key Pair Information
© 2012
156
The HIPAAsuite Claim Payment Master
Name (e-mail) for Public Key — Enter name or e-mail that will be used to
encrypt files for you by your trading partners.
Pass Phrase for Private Key — Enter passphrase here to decrypt files encrypted
previously with the pass phrase.
Note: The keys are identified by the email address of their owner.
Crypto Program
GnuPG — Select this option if you have already installed the GnuPG
and want to use it.
158
software
The configuration using GnuPG
Note: When you select GnuPG, the program checks if the executable gpg.exe/gpg2.exe is present
on your computer. If it is not found, you will have to specify the path manually or install the program
first.
PGP Desktop — Select this option if you have already installed the PGP Desktop
157 program and want to use it. You will see a different lower half of the
screen, where you can indicate the location of the keys. PGP Desktop uses "key
rings" — encrypted folders that contain all your keys. The location of these two
files is very important for PGP Desktop.
The configuration using PGP Desktop
4. Once the settings are done, click the "Save" button.
© 2012
EDI Exchange
157
The "Save" button
5. The following notification will appear. Click the "OK" button.
Notification window
7.5.3
Using PGP Desktop
Pretty Good Privacy (PGP) is a data encryption and decryption computer program that
provides cryptographic privacy and authentication for data communication. PGP is often
used for signing, encrypting and decrypting texts, e-mails, files, directories and whole
disk partitions to increase the security of e-mail communications. PGP and similar
products follow the OpenPGP standard (RFC 4880) for encrypting and decrypting data.
For more information, see How PGP works.
EDI Exchange supports PGP encryption and works seamlessly with PGP Desktop and open
source Gpg4Win applications.
PGP Desktop (Symantec’s encryption solutions) is a comprehensive suite of encryption
applications which provides flexible, multi-layered encryption by bundling Drive Encryption
to secure the files stored on local hard drives, and Desktop Email Encryption to secure
confidential data in email. For more information, see PGP Desktop documentation.
PGP Desktop key features:
1. Hard drive encryption software locks down the entire contents of a laptop, desktop,
external drive, or USB flash drive, including boot sectors, system, and swap files.
2. Enables encrypted email and secure AIM® Instant Messages.
3. Creates storage-independent encrypted containers for transport and sharing of specific
files using included utilities; PGP Self-Decrypting Archive, PGP Virtual Disk, and PGP
Zip.
4. Includes PGP Shredder which can completely destroy unwanted disk-based files and
folders.
5. Drive Encryption can be centrally deployed and managed by Symantec Encryption
Management Server.
© 2012
158
The HIPAAsuite Claim Payment Master
PGP Desktop key benefits:
1. Secures email without burdening users, to improve compliance with policies and
regulations without hindering productivity.
2. Allows users to easily and transparently share encrypted files and folders, improving
data security without impacting user productivity.
3. Management by Encryption Management Server centralizes creation, deployment and
management of data security policies and reporting.
PGP Desktop bundles the following products:
1. Drive Encryption. See System Requirements.
2. Desktop Email Encryption. See System Requirements.
3. Encryption Management Server. See System Requirements.
7.5.4
Using GnuPG
GnuPG is an Open Source project for the implementation of the OpenPGP (Pretty Good
Privacy) protocols of encryption. GnuPG allows to encrypt and sign your data and
communication, features a versatile key management system as well as access modules
for all kinds of public key directories. GnuPG, also known as GPG, is a command line tool
with features for easy integration with other applications. Front-end applications and
libraries are also available. Version 2 of GnuPG also provides support for S/MIME.
GnuPG is a free software, so it can be freely used, modified and distributed under the
terms of the GNU General Public License.
We recommend Gpg4Win for encrypting of your files and emails. Gpg4Win supports both
relevant cryptography standards, OpenPGP and S/MIME (X.509), and is the official GnuPG
distribution for Windows. Gpg4Win contains Kleopatra as one of its Free Software
components. For more information, see Gpg4Win documentation available both in PDF
and HTML versions.
© 2012
EDI Exchange
159
Kleopatra, a certificate manager for OpenPGP and X.509 (S/M IM E) and common crypto dialogs
With Kleopatra, it is easy to manage your certificates and create your own ones. It
seamlessly integrates with GnuPG. You can manage the key that you receive from your
trading partners, because there is a screen to view the details of a key.
Certificate details with Kleopatra
© 2012
160
The HIPAAsuite Claim Payment Master
7.6
Using EDI Exchange Features
7.6.1
Accessing Inbox Manager
Using the Inbox Manager you can access the most important functions of EDI Exchange.
Inbox Manager allows you to download EDI files into the "Inbox" folder and process these
files. This screen handles the post-processing of the EDI files, their compliance check and
auto-processing options.
1. To access the Inbox Manager, click the "Inbox Manager" under the "EDI Exchange"
menu.
The "Inbox M anager" menu item
2. The following screen will come up.
© 2012
EDI Exchange
161
The "Inbox M anager" window
Read more in:
Downloading EDI Files From FTP Server
Processing EDI Files
165
Selecting and Checking EDI Files
7.6.2
163
161
Checking EDI Files
EDI file analysis based on the HIPAA standards. Compliance with HIPAA EDI rules is an
essential part of the exchange of EDI documents. The standards are the only agreed upon
rules that sender and receiver use to exchange data from completely different backend
systems. Strict adherence is therefore necessary to guarantee frictionless operation.
Unfortunately, HIPAA compliance is difficult and the truth is that many HIPAA EDI files
are truly bad. Syntax errors, omitted loops, missing elements, wrongly formatted
elements — these are the most common EDI errors. Without a true analysis, it is difficult
to say what data ends up in your system.
EDI Exchange has a built-in compliance engine that analyzes each incoming and outgoing
EDI transaction. Line by line, element by element, error reporting provides a powerful
tool to determine the quality of the incoming and outgoing EDI files. All HIPAA file
versions are supported. The compliance check creates a detailed report that lists every
© 2012
162
The HIPAAsuite Claim Payment Master
compliance issue. Outgoing files can also be checked and individual transaction in
violation of HIPAA rules can be held back.
Note: You can enable automatic compliance check on outgoing and incoming EDI files. See Setting up
Incoming and Outgoing Files Options 126 .
Follow the instructions below to check EDI files for compliance.
1. Select "Check EDI File" under the "EDI Exchange" menu item.
The "Check EDI File" menu item
Alternatively, you can click on the "Select and Check EDI File" button in the Inbox
Manager window. Read more in Accessing Inbox Manager 160 .
© 2012
EDI Exchange
163
The "Select and Check EDI File" button
2. In the opened file selection dialog, select an EDI file and click "Open."
3. In the Inbox Manager, you can see the result messages for the operation. The details
are displayed in the "Activity Log and Warnings" area.
The "Activity Log and Warnings" area displaying log messages
7.6.3
Downloading EDI Files From FTP Server
EDI Exchange Inbox Manager allows you to load EDI files into the "Inbox" folder and
process these files. Be sure you have setup FTP settings in the "Remote FTP" tab of the
Trading Partner window (see Setting up Trading Partners 130 ).
Follow the instructions below to upload EDI files into the "Inbox" folder.
© 2012
164
The HIPAAsuite Claim Payment Master
1. Access the Inbox Manager by clicking the "Inbox Manager" under the "EDI Exchange"
menu.
The "Inbox M anager" menu item
2. Click the "Download from FTP Server" button.
The "Download from FTP Server" button
© 2012
EDI Exchange
165
3. When the process has been finished, the "Activity Log and Warnings" area displays the
report.
Activity Log and Warnings information
7.6.4
Processing EDI Files
EDI Exchange Inbox Manager allows you to process EDI files downloaded to the "Inbox"
folder beforehand.
Note: Once you have saved the auto-processing options (see Defining Auto-Processing Options 110 ),
the files will not only be analyzed but also processed according to the defined settings. The auto
processing enables you to combine and run multiple fulfillment steps together (for example, export,
saving, printing.)
1. Once Downloading EDI Files From FTP Server 163 is completed, and no errors are
displayed, click on the "Process Inbox" button. This will autoprocess all files present in
the EDI inbox directory.
© 2012
166
The HIPAAsuite Claim Payment Master
The "Process Inbox" button
2. Once the processing is completed, review the Activity Log and Warnings information.
Activity Log and Warnings information
7.6.5
Accessing EDI Receive Log
EDI Exchange has a file log. Each processed file creates an entry in the Trans_Log table.
You can access the "EDI Log" window to query this table and see what files came in and
how they were processed. You can access the EDI Receive Log once the application has
been initialized. Follow the instructions below.
1. To open the "EDI Log" window, select "EDI Receive Log" under the "EDI Exchange" menu
item.
© 2012
EDI Exchange
167
The menu for the EDI Receive Log
2. To display data, specify the time period and select trading partner.
Time Period — Period of time when the file was processed. Choose one of the
available options:
Receive Date
Load Date
Trading Partner Name — You can select your trading partner from the list. If
you select "---All---", all your trading partners will be included.
3. Click on the "Find Log Files" button to see the list of log files corresponding to your
query.
© 2012
168
The HIPAAsuite Claim Payment Master
Specifying the time period
4. The log will be displayed in form of a tree.
Displayed log
5. You can open the folder icons and see details related to each file.
© 2012
EDI Exchange
169
Details of the EDI Receive Log
If the records have been exported to the database, you can see the time, date and
record count.
7.6.6
Accessing EDI Send Log
This page contains instructions on how to access the "EDI Send Log" window. It becomes
available once EDI Exchange has been initialized.
1. Select "EDI Send Log" under the "EDI Exchange" menu.
© 2012
170
The HIPAAsuite Claim Payment Master
The "EDI Send Log" menu
2. The following window will appear:
The "EDI Send Log" screen
© 2012
EDI Exchange
171
3. To display the log data, select the time period and a trading partner.
Time Period — Period of time when the file was processed. Choose one of the
available options:
Receive Date
Load Date
Trading Partner Name — Select a trading partner in the list. If you select "--All---", all trading partners will be included.
4. Click on the "Find Log Files" button to display the list of log files corresponding to your
query.
7.6.7
Listing SEF Files
SEF (Standards Exchange Format) files are repositories of standards information that
define the format of EDI documents. SEF files are the basis for the compliance check
engine that EDI Exchange uses. These files contain all rules of the implementation guide
of a transaction. There is a SEF file for each transaction that EDI Exchange is licensed
for. For example, for 837 transactions we have SEF files for institutional, professional
and dental claims in 4010, 4010A1 and 5010A1 version and the 997 and 999 transactions.
1. To access the list of available SEF Files, select "SEF Files" under the "EDI Exchange"
menu.
© 2012
172
The HIPAAsuite Claim Payment Master
The "SEF Files" menu item
2. The "SEF Files" window will appear.
A list of SEF files
8
Creating 835 EDI Files
8.1
Setting up Company
When you create EDI files there are a few elements needed to identify your company as
© 2012
Creating 835 EDI Files
173
the sender, the producer of this EDI file. For this matter, use the company setup screen.
You can specify your company information and other setting related to your company
there.
Note: You need to configure the database first. See Setting up Database Connection
55
1. To configure the program options, select Setup Company Setup in the main menu.
The "Company Setup" menu
2. The following screen will appear.
The "Company Setup" window
3. You can configure the following options:
Company Information
EDI Version
Contact Information
ISA 14 and 15
Read the detailed descriptions further.
4. Once you have finished editing the options, click "Save."
© 2012
.
174
The HIPAAsuite Claim Payment Master
Company Information
Name — Company name. Obligatory option.
Address 1
Address 2
City — Obligatory option.
State
ZIP — Obligatory option.
ISA Segment Sender Identification — Important option. It identifies your
organization for all EDI transactions. Most commonly the Qualifier is "ZZ" and a free
form ID up to 15 character. Obligatory option.
Qualifier — Unique key to the trading partner database file. The qualifier has to be
2 bytes. Obligatory option. Approved qualifiers are:
01 Duns (Dun & Bradstreet)
14 Duns Plus Suffix
20 Health Industry Number (HIN)
27 Carrier Identification Number as assigned by HCFA
28 Fiscal Intermediary Identification Number as assigned by HCFA
29 Medicare Provider and Supplier Identification Number as assigned by HCFA
30 U.S. Federal Tax Identification Number
33 National Association of Insurance Commissioners Company Code (NAIC)
ZZ Mutually Defined
© 2012
Creating 835 EDI Files
175
The "Qualifier" drop-down menu
Application Sender's Code GS_2 — The option represents the program or machine
that created the file. Usually the same as the ISA Segment Sender Identification.
You can select other ID if you need. Obligatory option.
Tax ID — Obligatory option. Also called an Employer Identification Number (EIN).
Plan ID / Payor ID — Fill in your Payer ID and Plan ID if you have one; this is only
important for the 271 and 277 transactions. Optional setting.
Three letter identifier to prepend to all outgoing EDI files — Optional setting.
Makes your files easily identifiable.
EDI version
Specify EDI version:
only 4010
only 5010
Contact Information
© 2012
176
The HIPAAsuite Claim Payment Master
The contact information goes into the PER segment of outgoing transactions:
Contact Person
Telephone
Ext
Fax
E-mail
ISA 14 and 15
EDI files will be — ISA element 14 determines if the resultant file contains test or
production data:
test
production
Acknowledgement (TA1) req. — ISA element 15 indicates whether you want a TA1
acknowledgement for files that you send out.
8.2
Creating Company Setup Table
You can create the Company Setup Table by following the steps below in the HIPAA Claim
Payment Master.
1. To configure the program options, select Setup Create Company Setup Table in the
main menu.
The "Create Company Setup Table" menu
2. The following screen will appear.
© 2012
Creating 835 EDI Files
177
"Create Table" window
3. This window allows you to edit, save and run the table scripts.
4. Define the following options:
Database
Microsoft SQL Server
MySQL/Genetic
Company Setup Table Script — SQL statements to create the Company table in your
database.
Tip: You can modify the scripts so that they run on your specific database.
5. Once you have you modified the script, click "Save."
The "Save" button
6. Click "Execute Script" to create the table in the database.
© 2012
178
The HIPAAsuite Claim Payment Master
The "Execute Script" button
7. Once the table has been created successfully, you will see the following notification:
The success message
Warning: Executing the script will wipe out any previous table you have created. Remove the script
files once you are satisfied so nobody can occasionally destroy the database table.
Make sure there are no any error messages for successful table creation.
8.3
Creating 834 EDI Files from the Attached Database
The HIPAA Claim Payment Master has the capability to create 835 EDI files from the
records stored in the attached database. In general, any record that has been imported
by the HIPAA Claim Payment Master can be exported as EDI file.
Records that have been added through other processes outside of the HIPAA Claim
Payment Master have to be vetted for completeness. One way to do this is to create the
records and let the HIPAA Claim Payment Tool generate the EDI file. Now you can test
the EDI file for compliance with a free tool such as Softshare's EDI Notepad or full-fledged
HIPAA compliance tools. If you use the EDI Exchange module, you can check outgoing EDI
files on the fly and even withhold individual records that generate warning messages.
Follow the instructions below to create EDI files.
1. Select Data Export Create 835 EDI Files in the main menu.
The "Create 835 EDI Files" menu
2. The "Create 835 Transaction Sets" window will be displayed.
© 2012
Creating 835 EDI Files
179
The "Create 835 Transaction Sets" window
3. Before starting, enter values into the empty fields.
Tip: Once you have filled the fields out, the program will store your values. Next time you access the
window, the program will display your last configuration.
4. On top, see the query field. Here you can enter any query. Or use the query builder
discussed before and carry the query over into this screen.
Tip: Please, be reasonable, creating a file with many thousand records will take a few minutes.
5. The next block is concerned the ISA Segment.
Note: Some values are filled in and shaded out, they are created by the program. Other fields are blank
and you have to fill them out.
Sender ID Type, Sender ID — Your identifier. You can select "ZZ" and your name
(up to 15 letters) or your tax ID, etc. Fill in the sender's ID qualifier and ID.
Receiver ID Type, Receiver ID — An identifier that you can get from your trading
partner.
6. In the "GS Segment" add the following:
© 2012
180
The HIPAAsuite Claim Payment Master
Sender Code — Repeat your sender ID from ISA_06.
Receiver Code — Your trading partner should tell you the Receiver Code. If you are
in doubt, repeat "ISA_08."
7. Click the "Go!" button.
8. If some information is still missing, you will see an error message.
The information you put in the screen is now saved for future transactions and will
come up the next time you bring up this screen.
9. The EDI transaction is now displayed in the text box below.
10.The transaction exists only in memory. To save it to the disk, click on the "Write to
File" button.
A dialog box will pop up and ask you for a file name.
Provide a filename and save the EDI file.
11.Now you can click on "View EDI File" to see it in the EDI editor. Read more in Using
the EDI Editor 27 .
9
Bug Reporting and Program Update
9.1
Reporting an Issue
HIPAAsuite likes to make bug fixes fast and transparent. For this purpose we include n
Bug tracker with the HIPAA Eligibility Responder. btnet, Bugtracker in ASP.Net is an open
source project. HIPAAsuite implemented Bugtracker.Net in all its products to track bugs
and enhancements. One of the reason we liked btnet was the screen capture capabilities.
We adapted and included this facility.
1. You can reach the Issue Tracker under the Help menu. Click on Help Report an Issue
in the main menu.
© 2012
Bug Reporting and Program Update
181
The "Report an Issue" menu
Alternatively, you can use the Ctrl + I shortcut on your keyboard to call the Issue
Tracker. Some screens do not give you access to the menu while they are open, but
the key combination Crtl + I will call up the issue tracker report screen.
2. Click on "Capture" to snap a picture of your screen.
The "Capture" button
3. Using the mouse, select the area to make a screen-shot of and to attach to the bug
report.
© 2012
182
The HIPAAsuite Claim Payment Master
Selecting the area
4. Once you release the mouse button, the screen capture image appears in the
program.
You can enhance your screen shot with drawings. By pressing any key and holding down
the mouse while over the canvas, you can highlight in yellow, free draw in red or make
red arrows.
You can highlight sections as shown further.
High lighting a section
You can draw circles as displayed on the following screen-shot.
© 2012
Bug Reporting and Program Update
183
Circling a section
You can point arrows to pinpoint your concerns.
Drawing an arrow
5. Then enter as much information into the Description field as possible.
6. Now enter your email address so that we can get in contact with you.
7. Indicate whether this is a new bug or a follow up on an existing issue.
8. Then click on "Send."
9. Once the bug information has been submitted successfully, you will receive a
notification. Click "OK."
10.Then you will get updates on the issue by email.
9.2
Updating the Program
By default, the program checks for updates automatically. When the new version is out,
you will see an update report on the "Changes in Versions" window. It shows which
changes have been made and displays all differences between your version and the
current version. To continue with update, click "Update."
© 2012
184
The HIPAAsuite Claim Payment Master
The "Changes in Versions" screen with highlighted "Update" button
Then you will need to re-certify the application.
Specify a location on you local PC where to download the new version.
The "Save as" window with the "Save" button highlighted
Then the program will start downloading.
© 2012
Bug Reporting and Program Update
185
The "Downloading HIPAAClaimPyamentM aster32" popup
Then you will need to install the application.
The application installation window with the "Next>" button highlighted
Manual Updates
To switch off automatic updates and stick with the version you have, go select Setup
Options in the main menu.
The "Options" menu
Alternatively, you can click on the "Setup" button located on the main toolbar.
© 2012
186
The HIPAAsuite Claim Payment Master
The "Setup" button
The following screen will appear. Check the "Never check for update" option and click
"Save."
The "Options" window
To update the application manually, go to Help Check for Update in the main menu.
The "Check for Updates" menu item
© 2012
Back Cover