1
MySQL Workbench
Abstract
This is the MySQL™ Workbench Reference Manual. It documents both MySQL Workbench Commercial and MySQL
Workbench Community editions 6.2 through 6.2.4.
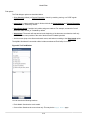
If you have not yet installed MySQL Workbench Community please download your free copy from the download site.
MySQL Workbench Community is available for Windows, OS X, and Linux.
For notes detailing the changes in each release, see the MySQL Workbench Release Notes.
For legal information, see the Legal Notices.
Document generated on: 2015-01-17 (revision: 41303)
Table of Contents
Preface and Legal Notices ................................................................................................................ vii
1 General Information ........................................................................................................................ 1
1.1 What Is New in MySQL Workbench 6 ................................................................................... 1
1.1.1 New in MySQL Workbench 6.2 .................................................................................. 1
1.1.2 New in MySQL Workbench 6.1 ................................................................................ 13
1.1.3 New in MySQL Workbench 6.0 ................................................................................ 28
1.2 MySQL Workbench Editions ............................................................................................... 40
2 Installation .................................................................................................................................... 43
2.1 System Requirements ........................................................................................................ 43
2.2 Command-line options ........................................................................................................ 44
2.3 MySQL Workbench on Windows ......................................................................................... 45
2.3.1 Installing ................................................................................................................. 45
2.3.2 Launching ............................................................................................................... 47
2.3.3 Uninstalling ............................................................................................................. 47
2.4 MySQL Workbench on Linux .............................................................................................. 48
2.4.1 Installing ................................................................................................................. 48
2.4.2 Launching ............................................................................................................... 51
2.4.3 Uninstalling ............................................................................................................. 51
2.5 MySQL Workbench on OS X .............................................................................................. 52
2.5.1 Installing ................................................................................................................. 52
2.5.2 Launching ............................................................................................................... 54
2.5.3 Uninstalling ............................................................................................................. 54
3 Configuration ................................................................................................................................ 55
3.1 User Accessibility Options .................................................................................................. 55
3.2 Workbench Preferences ..................................................................................................... 59
3.2.1 General Editors Preferences .................................................................................... 60
3.2.2 SQL Editor Preferences ........................................................................................... 61
3.2.3 Administration Preferences ...................................................................................... 67
3.2.4 Modeling Preferences .............................................................................................. 68
3.2.5 Fonts and Colors Preferences .................................................................................. 74
3.2.6 Advanced Preferences ............................................................................................. 75
3.2.7 Other Preferences ................................................................................................... 76
3.3 MySQL Workbench Settings and Log Files .......................................................................... 76
3.4 Tutorial: Add a Custom Link to the Home Page ................................................................... 78
4 The Home Screen ........................................................................................................................ 81
5 Administrative Tasks ..................................................................................................................... 85
5.1 Server Management ........................................................................................................... 85
5.1.1 MySQL Connection Navigator .................................................................................. 85
5.1.2 MySQL Connections ................................................................................................ 86
5.1.3 Server Logs .......................................................................................................... 114
5.1.4 Service Control ...................................................................................................... 116
5.1.5 Configuration (options file) ..................................................................................... 117
5.2 Users and Privileges ........................................................................................................ 118
5.3 Server Status ................................................................................................................... 122
5.4 Status and System Variables ............................................................................................ 123
5.5 Database Export and Import ............................................................................................. 125
5.6 MySQL Audit Inspector Interface ....................................................................................... 130
5.7 MySQL Enterprise Backup Interface .................................................................................. 134
5.7.1 General Requirements ........................................................................................... 134
5.7.2 Online Backup ....................................................................................................... 136
5.7.3 Backup Recovery .................................................................................................. 141
iii
MySQL Workbench
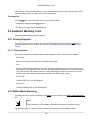
5.8 The wbcopytables Tool .....................................................................................................
6 Performance Tools ......................................................................................................................
6.1 Performance Dashboard ...................................................................................................
6.2 Performance Schema Reports ..........................................................................................
6.3 Visual Explain Plan ..........................................................................................................
6.4 Query Statistics ................................................................................................................
6.5 Tutorial: Using Visual Explain to improve query performance ..............................................
7 Database Development ...............................................................................................................
7.1 Visual SQL Editor ............................................................................................................
7.1.1 SQL Query Window ...............................................................................................
7.1.2 SQL Query Window Toolbar ..................................................................................
7.1.3 Query and Edit Menus ...........................................................................................
7.1.4 Results Window ....................................................................................................
7.1.5 SQL Snippets tab ..................................................................................................
7.1.6 Context Sensitive Help ..........................................................................................
7.1.7 Output History Panel .............................................................................................
7.1.8 Table Data Search Panel .......................................................................................
7.1.9 Export a Result Set ...............................................................................................
7.1.10 Tutorial: Adding Data ...........................................................................................
7.1.11 The MySQL Table Editor .....................................................................................
7.1.12 Code Generation Overview ..................................................................................
7.2 Object Management .........................................................................................................
7.2.1 Object Browser and Editor Navigator ......................................................................
7.2.2 Session and Object Information Panel ....................................................................
7.2.3 Schema and Table Inspector .................................................................................
8 Database Design / Modeling ........................................................................................................
8.1 Modeling Interface ............................................................................................................
8.1.1 Model Editor ..........................................................................................................
8.1.2 EER Diagram Editor ..............................................................................................
8.1.3 Creating Tables .....................................................................................................
8.1.4 Creating Foreign Key Relationships ........................................................................
8.1.5 Creating Views ......................................................................................................
8.1.6 Creating Routines and Routine Groups ...................................................................
8.1.7 Creating Layers .....................................................................................................
8.1.8 Creating Notes ......................................................................................................
8.1.9 Creating Text Objects ............................................................................................
8.1.10 Creating Images ..................................................................................................
8.2 Additional Modeling Tools .................................................................................................
8.2.1 Printing Diagrams ..................................................................................................
8.2.2 DBDoc Model Reporting ........................................................................................
8.2.3 Schema Validation Plugins .....................................................................................
8.3 Modeling Tutorials ............................................................................................................
8.3.1 Creating a Model ...................................................................................................
8.3.2 Basic Modeling ......................................................................................................
8.3.3 Importing a Data Definition SQL Script ...................................................................
8.3.4 Using the Default Schema .....................................................................................
8.3.5 Documenting the sakila Database ..........................................................................
8.4 Forward and Reverse Engineering ....................................................................................
8.4.1 Forward Engineering ..............................................................................................
8.4.2 Reverse Engineering .............................................................................................
8.5 Schema Synchronization and Comparison .........................................................................
8.5.1 Database Synchronization ......................................................................................
8.5.2 Compare and Report Differences in Catalogs ..........................................................
8.6 Table Templates ..............................................................................................................
iv
144
149
149
150
154
156
158
165
165
166
167
169
170
172
174
175
177
178
179
183
192
197
197
200
201
205
206
206
223
227
229
233
234
238
240
241
242
243
243
243
247
248
248
255
257
259
261
263
263
272
282
282
287
289
MySQL Workbench
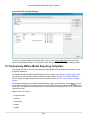
8.7 Customizing DBDoc Model Reporting Templates ...............................................................
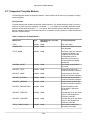
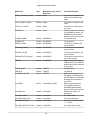
8.7.1 Supported Template Markers .................................................................................
8.7.2 Creating a Custom Template .................................................................................
9 Database Migration Wizard .........................................................................................................
9.1 General installation requirements ......................................................................................
9.1.1 ODBC Libraries .....................................................................................................
9.1.2 ODBC Drivers .......................................................................................................
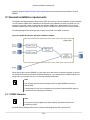
9.2 Migration Overview ...........................................................................................................
9.2.1 A visual guide to performing a database migration ...................................................
9.2.2 Migrating from supported databases .......................................................................
9.2.3 Migrating from unsupported (generic) databases .....................................................
9.3 Conceptual DBMS equivalents ..........................................................................................
9.4 Microsoft Access Migration ...............................................................................................
9.5 Microsoft SQL Server migration ........................................................................................
9.5.1 Preparations ..........................................................................................................
9.5.2 Drivers ..................................................................................................................
9.5.3 Connection Setup ..................................................................................................
9.5.4 Microsoft SQL Server Type Mapping ......................................................................
9.6 PostgreSQL migration ......................................................................................................
9.6.1 Preparations ..........................................................................................................
9.6.2 Drivers ..................................................................................................................
9.6.3 Connection Setup ..................................................................................................
9.6.4 PostgreSQL Type Mapping ....................................................................................
9.7 MySQL migration .............................................................................................................
9.8 Using the MySQL Workbench Migration Wizard .................................................................
9.8.1 Connecting to the databases ..................................................................................
9.8.2 Schemata Retrieval and Selection ..........................................................................
9.8.3 Reverse Engineering .............................................................................................
9.8.4 Object Selection ....................................................................................................
9.8.5 Migration ...............................................................................................................
9.8.6 Manual Editing ......................................................................................................
9.8.7 Target Creation Options .........................................................................................
9.8.8 Schema Creation ...................................................................................................
9.8.9 Create Target Results ............................................................................................
9.8.10 Data Migration Setup ...........................................................................................
9.8.11 Bulk Data Transfer ..............................................................................................
9.8.12 Migration Report ..................................................................................................
9.9 MySQL Workbench Migration Wizard FAQ ........................................................................
A MySQL Workbench Frequently Asked Questions ..........................................................................
B Keyboard Shortcuts ....................................................................................................................
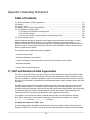
C Extending Workbench .................................................................................................................
C.1 GRT and Workbench Data Organization ...........................................................................
C.2 Modules ..........................................................................................................................
C.3 Plugins / Tools .................................................................................................................
C.4 Adding a GUI to a Plugin Using MForms ..........................................................................
C.5 The Workbench Scripting Shell .........................................................................................
C.5.1 Exploring the Workbench Scripting Shell ................................................................
C.5.2 The Shell Window .................................................................................................
C.5.3 The Files, Globals, Classes, Modules, and Notifications Tabs ..................................
C.6 Tutorial: Writing Plugins ...................................................................................................
D How To Report Bugs or Problems ...............................................................................................
E MySQL Enterprise Features ........................................................................................................
F MySQL Utilities ...........................................................................................................................
G MySQL Workbench Change History ............................................................................................
v
292
296
299
303
304
304
305
306
306
325
326
326
328
347
347
347
349
349
350
350
353
353
353
355
359
359
360
360
360
360
360
361
361
361
361
361
361
361
363
367
371
371
372
373
374
375
375
376
378
383
387
391
393
397
MySQL Workbench
H Third Party Licenses ...................................................................................................................
H.1 .NET Flat TabControl License ...........................................................................................
H.2 ANTLR License ...............................................................................................................
H.3 Bitstream Vera License ....................................................................................................
H.4 Boost Library License ......................................................................................................
H.5 Cairo License ..................................................................................................................
H.6 CTemplate (Google Template System) License .................................................................
H.7 cURL (libcurl) License ......................................................................................................
H.8 DockPanel Suite License .................................................................................................
H.9 Dojo Toolkit v1.7.0b1 License ..........................................................................................
H.10 GDAL/OGR License .......................................................................................................
H.11 GLib License (for MySQL Workbench) ............................................................................
H.12 Glitz License ..................................................................................................................
H.13 GNU Lesser General Public License Version 2.1, February 1999 ......................................
H.14 HtmlRenderer (System.Drawing.Html) .............................................................................
H.15 iODBC License ..............................................................................................................
H.16 Libiconv License ............................................................................................................
H.17 Libintl License ................................................................................................................
H.18 libpng License ...............................................................................................................
H.19 Libxml2 License .............................................................................................................
H.20 Libzip License ................................................................................................................
H.21 Lua (liblua) License ........................................................................................................
H.22 Paramiko License ..........................................................................................................
H.23 PCRE License ...............................................................................................................
H.24 Pixman License .............................................................................................................
H.25 PROJ.4 License .............................................................................................................
H.26 PyCrypto 2.6 License .....................................................................................................
H.27 PyODBC License ...........................................................................................................
H.28 PySQLite License ..........................................................................................................
H.29 Python License ..............................................................................................................
H.30 Scintilla License .............................................................................................................
H.31 ScintillaNET License ......................................................................................................
H.32 SQLCipher License ........................................................................................................
H.33 TinyXML License ...........................................................................................................
H.34 TreeViewAdv for .NET License .......................................................................................
H.35 VSQLite++ License ........................................................................................................
H.36 zlib License ...................................................................................................................
vi
399
401
401
401
402
403
403
404
404
405
405
409
410
410
418
419
419
420
420
422
423
423
424
424
425
427
427
429
430
430
440
442
443
443
443
444
445
Preface and Legal Notices
This is the User Manual for the MySQL Workbench.
For license information, see the Legal Notices. This product may contain third-party code. For license
information on third-party code, see Appendix H, Third Party Licenses.
Legal Notices
Copyright © 2006, 2015, Oracle and/or its affiliates. All rights reserved.
This software and related documentation are provided under a license agreement containing restrictions
on use and disclosure and are protected by intellectual property laws. Except as expressly permitted
in your license agreement or allowed by law, you may not use, copy, reproduce, translate, broadcast,
modify, license, transmit, distribute, exhibit, perform, publish, or display any part, in any form, or by any
means. Reverse engineering, disassembly, or decompilation of this software, unless required by law for
interoperability, is prohibited.
The information contained herein is subject to change without notice and is not warranted to be error-free.
If you find any errors, please report them to us in writing.
If this software or related documentation is delivered to the U.S. Government or anyone licensing it on
behalf of the U.S. Government, the following notice is applicable:
U.S. GOVERNMENT RIGHTS Programs, software, databases, and related documentation and
technical data delivered to U.S. Government customers are "commercial computer software" or
"commercial technical data" pursuant to the applicable Federal Acquisition Regulation and agency-specific
supplemental regulations. As such, the use, duplication, disclosure, modification, and adaptation shall be
subject to the restrictions and license terms set forth in the applicable Government contract, and, to the
extent applicable by the terms of the Government contract, the additional rights set forth in FAR 52.227-19,
Commercial Computer Software License (December 2007). Oracle USA, Inc., 500 Oracle Parkway,
Redwood City, CA 94065.
This software is developed for general use in a variety of information management applications. It is not
developed or intended for use in any inherently dangerous applications, including applications which
may create a risk of personal injury. If you use this software in dangerous applications, then you shall be
responsible to take all appropriate fail-safe, backup, redundancy, and other measures to ensure the safe
use of this software. Oracle Corporation and its affiliates disclaim any liability for any damages caused by
use of this software in dangerous applications.
Oracle is a registered trademark of Oracle Corporation and/or its affiliates. MySQL is a trademark of Oracle
Corporation and/or its affiliates, and shall not be used without Oracle's express written authorization. Other
names may be trademarks of their respective owners.
This software and documentation may provide access to or information on content, products, and services
from third parties. Oracle Corporation and its affiliates are not responsible for and expressly disclaim all
warranties of any kind with respect to third-party content, products, and services. Oracle Corporation and
its affiliates will not be responsible for any loss, costs, or damages incurred due to your access to or use of
third-party content, products, or services.
This document in any form, software or printed matter, contains proprietary information that is the exclusive
property of Oracle. Your access to and use of this material is subject to the terms and conditions of your
Oracle Software License and Service Agreement, which has been executed and with which you agree
to comply. This document and information contained herein may not be disclosed, copied, reproduced,
or distributed to anyone outside Oracle without prior written consent of Oracle or as specifically provided
vii
Legal Notices
below. This document is not part of your license agreement nor can it be incorporated into any contractual
agreement with Oracle or its subsidiaries or affiliates.
This documentation is NOT distributed under a GPL license. Use of this documentation is subject to the
following terms:
You may create a printed copy of this documentation solely for your own personal use. Conversion to other
formats is allowed as long as the actual content is not altered or edited in any way. You shall not publish
or distribute this documentation in any form or on any media, except if you distribute the documentation in
a manner similar to how Oracle disseminates it (that is, electronically for download on a Web site with the
software) or on a CD-ROM or similar medium, provided however that the documentation is disseminated
together with the software on the same medium. Any other use, such as any dissemination of printed
copies or use of this documentation, in whole or in part, in another publication, requires the prior written
consent from an authorized representative of Oracle. Oracle and/or its affiliates reserve any and all rights
to this documentation not expressly granted above.
For more information on the terms of this license, or for details on how the MySQL documentation is built
and produced, please visit MySQL Contact & Questions.
For help with using MySQL, please visit either the MySQL Forums or MySQL Mailing Lists where you can
discuss your issues with other MySQL users.
For additional documentation on MySQL products, including translations of the documentation into other
languages, and downloadable versions in variety of formats, including HTML and PDF formats, see the
MySQL Documentation Library.
viii
Chapter 1 General Information
Table of Contents
1.1 What Is New in MySQL Workbench 6 ........................................................................................... 1
1.1.1 New in MySQL Workbench 6.2 .......................................................................................... 1
1.1.2 New in MySQL Workbench 6.1 ........................................................................................ 13
1.1.3 New in MySQL Workbench 6.0 ........................................................................................ 28
1.2 MySQL Workbench Editions ....................................................................................................... 40
This chapter provides general information about MySQL Workbench and how it has changed.
MySQL Workbench is a graphical tool for working with MySQL Servers and databases. MySQL Workbench
fully supports MySQL Server versions 5.1 and above. It is also compatible with MySQL Server 5.0, but not
every feature of 5.0 may be supported. It does not support MySQL Server versions 4.x.
MySQL Workbench functionality covers five main topics:
• SQL Development: Enables you to create and manage connections to database servers. Along with
enabling you to configure connection parameters, MySQL Workbench provides the capability to execute
SQL queries on the database connections using the built-in SQL Editor.
• Data Modeling (Design): Enables you to create models of your database schema graphically, reverse
and forward engineer between a schema and a live database, and edit all aspects of your database
using the comprehensive Table Editor. The Table Editor provides easy-to-use facilities for editing Tables,
Columns, Indexes, Triggers, Partitioning, Options, Inserts and Privileges, Routines and Views.
• Server Administration: Enables you to administer MySQL server instances by administering users,
performing backup and recovery, inspecting audit data, viewing database health, and monitoring the
MySQL server performance.
• Data Migration: Allows you to migrate from Microsoft SQL Server, Microsoft Access, Sybase ASE,
SQLite, SQL Anywhere, PostreSQL, and other RDBMS tables, objects and data to MySQL. Migration
also supports migrating from earlier versions of MySQL to the latest releases.
• MySQL Enterprise Support: Support for Enterprise products such as MySQL Enterprise Backup and
MySQL Audit.
MySQL Workbench is available in two editions, the Community Edition and the Commercial Edition. The
Community Edition is available free of charge. The Commercial Edition provides additional Enterprise
features, such as access to MySQL Enterprise Backup and MySQL Audit, at low cost. For a complete
comparison, see http://www.mysql.com/products/workbench/features.html
For notes detailing changes made in each release of MySQL Workbench, see Appendix G, MySQL
Workbench Change History.
1.1 What Is New in MySQL Workbench 6
This section summarizes how the MySQL Workbench 6 series progressed with each minor release.
1.1.1 New in MySQL Workbench 6.2
This section summarizes many of the new features added to MySQL Workbench 6.2.x, in relation to
MySQL Workbench 6.1.x;.
1
New in MySQL Workbench 6.2
SQL Editor
Most of the changes and improvements were made to the SQL editor.
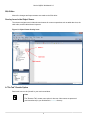
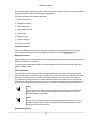
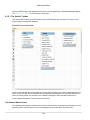
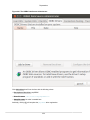
Overlay Icons in the Object Viewer
The schema navigator now includes shortcut buttons for common operations such as table data view, the
table editor, and the table/schema inspector.
Figure 1.1 Object Viewer Overlay Icons
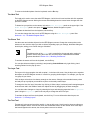
A "Pin Tab" Results Option
Result tabs can now be "pinned" to your result set window.
Note
The "Rename Tab" context menu option is also new. New names are preserved
(and remembered) in your Workbench's cache/ directory.
2
New in MySQL Workbench 6.2
Figure 1.2 Pin Tab
Microsoft Access to MySQL Migration
The migration wizard now supports Microsoft Access migration. Select "Microsoft Access" as your source
database in the wizard, use MySQL as your target source database, and then execute. For additional
information, see Section 9.4, “Microsoft Access Migration”.
MySQL Fabric Integration
MySQL Fabric cluster connectivity was added: Browse, view status, and connect to any MySQL instance in
a Fabric Cluster.
Note
This requires Connector/Python and MySQL Utilities 1.4.3+ installed, including the
Python module.
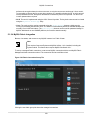
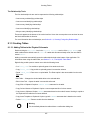
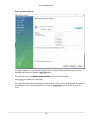
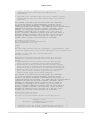
To set up a managed Fabric connection, create a new MySQL connection with the new MySQL Fabric
Management Node connection method. The connection tiles have a different look:
3
New in MySQL Workbench 6.2
Figure 1.3 Fabric Connection Group Tile
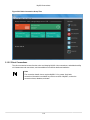
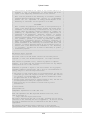
Clicking the new fabric group tile shows the managed connections:
4
New in MySQL Workbench 6.2
Figure 1.4 Fabric Connection Group Tiles
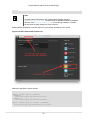
Visual Explain / Execution Plan Improvements
The Visual Explain Execution Plan feature was improved. A list of changes includes:
• An "Execution Plan" tab was added to the results view
• All statements now offer a "Visual Explain" execution plan
• The layout changed, and was improved to allow easier navigation in large query plans
5
New in MySQL Workbench 6.2
Figure 1.5 Execution Plan Explained
Spatial View Panel
GIS support for InnoDB tables is now supported to make it easier to visualize spatial and geometry data
in a geographic context. The new spatial view panel renders data from each row into a separate and
selectable element. When clicked, you can view the rest of the data from that row in the textbox. If you
have multiple queries with geometry data, you can overlay them onto the same map. View options include
the Robinson, Mercator, Equirectangular, and Bonne projection methods.
Note
GIS support for InnoDB tables was added in MySQL server 5.7.
6
New in MySQL Workbench 6.2
Figure 1.6 Spatial View Example
Geometry Data Viewer
The SQL field and form editors were updated to support the GEOMETRY datatype. You can view geometry
data, such as polygons, from a single row as an image or as text. The available formats include WKT,
GeoJSON, GML, and KML.
7
New in MySQL Workbench 6.2
Figure 1.7 Geometry Data Viewer
Additional New SQL Editor Features
• Result Set Widths: resized result set column widths are now preserved and remembered. This data is
saved under Workbench's cache/ directory using the schema.table.column format.
• Opened, closed, and reordered SQL editor tabs are now properly saved and restored. The scroll position
and cursor locations are also remembered.
• Shared Snippets: these allow multiple users to share SQL code across a shared MySQL connection.
They are stored in a schema named .mysqlworkbench on the connected MySQL server. by storing the
snippets in a shared MySQL instance. For additional information, see Section 7.1.5, “SQL Snippets tab”.
• The full SQL syntax error is now viewable by hovering over the error response message.
• The Query Status tab was improved to include graphs and additional information.
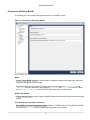
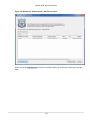
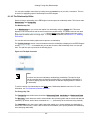
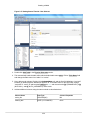
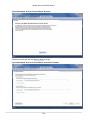
Execute SQL Scripts
The new Run SQL Script dialog executes an SQL script without loading it into the SQL editor. This is
useful because loading large scripts for editing can cause performance problems related to increased
memory usage and required processing for editor features such as syntax highlighting, syntax checking,
and code-folding. The dialog lets you preview a part of the script, optionally specify a default schema, and
optionally set the default character set to use for the imported data. The output window shows warnings,
messages, and an execution progression bar. Select Run SQL Script from the File menu to execute this
wizard.
8
New in MySQL Workbench 6.2
Figure 1.8 Run SQL Script
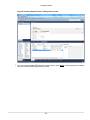
Model Script Attachments
Previously, MySQL Workbench modeling supported attaching SQL script files to models, usually for
documentation and organization purposes. You can now include attached SQL files to the output script
when performing forward engineering or synchronization operations.
9
New in MySQL Workbench 6.2
Figure 1.9 Data Modeling Script Attachments
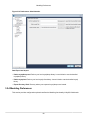
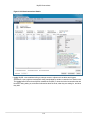
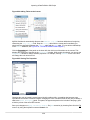
Client Connections and Metadata locks
The Client Connections management window has a new Show Details window. This window's three tabs
are:
• Details: connection details such as Process ID, Type, User, Host, Instrumented, and additional
information.
• Locks: MySQL uses metadata locking to manage access to objects such as tables and triggers.
Sometimes a query might be blocked while being manipulated by another connection from another user.
The Locks feature utilizes these MySQL metadata locks (MDL) to show the locked connections that are
blocked or being waiting on, and shows information about the locks, what they are waiting for, and what
they hold.
10
New in MySQL Workbench 6.2
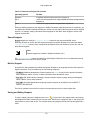
Figure 1.10 Metadata Locks Browser
Note
The metadata lock information is provided in the performance schema as of
MySQL server 5.7.3.
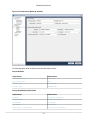
• Attributes: these are connection attributes such as OS, Client Name, Client Version, and Platform.
11
New in MySQL Workbench 6.2
Figure 1.11 Client Connection Attributes
Note
This feature uses performance schema details from MySQL server 5.7 and above.
For additional information, see Section 5.1.2.5, “Client Connections”.
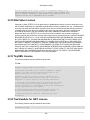
Additional New Features
• Performance columns (that display sizes) now have an option to alter the value units. They can be set to
KB, MB, or GB. Right-click on a column header and choose Set Display Unit.
• The migration wizard can now resume operation if a data copy failed during a database migration from,
for example, a timeout or network failure. Click Resume retry the data copy, and MySQL Workbench
locates the last row that was copied successfully and attempts to restart the copy from that row.
• The MySQL connection password is now remembered across the MySQL Workbench session, even if it
not stored in the keychain. This is so you do not need to re-enter it whenever a new MySQL connection
is needed.
• Under Modeling, the Role Editor now has "Add Everything" and "Check All Privileges" options.
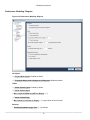
• The Preferences layout changed. The tabs were replaced by a list using a horizontal sidebar, and
additional category names were added. For additional information, see Section 3.2, “Workbench
Preferences”.
• Keyboard shortcuts now function in the Scripting Shell.
• Model diagram notes can now be resized and automatically rearranged. You can also change the style
attributes such as the font, background color, and text color.
12
New in MySQL Workbench 6.1
Figure 1.12 Model Diagram Note Formatting
1.1.2 New in MySQL Workbench 6.1
This section summarizes many of the new features added to MySQL Workbench 6.1.x, in relation to
MySQL Workbench 6.0.x;.
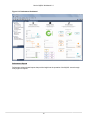
New Navigator PERFORMANCE Section
The new PERFORMANCE section includes Dashboard, Performance Reports, and Performance
Schema Setup pages. Generally, this new performance reporting feature provides a graphical
representation of key statistics from the MySQL server status, and provides an overview of the MySQL
server subsystems.
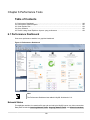
Dashboard
View server performance statistics in a graphical dashboard.
13
New in MySQL Workbench 6.1
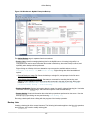
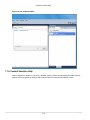
Figure 1.13 Performance Dashboard
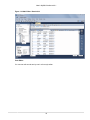
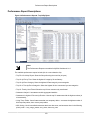
Performance Reports
Performance schema based reports that provide insight into the operation of the MySQL server through
many high-level reports.
14
New in MySQL Workbench 6.1
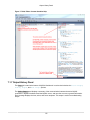
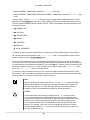
Figure 1.14 Performance Reports: Top I/0 By Bytes
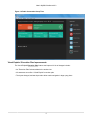
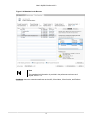
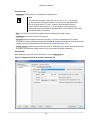
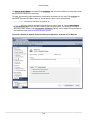
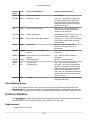
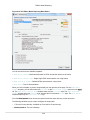
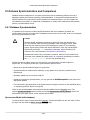
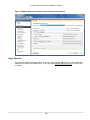
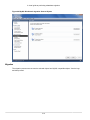
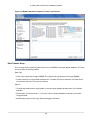
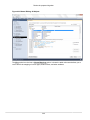
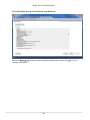
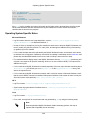
Performance Schema Setup
A GUI for configuring and fine tuning the Performance Schema instrumentation. Initially, this loads an
"Easy Setup" page that is enough for most users. Slide the "Performance Schema Full Enabled" slider to
YES to enable all available Performance Schema instruments.
15
New in MySQL Workbench 6.1
Figure 1.15 Performance Schema Setup: Easy Setup
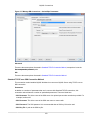
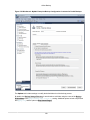
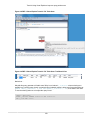
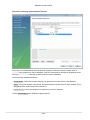
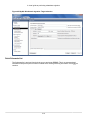
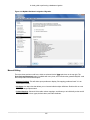
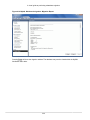
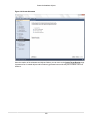
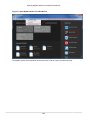
Clicking Show Advanced provides methods to fine tune the Performance Schema instrumentation.
16
New in MySQL Workbench 6.1
Figure 1.16 Performance Schema Setup: Introduction
For additional information, see Chapter 6, Performance Tools.
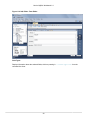
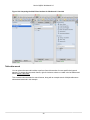
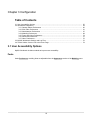
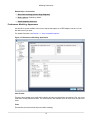
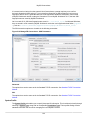
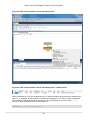
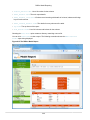
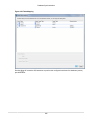
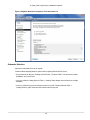
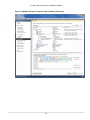
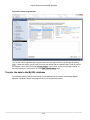
Server Variable Groupings
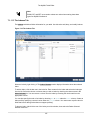
Variables can now be organized using custom groupings in the Status and System Variables
Management tab.
To create a custom group, right-click on a variable and choose either Add to Custom Category (to create
a new category), or an existing custom category. For additional information, see Section 5.4, “Status and
System Variables”.
17
New in MySQL Workbench 6.1
Figure 1.17 Status And System Variables: Custom
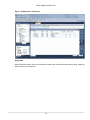
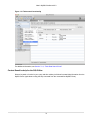
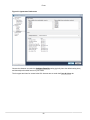
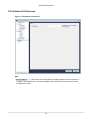
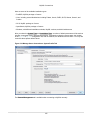
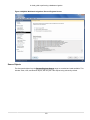
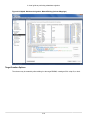
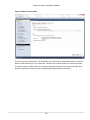
SQL Editor Views
Additional viewing options were added for executed statements:
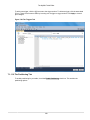
Result Grid
Available previously, and it remains the default view.
18
New in MySQL Workbench 6.1
Figure 1.18 SQL Editor: Result Grid
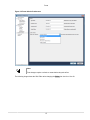
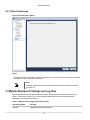
Form Editor
You can now edit records row by row in a form style editor.
19
New in MySQL Workbench 6.1
Figure 1.19 SQL Editor: Form Editor
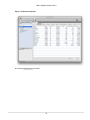
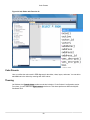
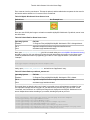
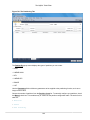
Field Types
Displays information about the selected fields, similar to passing in --column-type-info from the
command line client.
20
New in MySQL Workbench 6.1
Figure 1.20 SQL Editor: Field Types
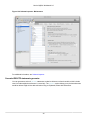
Query Stats
Query statistics are taken from the Performance Schema, and includes information about timing, temporary
tables, indexes, joins, and more.
21
New in MySQL Workbench 6.1
Figure 1.21 SQL Editor: Query Stats
Home Screen Features
Several behavioral improvements were made to the MySQL Workbench Home screen, including:
• Connection tiles can now be repositioned by using drag and drop
• A script or model file can be dragged into a MySQL connection tile
• The following right-click options were added to the connection tiles: Copy JDBC Connection String and
Copy Connection String
• Right-clicking a blank area in the MySQL Connections area now offers an option to create a New
Connection From Clipboard
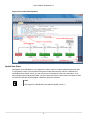
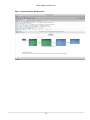
Visual Explain
The layout changed, and additional information is now viewable by hovering over the fields. It also displays
traditional EXPLAIN output in a separate tab, and the Raw Explain Data (as JSON) in another. For
MySQL server 5.7+, the new "cost information" (such as "query_cost" and "sort_cost) is also utilized.
22
New in MySQL Workbench 6.1
Figure 1.22 Visual Explain: Workbench 6.0
23
New in MySQL Workbench 6.1
Figure 1.23 Visual Explain: Workbench 6.1
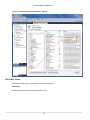
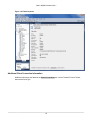
Table Inspector
View table information, similar to the Schema Inspector. This also has a simpler and easier to use interface
for analyzing and creating indexes for your tables.
24
New in MySQL Workbench 6.1
Figure 1.24 Table Inspector
Additional Client Connection Information
Additional information was added to the Client Connections tab, such as Thread ID, Parent Thread,
Instrumented, and Type.
25
New in MySQL Workbench 6.1
Figure 1.25 Client Connections: MySQL Workbench 6.0
Figure 1.26 Client Connections: MySQL Workbench 6.1
Also, a Thread Stack view option was added by right-clicking a connection entry in the Client
Connections tab and choosing View Thread Stack.
26
New in MySQL Workbench 6.1
Figure 1.27 Client Connections: View Thread Stack
27
New in MySQL Workbench 6.0
Additional Miscellaneous Additions
• MSAA (Windows Accessibility API) support and High contrast color theme in Microsoft Windows
• MySQL Enterprise Backup improvements
• Improvements with general performance and overall stability
1.1.3 New in MySQL Workbench 6.0
This section summarizes many of the new features added to MySQL Workbench 6.0.0, in relation to
MySQL Workbench 5.2.x;.
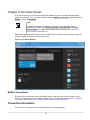
A new home screen
A new, modernized Home screen where major functionality of MySQL Workbench can be accessed,
including connections to MySQL servers, modeling, migration, and the command-line utilities.
Figure 1.28 Home Screen: Workbench 5.2
28
New in MySQL Workbench 6.0
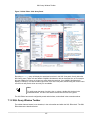
Figure 1.29 Home Screen: Workbench 6.0
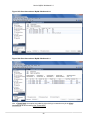
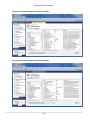
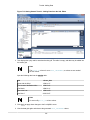
Unified SQL Editor and Administration interface
In the new user interface, the Server Administration functionality (such as start/stop server, managing user
accounts etc) is now accessible directly from the SQL Editor interface, located near where the schema
information can be browsed and queries executed.
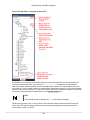
The image below contains three screenshots of the Schema window in the SQL Editor. The first is from
MySQL Workbench 5.2, the second is MySQL Workbench 6.0 with the management tab collapsed, and the
third shows what the merged management tab looks like. Toggle the merged and tabbed views by clicking
the new merge button next to the refresh button.
29
New in MySQL Workbench 6.0
Figure 1.30 Comparing the SQL Editor interface for Workbench 5.2 and 6.0
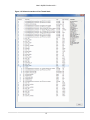
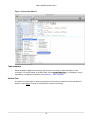
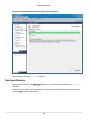
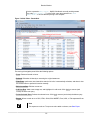
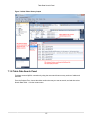
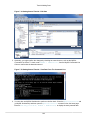
Table data search
You can select schemas and/or tables to perform client-side searches for user specified strings and
patterns. To access this new search feature, right click select a schema or a table in the left sidebar and
select Search Table Data....
This screenshot demonstrates the search feature, along with an example search. Multiple tables were
selected and searched in this example:
30
New in MySQL Workbench 6.0
Figure 1.31 Table search functionality
For additional information, see Section 7.1.8, “Table Data Search Panel”.
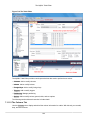
Context Sensitive help for the SQL Editor
Select a keyword or function in your query and after a delay it will show formatted help information from the
MySQL Server (equivalent to using the help command from the command-line MySQL Client).
31
New in MySQL Workbench 6.0
Figure 1.32 Context Sensitive Help
For additional information, see Section 7.1.6, “Context Sensitive Help”.
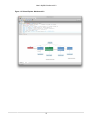
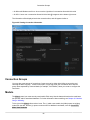
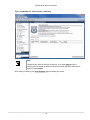
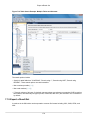
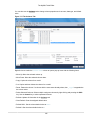
Schema Inspector
New Schema Inspector feature allows you to browse general information from schema objects. For tables,
it's also possible to perform maintenance tasks such as ANALYZE, OPTIMIZE, CHECK, and CHECKSUM
TABLE. To access the inspector, right-click a schema and select the Schema Inspector
32
New in MySQL Workbench 6.0
Figure 1.33 Schema Inspector
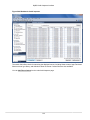
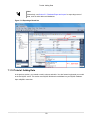
And choosing Maintenance for a table:
33
New in MySQL Workbench 6.0
Figure 1.34 Schema Inspector: Maintenance
For additional information, see Schema Inspector.
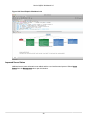
Cascaded DELETE statements generator
You can generate a series of DELETE statements needed to delete a row from that table, which includes
rows from other tables that reference it, recursively. The SELECT version allows you to preview what rows
would be deleted. Right click a table and select Copy to Clipboard, Delete with References.
34
New in MySQL Workbench 6.0
Figure 1.35 Cascading SELECT
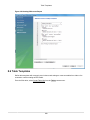
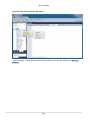
Table templates
Define templates of tables with commonly used columns, to be used to create new tables in a live
connection or in an EER model. In the SQL Editor, choose Create Table Like..., or in Modeling, use the
right sidebar. For additional information, see Section 8.6, “Table Templates”.
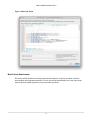
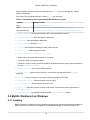
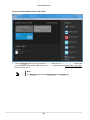
Vertical Text
A Vertical Text output option for queries (equivalent to \G from the command-line Client) was added. To
execute, choose Query, Execute Current Statement (Vertical Text Output).
35
New in MySQL Workbench 6.0
Figure 1.36 Vertical Text (\G)
Improved Visual Explain
The Visual Explain output was improved.
36
New in MySQL Workbench 6.0
Figure 1.37 Visual Explain: Workbench 5.2
37
New in MySQL Workbench 6.0
Figure 1.38 Visual Explain: Workbench 6.0
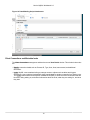
Improved Server Status
Additional server status information was added, and the user interface was improved. Select Server
Status from the Management tab to open this window.
38
New in MySQL Workbench 6.0
Figure 1.39 Server Status: Workbench 5.2
39
MySQL Workbench Editions
Figure 1.40 Server Status: Workbench 6.0
Enterprise Features
Support for MySQL Enterprise features in the Commercial edition of MySQL Workbench was added. From
within the Management tab for an open connection, look for the following products under the heading
MySQL Enterprise:
MySQL Enterprise Backup (MEB): A GUI frontend for the MEB tool. After installing a commercial
version of MySQL Workbench and MySQL Enterprise Backup, MySQL Workbench will check for and
handle the pre-requisites. Backup recovery is also supported. This plugin supports MEB with local and
remote installations of Linux and OS X, and locally for MySQL Windows.
MySQL Audit Log Inspector: A GUI for browsing the contents of generated logs by the commercial
Audit Log Plugin. Powerful filtering and search capabilities are available. Fast browsing is provided
by caching the log data locally in an encrypted file. This plugin supports MEB with local and remote
installations of Linux and OS X, and locally for MySQL Windows.
Database Migration Features
SQL Anywhere and SQLite are now supported.
1.2 MySQL Workbench Editions
MySQL Workbench is available in the following editions:
40
MySQL Workbench Editions
• Community Edition (Open Source, GPL) -- This is the foundation for all other editions
• Standard Edition (Commercial)
• Enterprise Edition (Commercial)
For details about each edition, see http://www.mysql.com/products/workbench/features.html
For more information about the Enterprise edition, visit http://www.mysql.com/enterprise
41
42
Chapter 2 Installation
Table of Contents
2.1 System Requirements ................................................................................................................
2.2 Command-line options ................................................................................................................
2.3 MySQL Workbench on Windows .................................................................................................
2.3.1 Installing .........................................................................................................................
2.3.2 Launching .......................................................................................................................
2.3.3 Uninstalling .....................................................................................................................
2.4 MySQL Workbench on Linux ......................................................................................................
2.4.1 Installing .........................................................................................................................
2.4.2 Launching .......................................................................................................................
2.4.3 Uninstalling .....................................................................................................................
2.5 MySQL Workbench on OS X ......................................................................................................
2.5.1 Installing .........................................................................................................................
2.5.2 Launching .......................................................................................................................
2.5.3 Uninstalling .....................................................................................................................
43
44
45
45
47
47
48
48
51
51
52
52
54
54
MySQL Workbench is available for Windows, Linux, and OS X.
Binary distributions of MySQL Workbench are available for the preceding platforms. Source code
distributions are also available as a tar.gz package, or an RPM package.
MySQL Workbench downloads are available at http://dev.mysql.com/downloads/tools/workbench/.
The following sections explain the installation process for each of these platforms.
2.1 System Requirements
MySQL Workbench is available on a number of operating systems and platforms. For information about
those platforms that are officially supported, see http://www.mysql.com/support/supportedplatforms/
workbench.html on the MySQL Web site.
General Requirements
Although it is not required, MySQL Workbench is designed for use with MySQL server, either locally or
remotely. For additional information about connecting to a MySQL server, see Section 5.1.2, “MySQL
Connections”. For additional information about installing a MySQL server, see Installing and Upgrading
MySQL.
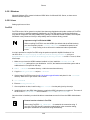
Note
On startup, the application checks the OpenGL version and chooses between
software and hardware rendering. To determine which rendering method is being
used, open the Help menu and choose the System Info item.
Requirements for Linux
• The requirements for Linux are embedded within their respective packages. Use the platform specific
tool (for example, yum or apt) to install the package and their dependencies.
• The "Save password in keychain" functionality requires gnome-keyring to store the passwords. Note
that on KDE systems, the gnome-keyring daemon is not started by default.
43
Requirements for Windows
• For Linux and OS X, the MySQL server administration features require sudo privileges to execute
several commands. The sudo user must be capable of executing the following system commands:
/usr/bin/sudo
/usr/bin/nohup
/usr/bin/uptime
/usr/bin/which
/usr/bin/stat
/bin/bash
/bin/mkdir
/bin/rm
/bin/rmdir
/bin/dd
/bin/cp
/bin/ls
Additionally, the sudo user must keep the HOME environment variable when executing system
commands, which means adding the following to /etc/sudoers:
env_keep +="HOME"
For MySQL Workbench to execute MySQL Enterprise Backup commands, the sudo user must also be
able to execute the MySQL Enterprise Backup binary.
Requirements for Windows
• Microsoft .NET 4.0 Framework
• Microsoft Visual C++ 2013 Redistributable Package (MSVC2013)
Note
The 2010 version was used in previous editions of MySQL Workbench 6.
• Windows 7 and above
Note
MySQL Workbench 6.1 supports earlier versions of Windows, including Vista
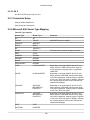
2.2 Command-line options
In addition to platform-specific command-line options, MySQL Workbench has the following command-line
options:
Note
On Microsoft Windows, the command-line options contain one leading dash instead
of two. For example, use -log-level for Microsoft Windows and --log-level
for Linux and OS X.
• --log-level level: Controls the verbosity level for logging output from Workbench.
44
MySQL Workbench on Windows
With increasingly levels of verbosity, the valid values for level are: error, warning, info, debug1,
debug2, and debug3.
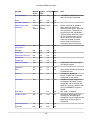
The location of the generated log files, such as wb.log, are as follows:
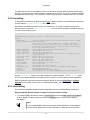
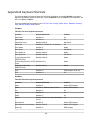
Table 2.1 The default location of generated MySQL Workbench log files
Platform
Default location
Linux
~/.mysql/workbench/log/
OS X
~/Library/Application Support/Workbench/log/
Microsoft Windows
C:\Users\user_nameAppData\Roaming\MySQL\Workbench\log\
• --admin instance: Open an administration tab to the named MySQL instance.
• --upgrade-mysql-dbs: Open the Migration Wizard tab.
• --migration: Open the Migration Wizard tab.
• --log-to-stderr: Also log to stderr.
• --version: Show MySQL Workbench version number and exit.
• --verbose, -v: Enable diagnostics output.
• --query [connection|connection_string]:
• Empty: Open a query tab and prompts for a connection.
• Connection: Open a named connection.
• Connection_string: Create a connection based on the entered connection string, which should be in
the form $USER@$HOST:$PORT.
• --model modelfile: pen the given EER model file.
• --script script: Open the given SQL file in a connection, typically used with the --query
parameter.
• --run code: Execute the given code using the default language for GRT shell.
• --run-python script: Execute the given code in Python.
• --run-script file: Execute Python code from a file.
• --open file: Open the given file at startup. Deprecated, so instead use specific types such as -script or --model.
• --quit-when-done: Quits MySQL Workbench after --script or --run finishes.
2.3 MySQL Workbench on Windows
2.3.1 Installing
MySQL Workbench for Windows can be installed using the MySQL Installer that installs and updates all
MySQL products on Windows, the standalone .msi installation package, or manually from a Zip file.
45
Installing
Important
Installing MySQL Workbench using an Installer package requires either
Administrator or Power User privileges. If you are using the Zip file without an
installer, you do not need Administrator or Power User privileges.
Requirements for Windows
• Microsoft .NET 4.0 Framework
• Microsoft Visual C++ 2013 Redistributable Package (MSVC2013)
Note
The 2010 version was used in previous editions of MySQL Workbench 6.
• Windows 7 and above
Note
MySQL Workbench 6.1 supports earlier versions of Windows, including Vista
Installation Using MySQL Installer
The general MySQL Installer download is available at http://dev.mysql.com/downloads/windows/installer/.
The MySQL Installer application can be used to install, upgrade, and manage several MySQL products
including MySQL Workbench.
When executing MySQL Installer, you may choose MySQL Workbench as one of the products to install. It
is selected by default, and essentially executes the standalone Installer Package described below.
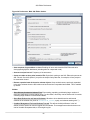
Installation Using the Installer Package
The standalone download is available at http://dev.mysql.com/downloads/tools/workbench/.
MySQL Workbench can be installed using the Windows Installer (.msi) installation package. The MSI
package bears the name mysql-workbench-community-version-winarch.msi, where version
indicates the MySQL Workbench version number, and arch the build architecture (either win32 or winx64).
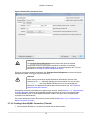
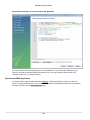
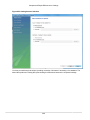
1. To install MySQL Workbench, right-click the MSI file and select the Install item from the pop-up menu,
or double-click the file.
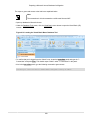
2. In the Setup Type window you may choose a Complete or Custom installation. To use all features of
MySQL Workbench choose the Complete option.
3. Unless you choose otherwise, MySQL Workbench is installed in C:\%PROGRAMFILES%\MySQL
\MySQL Workbench 6.2 edition_type\, where %PROGRAMFILES% is the default directory for
programs for your locale. The %PROGRAMFILES% directory is defined as C:\Program Files\ on
most systems.
Installation Using the Zip File
If you have problems running the Installer package, an alternative is to install from a Zip file without an
installer. That file is called mysql-workbench-community-version-arch.zip, where version
indicates the MySQL Workbench version number, and arch the build architecture (either win32 or winx64).
46
Launching
To install using the Zip file, download the Zip file to a convenient location and decompress the file using a
Zip utility. You can place the resulting directory anywhere on you system. You need not install or configure
the application before using it. You may want to create a shortcut on your desktop or the quick launch bar.
2.3.2 Launching
To start MySQL Workbench on Windows, select Start, Programs, MySQL, then select MySQL Workbench.
This executes the MySQLWorkbench.exe file on your system.
Alternatively, start MySQL Workbench from the command line. To view the available command-line
options, issue the command MySQLWorkbench -help from the MySQL Workbench installation directory.
You will see the following output:
MySQLWorkbench.exe [<options>] [<name of a model file or sql script>]
Options:
-swrendering
Force the diagram canvas to use software rendering instead of OpenGL
-query [<connection>|<connection string>]
Open a query tab and ask for connection if nothing is specified.
If named connection is specified it will be opened, else connection
will be created based on the given connection string, which should
be in form <user>@<host>:<port>
-admin <instance>
Open a administration tab to the named instance
-upgrade-mysql-dbs
Open a migration wizard tab
-model <model file>
Open the given EER model file
-script <sql file>
Open the given SQL file in an connection, best in conjunction with
a query parameter
-run-script <file>
Execute Python code from a file
-run <code>
Execute the given Python code
-run-python <code>
Execute the given Python code
-migration
Open the Migration Wizard tab
-quit-when-done
Quit Workbench when the script is done
-log-to-stderr
Also log to stderr
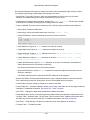
-help, -h
Show command line options and exit
-log-level=<level>
Valid levels are: error, warning, info, debug1, debug2, debug3
-verbose, -v
Enable diagnostics output
-version
Show Workbench version number and exit
-open <file>
Open the given file at startup (deprecated, use script, model etc.)
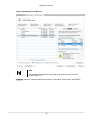
Use the -swrendering option if your video card does not support OpenGL 1.5. The -version option
can be used to display the MySQL Workbench version number. The other options are self-explanatory.
MySQL Workbench may also be started from MySQL Notifier by choosing SQL Editor or Configure
Instance from the Notifier context menu. For additional information, see MySQL Notifier.
2.3.3 Uninstalling
The method for uninstalling MySQL Workbench depends on how you installed MySQL Workbench.
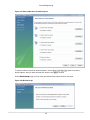
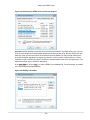
Removing MySQL Workbench After Installation Using the Installer Package
1. To uninstall MySQL Workbench, open the Control Panel and Choose Add or Remove Programs.
Find the MySQL Workbench entry and choose the Remove button. This will remove MySQL
Workbench.
Note
If you installed MySQL Workbench using the Installer package, it is not possible to
remove MySQL Workbench from the command line. Although you can manually
47
MySQL Workbench on Linux
remove some of the components, there is no command-line option for removing
MySQL Workbench.
Removing the MySQL Workbench directory manually will not remove all the files
belonging to MySQL Workbench.
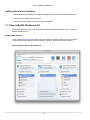
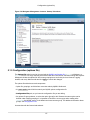
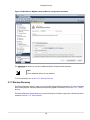
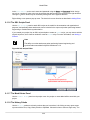
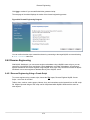
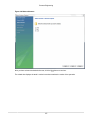
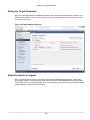
Removing MySQL Workbench After Installation from the MySQL Installer
Open the MySQL Installer for Windows, click Remove MySQL Products, choose MySQL Workbench, and
then Execute.
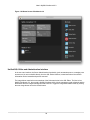
What Is Not Removed
The uninstallation process does not remove your MySQL Workbench configuration directory. This directory
includes your MySQL connections, configuration settings, cache files, SQL snippets and history, logs,
custom modules, and more. These files are stored under your user's %AppData% directory.
Note
By default, the MySQL Workbench configuration directory is C:\username
\AppData\Roaming\MySQL\Workbench\ where "C:\username\AppData
\Roaming\" is the value of your %AppData% Windows system variable.
Also, the uninstallation process does not remove the .mysqlworkbench schema that MySQL Workbench
creates when sharing SQL snippets across a MySQL connection. For additional information about shared
snippets, see Section 7.1.5, “SQL Snippets tab”.
2.4 MySQL Workbench on Linux
2.4.1 Installing
There are binary distributions of MySQL Workbench available for several variants of Linux, including
Fedora, Oracle Linux, and Ubuntu.
Installation options include:
• Official MySQL Yum or APT repository packages: These binaries are built by the MySQL Release
team. For additional information about installing these, see Yum or APT. They contain the newest
versions of MySQL Workbench.
• Your Linux distributions repository packages: These binaries are built and maintained by members
of the Linux distribution you use, and not by the MySQL team. They are stable but the releases often lag
behind.
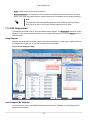
• Download official MySQL packages: Downloads are available at http://dev.mysql.com/downloads/
workbench.
• Download the source code and compile yourself: The source code is available at http://
dev.mysql.com/downloads/workbench as a tar.gz or RPM package.
Note
32-bit binary builds are not available as of MySQL Workbench 6.2.0. You can use
the source code to build your own 32-bit version, as needed.
The procedure for installing on Linux depends on which Linux distribution you are using.
48
Installing
Requirements for Linux
• The requirements for Linux are embedded within their respective packages. Use the platform specific
tool (for example, yum or apt) to install the package and their dependencies.
• The "Save password in keychain" functionality requires gnome-keyring to store the passwords. Note
that on KDE systems, the gnome-keyring daemon is not started by default.
• For Linux and OS X, the MySQL server administration features require sudo privileges to execute
several commands. The sudo user must be capable of executing the following system commands:
/usr/bin/sudo
/usr/bin/nohup
/usr/bin/uptime
/usr/bin/which
/usr/bin/stat
/bin/bash
/bin/mkdir
/bin/rm
/bin/rmdir
/bin/dd
/bin/cp
/bin/ls
Additionally, the sudo user must keep the HOME environment variable when executing system
commands, which means adding the following to /etc/sudoers:
env_keep +="HOME"
For MySQL Workbench to execute MySQL Enterprise Backup commands, the sudo user must also be
able to execute the MySQL Enterprise Backup binary.
Installing DEB packages
On Ubuntu, and other systems that use the Debian package scheme, you can either download and
install .deb packages or use the APT package manager.
Using the APT Package Manager
Your Linux distribution includes MySQL Workbench builds where "apt-get install mysql-workbench" will
install their build of the MySQL Workbench package. To use the official MySQL Workbench builds as
provided by the MySQL Release team, you must install the official MySQL APT repository and choose the
"mysql-workbench-community" package instead of "mysql-workbench".
• First, install the MySQL APT repository as described in the MySQL APT Repository documentation. For
example:
shell> sudo dpkg -i mysql-apt-config_0.3.1-1ubuntu14.04_all.deb
shell> sudo apt-get update
• Next, install MySQL Workbench. You might have multiple Workbench packages available, so choose the
"mysql-workbench-community" version. For example:
49
Installing
shell> sudo apt-get install mysql-workbench-community
Manually Installing a Package
You install MySQL Workbench using a command such as:
shell> sudo dpkg -i package.deb
package.deb is the MySQL Workbench package name; for example, mysql-workbenchcommunity-version1ubu1404-amd64.deb, where version is the MySQL Workbench version
number.
Note
You may be warned that certain libraries are not available, depending on what
you already have installed. Install the required libraries and then install the MySQL
Workbench package again.
Installing RPM packages
On Red Hat-based systems, and other systems that use the RPM package format, you can either
download and install RPM packages or use the Yum package manager.
Using the Yum Package Manager
Your Linux distribution includes MySQL Workbench builds where "yum install mysql-workbench" will install
their build of the MySQL Workbench package. To use the official MySQL Workbench builds as provided
by the MySQL Release team, you must install the official MySQL Yum repository and choose the "mysqlworkbench-community" package instead of "mysql-workbench".
• First, install the MySQL Yum repository as described in the MySQL Yum Repository documentation. For
example:
shell> sudo rpm -Uvh mysql-community-release-el7-5.noarch.rpm
• Next, install MySQL Workbench. You might have multiple Workbench packages available, so choose the
"mysql-workbench-community" version. For example:
shell> sudo yum install mysql-workbench-community
Manually Installing a Package
shell> sudo rpm -i package.rpm
package.rpm is the MySQL Workbench package name; for example, mysql-workbenchcommunity-version-1fc10.x86_64.rpm, where version is the MySQL Workbench version number.
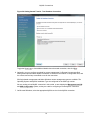
Installing Oracle Enterprise Linux and similar
MySQL Workbench requires access to the EPEL repository. EPEL is a repository with additional RPM
packages that are not part of the core RHEL/OEL distribution. This includes packages (such as tinyxml)
that MySQL Workbench requires.
50
Launching
You need to set up the EPEL repository in yum to resolve the required dependencies. For example, using
Oracle Linux 6.5 you would:
shell> wget http://download.fedoraproject.org/pub/epel/6/i386/epel-release-6-8.noarch.rpm
shell> rpm -ivh epel-release-6-8.noarch.rpm
shell> yum repolist
Loaded plugins: refresh-packagekit, rhnplugin
repo id
repo name
epel
Extra Packages for Enterprise Linux 6 - x86_64
status
7,124
These instructions also apply to similar Linux distributions such as Red Hat Enterprise Linux, CentOS, and
Scientific Linux.
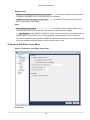
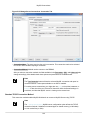
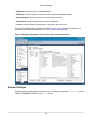
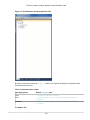
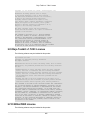
2.4.2 Launching
After MySQL Workbench has been installed, it can be launched by selecting Applications, Programming,
MySQL Workbench from the main menu.
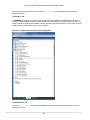
MySQL Workbench can also be launched from the command line on Linux. Type the command:
shell> /usr/bin/mysql-workbench --help
This will display the available command-line options:
mysql-workbench [<options>] [<name of a model file or sql script>]
Options:
--force-sw-render
Force Xlib rendering
--force-opengl-render
Force OpenGL rendering
--query [<connection>|<connection string>]
Open a query tab and ask for connection if nothing is specified.
If named connection is specified it will be opened, else connection
will be created based on the given connection string, which should
be in form <user>@<host>:<port>
--admin <instance>
Open a administration tab to the named instance
--upgrade-mysql-dbs
Open a migration wizard tab
--model <model file>
Open the given EER model file
--script <sql file>
Open the given SQL file in an connection, best in conjunction with
a query parameter
--run-script <file>
Execute Python code from a file
--run <code>
Execute the given Python code
--run-python <code>
Execute the given Python code
--migration
Open the Migration Wizard tab
--quit-when-done
Quit Workbench when the script is done
--log-to-stderr
Also log to stderr
--help, -h
Show command line options and exit
--log-level=<level>
Valid levels are: error, warning, info, debug1, debug2, debug3
--verbose, -v
Enable diagnostics output
--version
Show Workbench version number and exit
--open <file>
Open the given file at startup (deprecated, use script, model etc.)
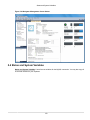
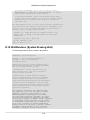
2.4.3 Uninstalling
The procedure for uninstalling MySQL Workbench on Linux depends on the package you are using.
Uninstalling DEB packages
51
MySQL Workbench on OS X
To uninstall a Debian package, use this command:
shell> sudo dpkg -r mysql-workbench-community
This command does not remove the configuration files. If you wish to also remove the configuration files,
use this command:
shell> sudo dpkg --purge mysql-workbench-community
Uninstalling RPM packages
To uninstall an RPM package, use this command:
shell> sudo rpm -e mysql-workbench-community
This command does not remove the configuration files.
What Is Not Removed
By default, the uninstallation process does not remove your MySQL Workbench configuration directory.
This directory includes your MySQL connections, configuration settings, cache files, SQL snippets and
history, logs, custom modules, and more. These files are stored under your user's .mysql/workbench/
directory.
Note
By default, the MySQL Workbench configuration directory is ~username/mysql/
workbench/ where "~username" is the path to your user's home directory.
Also, the uninstallation process does not remove the .mysqlworkbench schema that MySQL Workbench
creates when sharing SQL snippets across a MySQL connection. For additional information about shared
snippets, see Section 7.1.5, “SQL Snippets tab”.
2.5 MySQL Workbench on OS X
2.5.1 Installing
MySQL Workbench for OS X is distributed as a DMG file. The file is named mysql-workbenchcommunity-version-osx.dmg, where version is the MySQL Workbench version.
Downloads are available at http://dev.mysql.com/downloads/tools/workbench/.
To install MySQL Workbench on OS X, download the file. Double-click the downloaded file. You will be
presented with the installation window.
52
Installing
Figure 2.1 MySQL Workbench OS X Installation Window
Drag the MySQL Workbench icon onto the Applications icon as instructed. MySQL Workbench is now
installed.
You can now launch MySQL Workbench from the Applications folder, or from the command line:
shell> /Applications/MySQLWorkbench.app/Contents/MacOS/MySQLWorkbench --help
This will display the available command-line options:
MySQLWorkbench [<options>] [<name of a model file or sql script>]
Options:
--query [<connection>|<connection string>]
Open a query tab and ask for connection if nothing is specified.
If named connection is specified it will be opened,
else connection will be created based on the given connection string,
which should be in form <user>@<host>:<port>
--admin <instance>
Open a administration tab to the named instance
--upgrade-mysql-dbs
Open a migration wizard tab
--model <model file>
Open the given EER model file
--script <sql file>
Open the given SQL file in an connection, best in conjunction
with a query parameter
--run-script <file>
Execute Python code from a file
--run <code>
Execute the given Python code
--run-python <code>
Execute the given Python code
--migration
Open the Migration Wizard tab
--quit-when-done
Quit Workbench when the script is done
--log-to-stderr
Also log to stderr
--help, -h
Show command line options and exit
--log-level=<level>
Valid levels are: error, warning, info, debug1, debug2, debug3
--verbose, -v
Enable diagnostics output
--version
Show Workbench version number and exit
--open <file>
Open the given file at startup (deprecated, use script, model etc.)
53
Launching
2.5.2 Launching
To launch MySQL Workbench on OS X, open the Applications folder in the Finder, then double-click
MySQL Workbench.
It is also possible to start MySQL Workbench from the command line:
shell> open MySQLWorkbench.app [options] [model_file]
Specifying options and/or a model file is optional.
2.5.3 Uninstalling
To uninstall MySQL Workbench for OS X, locate MySQL Workbench in the Applications folder, right-click,
and select Move to Trash.
What Is Not Removed
By default, the uninstallation process does not remove your MySQL Workbench configuration directory.
This directory includes your MySQL connections, configuration settings, cache files, SQL snippets and
history, logs, custom modules, and more. These files are stored under your user's MySQL/Workbench/
folder.
Note
By default, the MySQL Workbench configuration directory is ~username/
Library/Application Support/MySQL/Workbench where "~username" is
the path to your user's home directory.
Also, the uninstallation process does not remove the .mysqlworkbench schema that MySQL Workbench
creates when sharing SQL snippets across a MySQL connection. For additional information about shared
snippets, see Section 7.1.5, “SQL Snippets tab”.
54
Chapter 3 Configuration
Table of Contents
3.1 User Accessibility Options ..........................................................................................................
3.2 Workbench Preferences .............................................................................................................
3.2.1 General Editors Preferences ............................................................................................
3.2.2 SQL Editor Preferences ...................................................................................................
3.2.3 Administration Preferences ..............................................................................................
3.2.4 Modeling Preferences ......................................................................................................
3.2.5 Fonts and Colors Preferences ..........................................................................................
3.2.6 Advanced Preferences .....................................................................................................
3.2.7 Other Preferences ...........................................................................................................
3.3 MySQL Workbench Settings and Log Files ..................................................................................
3.4 Tutorial: Add a Custom Link to the Home Page ...........................................................................
3.1 User Accessibility Options
MySQL Workbench includes methods to improve user accessibility.
Fonts
Under Preferences, modeling fonts are adjustable from the Appearance section of the Modeling menu:
55
55
59
60
61
67
68
74
75
76
76
78
Fonts
Figure 3.1 Appearance Preferences
Choose the character set under the Configure Fonts For setting (typically leave the default setting here)
and then adjust the model fonts to fit your needs.
The font types and sizes for several other GUI elements are set under the Fonts & Colors tab:
56
Fonts
Figure 3.2 Fonts & Color Preferences
Note
Font changes require a refresh or restart before they take effect.
The following image shows the SQL Editor after changing the Editor font size from 10 to 30:
57
Color Presets
Figure 3.3 SQL Editor with Font size 30
Color Presets
Here you define the colors used in EER diagrams for the tables, views, layers, and notes. You can edit or
add additional color choices by entering their ASCII values.
Theming
On Windows, the Fonts & Colors preference tab also includes a "Color Scheme" configuration section.
From here, you can enable the High Contrast color theme. This theme preference affects the MySQL
Workbench GUI.
58
Microsoft Active Accessibility (MSAA)
Figure 3.4 High Contrast Preference
Microsoft Active Accessibility (MSAA)
On Windows, MySQL Workbench supports MSAA, which allows use of screen reader applications with
MySQL Workbench.
3.2 Workbench Preferences
Use the Preferences menu to configure MySQL Workbench to your specific needs. This menu is divided
sections, as described below:
• General Editors: General-purpose editor options, such as SQL parsing options.
• SQL Editor: SQL editor related preferences that also includes subsections for the Query Editor, Object
Editor, and SQL Execution.
• Administration: Tools used by the Administrator functionality.
• Modeling: Model related preferences that also includes subsections for Defaults, MySQL (MySQL
specific settings), Diagram (EER), and Appearance (model colors and fonts).
• Fonts & Colors: Change fonts for tools such as the SQL editor and results grid.
• Advanced: Advanced options, including SSH attributes.
59
General Editors Preferences
• Others: Miscellaneous options.
A more detailed discussion of these options follows.
3.2.1 General Editors Preferences
The General Editors preferences section:
Figure 3.5 Preferences: General Editors
SQL Parsing in Code Editors
SQL properties that can be set include the SQL_MODE, case sensitivity of identifiers, and the SQL delimiter
used.
• Default SQL_MODE for syntax checker: Optionally configure the SQL_MODE for the SQL editor's
SQL syntax checker.
The document property SqlMode defines SQL_MODE for all operations affecting SQL parsing at the
document scope. The purpose of this option is to preserve the consistency of SQL statements within the
document.
The property has the following functions:
60
SQL Editor Preferences
• Sets the SQL_MODE DBMS session variable to the value stored in the SqlMode property of the
document when performing reverse engineering, forward engineering, or synchronization operations.
• Honors the SQL_MODE values defined in SqlMode so that SQL parsing is correct.
Only a subset of all possible SQL_MODE values affect the MySQL Workbench SQL parser. These
values are: ANSI_QUOTES, HIGH_NOT_PRECEDENCE, IGNORE_SPACE, NO_BACKSLASH_ESCAPES,
PIPES_AS_CONCAT. Other values do not affect the MySQL Workbench SQL parser and are ignored.
If the value of SqlMode is not set, the default value of the SQL_MODE session variable defined by
the server stays unchanged during operations with the server. However, the MySQL Workbench
SQL parser behaves as if SQL_MODE is also not set. This may potentially lead to inconsistencies in
parsing of SQL statements stored in the document. If you choose to not set the SqlMode property,
ensure that the default SQL_MODE variable defined by the server does not contain any values from the
following list: ANSI_QUOTES, HIGH_NOT_PRECEDENCE, IGNORE_SPACE, NO_BACKSLASH_ESCAPES,
PIPES_AS_CONCAT.
The SqlMode property is defined in two locations: globally and at document scope. MySQL Workbench
uses the global property to initialize the document property for each new document created. For each
document, the property value defined at document scope always has higher priority over the one defined
globally.
• [ ] SQL Identifiers are Case Sensitive: Whether to treat identifiers separately if their names differ only
in letter case. This is enabled by default.
• Non-Standard SQL Delimiter: [$$]. Define the SQL statement delimiter to be different from the normally
used delimiter (such as ";"). Change this if the deliminator you normally use, specifically in stored
routines, happens to be the current setting.
Indentation
Note
This preference section was added in MySQL Workbench 6.2.4.
• [ ] Tab key inserts spaces instead of tabs
• Indent width: [4] How many spaces to insert when indenting with the tab key.
• Tab width: [4] How many spaces wide are tab characters.
3.2.2 SQL Editor Preferences
This section provides configuration options that affect the SQL Editor functionality in MySQL Workbench.
The SQL Editor preferences includes three additional sections: Query Editor, Object Editors, and SQL
Execution.
Preferences: SQL Editor: Main
SQL Editor
61
SQL Editor Preferences
Figure 3.6 Preferences: Main SQL Editor Section
• Save snapshot of open editors on close: Enabling will save and reload the SQL Editor tabs after
closing/opening MySQL Workbench (including after an unexpected crash).
• Auto-save scripts interval: Frequency of the auto-saves.
• Create new tabs as Query tabs instead of File: By default, opening a new SQL Editor tab opens as an
SQL File tab. Check this option if you prefer the simpler Query tabs that, for example, will not prompt to
be saved when closed.
• Restore expanded state of the active schema objects: Group nodes that were previously expanded
in the active schema when the SQL editor was last closed are re-expanded and loaded. This is enabled
by default.
Sidebar
• Show Schema Contents in Schema Tree: Enumerating, populating, and drawing large numbers of
items can significantly increase loading times. For this reason, this facility can be switched off for models
containing large numbers of schemata and tables.
• Show Data Dictionaries and Internal Schemas: Whether to show data directories and internal
schemas in the schema tree (such as INFORMATION_SCHEMA, mysql, and schemas starting with ".").
• Combine Management Tools and Schema Tree tab: This affects the Object Browser in the left
sidebar, and this option can also be toggled from the sidebar. The management tools and schema tree
can be viewable as separate tabs, or as a single long list.
62
SQL Editor Preferences
MySQL Session
• DBMS connection keep-alive interval (in seconds): [600]. Time interval between sending keep-alive
messages to the DBMS. Set to 0 to not send keep-alive messages.
• DBMS connection read time out (in seconds): [600]. The maximum amount of time the query can
take to return data from the DBMS.
Other
• Internal Workbench Schema: [.mysqlworkbench]. This schema is used by MySQL Workbench to
store information required for certain operations, such as saving shared SQL snippets.
• [ ] : "Safe Updates", forbid UPDATE and DELETE queries to execute that lack a corresponding key in a
WHERE clause, or lack a LIMIT clause. Setting this option requires a MySQL server reconnection.
This makes it possible to catch UPDATE and DELETE statements where keys are not used properly and
that would probably accidentally change or delete a large number of rows.
Preferences: SQL Editor: Query Editor
Figure 3.7 Preferences: SQL Editor: Query Editor
Productivity
63
SQL Editor Preferences
• Enable Code Completion in Editors: The SQL Editor offers Auto-complete functionality by either
pressing the keyboard shortcut (Modifier + Space), or it will start automatically if the Automatically
Start Code Completion preference is enabled.
• Automatically Start Code Completion: Enabled by default, this will automatically execute the code
auto-completion feature while editing SQL in the SQL Editor. If disabled, you will instead use the
keyboard shortcut Modifier + Space to execute the auto-completion routine.
• Use UPPERCASE keywords on completion: Normally keywords are shown and inserted as they come
from the code editor's configuration file. This setting will always write completed keywords as uppercase.
• Comment type to use for comment shortcut: [--]. Defaults to "--", with "#" as another option.
• Max syntax error count: Large complex scripts may contain errors. Further, a syntax error early on can
lead to subsequent syntax errors. For these reasons, it is possible to limit the number of errors displayed
using this option. The default is 100 error messages.
• Max number of result sets: Maximum number of result sets for SQL queries that can be opened for a
single SQL editor. Defaults to 50. Reaching the limit emits a warning.
Note
This option was added in MySQL Workbench 6.2.4.
SQL Beautifier
• [ ] Change keywords to UPPER CASE: Enabled by default, executing the SQL beautifier will uppercase
all SQL keywords.
64
SQL Editor Preferences
Preferences: SQL Editor: Object Editors
Figure 3.8 Preferences: SQL Editor: Object Editors
Online DDL
• Default algorithm for ALTER table: The default algorithm selected when performing ALTER TABLE
operations in MySQL Workbench. The setting can also be adjusted for each ALTER TABLE operation.
Options include "In-Place" (preferred) and "Copy", see the online DDL documentation for more
information.
• Default lock for ALTER table: The default lock setting for allowing concurrent queries with ALTER
TABLE in MySQL Workbench. This setting can also be adjusted for each ALTER TABLE operation.
Options include "None", "Shared", and "Exclusive", see the online DDL documentation for more
information.
Views
• Reformat DDL for Views: Whether to automatically reformat the View DDL that is returned by the
MySQL Server.
Note
The MySQL Server does not store the formatting information for View definitions.
65
SQL Editor Preferences
Preferences: SQL Editor: SQL Execution
Figure 3.9 Preferences: SQL Editor: SQL Execution
General
• Max query length to store in history (in bytes): Queries that exceed this size will not be saved in the
history when executed. The default is 65536 bytes, and setting to 0 means there is no limit (all queries
will be saved).
• Continue on SQL Script Error: Should an error occur while executing a script, this option causes
execution to continue for the remainder of the script.
• Leave autocommit mode enabled by default: Toggles the default autocommit mode for connections.
When enabled, each statement will be committed immediately.
Note
All query tabs in the same connection share the same transaction. To have
independent transactions, you must open a new connection.
• Progress status update interval: When executing long running queries over a slow connection, you
may need to increase this value to prevent excess load on the connection. Defaults to 500 milliseconds.
SELECT Query Results
66
Administration Preferences
• Limit Rows: Queries can sometimes return an excessive number of rows, which can heavily load
the connection, and take time to display in MySQL Workbench. To prevent this, you can set a more
moderate value here. This limit is defined by the Limit Rows Count option.
• Limit Rows Count: Specify the maximum number of result rows to return. Defaults to 1000.
• Max. Field Value Length to Display: To avoid display problems due to excessive field length, it is
possible to set the maximum field length to display (in bytes). Defaults to 256.
• Treat BINARY/VARBINARY as non-binary character string: Binary byte string values are not
displayed by default in the results grid, but are instead marked as BLOB values. These can then be
viewed or edited with the BLOB editor. Nonbinary character string values are displayed in the results grid,
and can be edited in the grid cell or using the BLOB editor.
If this option is turned on, data truncation may result: Binary byte string values may contain null bytes as
part of their valid data, whereas for nonbinary character strings, a null byte terminates the string.
• Confirm Data Changes: In the SQL Editor, if you edit table data and then click the Applying changes
to data button, MySQL Workbench launches a wizard to step you through applying your changes. This
gives you a chance to review the SQL that will be applied to the live server to make the requested
changes. If this option is deselected, the changes will be applied to the server without the wizard being
displayed and without giving you a chance to review the changes that will be made.
3.2.3 Administration Preferences
This section provides configuration options that affect the Administration functionality in MySQL
Workbench.
67
Modeling Preferences
Figure 3.10 Preferences: Administration
Data Export and Import
• Path to mysqldump tool: Path to your local mysqldump binary. Leave it blank to use the bundled
mysqldump binary.
• Path to mysql tool: Path to your local mysql client binary. Leave it blank to use the bundled mysql
binary.
• Export Directory Path: Directory where your exported mysql dumps are located.
3.2.4 Modeling Preferences
This section provides configuration options that affect the Modeling functionality in MySQL Workbench.
68
Modeling Preferences
Preferences: Modeling: Main
Figure 3.11 Preferences: Modeling
EER Modeler
• Automatically reopen previous model at start: Check this if you want the model on which you
previously worked to be automatically reopened when you start MySQL Workbench.
• Force use of software based rendering for EER diagrams: MySQL Workbench will use OpenGL for
rendering when available. However, due to faulty drivers, problems do occasionally occur. These issues
can be resolved by selecting the software rendering option here.
• Model undo history size: You can limit the size of the undo history here. Set this value to 0 to have an
unlimited undo history.
• Auto-save model interval: An open model that has not been saved will automatically be saved after
this period. On loading a model file, MySQL Workbench will notify the user if the file was not previously
saved correctly, due to a crash or power failure. MySQL Workbench can then attempt to recover the last
auto-saved version. For automatic recovery to be available for a new file, it will have to have been saved
at least once by the user.
Preferences: Modeling: Defaults
Set default values for various modeling object names.
69
Modeling Preferences
Figure 3.12 Preferences: Modeling: Defaults
The following tables show the object names and their default values.
Column Defaults
Object Name
Default Value
PK Column Name
id%table%
PK Column Type
INT
Column Name
%table%col
Column Type
VARCHAR(45)
Foreign Key/Relationship Defaults
Object Name
Default Value
FK Name
fk%stable_%dtable%
Column Name
%table%_%column%
ON UPDATE
NO ACTION
ON DELETE
NO ACTION
Associative Table Name
%stable%_has_%dtable%
70
Modeling Preferences
Preferences: Modeling: MySQL
This enables you to set model related options specific to your MySQL version.
Figure 3.13 Preferences: Modeling: MySQL
Model
• Default Target MySQL Version: A limited subset of validation procedures and table editor options are
affected by this MySQL version number.
Supported MySQL Server 5.6 features include fraction seconds support for TIME, DATETIME, and
TIMESTAMP, automatic initialization and updates for TIMESTAMP and DATETIME (for example, setting
them to CURRENT_TIMESTAMP), and FULLTEXT index types with the InnoDB engine.
Model Table Defaults
• Default Storage Engine: Tables created in MySQL Workbench will be defined using this default storage
engine.
Forward Engineering and Synchronization
• SQL_MODE to be used in generated scripts: Defaults to "TRADITIONAL,ALLOW_INVALID_DATES",
this defines the SQL_MODE used by Forward Engineering and Synchronization.
71
Modeling Preferences
Preferences: Modeling: Diagram
Figure 3.14 Preferences: Modeling: Diagram
All Objects
• [ ] Expand New Objects: Enabled by default.
• [ ] Propagate Object Color Changes to All Diagrams: Enabled by default.
Tables
• [ ] Show Column Types: Enabled by default.
• [ ] Show Schema Name:
• Max. Length of ENUMs and SETs to Display: [20]
• [ ] Show Column Flags:
• Max. Number of Columns to Display: [30] Larger tables will be truncated.
Routines
• Trim Routine Names Longer Than: [20] characters.
72
Modeling Preferences
Relationships / Connections
• [ ] Draw Line Crossings (slow in large diagrams):
• [ ] Hide Captions: Enabled by default.
• [ ] Center Captions Over Line:
Preferences: Modeling: Appearance
Use this tab to set the available colors for the objects that appear on an EER diagram canvas. You can
also add colors if you wish.
For related information, see Section 3.1, “User Accessibility Options”.
Figure 3.15 Preferences: Modeling: Appearance
Color Presets
These are the available colors used while modeling, and they are divided into two sections. First, the colors
used when creating tables and views. The second section are available colors for items such as layers and
notes.
Fonts
These define the fonts and font sizes used while modeling.
73
Fonts and Colors Preferences
3.2.5 Fonts and Colors Preferences
Figure 3.16 Preferences: Fonts and Colors
Fonts
• SQL Editor: [Consolas 10] -- Global font for SQL text editors.
• Resultset Grid: [Tahoma 8] -- Resultset grid in SQL editor
• Scripting Shell: [Consolas 10] -- Scripting Shell output area
• Script Editor: [Consolas 10] -- Code editors in scripting shell
Color Scheme
On Microsoft Windows, set the scheme that determines the code colors.
74
Advanced Preferences
3.2.6 Advanced Preferences
Figure 3.17 Preferences: Advanced
SSH
• SSH KeepAlive: [0] -- This interval (in seconds) without sending any data over the connection, a
"keepalive" packet will be sent. This option applies to both SSH tunnel connections and remote
management via SSH.
75
Other Preferences
3.2.7 Other Preferences
Figure 3.18 Preferences: Others
Others
• [ ] Allow more than one instance of MySQL Workbench to run. By default, only one instance of MySQL
Workbench can be running at the same time. .
Note
All MySQL Workbench instances share the same files and settings, so enable at
your own risk.
3.3 MySQL Workbench Settings and Log Files
MySQL Workbench saves several configuration, cache, and log related files and directories on your
system. These files are saved in your user's MySQL Workbench directory as defined by MySQL
Workbench, with this base defaulting to:
Table 3.1 Default Local Configuration Base File Path
Operating System
File Path
Windows
%AppData%\MySQL\Workbench\
76
The cache/ directory
Operating System
File Path
OS X
~username/Library/Application Support/MySQL/Workbench/
Linux
~username/.mysql/workbench/
A brief description of these directories and files:
Table 3.2 Local Workbench Files and Directory Descriptions
Directory or File
Description
cache/
General behaviors are stored per-connection in *.cache files, and column
widths as *.column_widths files
log/
Log files include Workbench startup information, and also per-connection SQL
actions performed in Workbench
modules/
Home of installed plugins, for additional information see Section C.3, “Plugins /
Tools”
sql_history/
Queries executed in Workbench are stored here, and are available from within
MySQL Workbench
snippets/
Saved SQL snippets are stored here, for additional information see
Section 7.1.5, “SQL Snippets tab”
audit_cache/
Cache storage by the Audit Log inspector, for additional information see
Section 5.6, “MySQL Audit Inspector Interface”
connections.xml
Saved MySQL server connection information, as seen on the home screen
server_instances.xmlStores your MySQL server information, as it relates to your MySQL
connections
wb_options.xml
Stores your preferences, both configured and default
The cache/ directory
The cache/ directory contains cache files in the user's MySQL Workbench directory. All cache files are
stored as SQLite 3 databases, and they are not meant to be edited outside of MySQL Workbench. The
types of cache files are:
• *.column_widths:
These are the saved column widths after adjusting columns in the SQL editor's results grid. The fields
include column_id, stored as column_name::db_name::table_name, and width, stored as an integer of
character length.
• *.cache:
This information (schemas, engines, and other global information) serves as a quick lookup source for
the SQL editor's auto completion functionality, and is implicitly updated whenever the schema tree is
updated.
All cache/ file names begin with the MySQL connection name. For example, the column width file is named
Local_instance_3306.column_widths for a MySQL connection named "Local Instance 3306".
Cached files remain after a connection is either renamed or deleted.
77
The log/ directory
The log/ directory
MySQL Workbench start up and SQL actions are logged and stored in the log/ directory. This directory is
in the user's MySQL Workbench directory.
Note
To find these text files, from the main Workbench navigation menu choose Help and
then Show Log Files.
• wb*.log:
Debugging information is generated when MySQL Workbench is started and unexpectedly stopped.
Information includes paths used, modules and plugins loaded, system information, and more. The log
files are useful when reporting a MySQL Workbench bug.
The log files rotates when MySQL Workbench is started, in that wb.log is renamed to wb.1.log,
wb.log is reset, and the previous wb.1.log file is renamed to wb.2.log, and so on, all the way up to
wb.9.log.
• sql_actions_*.log:
A log of all SQL execution results but without the data, for debugging purposes.
The SQL editor's SQL history does not originate from here, as it is stored in the sql_history directory.
The modules/ directory
Custom plugins (modules) are stored in the modules directory. For additional information about MySQL
Workbench plugins, see Section C.3, “Plugins / Tools”.
The sql_history/ directory
SQL statements executed in the SQL editor are saved in the sql_history directory. They are
stored as plain text files that are separated one per day (such as 2014-01-15) and they contain your
MySQL Workbench SQL statement history for all MySQL connections. For additional information, see
Section 7.1.7, “Output History Panel”.
The snippets/ directory
SQL snippets used by the SQL editor are stored in the snippets directory. These files include bundled
snippets (such as "SQL DDL Statements") and custom snippets saved under the "My Snippets" tab. For
additional information, see Section 7.1.5, “SQL Snippets tab”.
3.4 Tutorial: Add a Custom Link to the Home Page
This tutorial introduces the concept of altering the MySQL Workbench home screen by adding your own
Shortcut link. Here we will add a shortcut titled "Example" that opens "example.org" as its own browser tab
inside MySQL Workbench.
Note
Although adding a link to the Home screen is not a common need, this tutorial is an
example that demonstrates the idea of customizing MySQL Workbench.
78
Tutorial: Add a Custom Link to the Home Page
First, create an icon for your shortcut. This step is optional, and the table below compares the icon used in
this tutorial and the default icon if a custom icon is not defined.
Table 3.3 MySQL Workbench Home Screen Icons
Default Icon
Our Example Icon
Save your new 52x52 pixel image to a location accessible by MySQL Workbench. By default, source icons
are stored here:
Table 3.4 Default Path for Home Screen Icons
Operating System
File Path
Windows
"C:\Program Files (x86)\MySQL\MySQL Workbench CE 6.2.4\images\home\
OS X
/Applications/MySQLWorkbench.app/Contents/Resources/
Linux
/usr/share/mysql-workbench/images/
Next, open starters_settings.xml (this file is located under your user's MySQL Workbench directory)
and add an entry for your new shortcut ID where the order determines the location on the Home screen.
Follow the standard convention by appending your value to "com.mysql.wb.starter.", this tutorial uses
"example":
<link type="object">com.mysql.wb.starter.example</link>
Lastly, open predefined_starters.xml and add a new "app.Starter" entry.
Table 3.5 Default Path to predefined_starters.xml
Operating System
File Path
Windows
"C:\Program Files (x86)\MySQL\MySQL Workbench CE 6.2.4\data\
OS X
/Applications/MySQLWorkbench.app/Contents/Resources/data/
Linux
/usr/share/mysql-workbench/data/
This tutorial does not describe this entry in detail, so consider it as a self-explanatory template for now.
The important concepts include using the "id" you defined in the previous step, your own URL for the
"command", and "smallIcon" as a 52x52 pixel image that is displayed on the MySQL Workbench home
screen. Adjust these entries according to your needs, including the path to your icon.
<value type="object" struct-name="app.Starter" id="com.mysql.wb.starter.example">
<value type="string" key="type">Website</value>
<value type="string" key="title">Example</value>
<value type="string" key="description">My wonderful example.org</value>
<value type="string" key="publisher">Example Inc.</value>
<value type="string" key="authorHome">http://www.example.org/about</value>
<value type="string" key="smallIcon">/usr/local/share/wb-home-screen-example-icon.png</value>
<value type="string" key="command">browse:http://example.org</value>
79
Tutorial: Add a Custom Link to the Home Page
</value>
Note
Upgrading MySQL Workbench will overwrite these changes, because
predefined_starters.xml is stored inside the MySQL Workbench installation
directory, and starters_settings.xml is reset during installation. Consider
saving copies of these changes for future reference.
Restart MySQL Workbench to see the new link on your MySQL Workbench home screen.
Figure 3.19 Home Screen with Custom Link
Additional "app.Starter" options include:
Require a specific edition of Workbench:
Community:
<value type="string" key="edition">ce</value>
Commercial:
<value type="string" key="edition">se</value>
Require a specific version (or higher) of Workbench:
<value type="string" key="introduction">6.1.0</value>
80
Chapter 4 The Home Screen
This is the first page you see when opening MySQL Workbench, and it is central to starting MySQL
Workbench operations. The three main sections include the MySQL Connections, MySQL Workbench
Models, and external Shortcuts.
Note
In MySQL Workbench 5.2 and below, the home screen was different and
broken up into sections titled SQL Development, Data Modeling, and Server
Administration. For additional information about this change, see Section 1.1.3,
“New in MySQL Workbench 6.0”.
Most MySQL Workbench functionality, such as the SQL editor and MySQL server manager, begin with
opening a MySQL connection from the home screen.
Figure 4.1 The Home Window
MySQL Connections
This section lists connections to all of your MySQL servers, and allows you to load, configure, group,
and view information about each MySQL connection. For more information, see Section 5.1.2, “MySQL
Connections” and Section 5.1.2.2, “Creating A New MySQL Connection (Tutorial)”.
Connection Information
The method to view connection information depends on the operating system.
81
Connection Groups
• On Microsoft Windows and Linux: hover over the right side of a connection title and click the title
• On OS X: hover over a connection title and click the little (i) in appears in the bottom right corner
The information will be displayed under the connection tiles, and will appear similar to:
Figure 4.2 Viewing Connection Information
Connection Groups
You may also create groups of connections. Create a group by either right-clicking a connection and
choosing the Move to group... context menu option, or you may prefix your connection name with the
group name separated by a forward slash (for example, "QA/TestBox") when you create or configure the
connection.
Models
The Models panel your most recently used models. Each entry lists the date and time that the model was
last opened, and its associated database. For further information about modeling, see Chapter 8, Database
Design / Modeling.
To the right of the Models title are three icons. The (+) adds a new model, the (folder) opens an existing
model from the disk, and the (>) opens a context menu for additional commands, such as Create EER
Model from Database.
82
Workbench Shortcuts
Workbench Shortcuts
Most of the options you can select on the home screen are straight-forward -- the ones that require
explanation are detailed after the screenshot. Here is a quick overview of the simpler options that open
your web browser to display information about
• MySQL Utilities: If the MySQL Utilities are installed, this opens the mysqluc utility. For additional
information, see Appendix F, MySQL Utilities.
• Database Migration: Opens the migration wizard. For additional information, see Chapter 9, Database
Migration Wizard.
• MySQL Bug Reporter: Lets you file a bug report in the MySQL bug system. For additional information,
see Appendix D, How To Report Bugs or Problems.
• Workbench Blogs: Directs you to the Workbench team's blog.
• Planet MySQL: Points you to the general MySQL blog aggregator.
• Workbench Forum: Sends you to the user forums where you can ask questions and interact with other
MySQL Workbench users.
• Scripting Shell: Execute Python scripts and develop MySQL Workbench plugins.
• Oracle eDelivery: Sends you to your MySQL Workbench downloads (Commercial).
• Oracle Support: Sends you to your MOS (My Oracle Support) page (Commercial).
83
84
Chapter 5 Administrative Tasks
Table of Contents
5.1 Server Management ................................................................................................................... 85
5.1.1 MySQL Connection Navigator .......................................................................................... 85
5.1.2 MySQL Connections ........................................................................................................ 86
5.1.3 Server Logs .................................................................................................................. 114
5.1.4 Service Control .............................................................................................................. 116
5.1.5 Configuration (options file) ............................................................................................. 117
5.2 Users and Privileges ................................................................................................................ 118
5.3 Server Status ........................................................................................................................... 122
5.4 Status and System Variables .................................................................................................... 123
5.5 Database Export and Import ..................................................................................................... 125
5.6 MySQL Audit Inspector Interface ............................................................................................... 130
5.7 MySQL Enterprise Backup Interface .......................................................................................... 134
5.7.1 General Requirements ................................................................................................... 134
5.7.2 Online Backup ............................................................................................................... 136
5.7.3 Backup Recovery .......................................................................................................... 141
5.8 The wbcopytables Tool ............................................................................................................. 144
MySQL Workbench provides a visual GUI to administer your MySQL environment. The available visual
tools help configure your MySQL servers, administer users, perform backup and recovery, inspect audit
data, and view database health.
5.1 Server Management
Manage your MySQL instances with a comprehensive view of your MySQL server connections. The
visual tree based navigation provides detailed information about server and status variables, including the
number of threads, bytes sent and received by clients, buffer allocations size, and more.
5.1.1 MySQL Connection Navigator
The Navigator panel has a Management tab with functionality to monitor and configure your selected
MySQL connection.
Note
The Navigator panel also has a Schemas tab for managing databases using your
MySQL Connection. For information about the Schemas tab, see Section 7.2.1,
“Object Browser and Editor Navigator”.
85
MySQL Connections
Figure 5.1 SQL Editor - Navigator Management Tab
The Navigator Management tab is separated into the MANAGEMENT, INSTANCE, and PERFORMANCE
sections, and the Commercial edition of MySQL Workbench also includes the MYSQL ENTERPRISE
section. Each section offers several actions.
5.1.2 MySQL Connections
Manage and create MySQL connections.
5.1.2.1 Creating A New MySQL Connection (Simple)
To add a connection, click the [+] icon to the right of the MySQL Connections title on the Home screen.
This opens the Setup New Connection form:
86
MySQL Connections
Figure 5.2 Setup New Connection Form
Important
The Configure Server Management button (bottom left) opens an optional
configuration wizard for setting shell commands on the host. For example,
commands to start/stop the MySQL instance, or to edit configuration file. For more
information, see Configure Server Management Wizard.
Fill out the connection details and optionally click Configure Server Management to execute the Server
Management wizard. Click OK to save the connection.
Important
When opening connections, MySQL Workbench automatically sets the client
character set to utf8. Manually changing the client character set, such as using
SET NAMES ..., may cause MySQL Workbench to not correctly display the
characters. For additional information about client character sets, see Connection
Character Sets and Collations.
New MySQL connections are added to the Home screen as a tile, and the Section 7.2.1, “Object Browser
and Editor Navigator” describes several MySQL Workbench features to monitor and configure each
connected MySQL server. A single MySQL Workbench instance can open one or multiple MySQL
connections into individual tabs.
For a more detailed overview of this process, see the tutorial titled Section 5.1.2.2, “Creating A New
MySQL Connection (Tutorial)”.
5.1.2.2 Creating A New MySQL Connection (Tutorial)
1. Launch MySQL Workbench. You will be presented with the Home window.
87
MySQL Connections
Figure 5.3 Getting Started Tutorial - Home Window
2. Our example already has two connections created, but let us create a new connection. From the
MySQL Workbench Home window, click the [+] icon near the MySQL Connections label. This opens
the Setup New Connection wizard.
3. Define the Connection Name value, which we will set to "MyFirstConnection" in this example.
88
MySQL Connections
Figure 5.4 Getting Started Tutorial - Setup New Connection: MyFirstConnection
The default connection values are for a typical local setup, so check them and enter the appropriate
values. If you are unsure, click the Test Connection button to check the connection parameters. Do not
press OK.
Next, optionally click Configure Server Management..., which opens up the Configure Local
Management wizard:
4. Read the Configure Local Management introduction, and press Next to begin defining the new
connection parameters.
89
MySQL Connections
Figure 5.5 Getting Started Tutorial - Configure Local Management Introduction
5. The connection will now be tested. You should see that the connection was successful. If not, click
Back and check that you have entered the information correctly.
90
MySQL Connections
Figure 5.6 Getting Started Tutorial - Test Database Connection
Toggle the Show Logs to view additional details about the tested connection, then click Next.
6. Optionally, you may configure a method for remote management if a Remote Host was specified.
Setting these options enables MySQL Workbench to determine the location of configuration files, and
the correct start and stop commands to use for the connection.
SSH login based management and Native Windows remote management types are available. The
Operating System and MySQL Installation Type are configured for the SSH login variant.
We are creating a local MySQL connection in this tutorial, so are skipping the Management and OS
and SSH Configuration options, as they are used for configuring a remote MySQL connection.
7. On Microsoft Windows, select the appropriate MySQL service for the MySQL connection.
91
MySQL Connections
Figure 5.7 Getting Started Tutorial - Windows Management
8. The wizard will now check its ability to access the start and stop commands, and check access to the
MySQL Server configuration file.
92
MySQL Connections
Figure 5.8 Getting Started Tutorial - Test Settings
9. You now have a chance to review the configuration settings. The information displayed varies slightly
depending on platform, connection method, and installation type.
At the Review Settings prompt, choose "I'd like to review the settings again" to review the settings.
Choosing "Continue" closes the "Configure Server Management" dialog.
93
MySQL Connections
Figure 5.9 Getting Started Tutorial - Review Settings
Check the Change Parameters if you want to check or edit information about the MySQL configuration
file. In our example we will check it, and click Next to continue.
10. Review the MySQL configuration file information. Click the Check buttons to perform the described
checks, or optionally change the configuration file path.
94
MySQL Connections
Figure 5.10 Getting Started Tutorial - MySQL Config File
11. Optionally, enter your own commands for starting, stopping, and checking the MySQL connection.
Typically the default values are used, which means leaving these optional values blank.
95
MySQL Connections
Figure 5.11 Getting Started Tutorial - Specify Commands
Click Finish to close the "Configure Server Management" dialog, which reveals the original Setup New
Connection window.
12. After reviewing the Setup New Connection information, press Test Connection again to make sure it
still functions, and then OK to create the new MySQL connection.
96
MySQL Connections
Figure 5.12 Getting Started Tutorial - Setup New Connection
13. Your new MyFirstConnection MySQL connection is now listed on the Home window.
97
MySQL Connections
Figure 5.13 Getting Started Tutorial - Home Window Instance
14. From the Home window, click the new MySQL connection to open the SQL editor for this connection.
The SQL editor is the default page, so now select the Server Status from the left Navigator panel to
display the connected MySQL server's current status.
98
MySQL Connections
Figure 5.14 Getting Started Tutorial - Server Status
15. Test the other Navigator panel options that relate to your new MySQL connection. Check its status,
MySQL logs, and measure its performance statistics from the Dashboard.
Notice the Management and Schemas tabs on the bottom of the Navigator panel. The Schemas
view displays the schemas that are associated with your new MySQL connection. Alternatively, you
can merge the Schemas and Management tabs by either clicking the merge icon on the top right of the
Navigator panel, or by enabling the Show Management Tools and Schema Tree in a single tab SQL
Editor preference.
This concludes the "Creating a MySQL connection" tutorial. For additional information about MySQL
connections, see Section 5.1.2, “MySQL Connections”.
5.1.2.3 Manage Server Connections
The Manage Server Connections dialog is another way to manage MySQL connections. This dialog is
invoked by either selecting Edit Connection or selecting Database, Manage Connections from the main
menu. It can also be invoked from any of the wizards requiring access to a live database.
After the MySQL connection manager is launched, you are presented with the following dialog, with the
Connection tab open:
99
MySQL Connections
Figure 5.15 Manage Server Connections: Connection Tab
• Connection Name: The name used to refer to this connection. This connection can then be selected
from a list in other wizards requiring a connection.
• Connection Method: Method used to connect to the RDBMS.
After you select a connection method, the fields available in the Parameters, SSL, and Advanced tabs
change accordingly. More details about these options and parameters are available below.
Note
The Test Connection button will test the selected MySQL connection and report its
connection status. It also reports whether or not SSL is enabled.
For testing remote connections, you might also use ping to check the hostname, or
telnet to also check the port. If these fail, then also check the firewall settings on
each host, and also that MySQL server is running on the remote host.
Standard TCP/IP Connection Method
This connection method enables MySQL Workbench to connect to MySQL Server using TCP/IP.
Note
The --skip-networking MySQL server configuration option affects the TCP/IP
connection method. If disabled, use named pipes or shared memory (on Windows)
or Unix socket files (on Unix).
100
MySQL Connections
Parameters tab
• Hostname: The host name or IP address of the MySQL server.
Note
The host name "localhost" might resolve to "127.0.0.1" or "::1" on your host,
so note this when checking permissions. For example, if a web application's
user only has access to "127.0.0.1" on a host, and a defined connection
uses "localhost" that resolves to "::1", this connection may lack the proper
permissions to the aforementioned web application. Ping "localhost" on each host
to determine where it resolves to.
• Port: The TCP/IP port on which the MySQL server is listening (the default is 3306).
• Username: User name to use for the connection.
• Password: Optional password for the account used. If you enter no password here, you will be
prompted to enter the password when MySQL Workbench attempts to establish the connection. MySQL
Workbench can store the password in a vault (see The Password Storage Vault).
• Default Schema: When the connection to the server is established, this is the schema that will be used
by default. It becomes the default schema for use in other parts of MySQL Workbench.
Advanced tab
More parameters can be set for the connection by using the Advanced tab.
Figure 5.16 Standard (TCP/IP) Connection: Advanced Tab
101
MySQL Connections
The Advanced tab includes these check boxes:
• Use compression protocol: If checked, the communication between the application and the MySQL
server will be compressed, which may increase transfer rates. This corresponds to starting a MySQL
command-line client with the --compress option. This option is unchecked by default.
• Use ANSI quotes to quote identifiers: Treat “"” as an identifier quote character (like the “`” quote
character) and not as a string quote character. You can still use “`” to quote identifiers with this mode
enabled. With this option enabled, you cannot use double quotation marks to quote literal strings,
because it is interpreted as an identifier. Note: If this option is checked, it overrides the server setting.
This option is unchecked by default.
• Enable Cleartext Authentication Plugin: Send the user password in cleartext. Required for some
authentication methods. This option is unchecked by default.
• Use the old authentication protocol: This option disables Connector/C++'s secure_auth option. This
option unchecked by default.
It also includes these options:
SQL_MODE: Override the default SQL_MODE used by the server.
Others: Other options for Connector/C++ as option=value pairs, one per line.
SSL tab
More parameters can be set for the connection by using the SSL tab.
• SSL: This dropdown provides options related to enabling SSL encryption. Choose No to disable SSL, If
available if the client library supports it, or Require to require SSL support for the MySQL connection to
succeed. This option defaults to If available.
• SSL CA File: Path to the Certification Authority file for SSL.
• SSL CERT File: Path the Certificate file for SSL.
• SSL Key File: Path to the Key file for SSL.
• SSL Cipher: Optional list of permissible ciphers to use for SSL encryption.
Local Socket/Pipe Connection Method
This connection method enables MySQL Workbench to connect to MySQL Server using a socket file (on
Unix) or a named pipe (on Windows).
Parameters
The unique field here is Socket/Pipe Path. Enter the name of the socket or pipe here. If the field is left
blank, the default socket or pipe name is used. On Unix, the default socket name is /tmp/mysql.sock.
On Microsoft Windows, the default pipe name is MySQL.
This option can be seen in the following screenshot.
102
MySQL Connections
Figure 5.17 Manage DB Connections - Socket/Pipe Parameters
Advanced
These are the same options discussed in Standard TCP/IP Connection Method, except there is not the
Use compression protocol option.
SSL
These are the same options discussed in Standard TCP/IP Connection Method.
Standard TCP/IP over SSH Connection Method
This connection method enables MySQL Workbench to connect to MySQL Server using TCP/IP over an
SSH connection.
Parameters
In addition to a number of parameters that are in common with Standard TCP/IP connections, this
connection method features a number of specialized parameters. These are listed here:
• SSH Hostname: This is the name of the SSH server. An optional port number can also be provided. For
example, localhost:22.
• SSH Username: This is the name of the SSH user name to connect with.
• SSH Password: The SSH password. It is recommended that an SSH key file is also used.
• SSH Key File: A path to the SSH key file.
103
MySQL Connections
If a remote host is missing from the system's list of known hosts, a prompt requires you to confirm
the host's fingerprint before storing it. If your stored host fingerprint is different than the host's current
fingerprint, then an error is generated and you will be required to handle the discrepancy from outside
of MySQL Workbench before creating the connection. Prior to MySQL Workbench 6.1.6, the host SSH
fingerprint was not saved by MySQL Workbench.
On Linux and OS X, SSH host fingerprints are stored in ~/.ssh/known_hosts. On Microsoft Windows,
they are stored in a file created by MySQL Workbench under the user's application data folder (%appdata
%), such as C:\Users\[username]\AppData\Roaming\MySQL\Workbench\known_hosts.
The SSH connection options are viewable in the following screenshot:
Figure 5.18 Manage DB Connections - SSH Parameters
Advanced
The options here are the same as for the Standard TCP/IP connection. See Standard TCP/IP Connection
Method.
SSL
The options here are the same as for the Standard TCP/IP connection. See Standard TCP/IP Connection
Method.
System Profile
The System Profile tab enables you to specify host-specific information. This is achieved primarily through
selecting a System Type, along with its corresponding Installation Type. These profile settings contain
standard information that is used in managing the host's MySQL instance.
104
MySQL Connections
Here are some of the available installation types:
• FreeBSD, MySQL package or Custom
• Linux, including several distributions including Fedora, Oracle, RHEL, SLES, Ubuntu, Generic, and
Custom
• OS X, MySQL package or Custom
• OpenSolaris, MySQL package or Custom
• Windows, with different installation methods, MySQL versions, and build architectures
After you select the System Type and Installation Type, a number of default parameters will be set that
includes: commands used to start and stop MySQL, commands to check the server status, the location
of the my.ini or my.cnf configuration file, and on Windows, the Windows Service Name. You may also
customize these preset default values.
Figure 5.19 Manage Server Connections: System Profile Tab
The Remote Management tab is available when connecting to MySQL remotely.
105
MySQL Connections
Figure 5.20 Manage Server Connections: Remote Management Tab
Configure Server Management Wizard
Clicking the [+] icon from the Home page launches the Setup New Connection wizard. The wizard
provides a MySQL connection form to create a new MySQL connection, and includes a Configure Server
Management option as a step-by-step approach to creating a new MySQL server connection. This can also
be executed later (on remote connections) when from the home page by clicking the top right corner of a
MySQL connection tile:
Figure 5.21 Configure Remote Management
106
MySQL Connections
Executing this wizard is required to perform tasks requiring shell access to the host. For example, starting/
stopping the MySQL instance and editing the configuration file.
The steps presented in the wizard are as follows:
1. Test DB Connection
2. Management and OS
3. SSH Configuration
4. Windows Management
5. Test Settings
6. Review Settings
7. MySQL Config File
8. Specify Commands
Test DB Connection
On this page, MySQL Workbench tests your database connection and displays the results. If an error
occurs, you are directed to view the logs, which can be done by clicking the Show Logs button.
Management and OS
Used to specify a remote management type and target operating system, which is available when the Host
Machine is defined as a remote host.
The SSH login based management option includes configuration entries for the Operating System and
MySQL Installation Type.
SSH Configuration
If you specified a Remote Host on the Specify Host Machine page, you will be presented with the Host
SSH Connection page, that enables you to use SSH for the connection to the server instance. This facility
enables you to create a secure connection to remotely administer and configure the server instance.
You must enter the host name and user name of the account that will be used to log in to the server for
administration and configuration activities. If you do not enter the optional SSH Key for use with the server,
then you will be prompted for the password when the connection is established by MySQL Workbench.
Note
This connection is to enable remote administration and configuration of the MySQL
Server itself. It is not the same as the connection used to connect to a server for
general database manipulation.
Note
You must use an SSH connection type when managing a remote server if you wish
to start or stop the server or edit its configuration file. Other administrative functions
do not require an SSH connection.
Windows Management
107
MySQL Connections
If a Windows server is used, then the Windows configuration parameters must be set. Windows
management requires a user account with the required privileges to query the system status, and to control
services. And read/write access to the configuration file is needed to allow editing of the file.
Test Settings
On the next page your settings are tested and the wizard reports back the results after attempting to
connect to the server. If an error occurs, you are directed to view the logs, which can be done by clicking
the Show Logs button.
MySQL Workbench must know where the MySQL Server configuration file is located to be able to display
configuration information. The wizard is able to determine the most likely location of the configuration file,
based on the selection made on the Operating System page of the wizard. However, it is possible to test
that this information is correct by clicking the Check path and Check section buttons. The wizard then
reports whether the configuration file and server configuration section can in fact be accessed. It is also
possible to manually enter the location of the configuration file, and the section pertaining to MySQL Server
data; these manually entered values should be tested using the buttons provided. Click the Next button to
continue.
Review Settings
The modified settings may be reviewed, which also includes the default values. Check the Change
Parameters checkbox if the MySQL Config File section will be edited, and then click Next to continue.
MySQL Config File
Allows configuration of the MySQL server version. It also allows the editing and validation of the
configuration file path, and validation of the server instance section. Click Next to continue.
Specify Commands
This page enables you to set the commands required to start, stop, and check the status of the running
server instance. It is possible to customize the commands if required, but the defaults should be suitable
in most cases. The defaults are set based on the options selected in the Operating System page of the
wizard. Click Next to continue.
Complete Setup
On this page, you finally assign a name to the server instance. This name is used in various parts of the
GUI to enable you to refer to this instance. After setting a suitable name, click Finish to save the instance.
The Password Storage Vault
The vault provides a convenient secure storage for passwords used to access MySQL servers. By using
the vault, you need not enter credentials every time MySQL Workbench attempts to connect to a server.
Note
The hostname is used for storing password information. For example, a local
connection might use "localhost", "127.0.0.1", or "::1", but these are stored
separately in the password storage vault, even if they all resolve to the same place.
The vault is implemented differently on each platform:
• Windows: The vault is an encrypted file in the MySQL Workbench data directory. This is where
connections.xml and related files are located. The file is encrypted using a Windows API which
108
MySQL Connections
performs the encryption based on the current user, so only the current user can decrypt it. As a result it
is not possible to decrypt the file on any other computer. It is possible to delete the file, in which case all
stored passwords are lost, but MySQL Workbench will otherwise perform as expected. You then must
re-enter passwords as required.
• OS X: The vault is implemented using the OS X Secure Keychain. The keychain contents can be viewed
using the Keychain Access.app utility.
• Linux: The vault works by storing passwords using the gnome-keyring daemon, which must be
running for password persistence to work. The daemon is automatically started in GNOME desktops, but
normally is not in KDE and others. The gnome-keyring daemon can be used for password storage in
MySQL Workbench on non-GNOME platforms, but must be started manually.
5.1.2.4 MySQL Fabric Integration
Browse, view status, and connect to any MySQL instance in a Fabric Cluster.
Note
This requires Connector/Python and MySQL Utilities 1.4.3+ installed, including the
Python module. This feature also requires MySQL Workbench 6.2+.
To set up a managed Fabric connection, create a new MySQL connection with the new MySQL Fabric
Management Node connection method. The connection tiles have a different look:
Figure 5.22 Fabric Connection Group Tile
Clicking the new fabric group tile shows the managed connections:
109
MySQL Connections
Figure 5.23 Fabric Connection Group Tiles
5.1.2.5 Client Connections
The client connection browser lists the active and sleeping MySQL client connections, and adds the ability
to kill statements and connections, and view additional connection details and attributes.
Note
The connection details viewer requires MySQL 5.6 or greater. Only basic
connection information is available for previous versions of MySQL, such as the
connection hosts, database, and state.
110
MySQL Connections
Figure 5.24 Client Connection Overview
Client Connections and Metadata locks
The Client Connections management window includes a Show Details for connections to MySQL 5.6 and
above. These details are separated into three tabs:
• Details: connection details such as Process ID, Type, User, Host, Instrumented, and additional
information.
111
MySQL Connections
Figure 5.25 Client Connections Details
• Locks: MySQL uses metadata locking to manage access to objects such as tables and triggers.
Sometimes a query might be blocked while being manipulated by another connection from another user.
The Locks feature utilizes these MySQL metadata locks (MDL) to show the locked connections that are
blocked or being waiting on, and shows information about the locks, what they are waiting for, and what
they hold.
112
MySQL Connections
Figure 5.26 Metadata Locks Browser
Note
The metadata lock information is provided in the performance schema as of
MySQL server 5.7.3.
• Attributes: these are connection attributes such as OS, Client Name, Client Version, and Platform.
113
Server Logs
Figure 5.27 Client Connection Attributes
5.1.3 Server Logs
The Server Logs page features two subtabs:
Error Log File
General MySQL errors, for more information see The Error Log
114
Server Logs
Figure 5.28 Navigator Management: Instance: Server Logs: Error Log
Slow Log File
Slow queries (when available), for more information see The Slow Query Log
115
Service Control
Figure 5.29 Navigator Management: Instance: Server Logs: Slow Log
5.1.4 Service Control
The Startup / Shutdown functionality includes:
• Viewing the Startup Message Log
• Start up and shut down the MySQL instance
• View the current status of the MySQL instance
116
Configuration (options file)
Figure 5.30 Navigator Management: Instance: Startup / Shutdown
5.1.5 Configuration (options file)
The Options File editor is used to view and edit the MySQL configuration file (my.ini on Windows, or
my.cnf on Linux / OS X) by selecting check boxes and other GUI controls, and then making edits. MySQL
Workbench divides the options file into its own groupings as a set of tabs (such as General, Logging,
InnoDB, and more). Make an edit and click Apply to commit the changes.
The options file editor has several components:
• Option file groupings, as divided into convenient tabs by MySQL Workbench
• A Locate option search field to search your MySQL options configuration file
• Configuration File path, so you know the configuration file you are editing
• An options file group selector, to select the option [group] to edit. Because the same option can be
defined under multiple groupings, it is important to choose the correct group when making edits.
[mysqld] (the MySQL server) is the default and most common group. For additional information about
groups, see Using Option Files.
A screenshot with the General tab selected:
117
Users and Privileges
Figure 5.31 Navigator Management: Instance: Options File: General
5.2 Users and Privileges
A listing of all users and privileges that relate to the MySQL connection. You may also manage (add) user
accounts, adjust privileges, and expire passwords.
The Users and Privileges page has several sections:
User Accounts
Lists each user account that is associated to the active MySQL connection.
Login
Login information related to the selected user account.
118
Account Limits
Figure 5.32 Navigator Management: User And Privileges: Login
Account Limits
Define limits for the user account, such as the maximum number of queries, updates, connections, and
concurrent connections that an account can execute in one hour.
119
Administrative Roles
Figure 5.33 Navigator Management: User And Privileges: Account Limits
Administrative Roles
To aid in assigning privileges to MySQL Server users, MySQL Workbench introduces the concept of
Administrative Roles. Roles are a quick way of granting a set of privileges to a user, based on the work the
user must carry out on the server. It is also possible to assign multiple roles to a user. To assign roles, click
the User Account you wish to modify, then click the Administrative Roles tab. Then click the check boxes
according to the roles you wish to allocate to the user. After you select a role to a user, you will see the
accumulated privileges in the Global Privileges Assigned to User panel. For example, if you select the
role BackupAdmin, the privileges granted include EVENT, LOCK TABLES, SELECT, SHOW DATABASES.
If you also select the role of ReplicationAdmin, the list of privileges expands to include REPLICATION
CLIENT, REPLICATION SLAVE and SUPER.
These roles are available:
• DBA: Grants all privileges
• MaintenanceAdmin: Grants privileges to maintain the server
• ProcessAdmin: Grants privileges to monitor and kill user processes
• UserAdmin: Grants privileges to create users and reset passwords
• SecurityAdmin: Grants privileges to manage logins and grant and revoke server privileges
• MonitorAdmin: Grants privileges to monitor the server
120
Schema Privileges
• DBManager: Grants privileges to manage databases
• DBDesigner: Grants privileges to create and reverse engineer any database schema
• ReplicationAdmin: Grants privileges to set up and manage replication
• BackupAdmin: Grants privileges required to back up databases
• Custom: Lists other (custom) privileges that are assigned to the user account
The Password Validation Plugin (available as of MySQL Server 5.6.6) is supported in Workbench. For
information about what these settings mean, see The Password Validation Plugin.
Figure 5.34 Navigator Management: User And Privileges: Administrative Roles
Schema Privileges
Additional schema privileges that the account can use. For example, the standard mysqlbackup user has
"CREATE TEMPORARY TABLES" on the mysql schema.
121
Server Status
Figure 5.35 Navigator Management: User And Privileges: Schema Privileges
5.3 Server Status
Get an immediate view into the basic health indicators and counters for your MySQL environment. This
includes viewing the server's running state (stopped/running), available features, primary server directories,
replication state, and security settings for authentication and SSL. Reports also include information and
graphs to track memory usage, connections, hit rates, and more.
122
Status and System Variables
Figure 5.36 Navigator Management: Server Status
5.4 Status and System Variables
Status and System Variables: Lists all server variables for the MySQL connection. You may also copy all
or selected variables to your clipboard.
123
Status and System Variables
Figure 5.37 Navigator Management: Status Variables
Figure 5.38 Navigator Management: Status Variables
124
Custom Variable Grouping
Custom Variable Grouping
The status and system variables are each categorized by groups (such as InnoDB or Logging), and you
may also create your own custom groups. Right-click on a variable, choose the custom group (or create a
new one), and add the variable to the aforementioned group. Your custom groups are listed along with the
pre-existing groups.
In the example below, we created a custom group titled "My Variables" and are in the process of adding
the Created_tmp_variables variable to it.
Figure 5.39 Navigator Management: Adding A Variable To A Custom Group
5.5 Database Export and Import
Data Export
This tab allows you to export your MySQL data. Select each schema you want to export, optionally choose
specific schema objects/tables from each schema, and generate the export. Configuration options include
125
Data Export
exporting to a project folder or self-contained SQL file, optionally dump stored routines and events, or skip
table data.
Note
Alternatively, use Section 7.1.9, “Export a Result Set” to export a specific result set
in the SQL editor to another format such as CSV, JSON, HTML, and XML.
Select the Database objects to export, and configure the related options.
Note
Click Refresh to load the current objects.
Figure 5.40 Navigator Management: Data Export: Object Selection
Optionally open the Advanced Options tab that allows you to refine the export operation. For example, add
table locks, use replace instead of insert statements, quote identifiers with backtick characters, and more.
126
Data Export
Figure 5.41 Navigator Management: Data Export: Advanced Options
Click Start Export to begin the export process:
127
Data Import/Restore
Figure 5.42 Navigator Management: Data Export: Export Progress
This functionality uses the mysqldump command.
Data Import/Restore
Restore exported data from the Data Export operation, or from other exported data from the mysqldump
command.
Choose the project folder or self-contained SQL file, choose the schema that the data will be imported to,
or choose New to define a new schema.
128
Data Import/Restore
Figure 5.43 Navigator Management: Data Import: Import From Disk
Note
You may only select specific data objects (tables) to import if the data export
operation used project folders instead of a self-contained SQL file.
Click Start Import to begin the import process:
129
MySQL Audit Inspector Interface
Figure 5.44 Navigator Management: Data Import: Import Progress
5.6 MySQL Audit Inspector Interface
MySQL Workbench offers a GUI interface to the Audit Inspector.
Note
The Audit Inspector interface was added in MySQL Workbench 6.0.0.
Initially, when you first load the Audit Inspector, you must use MySQL Workbench to cache the audit log
for performance reasons. MySQL Workbench will then parse, index, and retrieve values from the encrypted
cached file on your local computer. At this stage, you also set a password for the encrypted file that will be
used when viewing this file. The initial screen looks similar to:
130
MySQL Audit Inspector Interface
Figure 5.45 Workbench: Audit Inspector: Initializing
Note
Generating the cache file can take a long time. If you press Abort during the
caching process, MySQL Workbench will save the results that were cached at the
point you pressed Abort.
After caching an audit log, the Audit Inspector page will display the results:
131
MySQL Audit Inspector Interface
Figure 5.46 Workbench: Audit Inspector
The search field offers criteria for narrowing the displayed events, including Show events of type Fetch and
Show events of type Query, and defaults to Show all events. Custom filters are also available.
You can Add Files to Cache from the main Audit Inspector page:
132
MySQL Audit Inspector Interface
Figure 5.47 Workbench: Audit Inspector: Add Files to Cache
Future uses of the Audit Inspector will require the password that you set during the initial step. The login
page:
133
MySQL Enterprise Backup Interface
Figure 5.48 Workbench: Audit Inspector: Unlock
5.7 MySQL Enterprise Backup Interface
MySQL Workbench include a MySQL Enterprise Backup GUI interface that is listed in the Management
Navigator tab for a MySQL connection. There are two MySQL Enterprise Backup related sections in the
Navigator:
• Online Backup: Sets a backup profile that defines what should be backed up, where the backup
should be stored, and when (the frequency) MySQL should be backed up.
• Restore: Restores the MySQL server to a specific point in time, typically by restoring a backup that was
created by the Online Backup feature in MySQL Workbench.
The MySQL Enterprise Backup configuration is located on the MySQL server, and not locally. This
information includes the MySQL Enterprise Backup configuration backup profiles, job scheduling, backup
operations, and data. This also means that the backup operations are executed with (or without) MySQL
Workbench running.
5.7.1 General Requirements
MySQL Enterprise Backup is a MySQL Enterprise Feature that is separate from MySQL Workbench.
For more information about its functionality, see the MySQL Enterprise Backup documentation at http://
dev.mysql.com/doc/mysql-enterprise-backup/en. MySQL Workbench provides an interface to MySQL
134
General Requirements
Enterprise Backup, as described in the following documentation. In addition to having MySQL Enterprise
Backup installed on your host, the following general requirements also apply:
• A recent version of MySQL Enterprise Backup. The MySQL Enterprise Backup support policy is to
support the current GA version of MySQL Enterprise Backup, and the major version before that. This
dictates the minimum MySQL Enterprise Backup version required by MySQL Workbench, which is the
major version before the current GA release.
• Managing both local and remote MySQL instances is available on Linux and OS X, and managing local
MySQL instances is available on Microsoft Windows. Remote management is configured using SSH
Remote Management.
• A MySQL connection with a root user.
• The MySQL server configuration file path must be set and correct for the MySQL connection.
• The user running MySQL Workbench must be a sudoer (Linux / OS X) that is able to execute the MySQL
Enterprise Backup binary.
• Additionally, the sudo user must keep the HOME environment variable when executing system
commands, which means adding the following to /etc/sudoers:
env_keep +="HOME"
And the Prerequisites set in the Settings tab are:
• A path to the MySQL Enterprise Backup executable. MySQL Enterprise Backup is available via
eDelivery or My Oracle Support (MOS). MySQL Workbench attempts to locate the MySQL Enterprise
Backup executable, so check the path and adjust it accordingly.
• The path to the Backup Home Directory, where backup profiles and data is stored. This can be created
from within Workbench from the Settings tab.
• The MySQL account for the Backup Process. The available actions depends on the current state of this
set up, with options including:
• Create MEB Account: Available if a backup user does not already exist.
• Change Password: Available if a backup user does exist.
• Fix Grants for MEB...: Available if the user's privileges are invalid, which alters the user by adding the
RELOAD, SUPER, and REPLICATION CLIENT ON *.* privileges.
Uninstallation notes
• The MySQL Workbench uninstallation process does not remove the associated MySQL Enterprise
Backup backup tasks. To stop the scheduled backups, edit the related "Task Scheduler" entries on
Windows, or remove the associated cron jobs on Linux and OS X.
• The MySQL Workbench uninstallation process does not remove the MySQL Enterprise Backup master
related configuration file, the configuration files generated for each defined profile, nor the MySQL
backups.
The Settings tab:
135
Online Backup
Figure 5.49 Workbench: MySQL Enterprise Backup Settings
If any of the requirements are not met, then an error will be generated when attempting to use MySQL
Enterprise Backup features.
5.7.2 Online Backup
Sets a backup profile that defines what should be backed up, where the backup should be stored, and
when (the frequency) it should be backed up. The main page:
136
Online Backup
Figure 5.50 Workbench: MySQL Enterprise Backup
The Online Backup page is separated into three sections:
• Backup Jobs: Used for managing backup jobs for the MySQL server. A backup job (profile) is a
configuration file used to store information about what is backed up, where the backup is stored, and
optionally when backups will be performed.
Right-clicking on a Backup Job is an alternative way to access the available actions, such as
Configure Job, Delete Job, and Execute Backup. Right-clicking also offers two additional
options:
• Execute Backup to Image File: Saves the backup to a single file, and prompts for the file name.
• Copy Backup Command to Clipboard: Generates a command for executing the backup, and
copies it to your clipboard. You might execute this command in the shell or terminal, which looks
similar to: /bin/mysqlbackup --defaults-file="/var/lib/meb/foo.cnf" --showprogress=stdout backup --with-timestamp.
• Backup Job Details: Displays information about the state of a specific (selected) backup job. It includes
information from the Settings page, and information specific to the selected backup.
• Recent Activity: Historical information about the backup operations performed on the server. View the
backup log by right-clicking an entry and choosing View Backup Log
Executing a backup will show a dialog with the progress of the backup operation.
Backup Jobs
Creating a backup job offers several elements. The following information applies to the New Job operation,
and Configure Job is used to modify existing jobs.
137
Online Backup
The Backup Profile Name and its associated Comments field are used to identify the backup job's profile,
and this name is listed on the main page.
The New Job scheduling page separates the configuration information into four tabs. The Contents tab
defines the schemas and tables to back up, and whether the job is a full or partial backup.
• Full backup: All schemas and tables are backed up.
• Partial: Select the schemas and tables (objects) that you want to back up. Choose Select objects
to included/excluded to open the table inclusion (and exclusion) options. For additional information
about the include, exclude, and Transportable Tablespace options, see the MySQL Enterprise Backup
documentation titled Partial Backup and Restore Options.
Figure 5.51 Workbench: MySQL Enterprise Backup Configuration: Contents for Full Backups
138
Online Backup
Figure 5.52 Workbench: MySQL Enterprise Backup Configuration: Contents for Partial Backups
The Options tab includes settings to modify the default behavior of the backup process.
By default, the Backup Storage Directory is stored under a sub-folder using the name of the Backup
Profile Name in the MySQL Backup Home Directory setting. Additional options include compression
and apply-log, and the option to Skip Unused Pages.
139
Online Backup
Figure 5.53 Workbench: MySQL Enterprise Backup Configuration: Options
The Schedule tab optionally sets a backup schedule for both full and incremental backups. The schedule
uses the Windows Tasks Scheduler on Microsoft Windows, and a cron job on Linux and OS X. It is
scheduled using the operating system user that is scheduling the backup, which is typically the MySQL
user.
A full backup is slower than the incremental backup that merges with a full backup. A common scenario is
to set a full backup as weekly, and an incremental backup as daily. For additional information about backup
performance, see Optimizing Backup Performance.
140
Backup Recovery
Figure 5.54 Workbench: MySQL Enterprise Backup Configuration: Schedule
The Advanced tab allows you to pass in additional MySQL Enterprise Backup options.
Note
These additional options are not validated.
To recover backups, see Section 5.7.3, “Backup Recovery”.
5.7.3 Backup Recovery
The Backup Recovery wizard is used to recover MySQL Enterprise Backup backups. For more information
about creating MySQL Enterprise Backup backups using MySQL Workbench, see Section 5.7.2, “Online
Backup”
The Backup Recovery wizard allows you to restore backups from folders, image files, and backup profiles
created by Section 5.7.2, “Online Backup”.
141
Backup Recovery
Figure 5.55 Workbench: Backup Recovery: Main page
In our example, we will restore a full backup that was created by MySQL Workbench Online Backup.
After choosing the "backup (full)" profile that we created earlier, the next page lists each table that will be
updated:
Note
We unchecked Show System Schemas the option, which is enabled by default.
142
Backup Recovery
Figure 5.56 Workbench: Backup Recovery: Table View
Clicking Next > will open the Restore wizard. We then clicked Restore > to execute the restoration
process, and toggled the message logs in our example below:
143
The wbcopytables Tool
Figure 5.57 Workbench: Backup Recovery: Restore
5.8 The wbcopytables Tool
wbcopytables is a command line utility included in MySQL Workbench that allows you to copy table data
from a supported source database server to MySQL. It is used by the Workbench Migration wizard to copy
data after the schema is migrated and created in the target MySQL server.
wbcopytables can connect to the source database using either ODBC, the Python DBAPI, or the native
MySQL client library.
The copy is performed by executing a SELECT statement on the source database, and then INSERT
inserts the retrieved rows to the target MySQL server. Several options allow you to control the data that is
copied.
Table 5.1 File Location (Default)
Operating System
Location
Linux
/usr/bin/wbcopytables
OS X
/Applications/MySQLWorkbench.app/Contents/MacOS/
wbcopytables
144
Connection Parameters
Operating System
Location
Windows
C:\Program Files (x86)\MySQL\MySQL Workbench
6.2\wbcopytables.exe
Connection Parameters
Options for the source connection are:
--odbc-source=ODBC_connection_string: The syntax of the ODBC connection string uses standard
ODBC syntax. You can also use a ODBC data source name (DSN).
--mysql-source=MySQL_connection_string: Use for MySQL sources (when doing a MySQL to
MySQL migration/copy). It uses the same syntax as the MySQL Utilities:
• For TCP/IP connections: username[:password]@host:port
• For local socket connections: username[:password]@::socket_path
You can pass the connection password by using the --source-password option.
For the target connection, the option is: --target=MySQL_connection_string.
You can use the --passwords-from-stdin option to pass a passwords through STDIN. Source and
target passwords must be separated by a tab character.
You can use ODBC specific data source options from the source RDBMS to specify the number of rows to
fetch at a time for the source SELECT statement.
Table Specification
One or more tables can be specified in the command line for the copy operation. There are two copy types:
• Full table copy: --table
• Range copy: --table-range
Both table copy types require a set of common arguments:
• Source schema: The schema/catalog the table belongs to. If quoting is required, it must be done using
the syntax from the source RDBMS. For example, SQL Server uses [square_brackets].
• Source table: The table to copy. If the source RDBMS uses a schema name in addition to a catalog,
both schema and table must be specified here and separated by a dot. For example, [dbo].[mytable].
• Target schema: The name of the MySQL schema. If quoting is needed, it must use the MySQL backtick
syntax. For example, `sakila`.
• Target table: The name of the MySQL table.
• Select expression: The list of fields to SELECT. This will be inserted verbatim into the source SELECT
statement.
Caution
Use caution as this expression is copied directly into the source SELECT
statement.
145
Other Options
For the select expression, if both the source and target tables have the same fields in the same order, and
use compatible types, you can simply pass * here, which will build a query like "SELECT * FROM [dbo].
[mytable]". If not, you can specify the fields as you would in the SELECT statement, which are comma (,)
separated and with proper escaping/quoting specific to the source RDBMS. You can also specify typecasts
and/or data conversions that the source RDBMS supports. For example:
[client_id], [name], [address], AsText([location])
Because each option must be interpreted as a single option by the wbcopytables command, you must
perform OS shell specific quoting whenever necessary. Usually, quoting your parameter values with 'single'
or "double" quotes is enough. This is in addition to any database specific quoting you use.
Full Table Copy
This performs a full SELECT on the source table, fetches records, and then inserts them into the target
table.
There are no additional arguments required.
The --table syntax is as follows:
--table Source_Schema Source_Table Target_Schema Target_Table Select_Expression
Range Copy
This performs a SELECT copy on the source table for the specified range. The table must have a numeric
UNIQUE NOT NULL or PRIMARY KEY that is used to create a WHERE expression for the range.
The --table-range syntax is as follows:
--table-range Source_Schema Source_Table Target_Schema Target_Table Select_Expression Source_Key Range_Start R
The generated expression is:
key_column >= range_start AND key_column <= range_end
If you specify -1 for Range_End, then the expression will be:
key_column >= range_start
Other Options
• --thread-count=Number: If you are copying more than one table, you can use this option to divide
the tables across several threads. There is no support for dividing a single table across many threads.
• --count-only: Only perform a COUNT(*) of the SELECT which would be generated by the --table
option that was used. The target schema and table can be omitted in this case.
146
Trigger Handling
• --truncate-target: Execute a TRUNCATE TABLE command on each target table that is copied.
Trigger Handling
Because there is no way to temporarily disable triggers in MySQL and they can affect the copy process,
MySQL Workbench will backup and drop all triggers from the target MySQL database before the copy
process starts, and then these triggers are restored after the copy finishes. The triggers are backed up in
the target schema under a table named wb_tmp_triggers.
• --disable-triggers-on=Schema_Name: Performs the backup and DROP process for all triggers in
the specified schema.
• --reenable-triggers-on=Schema_Name: Restores triggers previously backed up to the
wb_tmp_triggers table.
• --dont-disable-triggers: Bypass the trigger disabling step.
147
148
Chapter 6 Performance Tools
Table of Contents
6.1
6.2
6.3
6.4
6.5
Performance Dashboard ...........................................................................................................
Performance Schema Reports ..................................................................................................
Visual Explain Plan ..................................................................................................................
Query Statistics ........................................................................................................................
Tutorial: Using Visual Explain to improve query performance ......................................................
149
150
154
156
158
6.1 Performance Dashboard
View server performance statistics in a graphical dashboard.
Figure 6.1 Performance: Dashboard
Note
The Performance Dashboard was added in MySQL Workbench 6.1.0.
Network Status
This highlights statistics for network traffic sent and received by the MySQL server over client connections.
Data points include the Incoming Network Traffic, Outgoing Network Traffic, and Client Connections.
149
MySQL Status
MySQL Status
This highlights the primary MySQL server activity and performance statistics. Data points include the Table
Open Cache efficiency, SQL Statements Executed, and counts (per second) for SELECT, INSERT,
UPDATE, DELETE, CREATE, ALTER, and DROP statements.
InnoDB Status
This provides an overview of the InnoDB Buffer Pool and disk activity that is generated by the InnoDB
storage engine. Data points are separated into three groups:
Note
Hover over a graph to see additional information, such as a total count.
• Usage
• Read Requests: The number of logical read requests (per second) InnoDB has performed to the buffer
pool.
• Write Requests: The number of logical write requests (per second) InnoDB has performed to the buffer
pool.
• Disk Reads: The number of logical reads that InnoDB could not satisfy from the buffer pool. As a
result, these had to be read from the disk.
• InnoDB Buffer Pool Usage: The percentage of the InnoDB buffer pool that is in use. Hover over the
graphic to see additional information, such as Usage Rate and Pages Free.
• Writes
• Data Written: The number of writes written to the InnoDB redo log file.
• Writes: The number of physical writes written to the InnoDB redo log file.
• InnoDB Disk Writes: Hover over this dynamic graph to see the number of disk writes over a specific
second. The available range includes the last 120 seconds.
• Writing: Total amount of data (in bytes) written using file operations by the InnoDB storage engine.
• Reads
• Doublewrite Buffer Writes: The number of doublewrite operations that were performed.
• InnoDB Disk Reads: Hover over this dynamic graph to see the number of disk reads over a specific
second. The available range includes the last 120 seconds.
• Reading: Total amount of data (in bytes) read in file operations by the InnoDB storage engine.
6.2 Performance Schema Reports
Performance schema based reports that provide insight into the operation of the MySQL server through
many high-level reports. MySQL Workbench uses the SYS views on the Performance Schema to generate
over 20 reports to help analyze the performance of your MySQL databases. Reports help analyze IO
hotspots, discover high cost SQL statements, and review wait statistics and InnoDB engine metrics.
150
Installation and Configuration
Installation and Configuration
A GUI for configuring and fine tuning the Performance Schema instrumentation. Initially, this loads an
"Easy Setup" page that is enough for most users. Slide the "Performance Schema Full Enabled" slider to
YES to enable all available Performance Schema instruments.
Figure 6.2 Performance Schema Setup: Easy Setup
Clicking Show Advanced provides methods to fine tune the Performance Schema instrumentation.
151
Installation and Configuration
Figure 6.3 Performance Schema Setup: Introduction
152
Performance Report Descriptions
Performance Report Descriptions
Figure 6.4 Performance Reports: Top I/0 By Bytes
Note
The Performance Reports were added in MySQL Workbench 6.1.0.
The available performance reports include (this is a non-exhaustive list):
• Top File I/O Activity Report: Show the files performing the most IOs (in bytes)
• Top I/O by File by Time: Show the highest IO usage by file and latency
• Top I/O by Event Category: Show the highest IO Data usage by event categories
• Top I/O in Time by Event Categories: Show the highest IO time consumers by event categories
• Top I/O Time by User/Thread: Show the top IO time consumers by user/thread
• Statement Analysis: Lists statements with aggregated statistics
• Statements in Highest 5 Percent by Runtime: Lists the top 5% statements with the highest runtime (in
microseconds),
• Using Temp Tables: Lists all statements that use temporary tables -- accesses the highest number of
disk temporary tables, then memory temp tables
• With Sorting: List all normalized statements that have done sorts, and accesses them in the following
priority order -- sort_merge_passes, sort_scans, then sort_rows
153
Visual Explain Plan
• Full Table Scans: Lists statements that performed a full table scan. Accesses query performance and the
where clause(s), and if no index is used then it recommends adding indexes for large tables
• Errors or Warnings: Lists statements that have raised errors or warnings
• Schema Object Overview (High Overhead): Shows counts by object type for each schema
Note
This can take a long time to execute on instances with a large number of objects.
• Schema Index Statistics
• Schema Table Statistics
• Schema Table Statistics (with InnoDB buffer)
• Tables with Full Table Scans: Finds tables that are being accessed by full table scans, ordering them by
the number of rows scanned (DESC)
• Unused Indexes: List of indexes that were never used since the server started or since P_S data
collection started
• Waits by Time: Lists the top wait events by their total time, ignoring idle (this may be very large)
• Waits by User by Time: Lists the top wait events by their total time, ignoring idle (this may be very large)
• Wait Classes by Time: Lists the top wait classes by total time, ignoring idle (this may be very large)
• Waits Classes by Average Time: Lists the top wait classes by average time, ignoring idle (this may be
very large)
• InnoDB Buffer Stats by Schema: Summarizes the output of the
INFORMATION_SCHEMA.INNODB_BUFFER_PAGE table, aggregating it by schema
• InnoDB Buffer Stats by Table: Summarizes the output of the
INFORMATION_SCHEMA.INNODB_BUFFER_PAGE table, aggregating it by schema and table name
6.3 Visual Explain Plan
The Visual Explain feature generates and displays a visual representation of the MySQL EXPLAIN
statement by using extended information available in the extended JSON format.
Note
The extended EXPLAIN format is available as of MySQL server 5.6.5.
MySQL Workbench provides all of the EXPLAIN formats for executed queries including the raw extended
JSON, traditional format, and visual query plan.
Visual Explain Conventions
An example Visual Explain diagram:
SELECT CONCAT(customer.last_name, ', ', customer.first_name) AS customer, address.phone, film.title
FROM rental
INNER JOIN customer ON rental.customer_id = customer.customer_id
154
Visual Explain Conventions
INNER JOIN address ON customer.address_id = address.address_id
INNER JOIN inventory ON rental.inventory_id = inventory.inventory_id
INNER JOIN film ON inventory.film_id = film.film_id
WHERE rental.return_date IS NULL
AND rental_date + INTERVAL film.rental_duration DAY < CURRENT_DATE()
LIMIT 5;
Figure 6.5 A Visual Explain Example
The order of execution is bottom to top, and left to right.
Graphic Conventions
• Standard Boxes: tables
• Rounded boxes: operations such as GROUP and SORT
• Framed boxes: subqueries
• Diamonds: joins
Textual Conventions
• Standard text below boxes: table (or alias) name
• Bold text below boxes: key/index that was used
• Number in top right of a box: number of rows used from the table after filtering
• Number in top left of a box: relative cost of accessing that table (requires MySQL 5.7 or greater)
• Number to the right of nested loop diamonds: number of rows produced by the JOIN
• Number above the loop diamonds: relative cost of the JOIN (requires MySQL 5.7 or greater)
The associated colors and descriptions used in the Visual Explain diagram:
Table 6.1 Visual Explain Diagram Information
System
Name
Color
SYSTEM Blue
Text on Visual Diagram
Tooltip related information
Single row: system constant
Very low cost
155
Visual Explain Usage
System
Name
Color
Text on Visual Diagram
Tooltip related information
CONST
Blue
Single row: constant
Very low cost
EQ_REF Green
Unique Key Lookup
Low cost -- The optimizer is able to find
an index that it can use to retrieve the
required records. It is fast because the
index search directly leads to the page
with all the row data
REF
Non-Unique Key Lookup
Low-medium -- Low if the number of
matching rows is small; higher as the
number of rows increases
FULLTEXTYellow
Fulltext Index Search
Specialized FULLTEXT search. Low -- for
this specialized search requirement
REF_OR_NULL
Green
Key Lookup + Fetch NULL Values
Low-medium -- if the number of matching
rows is small; higher as the number of
rows increases
INDEX_MERGE
Green
Index Merge
Medium -- look for a better index
selection in the query to improve
performance
Green
UNIQUE_SUBQUERY
Orange Unique Key Lookup into table of
subquery
Low -- Used for efficient Subquery
processing
INDEX_SUBQUERY
Orange Non-Unique Key Lookup into table of
subquery
Low -- Used for efficient Subquery
processing
RANGE
Orange
Index Range Scan
Medium -- partial index scan
INDEX
Red
Full Index Scan
High -- especially for large indexes
ALL
Red
Full Table Scan
Very High -- very costly for large tables,
but less of an impact for small ones. No
usable indexes were found for the table,
which forces the optimizer to search
every row. This could also mean that the
search range is so broad that the index
would be useless.
unknown
Note: This is the default, in case a match
cannot be determined
UNKNOWN
Black
Visual Explain Usage
To view a visual explain execution plan, execute your query from the SQL editor and then choose the
Execution Plan tab in the query results tab. The execution plan defaults to "Visual Explain" but also has a
"Tabular Explain" view that is similar to what you would see when executing EXPLAIN in the MySQL client.
6.4 Query Statistics
This Query Stats SQL editor results tab uses Performance Schema data to gather key statistics collected
for executed query, such as timing, temporary tables, indexes, joins, and more.
Requirements
• MySQL server 5.6 or newer
156
Requirements
• Query, Collect Performance Schema Stats enabled.
• The performance_schema enabled with statement instrumentation
• MySQL Workbench 6.1.0 or newer
Figure 6.6 SQL Editor: Query Stats
157
Tutorial: Using Visual Explain to improve query performance
Figure 6.7 SQL Editor: Query Stats with Performance Schema Graphs
6.5 Tutorial: Using Visual Explain to improve query performance
In this example, Visual Explain helps locate and fix problematic (slow) queries. This tutorial uses the DBT-3
database, and begins with the following query:
SELECT * FROM orders
WHERE YEAR(o_orderdate) = 1992 AND MONTH(o_orderdate) = 4
AND o_clerk LIKE '%0223';
In the screenshot below, we executed this query and generated a Visual Explain report by selecting Query,
Visual Explain Current Statement from the main menu.
158
Tutorial: Using Visual Explain to improve query performance
Figure 6.8 DBT-3 Visual Explain Tutorial: Full Table Scan
Figure 6.9 DBT-3 Visual Explain Tutorial: Full Table Scan: Traditional View
Notice that ...
Why did this query generate a full table scan? Why is our indexed o_orderdate column missing as a
possible key? Looking more closely, we notice that our indexed column is being used in an expression as
"WHERE YEAR(o_orderdate) = 1992 AND MONTH(o_orderdate) = 4", so its index is not used.
To use the existing index we can adjust the query like so:
SELECT * FROM orders
WHERE o_orderdate BETWEEN '1992-04-01' AND '1992-04-30'
AND o_clerk LIKE '%0223';
159
Tutorial: Using Visual Explain to improve query performance
Figure 6.10 DBT-3 Visual Explain Tutorial: Index Range Scan
Figure 6.11 DBT-3 Visual Explain Tutorial: Index Range Scan: Traditional View
Notice the differences. The Type changed from ALL to range, possible keys (and used key) changed from
NULL to i_o_orderdate, and the number of scanned rows changed from 1.5 million to about 33 thousand.
Still, scanning 33 thousand rows while returning just 18 is unnecessary, so we focus on the o_clerk
column. An index here should improve performance: so:
CREATE INDEX i_o_clerk ON orders(o_clerk);
160
Tutorial: Using Visual Explain to improve query performance
Figure 6.12 DBT-3 Visual Explain Tutorial: Index Range Scan: Traditional View, After Index
Notice that our new index is not being considered as a possible key. This is because we are searching the
suffix of the o_clerk column, and indexes do not work with suffixes (although they do work with prefixes).
In our simple case, we were being lazy and could have simply used the entire clerk ID. Adjusting the query
shows better results:
SELECT * FROM orders
WHERE o_orderdate BETWEEN '1992-04-01' AND '1992-04-30'
AND o_clerk LIKE 'Clerk#000000223';
161
Tutorial: Using Visual Explain to improve query performance
Figure 6.13 DBT-3 Visual Explain Tutorial: Index Range Scan: Better
Figure 6.14 DBT-3 Visual Explain Tutorial: Index Range Scan: Better (Traditional)
The new o_clerk index was considered and used, and our query scanned 1546 rows instead of 32642,
and the query execution improved from 0.281 to 0.234 seconds. However, EXPLAIN estimates that this
query scans 1546 rows to return 18. After reviewing our query, notice that a multi-column index can meet
the conditions of our WHERE clause that is based on both the o_orderdate and o_clerk columns:
CREATE INDEX io_clerk_date ON orders(o_clerk, o_orderdate)
162
Tutorial: Using Visual Explain to improve query performance
Note
We listed o_clerk as the first column in our index because o_orderdate uses a
range. ...
Now, executing the same query shows even better results. An estimated 18 rows are both scanned and
returned, and the execution time of our query is 0.234 seconds.
Figure 6.15 DBT-3 Visual Explain Tutorial: Index Range Scan: Best
Figure 6.16 DBT-3 Visual Explain Tutorial: Index Range Scan: Best (traditional)
163
Tutorial: Using Visual Explain to improve query performance
To summarize the results:
Table 6.2 DBT-3 Visual Explain Tutorial Query Comparison
Type
Possible keys
Key
Rows
Scanned
Duration Extra info
(seconds)
Rows
returned
all
NULL
NULL
1.50M
1.201
Using where
18
range
i_o_orderdate
i_o_orderdate
32642
0.281
Using index condition;
Using where
18
range
i_o_orderdate,
i_o_clerk
i_o_clerk 1546
0.234
Using index condition;
Using where
18
range
i_o_orderdate,
i_o_clerk,
i_o_clerk_date
i_o_clerk_date
18
0.234
Using index condition
18
164
Chapter 7 Database Development
Table of Contents
7.1 Visual SQL Editor ....................................................................................................................
7.1.1 SQL Query Window .......................................................................................................
7.1.2 SQL Query Window Toolbar ..........................................................................................
7.1.3 Query and Edit Menus ...................................................................................................
7.1.4 Results Window ............................................................................................................
7.1.5 SQL Snippets tab ..........................................................................................................
7.1.6 Context Sensitive Help ..................................................................................................
7.1.7 Output History Panel .....................................................................................................
7.1.8 Table Data Search Panel ...............................................................................................
7.1.9 Export a Result Set .......................................................................................................
7.1.10 Tutorial: Adding Data ...................................................................................................
7.1.11 The MySQL Table Editor .............................................................................................
7.1.12 Code Generation Overview ..........................................................................................
7.2 Object Management .................................................................................................................
7.2.1 Object Browser and Editor Navigator ..............................................................................
7.2.2 Session and Object Information Panel ............................................................................
7.2.3 Schema and Table Inspector .........................................................................................
A set of visual tools to create, edit, and manage SQL queries, database connections, and objects.
7.1 Visual SQL Editor
The visual SQL Editor lets you build, edit and run queries, create and edit data, and view and export
results. Color syntax highlighting, context sensitive help and auto-complete helps write and debug SQL
statements. The integrated EXPLAIN plans provide data to help optimize the your queries.
165
165
166
167
169
170
172
174
175
177
178
179
183
192
197
197
200
201
SQL Query Window
Figure 7.1 SQL Editor GUI
The following sections describe how to use the visual SQL editor.
7.1.1 SQL Query Window
In this area, you can enter SQL statements directly. The statements entered can be saved to a file or
snippet for later use. At any point, you can also execute the statements you have entered.
To save a snippet of code entered into the SQL Query panel, click the Save SQL to Snippets List
icon in the Snippets panel, enter a name (optional), and click OK. The snippet can be inserted into the
SQL Query panel at any time by double-clicking the snippet in the SQL Snippets panel.
166
SQL Query Window Toolbar
Figure 7.2 SQL Editor - SQL Query Panel
Executing a SELECT query will display the associated result set in the SQL View panel, directly below the
SQL Query panel. These cells are editable if MySQL Workbench is able to determine how, as for example
they are editable if a Primary or Unique key exists within the result set. If not, MySQL Workbench will
display a "read-only" icon at the bottom-right corner of the SQL View panel, and hovering the mouse cursor
over this icon will provide a hint as to why it's not editable.
Note
To quickly enter the name of a table, view, or column, double-click the item in the
Schemata Palette. The item name will be inserted into the SQL Query panel.
The SQL Editor has several configurable panels and windows, as described in the screenshot above.
7.1.2 SQL Query Window Toolbar
The toolbar features buttons in two locations, in the main toolbar and within the SQL Editor itself. The SQL
Editor buttons are described below.
167
SQL Query Window Toolbar
Figure 7.3 SQL Editor - Toolbar
From left to right, these buttons are:
• Open an SQL Script File: Loads contents from a saved SQL script into the SQL editor.
• Save SQL Script to File: Saves contents from the SQL editor into a file.
• Execute SQL Script: Executes the selected portion of the query, or the entire query if nothing is
selected.
• Execute Current SQL script: Execute the statement under the keyboard cursor.
• Explain (All or Selection): Execute the EXPLAIN command on the query under the keyboard cursor.
A "Results Grid" tab is also displayed when executing an EXPLAIN statement. Clicking it will execute the
same query, as if Execute SQL Script was selected.
Alternatively, the Visual Explain plan is already available for all executed queries. Select Execution Plan
from the results tab to view it.
• Stop the query being executed: Halts execution of the currently executing SQL script.
Note
The database connection will not be restarted, and open transactions will remain
open.
• Toggle whether execution of SQL script should continue after failed statements: If the red
“breakpoint” circle is displayed, the script terminates on a statement that fails. If the button is depressed
so that the green arrow is displayed, execution continues past the failed code, possibly generating
additional result sets. In either case, any error generated from attempting to execute the faulty statement
is recorded in the Output tabsheet.
This behavior can also be set from the SQL Execution user preferences panel.
• Commit: Commits the current transaction.
Note
All query tabs in the same connection share the same transactions. To have
independent transactions, a new connection must be opened.
• Rollback: Rolls back the current transaction.
Note
All query tabs in the same connection share the same transactions. To have
independent transactions, a new connection must be opened.
• Toggle Auto-Commit Mode: If selected, each statement will be committed independently.
Note
All query tabs in the same connection share the same transactions. To have
independent transactions, a new connection must be opened.
168
Query and Edit Menus
Auto-commit is enabled by default, and this default behavior can be modified (disabled) under the SQL
Execution user preferences panel.
• Set Limit for Executed Queries: The default value is 1000, which appends "LIMIT 0, 1000" to SELECT
queries.
The default (1000) can be changed from the SQL Execution user preferences panel.
• Save Snippet: Save the current statement or selection to the active snippet list.
• Beautify SQL: Beautify/reformat the SQL script.
By default, SQL keywords are changed to UPPER CASE. This functionality can be changed from the
SQL Editor user preferences panel.
• Find panel: Show the Find panel for the editor.
• Invisible characters: Toggle display of invisible characters, such as newlines, tabs, spaces.
A new line is represented as [LF], a space as a single dot (.), and a tab as a right arrow.
• Wrapping: Toggles the wrapping of long lines in the SQL editor window.
7.1.3 Query and Edit Menus
When an SQL Editor tab is selected, the most important items on the main menu bar are the Query and
Edit menus.
SQL Query Menu
The Query menu features the following items:
• Execute (All or Selection): Executes all statements in the SQL Query area, or only the selected
statements.
• Execute (All or Selection) to Text: Executes all statements in the SQL Query area, or only the selected
statements, and displays it in plain text like the standard MySQL command line console.
• Execute Current Statement: Executes the current SQL statement.
• Execute Current Statement (Vertical Text Output): Executes all statements in the SQL Query area, or
only the selected statements, and displays it in plain text like the MySQL command line console does
vertically (\G).
• Explain Current Statement: Describes the current statement by using the MySQL EXPLAIN statement.
• Visual Explain Current Statement: Visually describes the current statement, based on EXPLAIN
information provided by MySQL Server 5.6 and above. MySQL Workbench parses the EXPLAIN (JSON)
output from MySQL server 5.6+, and outputs a visual representation.
For additional information about Visual Explain, see Section 6.3, “Visual Explain Plan” and Section 6.5,
“Tutorial: Using Visual Explain to improve query performance”.
• Stop: Stops executing the currently running script.
• Stop Script Execution On Errors: If enabled, MySQL Workbench stops executing the a query if errors are
found. It can be enabled/disabled from this menu.
169
Results Window
• Limit Rows: By default, the number of returned rows (LIMIT) is 1000. Values defined here affects
subsequent statements. The number ranges from 10 to 50000, and "Don't Limit".
• Collect Performance Schema Stats: Provides data to the Query Stats result set view, which includes
statement specific information about Timing, Rows processed, Temporary tables, Joins per type, Sorting,
and Index usage.
• Collect Resultset Field Metadata: Provides data to the Form Editor and Field Types result set views.
• Reconnect to Server: Reconnects to the MySQL server.
• New Tab to Current Server: Creates a duplicate of the current SQL Editor tab.
• Auto-Commit Transactions: Enable to auto-commit transactions.
• Commit Transaction: Commits a database transaction.
• Rollback Transaction: Rolls back a database transaction.
• Commit Result Edits: Commits any changes you have made to the server.
• Discard Result Edits: Discards any changes you have made.
• Export Results: Exports result sets to a file. Selecting this option displays the Export Query Results to
File dialog. The dialog enables you to select which result set you wish to export, the file format (CSV,
HTML, XML), and the name and location of the output file. Then click Export to export the data.
Edit Menu
The Edit menu features the Format submenu. The Format submenu includes the following menu items:
• Beautify Query: Reformats the query selected in the query tab and lays it out in nicely indented fashion.
• UPCASE Keywords: Converts keywords to uppercase in the currently selected query in the query tab.
• lowercase Keywords: Converts keywords to lowercase in the currently selected query in the query tab.
• Un/Comment Selection: Comments the lines currently selected in the query tab. If the lines are already
commented, this operation removes the comments.
• Auto-complete: Triggers the auto-completion wizard. This is enabled (and triggered) by default, and can
be disabled with Preferences, SQL Editor, Automatically Start Code Completion. Auto-completion will
list functions, keywords, schema names, table names and column names.
7.1.4 Results Window
The results area of the screen shows the results from executed statements. If the script contains multiple
statements, a result tab will be generated for each statemented that returned results.
Note
MySQL Workbench handles quoting and escaping for strings entered into the
results grid, so adding quotes and proper escaping here is optional.
Note
It is possible to enter a function, or other expression, into a field. Use the prefix
\func to prevent MySQL Workbench from escaping quotation marks. For example,
170
Results Window
for the expression md5('fred'), MySQL Workbench normally would generate
the code md5(\'fred\'). To prevent this, enter the expression as \func
md5('fred') to ensure that the quoting is not escaped.
Figure 7.4 SQL Editor - Result Grid
The result grid navigation panel offers the following options:
• Reset: Resets all sorted columns.
• Refresh: Refreshes all data by re-executing the original statement.
• Filter Rows: performs a case-insensitive search of all cells. It automatically refreshes, and there is also
the refresh button to perform this action manually.
• Edit Current Row: Edit the current row.
• Add New Row: Adds a new empty row, and highlights it in edit mode. Click Apply to execute (and
review) the insert row query.
• Delete Selected Rows: Deletes the selected rows. Click Apply execute (and review) the delete query.
• Export: Writes a result set to a CSV, HTML, JSON, SQL INSERT, Excel, XML, or Tab separated file as
required.
Note
This exports a result set. To export an entire table or schema, see Data Export.
171
SQL Snippets tab
• Import: Import records from an external CSV file.
• Wrap Cell Content: If the contents of a cell exceeds the cell width, then the data will be cut off with an
ellipses. This option will instead wrap the contents within the cell, and adjust the cell height accordingly.
Note
The "Refresh" button automatically adjusts the column width to match the longest
string one of its cells. You may also manually adjust the column width.
7.1.5 SQL Snippets tab
The Snippets tab includes built-in, local, and shared custom snippets. The My Snippets tab stores custom
snippets in a file under the MySQL Workbench user's configuration directory. Select the Shared option for
shared snippets.
Using Snippets
Snippets can be inserted into the SQL editor or the system's clipboard. To insert (use) a snippet, either use
the snippet icons or right-click on the desired snippet and choose Insert.
Figure 7.5 SQL Snippets: Usage
Local Snippets (My Snippets)
Local snippets are stored in the MySQL Workbench user's directory. By default, the "My Snippets" SQL
snippets are stored here:
172
SQL Snippets tab
Table 7.1 Default Local Snippet File Location
Operating System
File Path
Windows
%AppData%\MySQL\Workbench\User Snippets.txt
OS X
~username/Library/Application Support/MySQL/Workbench/snippets/User
Snippets.txt
Linux
~username/.mysql/workbench/snippets/User Snippets.txt
Editing (or adding) snippets to "My Snippets" in MySQL Workbench edits this plain text file. Optionally, you
can edit this file outside of MySQL Workbench or create new files that will also be listed under the snippets
selector. For example, adding a file named "More Snippets.txt" will add a "More Snippets" section to the
snippets selection box.
Shared Snippets
Shared snippets are saved in a .mysqlworkbench schema on the connected MySQL server.
Selecting "Shared" for the first time will request permission for MySQL Workbench to create this shared
.mysqlworkbench schema. Users connected to this MySQL server are allowed to create, edit, and use
these shared snippets.
Note
Shared snippets were added in MySQL Workbench 6.2.0.
The .mysqlworkbench schema is hidden from within MySQL Workbench as it is considered an internal
schema that does not need to be seen or edited.
Built-in Snippets
Several built-in SQL snippets are bundled with MySQL Workbench, and typically show the SQL syntax for
MySQL operations. They are divided up into the following categories.
• DB Mgmt (Database Management): Syntax examples use SHOW in many forms to provide information
about databases, tables, columns, or status information about the MySQL server.
• SQL DDL (SQL Data Definition Language): Syntax examples include creating, altering, and dropping
tables, indexes, views, and procedures.
• SQL DML (SQL Data Manipulation Language): Syntax examples for operations such as SELECT,
INSERT, and REPLACE.
The built-in operations are stored in text files in the same directory as the custom snippet files.
Saving and Editing Snippets
To save a snippet, choose the Snippets Insert icon (
) or right-click in the snippet window and choose
Add Snippet from Editor Content from the context-menu. Double-click a snippet to open it, and choose the
snippet editor to edit its body or title. This example shows two snippets with only the first having defined a
name.
173
Context Sensitive Help
Figure 7.6 SQL Snippets: Editor
7.1.6 Context Sensitive Help
Select a keyword or function in your query, and after a delay it shows formatted help information from the
MySQL Server (equivalent to using the help command from the command-line MySQL Client).
174
Output History Panel
Figure 7.7 SQL Editor: Context Sensitive Help
7.1.7 Output History Panel
The Output is located at the bottom of MySQL Workbench. Its select box includes the Action Output,
History Output, and Text Output options.
The Action Output panel displays a summary of the communication between the active MySQL
connection in MySQL Workbench and the MySQL server, and can refer to errors or general information.
Each message displays the time, action, and server response. This output is useful for troubleshooting
scripts.
175
Output History Panel
Figure 7.8 SQL Editor: Output: Action Output
The History Output panel provides a history of SQL operations carried out in MySQL Workbench for the
active MySQL connection. The time and SQL code for each operation is recorded. To view the executed
SQL statement, click the time, and the SQL code executed will be displayed in the SQL column.
176
Table Data Search Panel
Figure 7.9 SQL Editor: History Output
7.1.8 Table Data Search Panel
Find data across a MySQL connection by using the text search feature on any number of tables and
schemas.
From the Schema Tree, choose the tables and/or schemas you want to search, and and then select
Search Data Table... from the context menu.
177
Export a Result Set
Figure 7.10 Table Search Example: Multiple Tables and Schemas
The search options include:
• Search for table fields that: "CONTAINS", "Search using =", "Search using LIKE", "Search using
REGEXP". These search options are case-insensitive.
• Max. matches per table: [100]
• Max. total matches: [1000]
• [ ] Search columns of all types: If checked, non-text column type columns are casted to CHAR to perform
the matches, otherwise only text types (CHAR, VARCHAR, and TEXT) are searched. This is unchecked
by default.
7.1.9 Export a Result Set
A result set in the SQL editor can be exported to common file formats including CSV, JSON, HTML, and
XML.
178
Tutorial: Adding Data
Note
Alternatively, use Section 5.5, “Database Export and Import” to export larger sets of
data, such as entire tables and databases.
Figure 7.11 Exporting a Result Set
7.1.10 Tutorial: Adding Data
In the previous section, you created a model, schema, and table. You also forward engineered your model
to the live MySQL server. This section uses MySQL Workbench to add data into your MySQL database.
Open a MySQL connection.
179
Tutorial: Adding Data
Figure 7.12 Getting Started Tutorial - SQL Editor
1. From the Navigator panel on the left, select the movies table from the dvd_collection schema that
we created earlier in this tutorial. Right-click on the movies table and choose Select Rows - Limit 1000
from the context menu.
Note
The Navigator panel has both Management and Schemas tabs.
180
Tutorial: Adding Data
Figure 7.13 Getting Started Tutorial - Adding Data from the SQL Editor
2. This displays the query and its associated results grid. The table is empty, and data may be added into
the results grid.
Note
The movie_id column is set to AUTO_INCREMENT, so values are not needed
for this column.
Input the following data into the movies table:
title
release_date
Gone with the Wind
1939-04-17
The Hound of the Baskervilles
1939-03-31
The Matrix
1999-06-11
Above the Law
1988-04-08
Iron Man 2
2010-05-07
Note
Do not modify movie_id column values.
3. Click Apply to apply these changes to the live MySQL server.
4. View the data grid again and observe the generated AUTO_INCREMENT values.
181
Tutorial: Adding Data
Figure 7.14 Getting Started Tutorial - Edit Data
5. Optionally, you might confirm the changes by checking an external source, such as the MySQL
Command Line Client. To check, enter SELECT * FROM movies; from the MySQL Command Line
Client to confirm that the data was entered.
Figure 7.15 Getting Started Tutorial - View Data From The Command Line
6. You can also use MySQL Workbench to perform a similar check. Close the MyFirstConnection tab
(or MySQL Workbench) and then open the MyFirstConnection connection from the home page.
Execute USE dvd_collection; SELECT * FROM movies; to display the newly entered data.
182
The MySQL Table Editor
In this section of the tutorial, you have learned how to add data to your database, and also how to execute
SQL statements using MySQL Workbench.
For additional information about the SQL editor, see Section 7.1, “Visual SQL Editor”.
7.1.11 The MySQL Table Editor
The MySQL Table Editor is a component that enables the creation and modification of tables. You can add
or modify a table's columns or indexes, change the engine, add foreign keys, or alter the table's name.
The MySQL Table Editor can be accessed in several ways, and most commonly by right-clicking on a
table name within the Object Viewer and choosing ALTER TABLE. This will open a new tab within the
main SQL Editor window. You can also access the MySQL Table Editor from an EER Diagram by doubleclicking a table object.
7.1.11.1 The Main Editor Window
Any number of tables may be edited in the MySQL Table Editor at any one time. Adding another table
creates a new tab at the top of the editor. By default, the MySQL Table Editor appears docked at the top of
the table editor tab, within the SQL editor..
The MySQL Table Editor is shown on top of the following figure.
183
The MySQL Table Editor
Figure 7.16 The Table Editor
The MySQL Table Editor provides a work space that has tabs used to perform these actions:
• Columns: Add or modify columns
• Indexes: Add or modify indexes
• Foreign Keys: Add or modify foreign keys
• Triggers: Add or modify triggers
• Partitioning: Manage partitioning
• Options: Add or modify various general, table, and row options
The following sections discuss these tabs in further detail.
7.1.11.2 The Columns Tab
Use the Columns tab to display and edit all the column information for a table. With this tab, you can add,
drop, and alter columns.
184
The MySQL Table Editor
You can also use the Columns tab to change column properties such as name, data type, and default
value.
Figure 7.17 The Columns Tab
Right-click a row under the Column Name column to open a pop-up menu with the following items:
• Move Up: Move the selected column up.
• Move Down: Move the selected column down.
• Copy: Copies the column for a model.
• Cut: Copies and then deletes the column for a model.
• Paste: Pastes the column. If a column with the same name already exists, then _copy1 is appended to
the column name.
• Delete Selected Columns: Select multiple contiguous columns by right-clicking and pressing the Shift
key. Use the Control key to select separated columns.
• Refresh: Update all information in the Columns tab.
• Clear Default: Clear the assigned default value.
• Default NULL: Set the column default value to NULL.
• Default 0: Set the column default value to 0.
185
The MySQL Table Editor
• Default CURRENT_TIMESTAMP: Available for TIMESTAMP data types.
• Default CURRENT_TIMESTAMP ON UPDATE CURRENT_TIMESTAMP: Available for TIMESTAMP data
types.
To add a column, click the Column Name field in an empty row and enter an appropriate value. Select a
data type from the Datatype list. Select the column property check boxes as required according to the list
of column properties below, and also read the CREATE TABLE documentation for information about what
these options mean.
• PK: PRIMARY KEY
• NN: NOT NULL
• UQ: UNIQUE INDEX
• BIN: BINARY
• UN: UNSIGNED
• ZF: ZEROFILL
• AI: AUTO_INCREMENT
To change the name, data type, default value, or comment of a column, double-click the value to edit it.
You can also add column comments to the Column Comment field. It is also possible to set the column
collation, using the list in the Column Details panel.
To the left of the column name is an icon that indicates whether the column is a member of the primary
key. If the icon is a small key, that column belongs to the primary key, otherwise the icon is a blue diamond
or a white diamond. A blue diamond indicates the column has NN set. To add or remove a column from the
primary key, double-click the icon. You can also add a primary key by checking the PRIMARY KEY check
box in the Column Details section of the table editor.
If you wish to create a composite primary key you can select multiple columns and check the PK check
box. However, there is an additional step that is required, you must click the Indexes tab, then in the Index
Columns panel you must set the desired order of the primary keys.
Note
When entering default values, in the case of CHAR and VARCHAR data types MySQL
Workbench will attempt to automatically add quotation marks, if the user does not
start their entry with one. For other data types the user must manage quoting if
required, as it will not be handled automatically by MySQL Workbench.
Caution
Care must be taken when entering a default value for ENUM columns because
a non-numeric default will not be automatically quoted. You must manually add
single quote characters for the default value. Note that MySQL Workbench will not
prevent you from entering the default value without the single quotation marks.
If a non-numeric default value is entered without quotation marks, this will lead
to errors. For example, if the model is reverse engineered, the script will contain
unquoted default values for ENUM columns and will fail if an attempt is made to run
the script on MySQL Server.
186
The MySQL Table Editor
Note
ENUM, BIT, and SET must contain at least one value when entering these data
types into MySQL Workbench.
7.1.11.3 The Indexes Tab
The Indexes tab holds all index information for your table. Use this tab to add, drop, and modify indexes.
Figure 7.18 The Indexes Tab
Select an index by right-clicking it. The Index Columns section displays information about the selected
index.
To add an index, click the last row in the index list. Enter a name for the index and select the index type
from the list. Select the column or columns that you wish to index by checking the column name in the
Index Columns list. You can remove a column from the index by removing the check mark from the
appropriate column.
You can also specify the order of an index by choosing ASC or DESC under the Order column. Create an
index prefix by specifying a numeric value under the Length column. You cannot enter a prefix value for
fields that have a data type that does not support prefixing.
To drop an index, right-click the row of the index you wish to delete, then select the Delete Selected
Indexes menu item.
187
The MySQL Table Editor
7.1.11.4 The Foreign Keys Tab
The Foreign Keys tab is organized in much the same fashion as the Indexes tab and adding or editing a
foreign key is similar to adding or editing an index.
Figure 7.19 The Foreign Keys Tab
To add a foreign key, click the last row in the Foreign Key Name list. Enter a name for the foreign key
and select the column or columns that you wish to index by checking the column name in the Column list.
You can remove a column from the index by removing the check mark from the appropriate column.
Under Foreign Key Options, choose an action for the update and delete events. The options are:
• RESTRICT
• CASCADE
• SET NULL
• NO ACTION
To drop a foreign key, right-click the row you wish to delete, then select the Delete Selected FKs menu
item.
To modify properties of a foreign key, select it and make the desired changes.
7.1.11.5 The Triggers Tab
The Triggers tab opens a textbox to create or edit existing triggers.
188
The MySQL Table Editor
To add a new trigger, click the [+] icon next to the trigger section. To delete a trigger, click the associated
[-] icon. These icons become visible by hovering over a trigger or trigger section. Click Apply to commit
your changes.
Figure 7.20 The Triggers Tab
7.1.11.6 The Partitioning Tab
To enable partitioning for your table, check the Enable Partitioning check box. This enables the
partitioning options.
189
The MySQL Table Editor
Figure 7.21 The Partitioning Tab
The Partition By pop-up menu displays the types of partitions you can create:
• HASH
• LINEAR HASH
• KEY
• LINEAR KEY
• RANGE
• LIST
Use the Parameters field to define any parameters to be supplied to the partitioning function, such as an
integer column value.
Choose the number of partitions from the Partition Count list. To manually configure your partitions, check
the Manual check box. This enables entry of values into the partition configuration table. The entries in this
table are:
• Partition
• Values
• Data Directory
190
The MySQL Table Editor
• Index Directory
• Min Rows
• Max Rows
• Comment
Subpartitioning is also available. For more information about partitioning, see Partitioning.
7.1.11.7 The Options Tab
The Options tab enables you to set several types of options.
Figure 7.22 The Options Tab
which are grouped into the following sections:
• General Options
• Row Options
• Storage Options
191
Code Generation Overview
• Merge Table options
The following discussion describes these options in more detail.
General Options Section
In the General Options section, choose a pack keys option. The options are Default, Pack None, and
Pack All. You may also encrypt the definition of a table. The AUTO_INCREMENT and delayed key update
behaviors apply only to MyISAM tables.
Row Options Section
To set the row format, choose the desired row format from the list. For more information about the different
row formats that are available, see MyISAM Table Storage Formats.
These options are:
• Default
• Dynamic
• Fixed
• Compressed
• Redundant
• Compact
When you expect a table to be particularly large, use the Avg. Row, Min. Rows, and Max. Rows options
to enable the MySQL server to better accommodate your data. See CREATE TABLE Syntax for more
information on how to use these options.
Storage Options Section
The Storage Options section is available only for MyISAM tables. Use it to configure a custom path to
the table storage and data files. This can help improve server performance by locating different tables on
different hard drives.
Merge Table Options Section
Use the Merge Table Options section to configure MERGE tables. To create a MERGE table, select MERGE
as your storage engine and then specify the MyISAM tables you wish to merge in the Union Tables dialog.
You may specify the action the server should take when users attempt to perform INSERT statements on
the merge table. You may also select the Merge Method by selecting from the list. For more information
about MERGE tables, see The MERGE Storage Engine.
7.1.12 Code Generation Overview
This document provides a quick hands-on introduction to using MySQL Workbench to generate code for
later use, for either in or outside of MySQL Workbench.
7.1.12.1 Generating SQL Statements
MySQL Workbench can be used to generate SQL, most typically as either INSERT statements or SELECT
statements.
192
Code Generation Overview
Below are common methods for generating SQL statements in MySQL Workbench.
Note
All of the MySQL Workbench Export options include the option to export as SQL.
Context-menu options after right-clicking on a schema in the schema view, using the sakila column as
an example:
Create Statement
CREATE DATABASE `sakila` /*!40100 DEFAULT CHARACTER SET latin1 */;
Name
`sakila`
Context-menu options after right-clicking on a table in the schema view, using the sakila.actor
column as an example:
Name (Short)
`actor`
Name (Long)
`sakila`.`actor`
Select All Statement
SELECT `actor`.`actor_id`,
`actor`.`first_name`,
`actor`.`last_name`,
`actor`.`last_update`
FROM `sakila`.`actor`;
Select with References
SET @actor_id_to_select = <{row_id}>;
SELECT film_actor.*
FROM film_actor, actor
WHERE `actor`.`actor_id` = `film_actor`.`actor_id`
AND actor.actor_id = @actor_id_to_select;
SELECT actor.*
193
Code Generation Overview
FROM actor
WHERE actor.actor_id = @actor_id_to_select;
Insert Statement
INSERT INTO `sakila`.`actor`
(`actor_id`,
`first_name`,
`last_name`,
`last_update`)
VALUES
(<{actor_id: }>,
<{first_name: }>,
<{last_name: }>,
<{last_update: CURRENT_TIMESTAMP}>);
Update Statement
UPDATE `sakila`.`actor`
SET
`actor_id` = <{actor_id: }>,
`first_name` = <{first_name: }>,
`last_name` = <{last_name: }>,
`last_update` = <{last_update: CURRENT_TIMESTAMP}>
WHERE `actor_id` = <{expr}>;
Delete Statement
DELETE FROM `sakila`.`actor`
WHERE <{where_expression}>;
Delete with References
-- All objects that reference that row (directly or indirectly)
-- will be deleted when this snippet is executed.
-- To preview the rows to be deleted, use Select Row Dependencies
START TRANSACTION;
-- Provide the values of the primary key of the row to delete.
SET @actor_id_to_delete = <{row_id}>;
DELETE FROM film_actor
USING film_actor, actor
WHERE `actor`.`actor_id` = `film_actor`.`actor_id`
AND actor.actor_id = @actor_id_to_delete;
DELETE FROM actor
USING actor
WHERE actor.actor_id = @actor_id_to_delete;
COMMIT;
Create Statement
194
Code Generation Overview
CREATE TABLE `actor` (
`actor_id` smallint(5) unsigned NOT NULL AUTO_INCREMENT,
`first_name` varchar(45) NOT NULL,
`last_name` varchar(45) NOT NULL,
`last_update` timestamp NOT NULL DEFAULT CURRENT_TIMESTAMP ON UPDATE CURRENT_TIMESTAMP,
PRIMARY KEY (`actor_id`),
KEY `idx_actor_last_name` (`last_name`)
) ENGINE=InnoDB AUTO_INCREMENT=201 DEFAULT CHARSET=utf8;
Context-menu options after right-clicking on a column in the schema view, using the
sakila.actor.first_name column as an example:
Name (short)
`first_name`
Name (long)
`actor`.`first_name`
Select Columns Statement
SELECT `first_name` FROM `sakila`.`actor`;
Insert Statement
INSERT INTO `sakila`.`actor`
(`first_name`)
VALUES
(<{first_name}>);
Update Statement
UPDATE `sakila`.`actor`
SET
`first_name` = <{first_name}>
WHERE <{where_expression}>;
Context-menu options after right-clicking on a field in the results view, using record #1 in the
sakila.actor table as an example:
Copy Rows (with names)
195
Code Generation Overview
# actor_id, first_name, last_name, last_update
'1', 'PENELOPE', 'GUINESS', '2006-02-15 04:34:33'
Copy Rows (with names, unquoted)
# actor_id, first_name, last_name, last_update
1, PENELOPE, GUINESS, 2006-02-15 04:34:33
Copy Row (tab separated)
1 PENELOPE GUINESS 2006-02-15 04:34:33
Copy Field
'GUINESS'
7.1.12.2 Generating PHP Code
MySQL Workbench can be used to generate PHP code with the bundled PHP plugin, by using the Tools,
Utilities, Copy as PHP Code menu option.
Below is an example scenario for how to create PHP code. It is a SELECT statement, and optionally uses
SET to set variables.
SQL @variables will generate PHP variables in the code, which will then be bounded to the statement
before execution.
1. Generate or type in the desired SQL query into the SQL editor. This example will use the sakila
database, with the query being:
SET @last_update = '2006-02-14';
SELECT actor_id, first_name, last_name, last_update
FROM actor
WHERE last_update > @last_update;
2. While in the SQL editor, choose Tools, Utilities, Copy as PHP Code (Iterate SELECT Results) from the
main menu. This will copy PHP code to the clipboard.
3. Paste the code to the desired location.
Additionally, PHP code that connects to the MySQL database can also be generated by choosing Tools,
Utilities, Copy as PHP Code (Connect to Server).
After combining the two, the generated PHP code will look like this:
196
Object Management
<?php
$host
$port
$socket
$user
$password
$dbname
=
=
=
=
=
=
"localhost";
3306;
"";
"nobody";
"";
"sakila";
$con = new mysqli($host, $user, $password, $dbname, $port, $socket)
or die ('Could not connect to the database server' . mysqli_connect_error());
//$con->close();
$query = "SELECT actor_id, first_name, last_name, last_update
FROM
actor
WHERE last_update > ?";
$last_update = '';
$stmt->bind_param('s', $last_update);
if ($stmt = $con->prepare($query)) {
$stmt->execute();
$stmt->bind_result($actor_id, $first_name, $last_name, $last_update);
while ($stmt->fetch()) {
// printf("%s, %s, %s, %s\n",
//
$actor_id, $first_name, $last_name, $last_update);
}
$stmt->close();
}
?>
Note that the PHP code uses the mysqli PHP extension for MySQL. This extension must be enabled in
your PHP distribution for this code to work. For additional details about this PHP extension, see MySQL
Improved Extension.
7.2 Object Management
The Object Browser allows you to navigate database schemas and objects. From here, you can perform
common tasks such as selecting tables and fields to query, edit tables, create new or drop tables and
databases, perform searches, and more.
7.2.1 Object Browser and Editor Navigator
The Navigator contains options to manage the active MySQL connection, and also lists the schemas
available to that connection.
Navigator Schemas Tab
The Schemata list shows available schemata on the currently connected server. These can be explored to
show tables, views, and routines within the schema.
197
Object Browser and Editor Navigator
Figure 7.23 SQL Editor - Navigator Schemas Tab
It is possible to set a schema as the default schema by right-clicking the schema and selecting the Set
As Default Schema menu item. This executes a USE schema_name statement so that subsequent
statements without schema qualifiers are executed against this schema. This setting applies only to the
query session. To set a default schema for multiple MySQL Workbench sessions, you must set the default
schema for the stored connection. From the Home screen, right-click on a MySQL connection, choose Edit
Connection, and set the desired default schema on the Default Schema box.
Note
The selected schema is displayed as bold in the Schema navigator.
Double-clicking a table, view, or column name in the schemata explorer inserts the name into the SQL
Query area. This reduces typing significantly when entering SQL statements containing references to
several tables, views, or columns.
198
Object Browser and Editor Navigator
The Schema Navigator also features a context menu which can be displayed by right-clicking an object.
For example, right-clicking a table displays the following menu items:
• Select Rows - Limit 1000: Pulls up to 1000 rows of table data from the live server into a Results
tabsheet, and enables editing. Data can be saved directly to the live server.
• Table Inspector: Displays table information, similar to the Schema Inspector. This also has a simpler
and easier to use interface for analyzing and creating indexes for tables.
• Copy to Clipboard: There are various submenus, each of which copies information to the clipboard:
• Name (short): Copies the table name.
• Name (long): Copies the qualified table name in the form `schema`.`table`.
• Select All Statement: Copies a statement to select all columns in this form:
SELECT
`table`.`column1`,
`table`.`column2`,
...
FROM `schema`.`table`;
• Insert Statement: Copies an INSERT statement to insert all columns.
• Update Statement: Copies an UPDATE statement to update all columns.
• Delete Statement: Copies a DELETE statement in the form DELETE FROM `world`.`country`
WHERE <{where_condition}>;.
• Create Statement: Copies a CREATE statement in the form DELETE FROM `world`.`country`
WHERE <{where_condition}>;.
• Delete with References: Copies a DELETE statement, in the form of a transaction, that deletes all
objects that reference the row (directly or indirectly).
Use Select with References first to preview this operation.
• Select with References: Copies a SELECT statement that selects all objects that reference the row
(directly or indirectly).
Use Delete with References to generate a DELETE statement for this operation.
• Send to SQL Editor: Provides functionality similar to Copy to Clipboard. However, this item inserts the
SQL code directly into the SQL Query panel, where it can be edited further as required.
• Create Table: Launches a dialog to enable you to create a new table.
• Create Table Like...: Launches a dialog to enable you to create a new table, and to also apply predefined
templates. For additional information, see Section 8.6, “Table Templates”.
• Alter Table...: Displays the table editor loaded with the details of the table.
• Table Maintenance: Opens a new tab for performing table maintenance operations. Operations include
"Analyze Table", "Optimize Table", "Check Table", and "Checksum Table". Additional information about
the table may also be viewed from this tab. For additional information, see Schema Inspector.
• Drop Table...: Drops the table. All data in the table will be lost if this operation is carried out.
• Truncate Table...: Truncates the table.
199
Session and Object Information Panel
• Search Table Data...: Opens a new tab for performing table searches. It performs a search on all
columns, and offers additional options to limit the search.
• Refresh All: Refreshes all schemata in the explorer by resynchronizing with the server.
Right-clicking on a schema provides similar options to the table context menu described above, but the
operations refer to the Schema. For example, the Table Maintenance in the table context menu selects
the table in the Schema Inspector, which is a schema context menu option.
7.2.2 Session and Object Information Panel
This panel summarizes the current connection to the server.
Figure 7.24 SQL Editor - Connection Information Palette
This panel also summarizes information about the object.
Figure 7.25 SQL Editor - Object Info
200
Schema and Table Inspector
7.2.3 Schema and Table Inspector
The Schema and Table Inspector includes the ability to analyze and repair tables, and also view table
metrics.
Schema Inspector
Use the Schema Inspector to browse general information from schema objects. It allows you to perform
maintenance tasks on tables such as ANALYZE, OPTIMIZE, CHECK, and CHECKSUM TABLE. To access
the inspector, right-click on a schema and select the Schema Inspector
Figure 7.26 Schema Inspector
Each tab lists topic oriented information, such as "Tables", "Indexes", and "Triggers". From the Tables tab,
click Inspect Table to open the Table Inspector, or Maintenance to open the table maintenance tools:
201
Schema and Table Inspector
Figure 7.27 Schema Inspector: Table Maintenance
Table Inspector
Table Inspector
View table information, similar to the Schema Inspector. This also has a simpler and easier to use interface
for analyzing and creating indexes for your tables.
Note
This feature was added in MySQL Workbench 6.1.
To open, right-click on a table in the object browser and choose Table Inspector from the context menu.
202
Schema and Table Inspector
Figure 7.28 Open the Table Inspector
The Table Inspector shows information related to the table.
203
Schema and Table Inspector
Figure 7.29 Table Inspector: Info Tab
204
Chapter 8 Database Design / Modeling
Table of Contents
8.1 Modeling Interface ....................................................................................................................
8.1.1 Model Editor ..................................................................................................................
8.1.2 EER Diagram Editor ......................................................................................................
8.1.3 Creating Tables .............................................................................................................
8.1.4 Creating Foreign Key Relationships ................................................................................
8.1.5 Creating Views ..............................................................................................................
8.1.6 Creating Routines and Routine Groups ...........................................................................
8.1.7 Creating Layers .............................................................................................................
8.1.8 Creating Notes ..............................................................................................................
8.1.9 Creating Text Objects ....................................................................................................
8.1.10 Creating Images ..........................................................................................................
8.2 Additional Modeling Tools .........................................................................................................
8.2.1 Printing Diagrams ..........................................................................................................
8.2.2 DBDoc Model Reporting ................................................................................................
8.2.3 Schema Validation Plugins .............................................................................................
8.3 Modeling Tutorials ....................................................................................................................
8.3.1 Creating a Model ...........................................................................................................
8.3.2 Basic Modeling ..............................................................................................................
8.3.3 Importing a Data Definition SQL Script ...........................................................................
8.3.4 Using the Default Schema .............................................................................................
8.3.5 Documenting the sakila Database ..................................................................................
8.4 Forward and Reverse Engineering ............................................................................................
8.4.1 Forward Engineering .....................................................................................................
8.4.2 Reverse Engineering .....................................................................................................
8.5 Schema Synchronization and Comparison .................................................................................
8.5.1 Database Synchronization ..............................................................................................
8.5.2 Compare and Report Differences in Catalogs ..................................................................
8.6 Table Templates ......................................................................................................................
8.7 Customizing DBDoc Model Reporting Templates .......................................................................
8.7.1 Supported Template Markers .........................................................................................
8.7.2 Creating a Custom Template .........................................................................................
Modeling simplifies database design and maintenance by enabling you, the data architect, to visualize
requirements and resolve design issues. Model-driven database design is an efficient methodology for
creating valid and well-performing databases, while providing the flexibility to respond to evolving data
requirements. Models are used to build ER diagrams and physical MySQL databases.
MySQL Workbench provides extensive capabilities for creating and manipulating database models,
including these:
• Create and manipulate a model graphically
• Reverse engineer a live database to a model
• Forward engineer a model to a script or live database
• Create and edit tables and insert data
This is not an exhaustive list. The following sections discuss these and additional data-modeling
capabilities.
205
206
206
223
227
229
233
234
238
240
241
242
243
243
243
247
248
248
255
257
259
261
263
263
272
282
282
287
289
292
296
299
Modeling Interface
8.1 Modeling Interface
TODO: This information is from the previous manual, so requires reorganization
8.1.1 Model Editor
When the Model Editor is executed from the Home window, MySQL Workbench displays the MySQL
Model page. The MySQL Model page has three main panels, as shown in the following screenshot:
Description Editor, User Types List/History panel, and Model Overview.
Figure 8.1 The MySQL Model Page
206
Model Editor
The Description Editor and User Types List/History panel are contained within the Sidebar. The Sidebar
is located on the left by default, but can be relocated to the right using a setting in the Workbench
Preferences dialog.
The Model Overview panel has several sections:
• EER Diagrams
• Physical Schemata
• Schema Privileges
• SQL Scripts
• Model Notes
For each of these sections, add objects to a project by clicking the appropriate add-object icon. You may
also rename, edit, cut, copy, or delete objects on this page by right-clicking to open a pop-up menu.
The following sections further discuss the MySQL Model page.
8.1.1.1 Modeling Menus
Some menu items are not available in the MySQL Workbench Community edition of this application, and
are available only in MySQL Workbench Commercial. This is indicated where applicable.
The File Menu
Use the File menu to open a project, begin a new project, or save a project. Choosing New Model opens
the default schema, mydb. Choosing Open Model opens a file dialog box with the default file type set to
MySQL Workbench Models (mwb extension). To display a list of recently opened MWB files, choose the
Open Recent menu item. The keyboard shortcut to create a new project is Control+N and the command to
open an existing project is Control+O.
To close the currently active MySQL Model or EER Diagram tab, use the Close Tab menu item. You
can also do this from the keyboard by pressing Control+W. To reopen the MySQL Model tab, see The
View Menu. To reopen an EER Diagram tab, double-click the EER Diagram icon in the EER Diagrams
section of the MySQL Model page.
Use the Save Model or Save Model As menu items to save a model. When you save a model, its name
appears in the title bar of the application. If you have made changes to a project and have not saved those
changes, an asterisk appears in the title bar following the model name. When you save a model, it is saved
as a MySQL Workbench file with the extension mwb.
Use the Import menu item to import a MySQL data definition (DDL) script file. For example, this might be a
file created by issuing the command mysqldump --no-data. MySQL Workbench handles the script as
follows:
• If the script does not contain a CREATE DATABASE db_name; statement, the schema objects are
copied to the default schema, mydb.
• If the script creates a database, a new tab bearing the database name is added to the Physical
Schemata section of the MySQL Model page.
• If the script contains data, the data is ignored.
For details about importing a DDL script, see Section 8.4.2.1, “Reverse Engineering Using a Create Script”.
Under the Import submenu, you can also import DBDesigner4 files.
207
Model Editor
There are variety of items under the Export submenu. You may generate the SQL statements necessary
to create a new database or alter an existing one. For more information about these menu items, see
Section 8.4.1.1, “Forward Engineering Using an SQL Script”.
Using the Export submenu, you can also export an EER diagram as a PNG, SVG, PDF, or Postscript file.
For an example of a PNG file, see Figure 8.29, “The sakila Database EER Diagram”.
The Page Setup menu item enables you to set the paper size, orientation, and margins for printing
purposes.
The printing options are enabled only if the EER Diagrams tab is selected. You have the choice of
printing your model directly to your printer, printing it as a PDF file, or creating a PostScript file. For more
information, see Section 8.2.1, “Printing Diagrams”.
Note
The printing options are available only in commercial versions of MySQL
Workbench.
Use the Document Properties menu item to set the following properties of your project:
• Name: The model name (default is MySQL Model)
• Version: The project version number
• Author: The project author
• Project: The project name
• Created: Not editable; determined by the MWB file attributes
• Last Changed: Not editable; determined by the MWB file attributes
• Description: A description of your project
The Edit Menu
Use the Edit menu to make changes to objects. The text description for several of the menu items changes
to reflect the name of the currently selected object.
This menu has items for cutting, copying, and pasting. These actions can also be performed using
the Control+X, Control+C, and Control+V key combinations. Undo a deletion using the Undo Delete
'object_name' item. The Control+Z key combination can also be used to undo an operation. It is also
possible to carry out a Redo operation using either the menu item, or the key combination Control+Y.
Also find a Delete 'object_name' menu item for removing the currently selected object. The keyboard
command for this action is Control+Delete. You can also right-click an object and choose the delete option
from the pop-up menu.
The Delete 'object_name' menu item behaves differently depending upon circumstances. For example,
if an EER Diagram is active and a table on the canvas is the currently selected object, a dialog box may
open asking whether you want to remove the table from the canvas only or from the database as well. For
information about setting the default behavior when deleting from an EER Diagram, see Section 3.2.4,
“Modeling Preferences”.
Warning
If the MySQL Model page is active, the selected object is deleted from the catalog
and there will be no confirmation dialog box.
208
Model Editor
Choose Edit Selected to edit the currently selected object. You can also perform edits in a new window by
selecting Edit Selected in New Window. The keyboard shortcuts for Edit Selected and Edit Selected in New
Window are Control+E and Control+Shift+E, respectively.
The Select item has the following submenus:
• Select All (Keyboard shortcut, Control+A): Selects all the objects on the active EER diagram.
• Similar Figures (Objects of the same type): Finds objects similar to the currently selected object.
• Connected Figures: Finds all the objects connected to the currently selected object.
These menu items are active only when an EER Diagram tab is selected. The Similar Figures and the
Connected Figures menu items are disabled if no object is currently selected on an EER diagram.
When multiple objects have been selected using one of these menu items, you can navigate between
selected items by choosing the Go to Next Selected or Go to previous Selected menu item.
Selecting objects changes some of the Edit menu items. If only one object is selected, that object's name
appears after the Cut, Copy and Delete menu items. If more than one object is selected, these menu items
show the number of objects selected.
Find Dialog Window
Each MySQL Workbench window includes search functionality. The Find panel with Find & Replace
enabled is shown below:
Figure 8.2 The Find Panel with Find & Replace
209
Model Editor
Find options
The Find dialogue options are described below:
• String Matching (default) or Regular Expression: Search by matching a string, or a PCRE regular
expression.
• Ignore Case: A case-insensitive search. Works with both the String Matching and Regular Expression
search methods. Enabled by default.
• Match Whole Words: If enabled, only whole strings are matched. For example, a search for "home"
would not match "home_id". Disabled by default.
• Wrap Around: The search will wrap around to the beginning of the document, as otherwise it will only
search from the cursor position to the end of the document. Enabled by default.
• And the arrows jump to the discovered search terms, and behave according to the Wrap Around option.
The MySQL Workbench Commercial edition includes an advanced Find facility for models:
Figure 8.3 The Find Window
You can search the following locations:
• Entire Model: Searches the entire model.
• Current View: Searches the current view only. This may be the MySQL Model page.
210
Model Editor
• All Views: Searches the MySQL Model Page and all EER diagrams.
• Database Objects: Searches database objects only.
• Selected Figures: Searches the currently selected objects. This feature works only for EER diagrams.
Enter the text you wish to search for in the Find Text list. You may also select any or all of the following
check boxes:
• Match Case
• Whole Word
• Use Regular Expression
• Search in Comments
• Search in SQL for Views, SPs etc.
Any text you enter into the Find Text list is retained for the duration of your session. Use the Next or
Previous buttons to find occurrences of your search criterion.
Clicking the Find All button opens a Find Results window anchored at the bottom of the application. If you
wish, you may undock this window as you would any other.
Use this window to navigate to objects. For example, double-clicking the Description of an object
located on an EER diagram navigates to the specific diagram and selects the object. Notice that the
properties of the object are displayed in the Properties palette.
The Find dialog window can also be opened using the Control+F key combination. Use Control+G to find
the next occurrence and Control+Shift+G to find a previous occurrence. Close the Find dialog window by
clicking the x in the top right corner or by pressing the Esc key.
Workbench Preferences
This menu item enables you to set global preferences for the MySQL Workbench application.
For further information, see Section 3.2, “Workbench Preferences”.
The View Menu
This context-aware menu features general options for changing the view in MySQL Workbench. These
options change depending on the current tab, and here are the available View menu items:
General options:
• Home: Selects the Home window
• Panels: Configure which of the three available panels are open. You may also manage this from the GUI
using the panel toggle buttons on the top-right side of MySQL Workbench.
• Output: Displays the console output.
• Select Next Main Tab: Selects the next (moves to the right, and wraps around) MySQL Workbench tab.
• Select Next Main Tab: Selects the previous (moves to the left, and wraps around) MySQL Workbench
tab.
Model/EER options:
211
Model Editor
• Windows: A submenu with items that activate (slide open) specific panels. Designated panels include the
"Model Navigator", "Catalog", "Layers", "User Datatypes", "Object Descriptions", "Object Properties", and
"Undo History".
• Zoom 100%: The default level of detail of an EER diagram
• Zoom In: Zooms in on an EER diagram.
• Zoom Out: Zooms out from an EER diagram.
The ability to zoom in on an EER diagram is also available using the slider tool in the Model
Navigator palette. See Section 8.1.1.9, “The Model Navigator Panel”.
• Set Marker: Bookmarks an object. From the keyboard, select the object you wish to bookmark, then use
the key combination Control+Shift and the number of the marker (1 through 9). You may create up to
nine markers.
• Go To Marker: Returns to a marker. From the keyboard, use the Control key and the number of the
marker.
• Toggle Grid: Displays grid lines on an EER diagram.
• Toggle Page Guides: Toggles Page Guides to help design the EER diagram on a per-page basis.
The Arrange Menu
The Arrange menu items apply only to objects on an EER diagram canvas and are enabled only if an EER
diagram view is active. The Arrange menu has these items:
• Align to Grid: Aligns items on the canvas to the grid lines
• Bring to Front: Brings objects to the foreground
• Send to Back: Sends objects to the background
• Center Diagram Contents: Centers objects on the canvas
• Autolayout: Automatically arranges objects on the canvas
• Reset Object Size: Expands an object on an EER diagram. For example, if a table has a long column
name that is not fully displayed, this menu item expands the table to make the column visible. This menu
item is not enabled unless an object is selected.
• Expand All: Use this item to expand all objects on an EER diagram. This item will display a table's
columns if the object notation supports expansion. Some object notations, such as Classic, do not
permit expansion or contraction. Indexes will not automatically be expanded unless they were previously
expanded and have been collapsed using the Collapse All menu item.
• Collapse All: Undo the operation performed by Expand All.
The Model Menu
When a model is opened, this menu features actions to perform against your model, and the Model menu
has these items:
• Add Diagram: Creates a new EER Diagram. The keyboard shortcut is Control+T.
• Create Diagram From Catalog Objects: Creates an EER diagram from all the objects in the catalog.
212
Model Editor
• User Defined Types: Presents a dialog box that enables you to add and delete user defined data types.
• DBDoc – Model Reporting...: For information about this menu item, see The DBDoc Model Reporting
Dialog Window (Commercial Version). Commercial version only.
• Validation: Checks the validity of the model using ANSI standards. For information about this menu item,
see The Validation Submenus (Commercial Version). Commercial version only.
• Validation (MySQL): Checks the validity of the model using MySQL standards. For information about this
menu item, see The Validation Submenus (Commercial Version). Commercial version only.
• Object Notation: For information about this menu item, see The Object Notation Submenu.
• Relationship Notation: For information about this menu item, see The Relationship Notation Submenu.
• Diagram Properties and Size: Opens a diagram size dialog box that enables you to adjust the width or
height of the canvas. The unit of measure is pages; the default value is two.
When you have tables with numerous columns, use this menu item to increase the size of the EER.
• Model Options: Sets options at the model level. These options should not be confused with the
options that are set globally for the Workbench application, and which are referred to as Workbench
Preferences. The available model options are a subset of the Workbench Preferences options.
For more information about Workbench Preferences, see Section 3.2.4, “Modeling Preferences”.
The DBDoc Model Reporting Dialog Window (Commercial Version)
This dialog window is found by navigating to the Model menu and choosing the DBDoc - Model Reporting...
item.
Note
The DBDoc - Model Reporting... item is not available in the MySQL Workbench
Community version.
Use this dialog window to set the options for creating documentation of your database models. For more
information, see Section 8.2.2, “DBDoc Model Reporting”.
The Validation Submenus (Commercial Version)
The Model menu has two validation submenus, Validation and Validation (MySQL). Use these submenus
for general validation and MySQL-specific validation of the objects and relationships defined in your model.
Note
These items are not available in the MySQL Workbench Community version.
The Validation submenu has these items:
• Validate All: Performs all available validation checks
• Empty Content Validation: Checks for objects with no content, such as a table with no columns
• Table Efficiency Validation: Checks the efficiency of tables, such as a table with no primary key defined
• Duplicate Identifiers Validation: Checks for duplicate identifiers, such as two tables with the same name
• Consistency Validation: Checks for consistent naming conventions
213
Model Editor
• Logic Validation: Checks, for example, that a foreign key does not reference a nonprimary key column in
the source table
The Validation (MySQL) submenu has these items:
• Validate All: Performs all available validation checks
• Integrity Validation: Checks for invalid references, such as a table name longer than the maximum
permitted
• Syntax validation: Checks for correct SQL syntax
• Duplicate Identifiers Validation (Additions): Checks for objects with the same name
For detailed information about validation, see Section 8.2.3, “Schema Validation Plugins”.
The Object Notation Submenu
The items under the Model, Object Notation submenu apply exclusively to an EER diagram. They are not
enabled unless an EER diagram tab is selected.
The Object Notation submenu has these items:
• Workbench (Default): Displays table columns, indexes, and triggers
• Workbench (Simplified): Shows only a table's columns
• Classic: Similar to the Workbench (Simplified) style showing only the table's columns
• IDEF1X: The ICAM DEFinition language information modeling style
The object notation style that you choose persists for the duration of your MySQL Workbench session and
is saved along with your model. When MySQL Workbench is restarted, the object notation reverts to the
default.
Note
If you plan to export or print an EER diagram be sure to decide on a notation style
first. Changing notation styles after objects have been placed on a diagram can
significantly change the appearance of the diagram.
The Relationship Notation Submenu
The items under the Relationship Notation submenu apply exclusively to an EER diagram. They are not
enabled unless an EER diagram tab is selected.
The Relationship Notation submenu has these items:
• Crow's Foot (IE): The default modeling style. For an example, see Figure 8.24, “Adding Tables to the
Canvas”.
• Classic: Uses a diamond shape to indicate cardinality.
• Connect to Columns
• UML: Universal Modeling Language style.
• IDEF1X: The ICAM DEFinition language information modeling method
To view the different styles, set up a relationship between two or more tables and choose the different
menu items.
214
Model Editor
The relationship notation style that you choose persists for the duration of your MySQL Workbench session
and is saved along with your model. When MySQL Workbench is restarted, the relationship notation
reverts to the default, the Crow's Foot style.
Note
If you plan to export or print an EER diagram, be sure to decide on a notation style
first. Changing notation styles after objects have been placed on a diagram can
significantly change the appearance of the diagram.
The Database Menu
This menu features actions against the connected MySQL server. The Database menu has these items:
• Query Database: Launches the SQL Editor, which enables you to create SQL code and execute it on a
live server. For more information, see Section 7.1, “Visual SQL Editor”.
• Manage Connections: Launches the Manage Server Connections dialog, which enables you to
create and manage multiple connections. For more information, see Section 5.1.2.3, “Manage Server
Connections”
• Reverse Engineer: Creates a model from an existing database. For more information, see
Section 8.4.2.2, “Reverse Engineering a Live Database”.
• Forward Engineer: Creates a database from a model. For more information, see Section 8.4.1.2,
“Forward Engineering to a Live Server”.
• Schema Transfer Wizard...: Executes the database migration wizard for MySQL databases. It is useful
for moving from an older MySQL server to the latest MySQL version, and is meant for local development
purposes. You should not use this tool on production MySQL instances as they often require more
complex data migration techniques.
For additional information about this wizard, see MySQL Schema Transfer Wizard.
• Migration Wizard...: Executes the database migration wizard for most any database, and is meant
to migrate tables and data from supported database systems to your MySQL server. For additional
information, see Chapter 9, Database Migration Wizard.
• Edit Type Mappings for Generic Migration: From here you can define custom type mappings, such as
migrating the source data type int8 to the target MySQL data type BIGINT.
• Synchronize Model: Synchronizes your database model with an existing database. For more information,
see Section 8.5.1, “Database Synchronization”.
• Synchronize with Any Source: Allows you to compare a target database or script with the open model,
external script, or a second database, and apply these changes back to the target. For more information,
see Section 8.5.1, “Database Synchronization”.
• Compare Schemas: Compares your schema model with a live database or a script file. Section 8.5.2,
“Compare and Report Differences in Catalogs”.
The Tools Menu
The Tools menu lists tools and utilities that related to MySQL Workbench usage.
• Browse Audit Log File: Launches a file browser to open a specific audit log file. For additional information
about the Audit Inspector, see Section 5.6, “MySQL Audit Inspector Interface”. Commercial only.
• Configuration: Backup (or restore) your MySQL Connections, as defined in MySQL Workbench.
215
Model Editor
• Utilities: These utilities generate PHP code to either "Connect to the MySQL server" or "Iterate SELECT
results", if applicable. For additional information about PHP code generation, see Section 7.1.12.2,
“Generating PHP Code”.
• Start Shell for MySQL Utilities: Opens the mysqluc MySQL Utility. For additional information about
MySQL Utilities, see Appendix F, MySQL Utilities.
The Scripting Menu
This menu features GRT scripting and plugin options. The Scripting menu has these items:
• Scripting Shell: Launches the MySQL Workbench Scripting Shell. For additional information, see
Section C.5, “The Workbench Scripting Shell”.
• New Script: Opens a New Script File dialogue, with options to create a Python Script, Python Plugin, or
Python Module.
• Open Script: Opens a Open GRT Script dialogue, which defaults to the Workbench scripts directory.
Files are opened into the Workbench Scripting Shell window.
• Run Script File: Executes the script that is currently open.
• Run Workbench Script File: Executes the specified script file.
• Install Plugin/Module File: Loads and installs a plugin or module file
• Plugin Manager: Displays information about the plugins that are installed, and allows disabling and
uninstalling the plugins.
The Help Menu
Use the Help menu when you require support, or when you want to help improve MySQL Workbench. This
menu has the following items:
• Help Index: Opens a window showing a local copy of the MySQL Workbench documentation. Read,
search, or print the documentation from this window.
• MySQL.com Website: Opens your default browser on the MySQL Web site home page.
• Workbench Product Page: Opens your default browser on the MySQL Workbench product page.
• System Info: Displays information about your system, which is useful when reporting a bug. For more
information, see System Info.
• Report a Bug: Opens your default browser to bugs.mysql.com, and automatically fills in several fields
such as the Operating System and MySQL Workbench version by passing in additional data via the
GET request. The default "Description" requests you to also attach the Workbench log file. For additional
information about reporting useful bug reports, see Appendix D, How To Report Bugs or Problems.
• View Reported Bugs: Opens your default browser to see a list of current bugs.
• Locate Log Files: Opens up the directory that contains the MySQL Workbench log files.
• Show Log File: Opens up the main MySQL Workbench log file in your default text editor. This file is
typically named wb.log.
• Check For Updates: Checks if you are using the current MySQL Workbench version. If you are, then
a popup informs you of this. If not, then a prompt asks you to open the MySQL Workbench download
page.
216
Model Editor
• About Workbench: Displays the MySQL Workbench About window. This also displays the MySQL
Workbench version.
System Info
Use the Help, System Info menu item to display information about your system. This item is especially
useful for determining your rendering mode. Sample output follows.
MySQL Workbench Community (GPL) for Windows version 6.1.4 revision 11773 build 1454
Configuration Directory: C:\Users\philip\AppData\Roaming\MySQL\Workbench
Data Directory: C:\Users\philip\Desktop\MySQL\MySQL Workbench 6.1.4 CE
Cairo Version: 1.8.8
OS: Microsoft Windows 7 Service Pack 1 (build 7601), 64-bit
CPU: 4x Intel(R) Core(TM) i5-2400 CPU @ 3.10GHz, 8.0 GiB RAM
Active video adapter NVIDIA GeForce GT 610
Installed video RAM: 1024 MB
Current video mode: 1920 x 1080 x 4294967296 colors
Used bit depth: 32
Driver version: 9.18.13.2049
Installed display drivers: nvd3dumx.dll,nvwgf2umx.dll,nvwgf2umx.dll,nvd3dum,nvwgf2um,nvwgf2um
Current user language: English (United States)
8.1.1.2 The Toolbar
The MySQL Workbench toolbar is located immediately below the menu bar. Click the tools in the toolbar to
perform the following actions:
• The new document icon: Creates a new document
• The folder icon: Opens a MySQL Workbench file (mwb extension)
• The save icon: Saves the current MySQL Workbench project
• The right and left arrows: The left arrow performs an “Undo” operation. The right arrow performs a
“Redo” operation.
Other tools appear on the toolbar depending upon the context.
Tool-Specific Toolbar Items
When an EER diagram canvas is selected, the following icons appear to the right of the arrow icons:
• The toggle grid icon: Turns the grid on and off
• The grid icon: Aligns objects on the canvas with the grid
• The new EER diagram icon: Creates a new EER diagram tab.
The toolbar also changes depending upon which tool from the vertical toolbar is active. For discussion of
these tools, see Section 8.1.2.1, “The Vertical Toolbar”.
If the Table tool is active, schemata lists, engine types, and collations appear on the toolbar. The table
properties can be modified using the Properties Editor.
When an object is selected, the object's properties, such as color, can be changed in the Properties Editor.
8.1.1.3 EER Diagrams
Use the Add new Diagram icon in the MySQL Model area to create EER diagrams. When you add an
EER diagram, a new tab appears below the toolbar. Use this tab to navigate to the newly created EER
diagram. For further discussion of EER Diagrams, see Section 8.1.2, “EER Diagram Editor”.
217
Model Editor
8.1.1.4 The Physical Schemata Panel
The Physical Schemata panel of the MySQL Model page shows the active schemata and the objects
that they contain.
Expand and contract the Physical Schemata section by double-clicking the arrow on the left of the
Physical Schemata title bar. When the Physical Schemata section is expanded, it displays all
currently loaded schemata.
Each schema shows as a tab. To select a specific schema, click its tab. When MySQL Workbench is first
opened, a default schema, mydb, is selected. You can start working with this schema or you can load a
new MySQL Workbench Model file (models use the .mwb extension.)
There are a variety of ways to add schema to the Physical Schemata panel. You can open an
MWB file, reverse engineer a MySQL create script, or, if you are using a commercial version of MySQL
Workbench, you can reverse engineer a database by connecting to a MySQL server.
You can also add a new schema by clicking the + button on the top right of the Physical Schemata
panel. To remove a schema, click its tab and use the - button found to the immediate left of the + button.
To the left of these buttons are three buttons that control how database object icons are displayed:
• The left button displays database objects as large icons.
• The middle button displays small icons in multiple rows.
• The right button displays small icons in a single list.
The Schema Objects Panel
The Physical Schemata panel has the following sections:
• Tables
• Views
• Routines
• Routine Groups
Each section contains the specified database objects and an icon used for creating additional objects.
Any database objects added to an EER diagram canvas also show up in the Physical Schemata
section. For information about adding objects to an EER diagram canvas, see Section 8.1.2, “EER
Diagram Editor”.
8.1.1.5 The Schema Privileges Panel
The Schema Privileges panel has the following sections, used to create users for your schemata and
to define roles —:
• Users
• Roles
The following image displays the Schema Privileges section of the MySQL Model tab.
218
Model Editor
Figure 8.4 Roles and Privileges
Adding Roles
To add a role, double-click the Add Role icon. This creates a role with the default name role1. Rightclicking a role opens a pop-up menu with the following items:
• Cut 'role_name': Cuts the role
• Copy 'role_name': Copies the role
• Edit Role...: Opens the role editor
• Edit in New Window...: Opens the role editor in a new editor window
• Delete 'role_name': Removes the role
• Copy SQL to Clipboard: Currently not implemented
To rename a role, click the role name. Then you will be able to edit the text.
All roles that have been defined are listed under Roles on the left side of the role editor. Double-clicking a
role object opens the role editor docked at the bottom of the page.
Figure 8.5 Role Editor
Select the role to which you wish to add objects. You may drag and drop objects from the Physical
Schemata to the Objects section of the role editor. To assign privileges to a role, select it from the
Roles section, then select an object in the Objects section. In the Privileges section, check the rights
you wish to assign to this role. For example, a web_user role might have only SELECT privileges and only
for database objects exposed through a web interface. Creating roles can make the process of assigning
rights to new users much easier.
Adding Users
To add a user, double-click the Add User icon. This creates a user with the default name user1. Doubleclicking this user opens the user editor docked at the bottom of the application.
219
Model Editor
In the User Editor, set the user's name and password using the Name and Password fields. Assign
one role or a number of roles to the user by selecting the desired roles from the field on the right and then
clicking the < button. Roles may be revoked by moving them in the opposite direction.
Right-clicking a user opens a pop-up menu. The items in the menu function as described in Adding Roles.
8.1.1.6 The SQL Scripts Panel
Use the SQL Scripts panel to attach SQL scripts to the model for documentation and organizational
purposes, and optionally these attachments can be included in the output script when performing forward
engineering or model/schema synchronization.
If you created your project from an SQL script and plan to create an ALTER script, you may want to add the
original script here, since it will be needed to create an ALTER script. For more information, see Altering a
Schema.
Note
The ability to use the attachments when performing forward engineering and
synchronization was added in MySQL Workbench 6.2.0.
Figure 8.6 SQL Scripts Editor
8.1.1.7 The Model Notes Panel
Use the Model Notes panel to write project notes. Any scripts or notes added will be saved with your
project.
8.1.1.8 The History Palette
Use the History palette to review the actions that you have taken. Left-clicking an entry opens a popup menu with the item, Copy History Entries to Clipboard. Choose this item to select a single entry. You
220
Model Editor
can select multiple contiguous entries by pressing the Shift key and clicking the entries you wish to copy.
Select noncontiguous entries by using the Control key.
Only actions that alter the MySQL model or change an EER diagram are captured by the History palette.
8.1.1.9 The Model Navigator Panel
Docked at the top left of the application is the Model Navigator, or Bird's Eye panel. This panel provides
an overview of the objects placed on an EER diagram canvas and for this reason it is most useful when an
EER diagram is active. Any objects that you have placed on the canvas should be visible in the navigator.
The Model Navigator shows the total area of an EER diagram. A black rectangular outline indicates the
view port onto the visible area of the canvas. To change the view port of an EER diagram, left-click this
black outline and drag it to the desired location. You can zoom in on selected areas of an EER diagram by
using the slider tool at the bottom of this window. The dimensions of the view port change as you zoom in
and out. If the slider tool has the focus, you can also zoom using the arrow keys.
Figure 8.7 The Model Navigator: Example
The default size of the Model Navigator is two pages. Use the Model, Diagram Properties and Size
page to change the size and diagram name.
221
Model Editor
Figure 8.8 The Model Navigator Palette
8.1.1.10 The Catalog Tree Palette
The Catalog Tree palette shows all the schemata that are present in the Physical Schemata section
of the MySQL Model page. Expand the view of the objects contained in a specific schema by clicking the >
button to the left of the schema name. This displays the following folder icons:
• Tables
• Views
• Routine Groups
Expand each of these in turn by clicking the > button to the left of the folder icon.
The Catalog Tree palette is primarily used to drag and drop objects onto an EER diagram canvas.
You can toggle the sidebar on and off using the Toggle Sidebar button, which is located in the top right of
the application.
8.1.1.11 The Layers Palette
This palette shows all the layers and figures that have been placed on an EER diagram. If a layer or figure
is currently selected, an X appears beside the name of the object and its properties are displayed in the
Properties palette. This can be especially useful in determining which objects are selected when you
have selected multiple objects using the various options under the Select menu item. For more information
on this topic, see The Edit Menu.
Selecting an object in the Layers palette also adjusts the view port to the area of the canvas where the
object is located.
Finding Invisible Objects Using the Layers Palette
In some circumstances, you may want to make an object on an EER diagram invisible. Select the object
and, in the Properties palette, set the visible property to False.
222
EER Diagram Editor
The Layer palette provides an easy way to locate an object, such as a relationship, that has been set to
hidden. Open the Layers palette and select the object by double-clicking it. You can then edit the object
and change its visibility setting to Fully Visible.
8.1.1.12 The Properties Palette
The Properties palette is used to display and edit the properties of objects on an EER diagram. It is
especially useful for editing display objects such as layers and notes.
Selecting an object in the EER diagram displays its properties in the Properties palette.
All objects except connections have the following properties except as noted:
• color: The color accent of the object, displayed as a hexadecimal value. Change the color of the object
by changing this value. Only characters that are legal for hexadecimal values may be entered. You can
also change the color by clicking the ... button to open a color changing dialog box.
• description: Applicable to layers only. A means of documenting the purpose of a layer.
• expanded: This attribute applies to objects such as tables that can be expanded to show columns,
indexes, and triggers.
• height: The height of the object. Depending upon the object, this property may be read only or read/
write.
• left: The number of pixels from the object to the left side of the canvas.
• locked: Whether the object is locked. The value for this attribute is either true or false.
• manualSizing: Whether the object has been manually sized. The value for this attribute is either true
or false.
• name: The name of the object.
• top: The number of pixels from the object to the top of the canvas.
• visible: Whether the object shows up on the canvas. Use ‘1’ for true and ‘0’ for false. It is currently
used only for relationships.
• width: The width of the object. Depending upon the object, this property may be read only or read/write.
Tables have the following additional properties:
• indexesExpanded: Whether indexes are displayed when a table is placed on the canvas. Use ‘1’ for
true and ‘0’ for false.
• triggersExpanded: Whether triggers are displayed when a table is placed on the canvas. Use ‘1’ for
true and ‘0’ for false.
For a discussion of connection properties, see Section 8.1.4.3, “Connection Properties”.
8.1.2 EER Diagram Editor
EER diagrams are created by double-clicking the Add Diagram icon. You may create any number of EER
diagrams just as you may create any number of physical schemata. Each EER diagram shows as a tab
below the toolbar; a specific EER diagram is selected by clicking its tab.
223
EER Diagram Editor
Clicking an EER diagram tab navigates to the canvas used for graphically manipulating database objects.
The Vertical Toolbar is on the left side of this page.
8.1.2.1 The Vertical Toolbar
The vertical toolbar shows on the left sidebar when an EER diagram tab is selected. The tools on this
toolbar assist in creating EER diagrams.
Figure 8.9 The Vertical Toolbar
Clicking a tool changes the mouse pointer to a pointer that resembles the tool icon, indicating which tool is
active. These tools can also be activated from the keyboard by pressing the key associated with the tool.
Hover the mouse pointer over a toolbar icon to display a description of the tool and its shortcut key.
A more detailed description of each of these tools follows.
The Standard Mouse Pointer
The standard mouse pointer, located at the top of the vertical toolbar, is the default mouse pointer for your
operating system. Use this tool to revert to the standard mouse pointer after using other tools.
224
EER Diagram Editor
To revert to the default pointer from the keyboard, use the Esc key.
The Hand Tool
The hand tool is used to move the entire EER diagram. Left-click on this tool and then left-click anywhere
on the EER diagram canvas. Moving the mouse while holding down the mouse button changes the view
port of the canvas.
To determine your position on the canvas, look at the Model Navigator panel on the upper right. If the
Model Navigator panel is not open, use View, Windows, Model Navigator to open it.
To activate the hand tool from the keyboard, use the H key.
You can also change the view port of an EER diagram using the Model Navigator panel. See
Section 8.1.1.9, “The Model Navigator Panel”.
The Eraser Tool
Use the eraser tool to delete objects from the EER Diagram canvas. Change the mouse pointer to the
eraser tool, then click the object you wish to delete. Depending upon your settings, the delete dialog box
should open, asking you to confirm the type of deletion.
Note
The delete action of the eraser tool is controlled by the general option setting for
deletion. Before using the eraser tool, be sure that you understand the available
options described in Section 3.2.4, “Modeling Preferences”.
To activate the eraser tool from the keyboard, use the D key.
You can also delete an object by selecting it and pressing Control+Delete or by right-clicking it and
choosing Delete from the pop up menu.
The Layer Tool
The layer tool is the rectangular icon with a capital L in the lower left corner. Use the layer tool to organize
the objects on an EER Diagram canvas. It is useful for grouping similar objects. For example, you may use
it to group all your views.
Click the layer tool and use it to draw a rectangle on the canvas. Change to the standard mouse pointer
tool and pick up any objects you would like to place on the newly created layer.
To change the size of a layer, first select it by clicking it. When a layer is selected, small rectangles appear
at each corner and in the middle of each side. Adjust the size by dragging any of these rectangles.
You can also make changes to a layer by selecting the layer and changing properties in the Properties
panel. Using the Properties panel is the only way to change the name of a layer.
To activate the layer tool from the keyboard, use the L key. For more information about layers, see
Section 8.1.7, “Creating Layers”.
The Text Tool
The text tool is the square icon with a capital N in the top left corner. Use this tool to place text objects on
the EER diagram canvas. Click the tool, then click the desired location on the canvas. After a text object
has been dropped on the canvas, the mouse pointer reverts to its default.
225
EER Diagram Editor
To add text to a text object, right-click the text object and choose Edit Note... or Edit in New Window... from
the pop-up menu.
You can manipulate the properties of a text object by selecting it and then changing its properties in the
Properties panel.
To activate the text tool from the keyboard, use the N key. For more information about text objects, see
Section 8.1.9, “Creating Text Objects”.
The Image Tool
Use the image tool to place an image on the canvas. When this tool is selected and you click the canvas, a
dialog box opens enabling you to select the desired graphic file.
To activate the image tool from the keyboard, use the I key. For more information about images, see
Section 8.1.10, “Creating Images”.
The Table Tool
Use this tool to create a table on the EER Diagram canvas.
Clicking the canvas creates a table. To edit the table with MySQL Table Editor, right-click it and choose
Edit Table... or Edit in New Window... from the pop-up menu. You can also double-click the table to load it
into the table editor.
To activate the table tool from the keyboard, use the T key.
For more information about creating and editing tables, see Section 7.1.11, “The MySQL Table Editor”.
The View Tool
Use this tool to create a view on an EER Diagram canvas. When the table tool is activated, a schema
list appears on the toolbar below the main menu, enabling you to associate the new view with a specific
schema. You can also select a color for the object by choosing from the color list to the right of the schema
list.
After selecting this tool, clicking the canvas creates a new view. To edit this view, right-click it and choose
Edit View... or Edit in New Window... from the pop-up menu.
To activate the view tool from the keyboard, use the V key.
For more information about creating and editing views, see Section 8.1.5, “Creating Views”.
The Routine Group Tool
Use this tool to create a routine group on the EER Diagram canvas. When this tool is activated, a schema
list appears on the toolbar below the main menu, enabling you to associate the routine group with a
specific schema. You can also select a color for the routine group by choosing from the color list to the
right of the schema list.
After selecting this tool, clicking the canvas creates a new group. To edit this view, right-click it and choose
Edit Routine Group... or Edit in New Window... from the pop-up menu.
To activate the routine group tool from the keyboard, use the G key.
For more information about creating and editing routine groups, see Section 8.1.6.2, “Routine Groups”.
226
Creating Tables
The Relationship Tools
The five relationship tools are used to represent the following relationships:
• One-to-many nonidentifying relationships
• One-to-one nonidentifying relationships
• One-to-many identifying relationships
• One-to-one identifying relationships
• Many-to-many identifying relationships
These tools appear at the bottom of the vertical tool bar. Hover the mouse pointer over each tool to see a
text hint that describes its function.
For more information about relationships, see Section 8.1.4, “Creating Foreign Key Relationships”.
8.1.3 Creating Tables
8.1.3.1 Adding Tables to the Physical Schemata
Double-clicking the Add table icon in the Physical Schemata section of the MySQL Model page
adds a table with the default name of table1. If a table with this name already exists, the new table is
named table2.
Adding a new table automatically opens the table editor docked at the bottom of the application. For
information about using the table editor, see Section 7.1.11, “The MySQL Table Editor”.
Right-clicking a table opens a context menu with the following items:
• Cut 'table_name': Cut a table to optionally paste it into another schema.
• Copy 'table_name': Copy a table to optionally paste it into another schema.
• Paste 'table_name': Paste a cut or copied table. The Paste option is also accessable from the main
Edit menu.
• Edit Table...: Changes the docked table editor to the selected table.
• Edit in New Tab...: Opens the table in a new table editor tab.
• Copy SQL to Clipboard: Copies a CREATE TABLE statement for the table.
• Copy Column Names to Clipboard: Copies a comma-separated list of column names.
• Copy Insert to Clipboard: Copies INSERT statements based on the model's inserts. Nothing is copied to
the clipboard if the table has no inserts defined.
• Copy Insert Template to Clipboard: Copies a generic INSERT statement that is based on the model.
• Delete 'table_name': Remove a table from the database.
Warning
This immediately deletes the table without a confirmation dialog box.
227
Creating Tables
If the table editor is not open, the Edit Table... item opens it. If it is already open, the selected table
replaces the previous one. Edit in New Tab... opens an additional table editor tab.
Any tables added to the Physical Schemata section also show up in the Catalog palette on the right
side of the application. They may be added to an EER Diagram by dragging and dropping them from this
palette.
8.1.3.2 Adding Tables to an EER Diagram
Tables can also be added to an EER Diagram using the table tool on the vertical toolbar. Make sure that
the EER Diagram tab is selected, then right-click the table icon on the vertical toolbar. The table icon is the
rectangular tabular icon.
Clicking the mouse on this icon changes the mouse pointer to a table pointer. You can also change the
mouse pointer to a table pointer by pressing the T key.
Choosing the table tool changes the contents of the toolbar that appears immediately below the menu
bar. When the Tables pointer is active, this toolbar contains a schemata list, an engines list, a collations
list, and a color chart list. Use these lists to select the appropriate schema, engine, collation, and color
accent for the new table. Make sure that you associate the new table with a database. The engine and
collation of a table can be changed using the table editor. The color of your table can be changed using
the Properties palette. The Default Engine and Default Collation values refer to the database
defaults.
Create a table by clicking anywhere on the EER Diagram canvas. This creates a new table with the default
name table1. To revert to the default mouse pointer, click the arrow icon at the top of the vertical toolbar.
Figure 8.10 A Table on an EER Diagram
As shown in the preceding diagram, the primary key is indicated by a key icon and indexed fields are
indicated by a different colored diamond icon. Click the arrow to the right of the table name to toggle the
display of the fields. Toggle the display of indexes and triggers in the same way.
Right-clicking a table opens a pop-up menu with the following items:
• Cut 'table_name'
• Copy 'table_name'
• Paste
228
Creating Foreign Key Relationships
• Edit 'table_name'
• Edit 'table_name' in New Tab...
• Copy SQL to Clipboard
• Copy Column Names to Clipboard
• Copy Inserts to Clipboard
• Copy Insert Template to Clipboard
• Delete 'table_name'
• Remove Figure 'table_name'
With the exception of the deletion item, these menu items function as described in Section 8.1.3.1, “Adding
Tables to the Physical Schemata”. The behavior of the delete option is determined by your MySQL
Workbench options settings. For more information, see Section 3.2.4, “Modeling Preferences”.
8.1.4 Creating Foreign Key Relationships
Foreign key constraints are supported for the InnoDB storage engine only. For other storage engines,
the foreign key syntax is correctly parsed but not implemented. For more information, see Foreign Key
Differences.
Using MySQL Workbench you may add a foreign key from within the table editor or by using the
relationship tools on the vertical toolbar of an EER Diagram. This section deals with adding a foreign key
using the foreign key tools. To add a foreign key using the table editor, see Section 7.1.11.4, “The Foreign
Keys Tab”.
The graphical tools for adding foreign keys are most effective when you are building tables from the ground
up. If you have imported a database using an SQL script and need not add columns to your tables, you
may find it more effective to define foreign keys using the table editor.
8.1.4.1 Adding Foreign Key Relationships Using an EER Diagram
The vertical toolbar on the left side of an EER Diagram has six foreign key tools:
• one-to-one non-identifying relationship
• one-to-many non-identifying relationship
• one-to-one identifying relationship
• one-to-many identifying relationship
• many-to-many identifying relationship
• Place a Relationship Using Existing Columns
An identifying relationship is one where the child table cannot be uniquely identified without its parent.
Typically this occurs where an intermediary table is created to resolve a many-to-many relationship. In
such cases, the primary key is usually a composite key made up of the primary keys from the two original
tables. An identifying relationship is indicated by a solid line between the tables and a nonidentifying
relationship is indicated by a broken line.
Create or drag and drop the tables that you wish to connect. Ensure that there is a primary key in the table
that will be on the “one” side of the relationship. Click on the appropriate tool for the type of relationship you
229
Creating Foreign Key Relationships
wish to create. If you are creating a one-to-many relationship, first click the table that is on the “many” side
of the relationship, then on the table containing the referenced key. This creates a column in the table on
the many side of the relationship. The default name of this column is table_name_key_name where the
table name and the key name both refer to the table containing the referenced key.
When the many-to-many tool is active, double-clicking a table creates an associative table with a many-tomany relationship. For this tool to function there must be a primary key defined in the initial table.
Use the Model menu, Menu Options menu item to set a project-specific default name for the foreign
key column (see The Relationship Notation Submenu). To change the global default, see Section 3.2.4,
“Modeling Preferences”.
To edit the properties of a foreign key, double-click anywhere on the connection line that joins the two
tables. This opens the relationship editor.
Mousing over a relationship connector highlights the connector and the related keys as shown in the
following figure. The film and the film_actor tables are related on the film_id field and these fields
are highlighted in both tables. Since the film_id field is part of the primary key in the film_actor
table, a solid line is used for the connector between the two tables. After mousing over a relationship for a
second, a yellow box is displayed that provides additional information.
Figure 8.11 The Relationship Connector
If the placement of a connection's caption is not suitable, you can change its position by dragging it to
a different location. If you have set a secondary caption, its position can also be changed. For more
information about secondary captions, see Section 8.1.4.3, “Connection Properties”. Where the notation
style permits, Classic for example, the cardinality indicators can also be repositioned.
The relationship notation style in Figure 8.11, “The Relationship Connector” is the default, crow's foot. You
can change this if you are using a commercial version of MySQL Workbench. For more information, see
The Relationship Notation Submenu.
230
Creating Foreign Key Relationships
You can select multiple connections by holding down the Control key as you click a connection. This can
be useful for highlighting specific relationships on an EER diagram.
8.1.4.2 The Relationship Editor
Double-clicking a relationship on the EER diagram canvas opens the relationship editor. This has two tabs:
Relationship, and Foreign Key.
The Relationship Tab
In the Relationship tab, you can set the caption of a relationship using the Caption field. This name
displays on the canvas and is also the name used for the constraint itself. The default value for this name
is fk_source_table_destination_table. Use the Model menu, Menu Options menu item to set a
project-specific default name for foreign keys. To change the global default, see Section 3.2.4, “Modeling
Preferences”.
You can also add a secondary caption and a caption to a relationship.
The Visibility Settings section is used to determine how the relationship is displayed on the EER Diagram
canvas. Fully Visible is the default but you can also choose to hide relationship lines or to use split
lines. The split line style is pictured in the following figure.
Figure 8.12 The Split Connector
Note
A broken line connector indicates a nonidentifying relationship. The split line style
can be used with either an identifying relationship or a nonidentifying relationship. It
is used for display purposes only and does not indicate anything about the nature of
a relationship.
To set the notation of a relationship use the Model menu, Relationship Notation menu item. For more
information, see The Relationship Notation Submenu.
The Foreign Key Tab
The Foreign Key tab contains several sections: Referencing Table, Cardinality and Referenced Table.
The Mandatory check boxes are used to select whether the referencing table and the referenced table are
mandatory. By default, both of these constraints are true (indicated by the check boxes being checked).
The Cardinality section has a set of radio buttons that enable you to choose whether the relationship is
one-to-one or one-to-many. There is also a check box that enables you to specify whether the relationship
is an identifying relationship.
231
Creating Foreign Key Relationships
8.1.4.3 Connection Properties
Right-click a connection to select it. When a connection is selected, it is highlighted and its properties are
displayed in the properties palette. Connection properties are different from the properties of other objects.
The following list describes them:
• caption: The name of the connection. By default, the name is the name of the foreign key and the
property is centered above the connection line.
• captionXOffs: The X offset of the caption.
• captionYOffs: The Y offset of the caption.
• comment: The comment associated with the relationship.
• drawSplit: Whether to show the relationship as a continuous line.
• endCaptionXOffs: The X termination point of the caption offset.
• endCaptionYOffs: The Y termination point of the caption offset.
• extraCaption: A secondary caption. By default, this extra caption is centered beneath the connection
line.
• extraCaptionXOffs: The X offset of the secondary caption.
• extraCaptionYOffs: The Y offset of the secondary caption.
• mandatory: Whether the entities are mandatory. For more information, see Section 8.1.4.2, “The
Relationship Editor”.
• many: False if the relationship is a one-to-one relationship.
• middleSegmentOffset: The offset of the middle section of the connector.
• modelOnly: Set when the connection will not be propagated to the DDL. It is just a logical connection
drawn on a diagram. This is used, for example, when drawing MyISAM tables with a visual relationship,
but with no foreign keys.
• name: The name used to identify the connection on the EER Diagram canvas. Note that this is not the
name of the foreign key.
• referredMandatory: Whether the referred entity is mandatory.
• startCaptionXOffs: The start of the X offset of the caption.
• startCaptionYOffs: The start of the Y offset of the caption.
In most cases, you can change the properties of a relationship using the relationship editor rather than the
Properties palette.
If you make a relationship invisible by hiding it using the relationship editor's Visibility Settings, and then
close the relationship editor, you will no longer be able to select the relationship to bring up its relationship
editor. To make the relationship visible again, you must expand the table object relating to the relationship
in the Layers palette and select the relationship object. To edit the selected object, right-click it, then select
Edit Object. You can then set the Visibility Settings to Fully Visible. The relationship will then be visible
in the EER Diagram window.
232
Creating Views
8.1.5 Creating Views
You can add views to a database either from the Physical Schemata section of the MySQL Model
page or from the EER Diagram.
8.1.5.1 Adding Views to the Physical Schemata
To add a view, double-clicking the Add View icon in the Physical Schemata section of the MySQL
Model page. The default name of the view is view1. If a view with this name already exists, the new view
is named view2.
Adding a new view automatically opens the view editor docked at the bottom of the application. For
information about using the view editor, see Section 8.1.5.3, “The View Editor”.
Right-clicking a view opens a pop-up menu with the following items:
• Cut 'view_name'
The 'view_name' is only cut from the EER canvas, and not removed from the schema.
• Copy 'view_name'
• Paste
• Edit View...
• Edit in New Window...
• Copy SQL to Clipboard
• Delete 'view_name': deletes from both the EER canvas and schema.
• Remove 'view_name': deletes from the EER canvas, but not the schema.
If the table editor is not open, the Edit View... item opens it. If it is already open, the selected table replaces
the previous one. Edit in New Window... opens a new view editor tab.
The cut and copy items are useful for copying views between different schemata. Copy SQL to Clipboard
copies the CREATE VIEW statement to the clipboard.
Warning
Use the Delete 'view_name' item to remove a view from the database. There will
be no confirmation dialog box.
Any views added to the Physical Schemata section also show up in the Catalog palette on the
left side of the application. They may be added to an EER Diagram, when in the EER Diagram tab, by
dragging and dropping them from this palette.
8.1.5.2 Adding Views to an EER Diagram
Views can also be added to an EER Diagram using the View tool on the vertical toolbar. Make sure that
the EER Diagram tab is selected, then left-click the view icon on the vertical toolbar. The view icon is the
two overlapping rectangles found below the table icon.
Clicking this icon changes the mouse pointer to a view pointer. To change the mouse pointer to a view
pointer from the keyboard, use the V key.
233
Creating Routines and Routine Groups
Choosing the View tool changes the contents of the toolbar that appears immediately below the main
menu bar. When the Views pointer is active, this toolbar contains a schemata list and a color chart list.
Use these lists to select the appropriate schema and color accent for the new view. Make sure that you
associate the new view with a database. The color of your view can be changed using the Properties
palette.
Create a view by clicking anywhere on the EER Diagram canvas. This creates a new view with the default
name view1. To revert to the default mouse pointer, click the arrow icon at the top of the vertical toolbar.
Right-clicking a view opens a pop-up menu. With the exception of the delete item, these menu items
function as described in Section 8.1.5.1, “Adding Views to the Physical Schemata”. The behavior of
the delete option is determined by your MySQL Workbench options settings. For more information, see
Section 3.2.4, “Modeling Preferences”.
8.1.5.3 The View Editor
To invoke the view editor, double-click a view object on the EER Diagram canvas or double-click a view in
the Physical Schemata section on the MySQL Model page. This opens the view editor docked at the
bottom of the application. Double-clicking the title bar undocks the editor. Do the same to redock it. Any
number of views may be open at the same time. Each additional view appears as a tab at the top of the
view editor.
There are three tabs at the bottom of the view editor: View, Comments, and Privileges. Navigate between
different tabs using the mouse or from the keyboard by pressing Control+Alt+Tab.
The View Tab
Use the View tab to perform the following tasks:
• Rename the view using the Name text box.
• Enter the SQL to create a view using the SQL field.
• Comment a view using the Comments text area.
The Comments Tab
This tab enables you to enter comments for a particular view.
The Privileges Tab
The Privileges tab of the view editor functions in exactly the same way as the Privileges tab of the routine
editor. For more information, see The Privileges Tab.
8.1.5.4 Modifying a View Using the Properties Palette
When you select a view on the EER Diagram canvas, its properties are displayed in the Properties
palette. Most of the properties accessible from the Properties palette apply to the appearance of a view
on the EER Diagram canvas.
For a list of properties accessible through the Properties palette, see Section 8.1.1.12, “The Properties
Palette”.
8.1.6 Creating Routines and Routine Groups
You can add Routine Groups to a database either from the Physical Schemata section of the MySQL
Model page or from an EER Diagram. Routines may be added only from the Physical Schemata section
of the MySQL Model page.
234
Creating Routines and Routine Groups
To view an existing schema, along with its Routines and Routine Groups, choose Database, Reverse
Engineer... from the main menu. After the schema has been added to the current model, you can see the
schema objects on the Physical Schemata panel on the MySQL Model page. The Routines and Routine
Groups are listed there.
MySQL Workbench unifies both stored procedures and stored functions into one logical object called a
Routine. Routine Groups are used to group routines that are related. You can decide how many Routine
Groups you want to create and you can use the Routine Group Editor to assign specific routines to a
group, using a drag and drop interface.
When designing an EER Diagram, you can place the Routine Groups on the canvas by dragging them
from the Catalog Palette. Placing individual routines on the diagram is not permitted, as it would clutter the
canvas.
8.1.6.1 Routines
Adding Routines to the Physical Schemata
To add a routine, double-click the Add Routine icon in the Physical Schemata section of the MySQL
Model page. The default name of the routine is routine1. If a routine with this name already exists, the
new routine is named routine2.
Adding a new routine automatically opens the routine editor docked at the bottom of the application. For
information about using the routine editor, see The Routine Editor.
Right-clicking a routine opens a pop-up menu with the following items:
• Rename
• Cut 'routine_name'
• Copy 'routine_name'
• Paste
• Edit Routine...
• Edit in New Window...
• Copy SQL to Clipboard
• Delete 'routine_name'
The Edit Routine... item opens the routine editor.
The cut and paste items are useful for copying routines between different schemata.
Note
Deleting the code for a routine from the Routines tab of the Routine Group Editor
results in removal of the routine object from the model.
Note
To remove a routine from a routine group, use the controls on the Routine Group
tab of the Routine Group Editor.
The action of the delete option varies depending upon how you have configured MySQL Workbench. For
more information, see Section 3.2.4, “Modeling Preferences”.
235
Creating Routines and Routine Groups
The Routine Editor
To invoke the routine editor, double-click a routine in the Physical Schemata section on the MySQL
Model page. This opens the routine editor docked at the bottom of the application. Any number of routines
may be open at the same time. Each additional routine appears as a tab at the top of the routine editor.
Routine and Privileges tabs appear at the bottom of the routine editor. Navigate between different tabs
using the mouse or from the keyboard by pressing Control+Alt+Tab.
The Routine Tab
Use the Routine tab of the routine editor to perform the following tasks:
• Rename the routine using the Name field.
• Enter the SQL to create a routine using the SQL field.
The Privileges Tab
The Privileges tab of the routine editor allows you to assign specific roles and privileges. You may also
assign privileges to a role using the role editor. For a discussion of this topic, see Adding Roles.
When this tab is first opened, all roles that have been created are displayed in the list on the right. Move
the roles you wish to associate with this table to the Roles list on the left. Do this by selecting a role and
then clicking the < button. Use the Shift key to select multiple contiguous roles and the Control key to
select noncontiguous roles.
To assign privileges to a role, click the role in the Roles list. This displays all available privileges in the
Assigned Privileges list. The privileges that display are:
• ALL
• CREATE
• DROP
• GRANT OPTION
• REFERENCES
• ALTER
• DELETE
• INDEX
• INSERT
• SELECT
• UPDATE
• TRIGGER
You can choose to assign all privileges to a specific role or any other privilege as listed previously.
Privileges irrelevant to a specific table, such as the FILE privilege, are not shown.
If a role has already been granted privileges on a specific table, those privileges show as already checked
in the Assigned Privileges list.
236
Creating Routines and Routine Groups
8.1.6.2 Routine Groups
Adding Routine Groups to the Physical Schemata
Double-clicking the Add Routine Group icon in the Physical Schemata section of the MySQL Model
page adds a routine group with the default name of routines1. If a routine group with this name already
exists, the new routine group is named routines2.
Adding a new routine group automatically opens the routine groups editor docked at the bottom of the
application. For information about using the routine groups editor, see The Routine Group Editor.
Right-clicking a routine group opens a pop-up menu with the following items:
• Rename
• Cut 'routine_group_name'
• Copy 'routine_group_name'
• Edit Routine...
• Edit in New Window...
• Copy SQL to Clipboard
• Delete 'routine_group_name'
The Edit Routine Group... item opens the routine group editor, which is described in The Routine Group
Editor.
The cut and paste items are useful for copying routine groups between different schemata.
Deleting a routine group from the MySQL Model page removes the group but does not remove any
routines contained in that group.
Any routine groups added to the Physical Schemata also show up in the Catalog palette on the right
side of the application. They may be added to an EER diagram by dragging and dropping them from this
palette.
Adding Routine Groups to an EER Diagram
To add routine groups to an EER Diagram, use the Routine Groups tool on the vertical toolbar. Make
sure that the EER Diagram tab is selected, then right-click the routine groups icon on the vertical toolbar.
The routine groups icon is immediately above the lowest toolbar separator.
Clicking the mouse on this icon changes the mouse pointer to a routine group pointer. You can also
change the mouse pointer to a routine pointer by pressing the G key.
Choosing the Routine Group tool changes the contents of the toolbar that appears immediately below
the menu bar. When the Routine Groups pointer is active, this toolbar contains a schemata list and a
color chart list. Use these lists to select the appropriate schema and color accent for the new routine group.
Make sure that you associate the new routine group with a database. The color of your routine group can
be changed later using the Properties palette.
Create a routine group by clicking anywhere on the EER Diagram canvas. This creates a new routine
group with the default name routines1. To revert to the default mouse pointer, click the arrow icon at the
top of the vertical toolbar.
237
Creating Layers
Right-clicking a routine group opens a pop-up menu. With the exception of the delete option and rename
options, these menu options function as described in Adding Routine Groups to the Physical Schemata.
There is no rename option, and the behavior of the delete option is determined by your MySQL Workbench
options settings. For more information, see Section 3.2.4, “Modeling Preferences”.
The Routine Group Editor
To invoke the routine group editor, double-click a routine group object on the EER Diagram canvas or
double-click a routine group in the Physical Schemata section on the MySQL Model page. This opens
the routine group editor docked at the bottom of the application. Double-clicking the title bar undocks
the editor. Do the same to redock it. Any number of routine groups may be open at the same time. Each
additional routine group appears as a tab at the top of the routine editor,
Routine group and Privileges tabs appear at the bottom of the routine editor. Navigate between different
tabs using the mouse or from the keyboard by pressing Control+Alt+Tab.
The Routine Groups Tab
Use the Routine Groups tab of the routine groups editor to perform the following tasks:
• Rename the routine group using the Name field.
• Add routines to the group by dragging and dropping them.
• Add comments to the routine group.
The Privileges Tab
The Privileges tab of the routine group editor functions in exactly the same way as the Privileges tab of
the table editor. For more information, see The Privileges Tab.
Modifying a Routine Group Using the Properties Palette
When you select a routine group on the EER Diagram canvas, its properties are displayed in the
Properties palette. All of the properties accessible from the Properties palette apply to the
appearance of a routine group on the EER Diagram canvas.
For a list of properties accessible through the Properties palette, see Section 8.1.1.12, “The Properties
Palette”.
8.1.7 Creating Layers
You can add layers to a database only from an EER Diagram. Layers are used to help organize objects on
the canvas. Typically, related objects are added to the same layer; for example, you may choose to add all
your views to one layer.
8.1.7.1 Adding Layers to an EER Diagram
To add layers to an EER Diagram, use the Layer tool on the vertical toolbar. Select an EER Diagram tab
and left-click the layer icon on the vertical toolbar. The layer icon is the rectangle with an ‘L’ in the lower
left corner and it is found below the eraser icon.
Clicking the mouse on this icon changes the mouse pointer to a layer pointer. You can also change the
mouse pointer to a layer pointer by pressing the L key.
Choosing the Layer tool changes the contents of the toolbar that appears immediately below the menu
bar. When the Layers pointer is active, this toolbar contains a color chart list. Use this list to select the
color accent for the new layer. The color of your layer can be changed later using the Properties palette.
238
Creating Layers
Create a layer by clicking anywhere on the EER Diagram canvas and, while holding the left mouse button
down, draw a rectangle of a suitable size. This creates a new layer with the default name layer1. To
revert to the default mouse pointer, click the arrow icon at the top of the vertical toolbar.
The following image shows a layer named "My Sakila Views" with several views:
Figure 8.13 The Layer Object
To open the layer editor, either double-click the layer or right-click the layer and choose the edit option. The
available context-menu options are:
• Cut 'layer_name'
• Copy 'layer_name'
• Paste 'a_table_name'
• Edit 'layer_name'
239
Creating Notes
• Delete 'layer_name'
Note
A layer may also be edited via Properties Editor on the left panel, and it offers
additional edit options.
The cut and copy items are useful for copying layers between different schemata.
Since layers are not schema objects, no confirmation dialog box opens when you delete a layer regardless
of how you have configured MySQL Workbench. Deleting a layer does not delete schema objects from the
catalog.
Adding Objects to a Layer
To add an object to a layer, drag and drop it directly from the Catalog palette onto a layer. If you pick up
an object from an EER diagram, you must press Control as you drag it onto the layer, otherwise it will not
be “locked” inside the layer.
Locking objects to a layer prevents their accidental removal. You cannot remove them by clicking and
dragging; to remove an object, you also must press the Control key while dragging it.
As a visual cue that the object is being “locked”, the outline of the layer is highlighted as the object is
dragged over it.
If you drag a layer over a table object, the table object will automatically be added to the layer. This also
works for multiple table objects.
Layers cannot be nested. That is, a layer cannot contain another layer object.
8.1.7.2 Modifying a Layer Using the Properties Palette
Choosing "Edit" allows you to edit the layer name and layer background color, and the "Properties Editor"
offers additional edit options.
When you select a layer on the EER Diagram canvas, its properties are displayed in the Properties
palette. The properties accessible from the Properties palette apply to the appearance of a layer on the
EER Diagram canvas.
In some circumstances, you may want to make a layer invisible. Select the layer and, in the Properties
palette, set the visible property to False. To locate an invisible object, open the Layers palette and
select the object by double-clicking it. After an object is selected, you can reset the visible property from
the Properties palette.
For a list of properties accessible through the Properties palette, see Section 8.1.1.12, “The Properties
Palette”. In addition to the properties listed there, a layer also has a description property. Use this
property to document the purpose of the layer.
8.1.8 Creating Notes
You can add notes to a database only from the Model Notes section of the MySQL Model page. Notes
are typically used to help document the design process.
8.1.8.1 Adding Notes
Double-clicking the Add Note icon in the Model Notes section of the MySQL Model page adds a note
with the default name of note1. If a note with this name already exists, the new note is named note2.
240
Creating Text Objects
Adding a new note automatically opens the note editor docked at the bottom of the application. For
information about using the note editor, see Section 8.1.8.2, “The Note Editor”.
Right-clicking a note opens a pop-up menu with the following items:
• Rename
• Cut 'note_name'
• Copy 'note_name'
• Delete 'note_name'
The Edit Note... item opens the note editor. For information about using the note editor, see
Section 8.1.8.2, “The Note Editor”.
The cut and copy items are useful for copying notes between different schemata.
Notes can be added only on the MySQL Model page.
8.1.8.2 The Note Editor
To invoke the note editor, double-click a note object in the Model Note section on the MySQL Model
page. This opens the note editor docked at the bottom of the application. Double-clicking the note tab
undocks the editor. Double-click the title bar to redock it. Any number of notes may be open at the same
time. Each additional note appears as a tab at the top of the note editor.
Use the editor to change the name of a note or its contents.
8.1.9 Creating Text Objects
Text objects are applicable only to an EER diagram. They can be used for documentation purposes; for
example, to explain a grouping of schema objects. They are also useful for creating titles for an EER
diagram should you decide to export a diagram as a PDF or PNG file.
8.1.9.1 Adding Text Objects to an EER Diagram
To add text objects to an EER Diagram, use the Text Object tool on the vertical toolbar. Make sure that
the EER Diagram tab is selected, then right-click the text object icon on the vertical toolbar. The text object
icon is the rectangular icon found below the label icon.
Clicking the mouse on this icon changes the mouse pointer to a text object pointer. You can also change
the mouse pointer to a text object pointer by pressing the N key.
Choosing the Text Object tool changes the contents of the toolbar that appears immediately below the
menu bar. When the Text Object pointer is active, this toolbar contains a color chart list. Use this list to
select the color accent for the new text object. The color of your text object can be changed later using the
Properties palette.
Create a text object by clicking anywhere on the EER Diagram canvas. This creates a new text object
with the default name text1. To revert to the default mouse pointer, click the arrow icon at the top of the
vertical toolbar.
Right-clicking a text object opens a pop-up menu. These menu options are identical to the options for other
objects. However, since a text object is not a database object, there is no confirmation dialog box when
you delete a text object.
241
Creating Images
8.1.9.2 The Text Object Editor
To invoke the text object editor, double-click a text object on the EER Diagram canvas. This opens the
editor docked at the bottom of the application. Double-clicking the text object table undocks the editor.
Double-click the title bar to redock it. Any number of text objects may be open at the same time. Each
additional text objects appears as a tab at the top of the text editor.
Use the editor to change the name of a text object or its contents.
Modifying a Text Object Using the Properties Palette
When you select a text object on the EER Diagram canvas, its properties are displayed in the
Properties palette. Most of the properties accessible from the Properties palette apply to the
appearance of a view on the EER Diagram canvas.
For a list of properties accessible through the Properties palette, see Section 8.1.1.12, “The Properties
Palette”.
There is no property in the Properties palette for changing the font used by a text object. To do so,
choose the Appearance tab of the Workbench Preferences dialog. For more information, see Preferences:
Modeling: Appearance.
8.1.10 Creating Images
Images exist only on the EER Diagram canvas; you can add them only from the EER Diagram window.
8.1.10.1 Adding Images to an EER Diagram
To add images to an EER Diagram, use the Image tool on the vertical toolbar. Make sure that the EER
Diagram tab is selected, then right-click the image icon on the vertical toolbar. The image icon is the icon
just above the table icon.
Clicking the mouse on this icon changes the mouse pointer to an image pointer. You can also change the
mouse pointer to an image pointer by pressing the I key.
Create an image by clicking anywhere on the EER Diagram canvas. This opens a file open dialog box.
Select the desired image, then close the dialog box to create an image on the canvas. To revert to the
default mouse pointer, click the arrow icon at the top of the vertical toolbar.
Right-clicking this object opens a pop-up menu with the following items:
• Cut 'Image'
• Copy 'Image'
• Edit Image...
• Edit in New Window...
• Delete 'Image'
These menu items function in exactly the same way as they do for other objects on an EER diagram.
However, images are not database objects so there is no confirmation dialog box when they are deleted.
8.1.10.2 The Image Editor
To invoke the image editor, double-click an image object on an EER Diagram canvas. This opens the
image editor docked at the bottom of the application. Double-clicking the image editor tab undocks the
242
Additional Modeling Tools
editor. Double-click the title bar to redock it. Any number of images may be open at the same time. Each
additional image appears as a tab at the top of the image editor.
The Image Tab
Use the Image tab of the image editor to perform the following tasks:
• Rename the image using the Name text box.
• Browse for an image using the Browse button.
8.2 Additional Modeling Tools
Additional modeling design tools and features.
8.2.1 Printing Diagrams
The printing options used to create printouts of your EER Diagrams are found under the File menu. To
create documentation of your models, see The DBDoc Model Reporting Dialog Window (Commercial
Version).
8.2.1.1 Printing Options
The printing menu items not enabled unless an EER Diagram is active. These items are available:
• Page Setup...
Enables you to choose the paper size, orientation, and margins.
• Print
Sends your EER Diagram directly to the printer. This option generates a preview before printing. From
the preview you can adjust the scale of the view and also choose a multi-page view. Clicking the printer
icon at the top left of this window, prints the currently selected EER Diagram. Close the print preview
window if you need to adjust the placement of objects on the EER Diagram canvas.
• Print to PDF...
Creates a PDF file of your EER Diagram.
• Print to PS...
Creates a PostScript file of your EER Diagram.
8.2.2 DBDoc Model Reporting
This dialog window is found by navigating to the Model menu and choosing the DBDoc - Model Reporting...
item.
Note
This functionality is only available in the MySQL Workbench Commercial version.
Use this dialog window to set the options for creating documentation of your database models.
243
DBDoc Model Reporting
Figure 8.14 The DBDoc Model Reporting Main Wizard
You can choose from four available templates:
• HTML Basic Frames: Model documentation in HTML format that makes use of frames
• HTML Basic Single Page: Single Page HTML documentation, not using frames
• HTML Detailed Frames: Detailed HTML documentation, using frames
• Text Basic: Text file documentation
When you click a template, a preview image displays on the right side of the page. For the HTML Basic
Frames template, you can select either the Colorful or the Restrained Colors option from the Style
list. The HTML Basic Single Page template offers only the Colorful style. The HTML Detailed
Frames template offers the Vibrant style, and also the more subdued Coated style. The Text Basic
template offers only the Fixed Size Font style.
From the Base Options frame choose the report title and the output directory for the report files.
The following variables may be used to configure the output path:
• ~: The user's home directory. Available on Linux and OS X versions only.
• %desktopfolder%: The user's desktop.
244
DBDoc Model Reporting
• %documentsfolder%: The user's Documents folders. The following table shows typical values for
various platforms.
Platform
Typical Default Documents Folder
Windows
C:\Documents and Settings
\user_name\My Documents
Linux
~/Documents
OS X
Users/user_name/Documents
• %date%: The date in the format YYYY-MM-DD.
• %time%: The time in the format HHMM.
• %year%: The year in the format YYYY.
• %month%: The month in the format MM. January is 01 and December is 12.
• %monthname%: The name of the month, rather than the number.
• %day%: The day number in the format DD. For example, the 12th would be 12.
Content options can also be set:
• Render Table Columns: Display all the columns.
• Render Table Indices: Display all the indexes.
• Render Foreign Keys: Display all the foreign keys.
• List Foreign Keys that refer to that table: Display the tables that foreign keys reference.
• Include DDL code for objects: Generates DDL code.
Clicking the Generate button creates the directory defined in the Output directory text box. If you chose to
create HTML Basic Frames, you will find the following files in this directory:
• basic.css: The style sheet for the overview.html page.
• index.html: The main page.
• overview.html: The model overview, the navigation links shown in the sidebar.
• restrained.css: The CSS file used if the Restrained Colors style option was chosen.
• table_details.html: The main frame of the model report.
Choosing the HTML Basic Single Page option creates a style sheet and an index.html file.
Choosing the HTML Detailed Frames option creates the following files:
• basic.css: The style sheet for the overview.html page. This is used if the vibrant style is chosen.
• coated.css: The CSS file used if the Coated style option was chosen.
• index.html: The main page.
• overview.html: Overview information for the report such as report title, project name and author.
• overview_list.html: A summary of schema in the model along with a list of tables contained in each
schema.
245
DBDoc Model Reporting
• routine_details.html: List of all routines for the schema.
• table_details.html: The main report details.
• table_details_list.html: A Schema overview along with details of columns, indexes and foreign
keys for each schema.
• table_element_details.html: The details for every element of the table.
• top.html: The top frame of the report.
• view_details.html: List of all columns and indexes for the schema.
Choosing the Text Basic option creates a directory containing one text file.
You can click index.html to view a report. The following screenshot shows the HTML Detailed
Frames report being displayed:
Figure 8.15 The DBDoc Model Report
246
Schema Validation Plugins
If you wish to create custom templates please refer to Section 8.7, “Customizing DBDoc Model Reporting
Templates”.
8.2.3 Schema Validation Plugins
MySQL Workbench provides validation modules so that you can test your models before implementing
them.
Note
This functionality is only available in the MySQL Workbench Commercial version.
The validation plugins are accessed from the Model menu. One plugin performs general validation for any
Relational Database Management System (RDMS) and the other is MySQL specific. Beneath these menu
items are a number of specific validation tests. Running any one of these tests opens an output window
docked at the bottom of the application. Warning messages are displayed on the left side of this window
and the tests performed are displayed on the right.
The following sections outline the tasks performed by the validation modules.
8.2.3.1 General Validation
The following list names the general validation types and gives examples of specific violations:
• Empty Content Validation
• A table with no columns
• A routine or view with no SQL code defined
• A routine group containing no routines
• A table, view, or routine not referenced by at least one role
• A user with no privileges
• Objects such as tables that do not appear on at least one EER Diagram
• Table Efficiency Validation
• A table with no primary key
• A primary key that does not use an integer-based data type
• A foreign key that refers to a column with a different data type
• Duplicated Identifiers Validation
• Duplicate object names
• Duplicate role or user names
• Duplicate index or routine names
• Consistency Validation
• Use of the same column with columns of differing data types
247
Modeling Tutorials
• Logic Validation
• A foreign key that refers to a column other than the primary key in the source table
• Any object that is object is either read only or write only by role definition
• Placeholder objects left over from reverse engineering
8.2.3.2 MySQL-Specific Validation
The following list names the MySQL-specific validation types and gives examples of specific violations:
• Integrity Violation
• An object name longer than the maximum permitted
• A foreign key defined for an engine type that does not support foreign keys (not yet implemented)
• A view or routine that references a nonexistent table (not yet implemented)
• A default value that does not match a column's data type
• An invalid partitioning scheme
• Syntax Violation
• A routine, trigger, or view with incorrect SQL syntax
• A reserved keyword used as an identifier
• Use of an invalid character
8.3 Modeling Tutorials
This chapter contains three short tutorials intended to familiarize you with the basics of MySQL
Workbench. These tutorials show how MySQL Workbench can be used both to design and to document
databases.
Creating a database from scratch is the focus of Section 8.3.4, “Using the Default Schema” and exploring
the graphic design capabilities of MySQL Workbench is touched upon in Section 8.3.2, “Basic Modeling”.
Both these tutorials show the database design capabilities of MySQL Workbench.
Importing an SQL data definition script is probably the quickest way to familiarize yourself with MySQL
Workbench—this tutorial makes use of the sakila database and emphasizes the use of MySQL
Workbench as a documentation tool. Examples taken from the sakila database are used throughout the
documentation, so doing this tutorial can be very helpful in understanding MySQL Workbench.
8.3.1 Creating a Model
This section provides a tutorial introduction to MySQL models by showing you how to create a new
database model, and how to forward engineer a model to a live MySQL server.
1. Start MySQL Workbench. On the Home window, click the [+] icon next to the Models section on the
bottom of the page, or select File, New Model. A model can contain multiple schemata. Note that when
you create a new model, it contains the mydb schema by default. You can change the name of this
schema to serve your own purposes, or delete it.
248
Creating a Model
Figure 8.16 Getting Started Tutorial - Home Window
2. Click the + button on the right side of the Physical Schemata toolbar to add a new schema. The
default schema name is "new_schema1", now change it to “dvd_collection” by modifying its Name field.
Confirm this change in the Physical Schemata panel. Now you are ready to add a table.
249
Creating a Model
Figure 8.17 Getting Started Tutorial - New Schema
3. Double-click Add Table in the Physical Schemata section.
4. This automatically loads the table editor with the default table name table1. Edit its Table Name field
and change the table name from “table1” to “movies”.
5. Next, add several columns. Double-click a Column Name cell, and the first field defaults to “moviesid”
because (by default) MySQL Workbench appends “id” to the table name for the initial field. Change
“moviesid” to “movie_id” and keep the Datatype as INT, and also select the PK (PRIMARY KEY), NN
(NOT NULL), and AI (AUTO_INCREMENT) check boxes.
6. Add two additional columns using the same method as described above:
Column Name
Data Type
Column Properties
movie_title
VARCHAR(45)
NN
release_date
DATE (YYYY-MM-DD)
None
250
Creating a Model
Figure 8.18 Getting Started Tutorial - Editing table columns
7. For a visual representation (EER diagram) of this schema, select Model, Create Diagram from Catalog
Objects to create the EER Diagram for the model.
251
Creating a Model
Figure 8.19 Getting Started Tutorial - EER Diagram
8. In the table editor, change the name of the column “movie_title” to “title”. Note that the EER Diagram is
automatically updated to reflect this change.
Note
There are several ways to open the table editor. Either change back to the
MySQL Model tab and right-click on the movies table, or right-click on movies
in the EER diagram and select an Edit 'movies' option.
9. Save the model by choosing File, Save Model from the main menu, or click Save Model to Current File
on the toolbar. Enter a model name at the file prompt. For this tutorial, enter “Home_Media” and then
Save the model.
10. Before synchronizing your new model with the live MySQL server, confirm that you already created
a MySQL connection. This tutorial assumes you followed the previous Section 5.1.2.2, “Creating A
New MySQL Connection (Tutorial)” tutorial to create a MySQL connection named MyFirstConnection,
although an alternative connection can also work.
11. Now forward engineer your model to the live MySQL server. Select Database, Forward Engineer... from
the main menu to open the Forward Engineer to Database wizard.
12. The Connection Options page selects the MySQL connection and optionally sets additional options
for the selected MySQL connection. We do not require connection changes so click Next.
252
Creating a Model
Note
You may decided to choose a different MySQL connection here, but this tutorial
uses MyFirstConnection.
13. The Options page lists optional advanced options. For this tutorial, you can ignore these and click
Next.
Figure 8.20 Getting Started Tutorial - Options
14. Select an object to export to the live MySQL server. In this case, we only have one table
(dvd_collection), so select dvd_collection and click Next.
253
Creating a Model
Figure 8.21 Getting Started Tutorial - Select Objects
15. The Review SQL Script page displays the SQL script that will be executed on the live server to create
your schema. Review the script to make sure that you understand the operations that will be carried
out.
Click Next to execute the Forward Engineering process.
254
Basic Modeling
Figure 8.22 Getting Started Tutorial - Review SQL Script
16. The Commit Progress page confirms that each step was executed. Click Show Logs to view the logs.
If no errors are present, click Close to close the wizard.
17. The new dvd_collection database is now present on the MySQL server. Confirm this by opening
the MySQL connection and viewing the schema list, or by executing SHOW DATABASES from the
MySQL Command Line Client (mysql).
18. Ensure that your model is saved. Click Save Model to Current File on the main toolbar.
For additional information about data modeling, see Chapter 8, Database Design / Modeling.
8.3.2 Basic Modeling
On the MySQL Model page, double-click the Add Diagram icon. This creates and opens a new EER
Diagram canvas.
255
Basic Modeling
Figure 8.23 Adding an EER Diagram
From an EER diagram page you can graphically design a database.
8.3.2.1 Adding a Table
The tools in the vertical toolbar on the left of the EER Diagram tab are used for designing an EER
diagram. Start by creating a table using the table tool. The table tool is the rectangular grid in the middle of
the vertical toolbar. Mousing over it shows the message, Place a New Table (T).
Clicking this tool changes the mouse pointer to a hand with a rectangular grid. Create a table on the
canvas by clicking anywhere on the EER Diagram grid.
Right-click the table and choose Edit in New Window from the pop-up menu. This opens the table editor,
docked at the bottom of the application.
The table name defaults to table1. Change the name by entering invoice into the Name: field.
Changes here affect the name of the tab in the table editor and the name of the table on the canvas.
Pressing Tab or Enter while the cursor is in the table name field selects the Columns tab of the table
editor and creates a default column named idinvoice.
Pressing Tab or Enter again sets the focus on the Datatype list with INT selected. Notice that a field has
been added to the table on the EER canvas.
Pressing Tab yet again and the focus shifts to adding a second column. Add a Description and a
Customer_id column. When you are finished, close the table editor, by clicking the x button on the top left
of the table editor.
8.3.2.2 Creating a Foreign Key
Select the table tool again and place another table on the canvas. Name this table invoice_item. Next
click the 1:n Non-Identifying Relationship tool.
First, click the invoice_item table; notice that a red border indicates that this table is selected. Next,
click the invoice table. This creates a foreign key in the invoice_item table, the table on the “many”
side of the relationship. This relationship between the two tables is shown graphically in crow's foot
notation.
Revert to the default mouse pointer by clicking the arrow at the top of the vertical toolbar. Click on the
invoice_item table and select the Foreign keys tab.
Click the Foreign key Name field. The referenced table should show in the Referenced Table column and
the appropriate column in the Referenced Column column.
To delete the relationship between two tables, click the line joining the tables and then press Control
+Delete.
256
Importing a Data Definition SQL Script
Experiment with the other tools on the vertical toolbar. Delete a relationship by selecting the eraser tool
and clicking the line joining two tables. Create a view, add a text object, or add a layer.
Save your changes to a MySQL Workbench Models file (mwb extension) by choosing Save from the File
menu or by using the keyboard command Control+S.
8.3.3 Importing a Data Definition SQL Script
For this tutorial, use the sakila database script, which you can find by visiting the http://dev.mysql.com/
doc/ page, selecting the Other Docs tab, and looking in the Example Databases section
After downloading the file, extract it to a convenient location. Open MySQL Workbench and find the
Reverse Engineer MySQL Create Script menu item by first choosing File and then Import. Find and
import the sakila-schema.sql file. This is the script that contains the data definition statements for the
sakila database. The file filter for the file open dialog window defaults to *.sql so you should be able to
view only files with the sql extension.
If the file was successfully imported, the application's status bar reads, Import MySQL Create Script
done. To view the newly imported script, expand the Physical Schemata section by double-clicking the
arrow on the left of the Physical Schemata title bar. Select the tab labeled sakila.
You may also wish to remove the default schema tab, mydb. Select this tab, then click the - button on the
upper right in the Physical Schemata panel.
To view all the objects in the sakila schema, you may need to expand the Physical Schemata window.
Move the mouse pointer anywhere over the gray area that defines the lower edge of the Physical
Schemata window. Hold down the right mouse button and move the mouse to adjust the size of the
window.
After you have expanded the window, all the objects in the sakila database should be visible. Tables
appear at the top followed by views and then routines. There are no routine groups in this schema, but you
should see the Routine Groups section and an Add Group icon.
For a complete description of importing a MySQL create script, see Section 8.4.2.1, “Reverse Engineering
Using a Create Script”.
8.3.3.1 Adding an EER Diagram
To create an EER diagram for the sakila database, first add an EER diagram by double-clicking the Add
Diagram icon in the EER Diagrams panel to create and open a new EER Diagram editor.
The EER Diagram canvas is where object modeling takes place. To add a table to the canvas, select the
Catalog tab in the middle panel on the right side of the application to display any schemata that appear
in the MySQL Model tab. Find the sakila schema and expand the view of its objects by clicking the +
button to the left of the schema name. Expand the tables list in the same way.
You can add tables to the EER canvas by dragging them from the Catalog panel dropping them onto the
canvas. Drop the address table and the city table onto the canvas.
257
Importing a Data Definition SQL Script
Figure 8.24 Adding Tables to the Canvas
MySQL Workbench automatically discovers that address.city_id has been defined as a foreign key
referencing the city.city_id field. Drop the country table onto the canvas and immediately you
should see the relationship between the country table and the city table. (To view all the relationships
in the sakila database, see Figure 8.29, “The sakila Database EER Diagram”.)
Click the Properties tab of the panel on the lower left, then click one of the tables on the canvas. This
displays the properties of the table in the Properties window. While a table is selected, you can use the
Properties window to change a table's properties. For example, entering #FF0000 for the color value
will change the color accent to red.
Figure 8.25 Viewing The Properties
Changing the color of a table is a good way to identify a table quickly—something that becomes more
important as the number of tables increases. Changing the color of a table is also an easy way to identify a
table in the Model Navigator panel. This panel, the uppermost panel on the left side of the page, gives
a bird's eye view of the entire EER canvas.
Save your changes to a MySQL Workbench Models file (mwb extension) by choosing Save from the File
menu or by using the keyboard command Control + S.
258
Using the Default Schema
8.3.4 Using the Default Schema
When you first open MySQL Workbench a default schema, mydb appears as the leftmost tab of the
Physical Schemata section of MySQL Workbench. You can begin designing a database by using this
default schema.
Figure 8.26 The Default Schema
To change the name of the default schema, double-click the schema tab. This opens a schema editor
window docked at the bottom of the application. To undock or redock this window, double-click anywhere
in the editor title bar.
To rename the schema, use the field labeled Name. After you have renamed the schema, a lightning
bolt icon appears right aligned in the Name field, indicating that other changes are pending. Click the
Comments field and a dialog box opens asking if you wish to rename all schema occurrences. Clicking
Yes ensures that your changes are propagated throughout the application. Add comments to the database
and change the collation if you wish. Close the schema editor by clicking the x button.
8.3.4.1 Creating a New Table
Create a new table by double-clicking the Add Table icon in the Physical Schemata panel. This opens
the table editor docked at the bottom of the application. If you wish, you can undock or dock this editor in
exactly the same way as the schema editor window.
259
Using the Default Schema
Figure 8.27 Model: Creating A New Table
Initially, the table name will default to 'table1' in the table editor. The following screenshot describes several
of the available actions:
260
Documenting the sakila Database
Figure 8.28 Model: Editing Table Values
In our example above, columns were added using the Columns tab. Clicking an empty row will add a new
column, and clicking an existing column starts edit mode. Click the Tab key to move to the next column
and set the column's data type.
Altering the table by adding indexes or other features is also possible using the table editor by clicking
each tab within the table editor.
8.3.4.2 Creating Other Schema Objects
Additional objects such as views or routines can be added in the same way as tables.
Any objects you have created can be found in the Catalog palette on the right. To view these schema
objects, select the Catalog tab in the middle palette on the right. View all the objects by clicking the +
button to the left of the schema name.
Save your changes to a MySQL Workbench Models file (mwb extension) by choosing Save from the File
menu or by using the keyboard command Control+S.
8.3.5 Documenting the sakila Database
This chapter highlights the capabilities of MySQL Workbench as a documentation tool using the sakila
database as an example. This is a sample database provided by MySQL that you can find by visiting the
261
Documenting the sakila Database
http://dev.mysql.com/doc/ page, selecting the Other Docs tab, and looking in the Example Databases
section
An EER diagram is an invaluable aid to a quick understanding of any database. There is no need to read
through table definition statements; glancing at an EER diagram can immediately indicate that various
tables are related.
You can also see how tables are related; what the foreign keys are and what the nature of the relationship
is.
8.3.5.1 A PNG File of the sakila Database
Find following an EER diagram showing all the tables in the sakila database. This image was created
using the File, Export, Export as PNG... menu item.
Figure 8.29 The sakila Database EER Diagram
262
Forward and Reverse Engineering
The object notation style used in Figure 8.29, “The sakila Database EER Diagram” is Workbench (PKs
only). This notation shows only primary keys and no other columns, which is especially useful where
space is at a premium. The relationship notation is the default, Crow's Foot.
As the connection lines show, each table is related to at least one other table in the database (with
the exception of the film_text table). Some tables have two foreign keys that relate to the same
table. For example the film table has two foreign keys that relate to the language table, namely
fk_film_language_original and fk_film_language. Where more than one relationship exists
between two tables, the connection lines run concurrently.
Identifying and nonidentifying relationships are indicated by solid and broken lines respectively. For
example, the foreign key category_id is part of the primary key in the film_category table so its
relationship to the category table is drawn with a solid line. On the other hand, in the city table, the
foreign key, country_id, is not part of the primary key so the connection uses a broken line.
8.4 Forward and Reverse Engineering
MySQL Workbench provides capabilities to forward engineering physical database designs. A visual data
model can be transformed into a physical database on a target MySQL Server by executing the forward
engineering wizard. All SQL code is automatically generated to help eliminate the normal error-prone
process of manually writing complex SQL code. MySQL Workbench also enables you to reverse engineer
an existing database or packaged application to get better insight into its database design. In addition to
forward and reverse engineering existing databases, it can also import SQL scripts to build models, and
export models to DDL scripts to execute at a later time.
8.4.1 Forward Engineering
It is possible to forward engineer a database using an SQL script or by connecting to a live database.
8.4.1.1 Forward Engineering Using an SQL Script
To create a script of your database model, choose the Export item from the File menu. You may export a
script to alter an existing database or create a new database. The script to create a database is similar to
the one created using the mysqldump db_name command.
If you choose to create a database, there are several export options available.
Creating a Schema
Select the File, Export, Forward Engineer SQL CREATE Script menu item to start the Forward Engineer
SQL Script wizard. The following figure shows the first page of the wizard.
263
Forward Engineering
Figure 8.30 SQL Export Options
The SQL Export Options displays the following facilities:
• Output SQL Script File
To specify the output file name, enter it into the Output SQL Script File field, or use the Browse button
to select a file. If this field is left blank, you will be able to view the generated script, but it will not be
saved to a file.
• Generate DROP Statements Before Each CREATE Statement
Select this option to generate a statement to drop each object before the statement that creates it. This
ensures that any existing instance of each object is removed when the output is executed.
• Generate DROP SCHEMA
• Skip creation of FOREIGN KEYS
• Skip creation of FK Indexes as well
• Omit Schema Qualifier in Object Names
Select this option to generate unqualified object names in SQL statements.
• Generate USE statements
264
Forward Engineering
• Generate Separate CREATE INDEX Statements
Select this option to create separate statements for index creation instead of including index definitions
in CREATE TABLE statements.
• Add SHOW WARNINGS after every DDL statement
Select this option to add SHOW WARNINGS statements to the output. This causes display of any warnings
generated when the output is executed, which can be useful for debugging.
• Do Not Create Users. Only Export Privileges
Select this option to update the privileges of existing users, as opposed to creating new users. Exporting
privileges for nonexistent users will result in errors when you execute the CREATE script. Exporting users
that already exist will also result in an error.
• Don't create view placeholder tables
• Generate INSERT Statements for Tables
Select this option if you have added any rows to a table. For more information about inserting rows, see
Section 7.1.1, “SQL Query Window”.
• Disable FK checks for inserts
• Create triggers after inserts
Clicking Next takes you to the SQL Object Export Filter page where you select the objects you wish to
export.
265
Forward Engineering
Figure 8.31 SQL Object Export Filter
Precise control over the objects to export can be fine tuned by clicking the Show Filter button. After the
objects to export have been selected, it is possible to reduce the expanded panel by clicking the same
button, now labeled Hide Filter.
After selecting the objects to export, click the Next button to review the script that has been generated.
266
Forward Engineering
Figure 8.32 Review Generated Script
You may return to the previous page using the Back button.
The Finish button saves the script file and exits. You can then use the saved script to create a database.
Altering a Schema
The menu item for creating an ALTER Script File is Database, Synchronize With Any Source. Typically,
this option is used when the SQL script of a database has been imported into MySQL Workbench and
changed, and then you want to create a script that can be run against the database to alter it to reflect the
adjusted model. For instructions on importing a DDL script, see Section 8.4.2.1, “Reverse Engineering
Using a Create Script”.
Select the Database, Synchronize With Any Source menu item to start the wizard. You will be presented
with the first page showing the introduction, and then the available options:
267
Forward Engineering
Figure 8.33 Synchronize With Any Source: Options
For additional information, see Section 8.5.1, “Database Synchronization”.
8.4.1.2 Forward Engineering to a Live Server
Use forward engineering to export your schema design to a MySQL server.
Select the model that you wish to forward engineer and then choose the Database, Forward Engineer...
menu item from the main menu.
The first step of the process is to connect to a MySQL server to create the new database schema. This
page enables you to use a previously stored connection, or enter the connection parameters.
268
Forward Engineering
Figure 8.34 Set Parameters for Connecting to a DBMS
After the connection parameters have been set, click Next. The next page of the wizard displays is Catalog
Validation (validation is available only in the Commercial Edition).
Figure 8.35 Catalog Validation
269
Forward Engineering
Click Run Validations to validate the catalog.
Click Next to continue.
The next page enables you to set options for the database to be created. These options are as described
in Creating a Schema.
Figure 8.36 Options
Select the required options and then click Next.
The next page enables you to select the objects to forward engineer.
270
Forward Engineering
Figure 8.37 Select Objects to Forward Engineer
To select a subset of objects to forward engineer, use the Show Filter/Hide Filter button, then select
specific objects. After you have selected your objects, click Next to continue
On the Review Script page you may review and edit the SQL script that will be executed.
Figure 8.38 Review Script
271
Reverse Engineering
Click Next to continue if you are satisfied with the generated script.
The next page of the wizard displays the results of the forward engineering process.
Figure 8.39 Forward Engineering Progress
You can confirm that the script created the schema by connecting to the target MySQL server and issuing
a SHOW DATABASES statement.
8.4.2 Reverse Engineering
With MySQL Workbench, you can reverse engineer a database using a MySQL create script or you can
connect to a live MySQL server and import a single database or a number of databases. All versions of
MySQL Workbench can reverse engineer using a MySQL DDL script. Only commercial versions of MySQL
Workbench can reverse engineer a database directly from a MySQL server.
8.4.2.1 Reverse Engineering Using a Create Script
To reverse engineer using a create script, choose the File, Import, Reverse Engineer MySQL Create
Script... menu item for a model.
Tables, views, routines, routine groups, indexes, keys, and constraints can be imported from an SQL script
file. Objects imported using an SQL script can be manipulated within MySQL Workbench the same as
other objects.
272
Reverse Engineering
Figure 8.40 Reverse Engineer SQL Script: Input
• Select SQL script file: Open a file open dialog box with the default file type set to an SQL script file, a
file with the extension sql.
• File encoding: Defaults to UTF8.
• Place imported objects on a diagram: Also create an EER diagram in MySQL Workbench.
Note
Importing a large number (about 300+) objects could fail to create an EER
diagram and instead emit a resource warning with the text "Too many objects are
selected for auto placement. Select fewer elements to create the EER diagram."
In this case, execute the reverse engineering wizard with this option disabled,
manually create the EER diagram, and then import the 300+ objects using the
EER diagram catalog viewer.
If your script creates a database, MySQL Workbench creates a new physical schemata tab on the MySQL
Model page.
Click Execute to reverse engineer the SQL script, verify its results, and optionally place the objects in a
new EER diagram.
273
Reverse Engineering
Figure 8.41 Reverse Engineer SQL Script: Execution
Click Next to view a summary of the results, and then Finish to close the wizard.
Figure 8.42 Reverse Engineer SQL Script: Results
Before exiting MySQL Workbench, be sure to save the schema. Choose the File, Save menu item and the
reverse-engineered database will be saved as a MySQL Workbench file with the extension mwb.
See Section 8.3.3, “Importing a Data Definition SQL Script”, for a tutorial on reverse engineering the
sakila database.
Creating a DDL script
You can create a data definition (DDL) script by executing the mysqldump db_name --no-data >
script_file.sql command. Using the --no-data option ensures that the script contains only DDL
statements. However, if you are working with a script that also contains DML statements you need not
remove them; they will be ignored.
Note
If you plan to redesign a database within MySQL Workbench and then export
the changes, be sure to retain a copy of the original DDL script. You will need
274
Reverse Engineering
the original script to create an ALTER script. For more information, see Altering a
Schema.
Use the --databases option with mysqldump if you wish to create the database as well as all its objects.
If there is no CREATE DATABASE db_name statement in your script file, you must import the database
objects into an existing schema or, if there is no schema, a new unnamed schema is created.
8.4.2.2 Reverse Engineering a Live Database
To reverse engineer a live database, choose the Database, Reverse Engineer... menu item from the main
menu. This opens the Reverse Engineer Database wizard.
Figure 8.43 Reverse Engineer Database Wizard
The first page of the wizard enables you to set up a connection to the live database you wish to reverse
engineer. You can set up a new connection or select a previously created stored connection. Typical
information required for the connection includes host name, user name and password.
After this information has been entered, or you have selected a stored connection, click the Next button to
proceed to the next page.
275
Reverse Engineering
Figure 8.44 Connect to DBMS
Review the displayed information to make sure that the connection did not generate errors, then click Next.
The next page displays the schemata available on the server. Click the check box or check boxes for any
schemata you wish to process.
276
Reverse Engineering
Figure 8.45 Select Schemas
After you have selected the desired schemas, click the Next button to continue.
The wizard then displays the tasks it carried out and summarizes the results of the operation.
277
Reverse Engineering
Figure 8.46 Retrieve Objects
Review the results before clicking Next to continue.
The next page is the Select Objects page. It has a section for each object type present in the schema
(tables, views, routines, and so forth). This page is of special interest if you do not wish to import all the
objects from the existing database. It gives you the option of filtering which objects are imported. Each
section has a Show Filter button. Click this button if you do not want to import all the objects of a specific
type. Here is this page with the filter open:
278
Reverse Engineering
Figure 8.47 Select Objects
This page enables you to select specific tables for import. Having selected the desired tables, you can
optionally hide the filter by clicking the Hide Filter button.
The other sections, such as MySQL Routine Objects, have similar filters available.
Click Execute to continue to the next page.
The wizard then imports objects, displaying the tasks that have been carried out and whether the operation
was successful. If errors were generated, you can click the Show Logs button to see the nature of the
errors.
279
Reverse Engineering
Figure 8.48 Reverse Engineer Progress
Click Next to continue to the next page.
The final page of the wizard provides a summary of the reverse engineered objects.
280
Reverse Engineering
Figure 8.49 Results
Click Finish to exit the wizard.
Before exiting MySQL Workbench be sure to save the schema. Choose the File, Save menu item to save
the reverse-engineered database as a MySQL Workbench file with the extension mwb.
Errors During Reverse Engineering
During reverse engineering, the application checks for tables and views that duplicate existing names
and disallows duplicate names if necessary. If you attempt to import an object that duplicates the name
of an existing object you will be notified with an error message. To see any errors that have occurred
during reverse engineering, you can click the button Show Logs. This will create a panel containing a list
of messages, including any error messages than may have been generated. Click the Hide Logs button to
close the panel.
If you wish to import an object with the same name as an existing object, rename the existing object before
reverse engineering.
If you import objects from more than one schema, there will be a tab in the Physical Schemata section
of the MySQL Model page for each schema imported.
You cannot reverse engineer a live database that has the same name as an existing schema. If you wish
to do this, first rename the existing schema.
281
Schema Synchronization and Comparison
8.5 Schema Synchronization and Comparison
Database change management is a complex process that involves maintaining different versions of
database schemas and manually modifying existing databases. To help with this administration task,
MySQL Workbench includes schema synchronization and comparison utilities. You can compare two
live databases, two models, or models with live databases, to visually see the differences and optionally
perform a synchronization routine.
8.5.1 Database Synchronization
It is possible to synchronize a model in MySQL Workbench with a live database. By default, the
synchronization process will change the live database to be the same as the model, but this is configurable
during the synchronization process.
Caution
Because MySQL databases correspond to directories within the data directory,
you must consider case sensitivity for database, table, and trigger names, which
follow the case sensitivity rules of the underlying file system for your operating
system. Synchronizing models with objects that differ in case may lead to MySQL
Workbench producing a DROP statement for that object, before recreating it as
lowercase. For more information, see Identifier Case Sensitivity
Workarounds include using a consistent convention, where the most portable code
uses lower case database and table names. Or a temporary workaround is to delete
the DROP SCHEMA IF EXISTS line from the generated query.
MySQL Workbench enables control over the direction of synchronization, and which objects to
synchronize, in a completely flexible way. Synchronization options include:
• Specify all or specific tables and objects to synchronize
• Synchronize both the model and live database, or only update one or the other (unidirectional or
bidirectional)
• Optionally update from or to an SQL script file
• Instead of executing the synchronization, you may generate an ALTER Script File to later perform the
appropriate updates
• Fine-tune how the synchronization will be performed by choosing the direction of each individual object,
or configuring particular objects to be ignored
There are two similar database synchronization wizards available from the Database menu. The
simpler Synchronize Model wizard, and the more flexible Synchronize with Any Source wizard. The
descriptions below apply to both, unless explicitly told otherwise.
Synchronize Model (with database)
To start the wizard, open a model and select Database, Synchronize Model from the main menu. Follow
the steps until you reach the Select Changes to Apply step:
282
Database Synchronization
Figure 8.50 Model and Database Differences
In the preceding example, the live database and model both have movies shows tables. In the MySQL
Workbench, an additional table, educational, has been created in the model, but it lacks an equivalent
in the live database. Further, friends exists in the live database, but it is not in the model. By default, the
actions will synchronize the database with the model, so in this example the educational table will be
added to the source, and the friends table will be removed from the source.
As described in the GUI, double-clicking the arrows will alternate between the Update Model, Ignore, and
Update Source actions. You may also select a row and click one of the three action buttons. Also note that
clicking on a row will reveal the associated SQL statement, as shown in the screenshot above.
The next example shows how the direction of synchronization can be changed.
283
Database Synchronization
Figure 8.51 Controlling Synchronization Direction
In this case, the synchronization direction has been changed so that rather than the default action of
friends being dropped from the live database, it will be incorporated into the MySQL Workbench model.
As before, educational table will be added to the live (source) database.
The three actions available actions are:
• Update Model: Causes the selected changes to be applied to the model, from the live database.
• Ignore: Causes the changes to be ignored. No synchronization will take place for those changes. This is
designated with a double arrow that is crossed out.
• Update Source: Causes the changes to be applied only to the live database.
Clicking Table Mapping offers additional mapping options:
284
Database Synchronization
Figure 8.52 Table Mapping
Pressing Next will reveal the SQL statement to perform the configured model and live database (source)
synchronization:
285
Database Synchronization
Figure 8.53 Previewing The Synchronization SQL Statement
You may now save the SQL statement to a file or the clipboard, or execute the SQL statement. If you
choose to execute the change in MySQL Workbench, then you may optionally choose to skip "DB
changes" so that only your model is altered.
Synchronize With Any Source
To start the wizard, open a model and select Database, Synchronize With Any Source from the main
menu. The steps are similar to the Synchronize Model wizard, but with additional options to create and/or
use SQL script files. See the Select Sources page:
286
Compare and Report Differences in Catalogs
Figure 8.54 Synchronize With Any Source: Select Sources
Notice how the source and destination types can be altered. The steps that follow depend on these source
and destination types, and the Synchronize Model describes the basic functionality of this wizard.
8.5.2 Compare and Report Differences in Catalogs
This facility enables you to create a report detailing the differences between your MySQL Workbench
model, and a live database or script. Choose Database, Compare Schemas from the main menu to run the
Compare and Report Differences in Catalogs wizard.
The first step in the wizard is to specify which catalogs to compare. For example, you may wish to compare
your live database against your current MySQL Workbench model.
287
Compare and Report Differences in Catalogs
Figure 8.55 Catalog Sources Selection
You then proceed through the wizard, providing connection information if accessing a live database. The
wizard then produces a catalog diff report showing the differences between the compared catalogs.
288
Table Templates
Figure 8.56 Catalog Differences Report
8.6 Table Templates
Define table templates with commonly used columns and settings to create new tables from either a live
connection or while creating an EER model.
From the SQL editor, select Create Table Like from the Tables context menu.
289
Table Templates
Figure 8.57 New Table Template: SQL Editor
Or while modeling, click the "Open the table template editor" icon on the right sidebar under Modeling
Additions.
290
Table Templates
Figure 8.58 New Table Template: Modeling
After opening the Table Templates manager, make the desired adjustments and click Apply to commit the
changes.
291
Customizing DBDoc Model Reporting Templates
Figure 8.59 Table Templates Manager
To open an existing template from the SQL editor, hover over the Create Table Like context menu and
select the desired table template. For modeling, double-click on a template in the right modeling sidebar.
8.7 Customizing DBDoc Model Reporting Templates
This section provides an overview of creating and modifying DBDoc Model Reporting templates, as used
by MySQL Workbench.
The MySQL Workbench DBDoc Model Reporting system is based on the Google Template System. This
discussion does not attempt to explain the Google Template System in detail. For a useful overview of
how the Google Template System works, see the Google document, How To Use the Google Template
System.
The templates employed by the DBDoc Model Reporting system are text files that contain Markers. These
text files are processed by the template system built into MySQL Workbench, and the markers replaced by
actual data. The output files are then generated. It is these output files, typically HTML or text, that are then
viewed by the user.
Markers can be of six types:
• Template Include
• Comment
• Set delimiter
• Pragma
• Variable
292
Customizing DBDoc Model Reporting Templates
• Section start and Section end
The last two are the most commonly used in MySQL Workbench templates and these important markers
are briefly described in the following sections.
• Variables
The use of variables in the templates is straightforward. Any variables denoted by markers in the
template file are replaced by their corresponding data prior to the output file being generated. The
mapping between variables and their corresponding data is stored by MySQL Workbench in what
is known as a data dictionary. In the data dictionary, the variable name is the key and the variable's
corresponding data is the value. The data dictionaries are built by MySQL Workbench and filled with the
data contained in the model being processed.
By way of example, the following code snippet shows part of a template file:
Total number of Schemata: {{SCHEMA_COUNT}}
In the generated output file, the variable {{SCHEMA_COUNT}} is replaced by the number of schemata in
the model:
Total number of Schemata: 2
A variable can appear as many times as required in the template file.
• Sections
Sections are used to perform iteration in the templates. When MySQL Workbench exchanges the
variables in a section for data, it does so iteratively, using all data in the data dictionary in which the
variable is defined. MySQL Workbench builds the data dictionaries according to the model currently
being processed.
Consider the following code snippet:
{{#SCHEMATA}}
Schema: {{SCHEMA_NAME}}
{{/SCHEMATA}}
In the preceding snippet, the section start and end are indicated by the {{#SCHEMATA}} and {{/
SCHEMATA}} markers. When MySQL Workbench processes the template, it notes the section and
iterates it until the variable data for {{SCHEMA_NAME}} in the corresponding data dictionary is
exhausted. For example, if the model being processed contains two schemata, the output for the section
might resemble the following:
Schema: Airlines
Schema: Airports
Data Dictionaries
It is important to understand the relationship between sections and data dictionaries in more detail. In a
data dictionary the key for a variable is the variable name, a marker. The variable value is the variable's
data. The entry for a section in a data dictionary is different. For a section entry in a data dictionary, the key
is the section name, the marker. However, the value associated with the key is a list of data dictionaries. In
MySQL Workbench each section is usually associated with a data dictionary. You can think of a section as
activating its associated dictionary (or dictionaries).
293
Customizing DBDoc Model Reporting Templates
When a template is processed, data dictionaries are loaded in a hierarchical pattern, forming a tree of data
dictionaries. This is illustrated by the following table.
Table 8.1 Data Dictionaries Tree
Data Dictionary
Loads Data Dictionary
MAIN
SCHEMATA
SCHEMATA
TABLES, COLUMNS (Detailed is true), FOREIGN_KEYS
(Detailed is true), INDICES (Detailed is true)
TABLES
REL_LISTING, INDICES_LISTING, COLUMNS_LISTING,
TABLE_COMMENT_LISTING, DDL_LISTING
COLUMNS_LISTING
COLUMNS (Detailed is false)
REL_LISTING
REL (Detailed is false)
INDICES_LISTING
INDICES (Detailed is false)
The root of the tree is the main dictionary. Additional dictionaries are loaded from the root to form the
dictionary tree.
Note
If a template has no sections, any variables used in the template are looked up in
the main dictionary. If a variable is not found in the main dictionary (which can be
thought of as associated with the default, or main, section), no data is generated in
the output file for that marker.
Evaluation of variables
The tree structure of the data dictionaries is important with respect to variable evaluation. As variables are
defined in data dictionaries, their associated values have meaning only when that particular data dictionary
is active, and that means when the section associated with that data dictionary is active. When a variable
lookup occurs, the system checks the data dictionary associated with the current section. If the variable
value can be found there, the replacement is made. However, if the variable's value is not found in the
current data dictionary, the parent data dictionary is checked for the variable's value, and so on up the tree
until the main data dictionary, or root, is reached.
Suppose that we want to display the names of all columns in a model. Consider the following template as
an attempt to achieve this:
Report
-----Column Name: {{COLUMN_NAME}}
This template produces no output, even for a model that contains many columns. In this example, the
only data dictionary active is the main dictionary. However, COLUMN_NAME is stored in the COLUMNS data
dictionary, which is associated with the COLUMNS section.
With this knowledge, the template can be improved as follows:
Report
-----{{#COLUMNS}}
Column Name: {{COLUMN_NAME}}
{{/COLUMNS}}
294
Customizing DBDoc Model Reporting Templates
This still does not produce output. To see why, see Table 8.1, “Data Dictionaries Tree”. The COLUMNS data
dictionary has the parent dictionary COLUMNS_LISTING. COLUMNS_LISTING has the parent TABLES,
which has the parent SCHEMATA, whose parent is the main dictionary. Remember that for a dictionary to be
involved in variable lookup, its associated section must currently be active.
To achieve the desired output, the template must be something like the following:
Report
-----{{#SCHEMATA}}
{{#TABLES}}
{{#COLUMNS_LISTING}}
{{#COLUMNS}}
Column Name: {{COLUMN_NAME}}
{{/COLUMNS}}
{{/COLUMNS_LISTING}}
{{/TABLES}}
{{/SCHEMATA}}
The following template is the same, but with explanatory comments added:
Report
-----{{! Main dictionary active}}
{{#SCHEMATA}} {{! SCHEMATA dictionary active}}
{{#TABLES}} {{! TABLES dictionary active}}
{{#COLUMNS_LISTING}} {{! COLUMNS_LISTING dictionary active}}
{{#COLUMNS}} {{! COLUMNS dictionary active}}
Column Name: {{COLUMN_NAME}} {{! COLUMN_NAME variable is looked-up,
and found, in COLUMNS data dictionary}}
{{/COLUMNS}}
{{/COLUMNS_LISTING}}
{{/TABLES}}
{{/SCHEMATA}}
Imagine now that for each column name displayed you also wanted to display its corresponding schema
name, the template would look like this:
Report
-----{{#SCHEMATA}}
{{#TABLES}}
{{#COLUMNS_LISTING}}
{{#COLUMNS}}
Schema Name: {{SCHEMA_NAME}} Column Name: {{COLUMN_NAME}}
{{/COLUMNS}}
{{/COLUMNS_LISTING}}
{{/TABLES}}
{{/SCHEMATA}}
When variable lookup is performed for SCHEMA_NAME, the COLUMNS dictionary is checked. As the variable
is not found there the parent dictionary will be checked, COLUMNS_LISTING, and so on, until the variable
is eventually found where it is held, in the SCHEMATA dictionary.
If there are multiple schemata in the model, the outer section is iterated over a matching number of times,
and SCHEMA_NAME accordingly has the correct value on each iteration.
It's important to always consider which dictionary must be active (and which parents) for a variable to be
evaluated correctly. The following section has a table that helps you identify section requirements.
295
Supported Template Markers
8.7.1 Supported Template Markers
The following table shows the supported markers. These markers can be used in any template, including
custom templates.
Using the table
The table shows which variables are defined in which sections. The variable should be used in its correct
section or its value will not be displayed. If a variable type is a variable, then the table describes its data
dictionary, and a parent dictionary if type is a section. Also remember that the data dictionaries used to
perform variable lookups form a hierarchical tree, so it is possible to use a variable in a child section that is
defined in a parent section.
Table 8.2 Supported Template Markers
Marker text
Type
Data Dictionary or Parent
Dictionary
Corresponding data
TITLE
Variable
MAIN
Title of the report
GENERATED
Variable
MAIN
Date and time when the report
was generated
STYLE_NAME
Variable
MAIN
The name of the style selected
in MySQL Workbench, this
is typically used to load the
corresponding CSS file,
depending on the name of
the style selected in MySQL
Workbench
SCHEMA_COUNT
Variable
MAIN
The number of schemata in
the model
PROJECT_TITLE
Variable
MAIN
Project title as set for the
model in Document Properties
PROJECT_NAME
Variable
MAIN
Project name as set for the
model in Document Properties
PROJECT_AUTHOR
Variable
MAIN
Project author as set for the
model in Document Properties
PROJECT_VERSION
Variable
MAIN
Project version as set for the
model in Document Properties
PROJECT_DESCRIPTION
Variable
MAIN
Project description as set
for the model in Document
Properties
PROJECT_CREATED
Variable
MAIN
Automatically set for the model
project, but as displayed in
Document Properties
PROJECT_CHANGED
Variable
MAIN
Automatically set for the model
project, but as displayed in
Document Properties
TOTAL_TABLE_COUNT
Variable
MAIN
The number of tables in all
schemata in the model
296
Supported Template Markers
Marker text
Type
Data Dictionary or Parent
Dictionary
Corresponding data
TOTAL_COLUMN_COUNT
Variable
MAIN
The number of columns in all
tables in all schemata in the
model
TOTAL_INDEX_COUNT
Variable
MAIN
The number of indexes in the
model
TOTAL_FK_COUNT
Variable
MAIN
The number of foreign keys in
the model
SCHEMATA
Section
MAIN
Used to mark the start and end
of a SCHEMATA section; the
SCHEMATA data dictionary
becomes active in this section
SCHEMA_NAME
Variable
SCHEMATA
The schema name
SCHEMA_ID
Variable
SCHEMATA
The schema ID
TABLE_COUNT
Variable
SCHEMATA
The number of tables in the
current schema
COLUMN_COUNT
Variable
SCHEMATA
The number of columns in the
current schema
INDICES_COUNT
Variable
SCHEMATA
The number of indexes in the
current schema
FOREIGN_KEYS_COUNT
Variable
SCHEMATA
The number of foreign keys in
the current schema
TABLES
Section
SCHEMATA
Marks the start and end of a
TABLES section; the TABLES
data dictionary becomes active
in this section
TABLE_NAME
Variable
TABLES
The table name
TABLE_ID
Variable
TABLES
The table ID
COLUMNS_LISTING
Section
TABLES
Marks the start and end of a
COLUMNS_LISTING section;
the COLUMNS_LISTING data
dictionary becomes active in
this section
COLUMNS
Section
COLUMNS_LISTING
Marks the start and end of
a COLUMNS section; the
COLUMNS data dictionary
becomes active in this section
COLUMN_KEY
Variable
COLUMNS
Whether the column is a
primary key
COLUMN_NAME
Variable
COLUMNS
The column name
COLUMN_DATATYPE
Variable
COLUMNS
The column data type
COLUMN_NOTNULL
Variable
COLUMNS
Whether the column permits
NULL values
COLUMN_DEFAULTVALUE
Variable
COLUMNS
The column default value
297
Supported Template Markers
Marker text
Type
Data Dictionary or Parent
Dictionary
Corresponding data
COLUMN_COMMENT
Variable
COLUMNS
The column comment
COLUMN_ID
Variable
COLUMNS
The column ID
COLUMN_KEY_PART
Variable
COLUMNS (if detailed)
The column key type
COLUMN_NULLABLE
Variable
COLUMNS (if detailed)
Can the column contain NULL
values
COLUMN_AUTO_INC
Variable
COLUMNS (if detailed)
Does the column autoincrement
COLUMN_CHARSET
Variable
COLUMNS (if detailed)
The column character set
COLUMN_COLLATION
Variable
COLUMNS (if detailed)
The column collation
COLUMN_IS_USERTYPE
Variable
COLUMNS (if detailed)
Whether the column is a user
type
INDICES_LISTING
Section
TABLES
Marks the start and end of an
INDICES_LISTING section;
the INDICES_LISTING data
dictionary becomes active in
this section
INDICES
Section
INDICES_LISTING
Marks the start and end of
an INDICES section; the
INDICES data dictionary
becomes active in this section
INDEX_NAME
Variable
INDICES
The index name
INDEX_PRIMARY
Variable
INDICES
Whether this is a primary key
INDEX_UNIQUE
Variable
INDICES
Whether this is a unique index
INDEX_TYPE
Variable
INDICES
The index type; for example,
PRIMARY
INDEX_KIND
Variable
INDICES
The index kind
INDEX_COMMENT
Variable
INDICES
The index comment
INDEX_ID
Variable
INDICES
The index ID
INDEX_COLUMNS
Section
INDICES
Marks the start and end of an
INDEX_COLUMNS section;
the INDEX_COLUMNS data
dictionary becomes active in
this section
INDEX_COLUMN_NAME
Variable
INDEX_COLUMNS
The index column name
INDEX_COLUMN_ORDER
Variable
INDEX_COLUMNS
The index column order;
for example, ascending,
descending
INDEX_COLUMN_COMMENT Variable
INDEX_COLUMNS
The index comment
INDEX_KEY_BLOCK_SIZE
Variable
INDEX_COLUMNS (if
detailed)
The index key-block size
REL_LISTING
Section
TABLES
Marks the start and end of a
REL_LISTING section; the
298
Creating a Custom Template
Marker text
Type
Data Dictionary or Parent
Dictionary
Corresponding data
REL_LISTING data dictionary
becomes active in this section
REL
Section
REL_LISTING
Marks the start and end of a
REL section; the REL data
dictionary becomes active in
this section
REL_NAME
Variable
REL, FOREIGN_KEYS
The relationship name
REL_TYPE
Variable
REL, FOREIGN_KEYS
The relationship type
REL_PARENTTABLE
Variable
REL, FOREIGN_KEYS
The relationship parent table
REL_CHILDTABLE
Variable
REL, FOREIGN_KEYS
The relationship child table
REL_CARD
Variable
REL, FOREIGN_KEYS
The relationship cardinality
FOREIGN_KEY_ID
Variable
REL
Foreign key ID
FOREIGN_KEYS
Section
SCHEMATA
Marks the start and end of
a FOREIGN_KEYS section;
the FOREIGN_KEYS data
dictionary becomes active in
this section
FK_DELETE_RULE
Variable
FOREIGN_KEYS
The foreign key delete rule
FK_UPDATE_RULE
Variable
FOREIGN_KEYS
The foreign key update rule
FK_MANDATORY
Variable
FOREIGN_KEYS
Whether the foreign key is
mandatory
TABLE_COMMENT_LISTING Section
TABLES
Marks the start and end of a
TABLE_COMMENT_LISTING
section; the
TABLE_COMMENT_LISTING
data dictionary becomes active
in this section
TABLE_COMMENT
Variable
TABLE_COMMENT_LISTING The table comment
DDL_LISTING
Section
TABLES
Marks the start and end of a
DDL_LISTING section; the
DDL_LISTING data dictionary
becomes active in this section
DDL_SCRIPT
Variable
DDL_LISTING
Display the DDL script of
the currently active entity;
for example, SCHEMATA,
TABLES
8.7.2 Creating a Custom Template
In the simplest case, a template consists of two files: a template file, which has a .tpl extension, and
a special file info.xml. The info.xml file has important metadata about the template. A third file is
optional, which is the preview image file. This preview file provides a thumbnail image illustrating the
appearance of the generated report.
One of the easiest ways to create a custom template is to make a copy of any existing template.
299
Creating a Custom Template
For example, the following procedure describes how to make a custom template based on the Text
Basic template.
1. Navigate to the folder where the templates are stored. Assuming that MySQL Workbench has been
installed into the default location on Windows, this would be C:\Program Files\MySQL\MySQL
Workbench 5.0 SE\modules\data\wb_model_reporting.
2. Copy the Text_Basic.tpl folder. The copy can be given any suitable name; for example,
Custom_Basic.tpl.
3. Edit the info.xml file to reflect your custom template. The unedited file in this case is shown here:
<?xml version="1.0"?>
<data>
<value type="object" struct-name="workbench.model.reporting.TemplateInfo"
id="{BD6879ED-814C-4CA3-A869-9864F83B88DF}" struct-checksum="0xb46b524d">
<value type="string" key="description">
A basic TEXT report listing schemata and objects.
</value>
<value type="string" key="name">HTML Basic Frame Report</value>
<value type="list" content-type="object"
content-struct-name="workbench.model.reporting.TemplateStyleInfo"
key="styles">
<value type="object" struct-name="workbench.model.reporting.TemplateStyleInfo"
id="{7550655C-CD4B-4EB1-8FAB-AAEE49B2261E}" struct-checksum="0xab08451b">
<value type="string" key="description">
Designed to be viewed with a fixed sized font.
</value>
<value type="string" key="name">Fixed Size Font</value>
<value type="string" key="previewImageFileName">
preview_basic.png
</value>
<value type="string" key="styleTagValue">fixed</value>
</value>
</value>
<value type="string" key="mainFileName">report.txt</value>
</value>
</data>
The file defines wwo objects: the TemplateInfo object and the TemplateStyleInfo object. These
objects contain information about the template that will be displayed in the DBDoc Model Reporting
wizard main page.
4. Change the object GUIDs that are used in the file. In this example, there are two that need replacing:
id="{BD6879ED-814C-4CA3-A869-9864F83B88DF}"
...
id="{7550655C-CD4B-4EB1-8FAB-AAEE49B2261E}"
Generate two new GUIDS. This can be done using any suitable command-line tool. There are also
free online tools that can be used to generate GUIDs. Another way to generate GUIDs is by using the
MySQL UUID() function:
mysql> SELECT UUID();
+--------------------------------------+
| UUID()
|
+--------------------------------------+
| 648f4240-7d7a-11e0-870b-89c43de3bd0a |
+--------------------------------------+
300
Creating a Custom Template
Once you have the new GUID values, edit the info.xml file accordingly.
5. Edit the textual information for the TemplateInfo and TemplateStyleInfo objects to reflect the
purpose of the custom template.
6. The modified file will now look something like the following:
<?xml version="1.0"?>
<data>
<value type="object" struct-name="workbench.model.reporting.TemplateInfo"
id="{cac9ba3f-ee2a-49f0-b5f6-32580fab1640}" struct-checksum="0xb46b524d">
<value type="string"
key="description">
Custom basic TEXT report listing schemata and objects.
</value>
<value type="string" key="name">Custom Basic text report</value>
<value type="list" content-type="object"
content-struct-name="workbench.model.reporting.TemplateStyleInfo" key="styles">
<value type="object"
struct-name="workbench.model.reporting.TemplateStyleInfo"
id="{39e3b767-a832-4016-8753-b4cb93aa2dd6}" struct-checksum="0xab08451b">
<value type="string" key="description">
Designed to be viewed with a fixed sized font.
</value>
<value type="string" key="name">Fixed Size Font</value>
<value type="string" key="previewImageFileName">preview_basic.png</value>
<value type="string" key="styleTagValue">fixed</value>
</value>
</value>
<value type="string" key="mainFileName">custom_report.txt</value>
</value>
</data>
7. Create the new template file. This too may best be achieved, depending on your requirements, by
editing an existing template. In this example the template file report.txt.tpl is shown here:
+--------------------------------------------+
| MySQL Workbench Report
|
+--------------------------------------------+
Total number of Schemata: {{SCHEMA_COUNT}}
=============================================
{{#SCHEMATA}}
{{SCHEMA_NR}}. Schema: {{SCHEMA_NAME}}
---------------------------------------------## Tables ({{TABLE_COUNT}}) ##
{{#TABLES}}{{TABLE_NR_FMT}}. Table: {{TABLE_NAME}}
{{#COLUMNS_LISTING}}## Columns ##
Key Column Name Datatype Not Null Default Comment
{{#COLUMNS}}{{COLUMN_KEY}}{{COLUMN_NAME}}{{COLUMN_DATATYPE}} »
{{COLUMN_NOTNULL}}{{COLUMN_DEFAULTVALUE}}{{COLUMN_COMMENT}}
{{/COLUMNS}}{{/COLUMNS_LISTING}}
{{#INDICES_LISTING}}## Indices ##
Index Name Columns Primary Unique Type Kind Comment
{{#INDICES}}{{INDEX_NAME}}{{#INDICES_COLUMNS}}{{INDEX_COLUMN_NAME}} »
{{INDEX_COLUMN_ORDER}}{{INDEX_COLUMN_COMMENT}}{{/INDICES_COLUMNS}} »
{{INDEX_PRIMARY}}{{INDEX_UNIQUE}}{{INDEX_TYPE}}{{INDEX_KIND}}{{INDEX_COMMENT}}
{{/INDICES}}{{/INDICES_LISTING}}
{{#REL_LISTING}}## Relationships ##
Relationship Name Relationship Type Parent Table Child Table Cardinality
{{#REL}}{{REL_NAME}}{{REL_TYPE}}{{REL_PARENTTABLE}}{{REL_CHILDTABLE}}{{REL_CARD}}
{{/REL}}{{/REL_LISTING}}
---------------------------------------------
301
Creating a Custom Template
{{/TABLES}}
{{/SCHEMATA}}
=============================================
End of MySQL Workbench Report
This template shows details for all schemata in the model.
8. The preceding template file can be edited in any way you like, with new markers being added, and
existing markers being removed as required. For the custom template example, you might want to
create a much simpler template, such as the one following:
+--------------------------------------------+
| MySQL Workbench Custom Report
|
+--------------------------------------------+
Total number of Schemata: {{SCHEMA_COUNT}}
=============================================
{{#SCHEMATA}}
Schema Name: {{SCHEMA_NAME}}
---------------------------------------------## Tables ({{TABLE_COUNT}}) ##
{{#TABLES}}
Table Name: {{TABLE_NAME}}
{{/TABLES}}
{{/SCHEMATA}}
Report Generated On: {{GENERATED}}
=============================================
End of MySQL Workbench Custom Report
This simplified report just lists the schemata and the tables in a model. The date and time the report
was generated is also displayed as a result of the use of the {{GENERATED}} variable.
9. The custom template can then be tested. Start MySQL Workbench, load the model to generate the
report for, select the Model, DBDOC - Model Reporting menu item. Then select the new custom
template from the list of available templates, select an output directory, and click Finish to generate the
report. Finally, navigate to the output directory to view the finished report.
302
Chapter 9 Database Migration Wizard
Table of Contents
9.1 General installation requirements ..............................................................................................
9.1.1 ODBC Libraries .............................................................................................................
9.1.2 ODBC Drivers ...............................................................................................................
9.2 Migration Overview ...................................................................................................................
9.2.1 A visual guide to performing a database migration ...........................................................
9.2.2 Migrating from supported databases ...............................................................................
9.2.3 Migrating from unsupported (generic) databases .............................................................
9.3 Conceptual DBMS equivalents ..................................................................................................
9.4 Microsoft Access Migration .......................................................................................................
9.5 Microsoft SQL Server migration ................................................................................................
9.5.1 Preparations ..................................................................................................................
9.5.2 Drivers ..........................................................................................................................
9.5.3 Connection Setup ..........................................................................................................
9.5.4 Microsoft SQL Server Type Mapping ..............................................................................
9.6 PostgreSQL migration ..............................................................................................................
9.6.1 Preparations ..................................................................................................................
9.6.2 Drivers ..........................................................................................................................
9.6.3 Connection Setup ..........................................................................................................
9.6.4 PostgreSQL Type Mapping ............................................................................................
9.7 MySQL migration .....................................................................................................................
9.8 Using the MySQL Workbench Migration Wizard .........................................................................
9.8.1 Connecting to the databases ..........................................................................................
9.8.2 Schemata Retrieval and Selection ..................................................................................
9.8.3 Reverse Engineering .....................................................................................................
9.8.4 Object Selection ............................................................................................................
9.8.5 Migration .......................................................................................................................
9.8.6 Manual Editing ..............................................................................................................
9.8.7 Target Creation Options .................................................................................................
9.8.8 Schema Creation ...........................................................................................................
9.8.9 Create Target Results ....................................................................................................
9.8.10 Data Migration Setup ...................................................................................................
9.8.11 Bulk Data Transfer ......................................................................................................
9.8.12 Migration Report ..........................................................................................................
9.9 MySQL Workbench Migration Wizard FAQ ................................................................................
MySQL Workbench provides the ability to migrate ODBC compliant databases to MySQL.
• Convert (migrate) different database types, including MySQL, across servers
• Convert tables and copy data, but will not convert stored procedures, views, or triggers
• Allows customization and editing during the migration process
• Works on Linux, OS X, and Microsoft Windows
This is not an exhaustive list. The following sections discuss these and additional migration capabilities.
Set up may be the most challenging aspect of using the MySQL Workbench Migration Wizard. There is
the installation section, which describes setting up ODBC requirements for Linux, OS X, and Microsoft
303
304
304
305
306
306
325
326
326
328
347
347
347
349
349
350
350
353
353
353
355
359
359
360
360
360
360
360
361
361
361
361
361
361
361
General installation requirements
Windows, and the Database Product Specific Notes section that references setup conditions for each
RDBMS.
9.1 General installation requirements
The MySQL Workbench Migration Wizard uses ODBC to connect to a source database, except for MySQL.
You will need the ODBC driver installed that corresponds to the database you want to migrate from. For
example, PostgreSQL can be migrated with the psqlodbc ODBC driver; Microsoft SQL Server can be
migrated using the native Microsoft SQL Server driver on Windows or with FreeTDS on Linux and OS X.
The following diagram shows the general components involved in an ODBC connection:
Figure 9.1 MySQL Workbench migration installation diagram
When specifying the source RDBMS, you can either use a data source configured externally, or provide
the individual connection parameters to MySQL Workbench. If you already have an ODBC Data Source
configured in your system, then you can use that in MySQL Workbench.
Note
The migration process does not support source or target RDBMS connections
through SSH.
A workaround is to set up an encrypted tunnel, and then treat the MySQL target as
a standard TCP (unencrypted) connection.
9.1.1 ODBC Libraries
Note
This section may be skipped when using a MySQL Workbench binary that is
provided by Oracle.
An ODBC Driver Manager library must be present. Both Windows and OS X provides one.
304
ODBC Drivers
Linux
iODBC: MySQL Workbench binaries provided by Oracle already include iODBC and no additional action
is required. If you compile it yourself, you must install iODBC or unixODBC. iODBC is recommended. You
can use the iODBC library provided by your distribution.
pyodbc: is the Python module used by MySQL Workbench to interface with ODBC, and may be used to
migrate ODBC compliant databases such as PostgreSQL and DB2. In Windows and OS X, it is included
with Workbench. In Linux, binaries provided by Oracle also include pyodbc.
If you're using a self-compiled binary, make sure you have the latest version, and that it is compiled against
the ODBC manager library that you chose, whether it is iODBC or unixODBC. As of version 3.0.6, pyodbc
will compile against unixODBC by default. If you are compiling against iODBC then you must perform the
following steps:
1. Install the development files for iODBC. Usually you just need to install the libiodbc-devel or
libiodbc2-dev package provided by your distribution.
2. In the pyodbc source directory, edit the setup.py file and around line 157,
replace the following line: settings['libraries'].append('odbc') with
settings['libraries'].append('iodbc')
3. Execute the following command as the root user: CFLAGS=`iodbc-config --cflags`
LDFLAGS=`iodbc-config --libs` python setup.py install
9.1.2 ODBC Drivers
For each RDBMS, you need its corresponding ODBC driver, which must also be installed on the
same machine that MySQL Workbench is running on. This driver is usually provided by the RDBMS
manufacturer, but in some cases they can also be provided by third party vendors or open source projects.
Operating systems usually provide a graphical interface to help set up ODBC drivers and data sources.
Use that to install the driver (i.e., make the ODBC Manager "see" a newly installed ODBC driver). You can
also use it to create a data source for a specific database instance, to be connected using a previously
configured driver. Typically you need to provide a name for the data source (the DSN), in addition to the
database server IP, port, username, and sometimes the database the user has access to.
If MySQL Workbench is able to locate an ODBC manager GUI for your system, a Tools, Start ODBC Administrator menu item be present under the Tools menu as a convenience shortcut to start it.
• Linux: There are a few GUI utilities, some of which are included with unixODBC. Refer to the
documentation for your distribution. iODBC provides iodbcadm-gtk. Official binaries of MySQL
Workbench include it and it can be accessed through the Tools, Start ODBC Administrator menu item.
• OS X: You can use the ODBC Administrator tool, which is provided as a separate download from Apple.
If the tool is installed in the /Applications/Utilities folder, you can start it through the Tools,
Start ODBC Administrator menu item.
• Microsoft Windows: You can use the Data Sources (ODBC) tool under Administrative Tools. And it
can be started through the Tools, Start ODBC Administrator menu item.
ODBC Driver architecture
Since the ODBC driver needs to be installed in the client side, you will need an
ODBC driver that supports your clients operating system and architecture. For
example, if you are running MySQL Workbench from Linux x64, then you need a
Linux x64 ODBC driver for your RDBMS. In OS X, MySQL Workbench is built as a
32-bit application, so you need the 32-bit drivers.
305
Migration Overview
9.2 Migration Overview
The Migration Wizard performs the following steps when migrating a database to MySQL:
1. Connects to the source RDBMS and retrieves a list of available databases/schemas.
2. Reverse engineers selected database/schemas into a internal representation specific to the source
RDBMS. This step will also perform the renaming of objects/schemas depending on the type of object
name mapping method that is chosen.
3. Automatically migrates the source RDBMS objects into MySQL specific objects.
a. Target schema objects are created.
b. Target table objects are created.
i.
Columns for each table are copied.
A. Data types are mapped to MySQL data types.
B. Default values are mapped to a MySQL supported default value, if possible.
ii. Indexes are converted.
iii. Primary Keys are converted.
iv. Triggers are copied, and commented out if the source is not MySQL.
c. Foreign Keys for all tables (of all schemas) are converted.
d. View objects are copied, and commented out if the source is not MySQL.
e. Stored Procedure and Function objects are copied, and commented out if the source is not MySQL.
4. Provides an opportunity to review the changes, for editing and correcting errors in the migrated objects.
5. Creates the migrated objects in the target MySQL server. If there are errors, you can return to the
previous step and correct them, and retry the target creation.
6. Copy data of the migrated tables from the source RDBMS to MySQL.
MySQL Workbench provides support for migrating from some specific RDBMS products. The Migration
Wizard will provide the best results when migrating from such products. However, in some cases, other
unsupported database products can also be migrated by using its Generic database support, as long as
you have an ODBC driver for it. In this case, the migration will be less automatic, but should still work
nonetheless.
9.2.1 A visual guide to performing a database migration
This example will migrate a Microsoft SQL Server database to MySQL, and include a screenshot for each
step.
From MySQL Workbench, choose Database, Migrate to open the migration wizard.
306
A visual guide to performing a database migration
Figure 9.2 MySQL Workbench migration: Start
Read the migration wizard overview:
307
A visual guide to performing a database migration
Overview
Figure 9.3 MySQL Workbench migration: Overview
It describes the prerequisites and requirements that should be understood before proceeding further. The
Open ODBC Administrator option will load odbcad32.exe, and is used to confirm that the ODBC Driver
for SQL Server is installed, and to make configuration changes if needed.
Click Start Migration to continue.
Source Selection
Select the source RDBMS that is migrating to MySQL. Choose the Database System that is being
migrated, and the other connection parameters will change accordingly.
308
A visual guide to performing a database migration
Figure 9.4 MySQL Workbench migration: Source Selection (Parameters)
Target Selection
The target is the MySQL database that will contain the newly migrated database. The current Workbench
MySQL connections will be available here, or you can choose Manage DB Connections to create a new
connection.
309
A visual guide to performing a database migration
Figure 9.5 MySQL Workbench migration: Target selection
Fetch Schemata List
The Schemata list is retrieved from both the source and target RDBMS. This is an automated and
informational step that reports connection related errors and/or general log information. Press Next to
continue.
310
A visual guide to performing a database migration
Figure 9.6 MySQL Workbench migration: Fetch Schemata List
Schemata Selection
Choose the schemata you want to migrate.
"Schema Name Mapping Method" options while migrating Microsoft SQL Server:
• Keep schemata as they are: Catalog.Schema.Table -> Schema.Table: This will create multiple
databases, one per schema.
• Only one schema: Catalog.Schema.Table -> Catalog.Table: Merges each schema into a single
database.
• Only one schema, keep current schema names as a prefix: Catalog.Schema.Table ->
Catalog.Schema_table: Preserves the schema name as a prefix.
311
A visual guide to performing a database migration
Figure 9.7 MySQL Workbench migration: Schemata Selection
Reverse Engineer Source
The source metadata is fetched from the source RDBMS, and reverse engineered. This is an automated
and informational step that reports related errors and/or general log information. View the logs and then
press Next to continue.
312
A visual guide to performing a database migration
Figure 9.8 MySQL Workbench migration: Reverse Engineer Source
Source Objects
The discovered objects from the Reverse Engineer Source stage are revealed and made available. This
includes Table, View, and Routine objects, with only the Table objects being selected by default.
313
A visual guide to performing a database migration
Figure 9.9 MySQL Workbench migration: Source Objects
Migration
The migration process now converts the selected objects into MySQL compatible objects. View the logs
and then proceed.
314
A visual guide to performing a database migration
Figure 9.10 MySQL Workbench migration: Migration
Manual Editing
There are three sections to edit here, which are selected via the View select box on the top right. The
Show Code and Messages button is available with every view, and it will show the generated MySQL code
that corresponds to the selected object.
• Migration Problems: This will either report problems or display "No mapping problems found." It is an
informational screen.
• All Objects: An object view that allows you to view and edit the object definitions. Double-click on a row
to modify a target objects name.
• Column Mappings: Shows all of the table column mappings, and allows you to individually review and fix
the mapping for all column types, default values, and other attributes.
315
A visual guide to performing a database migration
Figure 9.11 MySQL Workbench migration: Manual Editing (Migration Problems)
316
A visual guide to performing a database migration
Figure 9.12 MySQL Workbench migration: Manual Editing (All Objects)
317
A visual guide to performing a database migration
Figure 9.13 MySQL Workbench migration: Manual Editing (Column Mappings)
Target Creation Options
The schema may be created by either adding it to the target RDBMS, creating an SQL script file, or both.
318
A visual guide to performing a database migration
Figure 9.14 MySQL Workbench migration: Target Creation Options
Create Schemata
Now the schemata is created. The complete log is also available here.
319
A visual guide to performing a database migration
Figure 9.15 MySQL Workbench migration: Create Schemata
Create Target Results
The generated objects are listed here, along with the error messages if any exist.
The migration code may also be viewed and edited here. To make changes, select an object, edit the
query code, and press Apply. Repeat this process for each object that will be edited. And then, press
Recreate Objects to save the results.
Note
The Recreate Objects operation is required to save any changes here. It will then
execute the previous migration step (Create Schemata) with the modified code,
and then continue the migration process. This also means that the previously saved
schema will be dropped.
320
A visual guide to performing a database migration
Figure 9.16 MySQL Workbench migration: Create Target Results
Data Transfer Setup
The next steps involve transferring data from the source RDBMS to the target MySQL database. The setup
screen includes the following options:
Data Copy:
• Online copy of table data to target RDBMS: This (default) will copy the data to the target RDBMS.
• Create a batch file to copy the data at another time: The data may also be dumped to a file that can be
executed at a later time, or be used as a backup.
Options:
• Truncate target tables before copying data: In case the target database already exists, this will delete
said data.
• Worker tasks: The default value is 2. This is the number of tasks (database connections) used while
copying the data.
• Enable debug output for table copy: Shows debugging information.
321
A visual guide to performing a database migration
Figure 9.17 MySQL Workbench migration: Data Transfer Setup
Bulk Data Transfer
And now the data is transferred to the target RDBMS. Optionally, view the logs to confirm.
322
A visual guide to performing a database migration
Figure 9.18 MySQL Workbench migration: Bulk Data Transfer
Migration Report
And finally, the migration report is available and summarizes the entire migration process.
323
A visual guide to performing a database migration
Figure 9.19 MySQL Workbench migration: Migration Report
Pressing Finish will close the migration window. The database may now be viewed within the MySQL
Workbench SQL editor.
324
Migrating from supported databases
Figure 9.20 MySQL Workbench migration: Viewing the migrated database
Note
If a MySQL Workbench SQL Editor tab is already opened, then the schema list
within the Object Browser must be refreshed in order to view the newly imported
schema.
9.2.2 Migrating from supported databases
When a supported RDBMS product is being migrated, the MySQL Workbench Migration Wizard will
automatically convert as much information as it can, but you may still be required to manually edit the
automatically migrated schema for difficult cases, or when the default mapping is not as desired.
Generally speaking, only table information and its data are automatically converted to MySQL. Code
objects such as views, stored procedures, and triggers, are not. But supported RDBMS products will be
retrieved and displayed in the wizard. You can then manually convert them, or save them for converting at
a later time.
The following RDBMS products and versions are currently tested and supported by the MySQL Workbench
Migration Wizard, although other RDBMS products can also be migrated with Section 9.2.3, “Migrating
from unsupported (generic) databases”
• Microsoft SQL Server 2000, 2005, 2008, 2012
325
Migrating from unsupported (generic) databases
• Microsoft Access 2007 and greater
• MySQL Server 4.1 and greater as the source, and MySQL Server 5.1 and greater as the target
• PostgreSQL 8.0 and greater
• SQL Anywhere
• SQLite
• Sybase Adaptive Server Enterprise 15.x and greater
9.2.3 Migrating from unsupported (generic) databases
Most ODBC compliant databases may be migrated using the generic database support. In this case, code
objects will not be retrieved from the source database; only tables and data.
When using the generic support, column data types are mapped using the following steps:
1. It searches for the first entry in the Generic Datatype Mapping Table for the source type name. If
the length/scale ranges of the entry matches the source column, it will pick that type. Otherwise, it
continues searching.
2. If no matches were found in the generic table, then it tries to directly map the source type to a MySQL
type of the same name.
3. If the source type name doesn't match any of the MySQL data types, then it is not converted and an
error is logged. From here you can specify the target datatype in the Manual Object Editing step of the
wizard.
9.3 Conceptual DBMS equivalents
Table 9.1 Conceptual equivalents between supported DBMS products and MySQL
Concept
MS SQL Sybase
Server
ASE
PostgreSQL
MySQL
Authentication
Yes
Yes
Yes
Yes
Auto_Increment
Yes
Yes
Yes
Yes
PostgreSQL uses sequences for
Auto_Increment.
Backup
Yes
Yes
Yes
Yes
See MySQL Enterprise Backup
Catalog
Yes
Yes
Yes
N/A
You can map a catalog into a
schema and drop the , use the
owner as the schema name or
merge the owner and object name
together. ownerobject
Constraints
Yes
Yes
Yes
Yes
Data Dictionary
Database
Note
N/A
Yes
Yes
Yes
Yes
Dump
Yes
Yes
Yes
Yes
Events
Yes
Yes
Yes
Yes
Foreign Keys
Yes
Yes
Yes
Yes
Database Instance
326
mysqldump
Conceptual DBMS equivalents
Concept
MS SQL Sybase
Server
ASE
PostgreSQL
MySQL
Note
Full Text Search
Yes
Yes
Yes
Yes
In InnoDB as of MySQL Server 5.6,
and in all versions of MyISAM
Index
Yes
Yes
Yes
Yes
Information Schema
Yes
No
Yes
Yes
Object Names Case
Sensitivity
Depends Depends Mixed
on
on
collation collation
Mixed
Object Naming
Conventions
Yes
Yes
Yes
Yes
Packages
N/A
N/A
N/A
N/A
Partitioning
Yes
Yes
Yes
Yes
Performance Schema
N/A
N/A
Yes
Yes
Permissions
Yes
Yes
Yes
Yes
Primary Key
Yes
Yes
Yes
Yes
Referential Integrity
Yes
Yes
Yes
Yes
Replication
Yes
Yes
Yes
Yes
Role
Yes
Yes
Yes
N/A
Roles are not available in MySQL at
the database level.
Schema
Yes
Yes*
Yes
Yes
Equivalent to database in
MySQL. Sybase ASE: Schemata
corresponds to user names.
Sequences
Yes*
Yes*
Yes
Yes*
Standalone sequence objects are
not supported in MySQL. Similar
functionality can be obtained with
IDENTITY columns in MSSQL and
AUTO_INCREMENT columns in
MySQL
SQL Modes
Yes
Yes
Yes
SET_ANSI_* in MSSQL
Storage Engines
N/A
N/A
Yes*
Yes
PostgreSQL itself supports and
uses only one storage engine
(Postgresql). Other companies have
added extra storage engines to
PostgreSQL.
Stored Procedures
Yes
Yes
Yes
Yes
Synonyms
N/A
N/A
N/A
N/A
327
MySQL: sensitivity of database,
table, and trigger names OS
dependent; other object names are
case insensitive. PostgreSQL: as
specified in the SQL-99 standard,
unquoted object names are treated
as case insensitive while quoted
object names are case sensitive.
Unlike the standard, unquoted
object names are converted to
lowercase instead of uppercase.
Sybase ASE: referential integrity
only through triggers.
Microsoft Access Migration
Concept
MS SQL Sybase
Server
ASE
PostgreSQL
MySQL
Table
Yes
Yes
Yes
Yes
Tablespace
Yes
Yes*
Yes
N/A
Temporary Tables
Yes
Yes
Yes
Yes
Transactions
Yes
Yes
Yes
Yes
Triggers
Yes
Yes
Yes
Yes
UDFs
Yes
Yes
Yes
Yes
Unicode
Yes
Yes
Yes
Yes
Unique Key
Yes
Yes
Yes
Yes
User
Yes
Yes
Yes
Yes
Views
Yes
Yes
Yes
Yes
Note
MSSQL groups tables in schemata
(unless referring to CREATE
TABLESPACE). Sybase ASE:
tables are grouped in schemata
which are more like user names.
Handling Microsoft SQL Server and MySQL structural differences
A Microsoft SQL Server database is made up of one catalog and one or more
schemata. MySQL only supports one schema for each database (or rather, a
MySQL database is a schema) so this difference in design must be planned for.
The Migration Wizard must know how to handle the migration of schemata for the
source (Microsoft SQL Server) database. It can either keep all of the schemata as
they are (the Migration Wizard will create one database per schema), or merge
them into a single MySQL database. Additional configure options include: either
remove the schema names (the Migration Wizard will handle the possible name
collisions that may appear along the way), and an option to add the schema name
to the database object names as a prefix.
9.4 Microsoft Access Migration
Note
This feature was added in MySQL Workbench 6.2.0.
General Information
Microsoft Windows is required because Microsoft Access ODBC drivers are only available on Windows. As
for the destination MySQL server, you can have it in the same local machine or elsewhere in your network.
Preparing a Microsoft Access Database for Migration
Microsoft Access stores relationship/foreign key information in an internal table called
MSysRelationships. That table is protected against read access even to the Admin user, so if you try to
migrate without opening up access to it, then you will get an error like this:
[42000] [Microsoft][ODBC Microsoft Access Driver] Record(s) cannot be read; no read permission on 'msysobjects
328
Preparing a Microsoft Access Database for Migration
The steps to grant read access to the Admin are explained below.
Note
The screenshots in this documentation use Microsoft Access 2007.
• Open up database in Microsoft Access
• Under the Database Tools menu, click the Visual Basic macro button to open the Visual Basic (VB)
console.
Figure 9.21 Locating the Visual Basic Macro Database Tool
• To confirm that you're logged in as the "Admin" user, locate the Immediate panel and type the "?
CurrentUser" and press Enter. This should output "Admin" under "? CurrentUser" in the panel.
• Also in the Immediate panel, type the following command to grant access:
CurrentProject.Connection.Execute "GRANT SELECT ON MSysRelationships TO Admin"
329
Start the MySQL Workbench Migration Wizard
Figure 9.22 GRANT SELECT ON MSysRelationships TO Admin
• Quit the Microsoft Access application
Start the MySQL Workbench Migration Wizard
From the main MySQL Workbench screen you can start the Migration Wizard by clicking on the Database
Migration launcher in the Workbench Central panel or through Database, Migrate from the main menu.
330
Start the MySQL Workbench Migration Wizard
Figure 9.23 Start the Migration Wizard
A new tab showing the Overview page of the Migration Wizard should appear.
331
Setting Up ODBC Drivers
Figure 9.24 Migration Overview Page
Setting Up ODBC Drivers
To check if you have the ODBC driver installed, click Open ODBC Administrator from the MySQL
Workbench migration overview page to open the system ODBC tool. Then, select the Drivers tab.
332
Setting Up ODBC Drivers
Figure 9.25 Checking the ODBC Drivers for Access Support
Important: MySQL Workbench has both 32-bit and 64-bit executables. The ODBC drivers you use must
be of the same architecture as the MySQL Workbench binaries you are using. Because Office 2007 and
older was 32-bit only and even Office 2010 installs as 32-bit by default, you may need to install the 32bit version of MySQL Workbench to migrate from Access, even if you have a 64-bit machine. If during
migration you get an ODBC error about "architecture mismatch between the Driver and Application", you
installed the wrong version of MySQL Workbench.
In the User DSN tab, click on Add... to create a DSN for your database file. For this example, we created
one for the northwind sample database.
Figure 9.26 Adding a New DSN
333
Setting Up Source Parameters
Setting Up Source Parameters
Click on the Start Migration from the Overview page to advance to the Source Selection page. Here you
need to provide the information about the Access database you are migrating from, the ODBC driver to
use, and the parameters for the Access connection.
Open the Database System combo box for a list of supported RDBMSes, and select Microsoft Access
from the list. There is another combo box below it named Stored Connection. It lists saved connection
settings for that RDBMS. You can save connections by marking the checkbox at the bottom of the page,
along with a name for the saved connection.
The next combo box selects the Connection Method. This time we are going to select ODBC Data Source
from the list. This allows you to select pre-existing DSNs that you have configured in your system.
The DSN dropdown will have all DSNs you have defined in your system. Pick the one you created for the
Access database being migrated from the list.
In the Default Character Set field you can select the character set of your database. If your Access
version uses western/latin characters, you can leave the default cp1252. However, if you use a localized
version of Access, such as Japanese, you must enter the correct character set used by your edition of
Microsoft Office, otherwise the data will be copied incorrectly.
Figure 9.27 Access Source Selection
Lastly, click Test Connection to check whether an ODBC connection can be established. If you entered the
correct parameters then you should see a message reporting a successful connection attempt.
334
Setting Up Target Parameters
Setting Up Target Parameters
Next, set up the target (MySQL) database parameters. Once there set the parameters to connect to your
MySQL Server instance. When you are done click on the Test Connection button and verify that you can
successfully connect to it.
Figure 9.28 Target Database Selection
Select the objects to migrate
Next, you should see the reverse engineering of the selected database objects progress. At this point,
the migration wizard is retrieving relevant information about the involved database objects (such as table
names, table columns, primary and foreign keys, indices, triggers, views, and more). You will be presented
a page showing the progress as shown below.
335
Select the objects to migrate
Figure 9.29 Reverse Engineer Source
Wait for it to finish and verify that everything went well. Next, the Source Objects displays a list with the
objects that were retrieved and are available for migration. It will look similar to:
336
Select the objects to migrate
Figure 9.30 Source Objects
In the above example, the migration wizard discovered table and view objects for our source database.
Only the table objects are selected by default for migration.
Note
You can also select the view objects but you must also provide their corresponding
MySQL equivalent code later (no automatic migration is available for them) so our
example will leave the views unchecked. The same applies for stored procedures,
functions and triggers.
Click Show Selection to configure exactly which objects you want to migrate, as seen below:
337
Review the proposed migration
Figure 9.31 Source Objects Selection
The objects on the right will be migrated. The filter box can filter the list (wildcards are allowed, as
demonstrated above). By using the arrow buttons you can filter out the objects that you do not want to
migrate. Before continuing, clear the filter text box to check the full list of the selected objects. Our example
migrates all of the table objects so all of them are in the Objects to Migrate list, and the Migrate Table
Objects checkbox is checked.
Review the proposed migration
At this point, the migration wizard converts the selected objects into their equivalent objects into the target
MySQL server, and it also generates the MySQL code needed to create them. You might have to wait
before the Manual Editing page is ready, but here is the initial page:
338
Review the proposed migration
Figure 9.32 Manual Editing: Initial Page
The View combo box changes the way the migrated database objects are shown. Also notice the
Show Code and Messages buttons. Click Show Code to view and edit the generated MySQL code that
corresponds to the selected object. Additionally, you can double-click in a row in the object tree to edit the
object name, or double-click the database row to change its name.
339
Review the proposed migration
Figure 9.33 Manual Editing: All Objects
The View combo box also has a Column Mappings option. It shows the table columns and allows you to
review and fix the mapping of column types, default values, and other attributes.
340
Create the database objects
Figure 9.34 Manual Editing: Column Mappings
Create the database objects
Next is the Target Creation Options page:
341
Create the database objects
Figure 9.35 Target Creation Options
Here are options for executing the generated code in the target RDBMS (your MySQL instance from the
second step), or you can dump it to an SQL script file. Leave it as shown above and move to the next
page. The migrated SQL code will be executed on the target MySQL server. You can view its progress in
the Create Schemata page:
342
Create the database objects
Figure 9.36 Create Schemata
Once the creation of the schemata and objects finishes, you can move to the Create Target Results page.
It presents a list of created objects and includes any generated errors while they were created. It will look
similar to:
343
Transfer the data to the MySQL database
Figure 9.37 Create Target Results
You can still edit the migration code using the code box to the right, and save your changes by clicking
Apply. If edits were made, you still need to recreate the objects with the modified code in order to perform
the changes. This is done by clicking Recreate Objects. In this tutorial we are not changing anything, so
leave the code as it is, and continue on to the Data Transfer Setup page.
Transfer the data to the MySQL database
The next step transfers data from the source Access database into your newly created target MySQL
database. The Data Transfer Setup page allows you to configure this process.
344
Transfer the data to the MySQL database
Figure 9.38 Data Transfer Setup
There are two sets of options here. The first allows you to perform a live transference and/or to dump the
data into a batch file that you can execute later. The other set of options allows you to alter this process.
This tutorial uses the default values for the options in this page as shown in the above screenshot. Next,
the data is transferred. At this point the corresponding progress page will look familiar:
345
Verification
Figure 9.39 Bulk Data Transfer
Once it finishes, move to the next page. You will be presented a report page summarizing the whole
process. Now, review and click Finish to close the wizard.
Verification
Now that the Northwind database was successfully migrated, next we will view the results. Open an SQL
Editor that is associated with your MySQL Server instance, and then query the Northwind database. You
can try something like "SELECT * FROM Northwind.customers":
346
Microsoft SQL Server migration
Figure 9.40 Verify Your Results
9.5 Microsoft SQL Server migration
Introduction.
The MySQL Workbench Migration Wizard is tested against the following Microsoft SQL Server versions:
2000, 2005, 2008, and 2012.
9.5.1 Preparations
To be able to migrate from Microsoft SQL Server, ensure the following:
• The source SQL Server instance is running, and accepts TCP connections
• You know the IP and port of the source SQL server instance. If you will be migrating using a Microsoft
ODBC driver for SQL Server (the default in Windows), you will need to know the host and the name of
the SQL Server instance.
• Make sure that the SQL Server is reachable from where you will be running MySQL Workbench. More
specifically, check the firewall settings.
• Make sure that the account you will use has proper privileges to the database that will be migrated.
9.5.2 Drivers
General thoughts on the topic.
347
Drivers
9.5.2.1 Windows
Microsoft Windows XP or newer includes an ODBC driver for Microsoft SQL Server, so there are no
additional actions required.
9.5.2.2 Linux
Setting up drivers on Linux.
FreeTDS
FreeTDS version 0.92 or greater is required. Note that many distributions ship older versions of FreeTDS,
so it may need to be installed separately. Additionally, the FreeTDS version provided by distributions
may also be compiled for the wrong ODBC library (usually to unixODBC instead of iODBC, which MySQL
Workbench uses). Because of that you will probably need to build this library yourself.
Important: using FreeTDS with iODBC
When compiling FreeTDS for use with iODBC (the default with the official binaries),
you must compile it with the --enable-odbc-wide command line option for the
configure script. Failing to do so will result in crashes and other unpredictable
errors.
A script is provided to compile FreeTDS using the options required for MySQL Workbench. You
can find it in at /usr/share/mysql-workbench/extras/build_freetds.sh on Linux or
MySQLWorkbench.app/Contents/SharedSupport/build_freetds.sh on OS X. To use it, follow
these steps:
1. Make sure you have the iODBC headers installed. In Linux, install the libiodbc-devel or
libiodbc2-dev package from your distribution. In OS X, the headers come with the system and no
additional action is required for this step.
2. mkdir ~/freetds to create a directory - within the users home directory.
3. Copy the build_freetds.sh script to ~/freetds
4. Get the latest FreeTDS sources from ftp://ftp.freetds.org/pub/freetds/ and place it in the ~/freetds
directory. Make sure to get version 0.92 or newer.
5. cd ~/freetds
6. Execute build_freetds.sh
7. After compilation is done, install it using make install from the path given by the script.
8. Install the driver in the ODBC Administrator, to make the ODBC subsystem to recognize it. The name of
the driver file is libtdsodbc.so and is located in /usr/lib or /usr/local/lib
Once the driver is installed, you should be able to create data sources for it from the ODBC Administrator
GUI.
Protocol version selection in FreeTDS
When using FreeTDS, TDS_VERSION=7.0 is needed in the connection string. If
you pick a FreeTDS specific connection method option in the connection dialog,
that option is added to the connection string automatically.
348
Connection Setup
9.5.2.3 OS X
See the FreeTDS setup notes for Linux.
9.5.3 Connection Setup
Using an ODBC DataSource
Using Connection Parameters
9.5.4 Microsoft SQL Server Type Mapping
Table 9.2 Type mapping
Source Type
MySQL Type
Comment
INT
INT
TINYINT
TINYINT
SMALLINT
SMALLINT
BIGINT
BIGINT
BIT
TINYINT(1)
FLOAT
FLOAT
REAL
FLOAT
NUMERIC
DECIMAL
DECIMAL
DECIMAL
MONEY
DECIMAL
SMALLMONEY
DECIMAL
CHAR
CHAR/LONGTEXT
Depending on its length. MySQL Server 5.5 and
above can have CHAR columns with a length up
to 255 characters. Anything larger is migrated as
LONGTEXT
NCHAR
CHAR/LONGTEXT
Depending on its length. MySQL Server 5.5 and
above can have VARCHAR columns with a length
up to 65535 characters. Anything larger is migrated
to one of the TEXT blob types. In MySQL, character
set of strings depend on the column character set
instead of the datatype.
VARCHAR
VARCHAR/
MEDIUMTEXT/
LONGTEXT
Depending on its length. MySQL Server 5.5 and
above can have VARCHAR columns with a length
up to 65535 characters. Anything larger is migrated
to one of the TEXT blob types.
NVARCHAR
VARCHAR/
MEDIUMTEXT/
LONGTEXT
Depending on its length. MySQL Server 5.5 and
above can have VARCHAR columns with a length
up to 65535 characters. Anything larger is migrated
to one of the TEXT blob types. In MySQL, character
set of strings depend on the column character set
instead of the datatype.
DATE
DATE
DATETIME
DATETIME
UNSIGNED flag set in MySQL
Precision value is used for storage size in both
349
PostgreSQL migration
Source Type
MySQL Type
Comment
DATETIME2
DATETIME
Date range in MySQL is '1000-01-01 00:00:00'
to '9999-12-31 23:59:59'. Note: fractional second
values are only stored as of MySQL Server 5.6.4
SMALLDATETIME
DATETIME
DATETIMEOFFSET
DATETIME
TIME
TIME
TIMESTAMP
TIMESTAMP
ROWVERSION
TIMESTAMP
BINARY
BINARY/MEDIUMBLOB/ Depending on its length
LONGBLOB
VARBINARY
VARBINARY/
MEDIUMBLOB/
LONGBLOB
Depending on its length
TEXT
VARCHAR/
MEDIUMTEXT/
LONGTEXT
Depending on its length
NTEXT
VARCHAR/
MEDIUMTEXT/
LONGTEXT
Depending on its length
IMAGE
TINYBLOB/
MEDIUMBLOB/
LONGBLOB
Depending on its length
SQL_VARIANT
not migrated
There is not specific support for this datatype.
TABLE
not migrated
There is not specific support for this datatype.
HIERARCHYID
not migrated
There is not specific support for this datatype.
UNIQUEIDENTIFIER
VARCHAR(64)
A unique flag set in MySQL. There is not specific
support for inserting unique identifier values.
SYSNAME
VARCHAR(160)
XML
TEXT
9.6 PostgreSQL migration
9.6.1 Preparations
Before proceeding, you will need the following:
• Follow the installation guide for installing iODBC on your system. For more information, see Section 9.1,
“General installation requirements”.
• Access to a running PostgreSQL instance with privileges to the database you want to migrate, otherwise
known as the "source database." The Migration Wizard officially supports PostgreSQL 8.0 and above,
although older versions may work.
• Access to a running MySQL Server instance with privileges to the database you want to migrate. The
Migration Wizard officially supports MySQL 5.0 and above.
350
Preparations
9.6.1.1 Microsoft Windows
Download and install the MSI package for psqlODBC. Choose the newest file from http://
www.postgresql.org/ftp/odbc/versions/msi/, which will be at the bottom of the downloads page. This will
install psqlODBC on your system and allow you to migrate from Postgresql to MySQL using MySQL
Workbench.
9.6.1.2 Linux
After installing iODBC, proceed to install the PostgreSQL ODBC drivers.
Download the psqlODBC source tarball file from http://www.postgresql.org/ftp/odbc/versions/src/. Use the
latest version available for download, which will be at the bottom of the downloads page. The file will look
similar to psqlodbc-09.01.0200.tar.gz. Extract this tarball to a temporary location, open a terminal,
and cd into that directory. The installation process is:
shell>
shell>
shell>
shell>
cd the/src/directory
./configure --with-iodbc --enable-pthreads
make
sudo make install
Verify the installation by confirming that the file psqlodbcw.so is in the /usr/local/lib directory.
Next, you must register your new ODBC Driver.
Open the iODBC Data Source Administrator application by either executing iodbcadm-gtk in the
command-line, or by launching it from the Overview page of the MySQL Workbench Migration Wizard by
clicking the Open ODBC Administrator button.
Go to the ODBC Drivers tab in the iODBC Data Source Administrator. It should look similar to:
351
Preparations
Figure 9.41 The iODBC Data Source Administrator
Click Add a driver then fill out the form with the following values:
• Description of the driver: psqlODBC
• Driver file name: /usr/local/lib/psqlodbcw.so
• Setup file name: No value is needed here
And lastly, clicking OK will complete the psqlODBC driver registration.
352
Drivers
9.6.1.3 OS X
To compile psqlODBC on OS X, you will need to have Xcode and its "Command Line Tools" component
installed on your system, as this includes the required gcc compiler. Xcode is free, and available from the
AppStore. And after installing Xcode, open it and go to Preferences, Downloads, Components, and then
install the "Command Line Tools" component.
Download the psqlODBC source tarball file from http://www.postgresql.org/ftp/odbc/versions/src/. Use the
latest version available for download, which will be at the bottom of the downloads page. The file will look
similar to psqlodbc-09.01.0200.tar.gz. Extract this tarball to a temporary location, open a terminal,
and cd into that directory. The installation process is:
shell>
shell>
shell>
shell>
cd the/src/directory
./configure --with-iodbc --enable-pthreads
CFLAGS="-arch i386 -arch x86_64" make
sudo make install
9.6.2 Drivers
If you are compiling psqlodb, first configure with the --without-libpq option.
9.6.3 Connection Setup
After loading the Migration Wizard, click on the Start Migration button in the Overview page to begin the
migration process. You will first connect to the source PostgreSQL database. Here you will provide the
information about the PostgreSQL RDBMS that you are migrating from, the ODBC driver that will be used
for the migration, and all of the parameters required for the connection. The name of the ODBC driver is
the one you set up when you registered your psqlODBC driver with the driver manager.
Opening the Database System dropdown will reveal each RDBMS that is supported on your system.
Select PostgreSQL from the list. Below that is the Stored Connection dropdown, which is optional. Stored
connections will be listed here, which are connections saved after defining a connection with the Store
connection for future use as checkbox enabled.
The three Connection Method options are:
• ODBC (manually entered parameters): Each parameter, like a username, is defined separately
• ODBC Data Source: For pre-configured data sources (DSN)
• ODBC (direct connection string): A full ODBC connection string
Note
The psqlODBC driver does not allow a connection without specifying a database
name.
The migration process is similar to other databases. See Section 9.6.4, “PostgreSQL Type Mapping” for
information on how the migration wizard migrates types from PostgreSQL to MySQL, and Section 9.2.1, “A
visual guide to performing a database migration” for a general migration guide.
9.6.4 PostgreSQL Type Mapping
Table 9.3 Type mapping
Source Type
MySQL Type
INT
INT
Comment
353
PostgreSQL Type Mapping
Source Type
MySQL Type
SMALLINT
SMALLINT
BIGINT
BIGINT
SERIAL
INT
Sets AUTO_INCREMENT in its table definition.
SMALLSERIAL
SMALLINT
Sets AUTO_INCREMENT in its table definition.
BIGSERIAL
BIGINT
Sets AUTO_INCREMENT in its table definition.
BIT
BIT
BOOLEAN
TINYINT(1)
REAL
FLOAT
DOUBLE PRECISION
DOUBLE
NUMERIC
DECIMAL
DECIMAL
DECIMAL
MONEY
DECIMAL(19,2)
CHAR
CHAR/LONGTEXT
Depending on its length. MySQL Server 5.5 and
above can have CHAR columns with a length up
to 255 characters. Anything larger is migrated as
LONGTEXT
NATIONAL
CHARACTER
CHAR/LONGTEXT
Depending on its length. MySQL Server 5.5 and
above can have VARCHAR columns with a length
up to 65535 characters. Anything larger is migrated
to one of the TEXT blob types. In MySQL, character
set of strings depend on the column character set
instead of the datatype.
VARCHAR
VARCHAR/
MEDIUMTEXT/
LONGTEXT
Depending on its length. MySQL Server 5.5 and
above can have VARCHAR columns with a length
up to 65535 characters. Anything larger is migrated
to one of the TEXT blob types.
NATIONAL
VARCHAR/
CHARACTER VARYING MEDIUMTEXT/
LONGTEXT
Depending on its length. MySQL Server 5.5 and
above can have VARCHAR columns with a length
up to 65535 characters. Anything larger is migrated
to one of the TEXT blob types. In MySQL, character
set of strings depend on the column character set
instead of the datatype.
DATE
DATE
TIME
TIME
TIMESTAMP
DATETIME
INTERVAL
TIME
BYTEA
LONGBLOB
TEXT
LONGTEXT
CIDR
VARCHAR(43)
INET
VARCHAR(43)
MACADDR
VARCHAR(17)
UUID
VARCHAR(36)
Comment
354
MySQL migration
Source Type
MySQL Type
XML
LONGTEXT
JSON
LONGTEXT
TSVECTOR
LONGTEXT
TSQUERY
LONGTEXT
ARRAY
LONGTEXT
POINT
VARCHAR
LINE
VARCHAR
LSEG
VARCHAR
BOX
VARCHAR
PATH
VARCHAR
POLYGON
VARCHAR
CIRCLE
VARCHAR
TXID_SNAPSHOT
VARCHAR
Comment
9.7 MySQL migration
Perform MySQL server version upgrades to move off older MySQL versions to the latest version. The
standard migration wizard can migrate MySQL to MySQL, and a simpler Schema Transfer Wizard can
also be used.
MySQL Schema Transfer Wizard
The MySQL Schema Transfer wizard helps you move your data from an older MySQL server version to
a different (typically later) MySQL version. This migration tool is meant for developer hosts as it is simpler
than the standard migration wizard, because it only migrates MySQL to MySQL. The data is transferred
and not based on a consistent snapshot, so it works best on local MySQL instances.
Note
You should not use this wizard on production MySQL instances.
To open the wizard, select Database, Schema Transfer Wizard from the main menu.
355
MySQL Schema Transfer Wizard
Figure 9.42 MySQL Schema Transfer Wizard: Overview
Read the overview text and click Start the Wizard to begin.
Figure 9.43 MySQL Schema Transfer Wizard: Connection Selection
356
MySQL Schema Transfer Wizard
Choose your target and source MySQL connections. After choosing and testing your MySQL connections,
click Next to continue.
Figure 9.44 MySQL Schema Transfer Wizard: Schema Selection
Choose the schemas to migrate, and click Start Copy to begin copying the selected schemas from the
source to target MySQL server.
357
MySQL Schema Transfer Wizard
Figure 9.45 MySQL Schema Transfer Wizard: Copy Databases
Review the Message Log to confirm that the migration completed with success. Click Next to view a
summary of the results.
358
Using the MySQL Workbench Migration Wizard
Figure 9.46 MySQL Schema Transfer Wizard: Results
Click Finish to close the wizard.
9.8 Using the MySQL Workbench Migration Wizard
For a visual walk-through of the migration wizard, see Section 9.2.1, “A visual guide to performing a
database migration”.
9.8.1 Connecting to the databases
A connection is made to the source and target database servers.
Source Connection Setup
The Source Connection offers the MySQL, Microsoft SQL Server, and Generic RDBMS database system
options. This selection determines the available Parameters and Advanced configuration options.
This connection definition may be saved using the Store connection for future use as option,
and there is also the Test Connection option.
Target Connection Setup
The MySQL Server that will be home to the newly migrated database.
359
Schemata Retrieval and Selection
9.8.2 Schemata Retrieval and Selection
Fetch Schemata List
The names of available schemas will be retrieved from the source RDBMS. The account used for the
connection will need to have appropriate privileges for listing and reading the schemas you want to
migrate. Target RDBMS connection settings will also be validated.
The steps that are performed include: connects to the source DBMS, checks the connection, and retrieves
the schema list from the source.
Schemata Selection
Select the schemata that you want to migrate. The Schema Name Mapping Method options are:
• Keep schemata as they are: Catalog.Schema.Table -> Schema.Table: This will create multiple
databases, one per schema.
• Only one schema: Catalog.Schema.Table -> Catalog.Table. Merges each schema into a single
database.
• Only one schema, keep current schema names as a prefix: Catalog.Schema.Table ->
Catalog.Schema_table. Preserves the schema name as a prefix.
9.8.3 Reverse Engineering
This is an automated step, where the actions include: Connect to the source DBMS, Reverse engineer the
selected schemata, and perform post-processing if needed.
9.8.4 Object Selection
By default, all table objects will be migrated. Use the Show Selection button in order to disable individual
table objects from being migrated.
9.8.5 Migration
Reverse engineered objects from the source RDBMS are automatically converted to MySQL compatible
objects. Default data type and default column value mappings are used, and the generated objects and
column definitions may be reviewed and edited in the next step.
The steps performed include Migrating the selected objects, and generating the SQL CREATE statements.
9.8.6 Manual Editing
The migrated objects may be reviewed and edited here. You can manually edit the generated SQL before
applying them to the target database. Target schemas and tables may be renamed, and column definitions
may be changed, by double-clicking on them.
By default, the All Objects View is loaded. Other View options include Migration Problems and Column
Mappings.
• All Objects: Shows all objects, which can also be edited by double-clicking.
• Migration Problem: Will list all of the migration problems, or report that no mapping problems were
found.
360
Target Creation Options
• Column Mappings: Displays all of the schema columns, which may also be edited. There is an
advanced Show Code and Messages option that displays the SQL CREATE script for the selected
object.
9.8.7 Target Creation Options
Defines addition settings for the target schema.
Configuration options include:
• Create schema in target RDBMS:
• Create a SQL script file:
• An option to keep the schemata if they already exist. Objects that already exist will not be recreated or
update.
9.8.8 Schema Creation
The SQL scripts generated for the migrated schema objects will now be executed in the target database.
You can monitor execution in the logs, if errors exist then they will be fixed in the next step. Table data will
be migrated in a later step as well.
This is an automated step, where the actions include: Create Script File, Connect to Target Database, and
Create Schemata and Objects.
9.8.9 Create Target Results
Scripts to create the target schemas were executed, but the data has not yet been migrated. This step
allows reviewing a creation report. If there are any errors, then you can manually fix the scripts and click
Recreate Objects to retry the schema creation or return to the Manual Editing page to correct them there,
and then retry the target creation.
To edit, first select the object, and then the SQL CREATE Script will be shown for the selected object. Edit
it there, then press Apply to save.
9.8.10 Data Migration Setup
Provides additional options for data transfer, including the ability to set up a script to automate this transfer
in the future.
9.8.11 Bulk Data Transfer
The transfer is executed here.
9.8.12 Migration Report
Displays the final report, that can be reviewed to ensure a proper migration was executed.
9.9 MySQL Workbench Migration Wizard FAQ
Frequently Asked Questions with answers.
Questions
361
MySQL Workbench Migration Wizard FAQ
• 9.9.1: [362] While using the Postgresql psqlodbc driver, I see the following error: ('08001',
'[08001] Already connected. (202) (SQLDriverConnect)')
Questions and Answers
9.9.1: While using the Postgresql psqlodbc driver, I see the following error: ('08001', '[08001]
Already connected. (202) (SQLDriverConnect)')
This means that PostgreSQL is not configured to accept connections from the source IP.
362
Appendix A MySQL Workbench Frequently Asked Questions
Basic Usage
Questions
• A.1: [363] How do I create a MySQL database (schema) in MySQL Workbench?
• A.2: [363] Is there an easy way to select all data from a table, and then see the results?
Questions and Answers
A.1: How do I create a MySQL database (schema) in MySQL Workbench?
• Open a MySQL connection to open the SQL editor.
• On the left pane there is an Object Browser that contains two tabs titled Management and Schemas.
Choose the schemas tab (default).
• Right-click anywhere in the Schemas pane and choose Create Schema from the context-menu.
• Follow the schema creation wizard by naming your new schema, and click Apply to create your new
schema.
Other options include clicking the "Create Schema" icon on the main navigation bar, or executing a
"CREATE SCHEMA your_db_name" query in the SQL editor.
A.2: Is there an easy way to select all data from a table, and then see the results?
From the schema navigator, hover over the table and click the
icon. This executes a "SELECT * FROM
schema.table" query and loads the results into the result grid. From there you can view or edit the data.
Alternatively, right-click on a table and select Select Rows - Limit 1000 form the context menu.
Workbench Functionality
Questions
• A.1: [363] How do I copy my saved MySQL connections in Workbench to a different computer?
• A.2: [363] How can I view my MySQL Workbench query history?
• A.3: [364] Can I preserve a results tab rather than have it refresh every time I execute a statement?
• A.4: [364] How does MySQL Workbench increase import performance?
Questions and Answers
A.1: How do I copy my saved MySQL connections in Workbench to a different computer?
From the main navigation menu, choose Tools, Configuration, and then Backup Connections to create a
Zip file with your configured MySQL connections. Next, load this file into your new Workbench instance by
using the related Restore Connections option.
A.2: How can I view my MySQL Workbench query history?
In bottom pane, change Action Output to History and then choose the appropriate date.
363
The SQL statement history is stored as plain text on your system under your user's MySQL Workbench
configuration path in the sql_history directory. These files are organized per date (such as 2014-01-15)
and contain your MySQL Workbench SQL statement history for all MySQL connections.
A.3: Can I preserve a results tab rather than have it refresh every time I execute a statement?
Yes, you can pin the results tab to force it to remain and be unaffected by UPDATE and other statements.
Do that by right-clicking the result tab and choose "Pin Tab" from the context-menu, or left-click the little pin
icon to toggle it. Now, execute your other queries and then refresh the pinned tab (there is a "refresh" icon
in the result grid's menu).
A.4: How does MySQL Workbench increase import performance?
When a model is exported (Database, Forward Engineer...), some MySQL server variables are temporarily
set to enable faster SQL import by the server. The statements added at the start of the code are:
SET @OLD_UNIQUE_CHECKS=@@UNIQUE_CHECKS, UNIQUE_CHECKS=0;
SET @OLD_FOREIGN_KEY_CHECKS=@@FOREIGN_KEY_CHECKS, FOREIGN_KEY_CHECKS=0;
SET @OLD_SQL_MODE=@@SQL_MODE, SQL_MODE='TRADITIONAL,ALLOW_INVALID_DATES';
These statements function as follows:
• SET @OLD_UNIQUE_CHECKS=@@UNIQUE_CHECKS, UNIQUE_CHECKS=0;: Determines whether
InnoDB performs duplicate key checks. Import is much faster for large data sets if this check is not
performed. For additional information, see unique_checks.
• SET @OLD_FOREIGN_KEY_CHECKS=@@FOREIGN_KEY_CHECKS, FOREIGN_KEY_CHECKS=0;:
Determines whether the server should check that a referenced table exists when defining a foreign key.
Due to potential circular references, this check must be turned off for the duration of the import, to permit
defining foreign keys. For additional information, see foreign_key_checks.
• SET @OLD_SQL_MODE=@@SQL_MODE, SQL_MODE='TRADITIONAL';: Sets SQL_MODE to
TRADITIONAL, causing the server to operate in a more restrictive mode, and ALLOW_INVALID_DATES,
causing dates to not be fully validated.
These server variables are then reset at the end of the script using the following statements:
SET SQL_MODE=@OLD_SQL_MODE;
SET FOREIGN_KEY_CHECKS=@OLD_FOREIGN_KEY_CHECKS;
SET UNIQUE_CHECKS=@OLD_UNIQUE_CHECKS;
Workbench Behavior
Questions
• A.1: [365] Why do my query results sometimes say Read Only but other times I can edit data in the
results grid?
• A.2: [365] I'm attempting to execute a DELETE query but the query fails with an "Error Code: 1175"
error. How do I proceed?
• A.3: [365] My MySQL server connection is timing out with an error like "Error Code: 2013. Lost
connection to MySQL server during query". Can I adjust the timeout?
• A.4: [365] What do the column flag acronyms (PK, NN, UQ, BIN, UN, ZF, AI) in the MySQL
Workbench Table Editor mean?
364
Questions and Answers
A.1: Why do my query results sometimes say Read Only but other times I can edit data in the
results grid?
Data in the query results grid is only editable when the query results includes a primary key. For example,
"SELECT type FROM food" will be read-only if "type" is not a primary key, but "SELECT id, type FROM
food" will be editable when "id" is a primary key. Typically, "SELECT *" syntax is used in Workbench which
often includes query results with a primary key.
For additional information, hover over the "Read Only" icon to reveal a tooltip that explains why your result
set is in read-only mode.
A.2: I'm attempting to execute a DELETE query but the query fails with an "Error Code: 1175" error.
How do I proceed?
By default, Workbench is configured to not execute DELETE or UPDATE queries that do not include a
WHERE clause on a KEY column. To alter this behavior, open your Workbench Preferences, select the
SQL Editor section, and disable the following preference:
[ ] "Safe Updates". Forbid UPDATEs and DELETEs with no key in WHERE clause or no LIMIT clause.
Changing this preference requires you to reconnect to your MySQL server before it can take affect.
A.3: My MySQL server connection is timing out with an error like "Error Code: 2013. Lost
connection to MySQL server during query". Can I adjust the timeout?
Yes, go to Preferences, SQL Editor, and adjust the DBMS connection read time out option that defaults
to 600 seconds. This sets the maximum amount of time (in seconds) that a query can take before MySQL
Workbench disconnects from the MySQL server.
A.4: What do the column flag acronyms (PK, NN, UQ, BIN, UN, ZF, AI) in the MySQL Workbench
Table Editor mean?
Checking these boxes will alter the table column by assigning the checked constraints to the designated
columns.
Hover over an acronym to view a description, and see the Section 7.1.11.2, “The Columns Tab” and
MySQL CREATE TABLE documentation for additional details.
Data Management
Questions
• A.1: [365] How do I import comma-separated values (CSV) data into MySQL using Workbench?
• A.2: [366] How do I export MySQL data to a plain text file with a format such as CSV, JSON, or XML?
• A.3: [366] How to export (save) a MySQL database to a text file?
Questions and Answers
A.1: How do I import comma-separated values (CSV) data into MySQL using Workbench?
The results view panel in Workbench has an "Import records from external file" option that imports CSV
data directly into the result set. Execute that on your CSV file and click Apply to review and commit the
import.
365
Note
This is different than the Data Import wizard that imports your saved MySQL files
to your MySQL server. For additional information about that, see Section 5.5,
“Database Export and Import”.
If you are importing Excel files, then consider using the official MySQL for Excel Add-on for Excel.
A.2: How do I export MySQL data to a plain text file with a format such as CSV, JSON, or XML?
The results view panel in Workbench has an "Export recordset to an external file" option that exports your
result set to a wide variety of formats. For additional information, see Section 7.1.9, “Export a Result Set”.
Note
This is different than the Data Export wizard that exports your MySQL data to
standard MySQL formats. For additional information about that, see Section 5.5,
“Database Export and Import”.
If you are exporting to Excel, then consider using the official MySQL for Excel Add-on for Excel.
A.3: How to export (save) a MySQL database to a text file?
Open a MySQL connection, and select Server from the main navigation menu and choose Data Export
to open the data export wizard. Alternatively, choose Data Export from the left Management pane for the
desired MySQL selection.
Here you can choose which databases to export, whether or not to include the data, dump to a single file
or multiple files (one per table), and more. For additional details, see Section 5.5, “Database Export and
Import”.
General
Questions
• A.1: [366] I'm forced to use MySQL Workbench 5.2.x, is its documentation available?
Questions and Answers
A.1: I'm forced to use MySQL Workbench 5.2.x, is its documentation available?
Although the 5.2.x branch is no longer maintained, its documentation is archived at http://dev.mysql.com/
doc/index-archive.html.
366
Appendix B Keyboard Shortcuts
The following tables list keyboard shortcuts for MySQL Workbench commands. Modifier in the tables
stands for the platform-specific modifier key. This is Command on OS X, Control on other platforms. On
OS X, the Alt key is Option.
There are keyboard shortcut tables for the File, Edit, View, Arrange, Model, Query, Database, Scripting,
Help, and EER Diagram Mode menus.
File Menu
Table B.1 File menu keyboard shortcuts
Function
Keyboard Shortcut
Context
New Model
Modifier+N
All
Open Model
Modifier+O
All
Open SQL Script
Modifier+Shift+O
SQL Editor
Close Tab
Modifier+W, Modifier+F4 on Windows
All
Save Model
Modifier+S
Model
Save Script
Modifier+S
SQL Editor
Save Model As
Modifier+Shift+S
Model
Save Script As
Modifier+Shift+S
SQL Editor
Forward Engineer SQL
CREATE Script
Modifier+Shift+G
Model
Forward Engineer SQL ALTER Modifier+Alt+Y
Script
Model
Synchronize With SQL
CREATE Script
Modifier+Shift+Y
Model
Print
Modifier+P
EER Diagram mode only
Exit
Modifier+Q
All
Edit Menu
Table B.2 Edit menu keyboard shortcuts
Function
Keyboard Shortcut
Context
Undo
Modifier+Z
Model, EER Diagram
Redo
Modifier+Y, Modifier+Shift+Z (OS X)
Model, EER Diagram
Cut
Modifier+X
All
Copy
Modifier+C
All
Paste
Modifier+V
All
Delete
Modifier+Delete, Command+BackSpace
(OS X)
All
Edit Selected
Modifier+E
Model, EER Diagram
Edit Selected in New Window
Modifier+Shift+E
Model, EER Diagram
Select All
Modifier+A
EER Diagram
367
Function
Keyboard Shortcut
Context
Find
Modifier+F
All
Find Advanced
Modifier+Alt+F
All
Find Next
F3
All
Find Previous
Shift+F3
All
Search and Replace
Modifier+Shift+F
All
Comment/Uncomment lines of Modifier+/
SQL
SQL Editor
Auto-Complete SQL
SQL Editor
Modifier+Space
View Menu
Table B.3 View menu keyboard shortcuts
Function
Keyboard Shortcut
Context
Output Window
Modifier+F2, Modifier+Option+2 (OS X)
All
Set Marker n
Modifier+Shift+n (n is integer 1..9)
EER Diagram
Go to Marker n
Modifier+n (n is integer 1..9)
EER Diagram
Arrange Menu
Table B.4 Arrange menu keyboard shortcuts
Function
Keyboard Shortcut
Context
Bring to Front
Modifier+Shift+F
EER Diagram
Send to Back
Modifier+Shift+B
EER Diagram
Model Menu
Table B.5 Model menu keyboard shortcuts
Function
Keyboard Shortcut
Context
Add Diagram
Modifier+T
Model, EER Diagram
Validate All
Modifier+Alt+V
Model, EER Diagram
Validate All (MySQL)
Modifier+Alt+B
Model, EER Diagram
Model Options
Command+Alt+, (Shortcut available only
on OS X)
Model, EER Diagram
Query Menu
Table B.6 Query menu keyboard shortcuts
Function
Keyboard Shortcut
Context
Execute statement
Modifier+Return
SQL Editor
Execute statements
Modifier+Shift+Return
SQL Editor
New Tab
Modifier+T
SQL Editor
Database Menu
368
Table B.7 Database menu keyboard shortcuts
Function
Keyboard Shortcut
Context
Query Database
Modifier+U
All
Reverse Engineer
Modifier+R
Model, EER Diagram
Forward Engineer
Modifier+G
Model, EER Diagram
Synchronize Model
Modifier+Y
Model, EER Diagram
Scripting Menu
Table B.8 Scripting menu keyboard shortcuts
Function
Keyboard Shortcut
Context
Scripting Shell
Modifier+F3, Modifier+Option+3 (on OS
X)
All
Run Workbench Script File
Modifier+Shift+R
All
Help Menu
Table B.9 Help menu keyboard shortcuts
Function
Keyboard Shortcut
Context
Help Index
F1, Command+Option+question (on OS
X)
All
EER Diagram Mode
In the EER Diagram view, a number of other keyboard shortcuts are available.
Table B.10 EER diagram mode keyboard shortcuts
Function
Keyboard Shortcut
Selection tool
Escape
Hand tool
H
Delete tool
D
Layer tool
L
Note tool
N
Image tool
I
Table tool
T
View tool
V
Routine Group tool
G
Non-Identifying Relationship 1:1
1
Non-Identifying Relationship 1:n
2
Identifying Relationship 1:1
3
Identifying Relationship 1:n
4
Identifying Relationship n:m
5
Relationship Using Existing Columns
6
369
Table B.11 Keyboard shortcut changes
MySQL Workbench version
The Change
5.2.45
The "Modifier+/" shortcut was added to comment/uncomment SQL in the
SQL editor
5.2.45
On Microsoft Windows, the "Modifier+W" shortcut was changed to
"Control+F4" -- this shortcut closes MySQL Workbench tabs
370
Appendix C Extending Workbench
Table of Contents
C.1
C.2
C.3
C.4
C.5
GRT and Workbench Data Organization ...................................................................................
Modules ..................................................................................................................................
Plugins / Tools .........................................................................................................................
Adding a GUI to a Plugin Using MForms ..................................................................................
The Workbench Scripting Shell ................................................................................................
C.5.1 Exploring the Workbench Scripting Shell ........................................................................
C.5.2 The Shell Window .........................................................................................................
C.5.3 The Files, Globals, Classes, Modules, and Notifications Tabs ..........................................
C.6 Tutorial: Writing Plugins ...........................................................................................................
371
372
373
374
375
375
376
378
383
MySQL Workbench provides an extension and scripting system that enables the developer to extend
MySQL Workbench capabilities. While the core of MySQL Workbench is developed using C++, it is
possible to harness this core functionality using the Python scripting language. MySQL Workbench also
provides access to a cross-platform GUI library, MForms, which enables the creation of extensions that
feature a graphical user interface.
The extension system enables the following capabilities:
• Automate common tasks
• Extend the Workbench user-interface
• Create Tools/Plugins (code which can be invoked from the Workbench menu system)
• Manipulate schemata
• Create custom Workbench features
C.1 GRT and Workbench Data Organization
The GRT, or Generic RunTime, is the internal system used by Workbench to hold model document data.
It is also the mechanism by which Workbench can interact with Modules and Plugins. Workbench model
data, such as diagrams, schemata, and tables, is stored in a hierarchy of objects that can be accessed by
any plugin. The information is represented using standard data types: integers, doubles, strings, dicts, lists,
and objects.
The GRT can be accessed using the Python scripting language. Awareness is required of how the GRT
data types map into Python. For example, the GRT integer, double, and string data types are seen as
corresponding Python data types. Lists and dicts are kept in their internal representation, but can generally
be treated as Python lists and dicts, and accessed in the usual way. Objects contain data fields and
methods, but the GRT recognizes only objects from a pre-registered class hierarchy.
It is possible to fully examine the classes contained within the GRT using the Workbench Scripting
Shell. Dots in class names are changed to underscores in their Python counterparts. For example,
db.mysql.Table becomes db_mysql_Table in Python.
The Application Objects Tree (GRT Tree)
As mentioned previously, Workbench document data is stored in an object hierarchy. This hierarchy is
known as the GRT Tree. The GRT Tree can be accessed and modified from supported external scripting
371
Modules
languages such as Python. Care should be taken when modifying the GRT Tree, to prevent a mistake from
leading to corruption of the document. Backups should be made before manipulating the tree. Read-only
access to the tree is the safest approach, and is sufficient in most cases.
The main nodes in the Application Object Tree
Table C.1 The main nodes in the Application Object Tree
Node
Description
wb.registry
Application data such as plugin registry, list of
editors, and options.
wb.customData
A generic dictionary for data you can use to
store your own data. This dictionary is saved
and reloaded with Workbench and is global
(not document specific).
wb.options
Contains some default options that are used
by Workbench.
wb.rdbmsMgmt
Internal registry of supported RDBMS
modules, known data types.
wb.doc
The currently loaded model document.
wb.doc.physicalModels[0]
The currently loaded model object, containing
the database catalog and diagrams.
wb.doc.physicalModels[0].catalog
The database catalog for the model. Contains
the list of schemata.
wb.doc.physicalModels[0]catalog.schemata
List of schemata in the model. Individual
schema can be accessed as a list:
schemata[0], schemata[1] ...
wb.doc.physicalModels[0].catalog.schemata[0].tables
(.views, .routines, ...)
Lists of tables, views, routines in the schema.
wb.doc.physicalModels[0].diagrams
List of EER diagrams in the model.
wb.doc.physicalModels[0].diagrams[0].figures
(.layers, .connections, ...)
List of figures, layers, connections
(relationships) in the diagram.
C.2 Modules
In the GRT Modules are libraries containing a list of functions that are exported for use by code in other
modules, scripts, or Workbench itself. Modules can be written in C++ or Python, but the data types used for
arguments and the return value must be GRT types.
GRT modules are similar to Python modules, but are imported from the built-in grt module, instead
of directly from an external file. The list of modules loaded into the grt module is obtained from
grt.modules. Modules can be imported in Python using statements such as from grt.modules
import WbModel.
To export functions as a module from Python code, you must carry out the following steps:
1. The source file must be located in the user modules folder. This path is displayed in the Workbench
Scripting Shell with the label Looking for user plugins in.... It is also possible to install the file using
the main menu item Scripting, Install Plugin/Module File.
372
Plugins / Tools
2. The source file name must have the extension _grt.py; for example, my_module_grt.py.
3. Some module metadata must be defined. This can be done using the DefineModule function from the
wb module:
from wb import *
ModuleInfo = DefineModule(name='MyModule', author='Your Name', version='1.0')
4. Functions to be exported require their signature to be declared. This is achieved using the export
decorator in the previously created ModuleInfo object:
@ModuleInfo.export(grt.INT, grt.STRING)
def checkString(s):
...
For the export statement, the return type is listed first, followed by the input parameter types,
specified as GRT typenames. The following typenames can be used:
• grt.INT: An integer value. Also used for boolean values.
• grt.DOUBLE: A floating-point numeric value.
• grt.STRING: UTF-8 or ASCII string data.
• grt.DICT: A key/value dictionary item. Keys must be strings.
• grt.LIST: A list of other values. It is possible to specify the type of the contents as a tuple
in the form (grt.LIST, <type-or-class>). For example, (grt.LIST, grt.STRING) for
a list of strings. For a list of table objects, the following would be specified: (grt.LIST,
grt.classes.db_table).
• grt.OBJECT: An instance of a GRT object or a GRT class object, from grt.classes.
Note that these types are defined in the grt module, which must be imported before they can be used.
The following code snippet illustrates declaring a module that exports a single function:
from wb import *
import grt
ModuleInfo = DefineModule(name='MyModule', author="your name", version='1.0')
@ModuleInfo.export(grt.DOUBLE, grt.STRING, (grt.LIST, grt.DOUBLE))
def printListSum(message, doubleList):
sum = 0
for d in doubleList:
sum = sum + d
print message, sum
return sum
C.3 Plugins / Tools
Plugins are special Modules that are exposed to the user through the Workbench GUI. This is typically
done using the main menu, or the context-sensitive menu. Much of the MySQL Workbench functionality is
implemented using plugins; for example, table, view, and routine editors are native C++ plugins, as are the
forward and reverse engineering wizards. The Administrator facility in MySQL Workbench is implemented
entirely as a plugin in Python.
373
Adding a GUI to a Plugin Using MForms
A plugin can be a simple function that performs some action on an input, and ends without further
interaction with the user. Examples of this include auto-arranging a diagram, or making batch changes to
objects. To create a simple plugin, the function must be located in a module and declared as a plugin using
the plugin decorator of the ModuleInfo object.
Plugins can have an indefinite runtime, such as when they are driven by the user through a graphical
user interface. This is the case for the object editors and wizards within MySQL Workbench. Although the
wizard type of plugin must be declared in the usual way, only the entry point of the plugin will need to be
executed in the plugin function, as most of the additional functionality will be invoked as a result of the user
interacting with the GUI.
Note
Reloading a plugin requires MySQL Workbench to be restarted.
Imported plugin files (and their compiled counterparts) are stored here:
Table C.2 User Plugin File Location
Operating System
File Path
Windows
%AppData%\MySQL\Workbench\modules
OS X
~username/Library/Application Support/MySQL/Workbench/modules
Linux
~username/.mysql/workbench/modules
Declare a plugin using this syntax:
@ModuleInfo.plugin(plugin_name, caption, [input], [groups], [pluginMenu])
These parameters are defined as follows:
• plugin_name: A unique name for the plugin. It may contain only alphanumeric characters, dots, and
underscores.
• caption: A caption to use for the plugin in menus.
• input: An optional list of input arguments.
• groups: Optional list of groups the plugin belongs to. Recognized values are:
• Overview/Utility: The Context menu in the Model Overview.
• Model/Utility: The menu for diagram objects.
• Menu/<category>: The Plugins menu in the main menu.
• pluginMenu: Optional name of a submenu in the Plugins menu where the plugin should appear. For
example, Catalog, Objects, Utilities. This is equivalent to adding a Menu/<category> in the groups list.
C.4 Adding a GUI to a Plugin Using MForms
MySQL Workbench is implemented with a C++ core back-end, and a native front-end for each supported
platform. Currently the front-end is implemented with Windows Forms on Microsoft Windows, GTK+ on
374
The Workbench Scripting Shell
Linux, and Cocoa on OS X. This approach permits the application to have a native look and feel, while
reducing the amount of work required to maintain the project. However, the GUI functionality required by
MySQL Workbench can be met by a subset of graphical operations. These are implemented in a crossplatform GUI library, MForms. This further reduces the development effort because plugin developers
can use MForms rather than writing front-end specific code for each supported platform. This also helps
consistency of operation across all platforms. MForms is coded in C++, but provides a Python interface. To
use it, the Python code must import the mforms module.
MForms Containers
Given the problems of using an absolute coordinate system across different platforms, MForms employs
containers that perform automatic layout. The basic containers that MForms provides include:
• Form: A top-level window which can contain a single control, usually another container. The window will
be sized automatically to fit its contents, but can also be sized statically.
• Box: This is a container that can be filled with one or more controls in a vertical or horizontal layout.
Each child control can be set to use either the minimum of required space, or fill the box in the direction
of the layout. In the direction perpendicular to the layout, for example vertical in a horizontal layout, the
smallest possible size that can accommodate all child controls will be employed. So, in this example, the
smallest height possible to accommodate the controls would be used.
• Table: This is a container that can organize one or more controls in a grid. The number of rows and
columns in the table, and the location of controls within the grid, can be set by the developer.
• ScrollView: This is a container that can contain a single child control, and will add scrollbars if the
contents do not fit the available space.
C.5 The Workbench Scripting Shell
The Workbench Scripting Shell provides a means for entering and executing Python scripts. Through the
use of the scripting shell, MySQL Workbench can support new behavior and data sources using code
written in Python. The shell can also be used to explore the current Workbench GRT (Generic RunTime)
facilities.
The scripting shell is not only useful for expanding MySQL Workbench. You can use a script file from the
scripting shell command line to perform repetitive tasks programmatically.
Note
Although they serve a different purpose, the MySQL Utilities are also integrated with
MySQL Workbench. For more information, see Appendix F, MySQL Utilities.
C.5.1 Exploring the Workbench Scripting Shell
To open the Workbench Scripting Shell, select Scripting, Scripting Shell from the main menu. You can
also open the Workbench Scripting Shell using the Control + F3 key combination on Windows and
Linux, Command + F3 on OS X, or by clicking the shell button above the EER diagram navigator. The
Workbench Scripting Shell will then open in a new dialog.
The following screenshot shows the Workbench Scripting Shell dialog.
375
The Shell Window
Figure C.1 The Workbench Scripting Shell
C.5.2 The Shell Window
The Workbench Scripting Shell is primarily used for running Python scripts, or directly typing commands in
Python. However, you can also use it to access the Workbench Scripting Shell Scripting Library functions
and global functions and objects. To see the available commands, type “?”. You can also cut and paste
text to and from the shell window.
The Snippets tab is a scratch pad for saving code snippets. This makes it easy to reuse and execute code
in MySQL Workbench.
376
The Shell Window
Figure C.2 The Workbench Scripting Shell: Snippets
Opened script file tabs are to the right of the Snippets tab. Script tabs are labeled with the script's
filename, or Unnamed for snippets without a name. You can cut-and-paste to and from the tabs, or rightclick on a snippet to open a context menu with options to Execute Snippet, Send to Script Editor, or Copy
To Clipboard.
While individual commands can be entered into the shell, it is also possible to run a longer script, stored
in an external file, using the main menu item Scripting, Run Workbench Script File. When scripts are run
outside of the shell, to see the output use the main menu item View, Output.
It is also possible to run script files directly from the shell. For details on running script files, type ? run at
the Workbench Scripting Shell prompt. The following message is displayed:
Help Topics
----------grt
General information about the Workbench runtime
scripting Practical information when working on scripts and modules for Workbench
wbdata
Summary about Workbench model data organization
modules
Information about Workbench module usage
plugins
Information about writing Plugins and Modules for Workbench
Type '? [topic]' to get help on the topic.
Custom Python Modules
---------------------
377
The Files, Globals, Classes, Modules, and Notifications Tabs
grt
grt.root
grt.modules
grt.classes
mforms
wb
Module to work with Workbench runtime (grt) objects
The root object in the internal Workbench object hierarchy
Location where Workbench modules are available
List of classes known to the GRT system
A Module to access the cross-platform UI toolkit used in some Workbench features
Utility module for creating Workbench plugins
Type 'help(module/object/function)' to get information about a module, object or function.
Type 'dir(object)'
to get a quick list of methods an object has.
For an introductory tutorial on the Python language,
visit http://docs.python.org/tutorial/
For general Python and library reference documentation, visit http://python.org/doc/
Within the Workbench Scripting Shell, there are five tabs on the top of the left side panel: Files, Globals,
Classes, and Modules, and Notifications.
Note
An exception is thrown while attempting to use input() or read from stdin.
C.5.3 The Files, Globals, Classes, Modules, and Notifications Tabs
The Workbench Scripting Shell features the Files, Globals, Classes, Modules, and Notifications tabs, in
addition to the main Shell tab.
The Files Tab
Lists folders and files for user-defined (custom) script files. The categories are User Scripts, User
Modules, and User Libraries.
378
The Files, Globals, Classes, Modules, and Notifications Tabs
Figure C.3 The Workbench Scripting Shell tab: Files
By default, scripts are stored in the scripts/ folder of your MySQL Workbench configuration folder.
These default locations are:
Table C.3 Default Scripts Location
Operating System
Default scripts/ path
Linux
~/.mysql/workbench/scripts
OS X
~/Library/Application\ Support/MySQL/Workbench/
scripts/
Windows 7
C:\Users\[user]\AppData\Roaming\MySQL\Workbench
\scripts\
The Globals Tab
379
The Files, Globals, Classes, Modules, and Notifications Tabs
At the top of the window is a list that is used to select the starting point, or root, of the GRT Globals tree
displayed beneath it. By default, this starting point is the root of the tree, that is, '/'. You can expand
or collapse the GRT Globals tree as desired. The GRT Globals tree is the structure in which MySQL
Workbench stores document data. Clicking any item results in its name and value being displayed in the
panel below the tree.
Figure C.4 The Workbench Scripting Shell tab: Globals
The Classes Tab
380
The Files, Globals, Classes, Modules, and Notifications Tabs
A class is a user-defined data type formed by combining primitive data types: integers, doubles, strings,
dicts, lists, and objects. This tab shows the definitions of the classes used by the objects in the Modules
tab. Clicking a class causes a brief description of the class to be displayed in a panel below the classes
explorer.
Figure C.5 The Workbench Scripting Shell tab: Classes
When the Classes tab is selected, the list displays the following items:
• Group by Name: Group by the object name
• Group by Hierarchy: Group by inheritance
• Group by Package: Group by functionality
The default view for this tab is Group By Name. This view shows all the different objects arranged
alphabetically. Click the + icon or double-click a package to show the properties of the struct.
381
The Files, Globals, Classes, Modules, and Notifications Tabs
If you switch to the hierarchical view, you will see GrtObject: the parent object from which all other
objects are derived.
The Modules Tab
The Modules tab enables you to browse the MySQL Workbench installed modules and their functions.
Clicking a module within the explorer causes its details to be displayed in a panel below the explorer. This
facility is useful for exploring the available modules, and their supported functions. It is also a way to check
whether custom modules have been correctly installed.
Figure C.6 The Workbench Scripting Shell tab: Modules
The Notifications Tab
The set of notification classes used by MySQL Workbench modules. Click a notification class for a
description of its use.
382
Tutorial: Writing Plugins
Figure C.7 The Workbench Scripting Shell tab: Notifications
C.6 Tutorial: Writing Plugins
This tutorial shows you how to extend MySQL Workbench by creating a plugin.
The Sample Plugin
EER Diagrams are useful for visualizing complex database schemata. They are often created for existing
databases, to clarify their purpose or document them. MySQL Workbench provides facilities for reverse
engineering existing databases, and then creating an EER Diagram automatically. In this case, relationship
lines between foreign keys in the table will automatically be drawn. This graphical representation makes
the relationships between the tables much easier to understand. However, one of the most popular
storage engines for MySQL, MyISAM, does not include support for foreign keys. This means that MyISAM
tables that are reverse engineered will not automatically have the relationship lines drawn between
tables, making the database harder to understand. The plugin that will be created in this tutorial gets
383
Tutorial: Writing Plugins
around this problem by using the fact that a naming convention is very often used for foreign keys:
tablename_primarykeyname. Using this convention, foreign keys can automatically be created after a
database is reverse engineered, which will result in relationship lines being drawn in the EER diagram.
Algorithm
The basic algorithm for this task would be as follows:
for each table in the schema
for each column in the table
look for another table whose name and primary key name match the current column name
if such a table is found, add a foreign key referencing it
As iterating the complete table list to find a match can be slow for models with a large number of tables, it
is necessary to optimize by pre-computing all possible foreign key names in a given schema.
import grt
def auto_create_fks(schema):
fk_name_format = "%(table)s_%(pk)s"
possible_fks = {}
# create the list of possible foreign keys from the list of tables
for table in schema.tables:
if table.primaryKey:
format_args = {'table':table.name, 'pk':table.primaryKey.name}
fkname = fk_name_format % format_args
possible_fks[fkname] = table
# go through all tables in schema, this time to find columns that may be a fk
for table in schema.tables:
for column in table.columns:
if possible_fks.has_key(column.name):
ref_table = possible_fks[column.name]
if ref_table.primaryKey.formattedType != column.type:
continue
fk = table.createForeignKey(column.name+"_fk")
fk.referencedTable = ref_table
fk.columns.append(column)
fk.referencedColumn.append(ref_table.primaryKey)
print "Created foreign key %s from %s.%s to %s.%s" \
% (fk.name, table.name, column.name, ref_table.name, ref_table.primaryKey.name)
auto_create_fks(grt.root.wb.doc.physicalModels[0].catalog.schemata[0])
Creating a Plugin from a Script
To create a plugin from an arbitrary script, it is first necessary to make the file a module, and export the
required function from it. It is then necessary to declare the module as a plugin, and specify the return type
and input arguments.
from wb import *
import grt
ModuleInfo = DefineModule(name="AutoFK", author="John Doe", version="1.0")
@ModuleInfo.plugin("sample.createGuessedForeignKeys",
caption="Create Foreign Keys from ColumnNames",
input=[wbinputs.objectOfClass("db.mysql.schema")],
groups=["Overview/Utility"])
@ModuleInfo.export(grt.INT, grt.classes.db_mysql_Schema)
def auto_create_fks(schema):
384
Tutorial: Writing Plugins
...
With the addition of the preceding code, the auto_create_fks() function is exported and will be added
to the schema context menu in the model overview. When invoked, it receives the currently selected
schema as its input.
385
386
Appendix D How To Report Bugs or Problems
The following is a list of tips and information that is helpful for reporting a MySQL Workbench bug.
A useful bug report includes:
• The exact steps taken to repeat the bug, ideally as a video if the bug is tricky to repeat
• A screenshot, if the bug is visual
• The error messages, which includes text sent to stdout and the GUI
• The MySQL Workbench Log file
The log file location can be found using Help, Locate Log Files from within MySQL Workbench.
Bugs that cannot be reproduced are difficult and nearly impossible to fix, so it is important to provide the
steps necessary to reproduce the bug.
Where to report a bug
Visit http://bugs.mysql.com/ and use one of the "MySQL Workbench" bug categories.
Log Levels
There are six different log levels, with increasing levels of verbosity: error, warning, info, debug1,
debug2, and debug3. By default, the error, warning and info levels are enabled. There is also a
"none" level that completely switches off logging.
Important
Please enable the debug3 level before generating a log for the report.
The enabled error log levels can be configured using an environment variable, or by using a command line
parameter.
Both the environment variable and command line variants accept a single error level, but enabling a more
verbose option will implicitly enable the levels below it. For example, passing in "info" will also enable the
"error" and "warning" levels.
• Environment variable: WB_LOG_LEVEL
Command line option: --log-level on OS X and Linux, and -log-level on Microsoft Windows
Note
If both the command line and environment variable are set, the command line takes
precedence.
For example:
# Microsoft Windows
shell> cd "C:\Program Files (x86)\MySQL\MySQL Workbench CE 6.2.4\"
shell> MySQLWorkbench.exe -log-level=debug3
387
Operating System Specific Notes
# OS X
shell> cd /Applications
shell> MySQLWorkbench --log-level=debug3
# Linux (Ubuntu)
shell> cd /usr/bin
shell> mysqlworkbench --log-level=debug3
If the info level is enabled, the system information and all paths used in the application are also logged.
On Microsoft Windows, this also means that the log file contains the full set of current environment
variables that are active for the program.
Operating System Specific Notes
Microsoft Windows
• Log file location: Near the user's app data folder, such as C:\Users\[user]\AppData\Roaming
\MySQL\Workbench\log for Microsoft Windows 7.
• In case of errors (or exceptions), the log file contains the stack trace to the point MySQL Workbench can
track it (usually only C# code, and not C++ code). Also, all warnings are added to the log if the warning
(or greater) log level is enabled.
• If it is a crash and that cannot be replicated by the MySQL Workbench team, and the stack trace cannot
be obtained, we will request a crashdump. Instructions for enabling a crashdump can be found here, and
please also read the MSDN details for this as we need a full dump, and not the mini dump.
• For crashes related to display issues, start MySQL Workbench with the -swrendering parameter (and
only then, as it switches off OpenGL rendering, which is of no use in WBA or WQE). This output will be
added to the log file.
• If it is a crash when MySQL Workbench is started (especially if the error report includes something about
kernelbase.dll), we will ask you to run depends.exe on the MySQLWorkbench.exe binary, and
ask for the reported errors.
• If it is a crash when MySQL Workbench is started, and it is a 64-bit version of Microsoft Windows, check
that the correct MSVC runtimes are installed. Often people install the 64-bit version of them, but only the
32-bit will function. More precisely: MSVC 2010 runtime x86 (32-bit).
OS X
• Log File Location: ~/Library/Application Support/MySQL/Workbench/logs
• System crash logs generated for Workbench are in ~/Library/Logs/DiagnosticReports/
MySQLWorkbench*
Linux
• Log File Location: ~/.mysql/workbench/logs
• For a crash, we might ask for a stack trace that can generated by gdb by using the following steps:
Note
Because published MySQL Workbench builds lack debug symbols, this step is
optional and will probably not be necessary.
388
Operating System Specific Notes
• In shell, execute source /usr/bin/mysql-workbench
• Quit MySQL Workbench
• In shell, execute gdb /usr/bin/mysql-workbench-bin
• In the gdb interface, type run
• In MySQL Workbench, repeat the crash
• In the gdb interface, type bt
• If it is a crash, also run glxinfo. If that also crashes, then it is a driver/X server problem related to
OpenGL that is not specific to MySQL Workbench.
389
390
Appendix E MySQL Enterprise Features
A MySQL Enterprise subscription is the most comprehensive offering of MySQL database software,
services and support; it ensures that your business achieves the highest levels of reliability, security, and
uptime.
An Enterprise Subscription includes a MySQL Workbench GUI for the following enterprise features:
• The MySQL Enterprise server: The most reliable, secure, and up-to-date version of the world's most
popular open source database
• MySQL Enterprise Backup: Performs backup and restore operations for MySQL data, and MySQL
Workbench offers a GUI for these operations
• MySQL Enterprise Audit: An easy to use auditing and compliance solution for applications that are
governed by both internal and external regulatory guidelines
• DBDoc Model Reporting Templates: For accessing the Ctemplate System.
• Model Validation: Validation modules for testing models before implementing them, both with general
RDMS and specific MySQL rules.
• MySQL Production Support (MOS): Technical and consultative support when you need it, along
with regularly scheduled service packs, and hot-fixes, and MySQL Workbench links to your My Oracle
Support (MOS) service
For more information, visit http://www.mysql.com/enterprise
391
392
Appendix F MySQL Utilities
MySQL Utilities is a package of utilities that are used for maintenance and administration of MySQL
servers. These utilities encapsulate a set of primitive commands, and bundles them so they can be used
to perform macro operations with a single command. They can be installed via MySQL Workbench, or as a
standalone package.
They are a set of command-line utilities and a Python library for making the common tasks easy to
accomplish. The library is written entirely in Python, meaning that it is not necessary to have any other
tools or libraries installed to make it work. It is currently designed to work with Python v2.6 or later and
there is no support (yet) for Python v3.1.
The utilities are available under the GPLv2 license, and are extendable using the supplied library.
For more information, see the MySQL Utilities manual at http://dev.mysql.com/doc/index-utils-fabric.html.
Installing The MySQL Utilities
MySQL Utilities development is managed elsewhere, and require a separate download. Attempting to start
the MySQL Utilities when they are not installed will prompt for a download and their installation. See the
MySQL Utilities manual for additional information.
Note
MySQL Workbench searches for the mysqluc MySQL Utility in the system's PATH
to determine if the MySQL Utilities are installed.
Opening MySQL Utilities From MySQL Workbench
Open the MySQL Utility mysqluc (MySQL Utilities Unified Console) from MySQL Workbench from either
the Tools menu, or from the MySQL Utilities shortcut on the Home page.
393
Opening MySQL Utilities From MySQL Workbench
Figure F.1 Open MySQL Utilities From Workbench
The MySQL Utilities console window can be seen below, with the "help" command executed:
394
Opening MySQL Utilities From MySQL Workbench
Figure F.2 The MySQL Utilities Console
395
396
Appendix G MySQL Workbench Change History
Release Notes Description
Note that we tend to update the manual at the same time we make changes to MySQL Workbench. If you
find a recent version of MySQL Workbench listed here that you cannot find on our download page (http://
dev.mysql.com/downloads/), it means that the version has not yet been released.
The manual included in the source and binary distributions may not be fully accurate when it comes to the
release changelog entries, because the integration of the manual happens at build time. For the most upto-date release changelog, please refer to the online version instead.
MySQL Workbench Change History Location
MySQL Workbench release notes are not published in the MySQL Workbench Manual.
Release notes for the changes in each release of MySQL Workbench are located at MySQL Workbench
Release Notes.
397
398
Appendix H Third Party Licenses
Table of Contents
H.1 .NET Flat TabControl License ...................................................................................................
H.2 ANTLR License .......................................................................................................................
H.3 Bitstream Vera License ............................................................................................................
H.4 Boost Library License ..............................................................................................................
H.5 Cairo License ..........................................................................................................................
H.6 CTemplate (Google Template System) License .........................................................................
H.7 cURL (libcurl) License ..............................................................................................................
H.8 DockPanel Suite License .........................................................................................................
H.9 Dojo Toolkit v1.7.0b1 License ..................................................................................................
H.10 GDAL/OGR License ...............................................................................................................
H.11 GLib License (for MySQL Workbench) ....................................................................................
H.12 Glitz License ..........................................................................................................................
H.13 GNU Lesser General Public License Version 2.1, February 1999 ..............................................
H.14 HtmlRenderer (System.Drawing.Html) .....................................................................................
H.15 iODBC License ......................................................................................................................
H.16 Libiconv License ....................................................................................................................
H.17 Libintl License ........................................................................................................................
H.18 libpng License .......................................................................................................................
H.19 Libxml2 License .....................................................................................................................
H.20 Libzip License ........................................................................................................................
H.21 Lua (liblua) License ................................................................................................................
H.22 Paramiko License ..................................................................................................................
H.23 PCRE License .......................................................................................................................
H.24 Pixman License .....................................................................................................................
H.25 PROJ.4 License .....................................................................................................................
H.26 PyCrypto 2.6 License .............................................................................................................
H.27 PyODBC License ...................................................................................................................
H.28 PySQLite License ..................................................................................................................
H.29 Python License ......................................................................................................................
H.30 Scintilla License .....................................................................................................................
H.31 ScintillaNET License ..............................................................................................................
H.32 SQLCipher License ................................................................................................................
H.33 TinyXML License ...................................................................................................................
H.34 TreeViewAdv for .NET License ...............................................................................................
H.35 VSQLite++ License ................................................................................................................
H.36 zlib License ...........................................................................................................................
Use of any of this software is governed by the terms of the licenses that follow.
MySQL Workbench 6.2
• Section H.1, “.NET Flat TabControl License”
• Section H.2, “ANTLR License”
• Section H.3, “Bitstream Vera License”
• Section H.4, “Boost Library License”
399
401
401
401
402
403
403
404
404
405
405
409
410
410
418
419
419
420
420
422
423
423
424
424
425
427
427
429
430
430
440
442
443
443
443
444
445
MySQL Workbench 6.2
• Section H.5, “Cairo License”
• Section H.6, “CTemplate (Google Template System) License”
• Section H.7, “cURL (libcurl) License”
• Section H.8, “DockPanel Suite License”
• Section H.9, “Dojo Toolkit v1.7.0b1 License”
• Section H.10, “GDAL/OGR License”
• Section H.11, “GLib License (for MySQL Workbench)”
• Section H.12, “Glitz License”
• Section H.13, “GNU Lesser General Public License Version 2.1, February 1999”
• Section H.14, “HtmlRenderer (System.Drawing.Html)”
• Section H.15, “iODBC License”
• Section H.16, “Libiconv License”
• Section H.17, “Libintl License”
• Section H.18, “libpng License”
• Section H.19, “Libxml2 License”
• Section H.20, “Libzip License”
• Section H.21, “Lua (liblua) License”
• Section H.22, “Paramiko License”
• Section H.23, “PCRE License”
• Section H.24, “Pixman License”
• Section H.25, “PROJ.4 License”
• Section H.26, “PyCrypto 2.6 License”
• Section H.27, “PyODBC License”
• Section H.28, “PySQLite License”
• Section H.29, “Python License”
• Section H.30, “Scintilla License”
• Section H.31, “ScintillaNET License”
• Section H.32, “SQLCipher License”
• Section H.33, “TinyXML License”
• Section H.34, “TreeViewAdv for .NET License”
• Section H.35, “VSQLite++ License”
400
.NET Flat TabControl License
• Section H.36, “zlib License”
H.1 .NET Flat TabControl License
The following software may be included in this product:
• .NET Flat TabControl
Use of any of this software is governed by the terms of the license below:
It is free. Public domain!
Oscar Londono
H.2 ANTLR License
The following software may be included in this product:
ANTLR
This product was build using ANTLR, which was provided to Oracle under the
following terms:
Copyright (c) 2010 Terence Parr
All rights reserved.
Redistribution and use in source and binary forms, with or without
modification, are permitted provided that the following conditions are met:
Redistributions of source code must retain the above copyright notice, this
list of conditions and the following disclaimer.
Redistributions in binary form must reproduce the above copyright notice,
this list of conditions and the following disclaimer in the documentation
and/or other materials provided with the distribution.
Neither the name of the author nor the names of its contributors may be used
to endorse or promote products derived from this software without specific
prior written permission.
THIS SOFTWARE IS PROVIDED BY THE COPYRIGHT HOLDERS AND CONTRIBUTORS "AS IS"
AND ANY EXPRESS OR IMPLIED WARRANTIES, INCLUDING, BUT NOT LIMITED TO, THE
IMPLIED WARRANTIES OF MERCHANTABILITY AND FITNESS FOR A PARTICULAR PURPOSE
ARE DISCLAIMED. IN NO EVENT SHALL THE COPYRIGHT OWNER OR CONTRIBUTORS BE
LIABLE FOR ANY DIRECT, INDIRECT, INCIDENTAL, SPECIAL, EXEMPLARY, OR
CONSEQUENTIAL DAMAGES (INCLUDING, BUT NOT LIMITED TO, PROCUREMENT OF
SUBSTITUTE GOODS OR SERVICES; LOSS OF USE, DATA, OR PROFITS; OR BUSINESS
INTERRUPTION) HOWEVER CAUSED AND ON ANY THEORY OF LIABILITY, WHETHER IN
CONTRACT, STRICT LIABILITY, OR TORT (INCLUDING NEGLIGENCE OR OTHERWISE)
ARISING IN ANY WAY OUT OF THE USE OF THIS SOFTWARE, EVEN IF ADVISED OF THE
POSSIBILITY OF SUCH DAMAGE.
H.3 Bitstream Vera License
The following software may be included in this product:
Bitstream Vera
Copyright (c) 2003 by Bitstream, Inc. All Rights Reserved. Bitstream Vera is a trademark
of Bitstream, Inc.
Permission is hereby granted, free of charge, to any
401
Boost Library License
person obtaining a copy of the fonts accompanying this
license ("Fonts") and associated documentation files
(the "Font Software"), to reproduce and distribute the
Font Software, including without limitation the rights
to use, copy, merge, publish, distribute, and/or sell
copies of the Font Software, and to permit persons to
whom the Font Software is furnished to do so, subject
to the following conditions:
The above copyright and trademark notices and this
permission notice shall be included in all copies of
one or more of the Font Software typefaces.
The Font Software may be modified, altered, or added
to, and in particular the designs of glyphs or characters
in the Fonts may be modified and additional glyphs or
characters may be added to the Fonts, only if the fonts
are renamed to names not containing either the words
"Bitstream" or the word "Vera".
This License becomes null and void to the extent
applicable to Fonts or Font Software that has been
modified and is distributed under the "Bitstream
Vera" names.
The Font Software may be sold as part of a larger
software package but no copy of one or more of the
Font Software typefaces may be sold by itself.
THE FONT SOFTWARE IS PROVIDED "AS IS", WITHOUT
WARRANTY OF ANY KIND, EXPRESS OR IMPLIED, INCLUDING
BUT NOT LIMITED TO ANY WARRANTIES OF MERCHANTABILITY,
FITNESS FOR A PARTICULAR PURPOSE AND NONINFRINGEMENT
OF COPYRIGHT, PATENT, TRADEMARK, OR OTHER RIGHT. IN
NO EVENT SHALL BITSTREAM OR THE GNOME FOUNDATION BE
LIABLE FOR ANY CLAIM, DAMAGES OR OTHER LIABILITY,
INCLUDING ANY GENERAL, SPECIAL, INDIRECT, INCIDENTAL,
OR CONSEQUENTIAL DAMAGES, WHETHER IN AN ACTION OF
CONTRACT, TORT OR OTHERWISE, ARISING FROM, OUT OF
THE USE OR INABILITY TO USE THE FONT SOFTWARE OR
FROM OTHER DEALINGS IN THE FONT SOFTWARE.
Except as contained in this notice, the names of Gnome,
the Gnome Foundation, and Bitstream Inc., shall not
be used in advertising or otherwise to promote the
sale, use or other dealings in this Font Software
without prior written authorization from the Gnome
Foundation or Bitstream Inc., respectively. For
further information, contact: fonts at gnome dot org.
H.4 Boost Library License
The following software may be included in this product:
Boost C++ Libraries
Use of any of this software is governed by the terms of the license below:
Boost Software License - Version 1.0 - August 17th, 2003
Permission is hereby granted, free of charge, to any person or
organization obtaining a copy of the software and accompanying
documentation covered by this license (the "Software") to use,
reproduce, display, distribute, execute, and transmit the Software,
402
Cairo License
and to prepare derivative works of the Software, and to permit
third-parties to whom the Software is furnished to do so, all
subject to the following:
The copyright notices in the Software and this entire statement,
including the above license grant, this restriction and the
following disclaimer, must be included in all copies of the
Software, in whole or in part, and all derivative works of the
Software, unless such copies or derivative works are solely in the
form of machine-executable object code generated by a source
language processor.
THE SOFTWARE IS PROVIDED "AS IS", WITHOUT WARRANTY OF ANY KIND,
EXPRESS OR IMPLIED, INCLUDING BUT NOT LIMITED TO THE WARRANTIES OF
MERCHANTABILITY, FITNESS FOR A PARTICULAR PURPOSE, TITLE AND
NON-INFRINGEMENT. IN NO EVENT SHALL THE COPYRIGHT HOLDERS OR ANYONE
DISTRIBUTING THE SOFTWARE BE LIABLE FOR ANY DAMAGES OR OTHER
LIABILITY, WHETHER IN CONTRACT, TORT OR OTHERWISE, ARISING FROM, OUT
OF OR IN CONNECTION WITH THE SOFTWARE OR THE USE OR OTHER DEALINGS
IN THE SOFTWARE.
H.5 Cairo License
The following software may be included in this product:
Cairo
You are receiving a copy of the Cairo in both source
and object code in the following DLL (libcairo.dll) or
dynamic libraries
(MySQLWorkbench.app/Contents/Frameworks/libcairo.2.dylib
and MySQLWorkbench.app/Contents/Frameworks/libpixman-1.0.dylib).
The terms of the Oracle license do NOT apply to Cairo;
Oracle distributes it under the GNU Lesser General Public
License Version 2.1 separately from the Oracle programs you
receive. You can also separately obtain and use Cairo
independent of the Oracle programs under a dual license
subject to the terms of the LGPL or the Mozilla Public
License Version 1.1. If you do not wish to install this
program, you may delete libcairo.dll or libcairo.2.dylib
and libpixman-1.0.dylib from the installation directory
or uninstall MySQL Workbench completely.
This component is licensed under Section H.13, “GNU Lesser General Public License Version 2.1,
February 1999”.
H.6 CTemplate (Google Template System) License
The following software may be included in this product:
CTemplate (Google Template System)
Copyright (c) 2005, Google Inc.
All rights reserved.
Redistribution and use in source and binary forms,
with or without modification, are permitted provided
that the following conditions are met:
* Redistributions of source code must retain the
above copyright notice, this list of conditions
and the following disclaimer.
403
cURL (libcurl) License
* Redistributions in binary form must reproduce
the above copyright notice, this list of conditions
and the following disclaimer in the documentation
and/or other materials provided with the distribution.
* Neither the name of Google Inc. nor the names of
its contributors may be used to endorse or promote
products derived from this software without specific
prior written permission.
THIS SOFTWARE IS PROVIDED BY THE COPYRIGHT HOLDERS AND
CONTRIBUTORS "AS IS" AND ANY EXPRESS OR IMPLIED WARRANTIES,
INCLUDING, BUT NOT LIMITED TO, THE IMPLIED WARRANTIES OF
MERCHANTABILITY AND FITNESS FOR A PARTICULAR PURPOSE ARE
DISCLAIMED. IN NO EVENT SHALL THE COPYRIGHT OWNER OR
CONTRIBUTORS BE LIABLE FOR ANY DIRECT, INDIRECT, INCIDENTAL,
SPECIAL, EXEMPLARY, OR CONSEQUENTIAL DAMAGES (INCLUDING, BUT
NOT LIMITED TO, PROCUREMENT OF SUBSTITUTE GOODS OR SERVICES;
LOSS OF USE, DATA, OR PROFITS; OR BUSINESS INTERRUPTION)
HOWEVER CAUSED AND ON ANY THEORY OF LIABILITY, WHETHER IN
CONTRACT, STRICT LIABILITY, OR TORT (INCLUDING NEGLIGENCE
OR OTHERWISE) ARISING IN ANY WAY OUT OF THE USE OF THIS
SOFTWARE, EVEN IF ADVISED OF THE POSSIBILITY OF SUCH DAMAGE.
H.7 cURL (libcurl) License
The following software may be included in this product:
cURL (libcurl)
Use of any of this software is governed by the terms of the license below:
COPYRIGHT AND PERMISSION NOTICE
Copyright (c) 1996 - 2009, Daniel Stenberg, <[email protected]>.
All rights reserved.
Permission to use, copy, modify, and distribute this software for any purpose
with or without fee is hereby granted, provided that the above copyright
notice and this permission notice appear in all copies.
THE SOFTWARE IS PROVIDED "AS IS", WITHOUT WARRANTY OF ANY KIND, EXPRESS OR
IMPLIED, INCLUDING BUT NOT LIMITED TO THE WARRANTIES OF MERCHANTABILITY,
FITNESS FOR A PARTICULAR PURPOSE AND NONINFRINGEMENT OF THIRD PARTY
RIGHTS. IN NO EVENT SHALL THE AUTHORS OR COPYRIGHT HOLDERS BE LIABLE FOR
ANY CLAIM, DAMAGES OR OTHER LIABILITY, WHETHER IN AN ACTION OF CONTRACT, TORT
OR OTHERWISE, ARISING FROM, OUT OF OR IN CONNECTION WITH THE SOFTWARE OR
THE USE OR OTHER DEALINGS IN THE SOFTWARE.
Except as contained in this notice, the name of a copyright holder shall not
be used in advertising or otherwise to promote the sale, use or other
dealings in this Software without prior written authorization of the copyright
holder.
H.8 DockPanel Suite License
The following software may be included in this product:
DockPanel Suite
The MIT License
404
Dojo Toolkit v1.7.0b1 License
Copyright (c) 2007 Weifen Luo (email: [email protected])
Permission is hereby granted, free of charge,
to any person obtaining a copy of this software
and associated documentation files (the "Software"),
to deal in the Software without restriction,
including without limitation the rights to use,
copy, modify, merge, publish, distribute, sublicense,
and/or sell copies of the Software, and to permit
persons to whom the Software is furnished to do so,
subject to the following conditions:
The above copyright notice and this permission
notice shall be included in all copies or substantial
portions of the Software.
THE SOFTWARE IS PROVIDED "AS IS", WITHOUT WARRANTY
OF ANY KIND, EXPRESS OR IMPLIED, INCLUDING BUT NOT
LIMITED TO THE WARRANTIES OF MERCHANTABILITY, FITNESS
FOR A PARTICULAR PURPOSE AND NONINFRINGEMENT. IN NO
EVENT SHALL THE AUTHORS OR COPYRIGHT HOLDERS BE
LIABLE FOR ANY CLAIM, DAMAGES OR OTHER LIABILITY,
WHETHER IN AN ACTION OF CONTRACT, TORT OR OTHERWISE,
ARISING FROM, OUT OF OR IN CONNECTION WITH THE SOFTWARE
OR THE USE OR OTHER DEALINGS IN THE SOFTWARE.
H.9 Dojo Toolkit v1.7.0b1 License
The following software may be included in this product:
Dojo Toolkit v1.7.0b1
Copyright (c) 2005-2006, The Dojo Foundation
All rights reserved.
Redistribution and use in source and binary forms, with or without
modification, are permitted provided that the following conditions
are met:
* Redistributions of source code must retain the above copyright
notice, this list of conditions and the following disclaimer.
* Redistributions in binary form must reproduce the above copyright
notice, this list of conditions and the following disclaimer in
the documentation and/or other materials provided with the
distribution.
* Neither the name of the Dojo Foundation nor the names of its
contributors may be used to endorse or promote products derived
from this software without specific prior written permission.
THIS SOFTWARE IS PROVIDED BY THE COPYRIGHT HOLDERS AND CONTRIBUTORS
"AS IS" AND ANY EXPRESS OR IMPLIED WARRANTIES, INCLUDING, BUT NOT
LIMITED TO, THE IMPLIED WARRANTIES OF MERCHANTABILITY AND FITNESS
FOR A PARTICULAR PURPOSE ARE DISCLAIMED. IN NO EVENT SHALL THE
COPYRIGHT OWNER OR CONTRIBUTORS BE LIABLE FOR ANY DIRECT, INDIRECT,
INCIDENTAL, SPECIAL, EXEMPLARY, OR CONSEQUENTIAL DAMAGES (INCLUDING,
BUT NOT LIMITED TO, PROCUREMENT OF SUBSTITUTE GOODS OR SERVICES;
LOSS OF USE, DATA, OR PROFITS; OR BUSINESS INTERRUPTION) HOWEVER
CAUSED AND ON ANY THEORY OF LIABILITY, WHETHER IN CONTRACT, STRICT
LIABILITY, OR TORT (INCLUDING NEGLIGENCE OR OTHERWISE) ARISING IN
ANY WAY OUT OF THE USE OF THIS SOFTWARE, EVEN IF ADVISED OF THE
POSSIBILITY OF SUCH DAMAGE.
H.10 GDAL/OGR License
The following software may be included in this product:
405
GDAL/OGR License
GDAL/OGR
GDAL/OGR Licensing
==================
This file attempts to include all licenses that apply within the GDAL/OGR
source tree, in particular any that are supposed to be exposed to the end
user for credit requirements for instance. The contents of this file can be
displayed from GDAL commandline utilities using the --license commandline
switch.
GDAL/OGR General
---------------In general GDAL/OGR is licensed under an MIT/X style license with the
following terms:
Permission is hereby granted, free of charge, to any person obtaining a
copy of this software and associated documentation files (the "Software"),
to deal in the Software without restriction, including without limitation
the rights to use, copy, modify, merge, publish, distribute, sublicense,
and/or sell copies of the Software, and to permit persons to whom the
Software is furnished to do so, subject to the following conditions:
The above copyright notice and this permission notice shall be included
in all copies or substantial portions of the Software.
THE SOFTWARE IS PROVIDED "AS IS", WITHOUT WARRANTY OF ANY KIND, EXPRESS
OR IMPLIED, INCLUDING BUT NOT LIMITED TO THE WARRANTIES OF MERCHANTABILITY,
FITNESS FOR A PARTICULAR PURPOSE AND NONINFRINGEMENT. IN NO EVENT SHALL
THE AUTHORS OR COPYRIGHT HOLDERS BE LIABLE FOR ANY CLAIM, DAMAGES OR OTHER
LIABILITY, WHETHER IN AN ACTION OF CONTRACT, TORT OR OTHERWISE, ARISING
FROM, OUT OF OR IN CONNECTION WITH THE SOFTWARE OR THE USE OR OTHER
DEALINGS IN THE SOFTWARE.
gdal/frmts/gtiff/tif_float.c
---------------------------Copyright (c) 2002, Industrial Light & Magic, a division of Lucas
Digital Ltd. LLC
All rights reserved.
Redistribution and use in source and binary forms, with or without
modification, are permitted provided that the following conditions are
met:
*
Redistributions of source code must retain the above copyright
notice, this list of conditions and the following disclaimer.
*
Redistributions in binary form must reproduce the above
copyright notice, this list of conditions and the following disclaimer
in the documentation and/or other materials provided with the
distribution.
*
Neither the name of Industrial Light & Magic nor the names of
its contributors may be used to endorse or promote products derived
from this software without specific prior written permission.
THIS SOFTWARE IS PROVIDED BY THE COPYRIGHT HOLDERS AND CONTRIBUTORS
"AS IS" AND ANY EXPRESS OR IMPLIED WARRANTIES, INCLUDING, BUT NOT
LIMITED TO, THE IMPLIED WARRANTIES OF MERCHANTABILITY AND FITNESS FOR
A PARTICULAR PURPOSE ARE DISCLAIMED. IN NO EVENT SHALL THE COPYRIGHT
OWNER OR CONTRIBUTORS BE LIABLE FOR ANY DIRECT, INDIRECT, INCIDENTAL,
SPECIAL, EXEMPLARY, OR CONSEQUENTIAL DAMAGES (INCLUDING, BUT NOT
LIMITED TO, PROCUREMENT OF SUBSTITUTE GOODS OR SERVICES; LOSS OF USE,
DATA, OR PROFITS; OR BUSINESS INTERRUPTION) HOWEVER CAUSED AND ON ANY
THEORY OF LIABILITY, WHETHER IN CONTRACT, STRICT LIABILITY, OR TORT
(INCLUDING NEGLIGENCE OR OTHERWISE) ARISING IN ANY WAY OUT OF THE USE
406
GDAL/OGR License
OF THIS SOFTWARE, EVEN IF ADVISED OF THE POSSIBILITY OF SUCH DAMAGE.
gdal/frmts/hdf4/hdf-eos/*
-----------------------Copyright (C) 1996 Hughes and Applied Research Corporation
Permission to use, modify, and distribute this software and its documentation
for any purpose without fee is hereby granted, provided that the above
copyright notice appear in all copies and that both that copyright notice and
this permission notice appear in supporting documentation.
gdal/frmts/pcraster/libcsf
-------------------------Copyright (c) 1997-2003, Utrecht University
All rights reserved.
Redistribution and use in source and binary forms, with or without
modification, are permitted provided that the following conditions
are met:
* Redistributions of source code must retain the above copyright
notice, this list of conditions and the following disclaimer.
* Redistributions in binary form must reproduce the above
copyright notice, this list of conditions and the following
disclaimer in the documentation and/or other materials provided
with the distribution.
* Neither the name of Utrecht University nor the names of its contributors
may be used to endorse or promote products derived from this software
without specific prior written permission.
THIS SOFTWARE IS PROVIDED BY THE COPYRIGHT HOLDERS AND CONTRIBUTORS
"AS IS" AND ANY EXPRESS OR IMPLIED WARRANTIES, INCLUDING, BUT NOT
LIMITED TO, THE IMPLIED WARRANTIES OF MERCHANTABILITY AND FITNESS FOR
A PARTICULAR PURPOSE ARE DISCLAIMED. IN NO EVENT SHALL THE COPYRIGHT
OWNER OR CONTRIBUTORS BE LIABLE FOR ANY DIRECT, INDIRECT, INCIDENTAL,
SPECIAL, EXEMPLARY, OR CONSEQUENTIAL DAMAGES (INCLUDING, BUT NOT
LIMITED TO, PROCUREMENT OF SUBSTITUTE GOODS OR SERVICES; LOSS OF USE,
DATA, OR PROFITS; OR BUSINESS INTERRUPTION) HOWEVER CAUSED AND ON ANY
THEORY OF LIABILITY, WHETHER IN CONTRACT, STRICT LIABILITY, OR TORT
(INCLUDING NEGLIGENCE OR OTHERWISE) ARISING IN ANY WAY OUT OF THE USE
OF THIS SOFTWARE, EVEN IF ADVISED OF THE POSSIBILITY OF SUCH DAMAGE.
gdal/frmts/grib/degrib/*
-----------------------The degrib and g2clib source code are modified versions of code produced
by NOAA NWS and are in the public domain subject to the following
restrictions:
http://www.weather.gov/im/softa.htm
DISCLAIMER The United States Government makes no warranty, expressed or
implied, as to the usefulness of the software and documentation for any
purpose. The U.S. Government, its instrumentalities, officers, employees,
and agents assumes no responsibility (1) for the use of the software and
documentation listed below, or (2) to provide technical support to users.
http://www.weather.gov/disclaimer.php
The information on government servers are in the public domain, unless
specifically annotated otherwise, and may be used freely by the public so
long as you do not 1) claim it is your own (e.g. by claiming copyright for
NWS information -- see below), 2) use it in a manner that implies an
endorsement or affiliation with NOAA/NWS, or 3) modify it in content and
then present it as official government material. You also cannot present
407
GDAL/OGR License
information of your own in a way that makes it appear to be official
government information..
The user assumes the entire risk related to its use of this data. NWS is
providing this data "as is," and NWS disclaims any and all warranties,
whether express or implied, including (without limitation) any implied
warranties of merchantability or fitness for a particular purpose. In no
event will NWS be liable to you or to any third party for any direct,
indirect, incidental, consequential, special or exemplary damages or lost
profit resulting from any use or misuse of this data.
As required by 17 U.S.C. 403, third parties producing copyrighted works
consisting predominantly of the material appearing in NWS Web pages must
provide notice with such work(s) identifying the NWS material incorporated
and stating that such material is not subject to copyright protection.
port/cpl_minizip*
----------------This is version 2005-Feb-10 of the Info-ZIP copyright and license.
The definitive version of this document should be available at
ftp://ftp.info-zip.org/pub/infozip/license.html indefinitely.
Copyright (c) 1990-2005 Info-ZIP. All rights reserved.
For the purposes of this copyright and license, "Info-ZIP" is defined as
the following set of individuals:
Mark Adler, John Bush, Karl Davis, Harald Denker, Jean-Michel Dubois,
Jean-loup Gailly, Hunter Goatley, Ed Gordon, Ian Gorman, Chris Herborth,
Dirk Haase, Greg Hartwig, Robert Heath, Jonathan Hudson, Paul Kienitz,
David Kirschbaum, Johnny Lee, Onno van der Linden, Igor Mandrichenko,
Steve P. Miller, Sergio Monesi, Keith Owens, George Petrov, Greg Roelofs,
Kai Uwe Rommel, Steve Salisbury, Dave Smith, Steven M. Schweda,
Christian Spieler, Cosmin Truta, Antoine Verheijen, Paul von Behren,
Rich Wales, Mike White
This software is provided "as is," without warranty of any kind, express
or implied. In no event shall Info-ZIP or its contributors be held liable
for any direct, indirect, incidental, special or consequential damages
arising out of the use of or inability to use this software.
Permission is granted to anyone to use this software for any purpose,
including commercial applications, and to alter it and redistribute it
freely, subject to the following restrictions:
1. Redistributions of source code must retain the above copyright notice,
definition, disclaimer, and this list of conditions.
2. Redistributions in binary form (compiled executables) must reproduce
the above copyright notice, definition, disclaimer, and this list of
conditions in documentation and/or other materials provided with the
distribution. The sole exception to this condition is redistribution
of a standard UnZipSFX binary (including SFXWiz) as part of a
self-extracting archive; that is permitted without inclusion of this
license, as long as the normal SFX banner has not been removed from
the binary or disabled.
3. Altered versions--including, but not limited to, ports to new operating
systems, existing ports with new graphical interfaces, and dynamic,
shared, or static library versions--must be plainly marked as such
and must not be misrepresented as being the original source. Such
altered versions also must not be misrepresented as being Info-ZIP
releases--including, but not limited to, labeling of the altered
versions with the names "Info-ZIP" (or any variation thereof, including,
but not limited to, different capitalizations), "Pocket UnZip," "WiZ"
or "MacZip" without the explicit permission of Info-ZIP. Such altered
versions are further prohibited from misrepresentative use of the
408
GLib License (for MySQL Workbench)
Zip-Bugs or Info-ZIP e-mail addresses or of the Info-ZIP URL(s).
4. Info-ZIP retains the right to use the names "Info-ZIP," "Zip," "UnZip,"
"UnZipSFX," "WiZ," "Pocket UnZip," "Pocket Zip," and "MacZip" for its
own source and binary releases.
gdal/ogr/ogrsf_frmts/dxf/intronurbs.cpp
--------------------------------------This code is derived from the code associated with the book "An Introduction
to NURBS" by David F. Rogers. More information on the book and the code is
available at:
http://www.nar-associates.com/nurbs/
Copyright (c) 2009, David F. Rogers
All rights reserved.
Redistribution and use in source and binary forms, with or without
modification, are permitted provided that the following conditions are met:
* Redistributions of source code must retain the above copyright notice,
this list of conditions and the following disclaimer.
* Redistributions in binary form must reproduce the above copyright notice,
this list of conditions and the following disclaimer in the documentation
and/or other materials provided with the distribution.
* Neither the name of the David F. Rogers nor the names of its contributors
may be used to endorse or promote products derived from this software
without specific prior written permission.
THIS SOFTWARE IS PROVIDED BY THE COPYRIGHT HOLDERS AND CONTRIBUTORS "AS IS"
AND ANY EXPRESS OR IMPLIED WARRANTIES, INCLUDING, BUT NOT LIMITED TO, THE
IMPLIED WARRANTIES OF MERCHANTABILITY AND FITNESS FOR A PARTICULAR PURPOSE
ARE DISCLAIMED. IN NO EVENT SHALL THE COPYRIGHT HOLDER OR CONTRIBUTORS BE
LIABLE FOR ANY DIRECT, INDIRECT, INCIDENTAL, SPECIAL, EXEMPLARY, OR
CONSEQUENTIAL DAMAGES (INCLUDING, BUT NOT LIMITED TO, PROCUREMENT OF
SUBSTITUTE GOODS OR SERVICES; LOSS OF USE, DATA, OR PROFITS; OR BUSINESS
INTERRUPTION) HOWEVER CAUSED AND ON ANY THEORY OF LIABILITY, WHETHER IN
CONTRACT, STRICT LIABILITY, OR TORT (INCLUDING NEGLIGENCE OR OTHERWISE)
ARISING IN ANY WAY OUT OF THE USE OF THIS SOFTWARE, EVEN IF ADVISED OF THE
POSSIBILITY OF SUCH DAMAGE.
H.11 GLib License (for MySQL Workbench)
The following software may be included in this product:
GLib
You are receiving a copy of the GLib library in both source and
object code in the following folder: C:\Program Files
(x86)\MySQL\MySQLWorkbench 5.2\ on Windows and
MySQLWorkbench.app/Contents/Frameworks on Mac OS X. The terms of
the Oracle license do NOT apply to the GLib library; it is licensed
under the following license, separately from the Oracle programs
you receive. If you do not wish to install this library, you may
go to the folder C:\Program Files (x86)\MySQL\MySQL Workbench 5.2\
and remove or replace the libglib-2.0-0.dll, libgmodule-2.0-0.dll,
libgobject-2.0-0.dll and libgthread-2.0-0.dll files if present on
Windows or go to the folder MySQLWorkbench.app/Contents/Frameworks
and remove or replace the files libglib-2.*.dylib, libgmodule-2.*.dylib
and libgthread-2.*.dylib on Mac OS X, but the Oracle program might
not operate properly or at all without the library.
409
Glitz License
This component is licensed under Section H.13, “GNU Lesser General Public License Version 2.1,
February 1999”.
H.12 Glitz License
The following software may be included in this product:
Glitz
Copyright © 2004 David Reveman, Peter Nilsson
Permission to use, copy, modify, distribute, and sell
this software and its documentation for any purpose is
hereby granted without fee, provided that the above
copyright notice appear in all copies and that both
that copyright notice and this permission notice appear
in supporting documentation, and that the names of
David Reveman and Peter Nilsson not be used in advertising
or publicity pertaining to distribution of the software
without specific, written prior permission. David Reveman
and Peter Nilsson makes no representations about the
suitability of this software for any purpose. It is
provided "as is" without express or implied warranty.
DAVID REVEMAN AND PETER NILSSON DISCLAIMS ALL WARRANTIES
WITH REGARD TO THIS SOFTWARE, INCLUDING ALL IMPLIED
WARRANTIES OF MERCHANTABILITY AND FITNESS, IN NO EVENT
SHALL DAVID REVEMAN AND PETER NILSSON BE LIABLE FOR ANY
SPECIAL, INDIRECT OR CONSEQUENTIAL DAMAGES OR ANY DAMAGES
WHATSOEVER RESULTING FROM LOSS OF USE, DATA OR PROFITS,
WHETHER IN AN ACTION OF CONTRACT, NEGLIGENCE OR OTHER
TORTIOUS ACTION, ARISING OUT OF OR IN CONNECTION WITH
THE USE OR PERFORMANCE OF THIS SOFTWARE.
H.13 GNU Lesser General Public License Version 2.1, February 1999
The following applies to all products licensed under the
GNU Lesser General Public License, Version 2.1: You may
not use the identified files except in compliance with
the GNU Lesser General Public License, Version 2.1 (the
"License"). You may obtain a copy of the License at
http://www.gnu.org/licenses/lgpl-2.1.html. A copy of the
license is also reproduced below. Unless required by
applicable law or agreed to in writing, software distributed
under the License is distributed on an "AS IS" BASIS,
WITHOUT WARRANTIES OR CONDITIONS OF ANY KIND, either express
or implied. See the License for the specific language governing
permissions and limitations under the License.
GNU LESSER GENERAL PUBLIC LICENSE
Version 2.1, February 1999
Copyright (C) 1991, 1999 Free Software Foundation, Inc.
51 Franklin Street, Fifth Floor, Boston, MA 02110-1301 USA
Everyone is permitted to copy and distribute verbatim copies
of this license document, but changing it is not allowed.
[This is the first released version of the Lesser GPL. It also counts
as the successor of the GNU Library Public License, version 2, hence
the version number 2.1.]
Preamble
410
GNU Lesser General Public License Version 2.1, February 1999
The licenses for most software are designed to take away your
freedom to share and change it. By contrast, the GNU General Public
Licenses are intended to guarantee your freedom to share and change
free software--to make sure the software is free for all its users.
This license, the Lesser General Public License, applies to some
specially designated software packages--typically libraries--of the
Free Software Foundation and other authors who decide to use it. You
can use it too, but we suggest you first think carefully about whether
this license or the ordinary General Public License is the better
strategy to use in any particular case, based on the explanations below.
When we speak of free software, we are referring to freedom of use,
not price. Our General Public Licenses are designed to make sure that
you have the freedom to distribute copies of free software (and charge
for this service if you wish); that you receive source code or can get
it if you want it; that you can change the software and use pieces of
it in new free programs; and that you are informed that you can do
these things.
To protect your rights, we need to make restrictions that forbid
distributors to deny you these rights or to ask you to surrender these
rights. These restrictions translate to certain responsibilities for
you if you distribute copies of the library or if you modify it.
For example, if you distribute copies of the library, whether gratis
or for a fee, you must give the recipients all the rights that we gave
you. You must make sure that they, too, receive or can get the source
code. If you link other code with the library, you must provide
complete object files to the recipients, so that they can relink them
with the library after making changes to the library and recompiling
it. And you must show them these terms so they know their rights.
We protect your rights with a two-step method: (1) we copyright the
library, and (2) we offer you this license, which gives you legal
permission to copy, distribute and/or modify the library.
To protect each distributor, we want to make it very clear that
there is no warranty for the free library. Also, if the library is
modified by someone else and passed on, the recipients should know
that what they have is not the original version, so that the original
author's reputation will not be affected by problems that might be
introduced by others.
Finally, software patents pose a constant threat to the existence of
any free program. We wish to make sure that a company cannot
effectively restrict the users of a free program by obtaining a
restrictive license from a patent holder. Therefore, we insist that
any patent license obtained for a version of the library must be
consistent with the full freedom of use specified in this license.
Most GNU software, including some libraries, is covered by the
ordinary GNU General Public License. This license, the GNU Lesser
General Public License, applies to certain designated libraries, and
is quite different from the ordinary General Public License. We use
this license for certain libraries in order to permit linking those
libraries into non-free programs.
When a program is linked with a library, whether statically or using
a shared library, the combination of the two is legally speaking a
combined work, a derivative of the original library. The ordinary
General Public License therefore permits such linking only if the
entire combination fits its criteria of freedom. The Lesser General
Public License permits more lax criteria for linking other code with
the library.
We call this license the "Lesser" General Public License because it
411
GNU Lesser General Public License Version 2.1, February 1999
does Less to protect the user's freedom than the ordinary General
Public License. It also provides other free software developers Less
of an advantage over competing non-free programs. These disadvantages
are the reason we use the ordinary General Public License for many
libraries. However, the Lesser license provides advantages in certain
special circumstances.
For example, on rare occasions, there may be a special need to
encourage the widest possible use of a certain library, so that it
becomes a de-facto standard. To achieve this, non-free programs
must be allowed to use the library. A more frequent case is that
a free library does the same job as widely used non-free libraries.
In this case, there is little to gain by limiting the free library
to free software only, so we use the Lesser General Public License.
In other cases, permission to use a particular library in non-free
programs enables a greater number of people to use a large body of
free software. For example, permission to use the GNU C Library in
non-free programs enables many more people to use the whole GNU
operating system, as well as its variant, the GNU/Linux operating
system.
Although the Lesser General Public License is Less protective of the
users' freedom, it does ensure that the user of a program that is
linked with the Library has the freedom and the wherewithal to run
that program using a modified version of the Library.
The precise terms and conditions for copying, distribution and
modification follow. Pay close attention to the difference between a
"work based on the library" and a "work that uses the library". The
former contains code derived from the library, whereas the latter must
be combined with the library in order to run.
GNU LESSER GENERAL PUBLIC LICENSE
TERMS AND CONDITIONS FOR COPYING, DISTRIBUTION AND MODIFICATION
0. This License Agreement applies to any software library or other
program which contains a notice placed by the copyright holder or
other authorized party saying it may be distributed under the terms of
this Lesser General Public License (also called "this License").
Each licensee is addressed as "you".
A "library" means a collection of software functions and/or data
prepared so as to be conveniently linked with application programs
(which use some of those functions and data) to form executables.
The "Library", below, refers to any such software library or work
which has been distributed under these terms. A "work based on the
Library" means either the Library or any derivative work under
copyright law: that is to say, a work containing the Library or a
portion of it, either verbatim or with modifications and/or translated
straightforwardly into another language. (Hereinafter, translation is
included without limitation in the term "modification".)
"Source code" for a work means the preferred form of the work for
making modifications to it. For a library, complete source code means
all the source code for all modules it contains, plus any associated
interface definition files, plus the scripts used to control
compilation and installation of the library.
Activities other than copying, distribution and modification are not
covered by this License; they are outside its scope. The act of
running a program using the Library is not restricted, and output from
such a program is covered only if its contents constitute a work based
on the Library (independent of the use of the Library in a tool for
writing it). Whether that is true depends on what the Library does
and what the program that uses the Library does.
412
GNU Lesser General Public License Version 2.1, February 1999
1. You may copy and distribute verbatim copies of the Library's
complete source code as you receive it, in any medium, provided that
you conspicuously and appropriately publish on each copy an
appropriate copyright notice and disclaimer of warranty; keep intact
all the notices that refer to this License and to the absence of any
warranty; and distribute a copy of this License along with the
Library.
You may charge a fee for the physical act of transferring a copy,
and you may at your option offer warranty protection in exchange for a
fee.
2. You may modify your copy or copies of the Library or any portion
of it, thus forming a work based on the Library, and copy and
distribute such modifications or work under the terms of Section 1
above, provided that you also meet all of these conditions:
a) The modified work must itself be a software library.
b) You must cause the files modified to carry prominent notices
stating that you changed the files and the date of any change.
c) You must cause the whole of the work to be licensed at no
charge to all third parties under the terms of this License.
d) If a facility in the modified Library refers to a function or a
table of data to be supplied by an application program that uses
the facility, other than as an argument passed when the facility
is invoked, then you must make a good faith effort to ensure that,
in the event an application does not supply such function or
table, the facility still operates, and performs whatever part of
its purpose remains meaningful.
(For example, a function in a library to compute square roots has
a purpose that is entirely well-defined independent of the
application. Therefore, Subsection 2d requires that any
application-supplied function or table used by this function must
be optional: if the application does not supply it, the square
root function must still compute square roots.)
These requirements apply to the modified work as a whole. If
identifiable sections of that work are not derived from the Library,
and can be reasonably considered independent and separate works in
themselves, then this License, and its terms, do not apply to those
sections when you distribute them as separate works. But when you
distribute the same sections as part of a whole which is a work based
on the Library, the distribution of the whole must be on the terms of
this License, whose permissions for other licensees extend to the
entire whole, and thus to each and every part regardless of who wrote
it.
Thus, it is not the intent of this section to claim rights or contest
your rights to work written entirely by you; rather, the intent is to
exercise the right to control the distribution of derivative or
collective works based on the Library.
In addition, mere aggregation of another work not based on the Library
with the Library (or with a work based on the Library) on a volume of
a storage or distribution medium does not bring the other work under
the scope of this License.
3. You may opt to apply the terms of the ordinary GNU General Public
License instead of this License to a given copy of the Library. To do
this, you must alter all the notices that refer to this License, so
that they refer to the ordinary GNU General Public License, version 2,
instead of to this License. (If a newer version than version 2 of the
413
GNU Lesser General Public License Version 2.1, February 1999
ordinary GNU General Public License has appeared, then you can specify
that version instead if you wish.) Do not make any other change in
these notices.
Once this change is made in a given copy, it is irreversible for
that copy, so the ordinary GNU General Public License applies to all
subsequent copies and derivative works made from that copy.
This option is useful when you wish to copy part of the code of
the Library into a program that is not a library.
4. You may copy and distribute the Library (or a portion or
derivative of it, under Section 2) in object code or executable form
under the terms of Sections 1 and 2 above provided that you accompany
it with the complete corresponding machine-readable source code, which
must be distributed under the terms of Sections 1 and 2 above on a
medium customarily used for software interchange.
If distribution of object code is made by offering access to copy
from a designated place, then offering equivalent access to copy the
source code from the same place satisfies the requirement to
distribute the source code, even though third parties are not
compelled to copy the source along with the object code.
5. A program that contains no derivative of any portion of the
Library, but is designed to work with the Library by being compiled or
linked with it, is called a "work that uses the Library". Such a
work, in isolation, is not a derivative work of the Library, and
therefore falls outside the scope of this License.
However, linking a "work that uses the Library" with the Library
creates an executable that is a derivative of the Library (because it
contains portions of the Library), rather than a "work that uses the
library". The executable is therefore covered by this License.
Section 6 states terms for distribution of such executables.
When a "work that uses the Library" uses material from a header file
that is part of the Library, the object code for the work may be a
derivative work of the Library even though the source code is not.
Whether this is true is especially significant if the work can be
linked without the Library, or if the work is itself a library. The
threshold for this to be true is not precisely defined by law.
If such an object file uses only numerical parameters, data
structure layouts and accessors, and small macros and small inline
functions (ten lines or less in length), then the use of the object
file is unrestricted, regardless of whether it is legally a derivative
work. (Executables containing this object code plus portions of the
Library will still fall under Section 6.)
Otherwise, if the work is a derivative of the Library, you may
distribute the object code for the work under the terms of Section 6.
Any executables containing that work also fall under Section 6,
whether or not they are linked directly with the Library itself.
6. As an exception to the Sections above, you may also combine or
link a "work that uses the Library" with the Library to produce a
work containing portions of the Library, and distribute that work
under terms of your choice, provided that the terms permit
modification of the work for the customer's own use and reverse
engineering for debugging such modifications.
You must give prominent notice with each copy of the work that the
Library is used in it and that the Library and its use are covered by
this License. You must supply a copy of this License. If the work
during execution displays copyright notices, you must include the
copyright notice for the Library among them, as well as a reference
414
GNU Lesser General Public License Version 2.1, February 1999
directing the user to the copy of this License.
of these things:
Also, you must do one
a) Accompany the work with the complete corresponding
machine-readable source code for the Library including whatever
changes were used in the work (which must be distributed under
Sections 1 and 2 above); and, if the work is an executable linked
with the Library, with the complete machine-readable "work that
uses the Library", as object code and/or source code, so that the
user can modify the Library and then relink to produce a modified
executable containing the modified Library. (It is understood
that the user who changes the contents of definitions files in the
Library will not necessarily be able to recompile the application
to use the modified definitions.)
b) Use a suitable shared library mechanism for linking with the
Library. A suitable mechanism is one that (1) uses at run time a
copy of the library already present on the user's computer system,
rather than copying library functions into the executable, and (2)
will operate properly with a modified version of the library, if
the user installs one, as long as the modified version is
interface-compatible with the version that the work was made with.
c) Accompany the work with a written offer, valid for at
least three years, to give the same user the materials
specified in Subsection 6a, above, for a charge no more
than the cost of performing this distribution.
d) If distribution of the work is made by offering access to copy
from a designated place, offer equivalent access to copy the above
specified materials from the same place.
e) Verify that the user has already received a copy of these
materials or that you have already sent this user a copy.
For an executable, the required form of the "work that uses the
Library" must include any data and utility programs needed for
reproducing the executable from it. However, as a special exception,
the materials to be distributed need not include anything that is
normally distributed (in either source or binary form) with the major
components (compiler, kernel, and so on) of the operating system on
which the executable runs, unless that component itself accompanies
the executable.
It may happen that this requirement contradicts the license
restrictions of other proprietary libraries that do not normally
accompany the operating system. Such a contradiction means you cannot
use both them and the Library together in an executable that you
distribute.
7. You may place library facilities that are a work based on the
Library side-by-side in a single library together with other library
facilities not covered by this License, and distribute such a combined
library, provided that the separate distribution of the work based on
the Library and of the other library facilities is otherwise
permitted, and provided that you do these two things:
a) Accompany the combined library with a copy of the same work
based on the Library, uncombined with any other library
facilities. This must be distributed under the terms of the
Sections above.
b) Give prominent notice with the combined library of the fact
that part of it is a work based on the Library, and explaining
where to find the accompanying uncombined form of the same work.
8. You may not copy, modify, sublicense, link with, or distribute
415
GNU Lesser General Public License Version 2.1, February 1999
the Library except as expressly provided under this License. Any
attempt otherwise to copy, modify, sublicense, link with, or
distribute the Library is void, and will automatically terminate your
rights under this License. However, parties who have received copies,
or rights, from you under this License will not have their licenses
terminated so long as such parties remain in full compliance.
9. You are not required to accept this License, since you have not
signed it. However, nothing else grants you permission to modify or
distribute the Library or its derivative works. These actions are
prohibited by law if you do not accept this License. Therefore, by
modifying or distributing the Library (or any work based on the
Library), you indicate your acceptance of this License to do so, and
all its terms and conditions for copying, distributing or modifying
the Library or works based on it.
10. Each time you redistribute the Library (or any work based on the
Library), the recipient automatically receives a license from the
original licensor to copy, distribute, link with or modify the Library
subject to these terms and conditions. You may not impose any further
restrictions on the recipients' exercise of the rights granted herein.
You are not responsible for enforcing compliance by third parties with
this License.
11. If, as a consequence of a court judgment or allegation of patent
infringement or for any other reason (not limited to patent issues),
conditions are imposed on you (whether by court order, agreement or
otherwise) that contradict the conditions of this License, they do not
excuse you from the conditions of this License. If you cannot
distribute so as to satisfy simultaneously your obligations under this
License and any other pertinent obligations, then as a consequence you
may not distribute the Library at all. For example, if a patent
license would not permit royalty-free redistribution of the Library by
all those who receive copies directly or indirectly through you, then
the only way you could satisfy both it and this License would be to
refrain entirely from distribution of the Library.
If any portion of this section is held invalid or unenforceable under
any particular circumstance, the balance of the section is intended
to apply, and the section as a whole is intended to apply in other
circumstances.
It is not the purpose of this section to induce you to infringe any
patents or other property right claims or to contest validity of any
such claims; this section has the sole purpose of protecting the
integrity of the free software distribution system which is
implemented by public license practices. Many people have made
generous contributions to the wide range of software distributed
through that system in reliance on consistent application of that
system; it is up to the author/donor to decide if he or she is willing
to distribute software through any other system and a licensee cannot
impose that choice.
This section is intended to make thoroughly clear what is believed to
be a consequence of the rest of this License.
12. If the distribution and/or use of the Library is restricted in
certain countries either by patents or by copyrighted interfaces, the
original copyright holder who places the Library under this License
may add an explicit geographical distribution limitation excluding
those countries, so that distribution is permitted only in or among
countries not thus excluded. In such case, this License incorporates
the limitation as if written in the body of this License.
13. The Free Software Foundation may publish revised and/or new
versions of the Lesser General Public License from time to time.
Such new versions will be similar in spirit to the present version,
416
GNU Lesser General Public License Version 2.1, February 1999
but may differ in detail to address new problems or concerns.
Each version is given a distinguishing version number. If the Library
specifies a version number of this License which applies to it and
"any later version", you have the option of following the terms and
conditions either of that version or of any later version published by
the Free Software Foundation. If the Library does not specify a
license version number, you may choose any version ever published by
the Free Software Foundation.
14. If you wish to incorporate parts of the Library into other free
programs whose distribution conditions are incompatible with these,
write to the author to ask for permission. For software which is
copyrighted by the Free Software Foundation, write to the Free
Software Foundation; we sometimes make exceptions for this. Our
decision will be guided by the two goals of preserving the free status
of all derivatives of our free software and of promoting the sharing
and reuse of software generally.
NO WARRANTY
15. BECAUSE THE LIBRARY IS LICENSED FREE OF CHARGE, THERE IS NO
WARRANTY FOR THE LIBRARY, TO THE EXTENT PERMITTED BY APPLICABLE LAW.
EXCEPT WHEN OTHERWISE STATED IN WRITING THE COPYRIGHT HOLDERS AND/OR
OTHER PARTIES PROVIDE THE LIBRARY "AS IS" WITHOUT WARRANTY OF ANY
KIND, EITHER EXPRESSED OR IMPLIED, INCLUDING, BUT NOT LIMITED TO, THE
IMPLIED WARRANTIES OF MERCHANTABILITY AND FITNESS FOR A PARTICULAR
PURPOSE. THE ENTIRE RISK AS TO THE QUALITY AND PERFORMANCE OF THE
LIBRARY IS WITH YOU. SHOULD THE LIBRARY PROVE DEFECTIVE, YOU ASSUME
THE COST OF ALL NECESSARY SERVICING, REPAIR OR CORRECTION.
16. IN NO EVENT UNLESS REQUIRED BY APPLICABLE LAW OR AGREED TO IN
WRITING WILL ANY COPYRIGHT HOLDER, OR ANY OTHER PARTY WHO MAY MODIFY
AND/OR REDISTRIBUTE THE LIBRARY AS PERMITTED ABOVE, BE LIABLE TO YOU
FOR DAMAGES, INCLUDING ANY GENERAL, SPECIAL, INCIDENTAL OR
CONSEQUENTIAL DAMAGES ARISING OUT OF THE USE OR INABILITY TO USE THE
LIBRARY (INCLUDING BUT NOT LIMITED TO LOSS OF DATA OR DATA BEING
RENDERED INACCURATE OR LOSSES SUSTAINED BY YOU OR THIRD PARTIES OR A
FAILURE OF THE LIBRARY TO OPERATE WITH ANY OTHER SOFTWARE), EVEN IF
SUCH HOLDER OR OTHER PARTY HAS BEEN ADVISED OF THE POSSIBILITY OF SUCH
DAMAGES.
END OF TERMS AND CONDITIONS
How to Apply These Terms to Your New Libraries
If you develop a new library, and you want it to be of the greatest
possible use to the public, we recommend making it free software that
everyone can redistribute and change. You can do so by permitting
redistribution under these terms (or, alternatively, under the terms
of the ordinary General Public License).
To apply these terms, attach the following notices to the library.
It is safest to attach them to the start of each source file to most
effectively convey the exclusion of warranty; and each file should
have at least the "copyright" line and a pointer to where the full
notice is found.
<one line to give the library's name and a brief idea of what it does.>
Copyright (C) <year> <name of author>
This library is free software; you can redistribute it and/or
modify it under the terms of the GNU Lesser General Public
License as published by the Free Software Foundation; either
version 2.1 of the License, or (at your option) any later version.
This library is distributed in the hope that it will be useful,
417
HtmlRenderer (System.Drawing.Html)
but WITHOUT ANY WARRANTY; without even the implied warranty of
MERCHANTABILITY or FITNESS FOR A PARTICULAR PURPOSE. See the GNU
Lesser General Public License for more details.
You should have received a copy of the GNU Lesser General Public
License along with this library; if not, write to the Free Software
Foundation, Inc., 51 Franklin Street, Fifth Floor, Boston, MA
02110-1301 USA
Also add information on how to contact you by electronic and paper mail.
You should also get your employer (if you work as a programmer) or your
school, if any, to sign a "copyright disclaimer" for the library, if
necessary. Here is a sample; alter the names:
Yoyodyne, Inc., hereby disclaims all copyright interest in the
library `Frob' (a library for tweaking knobs) written by James
Random Hacker.
<signature of Ty Coon>, 1 April 1990
Ty Coon, President of Vice
That's all there is to it!
H.14 HtmlRenderer (System.Drawing.Html)
The following software may be included in this product:
HtmlRenderer (System.Drawing.Html)
Copyright (c) 2009, José Manuel Menéndez Poo
Copyright (c) 2013, Arthur Teplitzki
All rights reserved.
Redistribution and use in source and binary forms,
with or without modification, are permitted provided
that the following conditions are met:
* Redistributions of source code must retain the
above copyright notice, this list of conditions
and the following disclaimer.
* Redistributions in binary form must reproduce
the above copyright notice, this list of conditions
and the following disclaimer in the documentation
and/or other materials provided with the distribution.
* Neither the name of menendezpoo.com nor the names
of its contributors may be used to endorse or promote
products derived from this software without specific
prior written permission.
THIS SOFTWARE IS PROVIDED BY THE COPYRIGHT HOLDERS
AND CONTRIBUTORS "AS IS" AND ANY EXPRESS OR IMPLIED
WARRANTIES, INCLUDING, BUT NOT LIMITED TO, THE
IMPLIED WARRANTIES OF MERCHANTABILITY AND FITNESS
FOR A PARTICULAR PURPOSE ARE DISCLAIMED. IN NO EVENT
SHALL THE COPYRIGHT OWNER OR CONTRIBUTORS BE LIABLE
FOR ANY DIRECT, INDIRECT, INCIDENTAL, SPECIAL, EXEMPLARY,
OR CONSEQUENTIAL DAMAGES (INCLUDING, BUT NOT LIMITED
TO, PROCUREMENT OF SUBSTITUTE GOODS OR SERVICES; LOSS
OF USE, DATA, OR PROFITS; OR BUSINESS INTERRUPTION)
HOWEVER CAUSED AND ON ANY THEORY OF LIABILITY, WHETHER
IN CONTRACT, STRICT LIABILITY, OR TORT (INCLUDING
NEGLIGENCE OR OTHERWISE) ARISING IN ANY WAY OUT OF
418
iODBC License
THE USE OF THIS SOFTWARE, EVEN IF ADVISED OF THE
POSSIBILITY OF SUCH DAMAGE.
H.15 iODBC License
The following software may be included in this product:
iODBC
In accordance with the terms of the iODBC licensing scheme set forth below,
Oracle is hereby making the election to license iODBC under the BSD license.
iODBC Driver Manager
Copyright (C) 1995 by Ke Jin <[email protected]>
Copyright (C) 1996-2009 by OpenLink Software <[email protected]>
All Rights Reserved.
This software is released under either the GNU Library General Public
License (see LICENSE.LGPL) or the BSD License (see LICENSE.BSD).
Note that the only valid version of the LGPL license as far as this
project is concerned is the original GNU Library General Public License
Version 2, dated June 1991.
While not mandated by the BSD license, any patches you make to
the iODBC may be contributed back into the iODBC project at your
discretion. Contributions will benefit the Open Source and Data Access
community as a whole. Submissions may be made at http://www.iodbc.org.
LICENSE.BSD:
Copyright (C) 1995-2009, OpenLink Software Inc and Ke Jin.
All rights reserved.
.
Redistribution and use in source and binary forms, with or without
modification, are permitted provided that the following conditions
are met:
1. Redistributions of source code must retain the above copyright notice,
this list of conditions and the following disclaimer.
2. Redistributions in binary form must reproduce the above copyright
notice, this list of conditions and the following disclaimer in the
documentation and/or other materials provided with the distribution.
3. Neither the name of OpenLink Software Inc. nor the names of its
contributors may be used to endorse or promote products derived from
this software without specific prior written permission.
THIS SOFTWARE IS PROVIDED BY THE COPYRIGHT HOLDERS AND CONTRIBUTORS
"AS IS" AND ANY EXPRESS OR IMPLIED WARRANTIES, INCLUDING, BUT NOT LIMITED TO,
THE IMPLIED WARRANTIES OF MERCHANTABILITY AND FITNESS FOR A PARTICULAR
PURPOSE ARE DISCLAIMED. IN NO EVENT SHALL OPENLINK OR CONTRIBUTORS
BE LIABLE FOR ANY DIRECT, INDIRECT, INCIDENTAL, SPECIAL, EXEMPLARY,
OR CONSEQUENTIAL DAMAGES (INCLUDING, BUT NOT LIMITED TO, PROCUREMENT OF
SUBSTITUTE GOODS OR SERVICES; LOSS OF USE, DATA, OR PROFITS; OR BUSINESS
INTERRUPTION) HOWEVER CAUSED AND ON ANY THEORY OF LIABILITY, WHETHER IN
CONTRACT, STRICT LIABILITY, OR TORT (INCLUDING NEGLIGENCE OR OTHERWISE)
ARISING IN ANY WAY OUT OF THE USE OF THIS SOFTWARE, EVEN IF ADVISED OF
THE POSSIBILITY OF SUCH DAMAGE.
H.16 Libiconv License
The following software may be included in this product:
419
Libintl License
Libiconv
You may be receiving a copy of the GNU LIBICONV Library with this MySQL
product. The terms of the Oracle license do NOT apply to the GNU LIBICONV
Library; it is licensed under the following license, separately from the
Oracle programs you receive. If you do not wish to install this program,
you may delete iconv.dll or libiconv.* files.
This component is licensed under Section H.13, “GNU Lesser General Public License Version 2.1,
February 1999”.
H.17 Libintl License
The following software may be included in this product:
libintl
Copyright (C) 1994 X Consortium
Permission is hereby granted, free of charge, to any person obtaining a copy of
this software and associated documentation files (the "Software"), to deal in
the Software without restriction, including without limitation the rights to
use, copy, modify, merge, publish, distribute, sublicense, and/or sell copies of
the Software, and to permit persons to whom the Software is furnished to do so,
subject to the following conditions:
The above copyright notice and this permission notice shall be included in all
copies or substantial portions of the Software.
THE SOFTWARE IS PROVIDED "AS IS", WITHOUT WARRANTY OF ANY KIND, EXPRESS OR
IMPLIED, INCLUDING BUT NOT LIMITED TO THE WARRANTIES OF MERCHANTABILITY, FITNESS
FOR A PARTICULAR PURPOSE AND NONINFRINGEMENT. IN NO EVENT SHALL THE X CONSORTIUM
BE LIABLE FOR ANY CLAIM, DAMAGES OR OTHER LIABILITY, WHETHER IN AN ACTION OF
CONTRACT, TORT OR OTHERWISE, ARISING FROM, OUT OF OR IN CONNECTION WITH THE
SOFTWARE OR THE USE OR OTHER DEALINGS IN THE SOFTWARE.
Except as contained in this notice, the name of the X Consortium shall not be
used in advertising or otherwise to promote the sale, use or other dealings in
this Software without prior written authorization from the X Consortium.
FSF changes to this file are in the public domain.
Copyright 1996-2007 Free Software Foundation, Inc. Taken from GNU libtool, 2001
Originally by Gordon Matzigkeit <[email protected]>, 1996
This file is free software; the Free Software Foundation gives unlimited
permission to copy and/or distribute it, with or without modifications, as long
as this notice is preserved.
You are receiving a copy of the libintl library. The terms of the Oracle
license do NOT apply to the libintl library; it is licensed under the
following license, separately from the Oracle programs you receive. If you do
not wish to install this program, you may delete the intl.dll or libintl.*
files.
This component is licensed under Section H.13, “GNU Lesser General Public License Version 2.1,
February 1999”.
H.18 libpng License
The following software may be included in this product:
420
libpng License
libpng
COPYRIGHT NOTICE, DISCLAIMER, and LICENSE:
If you modify libpng you may insert additional notices immediately following
this sentence.
This code is released under the libpng license.
libpng versions 1.2.6, August 15, 2004, through 1.5.10, March 29, 2012, are
Copyright (c) 2004, 2006-2011 Glenn Randers-Pehrson, and are
distributed according to the same disclaimer and license as libpng-1.2.5
with the following individual added to the list of Contributing Authors
Cosmin Truta
libpng versions 1.0.7, July 1, 2000, through 1.2.5 - October 3, 2002, are
Copyright (c) 2000-2002 Glenn Randers-Pehrson, and are
distributed according to the same disclaimer and license as libpng-1.0.6
with the following individuals added to the list of Contributing Authors
Simon-Pierre Cadieux
Eric S. Raymond
Gilles Vollant
and with the following additions to the disclaimer:
There is no warranty against interference with your enjoyment of the
library or against infringement. There is no warranty that our
efforts or the library will fulfill any of your particular purposes
or needs. This library is provided with all faults, and the entire
risk of satisfactory quality, performance, accuracy, and effort is with
the user.
libpng versions 0.97, January 1998, through 1.0.6, March 20, 2000, are
Copyright (c) 1998, 1999 Glenn Randers-Pehrson, and are
distributed according to the same disclaimer and license as libpng-0.96,
with the following individuals added to the list of Contributing Authors:
Tom Lane
Glenn Randers-Pehrson
Willem van Schaik
libpng versions 0.89, June 1996, through 0.96, May 1997, are
Copyright (c) 1996, 1997 Andreas Dilger
Distributed according to the same disclaimer and license as libpng-0.88,
with the following individuals added to the list of Contributing Authors:
John Bowler
Kevin Bracey
Sam Bushell
Magnus Holmgren
Greg Roelofs
Tom Tanner
libpng versions 0.5, May 1995, through 0.88, January 1996, are
Copyright (c) 1995, 1996 Guy Eric Schalnat, Group 42, Inc.
For the purposes of this copyright and license, "Contributing Authors"
is defined as the following set of individuals:
Andreas Dilger
Dave Martindale
Guy Eric Schalnat
Paul Schmidt
Tim Wegner
421
Libxml2 License
The PNG Reference Library is supplied "AS IS". The Contributing Authors
and Group 42, Inc. disclaim all warranties, expressed or implied,
including, without limitation, the warranties of merchantability and of
fitness for any purpose. The Contributing Authors and Group 42, Inc.
assume no liability for direct, indirect, incidental, special, exemplary,
or consequential damages, which may result from the use of the PNG
Reference Library, even if advised of the possibility of such damage.
Permission is hereby granted to use, copy, modify, and distribute this
source code, or portions hereof, for any purpose, without fee, subject
to the following restrictions:
1. The origin of this source code must not be misrepresented.
2. Altered versions must be plainly marked as such and must not
be misrepresented as being the original source.
3. This Copyright notice may not be removed or altered from any
source or altered source distribution.
The Contributing Authors and Group 42, Inc. specifically permit, without
fee, and encourage the use of this source code as a component to
supporting the PNG file format in commercial products. If you use this
source code in a product, acknowledgment is not required but would be
appreciated.
A "png_get_copyright" function is available, for convenient use in "about"
boxes and the like:
printf("%s",png_get_copyright(NULL));
Also, the PNG logo (in PNG format, of course) is supplied in the
files "pngbar.png" and "pngbar.jpg (88x31) and "pngnow.png" (98x31).
Libpng is OSI Certified Open Source Software. OSI Certified Open Source is a
certification mark of the Open Source Initiative.
Glenn Randers-Pehrson
glennrp at users.sourceforge.net
March 29, 2012
H.19 Libxml2 License
The following software may be included in this product:
Libxml2
Except where otherwise noted in the source code (e.g.
the files hash.c, list.c and the trio files, which are
covered by a similar licence but with different Copyright
notices) all the files are:
Copyright (C) 1998-2003 Daniel Veillard.
All Rights Reserved.
Permission is hereby granted, free of charge, to any
person obtaining a copy of this software and associated
documentation files (the "Software"), to deal in the
Software without restriction, including without limitation
the rights to use, copy, modify, merge, publish, distribute,
sublicense, and/or sell copies of the Software, and to
permit persons to whom the Software is furnished to do so,
subject to the following conditions:
The above copyright notice and this permission notice
422
Libzip License
shall be included in all copies or substantial portions
of the Software.
THE SOFTWARE IS PROVIDED "AS IS", WITHOUT WARRANTY OF
ANY KIND, EXPRESS OR IMPLIED, INCLUDING BUT NOT LIMITED
TO THE WARRANTIES OF MERCHANTABILITY, FITNESS FOR A
PARTICULAR PURPOSE AND NONINFRINGEMENT. IN NO EVENT
SHALL THE DANIEL VEILLARD BE LIABLE FOR ANY CLAIM,
DAMAGES OR OTHER LIABILITY, WHETHER IN AN ACTION OF
CONTRACT, TORT OR OTHERWISE, ARISING FROM, OUT OF OR
IN CONNECTION WITH THE SOFTWARE OR THE USE OR OTHER
DEALINGS IN THE SOFTWARE.
Except as contained in this notice, the name of Daniel
Veillard shall not be used in advertising or otherwise
to promote the sale, use or other dealings in this
Software without prior written authorization from him.
H.20 Libzip License
The following software may be included in this product:
libzip
Copyright (C) 1999-2008 Dieter Baron and Thomas Klausner
The authors can be contacted at <[email protected]>
Redistribution and use in source and binary forms, with or without
modification, are permitted provided that the following conditions
are met:
1. Redistributions of source code must retain the above copyright
notice, this list of conditions and the following disclaimer.
2. Redistributions in binary form must reproduce the above copyright
notice, this list of conditions and the following disclaimer in
the documentation and/or other materials provided with the
distribution.
3. The names of the authors may not be used to endorse or promote
products derived from this software without specific prior
written permission.
THIS SOFTWARE IS PROVIDED BY THE AUTHORS "AS IS" AND ANY EXPRESS
OR IMPLIED WARRANTIES, INCLUDING, BUT NOT LIMITED TO, THE IMPLIED
WARRANTIES OF MERCHANTABILITY AND FITNESS FOR A PARTICULAR PURPOSE
ARE DISCLAIMED. IN NO EVENT SHALL THE AUTHORS BE LIABLE FOR ANY
DIRECT, INDIRECT, INCIDENTAL, SPECIAL, EXEMPLARY, OR CONSEQUENTIAL
DAMAGES (INCLUDING, BUT NOT LIMITED TO, PROCUREMENT OF SUBSTITUTE
GOODS OR SERVICES; LOSS OF USE, DATA, OR PROFITS; OR BUSINESS
INTERRUPTION) HOWEVER CAUSED AND ON ANY THEORY OF LIABILITY, WHETHER
IN CONTRACT, STRICT LIABILITY, OR TORT (INCLUDING NEGLIGENCE OR
OTHERWISE) ARISING IN ANY WAY OUT OF THE USE OF THIS SOFTWARE, EVEN
IF ADVISED OF THE POSSIBILITY OF SUCH DAMAGE.
H.21 Lua (liblua) License
The following software may be included in this product:
Lua (liblua)
Copyright © 1994–2008 Lua.org, PUC-Rio.
423
Paramiko License
Permission is hereby granted, free of charge, to any person obtaining
a copy of this software and associated documentation files (the
"Software"), to deal in the Software without restriction, including
without limitation the rights to use, copy, modify, merge, publish,
distribute, sublicense, and/or sell copies of the Software, and to
permit persons to whom the Software is furnished to do so, subject
to the following conditions:
The above copyright notice and this permission notice shall be
included in all copies or substantial portions of the Software.
THE SOFTWARE IS PROVIDED "AS IS", WITHOUT WARRANTY OF ANY KIND,
EXPRESS OR IMPLIED, INCLUDING BUT NOT LIMITED TO THE WARRANTIES
OF MERCHANTABILITY, FITNESS FOR A PARTICULAR PURPOSE AND
NONINFRINGEMENT. IN NO EVENT SHALL THE AUTHORS OR COPYRIGHT
HOLDERS BE LIABLE FOR ANY CLAIM, DAMAGES OR OTHER LIABILITY,
WHETHER IN AN ACTION OF CONTRACT, TORT OR OTHERWISE, ARISING
FROM, OUT OF OR IN CONNECTION WITH THE SOFTWARE OR THE USE OR
OTHER DEALINGS IN THE SOFTWARE.
H.22 Paramiko License
The following software may be included in this product:
Paramiko
You are receiving a copy of Paramiko in both source and object code. The
terms of the Oracle license do NOT apply to the Paramiko program; it is
licensed under the following license, separately from the Oracle
programs you receive. If you do not wish to install this program, you
may delete the Paramiko folder and all its contents.
This component is licensed under Section H.13, “GNU Lesser General Public License Version 2.1,
February 1999”.
H.23 PCRE License
The following software may be included in this product:
PCRE (Perl Compatible Regular Expressions) Library
PCRE LICENCE
PCRE is a library of functions to support regular expressions
whose syntax and semantics are as close as possible to those
of the Perl 5 language.
Release 7 of PCRE is distributed under the terms of the "BSD"
licence, as specified below. The documentation for PCRE,
supplied in the "doc" directory, is distributed under the same
terms as the software itself.
The basic library functions are written in C and are
freestanding. Also included in the distribution is a set
of C++ wrapper functions.
THE BASIC LIBRARY FUNCTIONS
--------------------------Written by:
Philip Hazel
Email local part: ph10
Email domain:
cam.ac.uk
University of Cambridge Computing Service,
424
Pixman License
Cambridge, England. Phone: +44 1223 334714.
Copyright (c) 1997-2006 University of Cambridge
All rights reserved.
THE C++ WRAPPER FUNCTIONS
------------------------Contributed by:
Google Inc.
Copyright (c) 2006, Google Inc.
All rights reserved.
THE "BSD" LICENCE
----------------Redistribution and use in source and binary forms,
with or without modification, are permitted provided
that the following conditions are met:
* Redistributions of source code must retain the above
copyright notice, this list of conditions and the
following disclaimer.
* Redistributions in binary form must reproduce the
above copyright notice, this list of conditions and
the following disclaimer in the documentation and/or
other materials provided with the distribution.
* Neither the name of the University of Cambridge nor
the name of Google Inc. nor the names of their contributors
may be used to endorse or promote products derived from
this software without specific prior written permission.
THIS SOFTWARE IS PROVIDED BY THE COPYRIGHT HOLDERS AND
CONTRIBUTORS "AS IS" AND ANY EXPRESS OR IMPLIED WARRANTIES,
INCLUDING, BUT NOT LIMITED TO, THE IMPLIED WARRANTIES OF
MERCHANTABILITY AND FITNESS FOR A PARTICULAR PURPOSE ARE
DISCLAIMED. IN NO EVENT SHALL THE COPYRIGHT OWNER OR CONTRIBUTORS
BE LIABLE FOR ANY DIRECT, INDIRECT, INCIDENTAL, SPECIAL, EXEMPLARY,
OR CONSEQUENTIAL DAMAGES (INCLUDING, BUT NOT LIMITED TO, PROCUREMENT
OF SUBSTITUTE GOODS OR SERVICES; LOSS OF USE, DATA, OR PROFITS;
OR BUSINESS INTERRUPTION) HOWEVER CAUSED AND ON ANY THEORY OF
LIABILITY, WHETHER IN CONTRACT, STRICT LIABILITY, OR TORT (INCLUDING
NEGLIGENCE OR OTHERWISE) ARISING IN ANY WAY OUT OF THE USE OF
THIS SOFTWARE, EVEN IF ADVISED OF THE POSSIBILITY OF SUCH DAMAGE.
End
H.24 Pixman License
The following software may be included in this product:
Pixman
Pixman v0.21.2
The following is the MIT license, agreed upon by most
contributors. Copyright holders of new code should use
this license statement where possible. They may also add
themselves to the list below.
Copyright
Copyright
Copyright
Copyright
Copyright
Copyright
Copyright
1987, 1988, 1989, 1998 The Open Group
1987, 1988, 1989 Digital Equipment Corporation
1999, 2004, 2008 Keith Packard
2000 SuSE, Inc.
2000 Keith Packard, member of The XFree86 Project, Inc.
2004, 2005, 2007, 2008, 2009, 2010 Red Hat, Inc.
2004 Nicholas Miell
425
Pixman License
Copyright
Copyright
Copyright
Copyright
Copyright
Copyright
Copyright
Copyright
Copyright
2005 Lars Knoll & Zack Rusin, Trolltech
2005 Trolltech AS
2007 Luca Barbato
2008 Aaron Plattner, NVIDIA Corporation
2008 Rodrigo Kumpera
2008 André Tupinambá
2008 Mozilla Corporation
2008 Frederic Plourde
2009, Oracle and/or its affiliates. All rights reserved.
Permission is hereby granted, free of charge, to any
person obtaining a copy of this software and associated
documentation files (the "Software"), to deal in the Software
without restriction, including without limitation the rights
to use, copy, modify, merge, publish, distribute, sublicense,
and/or sell copies of the Software, and to permit persons to
whom the Software is furnished to do so, subject to the
following conditions:
The above copyright notice and this permission notice
(including the next paragraph) shall be included in all
copies or substantial portions of the Software.
THE SOFTWARE IS PROVIDED "AS IS", WITHOUT WARRANTY OF
ANY KIND, EXPRESS OR IMPLIED, INCLUDING BUT NOT LIMITED
TO THE WARRANTIES OF MERCHANTABILITY, FITNESS FOR A
PARTICULAR PURPOSE AND NONINFRINGEMENT. IN NO EVENT
SHALL THE AUTHORS OR COPYRIGHT HOLDERS BE LIABLE FOR
ANY CLAIM, DAMAGES OR OTHER LIABILITY, WHETHER IN AN
ACTION OF CONTRACT, TORT OR OTHERWISE, ARISING FROM,
OUT OF OR IN CONNECTION WITH THE SOFTWARE OR THE USE
OR OTHER DEALINGS IN THE SOFTWARE.
Pixman v0.17.4 and lower:
The following is the 'standard copyright' agreed upon
by most contributors, and is currently the canonical
icense, though a modification is currently under
discussion. Copyright holders of new code should use
this license statement where possible, and append their
name to this list.
Copyright
Copyright
Copyright
Copyright
Copyright
Copyright
Copyright
Copyright
Copyright
Copyright
Copyright
Copyright
Copyright
Copyright
Copyright
Copyright
1987, 1988, 1989, 1998 The Open Group
1987, 1988, 1989 Digital Equipment Corporation
1999, 2004, 2008 Keith Packard
2000 SuSE, Inc.
2000 Keith Packard, member of The XFree86 Project, Inc.
2004, 2005, 2007, 2008 Red Hat, Inc.
2004 Nicholas Miell
2005 Lars Knoll & Zack Rusin, Trolltech
2005 Trolltech AS
2007 Luca Barbato
2008 Aaron Plattner, NVIDIA Corporation
2008 Rodrigo Kumpera
2008 André Tupinambá
2008 Mozilla Corporation
2008 Frederic Plourde
2009 Sun Microsystems, Inc.
Permission is hereby granted, free of charge, to
any person obtaining a copy of this software and
associated documentation files (the "Software"),
to deal in the Software without restriction, including
without limitation the rights to use, copy, modify,
merge, publish, distribute, sublicense, and/or sell
copies of the Software, and to permit persons to whom
the Software is furnished to do so, subject to the
following conditions:
426
PROJ.4 License
The above copyright notice and this permission notice
(including the next paragraph) shall be included in
all copies or substantial portions of the Software.
THE SOFTWARE IS PROVIDED "AS IS", WITHOUT WARRANTY OF
ANY KIND, EXPRESS OR IMPLIED, INCLUDING BUT NOT LIMITED
TO THE WARRANTIES OF MERCHANTABILITY, FITNESS FOR A
PARTICULAR PURPOSE AND NONINFRINGEMENT. IN NO EVENT
SHALL THE AUTHORS OR COPYRIGHT HOLDERS BE LIABLE FOR
ANY CLAIM, DAMAGES OR OTHER LIABILITY, WHETHER IN AN
ACTION OF CONTRACT, TORT OR OTHERWISE, ARISING FROM,
OUT OF OR IN CONNECTION WITH THE SOFTWARE OR THE USE
OR OTHER DEALINGS IN THE SOFTWARE.
H.25 PROJ.4 License
The following software may be included in this product:
All source, data files and other contents of the PROJ.4 package are available
under the following terms. Note that the PROJ 4.3 and earlier was "public
domain" as is common with US government work, but apparently this is not a
well defined legal term in many countries. I am placing everything under the
following MIT style license because I believe it is effectively the same as
public domain, allowing anyone to use the code as they wish, including making
proprietary derivatives.
Though I have put my own name as copyright holder, I don't mean to imply I
did the work. Essentially all work was done by Gerald Evenden.
-------------Copyright (c) 2000, Frank Warmerdam
Permission is hereby granted, free of charge, to any person obtaining a copy
of this software and associated documentation files (the "Software"), to deal
in the Software without restriction, including without limitation the rights
to use, copy, modify, merge, publish, distribute, sublicense, and/or sell
copies of the Software, and to permit persons to whom the Software is
furnished to do so, subject to the following conditions:
The above copyright notice and this permission notice shall be included
all copies or substantial portions of the Software.
in
THE SOFTWARE IS PROVIDED "AS IS", WITHOUT WARRANTY OF ANY KIND, EXPRESS OR
IMPLIED, INCLUDING BUT NOT LIMITED TO THE WARRANTIES OF MERCHANTABILITY,
FITNESS FOR A PARTICULAR PURPOSE AND NONINFRINGEMENT. IN NO EVENT SHALL THE
AUTHORS OR COPYRIGHT HOLDERS BE LIABLE FOR ANY CLAIM, DAMAGES OR OTHER
LIABILITY, WHETHER IN AN ACTION OF CONTRACT, TORT OR OTHERWISE, ARISING
FROM, OUT OF OR IN CONNECTION WITH THE SOFTWARE OR THE USE OR OTHER DEALINGS
IN THE SOFTWARE.
H.26 PyCrypto 2.6 License
The following software may be included in this product:
Copyright and licensing of the Python Cryptography Toolkit ("PyCrypto"):
~~~~~~~~~~~~~~~~~~~~~~~~~~~~~~~~~~~~~~~~~~~~~~~~~~~~~~~~~~~~~~~~~~~~~~~~
Previously, the copyright and/or licensing status of the Python Cryptography
Toolkit ("PyCrypto") had been somewhat ambiguous. The original intention of
Andrew M. Kuchling and other contributors has been to dedicate PyCrypto to
the public domain, but that intention was not necessarily made clear in the
427
PyCrypto 2.6 License
original disclaimer (see LEGAL/copy/LICENSE.orig).
Additionally, some files within PyCrypto had specified their own licenses
that differed from the PyCrypto license itself. For example, the original
RIPEMD.c module simply had a copyright statement and warranty disclaimer,
without clearly specifying any license terms. (An updated version on the
author's website came with a license that contained a GPL-incompatible
advertising clause.)
To rectify this situation for PyCrypto 2.1, the following steps have been
taken:
1. Obtaining explicit permission from the original contributors to dedicate
their contributions to the public domain if they have not already done so.
(See the "LEGAL/copy/stmts" directory for contributors' statements.)
2. Replacing some modules with clearly-licensed code from other sources
(e.g. the DES and DES3 modules were replaced with new ones based on Tom St.
Denis's public-domain LibTomCrypt library.)
3. Replacing some modules with code written from scratch (e.g. the RIPEMD
and Blowfish modules were re-implemented from their respective algorithm
specifications without reference to the old implementations).
4. Removing some modules altogether without replacing them.
To the best of our knowledge, with the exceptions noted below or within the
files themselves, the files that constitute PyCrypto are in the public
domain. Most are distributed with the following notice:
The contents of this file are dedicated to the public domain. To the
extent that dedication to the public domain is not available, everyone is
granted a worldwide, perpetual, royalty-free, non-exclusive license to
exercise all rights associated with the contents of this file for any
purpose whatsoever. No rights are reserved.
THE SOFTWARE IS PROVIDED "AS IS", WITHOUT WARRANTY OF ANY KIND, EXPRESS OR
IMPLIED, INCLUDING BUT NOT LIMITED TO THE WARRANTIES OF
MERCHANTABILITY, FITNESS FOR A PARTICULAR PURPOSE AND NONINFRINGEMENT. IN
NO EVENT SHALL THE AUTHORS OR COPYRIGHT HOLDERS
BE LIABLE FOR ANY CLAIM, DAMAGES OR OTHER LIABILITY, WHETHER IN AN ACTION
OF CONTRACT, TORT OR OTHERWISE, ARISING FROM, OUT OF OR IN
CONNECTION WITH THE SOFTWARE OR THE USE OR OTHER DEALINGS IN THE SOFTWARE.
Exception:
- Portions of HMAC.py and setup.py are derived from Python 2.2, and are
therefore Copyright (c) 2001, 2002, 2003 Python Software Foundation (All
Rights Reserved). They are licensed by the PSF under the terms of the Python
2.2 license. (See the file LEGAL/copy/LICENSE.python-2.2 for details.)
EXPORT RESTRICTIONS:
Note that the export or re-export of cryptographic software and/or source
code may be subject to regulation in your jurisdiction.
==============================================================
#
#
#
#
#
#
#
#
#
HMAC.py - Implements the HMAC algorithm as described by RFC 2104.
===================================================================
Portions Copyright (c) 2001, 2002, 2003 Python Software Foundation;
All Rights Reserved
This file contains code from the Python 2.2 hmac.py module (the
"Original Code"), with modifications made after it was incorporated
into PyCrypto (the "Modifications").
428
PyODBC License
#
#
#
#
#
#
#
#
#
#
#
#
#
#
#
#
#
#
#
#
#
#
To the best of our knowledge, the Python Software Foundation is the
copyright holder of the Original Code, and has licensed it under the
Python 2.2 license. See the file LEGAL/copy/LICENSE.python-2.2 for
details.
The Modifications to this file are dedicated to the public domain.
To the extent that dedication to the public domain is not available,
everyone is granted a worldwide, perpetual, royalty-free,
non-exclusive license to exercise all rights associated with the
contents of this file for any purpose whatsoever. No rights are
reserved.
THE SOFTWARE IS PROVIDED "AS IS", WITHOUT WARRANTY OF ANY KIND,
EXPRESS OR IMPLIED, INCLUDING BUT NOT LIMITED TO THE WARRANTIES OF
MERCHANTABILITY, FITNESS FOR A PARTICULAR PURPOSE AND
NONINFRINGEMENT. IN NO EVENT SHALL THE AUTHORS OR COPYRIGHT HOLDERS
BE LIABLE FOR ANY CLAIM, DAMAGES OR OTHER LIABILITY, WHETHER IN AN
ACTION OF CONTRACT, TORT OR OTHERWISE, ARISING FROM, OUT OF OR IN
CONNECTION WITH THE SOFTWARE OR THE USE OR OTHER DEALINGS IN THE
SOFTWARE.
===================================================================
#! /usr/bin/env python
#
# setup.py : Distutils setup script
#
# Part of the Python Cryptography Toolkit
#
# ===================================================================
# Portions Copyright (c) 2001, 2002, 2003 Python Software Foundation;
# All Rights Reserved
#
# This file contains code from the Python 2.2 setup.py module (the
# "Original Code"), with modifications made after it was incorporated
# into PyCrypto (the "Modifications").
#
# To the best of our knowledge, the Python Software Foundation is the
# copyright holder of the Original Code, and has licensed it under the
# Python 2.2 license. See the file LEGAL/copy/LICENSE.python-2.2 for
# details.
#
# The Modifications to this file are dedicated to the public domain.
# To the extent that dedication to the public domain is not available,
# everyone is granted a worldwide, perpetual, royalty-free,
# non-exclusive license to exercise all rights associated with the
# contents of this file for any purpose whatsoever. No rights are
# reserved.
#
# THE SOFTWARE IS PROVIDED "AS IS", WITHOUT WARRANTY OF ANY KIND,
# EXPRESS OR IMPLIED, INCLUDING BUT NOT LIMITED TO THE WARRANTIES OF
# MERCHANTABILITY, FITNESS FOR A PARTICULAR PURPOSE AND
# NONINFRINGEMENT. IN NO EVENT SHALL THE AUTHORS OR COPYRIGHT HOLDERS
# BE LIABLE FOR ANY CLAIM, DAMAGES OR OTHER LIABILITY, WHETHER IN AN
# ACTION OF CONTRACT, TORT OR OTHERWISE, ARISING FROM, OUT OF OR IN
# CONNECTION WITH THE SOFTWARE OR THE USE OR OTHER DEALINGS IN THE
# SOFTWARE.
# ===================================================================
H.27 PyODBC License
The following software may be included in this product:
PyODBC
429
PySQLite License
Permission is hereby granted, free of charge, to any person obtaining a copy
of this software and associated documentation files (the "Software"), to deal
in the Software without restriction, including without limitation the rights
to use, copy, modify, merge, publish, distribute, sublicense, and/or sell
copies of the Software, and to permit persons to whom the Software is
furnished to do so.
THE SOFTWARE IS PROVIDED "AS IS", WITHOUT WARRANTY OF ANY KIND, EXPRESS OR
IMPLIED, INCLUDING BUT NOT LIMITED TO THE WARRANTIES OF MERCHANTABILITY,
FITNESS FOR A PARTICULAR PURPOSE AND NONINFRINGEMENT. IN NO EVENT SHALL THE
AUTHORS OR COPYRIGHT HOLDERS BE LIABLE FOR ANY CLAIM, DAMAGES OR OTHER
LIABILITY, WHETHER IN AN ACTION OF CONTRACT, TORT OR OTHERWISE, ARISING FROM,
OUT OF OR IN CONNECTION WITH THE SOFTWARE OR THE USE OR OTHER DEALINGS IN THE
SOFTWARE.
H.28 PySQLite License
This product uses pysqlite 2.6.3 Copyright (c) 2004-2007 Gerhard Haering
H.29 Python License
The following software may be included in this product:
Python Programming Language
This is the official license for the Python 2.7 release:
A. HISTORY OF THE SOFTWARE
Python was created in the early 1990s by Guido van Rossum at Stichting
Mathematisch Centrum (CWI, see http://www.cwi.nl) in the Netherlands
as a successor of a language called ABC. Guido remains Python's
principal author, although it includes many contributions from others.
In 1995, Guido continued his work on Python at the Corporation for
National Research Initiatives (CNRI, see http://www.cnri.reston.va.us)
in Reston, Virginia where he released several versions of the
software.
In May 2000, Guido and the Python core development team moved to
BeOpen.com to form the BeOpen PythonLabs team. In October of the same
year, the PythonLabs team moved to Digital Creations (now Zope
Corporation, see http://www.zope.com). In 2001, the Python Software
Foundation (PSF, see http://www.python.org/psf/) was formed, a
non-profit organization created specifically to own Python-related
Intellectual Property. Zope Corporation is a sponsoring member of
the PSF.
All Python releases are Open Source (see http://www.opensource.org for
the Open Source Definition). Historically, most, but not all, Python
releases have also been GPL-compatible; the table below summarizes
the various releases.
Release
0.9.0 thru 1.2
1.3 thru 1.5.2
1.6
2.0
1.6.1
2.1
2.0.1
2.1.1
2.2
Derived
from
1.2
1.5.2
1.6
1.6
2.0+1.6.1
2.0+1.6.1
2.1+2.0.1
2.1.1
Year
Owner
GPLcompatible? (1)
1991-1995
1995-1999
2000
2000
2001
2001
2001
2001
2001
CWI
CNRI
CNRI
BeOpen.com
CNRI
PSF
PSF
PSF
PSF
yes
yes
no
no
yes (2)
no
yes
yes
yes
430
Python License
2.1.2
2.1.3
2.2.1
2.2.2
2.2.3
2.3
2.3.1
2.3.2
2.3.3
2.3.4
2.3.5
2.4
2.4.1
2.4.2
2.4.3
2.5
2.5.1
2.5.2
2.5.3
2.6
2.6.1
2.6.2
2.6.3
2.6.4
2.7
2.1.1
2.1.2
2.2
2.2.1
2.2.2
2.2.2
2.3
2.3.1
2.3.2
2.3.3
2.3.4
2.3
2.4
2.4.1
2.4.2
2.4
2.5
2.5.1
2.5.2
2.5
2.6
2.6.1
2.6.2
2.6.3
2.6
2002
2002
2002
2002
2003
2002-2003
2002-2003
2002-2003
2002-2003
2004
2005
2004
2005
2005
2006
2006
2007
2008
2008
2008
2008
2009
2009
2010
2010
PSF
PSF
PSF
PSF
PSF
PSF
PSF
PSF
PSF
PSF
PSF
PSF
PSF
PSF
PSF
PSF
PSF
PSF
PSF
PSF
PSF
PSF
PSF
PSF
PSF
yes
yes
yes
yes
yes
yes
yes
yes
yes
yes
yes
yes
yes
yes
yes
yes
yes
yes
yes
yes
yes
yes
yes
yes
yes
Footnotes:
(1) GPL-compatible doesn't mean that we're distributing Python under
the GPL. All Python licenses, unlike the GPL, let you distribute
a modified version without making your changes open source. The
GPL-compatible licenses make it possible to combine Python with
other software that is released under the GPL; the others don't.
(2) According to Richard Stallman, 1.6.1 is not GPL-compatible,
because its license has a choice of law clause. According to
CNRI, however, Stallman's lawyer has told CNRI's lawyer that 1.6.1
is "not incompatible" with the GPL.
Thanks to the many outside volunteers who have worked under Guido's
direction to make these releases possible.
B. TERMS AND CONDITIONS FOR ACCESSING OR OTHERWISE USING PYTHON
PYTHON SOFTWARE FOUNDATION LICENSE VERSION 2
-------------------------------------------1. This LICENSE AGREEMENT is between the Python Software Foundation
("PSF"), and the Individual or Organization ("Licensee") accessing and
otherwise using this software ("Python") in source or binary form and
its associated documentation.
2. Subject to the terms and conditions of this License Agreement, PSF
hereby grants Licensee a nonexclusive, royalty-free, world-wide
license to reproduce, analyze, test, perform and/or display publicly,
prepare derivative works, distribute, and otherwise use Python
alone or in any derivative version, provided, however, that PSF's
License Agreement and PSF's notice of copyright, i.e., "Copyright (c)
2001, 2002, 2003, 2004, 2005, 2006 Python Software Foundation; All Rights
Reserved" are retained in Python alone or in any derivative version
prepared by Licensee.
3. In the event Licensee prepares a derivative work that is based on
or incorporates Python or any part thereof, and wants to make
the derivative work available to others as provided herein, then
Licensee hereby agrees to include in any such work a brief summary of
431
Python License
the changes made to Python.
4. PSF is making Python available to Licensee on an "AS IS"
basis. PSF MAKES NO REPRESENTATIONS OR WARRANTIES, EXPRESS OR
IMPLIED. BY WAY OF EXAMPLE, BUT NOT LIMITATION, PSF MAKES NO AND
DISCLAIMS ANY REPRESENTATION OR WARRANTY OF MERCHANTABILITY OR FITNESS
FOR ANY PARTICULAR PURPOSE OR THAT THE USE OF PYTHON WILL NOT
INFRINGE ANY THIRD PARTY RIGHTS.
5. PSF SHALL NOT BE LIABLE TO LICENSEE OR ANY OTHER USERS OF PYTHON
FOR ANY INCIDENTAL, SPECIAL, OR CONSEQUENTIAL DAMAGES OR LOSS AS
A RESULT OF MODIFYING, DISTRIBUTING, OR OTHERWISE USING PYTHON,
OR ANY DERIVATIVE THEREOF, EVEN IF ADVISED OF THE POSSIBILITY THEREOF.
6. This License Agreement will automatically terminate upon a material
breach of its terms and conditions.
7. Nothing in this License Agreement shall be deemed to create any
relationship of agency, partnership, or joint venture between PSF and
Licensee. This License Agreement does not grant permission to use PSF
trademarks or trade name in a trademark sense to endorse or promote
products or services of Licensee, or any third party.
8. By copying, installing or otherwise using Python, Licensee
agrees to be bound by the terms and conditions of this License
Agreement.
BEOPEN.COM LICENSE AGREEMENT FOR PYTHON 2.0
------------------------------------------BEOPEN PYTHON OPEN SOURCE LICENSE AGREEMENT VERSION 1
1. This LICENSE AGREEMENT is between BeOpen.com ("BeOpen"), having an
office at 160 Saratoga Avenue, Santa Clara, CA 95051, and the
Individual or Organization ("Licensee") accessing and otherwise using
this software in source or binary form and its associated
documentation ("the Software").
2. Subject to the terms and conditions of this BeOpen Python License
Agreement, BeOpen hereby grants Licensee a non-exclusive,
royalty-free, world-wide license to reproduce, analyze, test, perform
and/or display publicly, prepare derivative works, distribute, and
otherwise use the Software alone or in any derivative version,
provided, however, that the BeOpen Python License is retained in the
Software, alone or in any derivative version prepared by Licensee.
3. BeOpen is making the Software available to Licensee on an "AS IS"
basis. BEOPEN MAKES NO REPRESENTATIONS OR WARRANTIES, EXPRESS OR
IMPLIED. BY WAY OF EXAMPLE, BUT NOT LIMITATION, BEOPEN MAKES NO AND
DISCLAIMS ANY REPRESENTATION OR WARRANTY OF MERCHANTABILITY OR FITNESS
FOR ANY PARTICULAR PURPOSE OR THAT THE USE OF THE SOFTWARE WILL NOT
INFRINGE ANY THIRD PARTY RIGHTS.
4. BEOPEN SHALL NOT BE LIABLE TO LICENSEE OR ANY OTHER USERS OF THE
SOFTWARE FOR ANY INCIDENTAL, SPECIAL, OR CONSEQUENTIAL DAMAGES OR LOSS
AS A RESULT OF USING, MODIFYING OR DISTRIBUTING THE SOFTWARE, OR ANY
DERIVATIVE THEREOF, EVEN IF ADVISED OF THE POSSIBILITY THEREOF.
5. This License Agreement will automatically terminate upon a material
breach of its terms and conditions.
6. This License Agreement shall be governed by and interpreted in all
respects by the law of the State of California, excluding conflict of
law provisions. Nothing in this License Agreement shall be deemed to
create any relationship of agency, partnership, or joint venture
between BeOpen and Licensee. This License Agreement does not grant
432
Python License
permission to use BeOpen trademarks or trade names in a trademark
sense to endorse or promote products or services of Licensee, or any
third party. As an exception, the "BeOpen Python" logos available at
http://www.pythonlabs.com/logos.html may be used according to the
permissions granted on that web page.
7. By copying, installing or otherwise using the software, Licensee
agrees to be bound by the terms and conditions of this License
Agreement.
CNRI LICENSE AGREEMENT FOR PYTHON 1.6.1
--------------------------------------1. This LICENSE AGREEMENT is between the Corporation for National
Research Initiatives, having an office at 1895 Preston White Drive,
Reston, VA 20191 ("CNRI"), and the Individual or Organization
("Licensee") accessing and otherwise using Python 1.6.1 software in
source or binary form and its associated documentation.
2. Subject to the terms and conditions of this License Agreement, CNRI
hereby grants Licensee a nonexclusive, royalty-free, world-wide
license to reproduce, analyze, test, perform and/or display publicly,
prepare derivative works, distribute, and otherwise use Python 1.6.1
alone or in any derivative version, provided, however, that CNRI's
License Agreement and CNRI's notice of copyright, i.e., "Copyright (c)
1995-2001 Corporation for National Research Initiatives; All Rights
Reserved" are retained in Python 1.6.1 alone or in any derivative
version prepared by Licensee. Alternately, in lieu of CNRI's License
Agreement, Licensee may substitute the following text (omitting the
quotes): "Python 1.6.1 is made available subject to the terms and
conditions in CNRI's License Agreement. This Agreement together with
Python 1.6.1 may be located on the Internet using the following
unique, persistent identifier (known as a handle): 1895.22/1013. This
Agreement may also be obtained from a proxy server on the Internet
using the following URL: http://hdl.handle.net/1895.22/1013".
3. In the event Licensee prepares a derivative work that is based on
or incorporates Python 1.6.1 or any part thereof, and wants to make
the derivative work available to others as provided herein, then
Licensee hereby agrees to include in any such work a brief summary of
the changes made to Python 1.6.1.
4. CNRI is making Python 1.6.1 available to Licensee on an "AS IS"
basis. CNRI MAKES NO REPRESENTATIONS OR WARRANTIES, EXPRESS OR
IMPLIED. BY WAY OF EXAMPLE, BUT NOT LIMITATION, CNRI MAKES NO AND
DISCLAIMS ANY REPRESENTATION OR WARRANTY OF MERCHANTABILITY OR FITNESS
FOR ANY PARTICULAR PURPOSE OR THAT THE USE OF PYTHON 1.6.1 WILL NOT
INFRINGE ANY THIRD PARTY RIGHTS.
5. CNRI SHALL NOT BE LIABLE TO LICENSEE OR ANY OTHER USERS OF PYTHON
1.6.1 FOR ANY INCIDENTAL, SPECIAL, OR CONSEQUENTIAL DAMAGES OR LOSS AS
A RESULT OF MODIFYING, DISTRIBUTING, OR OTHERWISE USING PYTHON 1.6.1,
OR ANY DERIVATIVE THEREOF, EVEN IF ADVISED OF THE POSSIBILITY THEREOF.
6. This License Agreement will automatically terminate upon a material
breach of its terms and conditions.
7. This License Agreement shall be governed by the federal
intellectual property law of the United States, including without
limitation the federal copyright law, and, to the extent such
U.S. federal law does not apply, by the law of the Commonwealth of
Virginia, excluding Virginia's conflict of law provisions.
Notwithstanding the foregoing, with regard to derivative works based
on Python 1.6.1 that incorporate non-separable material that was
previously distributed under the GNU General Public License (GPL), the
law of the Commonwealth of Virginia shall govern this License
433
Python License
Agreement only as to issues arising under or with respect to
Paragraphs 4, 5, and 7 of this License Agreement. Nothing in this
License Agreement shall be deemed to create any relationship of
agency, partnership, or joint venture between CNRI and Licensee. This
License Agreement does not grant permission to use CNRI trademarks or
trade name in a trademark sense to endorse or promote products or
services of Licensee, or any third party.
8. By clicking on the "ACCEPT" button where indicated, or by copying,
installing or otherwise using Python 1.6.1, Licensee agrees to be
bound by the terms and conditions of this License Agreement.
ACCEPT
CWI LICENSE AGREEMENT FOR PYTHON 0.9.0 THROUGH 1.2
-------------------------------------------------Copyright (c) 1991 - 1995, Stichting Mathematisch Centrum Amsterdam,
The Netherlands. All rights reserved.
Permission to use, copy, modify, and distribute this software and its
documentation for any purpose and without fee is hereby granted,
provided that the above copyright notice appear in all copies and that
both that copyright notice and this permission notice appear in
supporting documentation, and that the name of Stichting Mathematisch
Centrum or CWI not be used in advertising or publicity pertaining to
distribution of the software without specific, written prior
permission.
STICHTING MATHEMATISCH CENTRUM DISCLAIMS ALL WARRANTIES WITH REGARD TO
THIS SOFTWARE, INCLUDING ALL IMPLIED WARRANTIES OF MERCHANTABILITY AND
FITNESS, IN NO EVENT SHALL STICHTING MATHEMATISCH CENTRUM BE LIABLE
FOR ANY SPECIAL, INDIRECT OR CONSEQUENTIAL DAMAGES OR ANY DAMAGES
WHATSOEVER RESULTING FROM LOSS OF USE, DATA OR PROFITS, WHETHER IN AN
ACTION OF CONTRACT, NEGLIGENCE OR OTHER TORTIOUS ACTION, ARISING OUT
OF OR IN CONNECTION WITH THE USE OR PERFORMANCE OF THIS SOFTWARE.
Licenses and Acknowledgements for Incorporated Software
========================================================
This section is an incomplete, but growing list of licenses and acknowledgements
for third-party software incorporated in the Python distribution.
Mersenne Twister
================
The _random module includes code based on a download from
http://www.math.keio.ac.jp/ matumoto/MT2002/emt19937ar.html.
The following are the verbatim comments from the original code:
A C-program for MT19937, with initialization improved 2002/1/26.
Coded by Takuji Nishimura and Makoto Matsumoto.
Before using, initialize the state by using init_genrand(seed)
or init_by_array(init_key, key_length).
Copyright (C) 1997 - 2002, Makoto Matsumoto and Takuji Nishimura,
All rights reserved.
Redistribution and use in source and binary forms, with or without
modification, are permitted provided that the following conditions
are met:
1. Redistributions of source code must retain the above copyright
notice, this list of conditions and the following disclaimer.
2. Redistributions in binary form must reproduce the above copyright
434
Python License
notice, this list of conditions and the following disclaimer in the
documentation and/or other materials provided with the
distribution.
3. The names of its contributors may not be used to endorse or promote
products derived from this software without specific prior written
permission.
THIS SOFTWARE IS PROVIDED BY THE COPYRIGHT HOLDERS AND CONTRIBUTORS
"AS IS" AND ANY EXPRESS OR IMPLIED WARRANTIES, INCLUDING, BUT NOT
LIMITED TO, THE IMPLIED WARRANTIES OF MERCHANTABILITY AND FITNESS FOR
A PARTICULAR PURPOSE ARE DISCLAIMED. IN NO EVENT SHALL THE COPYRIGHT OWNER OR
CONTRIBUTORS BE LIABLE FOR ANY DIRECT, INDIRECT, INCIDENTAL, SPECIAL,
EXEMPLARY, OR CONSEQUENTIAL DAMAGES (INCLUDING, BUT NOT LIMITED TO,
PROCUREMENT OF SUBSTITUTE GOODS OR SERVICES; LOSS OF USE, DATA, OR
PROFITS; OR BUSINESS INTERRUPTION) HOWEVER CAUSED AND ON ANY THEORY OF
LIABILITY, WHETHER IN CONTRACT, STRICT LIABILITY, OR TORT (INCLUDING
NEGLIGENCE OR OTHERWISE) ARISING IN ANY WAY OUT OF THE USE OF THIS
SOFTWARE, EVEN IF ADVISED OF THE POSSIBILITY OF SUCH DAMAGE.
Any feedback is very welcome.
http://www.math.keio.ac.jp/matumoto/emt.html
email: [email protected]
Sockets
=======
The socket module uses the functions, getaddrinfo(), and getnameinfo(), which
are coded in separate source files from the WIDE Project, http://www.wide.ad.jp/.
Copyright (C) 1995, 1996, 1997, and 1998 WIDE Project.
All rights reserved.
Redistribution and use in source and binary forms, with or without
modification, are permitted provided that the following conditions
are met:
1. Redistributions of source code must retain the above copyright
notice, this list of conditions and the following disclaimer.
2. Redistributions in binary form must reproduce the above copyright
notice, this list of conditions and the following disclaimer in the
documentation and/or other materials provided with the distribution.
3. Neither the name of the project nor the names of its contributors
may be used to endorse or promote products derived from this
software without specific prior written permission.
THIS SOFTWARE IS PROVIDED BY THE COPYRIGHT HOLDERS AND CONTRIBUTORS
"AS IS" AND ANY EXPRESS OR IMPLIED WARRANTIES, INCLUDING, BUT NOT
LIMITED TO, THE IMPLIED WARRANTIES OF MERCHANTABILITY AND FITNESS FOR
A PARTICULAR PURPOSE ARE DISCLAIMED. IN NO EVENT SHALL THE COPYRIGHT OWNER OR
CONTRIBUTORS BE LIABLE FOR ANY DIRECT, INDIRECT, INCIDENTAL, SPECIAL,
EXEMPLARY, OR CONSEQUENTIAL DAMAGES (INCLUDING, BUT NOT LIMITED TO,
PROCUREMENT OF SUBSTITUTE GOODS OR SERVICES; LOSS OF USE, DATA, OR
PROFITS; OR BUSINESS INTERRUPTION) HOWEVER CAUSED AND ON ANY THEORY OF
LIABILITY, WHETHER IN CONTRACT, STRICT LIABILITY, OR TORT (INCLUDING
NEGLIGENCE OR OTHERWISE) ARISING IN ANY WAY OUT OF THE USE OF THIS
SOFTWARE, EVEN IF ADVISED OF THE POSSIBILITY OF SUCH DAMAGE.
Floating point exception control
================================
The source for the fpectl module includes the following notice:
--------------------------------------------------------------------Copyright (c) 1996.
\
The Regents of the University of California.
|
All rights reserved.
|
|
Permission to use, copy, modify, and distribute this software for
|
any purpose without fee is hereby granted, provided that this en|
/
|
|
|
|
|
435
Python License
|
|
|
|
|
|
|
|
|
|
|
|
|
|
|
|
|
|
|
|
|
|
|
|
|
|
tire notice is included in all copies of any software which is or
includes a copy or modification of this software and in all
copies of the supporting documentation for such software.
This work was produced at the University of California, Lawrence
Livermore National Laboratory under contract no. W-7405-ENG-48
between the U.S. Department of Energy and The Regents of the
University of California for the operation of UC LLNL.
|
|
|
|
|
|
|
|
|
|
|
|
|
|
|
|
|
|
|
|
|
|
|
|
|
|
DISCLAIMER
This software was prepared as an account of work sponsored by an
agency of the United States Government. Neither the United States
Government nor the University of California nor any of their employees, makes any warranty, express or implied, or assumes any
liability or responsibility for the accuracy, completeness, or
usefulness of any information, apparatus, product, or process
disclosed,
or represents that its use would not infringe
privately-owned rights. Reference herein to any specific commercial products, process, or service by trade name, trademark,
manufacturer, or otherwise, does not necessarily constitute or
imply its endorsement, recommendation, or favoring by the United
States Government or the University of California. The views and
opinions of authors expressed herein do not necessarily state or
reflect those of the United States Government or the University
of California, and shall not be used for advertising or product
\ endorsement purposes.
/
---------------------------------------------------------------------
MD5 message digest algorithm
============================
The source code for the md5 module contains the following notice:
Copyright (C) 1999, 2002 Aladdin Enterprises.
All rights reserved.
This software is provided 'as-is', without any express or implied
warranty. In no event will the authors be held liable for any damages
arising from the use of this software.
Permission is granted to anyone to use this software for any purpose,
including commercial applications, and to alter it and redistribute it
freely, subject to the following restrictions:
1. The origin of this software must not be misrepresented; you must not
claim that you wrote the original software. If you use this software
in a product, an acknowledgment in the product documentation would
be appreciated but is not required.
2. Altered source versions must be plainly marked as such, and must not
be misrepresented as being the original software.
3. This notice may not be removed or altered from any source
distribution.
L. Peter Deutsch
[email protected]
Independent implementation of MD5 (RFC 1321).
This code implements the MD5 Algorithm defined in RFC 1321, whose
text is available at
http://www.ietf.org/rfc/rfc1321.txt
The code is derived from the text of the RFC, including the test suite
(section A.5) but excluding the rest of Appendix A. It does not include
any code or documentation that is identified in the RFC as being
copyrighted.
The original and principal author of md5.h is L. Peter Deutsch
<[email protected]>. Other authors are noted in the change history
436
Python License
that follows (in reverse chronological order):
2002-04-13 lpd Removed support for non-ANSI compilers; removed
references to Ghostscript; clarified derivation from RFC 1321;
now handles byte order either statically or dynamically.
1999-11-04 lpd Edited comments slightly for automatic TOC extraction.
1999-10-18 lpd Fixed typo in header comment (ansi2knr rather than md5);
added conditionalization for C++ compilation from Martin
Purschke <[email protected]>.
1999-05-03 lpd Original version.
Asynchronous socket services
============================
The asynchat and asyncore modules contain the following notice:
Copyright 1996 by Sam Rushing
All Rights Reserved
Permission to use, copy, modify, and distribute this software and
its documentation for any purpose and without fee is hereby
granted, provided that the above copyright notice appear in all
copies and that both that copyright notice and this permission
notice appear in supporting documentation, and that the name of Sam
Rushing not be used in advertising or publicity pertaining to
distribution of the software without specific, written prior
permission.
SAM RUSHING DISCLAIMS ALL WARRANTIES WITH REGARD TO THIS SOFTWARE,
INCLUDING ALL IMPLIED WARRANTIES OF MERCHANTABILITY AND FITNESS, IN
NO EVENT SHALL SAM RUSHING BE LIABLE FOR ANY SPECIAL, INDIRECT OR
CONSEQUENTIAL DAMAGES OR ANY DAMAGES WHATSOEVER RESULTING FROM LOSS
OF USE, DATA OR PROFITS, WHETHER IN AN ACTION OF CONTRACT,
NEGLIGENCE OR OTHER TORTIOUS ACTION, ARISING OUT OF OR IN
CONNECTION WITH THE USE OR PERFORMANCE OF THIS SOFTWARE.
Cookie management
=================
The Cookie module contains the following notice:
Copyright 2000 by Timothy O'Malley <[email protected]>
All Rights Reserved
Permission to use, copy, modify, and distribute this software
and its documentation for any purpose and without fee is hereby
granted, provided that the above copyright notice appear in all
copies and that both that copyright notice and this permission
notice appear in supporting documentation, and that the name of
Timothy O'Malley not be used in advertising or publicity
pertaining to distribution of the software without specific, written
prior permission.
Timothy O'Malley DISCLAIMS ALL WARRANTIES WITH REGARD TO THIS
SOFTWARE, INCLUDING ALL IMPLIED WARRANTIES OF MERCHANTABILITY
AND FITNESS, IN NO EVENT SHALL Timothy O'Malley BE LIABLE FOR
ANY SPECIAL, INDIRECT OR CONSEQUENTIAL DAMAGES OR ANY DAMAGES
WHATSOEVER RESULTING FROM LOSS OF USE, DATA OR PROFITS,
WHETHER IN AN ACTION OF CONTRACT, NEGLIGENCE OR OTHER TORTIOUS
ACTION, ARISING OUT OF OR IN CONNECTION WITH THE USE OR
PERFORMANCE OF THIS SOFTWARE.
Profiling
=========
The profile and pstats modules contain the following notice:
Copyright 1994, by InfoSeek Corporation, all rights reserved.
437
Python License
Written by James Roskind
Permission to use, copy, modify, and distribute this Python software
and its associated documentation for any purpose (subject to the
restriction in the following sentence) without fee is hereby granted,
provided that the above copyright notice appears in all copies, and
that both that copyright notice and this permission notice appear in
supporting documentation, and that the name of InfoSeek not be used in
advertising or publicity pertaining to distribution of the software
without specific, written prior permission. This permission is
explicitly restricted to the copying and modification of the software
to remain in Python, compiled Python, or other languages (such as C)
wherein the modified or derived code is exclusively imported into a
Python module.
INFOSEEK CORPORATION DISCLAIMS ALL WARRANTIES WITH REGARD TO THIS
SOFTWARE, INCLUDING ALL IMPLIED WARRANTIES OF MERCHANTABILITY AND
FITNESS. IN NO EVENT SHALL INFOSEEK CORPORATION BE LIABLE FOR ANY
SPECIAL, INDIRECT OR CONSEQUENTIAL DAMAGES OR ANY DAMAGES WHATSOEVER
RESULTING FROM LOSS OF USE, DATA OR PROFITS, WHETHER IN AN ACTION OF
CONTRACT, NEGLIGENCE OR OTHER TORTIOUS ACTION, ARISING OUT OF OR IN
CONNECTION WITH THE USE OR PERFORMANCE OF THIS SOFTWARE.
Execution tracing
=================
The trace module contains the following notice:
portions copyright 2001, Autonomous Zones Industries, Inc., all rights...
err... reserved and offered to the public under the terms of the
Python 2.2 license.
Author: Zooko O'Whielacronx
http://zooko.com/
mailto:[email protected]
Copyright 2000, Mojam Media, Inc., all rights reserved.
Author: Skip Montanaro
Copyright 1999, Bioreason, Inc., all rights reserved.
Author: Andrew Dalke
Copyright 1995-1997, Automatrix, Inc., all rights reserved.
Author: Skip Montanaro
Copyright 1991-1995, Stichting Mathematisch Centrum, all rights reserved.
Permission to use, copy, modify, and distribute this Python software and
its associated documentation for any purpose without fee is hereby
granted, provided that the above copyright notice appears in all copies,
and that both that copyright notice and this permission notice appear in
supporting documentation, and that the name of neither Automatrix,
Bioreason or Mojam Media be used in advertising or publicity pertaining to
distribution of the software without specific, written prior permission.
UUencode and UUdecode functions
===============================
The uu module contains the following notice:
Copyright 1994 by Lance Ellinghouse
Cathedral City, California Republic, United States of America.
All Rights Reserved
Permission to use, copy, modify, and distribute this software and its
documentation for any purpose and without fee is hereby granted,
provided that the above copyright notice appear in all copies and that
both that copyright notice and this permission notice appear in
supporting documentation, and that the name of Lance Ellinghouse
not be used in advertising or publicity pertaining to distribution
438
Python License
of the software without specific, written prior permission.
LANCE ELLINGHOUSE DISCLAIMS ALL WARRANTIES WITH REGARD TO
THIS SOFTWARE, INCLUDING ALL IMPLIED WARRANTIES OF MERCHANTABILITY AND
FITNESS, IN NO EVENT SHALL LANCE ELLINGHOUSE CENTRUM BE LIABLE
FOR ANY SPECIAL, INDIRECT OR CONSEQUENTIAL DAMAGES OR ANY DAMAGES
WHATSOEVER RESULTING FROM LOSS OF USE, DATA OR PROFITS, WHETHER IN AN
ACTION OF CONTRACT, NEGLIGENCE OR OTHER TORTIOUS ACTION, ARISING OUT
OF OR IN CONNECTION WITH THE USE OR PERFORMANCE OF THIS SOFTWARE.
Modified by Jack Jansen, CWI, July 1995:
- Use binascii module to do the actual line-by-line conversion
between ascii and binary. This results in a 1000-fold speedup. The C
version is still 5 times faster, though.
- Arguments more compliant with Python standard
XML Remote Procedure Calls
The xmlrpclib module contains the following notice:
The XML-RPC client interface is
Copyright (c) 1999-2002 by Secret Labs AB
Copyright (c) 1999-2002 by Fredrik Lundh
By obtaining, using, and/or copying this software and/or its
associated documentation, you agree that you have read, understood,
and will comply with the following terms and conditions:
Permission to use, copy, modify, and distribute this software and
its associated documentation for any purpose and without fee is
hereby granted, provided that the above copyright notice appears in
all copies, and that both that copyright notice and this permission
notice appear in supporting documentation, and that the name of
Secret Labs AB or the author not be used in advertising or publicity
pertaining to distribution of the software without specific, written
prior permission.
SECRET LABS AB AND THE AUTHOR DISCLAIMS ALL WARRANTIES WITH REGARD
TO THIS SOFTWARE, INCLUDING ALL IMPLIED WARRANTIES OF MERCHANTABILITY AND FITNESS. IN NO EVENT SHALL SECRET LABS AB OR THE AUTHOR
BE LIABLE FOR ANY SPECIAL, INDIRECT OR CONSEQUENTIAL DAMAGES OR ANY
DAMAGES WHATSOEVER RESULTING FROM LOSS OF USE, DATA OR PROFITS,
WHETHER IN AN ACTION OF CONTRACT, NEGLIGENCE OR OTHER TORTIOUS
ACTION, ARISING OUT OF OR IN CONNECTION WITH THE USE OR PERFORMANCE
OF THIS SOFTWARE.
test_epoll
==========
The test_epoll contains the following notice:
Copyright (c) 2001-2006 Twisted Matrix Laboratories.
Permission is hereby granted, free of charge, to any person obtaining
a copy of this software and associated documentation files (the
"Software"), to deal in the Software without restriction, including
without limitation the rights to use, copy, modify, merge, publish,
distribute, sublicense, and/or sell copies of the Software, and to
permit persons to whom the Software is furnished to do so, subject to
the following conditions:
The above copyright notice and this permission notice shall be
included in all copies or substantial portions of the Software.
THE SOFTWARE IS PROVIDED "AS IS", WITHOUT WARRANTY OF ANY KIND,
EXPRESS OR IMPLIED, INCLUDING BUT NOT LIMITED TO THE WARRANTIES OF
MERCHANTABILITY, FITNESS FOR A PARTICULAR PURPOSE AND
NONINFRINGEMENT. IN NO EVENT SHALL THE AUTHORS OR COPYRIGHT HOLDERS BE
439
Scintilla License
LIABLE FOR ANY CLAIM, DAMAGES OR OTHER LIABILITY, WHETHER IN AN ACTION
OF CONTRACT, TORT OR OTHERWISE, ARISING FROM, OUT OF OR IN CONNECTION
WITH THE SOFTWARE OR THE USE OR OTHER DEALINGS IN THE SOFTWARE.
Select kqueue
=============
The select and contains the following notice for the kqueue interface:
Copyright (c) 2000 Doug White, 2006 James Knight, 2007 Christian Heimes
All rights reserved.
Redistribution and use in source and binary forms, with or without
modification, are permitted provided that the following conditions
are met:
1. Redistributions of source code must retain the above copyright
notice, this list of conditions and the following disclaimer.
2. Redistributions in binary form must reproduce the above copyright
notice, this list of conditions and the following disclaimer in the
documentation and/or other materials provided with the distribution.
THIS SOFTWARE IS PROVIDED BY THE AUTHOR AND CONTRIBUTORS ``AS IS'' AND
ANY EXPRESS OR IMPLIED WARRANTIES, INCLUDING, BUT NOT LIMITED TO, THE
IMPLIED WARRANTIES OF MERCHANTABILITY AND FITNESS FOR A PARTICULAR PURPOSE
ARE DISCLAIMED. IN NO EVENT SHALL THE AUTHOR OR CONTRIBUTORS BE LIABLE
FOR ANY DIRECT, INDIRECT, INCIDENTAL, SPECIAL, EXEMPLARY, OR CONSEQUENTIAL
DAMAGES (INCLUDING, BUT NOT LIMITED TO, PROCUREMENT OF SUBSTITUTE GOODS
OR SERVICES; LOSS OF USE, DATA, OR PROFITS; OR BUSINESS INTERRUPTION)
HOWEVER CAUSED AND ON ANY THEORY OF LIABILITY, WHETHER IN CONTRACT, STRICT
LIABILITY, OR TORT (INCLUDING NEGLIGENCE OR OTHERWISE) ARISING IN ANY WAY
OUT OF THE USE OF THIS SOFTWARE, EVEN IF ADVISED OF THE POSSIBILITY OF
SUCH DAMAGE.
strtod and dtoa
===============
The file Python/dtoa.c, which supplies C functions dtoa and strtod for conversion
of C doubles to and from strings, is derived from the file of the same name by
David M. Gay, currently available from http://www.netlib.org/fp/. The original
file, as retrieved on March 16, 2009, contains the following copyright and
licensing notice:
/****************************************************************
*
* The author of this software is David M. Gay.
*
* Copyright (c) 1991, 2000, 2001 by Lucent Technologies.
*
* Permission to use, copy, modify, and distribute this software for
* any purpose without fee is hereby granted, provided that this entire
* notice is included in all copies of any software which is or
* includes a copy or modification of this software and in all copies
* of the supporting documentation for such software.
*
* THIS SOFTWARE IS BEING PROVIDED "AS IS", WITHOUT ANY EXPRESS OR
* IMPLIED WARRANTY. IN PARTICULAR, NEITHER THE AUTHOR NOR LUCENT
* MAKES ANY REPRESENTATION OR WARRANTY OF ANY KIND CONCERNING THE
* MERCHANTABILITY OF THIS SOFTWARE OR ITS FITNESS FOR ANY PARTICULAR
* PURPOSE.
*
***************************************************************/
H.30 Scintilla License
The following software may be included in this product:
Scintilla
440
Scintilla License
License for Scintilla and SciTE
Copyright 1998-2003 by Neil Hodgson <[email protected]>
All Rights Reserved
Permission to use, copy, modify, and distribute this software and its
documentation for any purpose and without fee is hereby granted,
provided that the above copyright notice appear in all copies and that
both that copyright notice and this permission notice appear in
supporting documentation.
NEIL HODGSON DISCLAIMS ALL WARRANTIES WITH REGARD TO THIS
SOFTWARE, INCLUDING ALL IMPLIED WARRANTIES OF MERCHANTABILITY
AND FITNESS, IN NO EVENT SHALL NEIL HODGSON BE LIABLE FOR ANY
SPECIAL, INDIRECT OR CONSEQUENTIAL DAMAGES OR ANY DAMAGES
WHATSOEVER RESULTING FROM LOSS OF USE, DATA OR PROFITS,
WHETHER IN AN ACTION OF CONTRACT, NEGLIGENCE OR OTHER
TORTIOUS ACTION, ARISING OUT OF OR IN CONNECTION WITH THE USE
OR PERFORMANCE OF THIS SOFTWARE.
Scintilla includes some files copyright Adobe Systems Incorporated:
Copyright (c) 2007 Adobe Systems Incorporated
Permission is hereby granted, free of charge, to any person obtaining a copy
of this software and associated documentation files (the "Software"), to deal in
the Software without restriction, including without limitation the rights to
use, copy, modify, merge, publish, distribute, sublicense, and/or sell copies
of the Software, and to permit persons to whom the Software is furnished to do
so, subject to the following conditions:
The above copyright notice and this permission notice shall be included in
all copies or substantial portions of the Software.
THE SOFTWARE IS PROVIDED "AS IS", WITHOUT WARRANTY OF ANY KIND, EXPRESS OR
IMPLIED, INCLUDING BUT NOT LIMITED TO THE WARRANTIES OF MERCHANTABILITY,
FITNESS FOR A PARTICULAR PURPOSE AND NONINFRINGEMENT. IN NO EVENT SHALL THE AUTHORS
OR COPYRIGHT HOLDERS BE LIABLE FOR ANY CLAIM, DAMAGES OR OTHER LIABILITY,
WHETHER IN AN ACTION OF CONTRACT, TORT OR OTHERWISE, ARISING FROM, OUT OF OR IN
CONNECTION WITH THE SOFTWARE OR THE USE OR OTHER DEALINGS IN THE SOFTWARE.
---Scintilla includes some files copyright Apple Computer, Inc.:
Disclaimer: IMPORTANT: This Apple software is supplied to you by Apple
Computer, Inc. ("Apple") in consideration of your agreement to the following
terms, and your use, installation, modification or redistribution of this
Apple software constitutes acceptance of these terms. If you do not agree
with these terms, please do not use, install, modify or redistribute this
Apple software.
In consideration of your agreement to abide by the following terms, and
subject to these terms, Apple grants you a personal, non-exclusive license,
under Apple's copyrights in this original Apple software (the "Apple
Software"), to use, reproduce, modify and redistribute the Apple Software,
with or without modifications, in source and/or binary forms; provided that
if you redistribute the Apple Software in its entirety and without
modifications, you must retain this notice and the following text and
disclaimers in all such redistributions of the Apple Software. Neither the
name, trademarks, service marks or logos of Apple Computer, Inc. may be used
to endorse or promote products derived from the Apple Software without
specific prior written permission from Apple. Except as expressly stated in
this notice, no other rights or licenses, express or implied, are granted by
Apple herein, including but not limited to any patent rights that may be
441
ScintillaNET License
infringed by your derivative works or by other works in which the Apple
Software may be incorporated.
The Apple Software is provided by Apple on an "AS IS" basis. APPLE MAKES NO
WARRANTIES, EXPRESS OR IMPLIED, INCLUDING WITHOUT LIMITATION THE IMPLIED
WARRANTIES OF NON-INFRINGEMENT, MERCHANTABILITY AND FITNESS FOR A PARTICULAR
PURPOSE, REGARDING THE APPLE SOFTWARE OR ITS USE AND OPERATION ALONE OR IN
COMBINATION WITH YOUR PRODUCTS.
IN NO EVENT SHALL APPLE BE LIABLE FOR ANY SPECIAL, INDIRECT, INCIDENTAL OR
CONSEQUENTIAL DAMAGES (INCLUDING, BUT NOT LIMITED TO, PROCUREMENT OF
SUBSTITUTE GOODS OR SERVICES; LOSS OF USE, DATA, OR PROFITS; OR BUSINESS
INTERRUPTION) ARISING IN ANY WAY OUT OF THE USE, REPRODUCTION, MODIFICATION
AND/OR DISTRIBUTION OF THE APPLE SOFTWARE, HOWEVER CAUSED AND WHETHER UNDER
THEORY OF CONTRACT, TORT (INCLUDING NEGLIGENCE), STRICT LIABILITY OR
OTHERWISE, EVEN IF APPLE HAS BEEN ADVISED OF THE POSSIBILITY OF SUCH DAMAGE.
Copyright (c) 2002 Apple Computer, Inc., All Rights Reserved
H.31 ScintillaNET License
The following software may be included in this product:
ScintillaNET
ScintillaNET is based on the Scintilla component by Neil Hodgson.
ScintillaNET is released on this same license.
The ScintillaNET bindings are Copyright 2002-2006 by Garrett Serack
<[email protected]>
All Rights Reserved
Permission to use, copy, modify, and distribute this software and its
documentation for any purpose and without fee is hereby granted, provided
that the above copyright notice appear in all copies and that both that
copyright notice and this permission notice appear in supporting
documentation.
GARRETT SERACK AND ALL EMPLOYERS PAST AND PRESENT DISCLAIM ALL WARRANTIES
WITH REGARD TO THIS SOFTWARE, INCLUDING ALL IMPLIED WARRANTIES OF
MERCHANTABILITY AND FITNESS, IN NO EVENT SHALL GARRETT SERACK AND ALL
EMPLOYERS PAST AND PRESENT BE LIABLE FOR ANY SPECIAL, INDIRECT OR
CONSEQUENTIAL DAMAGES OR ANY DAMAGES WHATSOEVER RESULTING FROM LOSS OF USE,
DATA OR PROFITS, WHETHER IN AN ACTION OF CONTRACT, NEGLIGENCE OR OTHER
TORTIOUS ACTION, ARISING OUT OF OR IN CONNECTION WITH THE USE OR PERFORMANCE
OF THIS SOFTWARE.
The license for Scintilla is as follows:
----------------------------------------------------------------------Copyright 1998-2006 by Neil Hodgson <[email protected]>
All Rights Reserved
Permission to use, copy, modify, and distribute this software and its
documentation for any purpose and without fee is hereby granted, provided
that the above copyright notice appear in all copies and that both that
copyright notice and this permission notice appear in supporting
documentation.
NEIL HODGSON DISCLAIMS ALL WARRANTIES WITH REGARD TO THIS SOFTWARE, INCLUDING
ALL IMPLIED WARRANTIES OF MERCHANTABILITY AND FITNESS, IN NO EVENT SHALL NEIL
442
SQLCipher License
HODGSON BE LIABLE FOR ANY SPECIAL, INDIRECT OR CONSEQUENTIAL DAMAGES OR ANY
DAMAGES WHATSOEVER RESULTING FROM LOSS OF USE, DATA OR PROFITS, WHETHER IN AN
ACTION OF CONTRACT, NEGLIGENCE OR OTHER TORTIOUS ACTION, ARISING OUT OF OR IN
CONNECTION WITH THE USE OR PERFORMANCE OF THIS SOFTWARE.
H.32 SQLCipher License
Copyright (c) 2008, ZETETIC LLC All rights reserved. Redistribution and use in source and binary forms,
with or without modification, are permitted provided that the following conditions are met: * Redistributions
of source code must retain the above copyright notice, this list of conditions and the following disclaimer.
* Redistributions in binary form must reproduce the above copyright notice, this list of conditions and
the following disclaimer in the documentation and/or other materials provided with the distribution. *
Neither the name of the ZETETIC LLC nor the names of its contributors may be used to endorse or
promote products derived from this software without specific prior written permission. THIS SOFTWARE IS
PROVIDED BY ZETETIC LLC ''AS IS'' AND ANY EXPRESS OR IMPLIED WARRANTIES, INCLUDING,
BUT NOT LIMITED TO, THE IMPLIED WARRANTIES OF MERCHANTABILITY AND FITNESS FOR A
PARTICULAR PURPOSE ARE DISCLAIMED. IN NO EVENT SHALL ZETETIC LLC BE LIABLE FOR
ANY DIRECT, INDIRECT, INCIDENTAL, SPECIAL, EXEMPLARY, OR CONSEQUENTIAL DAMAGES
(INCLUDING, BUT NOT LIMITED TO, PROCUREMENT OF SUBSTITUTE GOODS OR SERVICES;
LOSS OF USE, DATA, OR PROFITS; OR BUSINESS INTERRUPTION) HOWEVER CAUSED AND ON
ANY THEORY OF LIABILITY, WHETHER IN CONTRACT, STRICT LIABILITY, OR TORT (INCLUDING
NEGLIGENCE OR OTHERWISE) ARISING IN ANY WAY OUT OF THE USE OF THIS SOFTWARE,
EVEN IF ADVISED OF THE POSSIBILITY OF SUCH DAMAGE.
H.33 TinyXML License
The following software may be included in this product:
TinyXML
TinyXML is released under the zlib license:
This software is provided 'as-is', without any express or implied
warranty. In no event will the authors be held liable for any
damages arising from the use of this software.
Permission is granted to anyone to use this software for any
purpose, including commercial applications, and to alter it and
redistribute it freely, subject to the following restrictions:
1. The origin of this software must not be misrepresented; you must
not claim that you wrote the original software. If you use this
software in a product, an acknowledgment in the product documentation
would be appreciated but is not required.
2. Altered source versions must be plainly marked as such, and
must not be misrepresented as being the original software.
3. This notice may not be removed or altered from any source
distribution.
H.34 TreeViewAdv for .NET License
The following software may be included in this product:
TreeViewAdv for .NET
443
VSQLite++ License
The BSD License
Copyright (c) 2009, Andrey Gliznetsov ([email protected])
All rights reserved.
Redistribution and use in source and binary forms, with or without
modification, are permitted provided that the following conditions
are met
- Redistributions of source code must retain the above copyright notice,
this list of conditions and the following disclaimer.
- Redistributions in binary form must reproduce the above copyright notice,
this list of conditions and the following disclaimer in the documentation
andor other materials provided with the distribution.
THIS SOFTWARE IS PROVIDED BY THE COPYRIGHT HOLDERS AND CONTRIBUTORS
AS IS AND ANY EXPRESS OR IMPLIED WARRANTIES, INCLUDING, BUT NOT
LIMITED TO, THE IMPLIED WARRANTIES OF MERCHANTABILITY AND FITNESS
FOR A PARTICULAR PURPOSE ARE DISCLAIMED. IN NO EVENT SHALL THE
COPYRIGHT OWNER OR CONTRIBUTORS BE LIABLE FOR ANY DIRECT, INDIRECT,
INCIDENTAL, SPECIAL, EXEMPLARY, OR CONSEQUENTIAL DAMAGES (INCLUDING,
BUT NOT LIMITED TO, PROCUREMENT OF SUBSTITUTE GOODS OR SERVICES;
LOSS OF USE, DATA, OR PROFITS; OR BUSINESS INTERRUPTION) HOWEVER
CAUSED AND ON ANY THEORY OF LIABILITY, WHETHER IN CONTRACT, STRICT
LIABILITY, OR TORT (INCLUDING NEGLIGENCE OR OTHERWISE) ARISING IN
ANY WAY OUT OF THE USE OF THIS SOFTWARE, EVEN IF ADVISED OF THE
POSSIBILITY OF SUCH DAMAGE.
H.35 VSQLite++ License
The following software may be included in this product:
VSQLite++
VSQLite++ - virtuosic bytes SQLite3 C++ wrapper
Copyright (c) 2006 Vinzenz Feenstra [email protected]
All rights reserved.
Redistribution and use in source and binary forms, with or without
modification, are permitted provided that the following conditions
are met:
* Redistributions of source code must retain the above copyright notice,
this list of conditions and the following disclaimer.
* Redistributions in binary form must reproduce the above copyright notice,
this list of conditions and the following disclaimer in the documentation
and/or other materials provided with the distribution.
* Neither the name of virtuosic bytes nor the names of its contributors may
be used to endorse or promote products derived from this software without
specific prior written permission.
THIS SOFTWARE IS PROVIDED BY THE COPYRIGHT HOLDERS AND CONTRIBUTORS "AS IS"
AND ANY EXPRESS OR IMPLIED WARRANTIES, INCLUDING, BUT NOT LIMITED TO, THE
IMPLIED WARRANTIES OF MERCHANTABILITY AND FITNESS FOR A PARTICULAR PURPOSE
ARE DISCLAIMED. IN NO EVENT SHALL THE COPYRIGHT OWNER OR CONTRIBUTORS BE
LIABLE FOR ANY DIRECT, INDIRECT, INCIDENTAL, SPECIAL, EXEMPLARY, OR
CONSEQUENTIAL DAMAGES (INCLUDING, BUT NOT LIMITED TO, PROCUREMENT OF
SUBSTITUTE GOODS OR SERVICES; LOSS OF USE, DATA, OR PROFITS; OR BUSINESS
INTERRUPTION) HOWEVER CAUSED AND ON ANY THEORY OF LIABILITY, WHETHER IN
444
zlib License
CONTRACT, STRICT LIABILITY, OR TORT (INCLUDING NEGLIGENCE OR OTHERWISE)
ARISING IN ANY WAY OUT OF THE USE OF THIS SOFTWARE, EVEN IF ADVISED OF THE
POSSIBILITY OF SUCH DAMAGE.
H.36 zlib License
The following software may be included in this product:
zlib
Oracle gratefully acknowledges the contributions of Jean-loup Gailly and Mark Adler in creating the zlib
general purpose compression library which is used in this product.
zlib.h -- interface of the 'zlib' general purpose compression library
Copyright (C) 1995-2004 Jean-loup Gailly and Mark Adler
zlib.h -- interface of the 'zlib' general purpose compression library
version 1.2.3, July 18th, 2005
Copyright (C) 1995-2005 Jean-loup Gailly and Mark Adler
zlib.h -- interface of the 'zlib' general purpose compression library
version 1.2.5, April 19th, 2010
Copyright (C) 1995-2010 Jean-loup Gailly and Mark Adler
This software is provided 'as-is', without any express or implied warranty.
In no event will the authors be held liable for any damages arising from the
use of this software. Permission is granted to anyone to use this software
for any purpose,including commercial applications, and to alter it and
redistribute it freely, subject to the following restrictions:
1. The origin of this software must not be misrepresented; you must not
claim that you wrote the original software. If you use this software
in a product, an acknowledgment in the product documentation would
be appreciated but is not required.
2. Altered source versions must be plainly marked as such, and must not
be misrepresented as being the original software.
3. This notice may not be removed or altered from any source distribution.
Jean-loup Gailly [email protected]
Mark Adler [email protected]
445
446