1
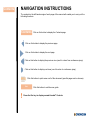
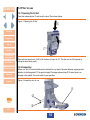
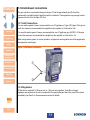
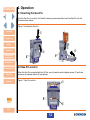
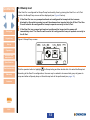
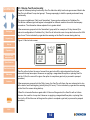
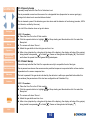
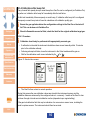
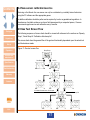
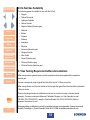
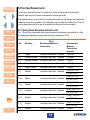
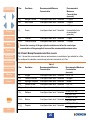
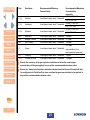
Q-Test User & Operator Manual H2S CO CH4 Q-Test Quick and simple in-field gas test and calibration solution Click here for navigation instructions Click here fo contents list M070001/ENG Issue 3 Jan 2015 Contents NAVIGATION INSTRUCTIONS The symbols in the left-hand margin of each page of the manual will enable you to carry out the following functions: Contents Click on this button to display the Contents page. Click on this button to display the previous page. Click on this button to display the next page. Click on this button to display the previous view (use it to return from a reference jump). Click on this button to display next view (use it to return to a reference jump). Click this button to print some or all of the document (specific pages can be chosen). Exit !! Click this button to exit the user guide. Press the Esc key to display normal Acrobat© Controls. CONTENTS Prologue. . . . . . . . . . . . . . . . . . . . . . . . . . . . . . . . . . . . . . . . . . . . . . 5 Safety Information. . . . . . . . . . . . . . . . . . . . . . . . . . . . . . . . . . . . . . 6 Unpacking . . . . . . . . . . . . . . . . . . . . . . . . . . . . . . . . . . . . . . . . . . . . 7 1.Set-up . . . . . . . . . . . . . . . . . . . . . . . . . . . . . . . . . . . . . . . . . . . . . 8 1.1 Mounting . . . . . . . . . . . . . . . . . . . . . . . . . . . . . . . . . . . . . . . . . . . . . . . . 8 1.2 Prior to use. . . . . . . . . . . . . . . . . . . . . . . . . . . . . . . . . . . . . . . . . . . . . . 10 1.2.1 Opening the Q-Test. . . . . . . . . . . . . . . . . . . . . . . . . . . . . . . . . . . 10 1.2.2 Inspection . . . . . . . . . . . . . . . . . . . . . . . . . . . . . . . . . . . . . . . . . . 10 1.3 Inlet/exhaust connections . . . . . . . . . . . . . . . . . . . . . . . . . . . . . . . . . 11 1.3.1 Inlet Connections . . . . . . . . . . . . . . . . . . . . . . . . . . . . . . . . . . . . 11 1.3.2 Regulators. . . . . . . . . . . . . . . . . . . . . . . . . . . . . . . . . . . . . . . . . . 11 2.Operation . . . . . . . . . . . . . . . . . . . . . . . . . . . . . . . . . . . . . . . . . 12 2.1 Inserting the Gas-Pro . . . . . . . . . . . . . . . . . . . . . . . . . . . . . . . . . . . . . 12 2.2 Gas-Pro control. . . . . . . . . . . . . . . . . . . . . . . . . . . . . . . . . . . . . . . . . . 12 2.3 Bump test. . . . . . . . . . . . . . . . . . . . . . . . . . . . . . . . . . . . . . . . . . . . . . . 13 2.3.1 Bump Test Functionality. . . . . . . . . . . . . . . . . . . . . . . . . . . . . . . 14 2.3.2 Speedy bump. . . . . . . . . . . . . . . . . . . . . . . . . . . . . . . . . . . . . . . . 15 2.3.3 Smart bump. . . . . . . . . . . . . . . . . . . . . . . . . . . . . . . . . . . . . . . . . 15 2.3.4 Calibration after bump fail. . . . . . . . . . . . . . . . . . . . . . . . . . . . . 16 2.4 New sensor calibration/service. . . . . . . . . . . . . . . . . . . . . . . . . . . . . 17 2.5 Gas Test Screen Flow. . . . . . . . . . . . . . . . . . . . . . . . . . . . . . . . . . . . . 17 2.6 Q-Test Gas Suitability. . . . . . . . . . . . . . . . . . . . . . . . . . . . . . . . . . . . . 18 2.7 Gas Testing Requirements/Recommendations . . . . . . . . . . . . . . . . 18 2.8 Test Gas Requirements. . . . . . . . . . . . . . . . . . . . . . . . . . . . . . . . . . . . 19 2.8.1 Speedy Bump Recommended Gas Levels. . . . . . . . . . . . . . . . 19 2.8.2 Smart Bump Recommended Gas Levels . . . . . . . . . . . . . . . . . 20 2.8.3 Calibration after bump fail Recommended Gas Levels. . . . . . 22 Exit 3 3. Service and maintenance . . . . . . . . . . . . . . . . . . . . . . . . . . . . 24 3.1 General. . . . . . . . . . . . . . . . . . . . . . . . . . . . . . . . . . . . . . . . . . . . . . . . . 24 3.2 Periodic checks. . . . . . . . . . . . . . . . . . . . . . . . . . . . . . . . . . . . . . . . . . 24 4. Specification. . . . . . . . . . . . . . . . . . . . . . . . . . . . . . . . . . . . . . . 25 5.Accessories . . . . . . . . . . . . . . . . . . . . . . . . . . . . . . . . . . . . . . . 26 6.Troubleshooting. . . . . . . . . . . . . . . . . . . . . . . . . . . . . . . . . . . . 27 Warranty. . . . . . . . . . . . . . . . . . . . . . . . . . . . . . . . . . . . . . . . . . . . . 28 Crowcon contacts. . . . . . . . . . . . . . . . . . . . . . . . . . . . . . . . . . . . . 30 Exit 4 Contents Prologue General Thank you for purchasing the Q-Test. At Crowcon we recognise the need for quick and simple gas test solutions which are suitable for the challenges of on-site and off-site use. Prologue Unpacking Set-up Operation Service and maintenance Specification Troubleshooting Q-Test provides a quick and simple in-field gas test and calibration solution. Providing off-site testing for remote locations where power is not always available or practical. Simple to use and easy to repeat, Q-Test reduces set-up, training requirements and space needed. Flexibility Q-Test manages speedy and smart bumps as well as calibration. Q-Test can also be easily mounted via din rail mounts on a wall or inside a vehicle to give a gas test solution for any application. The charging option also gives a permanent home to detectors mounted in vehicles and is easily powered via a standard in-vehicle power socket or multiregional power supply. Remote Workers When in the field, Q-Test provides confined space workers with repeatable gas testing solutions that maintain detector integrity and safety. When working in conjunction with +ve Safety™ fleet managers can quickly and easily tell when site requirements have not been adhered to. Economic Repeatable test solutions that, through recommended gas use instructions, can offer over 200 speedy bumps from a 34l cylinder and over 330 speedy bumps from a 56l cylinder. Warranty Contacts Exit 5 Contents Safety Information • Read and understand all instructions in the operation section of this manual prior to use. • Before use ensure that the equipment is in good condition, the enclosure is intact has not been damaged in any way. • If there is any damage to the equipment or it is not working properly, do not use, read the troubleshooting guide (see page 27) and/or contact your local Crowcon office or agent for repair/replacement. Prologue Unpacking Set-up Operation Service and maintenance Specification • Observe all warnings and instructions marked on the unit and within this manual. • Observe site health and safety procedures for gases being monitored and evacuation procedures. • Understand the Gas-Pro screen display and alarm warnings prior to use (see Gas-Pro User & Operator Manual). • Ensure maintenance, service and calibration is carried out in accordance with the procedures in the manual and only by trained personnel. • Gas-Pro is a hazardous area certified gas detector and as such must be operated and maintained in strict accordance with its instructions, warnings and label information included in the Gas-Pro manual. • Use only Crowcon supplied Gas-Pro mulitregion plug or vehicle charging adaptor. Not suitable for use with other mulitregion plugs as these may cause damage to the unit. Troubleshooting Warranty Contacts Exit 6 Contents Unpacking Remove the Q-Test from the packaging. The standard accessories are under the supporting trays. The following items will be included as standard: Box contents • Q-Test • CD Manual Prologue Unpacking Optional items in the box • Regulators • Gas-Pro Mulitregion plug Set-up Operation • Vehicle charging adaptor The box label details the contents. Service and maintenance Specification Troubleshooting Warranty Contacts Exit 7 Contents 1.Set-up 1.1 Mounting ii The gas inlet pipe À and gas exhaust pipe Á are long enough to allow placement to the left or the right of the Q-Test Â, powered Q-Test à or powered Q-Test with cylinder holder Ä but should be located prior to mounting. Figure 1: Inlet/outlet location Prologue Unpacking À Set-up Operation Service and maintenance Specification Troubleshooting Warranty Contacts Á Ä Ã Â Exit 8 Contents The Q-Test can be mounted on a standard DIN rail type EN 50022 À or screwed to a suitable flat surface through the 3 holes Á in the module’s main body (see below). The recommended length of DIN rail if a Q-Test is to be mounted on its own, is 150mm. If the Q-Test is to be used in conjunction with a cylinder holder, the recommend length of DIN rail required is 250mm. The recommended length of DIN rail if a Powered Q-Test is to be mounted on its own, is 275mm (this is supplied with the powered Q-Test). Prologue Unpacking Set-up If the Powered Q-Test is to be used in conjunction with a cylinder holder, the recommend length of DIN rail required is 350mm. Mount the DIN rail to the wall (flat side against the wall), allowing space on at least one side to slide the Q-Test on. The cylinder holder is available to mount on the DIN rail or direct to the wall. Operation Service and maintenance Specification ii Ensure that when the Q-Test is mounted, the Gas-Pro screen and operator button will be accessible (see Figure 7 on page 12). Figure 2: Mounting the Q-Test Á Troubleshooting Warranty Contacts À Exit 9 Contents 1.2 Prior to use 1.2.1 Opening the Q-Test Press the release button À and lower the door Á as shown below: Figure 3: Opening the Q-Test À Prologue Unpacking Á Set-up Operation Service and maintenance Specification Troubleshooting There are two open levels, if left to fall the door will open to 45º. The door can be fully opened by pulling the door down gently. 1.2.2 Inspection Warranty Before use, the Q-Test should always be checked for any signs of physical damage, paying special attention to the flow gasket À, the gas inlet pipe Á and gas exhaust pipe Â. Ensure there is no damage to the gasket; this could result in poor gas flow. Contacts Figure 4: Inspection prior to use À Á  Exit 10 Contents 1.3 Inlet/exhaust connections The gas cylinder is connected to the gas inlet pipe À and the gas exhaust pipe Á should be connected to a suitable length of pipe that vents to outside air. These pipes are long enough to allow placement to the left or the right of Q-Test. 1.3.1 Inlet Connections For non reactive gases Crowcon recommend the use of Tygothane or Tygon 3603 pipe. If this pipe is used, the maximum recommended tube length from the regulator to Q test inlet is 30m. Prologue Unpacking Set-up For use with reactive gases Crowcon recommends the use of Tygothane pipe (AC0301). If this pipe is used the maximum recommended tube length form the regulator to Q test inlet is 1m. When using reactive gases, for correct operation, all pipe work and regulators should be purged with the respective reactive gas. Figure 5: Inlet/exhaust connections Operation Service and maintenance Specification À Troubleshooting Warranty Contacts Á 1.3.2 Regulators Q-Test can be used with 0.5 litres per min or 1 litre per min regulators. Fixed flow or trigger regulators are required as the user is responsible for opening the gas flow at the correct time (when prompted by the Gas-Pro). See accessories section for details. Exit 11 Contents 2.Operation 2.1 Inserting the Gas-Pro Turn the Gas-Pro on, wait for it to finish the start up process and then insert the Gas-Pro into the Q-test as shown below: Figure 6: Inserting the Gas-Pro Prologue À Unpacking Set-up Operation  Á à Service and maintenance Specification Troubleshooting 2.2 Gas-Pro control Warranty When the Gas-Pro is inserted into the Q-Test, you will need to see the display screen À and have access to the operator button Á (see below). Contacts Figure 7: Gas-Pro controls À Á Exit 12 Contents 2.3 Bump test If the Gas-Pro is configured for Bump/Pump functionality, then by placing the Gas-Pro in a Q-Test module, the Bump/Pump screen will be displayed (see Figure 8 below). ii ii If the Gas-Pro is a non pumped unit and not configured for bump test the ‘sensors blocked by flow plate’ warning icon will be shown when inserted into the Q-Test. The GasPro will need to be configured for bump to operate correctly in the Q-Test. Prologue Unpacking If the Gas-Pro is a pumped unit and not configured for bump test the pump will immediately start. The Gas-Pro will need to be configured for bump to operate correctly in the Q-Test. Figure 8: Bump/Pump screen Set-up Operation Service and maintenance Specification Troubleshooting Warranty Click the operator button to highlight for Bump testing and then double click it to select the Bump test. According to the Gas-Pro configuration, the user may be asked to choose which group of gases to bump and either a Speedy bump or Smart bump test will be performed (see page 15). Contacts Exit 13 Contents 2.3.1 Bump Test Functionality As part of the bump testing functionality Gas-Pro offers the ability to allocate gas sensors fitted to the Gas-Pro into different ‘bump test groups’. These groups apply to both the speedy and smart bump functionality. The groups available are ‘Daily’ and ‘Intermittent’, these can be configured via Portables-Pro. This allows a different gas test regime to be applied for different sensors inline with site/company procedures. The information below explains this in greater detail: Prologue Unpacking If the sensors are grouped into the ‘Intermittent’ group with, for example, a 90 day interval (this interval is configurable in Portables-Pro), Gas-Pro will inform the user a bump test is due on the 90th day of use. This is indicated by a gas test due warning on the Gas-Pro screen during start up. Figure 9: Gas test due screen Set-up Operation Service and maintenance Specification Troubleshooting Warranty Contacts Gas-Pro will not inform the user of a need for a gas test until the interval period from the last successful bump has expired. However on applying a magnetised flow plate, or placing Gas-Pro into the Q-Test, the user will be given the option to complete a gas test (or proceed to pumped operation). If the sensors are grouped into the ‘Daily’ group, the Gas-Pro will inform the user a bump test is due at the start of each working day (actually every 24 hours). This is indicated by a gas test due warning on the Gas-Pro screen during start up. If Gas-Pro is turned off and on again within 24 hours of the gas test, the Gas-Pro will not inform the user of a need for a bump test. However on applying a magnetised flow plate, or placing GasPro into the Q-Test the user will be given the option to complete a gas test (or proceed to pumped operation). Exit 14 Contents 2.3.2 Speedy bump A speedy bump tests the Gas-Pro to first alarm level. Gas is presented across/over the sensor for a designated time (dependent on sensor gas type) during which alarm level one should be activated. This is deemed a pass if the detector goes into alarm and the detector is functioning (sounder, LED’s and vibrator, verified by the user). It is a fail if the detector does not go into alarm. Prologue Unpacking Set-up Operation 2.3.2.1 Procedure XX Place the Gas-Pro in the Q-Test module. XX Click the operator button to highlight Bump test. for Bump testing and then double click it to select the XX The screen will show ‘Gas on’. XX Attach the gas bottle to the inlet pipe and turn it on. Service and maintenance XX After a time (depicted by a time bar at the base of the display), the display will show if the gas(es) being tested have passed or failed . Gases not being tested will display [ ]. The test will end before the preset time if all gases being tested pass. Specification 2.3.3 Smart bump Troubleshooting Warranty Contacts * A smart bump tests that the Gas-Pro responds correctly to a specified level of test gas. Gas is passed over/across the sensors and a predicted response is expected within a time window dependant on the sensor response time. The test is passed if the gas level indicated by the detector is within pre-specified limits within this time window (the parameters of this test are configurable via Portables-Pro). 2.3.3.1 Procedure XX Place the Gas-Pro in the Q-Test module. XX Click the operator button to highlight Bump test. for Bump testing and then double click it to select the XX The screen will show ‘Gas on’. XX Attach the gas bottle and turn it on. XX After a time (depicted by a time bar at the base of the display), the display will show if the gas(es) being tested have passed or failed . Gases not being tested will display [ ]. * Exit 15 Contents 2.3.4 Calibration after bump fail If any channel fails speedy bump or smart bump then Gas-Pro can be configured (via Portables-Pro) to perform a ‘calibration after bump fail’ immediately after the test failure. As this test immediately follows a speedy or smart bump, if ‘calibration after bump fail’ is configured the speedy or smart bump test will need to undertaken with calibration quality gas. ii ii ii Ensure the gas applied matches the configuration settings in the Gas-Pro or the test will fail. This can be done via Portables-Pro. Prologue Unpacking Should a flammable sensor be fitted, check the label for the original calibration target gas. 2.3.4.1 Procedure Calibration should only be performed with appropriately accurate gas. Set-up Operation Service and maintenance • If calibration is intended the instrument should have been zeroed manually within 15 minutes prior to the calibration attempt. • Following a bump test failure, leave the instrument in the Q-test module and the gas on. • Wait for the calibration result screen indicated by the or . Figure 10: Gas test due screen Specification Troubleshooting Warranty Contacts • The Gas-Pro then returns to normal operation. During this process the new calibration values are stored to the instrument memory and the calibration dates are advanced by the configured interval – commonly 1 month as the Gas-Pro has not been through a formal service/calibration routine (dependant upon region/setting). If the gas test calibration fails this may be indicative of a more serious sensor issue, including the need to replace sensors. The instrument should then be serviced. Exit 16 Contents 2.4 New sensor calibration/service Servicing or the fitment of a new sensor can only be undertaken by a suitably trained technician using the PC software and the appropriate gases. In addition calibration should be performed as required by local or organisational regulations. In the absence of suitable evidence, such as a field assessment by a competent person, Crowcon recommend regular service and calibration every 6 months. Prologue Unpacking Set-up Operation 2.5 Gas Test Screen Flow The following sequence of screen shots should be viewed with reference to the sections on ‘Speedy Bump’, ‘Smart Bump’ & ‘Calibration after bump fail‘. The screen shots show the general flow of the gas test functionality dependant upon the actual test and the decisions made. Figure 11: Gas test screen flow Bump/Pump Service and maintenance Specification Gas Groups Gas On Troubleshooting Gas Off Warranty Contacts Pass One gas fail Fail If enabled & manual zero <15mins prior Calibration after bump fail Pass Fail Exit 17 One gas fail Contents 2.6 Q-Test Gas Suitability The following gases are suitable for use with the Q-Test: • Oxygen • Carbon Monoxide • Hydrogen Sulphide • Carbon Dioxide • Sulphur Dioxide (Reactive gas) Prologue Unpacking Set-up Operation • Methane • Butane • Propane • Pentane • Acetylene • Ethylene • Ammonia (Reactive gas) • Nitrogen Dioxide Service and maintenance • Nitric Oxide Specification • Chlorine (Reactive gas) Troubleshooting Warranty Contacts • Ozone (Reactive gas) • Chlorine Dioxide (Reactive gas) 2.7 Gas Testing Requirements/Recommendations When using reactive gases all pipe work and regulators should be purged with the respective reactive gas. Crowcon recommend using a typical flow rate of the test of 0.5 litres per minute. When using chlorine and chlorine dioxide as the test gas the typical flow rate should be increased to 1 litre per minute. Chlorine dioxide gas testing (or calibration) must only be carried out using a chlorine dioxide generator. Crowcon recommend Advanced Calibration Designs, inc. Gas Generator, model: CAL2000 (P/N: 750-0603-AT), using the Chlorine Dioxide Cell (P/N: 510-2060-00). Refer to generator instructions for use. Exit Ozone gas testing (or calibration) must only be carried out using an ozone generator. Crowcon recommend Analytical Technology, inc. Ozone Generator, Model: A23-14. Refer to generator instructions for use. 18 Contents 2.8 Test Gas Requirements For each type of gas test that can be undertaken by Q-Test; speedy bump; smart bump and calibration after bump fail, Crowcon recommend the following gas levels. Care should be taken to ensure Gas-Pro is configured correctly such that the gas levels applied are suitable for the test to be undertaken, the configuration can be verified via Portables Pro. If Gas-Pro is not configured correctly for the gas to be applied, then the test will not be successful. Prologue 2.8.1 Speedy Bump Recommended Gas Levels Table 1 shows the recommended minimum and maximum concentration of gas suitable for a GasPro configured to undertake a speedy bump test when inserted into a Q-Test. Unpacking Set-up Gas Gas Name Table 1 Recommended Minimum Concentration O2 Oxygen ≥ configured alarm level 1 threshold Recommended Maximum Concentration (see note) ≤ 22% VOL CO Carbon Monoxide ≥ configured alarm level 1 threshold ≤ 400ppm H 2S Hydrogen Sulphide ≥ configured alarm level 1 threshold ≤ 85ppm CO2 Carbon Dioxide ≥ configured alarm level 1 threshold ≤ 2% VOL SO2 Sulphur Dioxide ≥ configured alarm level 1 threshold ≤ 16ppm CH4 Methane ≥ configured alarm level 1 threshold C4H10 Butane ≥ configured alarm level 1 threshold C 3H 8 Propane ≥ configured alarm level 1 threshold C 2H 2 Acetylene ≥ configured alarm level 1 threshold C5H12 Pentane ≥ configured alarm level 1 threshold C 2H 4 Ethylene ≥ configured alarm level 1 threshold NH3 Ammonia ≥ configured alarm level 1 threshold Operation Service and maintenance Specification Troubleshooting Warranty Contacts Exit 19 [ATEX] 2.2% VOL [UL] 2.5% VOL [ATEX] 0.7% VOL [UL] 0.6 % VOL [ATEX] 0.85% VOL [UL] 1.05% VOL [ATEX] 0.55% VOL [UL] 0.75% VOL [ATEX] 1.15% VOL [UL] 1.2% VOL [ATEX] 1.15% VOL [UL] 1.35% VOL ≤ 85ppm Contents Gas Gas Name Recommended Minimum Concentration N02 Nitrogen Dioxide ≥ configured alarm level 1 threshold Recommended Maximum Concentration (see note) ≤ 17ppm NO Nitric Oxide ≥ configured alarm level 1 threshold ≤ 85ppm ≤ 0.7ppm Prologue Unpacking Set-up Operation Service and maintenance O3 Ozone ≥ configured alarm level 1 threshold (concentration from recommended generator) CL2 Chlorine ≥ configured alarm level 1 threshold ≤ 3ppm CLO2 Chlorine Dioxide ≥ configured alarm level 1 threshold ≤ 0.8ppm ii Ensure the accuracy of the gas cylinder used does not allow the nominal gas concentration of the gas applied, to exceed the recommended maximum value. 2.8.2 Smart Bump Recommended Gas Levels Table 2 shows the recommended minimum and maximum concentration of gas suitable for a GasPro configured to undertake a smart bump test when inserted into a Q-Test. Specification Troubleshooting Warranty Contacts Gas Gas Name Table 2 Recommended Minimum Concentration O2 Oxygen ≥ configured alarm level 1 threshold Recommended Maximum Concentration (see note) ≤ 22% VOL CO Carbon Monoxide ≥ configured alarm level 1 threshold ≤ 400ppm H 2S Hydrogen Sulphide ≥ configured alarm level 1 threshold ≤ 85ppm CO2 Carbon Dioxide ≥ configured alarm level 1 threshold ≤ 2% VOL SO2 Sulphur Dioxide ≥ configured alarm level 1 threshold ≤ 16ppm CH4 Methane ≥ configured alarm level 1 threshold C4H10 Butane ≥ configured alarm level 1 threshold C 3H 8 Propane ≥ configured alarm level 1 threshold Exit 20 [ATEX] 2.2% VOL [UL] 2.5% VOL [ATEX] 0.7% VOL [UL] 0.6% VOL [ATEX] 0.85% VOL [UL] 1.05% VOL Contents Prologue Unpacking Set-up Operation Service and maintenance Specification Troubleshooting Warranty Gas Gas Name Recommended Minimum Concentration Recommended Maximum Concentration (see note) [ATEX] 0.55% VOL C5H12 Pentane ≥ configured alarm level 1 threshold C 2H 2 Acetylene ≥ configured alarm level 1 threshold C 2H 4 Ethylene ≥ configured alarm level 1 threshold NH3 Ammonia ≥ configured alarm level 1 threshold ≤ 85ppm N02 Nitrogen Dioxide ≥ configured alarm level 1 threshold ≤ 17ppm NO Nitric Oxide ≥ configured alarm level 1 threshold ≤ 85ppm [UL] 0.75% VOL [ATEX] 1.15% VOL [UL] 1.2% VOL [ATEX] 1.15% VOL [UL] 1.35% VOL ≤ 0.7ppm O3 Ozone ≥ configured alarm level 1 threshold (concentration from recommended generator) CL2 Chlorine ≥ configured alarm level 1 threshold ≤ 3ppm CLO2 Chlorine Dioxide ≥ configured alarm level 1 threshold ≤ 0.8ppm ii ii Ensure the accuracy of the gas cylinder used does not allow the nominal gas concentration of the gas applied, to exceed the recommended maximum value. Ensure the ‘bump test plus/minus deviation’ implemented for the smart bump test limit (as configured via Portables-Pro) does not allow the gas concentration to be applied, to exceed the recommended maximum value. Contacts Exit 21 Contents 2.8.3 Calibration after bump fail Recommended Gas Levels Table 3 shows the recommended minimum and maximum concentration of gas suitable for a GasPro when configured to undertake a bump fail calibration, when the unit fails either a speedy or a smart bump. Table 3 Prologue Unpacking Set-up Operation Gas Gas Name Recommended Minimum Concentration Recommended Concentration Recommended Maximum Concentration O2 Oxygen ≥ 18% VOL 18% VOL ≤ 22% VOL CO Carbon Monoxide ≥ 100ppm 250ppm (100ppm) ≤ 400ppm H 2S Hydrogen Sulphide ≥ 15ppm 25ppm (15ppm) ≤ 85ppm CO2 Carbon Dioxide ≥ 0.5% VOL 2% VOL (1%) ≤ 2% VOL SO2 Sulphur Dioxide ≥ 10ppm 10ppm ≤ 16ppm CH4 Methane [ATEX] 2.2% VOL [ATEX] 2.2 % VOL [ATEX] ≤ 2.2% VOL [UL] 2.5% VOL [UL] 2.5% VOL [UL] ≤ 2.5% VOL C4H10 Butane [ATEX] 0.7% VOL [ATEX] 0.7% VOL [ATEX] ≤ 0.7% VOL [UL] 0.6% VOL [UL] 0.6% VOL [UL] ≤ 0.6% VOL C 3H 8 Propane [ATEX] 0.85% VOL [ATEX] 0.85% VOL [ATEX] ≤ 0.85% VOL [UL] 1.05% VOL [UL] 1.05% VOL [UL] ≤ 1.05% VOL C5H12 Pentane [ATEX] 0.55% VOL [ATEX] 0.55% VOL [ATEX] ≤ 0.55% VOL [UL] 0.75% VOL [UL] 0.75% VOL [UL] ≤ 0.75% VOL C 2H 2 Acetylene [ATEX] 1.15% VOL [ATEX] 1.15% VOL [ATEX] ≤ 1.15% VOL [UL] 1.2% VOL [UL] 1.2% VOL [UL] ≤ 1.2% VOL C 2H 4 Ethylene [ATEX] 1.15% VOL [ATEX] 1.15% VOL [ATEX] ≤ 1.15% VOL [UL] 1.35% VOL [UL] 1.35% VOL [UL] ≤ 1.35% VOL NH3 Ammonia ≥ 50ppm 50ppm ≤ 85ppm N02 Nitrogen Dioxide ≥ 10ppm 10ppm ≤ 17ppm NO Nitric Oxide ≥ 50ppm 50ppm ≤ 85ppm Service and maintenance Specification Troubleshooting Warranty Contacts Exit 22 Contents Prologue Unpacking Set-up Operation Gas Gas Name Recommended Minimum Concentration Recommended Concentration Recommended Maximum Concentration 0.7ppm 0.7ppm ≤ 0.7ppm O3 Ozone (concentration from recommended generator) (concentration from recommended generator) (concentration from recommended generator) CL2 Chlorine ≤ 1ppm 2.5ppm ≤ 3ppm CLO2 Chlorine Dioxide ≤ 0.5ppm 0.5ppm ≤ 0.8ppm ii ii For a bump fail calibration certified gas to ±2% accuracy is recommended. Ensure the accuracy of the gas cylinder used does not allow the nominal gas concentration of the gas applied, to exceed the recommended maximum value. Service and maintenance Specification Troubleshooting Warranty Contacts Exit 23 Contents 3.Service and maintenance 3.1 General ii Ensure maintenance and service are carried out in accordance with the procedures in the manual and only by trained personnel. Q-Test is designed to require minimal service and maintenance. Use only genuine Crowcon replacement parts. Prologue Unpacking Set-up 3.2 Periodic checks Periodically check for any signs of physical damage, paying special attention to the flow gasket À and the gas inlet & exhaust pipes Á. Figure 12: Periodic checks Operation À Service and maintenance Specification Troubleshooting Á Warranty Contacts Exit 24 Contents 4.Specification Table 4 Q-Test Size (d x l x w) 88 x 221 x 116mm (3.46 x 8.70 x 4.57 inches) Weight 340g DIN rail 35mm x 75mm top hat rail (EN 50022, BS 5584, DIN 46277-3) Prologue Unpacking With Cylinder holder recommended length of DIN is 250mm Gas inlet/exhaust tube diameter 3mm inside diameter, 5mm outside diameter Set-up Operation Service and maintenance Powered Q-Test Size (d x l x w) 88 x 240 x 185mm (3.46 x 9.45 x 7.29 inches) Weight 762g DIN rail 35mm x 275mm top hat rail (EN 50022, BS 5584, DIN 46277-3) Specification With Cylinder holder recommended length of DIN is 300mm Troubleshooting Gas inlet/exhaust tube diameter 3mm inside diameter, 5mm outside diameter Warranty Contacts Exit 25 Contents Prologue Unpacking Set-up Operation Service and maintenance Specification Troubleshooting Warranty Contacts 5.Accessories Table 5 Part Number Description REG001 0.5l/min fixed flow regulator with on/off switch REG002 0.5l/m fixed flow trigger regulator REG003 0.5l/min fixed flow reactive gas regulator with on/off switch AC0510 Cylinder Holder (wall mount) for 34l to 110l cylinders AC0611 Replacement flow gasket AC0612 Inlet tube connector AC0613 Exhaust tube connector CH0106 Vehicle charging adaptor CH0101 Multiregion power supply AC0201 1M Standard tubing (includes tube insert) AC0203 3M Standard tubing (includes tube insert) AC0205 5M Standard tubing (includes tube insert) AC0210 10M Standard tubing (includes tube insert) AC0220 20M Standard tubing (includes tube insert) AC0230 30M Standard tubing (includes tube insert) AC0301 1m reactive gas tubing (Tygothane® 3.2mm ID including tube insert) AC0303 3m reactive gas tubing (Tygothane® 3.2mm ID including tube insert) AC0614 35mm x 275mm DIN rail For gas cylinder information please contact Crowcon or your local agent. Exit 26 Contents Prologue Unpacking Set-up 6.Troubleshooting Table 6 Symptom Action Gas-Pro does not go into bump mode Ensure the Gas-Pro is on and configured to bump test. Ensure the gas is correct for the Gas-Pro type presented. Ensure the gas is manually turned on for the duration of the test. Check the gasket for any signs of damage or wear and tear. Ensure the door is fully closed. Gas-Pro does not pass the bump test If the Gas-Pro still fails it is very likely that the Gas-Pro requires calibration. Gas-Pro does not charge (Powered Q-Test only) Check power supply is turned on and connected. Check that charging contacts are not damaged and are clean Operation Service and maintenance Specification Troubleshooting Warranty Contacts Exit 27 Contents Warranty This equipment leaves our factory fully tested and calibrated. If within the warranty period of two years from despatch, the equipment is proved to be defective by reason of faulty workmanship or material, we undertake at our option either to repair or replace it free of charge, subject to the conditions below. Flow gasket The flow gasket is expected to last 15,000 bumps in ambient conditions. Prologue Unpacking Set-up Operation Service and maintenance Specification Troubleshooting Warranty Contacts Warranty Procedure To facilitate efficient processing of any claim, contact your local Crowcon agent/distributor, a Crowcon regional office or our global customer support team (English working language) on +44 (0)1235 557711 or [email protected] to obtain a returns form for identification and traceability purposes. This form may be downloaded from our website ‘crowconsupport.com’ and requires the following information: • Your company name, contact name, phone number and email address. • Description and quantity of goods being returned, including any accessories. • Instrument serial number(s). • Reason for return. Gas-Pro will not be accepted for warranty without a Crowcon Returns Number (CRN). It is essential that the address label is securely attached to the outer packaging of the returned goods. The guarantee will be rendered invalid if the instrument is found to have been altered, modified, dismantled, tampered with, or has not used Crowcon spares for replacement parts or has been serviced or repaired by any party not authorised and certified by Crowcon to do so. The warranty does not cover misuse or abuse of the unit including use outside of specified limits. Warranty Disclaimer Crowcon accept no liability for consequential or indirect loss or damage howsoever arising (including any loss or damage arising out of the use of the instrument) and all liability in respect of any third party is expressly excluded. This warranty does not cover the accuracy of the calibration of the unit or the cosmetic finish of the product. The unit must be maintained in accordance with the instructions in this manual. Exit The warranty on replacement consumable items supplied under warranty to replace faulty items, will be limited to the unexpired warranty of the original supplied item. 28 Contents Our liability in respect of defective equipment shall be limited to the obligations set out in the guarantee and any extended warranty, condition or statement, express or implied statutory or otherwise as to the merchantable quality of our equipment or its fitness for any particular purpose is excluded except as prohibited by statute. This guarantee shall not affect a customer’s statutory rights. Crowcon reserves the right to apply a handling and carriage charge whereby units returned as faulty, are found to require only normal calibration or servicing, which the customer then declines to proceed with. Prologue Unpacking For warranty and technical support enquiries please contact: Customer Support Set-up Operation Service and maintenance Specification Troubleshooting Warranty Contacts Exit 29 Contents Prologue Unpacking Set-up Operation Service and maintenance Specification Troubleshooting Warranty Contacts Exit 30