1
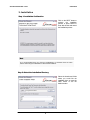
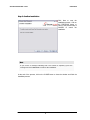
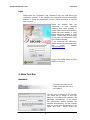
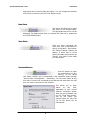
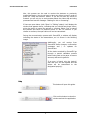
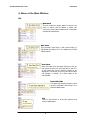
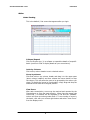
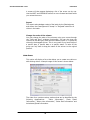
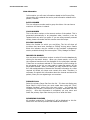
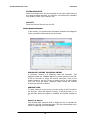
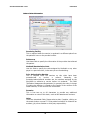
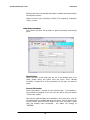
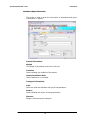
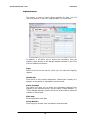
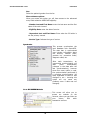
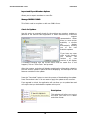
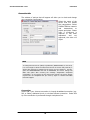
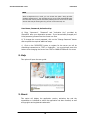
USER MANUAL
© 2006-2007 SECUREEDI Corporation
All right reserved.,
www.secureedi.com
I
TABLE OF CONTENTS
1.
INTRODUCTION
1
2.
BEFORE STARTING
1
3.
INSTALLATION
2
STEP 1: INSTALLATION CONFIRMATION ............................................................................................................2
STEP 2: SELECT THE INSTALLATION DIRECTORY .............................................................................................2
STEP 3: CONFIRM INSTALLATION .......................................................................................................................3
4.
INITIAL SET UP AND CONFIGURATION
4
SELECT SERVER AND CONNECTION TYPE...........................................................................................................4
SPECIFY THE ACCESS INFORMATION ...................................................................................................................4
LOGIN .......................................................................................................................................................................5
5.
MAIN TOOL BAR
5
NEW BATCH ............................................................................................................................................................5
NEW CLAIM .............................................................................................................................................................6
SAVE CLAIM ............................................................................................................................................................6
SEND AND RECEIVE ...............................................................................................................................................6
HELP .........................................................................................................................................................................7
EXIT ..........................................................................................................................................................................7
6.
MENU OF THE MAIN WINDOW
8
FILE...........................................................................................................................................................................8
New Batch....................................................................................................................................8
New Claim....................................................................................................................................8
Save Claim...................................................................................................................................8
Print HCFA 1500.........................................................................................................................8
Exit.................................................................................................................................................8
ACTION ....................................................................................................................................................................9
Claims Tracking..........................................................................................................................9
Claim Forms ..............................................................................................................................10
Claim Information....................................................................................................................11
Claims Details Information ...................................................................................................12
Others Claims Information....................................................................................................15
Other Plans Information ........................................................................................................16
Ambulance Spinal Information ............................................................................................17
Eligibility Request ....................................................................................................................18
Synchronize...............................................................................................................................19
Go to SECUREEDI Website ...................................................................................................19
Send and Receive....................................................................................................................20
7.
TOOLS
20
MANAGE MEMBERS ..............................................................................................................................................20
MANAGE PROVIDERS ...........................................................................................................................................20
MANAGE REFERRING / ORDERING PROVIDERS...............................................................................................22
MANAGE CONTROL NUMBERS ............................................................................................................................22
MANAGE PAPER CLAIMS PAYERS .......................................................................................................................22
MANAGE PROCEDURES RATES ...........................................................................................................................22
II
IMPORT AND EXPORT MEMBERS OPTIONS .......................................................................................................23
MANAGE DMERC FORMS................................................................................................................................23
CHECK FOR UPDATES ..........................................................................................................................................23
PRINT OPTIONS ....................................................................................................................................................23
CONNECTION INFO...............................................................................................................................................24
8.
HELP
25
9.
ABOUT
25
10.
LEFT PANE MENU BAR
26
CLAIMS...................................................................................................................................................................26
Claim Tracking..........................................................................................................................26
Claim Form ................................................................................................................................26
ELIGIBILITY ...........................................................................................................................................................26
Request.......................................................................................................................................26
11.
TROUBLESHOOTING
27
12.
TECHNICAL SUPPORT
28
III
SECURE PROFESSIONAL CLAIM
USER GUIDE
1. Introduction
This guide is designed for Medical Healthcare Providers and Software Vendors
that use SecureEDI to perform electronic transactions following the standards
for privacy and security as well as for transactions and code sets as
promulgated by HIPAA (Health Insurance Portability and Accountability Act of
1996).
Secure Claim allows Medical healthcare providers to facilitate the Electronic
Data Entry of. There are additional functionalities which may not be included in
this documentation. Secure Claim is meant to be simple to learn and use,
however if you require assistance at any time using any of the features of
SecureClaim, please contact a SecureEDI representative:
For Continental USA:
Call 800-466-9676
Fax :917-591-8247 or
email customer service at [email protected]
2. Before Starting
To assure success with this application and configuration process, please make
sure that your system complies with the minimum requirements for this
application. These requirements are listed below.
Hardware Requirements:
Pentium Processor 366MHz or Higher
64 MB RAM Minimum (128MB or above recommended)
30 MB Minimum Hard Disk space available
Broadband or dial-up Internet connection
Software Requirements:
Microsoft Windows Operating System (95SE, 98SE, Me, NT, 2000, XP or Vista)
Internet Explorer 5.5 SP1 or higher
Important Note
Secure Claim does not coexist with other installations of either SecureClaim or
SecurEDILink. Only one version of SecureClaim Professional, SecureClaim
Medical, SecureClaim Institutional or SecureEDILink can be installed per machine.
Please contact SecureEDI customer support should you need any additional
information about using multiple SecureEDI products on the same computer.
1
SECURE PROFESSIONAL CLAIM
USER GUIDE
3. Installation
Step 1: Installation Confirmation
Click on the NEXT button to
continue
the
installation
process or press Cancel to
close this window and cancel
the installation process
Note
It is recommended that you close any applications or programs that are open
before continuing the installation of SecureClaim Medical.
Step 2: Select the Installation Directory
Select the location and folder
where you would like the
installation done or press the
NEXT button to use the
default location.
2
SECURE PROFESSIONAL CLAIM
USER GUIDE
Step 3: Confirm Installation
Click Next to start the
installation process. Click on
the PREVIOUS button to
return to the previous step or
CANCEL to cancel the
installation.
Note
If you receive a message indicating that a file cannot be replaced, ignore the
message and click CONTINUE to continue the installation.
At the end of the process, click on the CLOSE button to close the window and finish the
installation process.
3
SECURE PROFESSIONAL CLAIM
USER GUIDE
4. Initial Set up and Configuration
Select Server and Connection Type
When using SecureClaim to
test the sending of claims,
please select TEST as the
server name.
To use
SecureClaim to send your
actual
claims,
select
PRODUCTION. Production
is the normal default setting.
For the connection type,
select “LAN“ for connections
using broadband Internet,
dedicated line (T1/FT1) or a
wireless connection. Select
“Dial-Up“for a connection
through a standard telephone
line.
Note
Registration requires that you have an internet connection available.
Specify the access information
Enter the information related to “Username”, “Password” and the
“Activation key”, as they were provided by SecureEDI before the
installation process began.
If you do not yet have this information, please contact technical or
customer support or send an email to [email protected].
Once you complete the information required, press “Register” to begin the
registration process.
4
SECURE PROFESSIONAL CLAIM
USER GUIDE
Login
Please enter the “Username” and “Password” that you used during the
registration process. If you changed your password using the SecureEDI
website or during the registration process, please remember to use the
new one here.
Please be advised that the
“Password”
is
case
sensitive
meaning that what appears in
capital letters should be entered in
capital and what appears in small
letters should be entered in small
letters. Please check to ensure you
do not have your keyboard’s ‘CAPS
LOCK’ button selected.
If you encounter any difficulties,
please contact technical support at
the
email
address
[email protected].
Click on the LOGIN button or press
ENTER to continue.
5. Main Tool Bar
New Batch
This option will allow you to
create a new batch of one or
more claims.
You will now be asked for the number
you would like to assign to this new
batch or if you desire this number to be
generated automatically. If you would
like SecureClaim always generate the
numbers automatically, you can indicate
that you do not want this question to be
asked next time.
Simply check the
5
SECURE PROFESSIONAL CLAIM
USER GUIDE
appropriate box to ensure select this option. You can change this selection
at any time in the future via the Tools, Options menu.
New Claim
This option will allow you to add a
new claim to the selected batch.
The appropriate claim form will be
displayed. For details about how to complete the claim form, please see
the CLAIM FORM section.
Save Claim
Once you have completed the
claim form, click on this button to
save it to the batch. Once saved,
the “Claims Tracking” window will
display. If there are no errors
found, the status will be shown as
“Saved”. Your claim is now ready
for transmission.
Send and Receive
Use this button to begin
the transmission of your
claim(s). All the claims
with status “SAVED” will be transmitted to the respective payers through
"Secure Claim Clearinghouse”. Remember, you can enter claims at any
time even if you are not connected to the Internet and send them the next
time you have a connection to the Internet.
This allows you to enter
claims
at
any
time,
regardless of your current
Internet connection status.
Once you are connected, you
can hit “Send and Receive”
and all the claims you
entered since the last time
you hit this button will be
transmitted.
6
SECURE PROFESSIONAL CLAIM
USER GUIDE
Also, this process can be used to receive the statuses on previously
transmitted claims. You do not have to have any claims to send in order to
press the ”Send and Receive” button. If you do not have any claims to
transmit you will only try to receive status about the claims that are being
processed and see the message: “Waiting for Ack or Processing”.
If there are open claims (with “Open” or “Editing” status) it will display the
window that appears above, indicating that you should save these claims,
giving the option to cancel the process or continue. Select “Yes” to cancel
the process and return to previous screen or “No” to continue. If you
choose to continue, the open claims will not be transmitted.
During the communication process with SecureEDI, a window will display
indicating the status of the transmission, as it is shown in the following
image:
Additionally, you will receive from
SecureEDI status changes, confirmation
messages and / or updates for
SecureClaim.
All the claims received by SecureEDI go
through a special validation process
before being sent to the payer to ensure
accuracy and avoid rejections.
If an error is found, only the claim(s)
with and error will be rejected and the
others will be transmitted to the
designated payer(s).
Help
This button will open this guide.
Exit
Click on this button to close the
window and exit the application.
7
SECURE PROFESSIONAL CLAIM
USER GUIDE
6. Menu of the Main Window
File
New Batch
This will create an empty batch so that a new
claim or claims can be added. A batch can
continue to have claims added until it has been
saved and transmitted.
New Claim
This will add a new claim to the current batch. It
will display the Claim Form. For details see CLAIM
FORM section.
Save Claim
Once the claim form has been filled out, click on
this button to save it to the hard disk of your PC.
It will cause the Claims Tracking screen to be
displayed. If there are no errors, the claim status
will change to “saved”. It is then ready to be
transmitted.
Print HCFA 1500
This option will allow the provider to print
the bill in a printable 1500 format or in a
white and black format.
Exit
Click on this button to close this window and
exit the application.
8
SECURE PROFESSIONAL CLAIM
USER GUIDE
Action
Claims Tracking
This is the default / first screen that appears after you login.
Collapse/Expand
Click on the plus sign (+) to collapse or expand the details of a specific
batch (use this to hide or display details at your convenience).
Order by Columns
Click on any column header to sort a desired column.
Group by columns
Click and hold on any column header and drag it to the upper pane
(above column headers) and then release the mouse button to drop
the column. This will cause the rows to be grouped by the column you
chose. To disable the ‘group by’ functionality, simply drag and drop the
selected column back to its original position.
View Errors
After each transmission, errors may be received and reported by the
Clearinghouse or from the payer directly. When there are errors, the
claims and / or batches will be displayed in red and the “ERRORS”
column will show a number greater than 0. To see number of errors in
the batch, click with your mouse right button and select “View Errors”
from the display menu.
9
SECURE PROFESSIONAL CLAIM
USER GUIDE
A screen will then appear displaying a list of the errors one by one.
Use the NEXT and PREVIOUS buttons to move forward and back while
you review the errors.
Report
This report acknowledges receipt of the batch by the Clearinghouse
and shows the Clearinghouse’s “Accept” or “Rejected” status for all
claims in the batch.
Change the order of the column
You may change the order of the columns using your mouse through
the “Drag and Drop” windows functionality. You can also drag the
columns to the dark grey area where the Batch button is, to group the
claims by the dragged column. This is very useful if you want claims of
a specific plan, a specific date or a specific status. To take off the
group you only have to drag the name of the column to the original
position.
Claim Forms
This option will display a form that allows you to create new claims or
edit existing claims. A sample image of this screen is shown below.
The claim form contains various sections that can be identified by the
following classifications:
“Claim Information”, “Claim Detail
Information”, “Other claim information”, “Other Plan Information” and
Ambulance/Spinal Information.
10
SECURE PROFESSIONAL CLAIM
USER GUIDE
Claim Information
In this section you will enter information related to the Primary Plan,
the provider who rendered the service, and information related to the
patient / insured.
BATCH NUMBER
This is a reference number used to group the claims. You can have a
maximum 100 claims in a batch.
CLAIM NUMBER
This is the claim number or the account number of the patient. This is
generated automatically in an ascendant order, however it can be
replaced with any value you prefer. If you are using manually entered
values, please remember that this number must be unique.
BILLING PROVIDER
Select the Provider for which you are billing. The list will show all
providers that have been checked as “Billing” during setup. Details
about this indicator may be verified on the providers’ management
section, available through the menu option “Tools, Manage Providers”.
INSURED ID NUMBER
You may enter the subscriber number or select it from the database by
clicking on the search button. When you choose search, a list of all
the registered members will be displayed for the plan/payer selected.
If there are no members selected or if the member you are looking for
do not appear in the list, you may need to create that registry for the
payer/plan selected. After it is created, you may include it in the claim
as it was explained above. Because the insured’s information is a value
required by HIPAA, all claims must contain this value. Therefore, is
necessary to register this information about the insured and about the
patient, when you are registering a new member.
PRIMARY PLAN
Select the primary Payer Plan from the list. If it does not display any
Payer Plans in the list then you must create them using the “Tools,
Manage Providers” option from the main menu. You should also
complete the provider’s information for providers associated with the
plan(s). . Once this information is completed, you may return and
select the primary Payer Plan where you wish to send the claim.
RENDERING PROVIDER
All providers marked as “Is Rendering” will be displayed on this list.
Select from this list the provider that rendered the service.
11
SECURE PROFESSIONAL CLAIM
USER GUIDE
FILING INDICATOR
Select an indicator from the list according to the type of plan that you
are using to submit the claim, for example: commercial plan, Medicare
Part A/Part B, HMO, PPO, Champus, etc.
FACILITY
Select the Place of Service from the list.
Claims Details Information
In this section, you should enter information related to the diagnosis
codes, procedure codes and service performed.
DIAGNOSIS NATURE ILLNESS OR INJURY
A maximum number of 8 diagnosis codes are accepted. The
diagnosis codes are validated against the actual version of the ICD9-CM for the date on which the service was given. Click on the
search button or use the F5 key to display the list of valid values
form the ICD-9-CM table. Diagnosis codes should be entered
without any periods or dashes.
SERVICE LINES
To enter values for a service line, put the mouse on the first field of
the first line. When the registry is empty, it will show a star (*) on
the left side. When the registry is modified, this symbol changes to
a.
Date(s) of Service
Click on date field, and then click to display the list. A calendar will
appear to pick the corresponding date. This also reduces data entry
errors by selecting from the calendar.
12
SECURE PROFESSIONAL CLAIM
USER GUIDE
Facility
Select the place of the service corresponding to the procedure
specified in this line.
CPT/HCPCS
Enter the procedure code or use the F5 key to display a list of the
valid CPT/HCPCS codes. These codes will be validated against the
valid codes list for the date the service was rendered.
Modifier
You can specify up to 4 modifiers for each procedure code. These
modifiers will also be validated against the official list of codes for
the date the service was rendered.
Diag Code
This refers to the position of the diagnosis code associated to the
procedure code. The values are the digits 1 to 8.
Price/Unit Rate
This field is to enter the price or rate designated for each payer. The
rates will be read from the data base when the produce code is
selected date or modifier, and then after the claim is saved the rates
that were used will be updated, so they are the ones to appear for
the next claim.
For the procedure codes previously used, a rate will be suggested
based on the last time that the procedure was used for the plan
selected. These values can be changed at the time the claim is
created or using the option “Tools-Manage Procedure Rates” to
change the master.
Days/Units
This is to enter the amount of days or units used for this procedure.
Charge
This is the total value billed for this line of service. This is a result of
total of calculating the rate/price by the units (days/units) of the
procedures used. This value can not be modified.
Measure
This is to select Units, International Units or Minutes.
Other Information
This section is available to provide information for the claim when it
applies to the service performed. Please read below for details
about this section.
Other Lab
This field provides information to indicate when the service is
rendered at a place different from the home or office.
13
SECURE PROFESSIONAL CLAIM
USER GUIDE
Name
You can search the name of the entity in the icon with the
magnifying glass located at the right of the selection.
To create a new facility press the button that states “New outside
facility” to edit the information about the existing selections press
Edit Outside Facility.
New outside facility:
1. - Select the type of facility.
2. - Enter the name of the facility Address, City, State, Zip
Code. (with no separation lines between 5 to 9 digits)
3. - Enter the CLIA. (Clinical Laboratory Improvement
Amendment of 1988)
4. - Enter the purchased service provider Number -if
necessary enter the number that Medicare assigned to the
facility to buy lab test.
Ordering Provider Information:
This field provides information about the providers that order
services to be billed. To search for a provider of the service that had
ordered a service, verify in the magnifying glass located next to the
indicated field. You can do your search by provider number or last
name.
DMERC CMN/Oxygen:
This option will allow you to select the durable medical equipment or
oxygen therapy that the patient requires. After you make your
selection press “OK”. Before you can use the CMN forms you must
go the option “Tools-Manage DMERC/CMN Forms”.
Amount Paid
Enter the amount paid by the patient, if applies.
When the required fields for a line of service are completed, click on
the ENTER key to add that line. Repeat the same steps to add other
service lines.
14
SECURE PROFESSIONAL CLAIM
USER GUIDE
Others Claims Information
Rendering Facility
This is required when the service is rendered in a different place from
the patient’s home or the provider’s office.
References
Use these fields to specify the information of the provider that referred
the patient.
Medicaid Resubmission Code
Use this field to specify the code assigned by Medicaid or any other
payer in a previous claim, in the case you are resubmitting.
Prior Authorization Number
This is required when the services on this claim have been
preauthorized
or
involve
a
referral.
Generally,
the
preauthorization/referred numbers are the numbers assigned by the
plan/UMO to authorize a service before it’s rendered. The UMO
(Utilization Management Organization) is generally the entity in charge
of making the decision in regards to the results of the revision of the
health services, or the owner of the information.
Remarks
This is free text up to 80 characters to provide any additional
information or notes of this claim, such as NEA attachment numbers.
Other
These are situational fields. Please select a date, if applies, clicking on
the search button or press F5. If the patient’s condition is related to an
accident, job, other accident or third party responsibility.
15
SECURE PROFESSIONAL CLAIM
USER GUIDE
Select a date from the calendar and select a related cause according to
the following criteria:
Date of Current Injury (Accident), Illness (First symptom), Pregnancy
(LMP), or None.
Other Plans Information
This section will allow the provider to specify secondary and tertiary
plans.
Identification
Select the name of the plan from the list. If the desired plan is not
listed, please select the option from the menu Tools, Manage
Providers” to add the ID of the provider(s) for the plan you want to
select.
Insured ID Number
Select the patient / insured for the selected plan. If the patient /
insured does not appear on the list, you can add it using the button
“Create new” option.
After all the required fields are completed in this claim form, click on
the SAVE button to validate and save your claim. This will add it to the
current “batch” with the SAVED status. Every time you open a claim
that has already been completed,
the status will change to
“EDITING”.
16
SECURE PROFESSIONAL CLAIM
USER GUIDE
Ambulance Spinal Information
This screen is used to enter the information of ambulance and spinal
manipulation, if applies.
Patient Information:
Weigth
The weight of the patient at the time of service.
Condition
Code indicating the condition of the patient.
Hospital Admission Date
Date of Admission in a hospital.
Transport Information:
Code
Select the code that indicates the type of transportation.
Reason
Code indicating the reason of the transportation.
Distance
Range in miles during the transport.
17
SECURE PROFESSIONAL CLAIM
USER GUIDE
Eligibility Request
This section is used to check patient eligibility for plans. You will
receive an answer in real time - approximately 3 to 15 seconds.
In addition, it will allow you to export the information from the
eligibility check directly to the Manage Members window in the Tools
menu for added convenience.
Payer
Select from the list the plan for which you will make the eligibility
request.
Member No:
Enter the ID of the insured or dependent.. Please enter it exactly as it
appears on the patient or dependent’s insurance card.
Add to member:
This option will allow you to export the information obtained from
eligibility to the members profile. Use the option “Create Member” in
“Tools, Manage Members” section and fill out all the fields to make the
creation of claims easier.
Birth date:
Enter the patient’s birth date.
Group Number:
Enter the group number from the patient’s insurance card.
18
SECURE PROFESSIONAL CLAIM
USER GUIDE
Sex:
Select the patient’s gender from the list.
Show advance options:
When you access this option you will have access to the advanced
entry fields related to MEDICARE eligibility:
- Member Last and First Name: enter the last name and the first
name of the main insured.
- Eligibility Date: enter the date of service.
- Dependent Last and First Name: Enter when the ID holder is
not the primary insured.
- Service Type: Indicate the type of service.
Synchronize
This process synchronizes the
local database with SecureEDI.
The data that is synchronized
may include: information about
the account, medical plans,
provider list, procedure codes,
diagnosis codes, etc.
After each transmission, an
incremental synchronization will
take
place
automatically
(changes in the data after the
last synchronization), however
when this menu option is used,
the synchronization performed is
a complete synchronization (All
data, regardless of where it was
changed or not – choosing this
option will not cause any
problems even if data was not
changed).
Go to SECUREEDI Website
This screen will allow you to
access our website on the
Internet, where you can follow up
your
claims,
ERA
other
transaction services.
19
SECURE PROFESSIONAL CLAIM
USER GUIDE
Send and Receive
Select this option to start the transmit and receive process as
described previously in the description of the “Tool Bar,
Send/Receive” option.
7. Tools
Manage Members
This screen is used to create a new
member or edit existing members. They
can be filtered by payer.
Manage Providers
This option will allow you to manage the
information required for billing providers
and for providers that rendered service
(“rendering providers”), as well as
information about the medical plans the
providers are affiliated with.
Listed in this window are registered providers for the facility or office. To edit
the information for a specific provider, click on the provider name to select it,
then click on “EDIT PROVIDER”.
The provider management form shown below will be displayed. You can also
double click on the selected provider to open the provider management form.
To create a new provider, click on “CREATE NEW PROVIDER”.
Click on the button “CLOSE” to close this window.
20
SECURE PROFESSIONAL CLAIM
USER GUIDE
PROVIDER MANAGEMENT
Name (Last/Org, First,
Middle)
Enter the Provider Last
Name or Organization
name, followed by first
and middle name, when
applicable.
Address1
Street Name and Number
Address2
Building Name, Suite number, if applicable
City, State, Zip Code
Enter the City Name, State (2 characters) and Zip Code. Click on the
SEARCH button to display a list of valid states to choose from. Valid Zip
Codes are 5 or 9 digits only – please do not enter dashes.
EIN/SSN
Enter the provider’s Federal Tax Identification Number or Social Security
Number.
Billing
If this is a Billing Provider, then there must be a check mark. If this
provider will never be a rendering provider, such as a hospital, provider
group, etc., please leave this check mark off.
Taxonomy Code
Please specify the standard specialty code for this provider, also called the
‘Taxonomy Code’.
Entity Type
Select the Person/Organization according to the type of provider.
Accepts Medicare Assignment
If provider accepts Medicare assignments, enter a check mark.
Active
Use this check mark to enable / disable a provider. When the provider is
not active, his name will not appear on the providers’ list in the claim form.
21
SECURE PROFESSIONAL CLAIM
USER GUIDE
PAYER INFO
Payer
Select a payer or plan
from the list.
Plan Description
Enter the specific plan
description.
Identifier
Enter the provider identification that the payer / plan assigned. If you have
more that none provider number for the same payer / plan, add the
additional identification numbers here as well.
Qualifier
For default, this qualifier will be G2. You can leave this value or select any
other qualifier, if required by the payer / plan.
Press ENTER to add an entry. Repeat the process to add another
identification number with another payer or medical plan.
Press OK to close the provider management window and save the current
information or press CANCEL to exit without saving the changes.
Manage Referring / Ordering Providers
Option that will allow you to indicate or change the information of the doctor
that orders the service.
Manage Control Numbers
This selection is exclusive for SecureEDI technical use.
Manage Paper Claims Payers
The functionality of this option is to configure payers that are not receiving
electronic bills yet, only paper.
Manage Procedures Rates
With this Tool, rates can be administered for the plans. You can modify the
ones generated by the use of the SecureClaim. In addition, you can manually
add and delete rates/prices by payer.
22
SECURE PROFESSIONAL CLAIM
USER GUIDE
Import and Export Members Options
Allows you to export members to a text file.
Manage DMERC FORMS
This field is used to complete or edit new CMN’s forms.
Check for Updates
Use this option to manually check for the existing new versions, updates or
patches to the Secure Claim application or when instructed by a technical
support
representative. When
there is a new version
available, a window
will
display
automatically alerting
you
of
the
new
available updates.
If you have any open
claim at the moment
you
execute
the
revision
of
new
versions it will display
a message indicating that the current claim must be saved first. If this
happens, click on “Save Claim” and proceed.
After this process, a window will display containing the information related to
the new version, update or patch as well as displaying the description of new
features contained in the update.
Press the “Download” button to start the process of downloading the update.
Press “Remember Later” if do not want to apply the update at this moment.
If an upgrade is critical, the application will not allow you to update later and
will require that you download the update at this point.
Print Options
This selection will allow you to print
the HCFA 1500 form or in a black
and white format.
23
SECURE PROFESSIONAL CLAIM
USER GUIDE
Connection Info
The window of options that will appear will allow you to check and change
your connection configuration.
Select the name of the
server that will handle
the transmission. Select
PRODUCTION to transmit
real
transactions
to
payers and plans. Please
note, if enrollment is
required or has been
requested
and
not
approved, the claim will
reject.
Note
To change the test server (TEST) to production (PRODUCTION) or vice versa,
it is not enough to select the name from the list of servers and press OK, it
will be also necessary to register for the server you just change to. For this,
open the ORGANIZATION and click on REGISTER. The server change will
ONLY take place after receiving the message “Registration completed
successfully”. If you receive an error during this process, the server change
request was not completed and you must try again or contact SecureEDI
technical support.
Connection:
Select LAN if your internet connection is through broadband connection (e.g.
DSL or Cable), dedicated circuit, or wireless Internet connection. Select Dial
Up if the connection is performed through a telephone line.
24
SECURE PROFESSIONAL CLAIM
USER GUIDE
Note
When a telephone line is used, you can choose the option “Hang Up after
Sending and Receiving”. This will allow the line to be freed automatically after
the send and receive process is finished, allowing the line to be free for other
devices that may be sharing like fax, point of service terminal, etc.
User Name, Password, Activation Key:
a) Enter “Username”, “Password” and “Activation Key” provided by
SecureEDI after your registration process. If you have already changed your
initial password, please enter the current one here
b) To change the current password, click on the “Change Password” button
and complete the required additional steps.
c) Click on the “REGISTER” button to register for the server you will be
submitting transactions to, TEST or Production. You must always press this
button when changing the server from TEST to PRODUCTION and vice versa.
8. Help
This option will open the user guide.
9. About
This option will display the application version, activation key and the
organization or individual to whom the application has been licensed, as well
as copyrights and registered trademarks.
25
SECURE PROFESSIONAL CLAIM
USER GUIDE
10. Left Pane Menu Bar
Claims
Claim Tracking
The functionality of this button is the same as that
in the Actions, Claim Tracking menu option
described previously.
Claim Form
This will open the Claim form window.
Eligibility
Request
This will open the “Eligibility Request” window
described previously when the “Action-Eligibility
request” menu option was described.
26
SECURE PROFESSIONAL CLAIM
USER GUIDE
11. Troubleshooting
Error
401
Descriptions
HTTP Status Denied
Comments
Invalid username and/or
password specified.
12045
HTTP Invalid Certificate
Authority
The required digital
certificate has not yet
been installed in your PC.
Please verify the
installation process for
instructions on how to
install this certificate.
Account is locked
This account can not be used
again unless it is released by
SecureEDI contact customer
service.
12002
HTTP Connection Time Out
A connection could not be
established due to a slow
communication line.
Please try again.
12029
HTTP Cannot Connect
A connection could not be
established to your ISP
network using this
account information.
12031
HTTP Connection Reset
The connection with your
ISP network was lost.
Please try connecting
again.
27
SECURE PROFESSIONAL CLAIM
USER GUIDE
12. Technical Support
Internet
For consultation on our products and solutions, to uninstall components or
updates, use our website at
http://www.secureedi.com.
EMail:
Send an email message to our technical support staff for assistance with
installation or use of SecureClaim to [email protected].
SecureEDI Corporation
SecureEDI
Empire State Building
350 5th Ave. Suite 6408-12
New York, N. Y. 10118
Tel: 212-629-9673
Tel: 800-466-9676
Fax: 702-974-6855
28