1
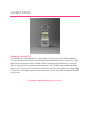
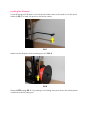
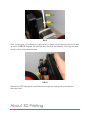
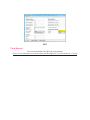
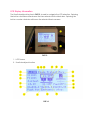
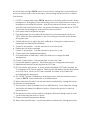
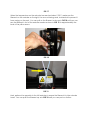
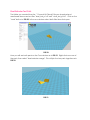
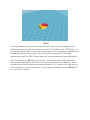
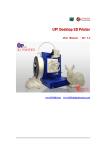
User Manual Connect XL Table of Contents CAUTIONS AND WARNINGS ........................................................................................................ 5 Hot Surfaces:.............................................................................................................................. 5 Risk of Shock: ............................................................................................................................. 5 Moving Parts: ............................................................................................................................. 5 Do Not Leave the Unit Unattended: ...................................................................................... 5 Emergency Disconnect: .......................................................................................................... 5 Well Ventilated Area: ............................................................................................................... 5 Adult Supervision: ...................................................................................................................... 5 UNBOXING ..................................................................................................................................... 6 Unboxing Connect XL .............................................................................................................. 6 Before Connecting Power ....................................................................................................... 8 Connecting Power ................................................................................................................... 9 Initial Power-up .......................................................................................................................... 9 Loading the filament .............................................................................................................. 10 About 3D Printing ........................................................................................................................ 11 3D Printing Background ......................................................................................................... 12 Modeling, Downloading, or Scanning a Part ..................................................................... 12 Modeling .................................................................................................................................. 12 Downloading ........................................................................................................................... 13 Scanning .................................................................................................................................. 14 Sense 3D Scanner ($399 at writing of this document and information below provided by their ad) ......................................................................................................... 14 MakerBot Digitizer Desktop 3D Scanner ($799 at writing of this document and information below provided by their ad) ........................................................................ 14 Installing the Host Software ....................................................................................................... 15 Downloading the Software ................................................................................................... 15 Installing and Configuring Cura ............................................................................................ 15 Configuration Wizard ............................................................................................................. 16 Setting the COM port in Cura ............................................................................................... 16 Cura Manual ........................................................................................................................... 17 Connect to your Computer ...................................................................................................... 18 LCD Screen .................................................................................................................................. 19 Firmware Version Number ..................................................................................................... 19 LCD Display Information......................................................................................................... 20 Printing Your First Print ................................................................................................................. 22 Perform Auto Calibration ....................................................................................................... 22 Single Extruder Test Print. ........................................................................................................ 23 Dual Extruder Test Print. .......................................................................................................... 25 Thank you for choosing the punchtec Connect XL. The Connect XL was designed to be very easy to use and reliable so that you can spend your time printing and connecting with your ides rather than fixing or adjusting your 3D printer. This user manual is in first revision and more information will be added from questions posted on the forum. Here is a link to the forum: http://www.punchtec.com/forum/?mingleforumaction=vforum&g=7.0 CAUTIONS AND WARNINGS Hot Surfaces: The Connect XL Extruder head and heated bed generate high temperatures and are marked with "Caution Hot" decals. Always allow these surfaces to cool down before you touch these areas. Risk of Shock: The Connect XL has warning labels in areas where there is a risk of shock. Do not touch these areas unless the power is disconnected from the wall socket. Moving Parts: The Connect XL has moving parts while in operation. Make sure to stay clear of any moving parts while the printer is in operation. Do Not Leave the Unit Unattended: Never leave the Connect XL unattended during operation. Emergency Disconnect: In case of emergency disconnect the Connect XL from the wall socket. Make sure the wall socket is located within reach. Well Ventilated Area: The Connect XL melts plastic during printing. Depending on the filament use, odors are emitted during operation that could be harmful to your health. Make sure to have a well ventilated area when using filament that may be harmful to your health. Adult Supervision: Be sure to have any minors or children supervised by an adult during operation. UNBOXING Unboxing Connect XL The Connect XL comes packed in a box inside of a box to protect it during shipping. Cut the top tape at the joints of the box lids of the outside box with the punchtec logo right side up using a box knife or similar. Without removing the inside box, cut the top tape at the joints of the box lids of the inside box. Next, pull the top cardboard inside the box out. Remove the Connect XL from the box by the top handle as showing in Fig 1. Then set it on a stable surface. Save your boxes in case you need to transport the unit in the future. Picture of hand pulling the unit out FIG.1 Remove the wire ties shown in FIG.2 by cutting them with some wire cutters. Be careful not to scratch the unit. Picture removing the wire ties FIG.2 Next remove the foam blocking pieces (FIG.3). There are 6 located as shown in FIG.5. FIG.3 FIG.4 Before Connecting Power IMPORTANT! Before connecting the Connect XL to a wall socket, make sure the voltage selector switch on the back of the power supply FIG 5. is set to your countries' voltage. For 110V, slide the slider to the left position and for 220V, slide the slider to the right position. The Connect XL is shipped with the voltage selector in the 220V (left position). If the unit is plugged into 220V power and the selector is in the 110V position, the power supply will be damaged. FIG.5 Connecting Power Connect the Connect XL to an accessible wall socket only after the voltage selector on the power supply has been verified as discussed above. Then turn the power switch on the power cord shown in FIG 6. FIG.6 Initial Power-up On the initial power-up, you must run the auto-calibration because components may move during shipping. This auto calibration only needs to be performed when you see a problem during first layer printing but it does not hurt to perform this operation after every 10 prints or so. Please refer to the Auto calibration section P.21 to carry out this operation. Loading the filament To install the spool of filament onto the spool holder, remove the end-nut of the spool holder in FIG. 7 to load the spool on the spool carrier. FIG.7 Make sure the filament end is pointing up as in FIG. 8. FIG.8 Remove PTFE tubing FIG. 9. by pushing in the tubing then push down the white plastic collar then pull the tubing out. FIG.9 Next, cut the end of the filament to get it ready to insert into the bottom hole in the arm as shown in FIG. 10. Depress the extruder arm and slide the filament in through the hole at the bottom of the extruder arm. FIG.10 Reinsert the PTFE tubing then feed filament through the tubing until it reaches the extruder head. About 3D Printing 3D Printing Background The Connect XL 3D printer makes plastic parts with an additive manufacturing technology named fused deposition modeling (FDM). FDM works on an "additive" principle by laying down material layer by layer; a plastic filament is unwound from a spool and supplies material to produce a part. Modeling, Downloading, or Scanning a Part A real object is created from a 3D design file. There are several way to obtain a part file to print. The file to print must be of an .STL, OBJ, DAE, or AMG format. These are the most common file types use for 3D printing and most CAD packages are able to save in this format. Modeling If you’re just getting started you can try some of 3D modeling software which can be downloaded for free. (Information below was borrowed from http://www.3ders.org/3dprinting-basics.html) Google SketchUp This Google SketchUp is fun and free, and is known for being easy to use. To build models in SketchUp, you draw edges and faces using a few simple tools that you can learn in a short time. With Push/Pull tool you can extrude any flat surface into a 3D form. Furthermore, it works together with Google Earth, that you can import a scaled aerial photograph directly from Google Earth, or use SketchUp to build models which can be seen in Google Earth. 3Dtin The simplest 3D software. You can draw directly from your browser. Blender Blender is the free open source 3D content creation suite, available for all major operating systems under the General Public License (GNU). Blender was developed as an in-house application by the Dutch animation studio NeoGeo and Not a Number Technologies (NaN). It is a powerful program contains features that are characteristic of high-end 3D software. OpenSCAD OpenSCAD is a software for creating solid 3D CAD objects. It is free software and available for Linux/UNIX, MS Windows and Mac OS X. It does not focus on the artistic aspects of 3D modeling but instead on the CAD aspects. Tinkercad Tinkercad is a new and faster way of creating designs for your 3D printer. With only three basic tools you can create a wide range of useful things. Once your project is ready simply download the STL file and start your 3D print. Check out more softwares to use in the free software list. Commercial software such as CAD software AutoCAD and Pro Engineer, software packages Rhino, Maya, and SolidWorks are all pretty good for designing 3D models. Downloading Thousands of objects ready to print may be downloaded online; you can find many for free, some may require you to pay for the design. Thingiverse www.thingiverse.com Thingiverse is a wealth of shared user 3-D content of other users’ creations and you can share and upload your own. Keep in mind that Thingiverse has many different types of creations, including some that can’t be made on a 3D printer (e.g. designed to be made on a lasercutter). GrabCAD www.grabcad.com GrabCAD is another community that was founded by mechanical engineers. It is also a place for engineers to share their talent, and after a free registration you can download files for free. Make sure you select the 3D Print filter as only some files have STL download options. Google’s 3D Warehouse sketchup.google.com/3dwarehouse The 3D Warehouse has thousands of 3-D models but most of these files require a bit of a process to prepare them for 3D Printing. If you are into 3-D printing some of these models, have a read on the “Preparing 3D Warehouse files for 3D printing” Parts Libraries 3D Content Central www.3dcontentcentral.com If you are looking for a 3D model of a spare part or component then there are thousands of parts that can be used here. Most of the parts don’t require much clean up to get them ready for printing on your 3d printer. Free registration is required before you can download any CAD model. Trace Parts Online www.tracepartsonline.net This is another parts library for the engineering 3D Cad files and requires free registration. Other 3DTin www.3dtin.com Like Tinkercad, 3D Tin is another cloud based CAD package. It is more powerful than TinkerCad, but also has a steeper learning curve. Once again you can browse through other inventors' designs. Scanning Scanning with the Digitizer will enable you to create files for printing from objects you have. Here is a list of a few low end scanners. More expensive with higher resolution are also available. Sense 3D Scanner ($399 at writing of this document and information below provided by their ad) Sense 3D Scanner most versatile scan range in its class with auto-optimized settings for objects large and small. Savor every dimension of your favorite memories: Graduation day. Wedding day. Bringing home baby. Holidays. Trips around the world. All with your Sense, all in 3D. With quick cropping, enhancement and solidifying tools, Sense can prepare 3D printable files within minutes MakerBot Digitizer Desktop 3D Scanner ($799 at writing of this document and information below provided by their ad) Scan objects up to 8" wide and 8" tall and up to 6.6lbs. in approx. 12 minutes Includes simple yet sophisticated software to create watertight 3D models with just two clicks USB connectivity Installing the Host Software Downloading the Software The Connect XL can use most of the host software available for 3D printers but we recommend to use Cura, open source, developed and maintained by David Braam. Is this statement safe to say???? Cura is much faster at slicing than most other programs, and the latest version provides both a handy set of tools to visualize your printable object. While you make decisions on the look and quality of your 3D object, Cura’s slicer engine prepares your model in the background faster than ever. From there it is just seconds away from being ready to print and ready to become your physical object. Download the latest release from the following link XXXX for your particular operating system. Cura is available for Windows, Mac, and Linux. (Some of the text on installation and using Cura are taken directly from the Cura user manual) Additionally, a zip file available on our website, will allow you to set the preferences so that Cura will recognize the Connect XL as a 3D printer. Installing and Configuring Cura Cura will run on the platforms listed below. Windows XP or newer Mac 10.6 (snow leopard) or newer Unix Ubuntu 12.10 or newer Minimum required hardware Minimum of 512 MB of RAM Minimum of 200 MB of disk space Minimum a Pentium 4 processor Recommended hardware 2 Gigabyte of RAM 500MB disk space Intel Core 2 - 2.0Ghz Compatible file types .STL This file format is supported by almost any 3D software package and is the industry standard used for 3D printing .OBJ .DAE .AMG 1. Download the latest version of Cura for your operating system as described above. 2. Open the installer and follow the directions to install the software. 3. The Connect XL will be added to Cura as a "Machine" on the next release, but for now you will have to copy the file " preferences.ini" that is in the zip file mentioned above. Download CuraSetup_14_03.zip. These files will configure Cura for your punchtec printer and also setup profile for 3D printing. Then unzip and copy all these file to your Cura install directory (in windows this would be C:\Program Files (x86)\Cura_14xx\Cura. Make sure to select to overwrite the file “preferences.ini” and “current_profile.ini” when the popup message is displayed. Cura will also install the driver for your printer. Before this, you should not open Cura. 4. After installing Cura, Start up Cura and go to the next page to configure the software to your 3D printer. NOTE: On every kind of operating system the installation procedure of the software will work quite differently. Configuration Wizard If the configuration wizard is displayed, you did not copy the file " preferences.ini" to the Cura directory as mentioned above. If this occurs, close the wizard and follow the steps described in the Installing and Configuring Cura section. In the next release of Cura the wizard will be used because the Connect XL will be available to the wizard. Setting the COM port in Cura Open Cura if it is not already open. On the top menu, click "Machine", then click "Machine settings...". In the new opened window FIG.7., set the "serial port" to the COM port assigned by your operating system in the Cura then click "Ok". FIG.7 Cura Manual You can download the full Cura manual here https://www.ultimaker.com/spree/uploads/38/original/Cura_User-Manual_v1.0.pdf Connect to your Computer With the power switch in the off position, connect the provide USB cable in FIG 8. between your computer and the Connect XL. FIG 8. Insert the USB connector in FIG 9. to an available USB port on your computer and the mini USB connector in FIG 10. to the connector on the side of the LCD screen in FIG 11. FIG 9. FIG 10. FIG 11. Note: Make note of the com port your computer assigns to the Connect XL; you will need to set this in the host software to allow communication between the computer and the printer. LCD Screen Firmware Version Number The firmware version number will be displayed when the unit first boots up as shown in FIG 12. FIG 12. LCD Display Information The Scroll wheel/push button in FIG 13. is used to navigate the LCD selection. Spinning the button clockwise will advance the item selected with a black box. Spinning the button counter-clockwise will move the selected item in reverse. FIG 13. 1. LCD Screen 2. Scroll wheel/push button FIG 14. All of the main setting in FIG 14. can be accessed by turning the Scroll wheel/push button clockwise and counter clockwise, then pressing the same button to select that feature. 1. E-STOP is currently selected in FIG 14. because it is showing white text with black background. Emergency Stop will shutdown all motors and heaters in case of an emergency and restart the printer. After 30 seconds and if there is no activity with the Scroll wheel/push button, the system will always revert back the "E-STOP". To activate the emergency stop function, press the button. 2. Print speed can be adjusted anytime. 3. Flow adjustment can be adjusted anytime but is recommended to leave at 100%. Make the flow adjustment in the Cura settings is a better option before slicing your part. 4. Z-offset allows you to adjust the auto calibration to bring the nozzle closer or father from the heated bed platform. 5. Current X axis position. Can be selected to move the X axis. 6. Display area of status message. 7. Current Y axis position. Can be selected to move the Y axis. 8. Current heat bed temperature display. 9. Set temperature of heat bed. Select this feature to change the bed temperature. 10. Current Z axis position. Can be selected to move the Z axis. 11. Fan speed display in percent. This feature can be changed by selecting it. 12. Approximate time left for printing from an SD Card. 13. SD Card status and access. A check mark indicates an SD Card is inserted, an "X" indicates no SD Card is inserted. Selecting this will display the files and folders on the SD Card. When an SD Card is inserted, the items on the folder will automatically be displayed. 14. The "MORE" Function will display a drop-down menu with secondary functions shown in FIG 15. More information is available below. 15. When selected, Extruder 2 can be extruded or retracted by turning the button. 16. Extruder set temperature. 17. This function is used to preheat for PLA or ABS filament. Once selected, turning the button will display the different options, this press the button to select a particular item. 18. The pause function can be used to change the filament during a print in case you are reaching the end of a spool. 19. Current extruder temperature display. 20. When selected, Extruder 1 can be extruded or retracted by turning the button. FIG 15. 1. Selecting the Home option will drive the axis to a zero position. 2. Auto calibration will be performed when selecting this option. More details on this will be given in the Perform Auto Calibration Section. 3. This option will disable the Steppers. 4. Enabling this function will turn the toggle lights on or off. Printing Your First Print With the power plugged in to a wall socket and the USB cable connect as mentioned above, turn the power switch FIG.6 to the on position. Perform Auto Calibration Auto calibration should be performed before your first print or when your first layer is not printing correct. Before performing auto-calibration, make sure the bed is free of any dried filament and the anti-wobble components on both sides are touching the nut block above as shown in FIG 16. If the anti-wobble components are not touching the nut block above it, rotate the shaft coupler below on that particular side in either direction until the two parts meet. From the main display FIG 14-14 select the "More" item. From the drop-down menu FIG 15, select "Auto Calibration". Make sure not to touch the bed during this operation. FIG 16. First the heated bed will be heated followed by heating the extruder. This ensures filament on the nozzle will impede auto calibration. Next the printer will sample the heated bed at four points to find the plane correction. Single Extruder Test Print. The folder you created from the " Connecl-XL-Files.zip" file you download and mentioned above is a file " food_clip.stl". Double click the file and it will open in Cura. Click on the top menu "Expert", select "Switch to full settings" . On the "File" menu, select "Open Profile" in Cura. Navigate to the folder created above from the zip file then select "PLA Profile.ini" and " ABS Profile.ini " if you are printing with ABS. These profiles may require a bit of adjustments depending on the filament brand you are using. The most important settings are the printing temperature and Flow 100%. Please read the Cura user manual for more information. Press the "print button FIG 17 to start the print. The heat bed and nozzle will heat to appropriate temperatures then the printer will home each axis for calibration. FIG 17 When the temperature on the extruder has reached about 150 C, make sure the filament on the extruder on the right, the one not being used, is retracted to prevent it from oozing on the part. You can pull on the filament as shown in FIG 18 until you can see the filament is out of the extruder nozzle as shown in FIG 19 to approximately the level of the yellow arrow. FIG 18 . FIG 19. Next, perform the opposite to the left extruder to ensure the filament is in the extruder head. You can push the filament up as in FIG 18 until you can push no further. Dual Extruder Test Print. The folder you created from the " Connecl-XL-Files.zip" file you download and mentioned above are two files " dual_test_p1.stl" and " dual_test_p2.stl". Click on the "Load" button in FIG 20, in the new window select both files then click open. FIG 20. Now you will see both parts on the Cura window as in FIG 21. Right click over one of the parts, then select "dual extrusion merge". This will join the two parts together as in FIG 22. FIG 21. FIG 22. If you have already performed this step above you can continue. Navigate to the folder created above from the zip file then select "PLA Profile.ini" and " ABS Profile.ini " if you are printing with ABS. These profiles may require a bit of adjustments depending on the filament brand you are using. The most important settings are the printing temperature and Flow 100%. Please read the Cura user manual for more information. Press the "print button FIG 17 to start the print. The heat bed and nozzle will heat to appropriate temperatures then the printer will home each axis for calibration. When the temperature on the extruder has reached about 150 C, make sure the filament on both extruders is in the extruder head. You can push the filament up as in FIG 18 until you can push no further.