1
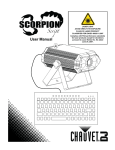
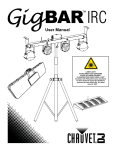
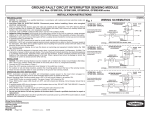
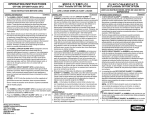
OCCUPANCY SENSOR IWS-ZP-3P CAPTEURS DE MOUVEMENT IWS-ZP-3P Installation Instructions Directives de montage UNENCO A Division of HUBBELL INCORPORATED (Delaware) 185 Plains Road Milford, CT 06460 (800) 245-9135 UND1023 (Page 1) 11/01 PRINTED IN USA Français DESCRIPTION Le IWS-ZP-3P de 120/277 V, CA est un capteur de mouvement mural à infrarouge passif. Il est fourni avec deux vis de fixation, la plaque de couverture et sa vis de fixation. CARACTÉRISTIQUES COUVERTURE Temporisation réglable entre 30 secondes et 30 minutes, 120 V, CA, 50/60 Hz, 800 W incandescent, 1/6 HP, 1000 W ballast. 277 V, CA, 50/60 Hz, 1800 W ballast. Couverture de 83 m 2. Commande dappareil électrique de qualité spécifiée. Homologué UL et cUL (dossier E88585) AVANT LE MONTAGE 1. AVIS - Doit être installé par un électricien qualifié conformément aux codes de lélectricité nationaux et locaux et selon les directives suivantes. 2. Pour usage à lintérieur seulement. 1,3 m 3. ATTENTION - RISQUE DE CHOC ÉLECTRIQUE. Débrancher le circuit avant de procéder au montage. Ne jamais câbler des composants électriques dans Plancher un circuit sous tension. Instrucciones de instalación Español DESCRIPCIÓN Detector mural por infrarrojos pasivos para V~120/277 IWSZP-3P. Se provee con dos tornillos de fijación, placa mural y tornillos para la misma. COBERTURA CARACTERÍSTICAS Temporización de 30 segundos a 30 minutos. V~120, 50/60 Hz, Incandescente de 800 W, 1/6 HP, Reactancia de 1000 W. V~277, 50/60 Hz, Reactancia de 1800 W. Cobertura de 83 m². Control de artefactos, de grado especificación Homologado por UL y cUL (Legajo Núm. E88585) PRE-INSTALACIÓN 1.Debe ser instalado por un electricista competente, de conformidad con los códigos nacionales y 5 m locales y siguiendo estas instrucciones. 2.Exclusivamente para uso en interiores. 3.¡CUIDADO! - RIESGO DE CHOQUE ELÉCTRICO. 15º Desconectar la corriente antes de la 15º instalación. No cablear nunca componentes 4. ATTENTION - EMPLOYER UNIQUEMENT DES eléctricos energizados. 10,5 m CONDUCTEURS EN CUIVRE. 4.¡CUIDADO! - USAR ÚNICAMENTE CONDUCTORES 5. Sassurer que le type et les caractéristiques nominales de ce dispositif DE COBRE. conviennent à lapplication. 5. Asegurarse de que el tipo y las características nominales del dispositivo 6. Si le dispositif semble être humide ou présenter des traces de sean apropiados para la aplicación. condensation, attendre quil soit complètement sec avant de le monter. 6. Si se advierte humedad o condensación, dejar secar completamente 7. Ne pas monter le dispositif si des dommages sont observés. el producto antes de instalarlo. MONTAGE 7. No instalar si se observa cualquier deterioro en el producto. 1. Pour les boîtes non métalliques, utiliser la vis de MALT pour connecter le INSTALACIÓN fil de mise à la terre. Une mise à la terre solide est nécessaire au bon 1. Con cajas eléctricas no metálicas, usar un tornillo de puesta a tierra fonctionnement du dispositif. para conectar el cable de tierra. Para que el dispositivo funcione 2. Mettre le circuit hors tension. Le cas échéant, enlever lancien commutateur. correctamente, se requiere una conexión segura a tierra. 3. Connecter le capteur tel quindiqué dans les illustrations au verso. 2. Desconectar la energía. Si corresponde, retirar el interruptor anterior. 5 Remettre le circuit sous tension. 3. Cablear como se muestra en el diagrama de cableado a continuación. RÉGLAGES 1. Effectuer les réglages après une période de réchauffement de 2 minutes. Enlever 4. Restablecer la energía en el detector. le couvercle situé entre la lentille du capteur et le bouton-poussoir en insérant un AJUSTES petit tournevis à lame plate dans lencoche située au haut du couvercle. Soulever 1. Quitar la tapa situada entre la lente del detector y el botón, insertando un pequeño desarmador de cabeza chata en la muesca de la parte superior le tournevis vers le haut délicatement pour relâcher le couvercle. de la tapa. Levantar suavemente el desarmador para destrabar la tapa. 2. Temporisation - Tourner la commande de temporisation (située à gauche, marquée «T») à fond dans le sens inverse des aiguilles dune 2. Temporización - Girar el ajuste de la izquierda marcado con «T» montre au minimum de 30 secondes. Ce réglage doit être au minimum completamente en sentido contrario a las agujas del reloj hasta el reglaje pendant les tests du capteur et pour le réglage de la cellule mínimo (30 segundos). Debe quedar regulado al mínimo mientras se photoélectrique et de la sensibilité. Tourner le réglage à fond dans le prueba el detector y se ajustan los reglajes de la célula fotoeléctrica y la sens des aiguilles d'une montre met le capteur en mode annulation de sensibilidad. Si se gira el ajuste totalmente en el sentido de las agujas priorité, ce qui maintient les lumières allumées peu importe qu'il y ait del reloj, el dispositivo queda en derivación, de modo que las luces se mouvement ou pas à l'intérieur de la pièce. mantienen encendidas al margen de la situación de ocupación. 3. Cellule photoélectrique - La cellule photoélectrique est utilisée pour 3. Célula fotoeléctrica - Se emplea para detectar si otras fuentes luminosas, évaluer le niveau de lumière ambiante, comme par exemple le soleil, et como la luz solar, son suficientes para alumbrar el ambiente sin encender déterminer si ce niveau procure suffisamment dillumination sans avoir à las luces. Si se desea usar la célula fotoeléctrica, ver las instrucciones allumer les lampes. Si lemploi de la cellule photoélectrique est désiré, sobre «Ajuste de la célula fotoeléctrica» más abajo. Si no se desea usar voir «Réglage de la cellule photoélectrique» ci-dessous. Si son usage la célula fotoeléctrica, girar su ajuste (situado a la derecha, con la marca nest pas désiré, tourner la commande de la cellule (située à droite et «A») completamente en el sentido de las agujas del reloj hasta el reglaje marquée «A») à fond dans le sens des aiguilles dune montre. Ceci máximo. Así se permitirá que el detector encienda y apague las luces permettra au capteur dallumer les lampes sans égard au conditions de independientemente de las condiciones de luz ambiental. léclairage ambiant. 4. Salir de la habitación hasta que las luces se apaguen. 4. Sortir de la pièce et attendre que les lampes séteignent. 10,5 m 35' English DESCRIPTION IWS-ZP-3P is a 120/277 VAC Passive Infrared Wall Switch Sensor. Supplied with two mounting screws, wall plate and wall plate screws. FEATURES 30 second - 30 minute time COVERAGE delay. 120VAC 50/60 Hz, 800W Incandescent, 1/6HP, 1000W Ballast 277VAC 50/60 Hz, 1800W Ballast 900 ft2 of coverage. Appliance Control, Specification Grade UL and cUL Listed (File 16' #E88585) PRE-INSTALLATION 1. For installation by a 15º qualified electrician in 15º accordance with national 4' Floor and local codes and the 35' following instructions. 2. For indoor use only. 3. CAUTION: RISK OF ELECTRIC SHOCK. Disconnect power before installing. Never wire energized electrical components. 4. CAUTION: USE COPPER CONDUCTORS ONLY. 5. Check to see that the device type and rating are suitable for the application. 6. If moisture or condensation is evident, allow the product to dry completely before installation. 7. Do not install if any damage to the product is noticed. INSTALLATION 1. For non metallic electrical switch box, use grounding screw for ground wire connection. Secure connection to ground is necessary for the unit to operate properly. 2. Disconnect power. Remove old switch if applicable. 3. Wire in accordance with the appropriate wiring diagram shown on reverse side. 4. Restore power to the sensor ADJUSTMENTS 1. Remove the cover located between the sensor lens and the push button by inserting a small Flathead screwdriver into the notch located on the top of the cover. Gently lift screwdriver upward to unlatch cover. 2. Time delay: - Turn the adjustment on the left labeled T fully counter clockwise to the minimum setting (30 seconds). This must be set at the minimum while testing the sensor and adjusting the photocell and sensitivity settings. Turning the adjustment fully clockwise puts the unit into bypass which keeps the light on regardless of occupancy conditions. 3. Photocell - The photocell is used to detect if other light sources such as sunlight, are enough to illuminate the space without turning on the lights. If use of the photocell is desired, see directions for Photocell Adjustment listed below. If use of the photocell is not desired, turn the photocell adjustment (located on the right labeled A) fully clockwise to the maximum setting. This will allow the sensor to turn the lights on and off regardless of ambient light conditions. 4. Vacate the room until the lights turn off. DETECTORES DE MOVIMIENTO IWS-ZP-3P English 5. Re-enter the room; lights should turn on immediately. The LED will flash every 3 seconds upon detection of a person. If the lights do not turn on immediately, verify correct sensor wiring including a secure ground connection. 6. Sensitivity -The sensitivity adjustment is in the center and marked SENS. Adjust the sensitivity setting to avoid unwanted detection such as hallway traffic or adjacent movement. Turning the setting counter clockwise will decrease sensitivity while turning it clockwise will increase it. 7. Adjust the time delay to the desired setting by turning the adjustment clockwise. Maximum setting is 30 minutes. Photocell Adjustment 1. Adjust light level in the room to a level which you want the sensor to turn on by using the shades, blinds, etc. 2. Set the time delay to the minimum setting by turning the adjustment fully counter clockwise. 3. Turn the Ambient Control setting fully counter clockwise. Leave the room and allow the lights to turn off. 4. Re-enter the room and slowly turn the ambient control clockwise until the lights switch on. NOTE: Avoid blocking lens and sensor while making this adjustment. 5. Ambient threshold is now set at the ambient light level present at the sensor. WIRING DIAGRAM Line (Black) Red Load Français 5. Rentrer dans le pièce, les lampes devraient sallumer immédiatement. La DEL clignotera toutes les trois secondes si la pièce est occupée. Si les lampes ne sallument pas immédiatement, vérifier le câblage et sassurer que la connexion de mise à la terre est solide. 6. Sensibilité - La commande de sensibilité est au centre et est marquée «SENS». Régler la sensibilité de façon à éviter que les mouvements dans les couloirs adjacents causent lallumage intempestif des lampes. Tourner la commande dans le sens contraire des aiguilles dune montre réduit la sensibilité. La tourner dans le sens des aiguilles dune montre laugmente. 7. Régler la temporisation à la durée désirée en tournant la commande dans le sens des aiguilles dune montre. Le maximum est 30 minutes. Réglage de la cellule photoélectrique 1. Régler la lumière ambiante de la pièce au niveau où il est souhaité que le capteur soit activé au moyen de stores, etc. 2. Régler la temporisation au minimum en tournant la commande à fond dans le sens contraire des aiguilles dune montre. 3. Tourner la commande de niveau de lumière ambiante à fond dans le sens contraire des aiguilles dune montre. Sortir de la pièce et attendre que les lumières séteignent. 4. Rentrer dans la pièce et tourner lentement la commande de niveau de lumière ambiante dans le sens des aiguilles dune montre jusquà ce que les lampes sallument. REMARQUE - Éviter dobstruer le capteur et la lentille en faisant ces réglages. 5. Le point de consigne de lumière ambiante du capteur est maintenant réglé au niveau de lumière ambiante vu par le capteur. DIAGRAMA DE CABLEADO DIAGRAMME DE CÂBLAGE Línea (Negro) Phase (Noir) Ground (Green) Neutral (White) Rouge Carga Tierra (Verde) Terre (Vert) Line Neutre (Blanc)) 3 VÍAS Negro Negro Línea Black Black 3 VOIES Phase Noir Noir Tierra (Verde) Ground (Green) Ground (Green) Rojo Charge Neutre (Blanc)) 3-WAY Español 5. Volver a entrar a la habitación; las luces deberán encenderse inmediatamente. El diodo luminoso parpadeará cada 3 segundos cuando detecte una persona. Si las luces no se encienden inmediatamente, verificar si el cableado del detector se ha efectuado correctamente, incluso con una conexión a tierra segura. 6. Sensibilidad - El ajuste de la sensibilidad está al centro, marcado con «SENS». Ajustar el reglaje de la sensibilidad para evitar una detección involuntaria, como la debida a circulación por un pasillo o movimientos en zonas contiguas. Si se gira el reglaje en sentido contrario a las agujas del reloj, se reducirá la sensibilidad, y si se gira en sentido inverso, se aumentará. 7. Ajustar la temporización en el reglaje que se desee, haciendo girar el ajuste en el sentido de las agujas del reloj. El reglaje máximo es de 30 minutos. Ajuste de la célula fotoeléctrica 1. Ajustar la luminosidad de la habitación en el nivel que se desee que el detector encienda las luces, utilizando cortinas, pantallas, etc. 2. Regular la temporización en el reglaje mínimo, haciendo girar el ajuste completamente en sentido contrario a las agujas del reloj. 3. Hacer girar el reglaje de control de ambiente completamente en sentido contrario a las agujas del reloj. Salir de la habitación para que las luces se apaguen. 4. Volver a entrar a la habitación y girar lentamente el control de ambiente en el sentido de las agujas del reloj hasta que las luces se enciendan. NOTA - Tratar de no bloquear la lente y el detector mientras se procede al ajuste. 5. El umbral luminoso del ambiente queda fijado en el nivel de luz ambiental presente en el detector. Red Red Load Neutral Terre (Vert) Rojo Terre (Vert) Rouge Tierra (Verde) Rojo Carga Rouge Charge Neutre Neutro HUBBELL DE MÉXICO garantiza este producto, de estar libre de defectos en materiales y mano de obra por un año a partir de su compra. Hubbell reparará o reemplazará el artículo a su juicio en un plazo de 60 días. Esta garantía no cubre desgastes por uso normal o daños ocasionados por accidente, mal uso, abuso o negligencia. El vendedor no otorga otras garantías y excluye expresamente daños incidentales o consecuenciales inherentes a su uso. Esta garantía es válida sólo en México. HUBBELL DE MÉXlCO S.A. DE C.V. Av. Coyoacán # 1051 Tel.:(5)575 - 2022 México, D.F. 03100 FAX: (5)559 - 8626 UND1023 (Page 2) 11/01 PRINTED IN USA Addendum to IWS-ZP-3P and IWS-ZPM Installation Instructions ADJUSTMENTS Note: If motion is not detected by the IWS-ZPM within 30 seconds of the lights turning off, the pushbutton on the switch must be pressed to turn the lights back on. 1. Remove the cover located between the sensor lens and the pushbutton by inserting a small Flathead screwdriver into the notch located on the top of the cover. Gently lift screwdriver upward to unlatch cover. 2. Time delay: - Turn the adjustment on the left labeled “T” fully counter clockwise to the minimum setting (30 seconds). This must be set at the minimum while testing the sensor and adjusting the sensitivity and photocell (IWS-ZP-3P only) settings. Turning the adjustment fully clockwise puts the unit into bypass mode which keeps the light on regardless of occupancy conditions or pushbutton operations. To locate the 30 minute max setting: a. Turn adjustment knob fully counter clockwise b. Turn lights on then off with the pushbutton c. Turn adjustment knob fully clockwise – lights should turn on d. Slowly turn adjustment knob counter clockwise until lights shut off e. You are now at the 30 minute max setting f. Verify by turning lights on with pushbutton 3. Photocell (IWS-ZP-3P only): – The photocell is used to detect if other light sources such as sunlight, are enough to illuminate the space without turning on the lights. If use of the photocell is desired, see directions for Photocell Adjustment listed on the IWS-ZP-3P Installation Instructions. If use of the photocell is not desired, turn the photocell adjustment (located on the right labeled “A”) fully clockwise to the maximum setting. This will allow the sensor to turn the lights on and off regardless of ambient light conditions. 4. Vacate the room until the lights turn off. 5. Re-enter the room; lights should turn on immediately. The LED will flash every 3 seconds upon detection of a person. If the lights do not turn on immediately, verify correct sensor wiring including a secure ground connection. 6. Sensitivity: - The sensitivity adjustment is in the center and marked “S”. Adjust the sensitivity setting to avoid unwanted detection such as hallway traffic or adjacent movement. Turning the setting counter clockwise will decrease sensitivity while turning it clockwise will increase it. Max sensitivity can be achieved by turning fully clockwise then counter clockwise ¼ turn. 7. Adjust the time delay to the desired setting by turning the timer adjustment clockwise. Maximum setting is 30 minutes. See item #2 above.