1
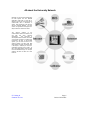
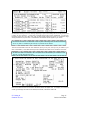
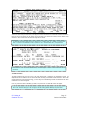
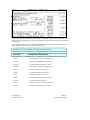
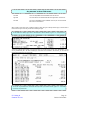
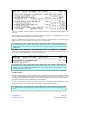
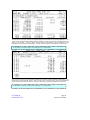
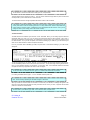
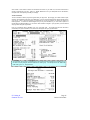
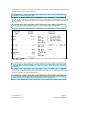
Introduction
To
Define (BIS)
Welcome to the
BIS!
Dear New BIS User,
Before you read this user manual, we’d like to welcome you aboard and introduce you to UTEP’s Business
Information System (BIS). Once your department begins working with the system, the way you conduct your
daily operations will never be the same. You’ll immediately notice that you’re making fewer and fewer phone
calls to processing departments (Accounting, Payroll, Human Resources, etc.) because the information you need
will be right there at your fingertips! The BIS Support Group has developed several training packages which will
gradually introduce your department to all the working advantages that BIS provides. This starter package is an
excellent way for you to “get your feet wet” and more importantly, to find out which BIS commands are most
useful to your department.
BIS is one of the many systems that UTEP uses to strive towards the latest in telecommunication technology.
We’re glad your department is able to share in this advancement. We’ve always known that the people here at
UTEP are the University’s greatest asset, and with BIS, we will become an ever better team. So again,
welcome, and good luck with BIS!
Sincerely,
Cynthia Villa
Vice-President for
Finance & Administration
All About BIS
UTEP’s Business Information System (BIS) is the computing tool used to carryout the University’s financial and
administrative responsibilities. The database that retains the information necessary to conduct these
responsibilities actually resides in a mainframe computer at U.T. Austin.
Through sophisticated
telecommunication equipment, all PC’s connected to the on-campus network can access the database in Austin.
The interface between what U.T. Austin does with the system and what we do with the system lies within UTEP’s
BIS Support Group, whose function is to provide the best system support possible to all BIS users.
All About DEFINE
DEFINE is one of several modules within BIS which is used by UTEP. UTEP uses DEFINE to process financial
transaction throughout all the departments across campus. This module gives departments the ability to process
accounting, payroll, and purchasing transactions. These transactions may include purchase requisitions under
$1000, voucher payments, vacation and sick leave, IDTVs, and budget transfers.
There are several advantages to using DEFINE worth mentioning. Your first exposure to DEFINE will consist of
the on-line viewing of your department’s account balances, account detail, and transaction detail. All current and
previous appointment information can be viewed for every employee (full- time or part-time) in your department.
Later on, you will learn the advanced commands in DEFINE that will allow you to prepare purchase orders online, create electronic re-appointment forms, design informative reports, and maintain an on-line bookkeeping
system for your department.
Now that you have a better feel for what DEFINE is all about, you can probably think of several ways that it can
help you perform your job in a quicker and more efficient way.
IT Training &
Financial Services
Page 3
Revised: 8/29/2003
All about the University Network
Now that you are becoming familiar with
the BIS system and the DEFINE
application within BIS, it might be of
interest to know how your PC is able to
communicate with a mainframe in
Austin. Also noteworthy is the fact that,
with the University Network, you have
access to applications throughout the
campus and even around the world.
The
campus
network
is
the
communication device that allows us to
use
BIS
and
other
computer
applications.
This connection is
accomplished with a network card inside
your PC that connects to a network port
connection in the wall. To use the BIS
system, your PC first connects to the
campus network, and then uses data
lines between El Paso and Austin (with
a few stops in between) to reach the
mainframe computer at U.T. Austin. To
learn about applications other than BIS
that are available through the campus
network, call 4357 or HELP for a free
brochure.
IT Training &
Financial Services
Page 4
Revised: 8/29/2003
All About
The Help Desk
UTEP’s Information Technology (IT) is committed to providing the highest level of on-campus user supp ort
possible. One area within IT that helps us keep that commitment is our Help Desk. Using call-tracking software,
the Help Desk Representatives keep an electronic log of all problem calls or user requests. All calls that cannot
be handled immediately are then automatically assigned to the employee that can most easily resolve the user’s
concern. This electronic Help Desk not only reduces response time, but ensures that your problem or request
doesn’t “fall through the cracks”.
Now that you’re a BIS user, it’s more important than ever to know that you can rely on the Help Desk when you
need assistance. So whether your PC isn’t operating properly, you need help with your Octel phone service or
you just can’t understand the information on your screen, give our Help Desk a try at extension 4357 or HELP.
You’ll be glad you did!
IT Training &
Financial Services
Page 5
Revised: 8/29/2003
Before You Begin
$The Fund Accounting Basics$
The type of accounting that the university uses to manage its financial affairs is called fund accounting (see
insert). Fund accounting is the procedure by which resources are classified into funds according to specified
activities or donor objectives for financial accounting and reporting purposes. The classification is according to
donor specifications or regulations, restrictions, or limitations imposed by sources outside the University, or with
directives issued by the Board of Trustees or delegate.
Funds are separate accounting entities for different purposes or activities. For example, UTEP’s plant funds are
used for the acquisition and management of long-term fixed assets, while its general fund is used specifically to
finance the operating budget. Some funds are treated as nonprofit, while others (called Auxiliary Funds) operate
on a profit or loss basis. This different treatment, as well as special guidelines imposed by external parties and
the state & federal government is the focus of this type of accounting.
Although it’s not very important to know all about fund accounting to learn the BIS system, there will be terms
and concepts that will be helpful to know. For instance, the university uses an 8-digit account number to
represent a budget group. Two digits are added on at the end of the 8-digit account number to designate
different budget categories (maintenance and operation, equipment, salary, etc.) So, when you enter an account
number in BIS, you will use a 10-digit number to represent a specific budget category and an 8-digit number to
solely identify a budget group (or groups of accounts). These accounts are given a specific balance from
UTEP’s entire original budget & balance forwards (commitments or surpluses carried over from the previous
fiscal year). Account balances are reduced throughout the year either by expenditures (similar to expense) and
income activity.
IT Training &
Financial Services
Page 6
Revised: 8/29/2003
Description of an Account Number
The first 2 digits represent
the fund group.
For
example, 19 stands for
designated funds.
The next 6 digits represent the budget group and
where the account is placed in the account
structure.
The
last
2
digits
represent the budget
category.
For example, 50 stands
for Maintenance and
Operation ( M & O) .
Every account that you will see in BIS will have transaction activity within ti . Types of transactions that will
appear include; budget set-ups, budget adjustments, encumbrances (commitments against funds to be
distributed later), expenditures, income (for those funds that generate income), transfers (in and out of an
account to another UTEP account), and employee salary activity (both encumbrances and expenditures). It will
be important to distinguish between these different types of transactions when analyzing the make up of a
particular account balance.
For all of the transaction activity just mentioned, the BIS system uses electronic documents created by BIS users
to disseminate transactions to the appropriate account. For instance, when a payment voucher document is
created, an expenditure transaction is created into an account which will then cut a check to pay a particular
vendor. An electronic purchase order will encumber (set monies aside) funds from an account, which will be
paid later with a payment voucher. An interdepartmental voucher will transfer expenses between accounts when
something is purchased from another department on campus.
As a BIS user, you will become very familiar with electronic documents and the types of transactions they create.
Eventually, you will be involved in the creation of these electronic documents for your own department. Finally, if
there are any terms that you see in BIS or this manual, check the glossary of terms section for a better
understanding. If the glossary of terms does not answer your question, please call the Help Desk at 4357,
identify yourself as a BIS user, and they will connect you with someone who can answer your question.
IT Training &
Financial Services
Page 7
Revised: 8/29/2003
Helpful Tips
For DEFINE
Here are some tips that will help you navigate through DEFINE and the BIS system. Remembering these helpful
hints may save you a lot of time.
On-line Help - After you’ve logged onto DEFINE, there are two different sources of on-line help. Pressing F6 on
many of the screens will provide a description of that particular command as well as how to use it. Additional online help can be viewed on your screen when you place a “?” on any unprotected field and press enter. This will
explain what the field means or what is needed in the field to continue.
Quick Shortcuts - By using the “TAB” key on your keyboard, you can advance to the next field on the screen.
Also, press “SHIFT-TAB” to place the cursor at the previous field. When processing documents you can type in
the minus sign “(-)” and then press “ENTER” to clear the typing on a line. These shortcuts will enable you to
maneuver across each screen more quickly.
BIS is not case sensitive - Capitalizing commands or text is unnecessary in the BIS system because the
database is not upper/lower case-sensitive. When a screen is updated, all text entered becomes capitalized
automatically.
Misc Field - Many commands in DEFINE use the “MISC” or miscellaneous field in some way or another. For
instance: the GTD command/screen needs a starting date in the “MISC” field if only certain transactions need to
be viewed. Another example is when the “AL2” command/screen needs an employee’s last name or starting
point to provide a listing.
Online Traffic - Getting from one screen to another sometimes takes longer than usual because of heavy traffic
on the system. When enter is pressed to update a screen or go to another command, the message “XSYS X”
will appear on the bottom of your screen while the database is being accessed. The system may take a while to
remove this message, but DO NOT PRESS ENTER UNTIL IT’S GONE. IF “XSYS X” remains on your screen for
more than a minute or two, call the Help Desk for additional assistance.
IT Training &
Financial Services
Page 8
Revised: 8/29/2003
A Look at Getting
Started in DEFINE
The Starter Package for DEFINE was designed to provide the departmental user with a good start to mastering
the entire application. With the commands that were selected for this introductory level of DEFINE; several timeconsuming tasks are minimized to just a few keystrokes. Here’s exactly what the Starter Package offers:
AL2 – This command allows a BIS user to look-up
an employee by name, and view detailed
biographical or employment information. Such
information includes the employee’s current and
previous appointments, salary detail, accrued
vacation & sick leave, and hire dates.
GB1 & GB2 – These commands are used to view
account balance information. Such information
includes expenditures against the account, free
balances, and authorized signatures of an
account.
GT1 & GTD – These commands are used to view
detailed transactions for a particular account on
any given date.
IT Training &
Financial Services
YI3 – This command allows a user to play “what-if”
games with their paycheck. Tax data, insurance,
and other deductions can be altered to raise or
lower your net pay. This is for speculation only
and doesn’t affect your real paycheck.
YB2 – The YB2 command is your electronic “inbox” and is used to retrieve documents that have
been forwarded to you for approval.
YI8 – The YI8 command was designed to allow
employees
to
update
their
biographical
information on their employee record. No special
authorization is required to use YI8 to update or
view your own information.
Page 9
Revised: 8/29/2003
How to
Log-On to BIS
If your computer syst em is running Windows 98 as its operating system, you should have a desktop with a BIS
icon on it. If you do not have a BIS icon please contract the help desk and have it installed. To connect to the
BIS, double-click on the BIS icon and the logon screen will appear. If you computer system is running an earlier
version of Windows your BIS icon will be located in your Internet program group. From the Program Manager,
open your Internet program group from the Window menu. Double-click on the BIS icon and the logon screen
will appear.
When you arrive at this screen, disregard the information and telephone numbers surrounding the U.T. Austin
tower symbol in the center of the screen. This information applies to users at U.T. Austin only.
Type “fiscal” or “fi” at the bottom of the screen and press enter. The next screen that appears will
require that you input your user ID and password.
You are now at the front door of the BIS system. To continue, your BIS ID and password are needed. When
typing your password, the letters will not appear on your screen due to security concerns.
Please be aware that the system will force you to change your password every 45 days.
IT Training &
Financial Services
Page 10
Revised: 8/29/2003
To enter a new password after one has already been established, see “How to Change My Password”.
Type your user ID in the corresponding field, then tab to the next field, enter your password, and press
enter. If this is the first time you have logged in, you will need to read the Austin Security Policy. Press
enter until you reach the end of the policy and type in your BIS Logon ID to confirm the acceptance of
the policy.
University of Texas at El Paso Security Policy
Please be aware that all BIS users must also adhere to the University’s security policy which reads like
this:
I understand that this administrative office staff account is assigned to me at the request of the
Department Head to be used only in connection with my assigned duties as an employee of UTEP and
may be revoked without notice upon the request of this administrator. I understand and accept the
following terms and conditions:
Ø I am aware that passwords are the first line of security on BIS or Goldmine/Banner. I agree
not to reveal my password nor allow anyone to use the account assigned to me. I am
responsible for any changes made to the database under my user name.
Ø I agree to abide by the Family Education Rights and Privacy Act of 1974 (FERPA)
regulations. Under this act, information about current and former UTEP students is legally
designated as private. I agree to refer all outside requests for student information to the Office
of the Registrar, unless I have been authorized by the Registrar to release predestinated
information.
Ø I must maintain the confidentiality of any and all data that I retrieve from BIS or
Goldmine/Banner in the course of my job duties, including data that I use for reporting
purposes of in other software products.
Ø Access to administrative data will be determined by the requirements of my job, and therefore
I am only authorized to retrieve this data on a “need to know” basis.
Ø I agree to comply with all UTEP policies on security, computer access, and confidentiality of
data, data entry standards, and data integrity.
I am aware that any violation of these policies may lead to the immediate suspension of my computer
privileges. I understand that unauthorized release of sensitive or restricted information is a breach of
data security and may be cause for disciplinary action, which could include dismissal.
This screen is just to let you know that you have logged on successfully. The other information on your screen
will
be
helpful
later
when
you
receive
electronic
mail
and
process
electronic
documents.
IT Training &
Financial Services
Page 11
Revised: 8/29/2003
No input is necessary for this screen. Press enter to advance to the “COM-PASS” screen.
This is known as the “COM-PASS” screen, and is used to let the system know which application you wish to
access. Every application listed under the heading “Program Services” has a shortcut key listed under the “ID”
column. Notice that the DEFINE application has “F” assigned as its shortcut key.
Type “F” under the “Enter Input” field, and press enter. The next screen you wi ll see will welcome you
into DEFINE.
Please be aware that you might be assigned different DEFINE desks depending on your access. To view the
desk that you are currently working on hit F1, place a “?” in the desk field and press enter. The system will
provide you with a list of desks that are available for your use. Enter the desk number that you would like to work
on in the Select a New Desk/View field. You can also type in YS1 on the command line and use that screen to
switch your desk. In YS1, just type in the number of the desk and place an “S” in the action field.
The AL2 Command
IT Training &
Financial Services
Page 12
Revised: 8/29/2003
Please make sure that you are practicing the utmost confidentiality of information when using BIS. The AL2
command provides important confidential information about employees within your department. All appointments
(employment contracts on BIS), previous or current, can be viewed in detail with AL2. It will also be helpful to
look-up biographical information on an employee, such as hire date, birth date, education, and mailing address.
An employee’s accrued vacation and sick-leave can also be viewed with the AL2 command. With just a little
practice on this command, you’ll learn to find the information you need with only a few keystrokes!
You can access AL2 from any command field in DEFINE, simply type “AL2” in the command field, and press
enter. A blank AL2 screen will appear.
By placing an employee’s last name or the beginning letters of an employee’s last name in the “Misc” field, and
pressing enter, the system bring up an appointment listing beginning with that name. Note: Only those
employees with a “2” in the “Cmp” column have UTEP appointments.
*T
he SSN is purposely grayed out for security reasons.
To view current and previous appointments for an employee, tab to the field beside that employee’s
name, place an “a” in the blank, and pressField
enter. Description
*The SSN and salaried information is purposely grayed out for security reasons.
From this appointment screen, you can place one of the following commands beside the appointment
and press enter to access the information below:
B to view biographical information on the employee
D to view more detail of the appointment selected
F to view the budget source of funds
H to view historical information on the appointment
R to view special remarks about the appointment
N to view the document that created the appointment
E to view detailed employment information
T to view the appointment update document
If you choose “b” from the previous screen and press enter, a pop up screen will come up and provide basic
biographical information about the employee.
Again, to access a help screen just type in a “?” to bring up a menu of options.
IT Training &
Financial Services
Page 13
Revised: 8/29/2003
To get out of a pop up screen, simply press enter from this screen to return to the employee listing.
If you choose “d” from the main appointment screen and press enter, an employment detail screen will appear.
Simply press enter from this screen to return to the employee listing.
If you choose “h” from the main appointment screen and press enter, this historical appointment screen will
appear which shows summary information about the electronic document that created the original appointment.
Simply press enter from this screen to return to the employee listing.
If you choose “R” from the main appointment screen and press enter, this appointment remarks screen will
appear. This screen may show special information about the employee’s appointment.
Simply press enter from this screen to return to the employee listing.
If you choose “e” from the main appointment screen and press enter, this employment detail screen will appear.
Simply press enter from this screen to return to the employee listing.
If you choose “n” from the main appointment screen and press enter, you will proceed to the cover screen of the
electronic document that created the appointment.
The information on this main appointment screen can be presented differently by pressing enter. This
will allow you to view all the pages related to the main appointment screen
You should take some time and get acquainted with all the screens in this command.
The GT1 command
The GT1 command is used to view detailed transactions within an account. These transactions make up the
account’s balance. Transactions can be anything from payment vouchers to interdepartmental transfers to
salary payments. The detail provided for each transaction includes the document’s creation date, a short
description of the transaction, any check numbers, P.O. numbers or document I.D.’s, and transaction type. This
command is generally used when it becomes necessary to analyze transaction detail in order to reconcile an
account’s balance.
GT1 is one of the more commonly used commands in the entire BIS system.
From any “Command” field in DEFINE, type “GT1”, and press enter. A blank GT1 screen will appear.
Tab to the “Account” fi eld, type in the account you will be viewing (without dashes), and press enter.
IT Training &
Financial Services
Page 14
Revised: 8/29/2003
All transactions involving this account will begin appearing on your screen starting with the first day of the month
in which you are currently in. Press enter to proceed through each month’s transactions. To limit your
transaction search, tab to the “Misc” field, enter the date (format mmddyy) from which you would like to begin
viewing transactions, and press enter. All transactions after that date will now appear on your screen.
Some of the information on this transaction screen may seem intimidating at first, but all this information
will be very useful in understanding the make-up of a particular account balance.
There are several detail screens for each transaction (some you may use, some you may not based on your
level of authorization). These detail screens provide considerable information that is not listed on this screen.
To view more detail for a transaction, tab to the space next to the transaction you would like to view,
place an “x” in that field, and press enter.
Some of the items that were not on the GT1 transaction screen will appear here. For example, the Vendor ID
number, general ledger accounts that are affected, Check Date, & Document creator’s ID.
IT Training &
Financial Services
Page 15
Revised: 8/29/2003
Some of the other detail screens may be of some benefit. To view these screens, tab to the “Screen 1
of 6” field, type a “2”, and press enter. If you wish to return to the main transaction screen, just press
enter.
Screen 2 will display the date that a check was printed. This screen may be useful when determining whether or
not a check has arrived for a vendor or for your department. Using this screen you will be able to identify when
the check was printed.
To view screen 3, tab to the “Screen 2 of 6” field, type a “3”, and press enter. If you wish to return to the
main transaction screen, just press enter.
Screen 3 will display purchasing and central receiving information (this transaction was a travel reimbursement,
not a purchase, so no data appears). This screen will be helpful to view vendor information for a purchase
transaction.
To view screen 4, tab to the “Screen 3 of 6” field, type a “4”, and press enter. If you wish to return to the
main transaction screen, just press enter.
Screen 4 will display information about the payment voucher that created the transaction. Items of note include
voucher comments and invoice information. This data will be helpful when specific detail is needed for a
transaction.
To view screen 5, tab to the “Screen 4 of 6” field, type a “5”, and press enter. If you wish to return to the
main transaction screen, just press enter.
Screen 5 displays information that has already been displayed, but in a different order. Some of the detail
screens in BIS will often have similar data that is displayed differently, but in any case they might be useful in the
tracking process.
To view screen 6, tab to the “Screen 5 of 6” field, type a “6”, and press enter. If you wish to return to the
main transaction screen, just press enter.
Screen 6 provides line item detail about the purchase order that initiated the transaction (again, this transaction
example was a travel reimbursement, so line item data does not appear). This screen is helpful when purchase
order data needs to be tracked and analyzed.
This is the last detail screen for this transaction. The next page will show you how to “travel” to the
electronic document that created this transaction. Press enter from this screen to return to the main
transaction screen.
Quite often, it may be helpful to view the actual electronic document that created a particular transaction. This
command will come in handy when you don’t know why a transaction is being charged to a certain account and
you would like to view the details of the transaction in question.
To “travel” to the cover screen of the document that created a transaction, tab to the transaction, place a
“t” beside it, and press enter.
IT Training &
Financial Services
Page 16
Revised: 8/29/2003
This is the cover sheet (or first screen) of the payment voucher document that created the selected transaction.
Items of note on this screen are the creator of the document, the vendor’s ID number, and the status of the
document. Other screens from this document may also be viewed.
To view this document’s detail, tab to the “Sections 1 & 2” fields, place an “x” beside 1 & 2, and press
enter. To return to the transaction screen, replace the “VP1” command with “GT1”, and press enter.
Press enter to vi ew the second detail screen, and enter again to return to the cover sheet of the
document.
The GB1 Command
The GB1 command may prove to be one of the most helpful tools in managing your department’s funds. All
departmental account balances can be viewed with GB1, including a breakdown of those balances. With a little
practice and some accounting terminology, you’ll be using and understanding the GB1 command with the same
confidence as our Accounting staff.
From any “Command” field in DEFINE, type “GB1”, and press enter. A blank GB1 screen will appear.
Tab t o the “Account” field, type in the 10 digit you will be viewing (without dashes), and press enter.
IT Training &
Financial Services
Page 17
Revised: 8/29/2003
Items of note that appear on this screen include; the account title & description, the administrator of the account
and their mail code, authorized signers, area experts & telephone numbers, account breakdowns, a free balance
and pool balance.
Note: Explaining the GB1 command requires several accounting terms you may be unfamiliar with, therefore, a
periodic review of the glossary may be necessary to follow along.
The following will provide a description of the fields to the right of the screen.
This Field:
Provides This Detail Screen:
Beg Bal:
Account balance carried forward from last year.
Trsf/Adj:
All transfers and adjustments to the account.
Budg/Adj:
All budget adjustments made to the account.
Appr/Bud:
Account balance carried forward from last year.
Income:
All income activity for this account.
Expend:
All expenditure activity for this account.
Invest:
All investment activity for this account.
Asset/Li:
All asset and liability activity for this account.
Misc Enc:
All income activity for this account.
Sal Enc:
All salary encumbrance activity for this account.
Sch Enc:
This field is not being used by the university.
IT Training &
Financial Services
Page 18
Revised: 8/29/2003
Any amounts in these fields mean:
Free Bal:
This is the expendable amount available from this account.
Appr OD:
This is the amount of overdraft that has been approved for this account.
Pool Bal:
This is the expendable amount available from the pool of accounts that
this account is connected to.
When a field on this screen has no balance beside it, either this type of activity doesn’t apply to this account or
the account has yet to have any of this kind of activity this year.
To view detail of an activity type, tab to a field that has an amount beside it, type an “x”, and press enter.
This screen indicates what makes up the amount shown on the first screen (in this case, $27,699.86). If there
are any transactions (as in the GT1 command) for this month that contribute to this amount, you can view the
individual transactions on the next screen.
To look for any transactions for this month that help make up the amount shown, type an “x” in the field
on the left, and press enter.
IT Training &
Financial Services
Page 19
Revised: 8/29/2003
This line of information should be familiar if you’ve already looked at the account’s transactions using the GTI
command
From this screen, you can either view the detail of the transaction (placing an “x”, and pressing enter), or you can
travel to the document itself (placing a “t”, and pressing enter).
After you’ve viewed this document, tab to the “command” field, type “GB1” (returning you to the first account
balance screen) or any other command, and press enter to leave this screen.
The last important item to mention about the GB1 command is how to view account balances from
different months of the year. Return to the main GB1 screen by typing “GB1” in the command field, and
pressing enter.
To look at the ending account balance of a particular month, tab to the “month” field in the upper right side of the
screen, type the 3 letter abbreviation for the month, and press enter.
Although this GB1 command seems like too much information to digest at once, many users only view a
selected number of the GB1 screens available. With some practice, you’ll be able to determine what
information is critical to your needs.
The GB2 Command
The GB2 command is merely a sister of the GB1 command, and provides additional account balance information
to the user. GB2 breaks down a budget group between expenditures, transfers, income, encumbrances, etc. As
you become more comfortable with university accounting terminology, the GB2 screens become easier to
comprehend, and will prove to be a powerful tool for your department.
From any “command” field in DEFINE, type “GB2”, and press enter. This blank GB2 screen will appear. Once a
budget group is chosen, each account’s balance and detail from that group can be viewed.
To view a breakdown of a budget group, type the 8-digit account number in the account field, and press
enter.
IT Training &
Financial Services
Page 20
Revised: 8/29/2003
The first column of amounts combines the original budget for that account and any budget adjustments. The
second column represents balance forward amounts, transfers in and out of the account, all expenditures, and all
income in that account. The third column combines material encumbrances, salary encumbrances, and
asset/liability activity (payable and receivables). The last column represents the free balance for each account.
To view screen 2, tab to the “screen 1 of 9” field, type a “2”, and press enter.
Once you are in screen 2, the first column of amounts on this screen shows all balance forward activity. The
second column shows all transfer activity in and out of the account. The third column combines all expenditures
and all income activity within each account. Again, the last column provides a free balance for each account.
To view screen 3, tab to the “screen 2 of 9” field, type a “3”, and press enter.
IT Training &
Financial Services
Page 21
Revised: 8/29/2003
The first column of amounts on this screen shows all material encumbrance activity for each account. The
second column shows all salary encumbrance activity for each account. The information in the third column is
not used by the university. The last column combines all asset and liability activity (payables and receivables) for
each account.
To view screen 4, tab to the “screen 3 of 9” field, type a “4”, and press enter.
The first column of amounts on this screen combines all balance forward, transfer, original budget, and budget
adjustment activity for each account. The second column combines all expenditure and income activity for each
account. The third column combines all encumbrances and asset/liability (payables and receivables) activity for
each account. Again, the last column will provide a free balance for each account.
To view screen 5, tab to the “screen 4 of 9” field, type a “5”, and press enter.
The first column of amounts on this screen shows all balance forwards for each account. The second column
shows all transfers in and out of each account. The third column shows the original budget for each account.
The last column will show all budget adjustments for each account.
To view screen 6, tab to the “screen 5 of 9” field, type a “6”, and press enter.
The first column of amounts on this screen shows all investment activity for each account. The second column
combines all balance forward, transfer, expenditure, and income activity for each account. The third column
provides a free balance for each account. The information in the last column is not used by the university.
To view screen 7, tab to the “screen 6 of 9” field, type a “7”, and press enter.
The first column of amounts on this screen combines all balance forward, transfer, income, original budget, and
budget adjustment activity for each account. The second column combines all expenditure and cash activity for
each account. The last column provides a free balance, which, in this case, is the sum of the three previous
columns.
To view screen 8, tab to the “screen 7 of 9” field, type an “8”, and press enter.
The first column of amounts on this screen combines the original budget with budget adjustments for each
account. The second column shows all actual expenditures and income activity for each account. The third
column combines all encumbrances and accruals for each account. The last column subtracts column 2 & 3
from column 1 to provide an over or under budget amount.
IT Training &
Financial Services
Page 22
Revised: 8/29/2003
To view screen 9, tab to the “screen 8 of 9” field, type a “9”, and press enter.
This last detail screen is identical to screen 7. The only amount that will change relates to plant fund accounts
and will provide a year-to-date amount for those accounts.
You should take some time and get acquainted with all the screens in this command.
A few things to remember about GB2: If there are more accounts for a budget group that can fit on one
screen, press enter to view the remaining accounts. For every detail screen, if there is expenditure and
income activity in the same column, a breakdown of each will appear below the accounts. Also, you can
change the month you’re viewing (refer to the section on GB1).
The YB2 Command
The YB2 command is considered your electronic “in-box” within BIS. When you are ready to approve electronic
documents (PRO, VP1, AD1, et c), you can retrieve the documents using the YB2 command. Also, when a
document is forwarded to someone within your department for approval, they may access the document using
the YB2 command. So, if you hear the phrase, “the document is sitting in your YB2 box”, you will know that you
must use the YB2 command to retrieve that specific document.
From any “command” field in DEFINE, type “YB2”, and press enter. All documents residing in your YB2 “in-box”
will appear.
To view any document on your screen, place an “x” in the field beside the appropriate document, and press F3.
You will immediately advance to the cover sheet of that document. You can then begin reviewing that document.
Once you have finished reviewing your document, you must type “APP” in the “ACTION” field of the document
and press the enter key to approve it and route it to the next signer.
To view more than one document at a time, type an “x” beside those documents, and press F3.
For a listing of available actions, type a “?” in the “ACTION” field and press enter.
Note: Actions will vary depending on the status and type of document.
When you choose to view more than one document at a time from your YB2 box, a message will appear on the
lower left of each document indicating how many selections are left. Once you view, or approve the document
press F3 to retrieve the next document.
To return back to your YB2 box, type “YB2” in the “command” field, and press enter.
IT Training &
Financial Services
Page 23
Revised: 8/29/2003
There are currently 7 different “views” or ways you can have documents appear in your YB2 box. This “view 1 of
7” provides the document type, creator, the document’s summary line, and a status (far-right).
Status codes:
A-
This document is waiting for your approval.
C-
You will not see this status in your YB2 box.
N-
This is just an informational copy that stays in your YB2 box after it is approved. To remove this
copy, retrieve the document by typing an “x” next to it and press enter. Type “dis” in the “action”
field, and press enter again. This action will discard the document from your YB2 box.
The YB2 command also gives you the capability to view another user’s YB2 box. By tabbing to the “Logon ID”
field and inserting another person’s logon ID and pressing enter, you can view all documents residing in that
individual’s YB2 box. Also, you may use the “Misc” field to start at a certain type of document by typing the
document type (PRO, VP1, VT5), and pressing enter. Again other “views” may be preferable to you depending
on the usage of your YB2 box.
To change the “view” in your YB2 box, tab to the “view 1 of 7” field. This gives you the option of
entering numbers 1-7 depending on the view you choose to use. Just type the number and press enter.
Above is view 2 of 7 and below is 3 of 7. Notice the different fields and how they are organized.
IT Training &
Financial Services
Page 24
Revised: 8/29/2003
Above is view 4 of 7 and below is view 5 of 7. Notice the different fields and how they are organized.
Above is view 6 of 7 and below if view 7 of 7. Notice the different fields and how they are organized.
If you wish to have a different view in your YB2 box than your current view, press F5, and this window will
appear.
Type the desired view in the “View Number” field, then place an “X” beside “Mark here to save this YB2 profile for
future sessions”, and press enter. This view will now appear every time you use the YB2 command. Use the
IT Training &
Financial Services
Page 25
Revised: 8/29/2003
other criteria in this window to affect how documents are sorted in your YB2 box, and which documents to
include or exclude from your view. Type an “x” beside “Mark here to turn your YB2 profile OFF for this session”,
and press enter to temporarily override your settings.
The YI3 Command
The YI3 command is used to play what-if games with your paycheck. By changing your health insurance plan,
annuities, tax withholding, and other check deductions, you can view what effect those changes would have on
your net pay. Keep in mind that changes you make with the YI3 are for analysis only and do not affect your
actual paycheck. To make the official changes that you may have decided on, you will need to speak to a
Human Resource Representative. So, feel free to make whatever changes to your paycheck you’d like without
worrying about losing the original data.
From any “Command” field in DEFINE, type “YI3”, and press enter. The system will take 5-10 seconds to
accumulate your payroll information; then, this screen will appear with your paycheck detail.
You will notice as you begin to understand the YI3 command that some fields can be updated so you
can look at net pay changes, and other fields are for viewing only. For example, tab to the “State Paid
OASI” field, type an “x”, and press enter.
IT Training &
Financial Services
Page 26
Revised: 8/29/2003
This window is for viewing only and cannot be updated; it merely shows you how the state paid OASI amount is
calculated and how much has been paid to date.
Press enter to return to the main YI3 screen.
Now, you will go to a screen that can be updated and may be used to make imaginary changes to your health
and life insurance. Such changes will show how your net pay would be affected if you actually did change your
insurance coverage.
To view and update insurance deductions, type an “x” in the “insurance” field, and press enter.
Notice that this employee has “Plan Z” health coverage. Once it is changed to “Plan A (higher premiums)”, the
net pay will decrease.
To see how different health plans affect your net pay, type “a” or “b” (a different plan) in the “Plan” field,
and press enter. For more information on health plan options, contact the Human Resources
Department .
The net pay is now different because of the changes made to the health plan. Try changing the other fields on
the insurance screen to see how net pay is affected.
You’ve now seen examples of screens that can be updated, as well as screens that can only be viewed.
See the next page for a complete listing of the different options in the YI3 command.
IT Training &
Financial Services
Page 27
Revised: 8/29/2003
Screens that can
Be Updated
Lon/Haz Pay (if you qualify for longevity and/or
hazardous duty)
Screens That can
Be Viewed Only
State Paid OASI
Premium Sharing
Insurance
Other Additions
Annuity/Def Comp (if you currently have an annuity
or deferred compensation plan)
Withholding
UT FLEX Deductions
OASI
Other Deductions (only if you currently have special
deductions set-up)
Retirement
Retirement/Ins. Code
Fields on this screen that will influence the net pay amount are:
Tax Marital Status
Withholding Allowance
Additional Withholding
Three fields in the upper-right portion of the screen can be updated to affect the net pay amount; “Tax Marital
Status”, “Withholding Allowance”, and “Additional Withholding”.
To see an effect from a withholding allowance change, type a new number of dependents in the
“Withholding Allowance(s)” field, and press enter.
Again, notice how the increase in withholding allowances affects the net pay amount. It is important to
remember that no updates to this and other YI3 screens actually affect official payroll and tax information. You
must contact the Human Resources Department to make desired changes.
Finally, to reset any changes you made tab to the “Reset to initial values” field, type an “x”, and press
enter. From this point, you can begin to try other ways to affect your net pay amount.
The YI8 Command
The YI8 command was designed to allow employees to update their biographical information on their employee
record. No special authorization is required to use YI8 to update or view your own in formation. Please note that
any changes made on the YI8 screens will be reflected on your employee record only. These changes will not
be made on any other type of records you may have with the University (student, applicant, etc.). The YI8
command will be useful in saving you time by not having to go through Human Resources to specify changes to
your personal information.
To enter the YI8 Module simply type “YI8” in the “Command” field in DEFINE, and press enter. To update the
biographical information for any of the sections listed, simply mark the field next to that section with an “X” and
press enter.
IT Training &
Financial Services
Page 28
Revised: 8/29/2003
Personal Information: This screen allows you the ability to update your personal information on your employee
record. In the Information Release section, you can specify whether or not you do not want personal information
released to the University’s community. You can keep such information as your SSN, home address, family
information, and home phone number private. Unless you have recently undergone a sex change operation or
have discovered some new information about your ethnic background, do not change the sex or ethnicity fields.
To go to the next section, press enter.
Home Addresses: This screen allows you to update your employee address on your employee record. These
changes will not affect any other record you have with the University such as student, applicant, etc. If you have
recently changed your home address, you can enter your new address in the appropriate fields and press enter.
If your working location has changed within UTEP, you may update the Bldg1 and Room1 fields to reflect your
new location. Your E-Mail address can also be changed by modifying the Internet field. If you do not want your
home address released, place an ‘X’ next to the DO NOT release Home address field. To go to the next section,
press enter.
NOTE: You are required to go through Human Resources to make adjustments to your mail code, no
exceptions.
Work Addresses: This screen allows you to update your home and campus phone numbers. You can also
enter your fax and pager numbers if you have any. If you do not want your home phone number released, place
an ‘X’ next to the DO NOT release Home Phone Number field. To go to the next section, press enter.
Telephone numbers: This screen allows you to enter the names of people whom you would like contact in the
event of an emergency. Once you have entered this information press enter. To go to the next section, press
enter.
Emergency Contacts: This screen allows one to update educational information. If you have recently been
awarded a diploma, certificate, or degree, place an ‘X’ next to the field that describes your award and press
enter. If the educational information is incorrect, place an ‘X’ next to the highest degree, certificate, or diploma
that you have received and press enter. To go to the next section, press enter.
Education: This screen allows you to indicate any higher education teaching experience that you have acquired
in the past. If you have any higher education teaching experience, enter the number of years of experience to
the right of the “Total Years Teaching Experience” field and press enter. If your teaching experience includes
teaching at UT Austin, enter the total number of years you taught there to the right of the “Total Years Teaching
Experience at UT Austin:” and press enter. To go to the next section, press enter.
Veteran Status Information: This screen allows you to update your veteran status. Before you make any
changes to your veteran status, place a ‘?’ next to the field you want to update to view the definition of that
IT Training &
Financial Services
Page 29
Revised: 8/29/2003
status. Read the definition carefully and make sure that you qualify before selecting that particular status. To
select any of the veteran statuses, place an ‘X’ next to the appropriate field and press enter. To go to the next
section, press enter.
History of YI8 Updates: This screen allows you to look at your history of YI8 updates. To view a history of any
changes you have made to your employee record, place an ‘X’ to the left of the appropriate field and press enter.
To return to the YI8 menu screen, press enter.
Logging off BIS
From any main screen in DEFINE, press F8 to arrive at this COM-PASS screen. From this screen, tab
to the “Enter Input” field, type “U”, and press enter to log-off of BIS. You will then have the UNET menu
on your screen. Press your “ESC” key twice to leave both UNET menu screens, and return to a C:
prompt.
IT Training &
Financial Services
Page 30
Revised: 8/29/2003
Additional Information
How to Change My Password
To change your BIS password from this screen, type your current password in the “password” field, and
DO NOT PRESS ENTER. Now, tab to the “New Password” field, type your new password (4 or more
letters), and press enter. For verification purposes, BIS will ask you to re-type that same password.
Re-type of the password and press enter. Your password has now been changed, and you will be able
to log-on using the usual procedures.
Viewing Previous
Year’s Information
There maybe times when you need to view BIS information from previous years. The database manages
UTEP’s data as far back as fiscal year 1990.
To change to a previous fiscal year, you must be on any screen in DEFINE that has the “year” field in
the upper-right hand corner. Tab to that field, type the fiscal year (last 2 digits) you wish to view, and
press enter. Also, change the “month” field, if necessary.
IT Training &
Financial Services
Page 31
Revised: 8/29/2003
Comment: Mark, what year
should this be changed to?
Quick Reference
Q: How do I find out how many available funds are in an account?
A: Go to the GB1 command, type the account in the “account” field, and press enter. The free balance tells
what expendable funds are available from this account. The pool balance tells how many expendable funds are
available from the entire account pool.
Q: How do I find the hire date of a certain employee?
A: Go to the AL2 command, type the last name of the employee in the “Misc” field, and press enter. Then, type
an “e” beside the employee’s name, and press enter. Employment information relating to this person will appear
on your screen, including his or her hire date.
Q: How can I view all of the line items from a particular purchase?
A: Go to the GT1 command, type an account in the “account” field, and press enter. Then, find the purchasing
transaction you’re looking for. Type a “6” in the field beside the transaction, and press enter. Line item
information for that purchase will appear on your screen.
Q: How do I find the sum of all funds encumbered from a certain account?
A: Go to the GB2 command, type a budget group (first 8 digits of an account) in the “account” field, and press
enter. Tab to the “screen 1 of 9” field, type a “3”, and press enter. All encumbrances for each account will
appear on your screen.
Q: How can I find the amount of accrued vacation and accrued sick leave for a certain employee?
A: Go to the AL2 command, type the employee’s last name, and press enter. Then, type an “e” beside the
employee’s name, and press enter. Employment information relating to this person will appear on your screen,
including the amount of accrued vacation and sick leave hours.
Q: How can I see the difference between an account’s expenditures and its original budget and budget
adjustments?
A: Go to the GB2 command, type the budget group (first 8 digits of the account) in the “account” field, and press
enter. Tab to the “screen 1 of 9” field, type an “8”, and press enter. This screen will show you the budget plus
any adjustments, actual expenditures, encumbrances, and an over/under amount for each account.
Q: How can I find out which person created the electronic appoi ntment or reappointment document for a
certain employee?
A: Go to the AL2 command, type an employee’s name in the “Misc” field, and press enter. Type an “a” beside
the employee’s name, and press enter to reveal all appointments for that employee. Tab to the appointment in
question, type an “n” beside it, and press enter. The cover sheet of the electronic appointment document will
appear, and in the middle of the screen it will show who created this document along with that person’s phone
number.
Q: How can I find out how many funds have been transferred in and out of an account?
A: Go the GB2 command, type a budget group (first 8 digits of an account) in the “account” field, and press
enter. Then, tab to the “screen 1 of 9” field, type a “2”, and press enter. A screen showing a transfer total
(combining in and out) will appear on the screen.
Q: How can I find detail on a transaction that occurred last fiscal year?
A: Go the GT1 command, tab to the year field (upper-right of screen) and change the year to last fiscal year,
and press enter. Then, type the account in the “account” field, change to the month field (upper-right of screen)
and change the month to indicate the month in which the transaction you are looking for occurred, and press
enter. When you’ve found the transaction, tab to place the cursor beside it, type an “x” in the blank field next to
the transaction, and press enter to reveal the transaction’s detail.
IT Training &
Financial Services
Page 32
Revised: 8/29/2003
Troubleshooting
Problems
Q: I was in the BIS system and somebody turned my PC off without logging me out of BIS. Now, when I
type my password and press enter, I receive a message saying I’m already logged on. What’s wrong?
A: Because you didn’t properly log-off before your PC was turned off, the BIS system still thinks you’r e logged
on. BIS needs about 15-30 minutes to reset your logon ID. Wait awhile and try to log-on later.
Q: We lost power while I was logged onto BIS, will I be able to log on right after the power outage?
A: The system will still think that you are still logged on; it will take from 15-30 minutes before you can logon
again.
Q: I am in BIS and have a message on my screen saying, “There has been an error in DEFINE, and you
are not responsible for this error.” What’s wrong?
A: This is a problem wit h the database at U.T. Austin. Whatever command or screen you’re trying to access is
not functioning properly or is being repaired in Austin. Press enter to remove this screen from your PC, and
contact the Help Desk at 4357.
Q: It’s been a while since I logged on to BIS, and I forgot my password. What should I do?
A: Contact the Help Desk at 4357 and state your problem. They will contact a member of the BIS Support
Group, who will reset your ID and give you a temporary password, which you must change the first time you try
to log-on to BIS.
Q: I was logged-on to BIS and viewing different screens when my PC locked-up and now won’t do
anything (the XSYS X message is on the bottom of my screen). What’s wrong?
A: Sometimes the traffic in the BIS system gets heavy, and it takes longer to change from one screen to another
(or there could be a problem with the database at Austin). Wait for about five minutes, and if the problem still
persists, call the Help Desk at 4357 and they will contact the BIS Support Group which will attempt to address
your problem .
Q: I’m logged on to BIS, and I’m trying to view an account balance, but I’m getting a message on the top
of my screen saying that I am not authorized to view this account. What’s wrong?
A: You are trying to access an account that you don’t have BIS authorization for. Check the account number to
make sure it is correct. If it is correct and you are supposed to have authorization for this account, call the Help
Desk at 4357 and they will contact the BIS Support Group. They will correct the problem and contact you as
soon as possible.
Q: I thought I knew my password, and after several attempts to log-on, I received a message saying that
I’ve had too many invalid log-on attempts. What should I do?
A: Call the Help Desk at 4357, and they will alert the BIS Support Group of your problem. They will reset your
ID, and if you still remember your password, you can log-on again. If you’ve forgotten your password, they will
have to issue you a temporary password, and you must change to a new one the first time you try to log- on to
BIS.
IT Training &
Financial Services
Page 33
Revised: 8/29/2003
Glossary of Terms
Transaction and Account Types:
SA= a salary transaction or account
EX= an external expenditure transaction or account
DI= an internal expenditure (within UTEP) transaction type
EN= an encumbrance transaction type
RP= a temporary reverse payable transaction created when a payment voucher is created and approved
CA= a cash transaction or account
IN= an income transaction or account
Agency Funds:
organizations.
Funds held in custody on behalf of groups related to the university, such as student
Annuity: An investment whereby an employee has a monthly amount deducted from his or her paycheck.
Appointment: The designation of an individual as an employee of the university.
Appropriation: A lump-sum of funds given to the university by the state government.
Auxiliary Enterprises: Includes all activities such as food services, printing press, and the bookstore that
usually operate on a self-supporting basis. That is, revenues generated by the activity that usually equal or
exceeds its expenses.
Balance Forward: Expendable balances and outstanding encumbrances that are carried over from a prior fiscal
year.
Budget adjustments: Monetar y adjustments that are made to the original budget of an account or budget
group.
Budget Rollover: Process by which original operating budget is loaded onto the system.
Classified employee: A salaried employee who is not on hourly pay, a professor, or an individual on an
administrative and professional designation.
Current Funds: Funds used for the daily operations of the university.
Designated Funds: Funds that are only used for a specific purpose by the university.
Encumbrance: Commitments pertaining to contracts for goods or services that have not yet been performed or
paid for.
Endowment Funds: Funds that have purpose stipulated by the donor of those funds.
typically established for fund scholarships, loans, or specific academic programs.
Endowments are
Expenditure: A transaction that involves a financial outflow.
Free Balance: The expendable balance available from an account.
General Funds: The operating fund of the university supported by general revenues.
HUB vendor: A vendor that has been designated by the state as a Historically Under- utilized Business. The
state of Texas now mandates that all state organizations make an attempt to do business with a certain
percentage of HUB vendors.
Interdepartmental Transfers: Transfers from one account to pay for goods or services from another
department within the university.
IT Training &
Financial Services
Page 34
Revised: 8/29/2003
Loan Funds: Funds provided by donors to be held for the purpose of making loans to students, faculty, or staff.
Object Code: The code used to classify a transaction by its specific type and purpose so that internal and
external reporting can be facilitated.
Original Budget: The budgeted funds for an account as determined by the university’s administration.
Payables: A commitment to pay for goods or services; mainly used by the university’s auxiliary departments.
Payment Voucher: The document used to pay for goods and services to parties outside the university.
Plant Funds: Resources used to finance the acquisition of long-lived plant assets and associated liabilities.
Pool Balance: The expendable balance for a specific pool of accounts.
Premium Re -direct: The amount to be paid by the employee after the Premium Sharing from the state has
been applied to the employee’s total health & life insurance premiums.
Purchase Order: The document used to encumber funds from an account for the purpose of purchasing goods
and services outside the university.
Purchase Requisition:
Department.
The document used by departments to request purchases from the Purchasing
Receivables: A commitment whereby an outside party owes a department for goods or services; these are
mainly used by the university’s auxiliary departments.
Restricted Funds:
external party.
Funds available for specific operating purposes only. The purpose is restricted by an
Revolving Funds: Funds used for current operating purposes which have no original budget.
Salary Spread: The process by which faculty who are not appointed throughout the year can have their salary
spread evenly across the fiscal year.
State-paid OASI: The portion of employees’ social security tax that is paid by the state of Texas, which is
limited to $965.25.
Transaction Code: The code in the system that designates which general ledger accounts the transaction will
affect.
IT Training &
Financial Services
Page 35
Revised: 8/29/2003