1
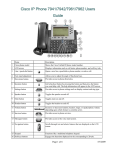
IP Phone 7941/7961 User Manual IP Phone User Manual IP Phone User Manual ..........................................................................................................................................................2 IP Phone Introduction ...........................................................................................................................................................3 Setting Up Your IP Phone ...................................................................................................................................................3 Locating Buttons and Hardware ..........................................................................................................................................5 Using Help on Your Phone ..................................................................................................................................................7 Choosing a Menu Item.........................................................................................................................................................7 Using the Speaker ................................................................................................................................................................7 Making Calls on Your Phone................................................................................................................................................8 Placing a Call.......................................................................................................................................................................8 Dialing from a Phone Directory...........................................................................................................................................8 Dialing from a Phone Log ...................................................................................................................................................9 Answering a Call .................................................................................................................................................................9 Answering a Call using Call Waiting ..................................................................................................................................9 Ending a Call .....................................................................................................................................................................10 Using Hold and Resume ....................................................................................................................................................10 Using Mute ........................................................................................................................................................................10 Transferring Calls ..............................................................................................................................................................11 Using Call Park..................................................................................................................................................................11 Using Call Pickup ..............................................................................................................................................................11 Forwarding All Calls .........................................................................................................................................................12 Making Conference Calls on Your Phone .........................................................................................................................13 Placing a Conference Call..................................................................................................................................................13 Removing a Conference Call Participant...........................................................................................................................13 Initiating a Meet-me Conference Call................................................................................................................................13 Joining a Meet-me Conference Call...................................................................................................................................14 Customizing Settings on Your Phone.................................................................................................................................14 Adjusting the Handset, Speakerphone, and Headset Volume ............................................................................................14 Adjusting the Ringer Volume ............................................................................................................................................14 Personalizing the Ringer Sound.........................................................................................................................................14 Changing the LCD Contrast...............................................................................................................................................15 Reference Information ........................................................................................................................................................15 3 IP Phone 7941/7961 User Manual Page 2 Office of Enterprise Technology April 13, 2009 IP Phone Introduction Use this guide to perform basic and advanced phone tasks for your 7941 or 7961 Cisco IP Phone with CallManager. Setting Up Your IP Phone Connect your IP Phone to the corporate IP telephony network. Your phone will share a network connection with your computer. 1. Connect the handset and headset to their respective ports. Ensure that the end of the cord of the handset with the longer uncoiled section is connected to the body of the phone. 2. Disconnect the Ethernet cable from the computer and attach it to the Network port (located under 10/100 SW label) on the back of your phone. 3. Use the Ethernet cable included with your phone to connect the Access port (located under the 10/100 PC label) on the back of your phone to your desktop computer. Once you connect your IP phone a startup process begins. After several minutes the screen displays a neutral “ready” state. Startup is complete and your phone is ready for use. IP Phone 7941/7961 User Manual Page 3 Office of Enterprise Technology April 13, 2009 1 DC adaptor port (DC48V) for phones not provided with inline power 5 Access port (10/100 (/1000) PC) for connecting your phone to your computer 2 AC-to-DC power supply 6 Handset port 3 AC power cord 7 Headset port 4 Network port (10/100 (/1000) SW) for connecting to the network 8 Footstand button IP Phone 7941/7961 User Manual Page 4 Office of Enterprise Technology April 13, 2009 Locating Buttons and Hardware Note Note The illustration above shows a 7941 phone. The 7961 phone has six lines, which can be a combination of phone lines and speed dial lines. IP Phone 7941/7961 User Manual Page 5 Office of Enterprise Technology April 13, 2009 1 Button/Hardware Programmable Buttons Description Depending on configuration, programmable buttons provide access to: • Phone lines (line buttons) • Speed-dial numbers (speed-dial buttons) • Web-based services (for example, a Personal Address Book button) • Phone features (for example, a Privacy button) The buttons illuminate to indicate status: Green, steady—Active call on this line (off-hook) Green, blinking—Call on hold on this line Amber, blinking—Incoming call ringing on this line Red—Shared line, currently in use No color—No call activity on this line (on-hook) 2 Phone screen Shows phone features such as time, date, phone number and current options. 3 Footstand button Allows you to adjust the angle of the phone base. 4 Messages button Typically auto-dials your voice message service so you only need to enter your password. 5 Directories button 6 Help button 7 Settings button 8 Services button 9 Volume button Opens/closes the Directories menu. Used to access call logs and corporate directories. Provides access to your missed, received, and placed calls. You can use each of these directories to locate or dial these numbers. Activates the Help menu. Opens/closes the Settings menu. Provides access to phone settings such as LCD screen contrast, ring sounds, network configuration, and status information. Use it to control phone screen contrast and ring sounds. Opens/closes the Services menu. Provides access to available phone services that have been implemented. These may include Fast Dials and Extension Mobility login/logout screens. Controls the volume settings for the handset, headphones, and speaker options. 10 Speaker button Toggles the speakerphone on or off. When the speakerphone is on, the button is lit. 11 Mute button Toggles the Mute feature on or off. When Mute is on, the button is lit. 12 Headset button Toggles the headset on or off. When the headset is on, the button is lit. 13 Navigation button Allows you to scroll through menus and highlight items. Use in conjunction with softkeys to activate highlighted items. 14 Keypad Allows you to dial phone numbers, enter letters, and choose menu items. IP Phone 7941/7961 User Manual Page 6 Office of Enterprise Technology April 13, 2009 Button/Hardware Description 15 Softkey buttons Each button activates a softkey option (displayed on your phone screen). 16 Handset light strip Indicates an incoming call or new voice message. Using Help on Your Phone Use any of these methods to access online help from your phone: Press the or key. button twice quickly during an active call to view the network statistics Press the on that call. button once, and press any key to display information about that button Choosing a Menu Item After selecting one of the Information Feature buttons, which include Messages, Directories, Services, or Settings buttons, you can choose menu items that appear on your LCD screen in numerous ways: Press the Navigation button to highlight the menu item and then the Select softkey to choose the item. Press the number key on your phone’s dial pad that corresponds to the number of the item displayed on your LCD screen. Using the Speaker You can use the speaker in conjunction with all of the features on your IP Phone. To place and answer calls using the speaker, press the Speaker button. To switch from the handset to the speaker during a call, press the Speaker button and then hang up the handset. To switch from the speaker to the handset, simply lift the handset. IP Phone 7941/7961 User Manual Page 7 Office of Enterprise Technology April 13, 2009 Making Calls on Your Phone Placing a Call You can use any of the following methods to place a call: Lift the Handset and dial the number. Press a Line button corresponding to your extension and dial the number. Press the Speaker button and dial the number. Press the Headset button if it is not activated and dial the number. Press the New Call softkey and dial the number. Enter the number and press the Dial softkey. Press the button that corresponds with your Speed dial. Press the Redial softkey to dial the last number dialed. Unless you first choose a secondary line, this feature uses your primary line. Dialing from a Phone Directory Your phone is configured with a searchable corporate directory that allows you to easily find and dial the phone numbers of colleagues. 1. Press the Directories button. 2. Select a Directory. Note Note A corporate directory includes all phones for your organization. When choosing a number from the Corporate Directory, you can perform a search. To enter any letter on the screen, use a corresponding number key. Press the key one or more times to display a particular letter. For example, press 2 once for “a,” twice for “b” and three times for “c.” To back up, press the << softkey. 3. Search for a listing by using your dial pad to enter letters and press the Search softkey. 4. Press the corresponding number or use the Navigation button to highlight the desired number, and press the Dial softkey. Press the Exit softkey twice to exit the Directory menu. IP Phone 7941/7961 User Manual Page 8 Office of Enterprise Technology April 13, 2009 Dialing from a Phone Log You can search for and dial the numbers of missed calls, received calls, and placed calls by accessing your phone log through the Directories button. Your IP Phone can store up to 32 calls in each of these directories. 1. Press the Directories button. 2. Choose Missed Calls, Received Calls, or Placed Calls. 3. Press the corresponding number or use the Navigation button to highlight the desired number, and press the Dial softkey. Press the Exit softkey twice to exit the Directory menu. Note Note Note Note To dial an external number – press the Edit Dial softkey > Add a 9 before the number. To dial a long distance number - press the Edit Dial softkey > Add a 9-1 before the number To view information about a call press the More > Details softkey. To remove an individual call press the More > Delete softkey. By pressing the Clear softkey from your directories menu, you will delete all Missed Calls, Received Calls, and Placed Calls. Answering a Call To answer an incoming call use one of the following methods: Lift the handset. Press the Answer softkey. To answer with the speakerphone, press the Answer softkey, the Speaker button or the flashing line button. If using a headset and the button is lit, press the Answer softkey or the flashing line button. Note Note You will not be able to answer the incoming call on the additional line by pressing the Answer softkey. To answer an incoming call while already on another line, press the corresponding line button of the incoming call. The first call will automatically be placed on hold. Answering a Call using Call Waiting To switch from a connected call to answer a ringing call: Press the Answer softkey or press the Blinking Amber Button for the line with the incoming call. The other call is placed on hold automatically. To switch between calls on one line: IP Phone 7941/7961 User Manual Page 9 Office of Enterprise Technology April 13, 2009 Highlight the call you are switching to and press the Resume softkey. The other call is placed on hold automatically. Ending a Call To end a call use one of the following methods: Using the handset hang up the handset or press EndCall softkey. Using the headset press the Headset button. If you want to keep the headset activated, press the EndCall softkey. Using the speakerphone press the Speaker button or press the EndCall softkey. Using Hold and Resume To place a call on hold: 1. During the call, highlight the call you want to put on hold and press the Hold softkey. Note The call remains active but the connected parties cannot hear each other. You can answer other calls while on hold. 2. To return to a call, highlight the appropriate call and press the Resume softkey. Note If you have multiple calls on hold on the same line, use the Navigation button to select the desired call and then press Resume. To return to a call on hold when you have multiple calls on multiple lines on hold: 1. Press the appropriate line button. If there is a single call holding on this line, the call will resume automatically. If there are multiple calls holding, make sure that the appropriate call is highlighted. 2. Press Resume. Note If you have multiple lines on hold and want to see the phone number for a call you have on hold, press the ? button followed by the line button of the call on hold. Using Mute To mute a call: 1. Press the Mute button to mute the handset, headset, or speakerphone during a call. This temporarily disables your phone’s microphone so you can hear other parties but they cannot hear you. IP Phone 7941/7961 User Manual Page 10 Office of Enterprise Technology April 13, 2009 Transferring Calls To transfer a call without talking to the transfer recipient: 1. Press Transfer and enter the target number. The original call is automatically placed on hold. When you hear the call ringing, press Transfer again to complete the transfer. To cancel the transfer, press EndCall. To transfer a call when talking to the recipient before transferring: 2. Press Transfer and enter the target number. Wait for the transfer recipient to answer. If the recipient accepts the transferred call, press Transfer again to complete the transfer.) If the recipient refuses the call, press Resume to return to the original call. To cancel the transfer, press EndCall. To transfer two current calls to each other (direct transfer): 3. Scroll to highlight any call on the line and press Select. Repeat this process for the second call. With one of the selected calls highlighted, press DirTrfr. (You might need to press more to see DirTrfr.) The two calls connect to each other and drop you from the call. Send a call to your voice messaging system: 4. Press iDivert. The call is automatically transferred to your voice message greeting. You can use iDivert with a call that is active, ringing, or on hold. Using Call Park You can park a call when you want to store the call before retrieving it from another phone in the CallManager System. 1. During an active call, press the more softkey and then select the Park softkey. 2. The LCD screen displays the number where the call is parked. 3. Before hanging up the phone, take note of this number. 4. To retrieve the parked call from any phone in your CallManager, dial the call park number where the call is parked. Note If the call is not retrieved from park before the allotted amount of time, it will ring back at its original destination. Using Call Pickup IP Phone 7941/7961 User Manual Page 11 Office of Enterprise Technology April 13, 2009 You can answer an incoming call to your extension that is ringing on an extension other than your own by using the call pickup feature. You will be able to pick up a call from within your own group (a “group” is any consolidation of IP Phone extensions, as defined by your telecomm administrator. For example, your group might contain coworkers from neighboring cubes or your business unit). Answer a call that is ringing on another extension within your call pickup group: 1. Press PickUp. 2. Press Answer to connect to the call. Answer a call that is ringing on another extension outside your group: 1. Press GPickUp. 2. Enter the group pickup code. 3. Press Answer to connect to the call. Answer a call that is ringing on another extension in your group or in an associated group: 1. Press OPickUp. 2. Press Answer to connect to the call. Note When you press PickUp and GPickUp, you connect to the call that has been ringing for the longest time. With OPickUp, your system administrator can associate multiple call pickup groups with your group and assign a priority to the groups. When you press OPickUp, you connect to the ringing call in the pickup group with the highest priority. If you want to pick up the call on an extension other than your primary line, first press Forwarding All Calls You can set up call forwarding to forward all your incoming calls on line one to another phone number or voice mail. Note This feature only applies to the first line on your phone. An ACD (Agent) line should never be set up for forwarding. 1. Press the CfwdAll softkey. You will hear two beeps. 2. Dial the number to which you want to forward all of your calls. Make sure to enter in this number exactly how you would if you were placing a call from your office phone. IP Phone 7941/7961 User Manual Page 12 Office of Enterprise Technology April 13, 2009 Note The phone number that your calls have been forwarded to will appear on the bottom of your LCD screen. 3. You can cancel call forward all so that incoming calls will call your extension again by pressing the CfwdAll softkey. Note To forward all calls to voicemail press the CFwdALL softkey followed by the Messages button. Making Conference Calls on Your Phone Placing a Conference Call 1. During a call, press the more softkey and then the Confrn softkey. The first party is placed on hold. 2. Dial another number or extension. 3. When the call connects, press Confrn again to add the new party to the call. Note If the person at the number that you are attempting to conference in is not available, press the Resume softkey to return to the first party on the line. 4. Repeat the first three steps to add additional participants. Note Once the call has been connected, the lines are joined. If you wish to leave the conference yourself, hang up your handset. Removing a Conference Call Participant 1. During a conference call that you initiated, press the more softkey and then the ConfList softkey. 2. Use the Navigation buttons to select the participant you wish to remove and press the remove softkey. Note While viewing the list, press the Update softkey to get an updated list of the participants. Initiating a Meet-me Conference Call A Meet-me conference allows other callers to dial into the conference call. 1. Obtain necessary Meet-me conference number(s) from your telecomm administrator. 2. Lift the handset or some other method to go offhook. 3. Press the more softkey until you see the Meet-me softkey. IP Phone 7941/7961 User Manual Page 13 Office of Enterprise Technology April 13, 2009 4. Press the Meet-me softkey. 5. Dial the Meet-me conference number to establish the conference. Now others can join the conference call by dialing the Meet-me conference number. Joining a Meet-me Conference Call 1. Dial the Meet-me conference number provided by the Meet-me Conference initiator. You will be connected to the conference. Note If the Meet-me conference has not yet been established, you will get a busy tone. Customizing Settings on Your Phone Adjusting the Handset, Speakerphone, and Headset Volume You can adjust the volume of the caller for the handset, speakerphone, and headset separately. When you change the volume for one, the others are not affected. 1. Press the up or down Volume button when the handset, speakerphone, or headset are in use. 2. To save this volume setting for future calls, press the Save softkey. Adjusting the Ringer Volume To change the volume of the ringer: 1. Press the up or down Volume button to hear sample rings and to adjust the volume to the desired level. The ringer volume setting will be automatically saved. Personalizing the Ringer Sound To change the ringing sound on each of your lines: 1. Press the Settings button. 2. Use the Navigation button to select User Preferences and then press the Select softkey. 3. Use the Navigation button to select Rings and then the Select softkey. You will see two different ring types on the LCD screen: default ring and a ring type for each of your lines. 4. To select the ring type for the default tone, use the Navigation button to highlight Default Ring and then the Select softkey. IP Phone 7941/7961 User Manual Page 14 Office of Enterprise Technology April 13, 2009 5. Use the Navigation button to scroll through the list of ring types and press the Play softkey to hear the selected ring. 6. Press the Select softkey and then the Save softkey to accept and save your default ringer selection. Note To configure a specific line, use the Navigation button to scroll through the list of your lines. When you find the line you want to configure, press the Select softkey and follow steps 4 and 5 above. 7. Press the Exit softkey to exit the Settings menu. Changing the LCD Contrast To improve the readability of the LCD screen, follow these steps to adjust the contrast: 1. Press the Settings button. 2. Use the Navigation button to select User Preferences and then press the Select softkey. 3. Use the Navigation button to highlight Contrast and then the Select softkey. 4. Press the Up or Down softkeys to adjust the contrast of your LCD screen. 5. Press the Save softkey to accept and save your settings. Reference Information Resource Value/Location Octel Voice Mail Ten Digit Access Number 651.556.7600 CallManager User URL https://ccmuser.voice.ccm.state.mn.us/ccmuser IP Phone 7940/7960 User Manual http://mnet.state.mn.us IP Phone Quick Reference Guide Voice>IP Telephony Services>IP Phone Information Voice Mail Instructions for IPT and CCM Users Calling/Dialing Patterns | IP Phone 7941/7961 User Manual Page 15 Office of Enterprise Technology April 13, 2009