1
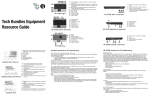
Name Function (4) ENTER Make a selection in Playback mode and OSD menu. Use this to quick zoom to 200% or back to 100% in Camera mode only. (5) MENU Pull up and exit the OSD main-menu and sub-menu. (6) CAMERA/PC Switch between Camera and PC mode. - Camera mode displays the video signal from the built-in camera. - PC mode displays the video signal from the RGB INPUT port of CP355. (7) AUTO FOCUS Adjust the focus automatically. (8) CAP/DEL - Capture a still image in Camera mode. The captured image is saved in the memory and can store up to 80 images. The image size can be saved either in 1024 x 768 (default) or 2016 x 1520 pixels. If the Capture setting is in Continuous mode, use CAP/DEL button to start and stop successive still image capture. To stop continuous capture, press CAP/DEL button when “SAVE” message in the status box at the lower right corner of the screen disappear. To set the image size of your choice, press MENU, select CAPTURE in IMAGE menu list, press ENTER, select IMG SIZE, press ENTER, use Ÿ and ź to make a selection, and press ENTER to save the setting. - Remove the selected picture from the built-in memory permanently in Playback mode. (9) EFFECT Convert and display the image in BW, Negative or Color in Camera and Playback mode only. (10) PIP Show a thumbnail size playback screen at the corner of the screen to view the captured image from the memory in Camera mode. Use Ż or Ź to move to the previous or next image and ENTER to view the image in full screen and press ENTER again to go back to PIP mode. To move the thumbnail playback screen to different corners or close, press PIP button repeatedly. You may also press CAMERA/PC to exit PIP mode and switch to Camera mode. (11) PRESENTER Select to turn on/off AVERBOX or AVERVISOR. Only one feature can be used at a time. In the PRESENTER menu, use Ÿ and ź to select between AVERBOX or AVERVISOR, and press ENTER to turn on/off the selected feature. Then press MENU to close menu or execute the turned 12