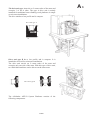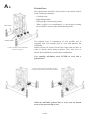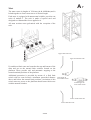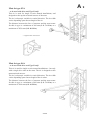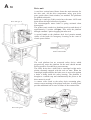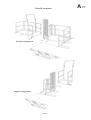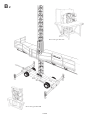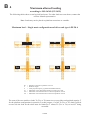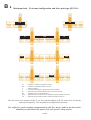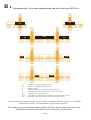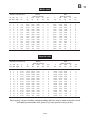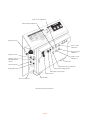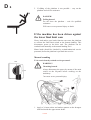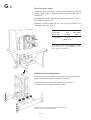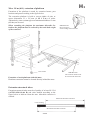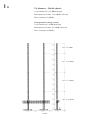
1
ALIMAK APF
Technical Description
& Instruction Manual
This manual is only applicable if the manufacturing number indicated below corresponds to the manufacturing number stamped on the identification
sign of the equipment. Where there is a conflict contact Your ALIMAK representative.
Manufacturing No.:
Year:
If the bottom right corner of this book is cut, the book is only valid for illustrative use!
Part No. 9095 756 - 1 01 DRAFT
2001 - 03 - 29
Photographs and drawings are illustrative only and do not necessarily show the
design of the products on the market at any given point in time. The products must
be used in conformity with applicable practice and safety regulations. Specifications
of the products and equipment presented herein are subject to change without notice.
CONTENTS
TECHNICAL DESCRIPTION
TECHNICAL DATA & SPECIFICATIONS
IMPORTANT SAFETY INSTRUCTIONS
INSTRUCTIONS FOR USE
SERVICE AND MAINTENANCE
ELECTRICAL TROUBLESHOOTING
ASSEMBLY
MAST AND PLATFORM
PROJECTING OF HOIST MAST
INSTALLATION AND REMOVAL OF MAST TIE
TRANSPORT AND MOVEMENT
A
B
C
D
E
F
G
H
I
K
L
ALIMAK AB IS ISO 9001 CERTIFIED
ISO 9001 is an international Quality Assurance Standard, which provides the parameters for
Quality Assurance Systems. The standard states how the organization of a company, working methods,
etc., shall function in order to attain the intended quality of products and related services.
Alimak AB, innovators in rack and pinion driven hoists and lifts, is the first hoist
and lift manufacturer, using this technology, to have achieved ISO 9001 certification.
The Certificate is valid for:
Design, Manufacture and Service related to Construction Hoists, Mast Climbing Work Platforms,
Lifts,Elevators, and Equipment for Drilling and Enlarging of Shafts.
A0
TECHNICAL DESCRIPTION
Applications . . . . . . . . . . . . . . . . . . . . . . . . . . . . . . . . . . . . . . . .
System description . . . . . . . . . . . . . . . . . . . . . . . . . . . . . . . .
Mobile chassis . . . . . . . . . . . . . . . . . . . . . . . . . . . . . . . . . . . . .
Pedestal base . . . . . . . . . . . . . . . . . . . . . . . . . . . . . . . . . . . . . . .
Mast and mast ties . . . . . . . . . . . . . . . . . . . . . . . . . . . . . . . .
Drive unit . . . . . . . . . . . . . . . . . . . . . . . . . . . . . . . . . . . . . . . . . . .
Work platform . . . . . . . . . . . . . . . . . . . . . . . . . . . . . . . . . . . . .
Platform extension max. 1.8 m . . . . . . . . . . . . . . . .
Railing cross members . . . . . . . . . . . . . . . . . . . . . . . . . . .
Extra long 2.7 m platform extension . . . . . . . . .
Canopy . . . . . . . . . . . . . . . . . . . . . . . . . . . . . . . . . . . . . . . . . . . . . .
Platform for installations around corners . .
Catwalk extension . . . . . . . . . . . . . . . . . . . . . . . . . . . . . . . .
Erection crane . . . . . . . . . . . . . . . . . . . . . . . . . . . . . . . . . . . . .
Safety features . . . . . . . . . . . . . . . . . . . . . . . . . . . . . . . . . . . . .
Electrical equipment . . . . . . . . . . . . . . . . . . . . . . . . . . . . .
Electrical system description . . . . . . . . . . . . . . . . . . .
Transport and movement . . . . . . . . . . . . . . . . . . . . . . .
ALIMAK
A 1
A 2
A 4
A 6
A 7
A 10
A 12
A 13
A 13
A 14
A 15
A 16
A 16
A 18
A 18
A 18
A 19
A 22
For lifting heights up to 100 m (330 ft.)
Where required lifting height exceeds the maximum allowed mast heights, we
request that you to contact ALIMAK´s Calculation Department for advice.
ALIMAK 33801 -1/01
A1
Technical description
Applications
The Aliclimber APF-50 System is designed for the following
applications:
Length
max. 6.0 m
(20 ft.)
– To carry personnel and materials efficiently and economically.
– To improve accessibility to difficult to reach areas.
– To be easily erected, dismantled, serviced, and moved about
on the job site, while still maintaining high safety standards.
– To comply with applicable regulations.
Typical applications are:
– Traditional construction work such as wall repairs, plastering, and glazing.
Length
max. 28.5 m
(93 ft.)
– Bricklaying.
– Refurbishment work such as building fronts, roofs, gutters,
wall cladding, and window replacement.
– Fixing cladding and sealing joints on industrial and prefabricated structures.
– Finish work such as touch up and installing insulation.
– Installing windows and railings.
Length
max. 28.5 m
(93 ft.)
Example:
a 47
Length max. 28.5 m (93 ft.)L
Note: reduced load capacity
due to the corner platform section.
”Catwalk”
”Catwalk”
ALIMAK 33802 -1/01
Straight or
angular corner
platform
section
A2
System description
The Aliclimber APF-50 System is a concept consisting of
modules and accessories for work and materials platforms. Two
different drive units are available from which the following
combinations can be attained:
Mast Climbing Work Platform APF - 50A, with drive unit type
A for single or twin mast installations.
Single
length 4.4 – 19.4 m
(14.5 ft. – 64 ft.)
a 48
Twin
length 11.8 – 43.3
m (39 ft. – 142 ft.)
Mast Climbing Work Platform APF - 50B, with drive unit type
B for twin mast installations.
Twin between masts
length 6.0 – 28.5 m
(20 ft. – 93.5 ft.)
a 52
ALIMAK 33803 -1/03
The drive unit type A travels on 2 corner tubes of the mast and
occupies 3 of the 4 sides. The type A drive unit is mainly
intended for traditional mast climbing work platforms in single
or twin mast installations.
The drive unit has a low profile and is compact.
Drive unit type A
a 56
Drive unit type B has a low profile and is compact. It is
intended to be used for twin mast installations.
The drive unit travels on 2 corner tubes of the mast and
occupies only one side of the mast. With this type of drive unit,
two individual machines can be driven on the same mast.
Drive unit type B
a 58
a 59
The Aliclimber APF-50 System Platforms consists of the
following components:
ALIMAK 33806 -1/01
A3
A4
Mobile chassis
The base unit is normally delivered on a rubber wheeled mobile
chassis with or without optional horizontal drive equipment for
two of the wheels.
The chassis is constructed of steel profiles and is equipped with
four telescopic outriggers and mechanical jacks to level and
stabilize the work platform.
Tall free standing heights can be achieved due in part to the
mast sections’ strength and the rigidity of the chassis.
The chassis is equipped with brackets for a stair assembly.
Locking device
The chassis is equipped with ”Ackerman” steering at the front
end and along with the tow bar makes it easy to manually steer
the work platform on the job site.
Tow bar
Mechanical jack
Telescopic outrigger
ALIMAK
A5
The tow bar on the optional self propelled chassis is equipped
with a push button box for horizontal movement.
a 163
The chassis rear wheels are individually engaged to the
horizontal drive machinery by means of a lever located near the
wheels. This is particularly useful when negotiating curves.
Horizontal travel speed:
Rated motor power:
Maximum incline / decline:
13 m/min. (42 ft. min.)
1.5 kW / 50Hz or 1.75 kW / 60Hz
5° – 6°
Lever
a 101
ALIMAK
A6
Pedestal base
The pedestal base should be used in place of the mobile chassis
in the following conditions:
– Confined areas.
– High lifting heights.
– During longer construction periods.
Base frame
Rubber buffers
Location of mast section and buffers
for drive unit type A
– Where weight is of consideration, i.e. the structure bearing
the Aliclimber can only take limited bearing loads.
The pedestal base is constructed of steel profiles and is
equipped with four manual jacks to level and stabilize the
Aliclimber.
Rubber buffers are located on the base frame and are there in
order to absorb shock during transport. They also serve to
absorb shock should the system brakes malfunction.
Free standing Aliclimbers must NEVER be used with a
pedestal base.
Location of mast section and buffers for drive
unit type B to be used for twin mast installations.
When the Aliclimber pedestal base is to be used the bottom
mast section must include a rack.
ALIMAK
A7
Mast
The mast comes in lengths of 1508 mm ( 4 ft. 11 3/8 in.) and is
bolted together to form a mast tower of desired length.
Each mast is equipped with one or two boltable, precision cut
racks of module 5. The rack is made of special steel and
designed to withstand the forces applied to it.
All mast sections come galvanized with the exception of the
rack.
Upper final limit cam
Upper normal limit cam
Up and down limit cams are located at the top and bottom of the
mast and act on the normal limit switches located on the
platform. These provide safe and automatic stopping at the
normal terminal positions of the platform.
Additional protection is provided by means of a final limit
switch with its cams located a minimum prescribed distance
above and below the normal limit positions. Activation of this
switch removes power to the platform should some fault occur
with the normal switches.
Final upper &
lower limit switch
Normal upper &
lower limit switch
Lower normal limit cam
Lower final limit cam
ALIMAK
A8
Mast ties come in four different types and are used to tie the
mast tower to the structure:
Mast tie type R0A
The tie is preferably intended for single and twin mast
installations with drive unit type A. The tie can also be used
with drive unit type B – but in single mast installations only!
The mast tower is clamped to the wall with a mast clamp.
By a suitable space between the clamps and the mast tubes, the
mast tower is free for thermal expansion.
Mast tie type R2A
The tie is preferably intended for single and twin mast
installations with drive unit type A. The tie can also be used
with drive unit type B – but only with a single drive unit on the
mast. The tie is designed to take mast torsional stresses.
The tie is telescopic variable in vertical direction. The tie width
varies depending upon chosen length of the tie tubes.
The distance between the face of the structure and the mast
center for this tie type is a minimum of 800 mm (2 ft. 7-1/2 in.)
to a maximum of 2200 mm (6 ft. 4-5/8 in.) .
Corresponding tie bracket can be installed either on vault...
a 138
ALIMAK
A9
Mast tie type S2A
– to be used with drive unit Type B only!
This tie is used for single or twin masted installations, and
designed to take up the torsional stresses of the mast.
The tie is telescopic variable in vertical direction. The tie width
varies depending upon chosen length of the tie.
The distance between the face of structure and the mast center
for this tie type is a minimum of 800 mm (2 ft. 7-1/2 in.) to a
maximum of 2950 mm (9 ft. 8-1/8 in.).
... or against face of structure.
a 139
Mast tie type S4A
– to be used with drive unit Type B only!
This tie is used for single or twin masted installations – but only
with a single drive unit on the mast. The tie is designed to take
mast torsional stresses.
The tie is telescopic variable in vertical direction. The tie width
varies depending upon chosen length of the tie tubes.
The distance between the face of structure and the mast center
for this tie type is a minimum of 800 mm (2 ft. 7-1/2 in.) to a
maximum of 2200 mm (6 ft. 4-5/8 in.).
ALIMAK
A 10
Drive unit type A
Drive unit
A steel box section braced frame forms the main structure for
the drive unit. All the drive components, safety gear, drive
gears, guide rollers, limit switches, are attached. The platforms
are pinned to this unit.
Both type A and type B drive units have the same 4 kW rated
brake motor driving a helical bevel gearbox.
The electromagnetic motor brake is spring activated when
deenergized.
The gearbox ratio results in a platform speed (up and down) of
approximately 12 m/min. (39 fpm). They move the platform
through a module 5 pinion engaging the mast rack.
A special handle at the platform deck level permits manual
release of the brake for emergency lowering in the event of
electric power failure.
Brake release handle
The work platform has an overspeed safety device which
progressively stops the platform on the mast should normal
driving speed be exceeded by a preset amount.
The safety device has a shaft with a centrifugal weight and a
pinion constantly engaged with the rack on mast. When the
centrifugal weight actuates, the brake cone is screwed in against
a brake a lining inside the safety housing. The platform is
brought to a smooth stop and simultaneously the power to the
drive motors is cut off.
A counter roller fitted to the safety device mounting plate,
ensures correct meshing of the pinion at all time. A safety hook
provides additional safe in case of failure of the counter roller.
Drive unit type B
a 34
ALIMAK
A 11
When the platform is used in the twin configuration, the drive
unit is provided with electro-mechanical levelling equipment
which controls and limits the inclination of the platform, from
horizontal.
The levelling equipment consists of a horizontally sliding rod,
which is attached to the platform modules. The platform
modules are, in turn, attached to the drive unit. The rod is
provided with cams which act on a limit switch that controls the
motors to both drive units, thereby ensuring the platform is kept
level.
Upper fixed connections
Push/Pull rod
The same rod is also provided with a cam that acts on a
mechanical arm, which by a teleflex cable, makes manual
lifting of the brakes impossible if the platform angle towards the
horizontal plane is too large. This brake sliding control makes it
possible to safely slide down to ground level should an
emergency situation occur, i.e. power failure.
Different lengths or work platform sections of 1.5 m (4 ft. 11
in.) or 0.82 m (2 ft. 8 in.), with associated railings and gates,
can be attached to the drive unit. This makes it possible to adapt
the work platform length to the job.
ALIMAK
Teleflex cable
connected to
motor brake
Push/Pull rod
A 12
Work Platform (APF)
The platform consists of 819 (2 ft. 8 in.) and / or 1500 mm (4 ft.
11 in.) long sections, with a width 1.5 m, and are constructed of
steel pipe and structural tubes.
The platform sections are equipped with a floor of weather
treated anti-skid plywood.
The platform sections are assembled with 3 pins per side and
locked in place with spring clips – to achieve lengths up to 19.4 m
(64 ft.) in a single mast installation, APF - 50A.
a 70
Safety railing bracket
with lock bolt
In a twin mast installation the length of the platform can vary
from 11.8 m to 43.3 m (39 to 142 ft.), APF - 50A.
Alternatively 6.0 m to 28.5 m (20 to 93.5 ft.), APF - 50B.
The safety railing, which is constructed of galvanized steel pipe,
is mounted in brackets located at each corner of the platform
section and locked into place with a bolt.
The railing comes equipped with a kickplate.
Entrance gate
a 71
a 72
Pin for assembling
platform sections:
2 pcs. dia 30 mm (1 - 3/16’’)
1 pce. dia 37 mm (1 - 7/16’’)
The railing with gate for entering and exiting of the platform is
constructed of galvanized steel pipe and is 1500 mm (4 ft. 11
in.) wide. Entrance width is 680 mm (2 ft. 2 in.). It is mounted
in the same manner as the railing. The gate which is manually
latched and electrically interlocked, must be closed in a closed
position in order for the platform to operate.
ALIMAK
A 13
Platform Extension maximum 1.8 m ( 6 ft.)
The wood floor of the platform extension is supported by
structural tubes inserted into tubes forming part of the main
platform section.
The extension beams are equipped with railing brackets so that
safety railing can be job site built using appropriately
dimensioned wooden elements.
Safety railing built on site
a 73
Aw
ood
floo
r is
buil
t on
site
Nail/wood screw.
Railing Cross Members
The railing cross members must be of high quality (for example
pine or spruce) with dimensions according to applicable
standrad or local regulations.
Joint
ALIMAK
A 14
Extra long 2.7 m ( 9 ft.) platform extension
Reinforcement for extra long 2.7 m (9 ft.) extension
Stepdown platform extension
To obtain an ergonomical working position, as an example,
when bricklaying, the platform can be equipped with an
optional stepdown extension. The stepdown platform extension
is accomplished in the same manner as the normal platform
extension.
In addition to the extension beams and railing brackets for a
normal extension a special step down bracket is required for the
platform sections.
Step down brackets are assembled with
pins to the platform section.
Aw
ood
floo
r is b
uilt
on
site
ALIMAK
A 15
Canopy
To obtain a weather protected environment the work platform
can be equipped with an optional canopy. The canopy frame is
constructed of square steel structural tubes and covered with an
reinforced transparent plastic cloth. The cloth is rolled out in
one or two sheets, cut to the appropriate length and then
attached by rubber straps in four rows at intervals of 1 m (3.3
ft.), over the entire length of the canopy. Openings for the mast
and/or gate can be cut out with a knife.
a 165
Canopy frame clad with reinforced transparent plastic cloth
a 157
ALIMAK
Rubber strap
A 16
Platform for installations around corners
This accessory part can be delivered in square design or adapted
for special purposes.
Teleflex cabel arrangement for
horizontal levelling equipment
Catwalk
Catwalk extension
Catwalk extensions are used when several machines in a
multiple mast installation must be able to access each other for
material or personnel transportation.
The catwalk extension fit all platform sections but is always
used at the end of the platform, on the left or right side.
Gates are electrically interlocked with both platforms.
ALIMAK
Catwalk extension
Straight configuration
Angular configuration
ALIMAK
A 17
A 18
Erection crane
To ease handling of mast sections during erection and disassembly, an erection crane is available.
The erection crane is swung manually and can be equipped with
manual or electric hoists. Drive unit type APF-50A can use both
manual or electrical. Drive unit type APF-50B can only use
electrical.
The erection crane is mounted to a bracket in the center of the
platform for the APF-50A drive, or on the supplied attachment
for the APF-50B drive.
The crane is self-erecting by using the winch.
Max. capacity of erection crane is 300 kg (660 lbs.) which
includes the weight of the hoist.
Platform safety equipment
– Safety device which is activated on overspeed and brings the
work platform to a controlled stop.
– Strategically located safety hooks make it impossible to
drive over the top of the mast.
– Top and bottom final limit switch.
– 2 separate spring loaded motor brakes which requires power
to be released.
– Automatic horizontal levelling for twin mast installations.
– Ability to be manually lower to ground level in the event of a
power failure.
– Automatic horizontal levelling during manual lowering.
– Mechanically latched and electrically interlocked gate.
– Phase sequence relay.
– Phase sequence selector switch.
ALIMAK
A 19
Electrical equipment
The electrical equipment for the work platform is designed and
built to withstand the rough working conditions normally found
on construction sites. The components are well proven and meet
a number of national / international standards, such as IEC,
CEE, EN, DIN, UL, CSA, SS.
The electric material is rated class IP 54 or higher.
Connection to power supply
Power input connection to the work platform electrical M-panel
should be made with a minimum of 5 x 10.0 mm 2 (approx.
AWG No. 6 ) cable.
If the phase indication light is illuminated, change the phase
sequence by means of the phase invertrer switch in the
platform electrical M-panel.
a 82
Power supply
Cable handling
The trailing power cable is normally suspended under the
platform. The cable coils freely on the ground.
ALIMAK
Power supply
A 20
Electrical system description
The electrical equipment for the APF-50 system is designed to
be flexible and easy to handle during erection and dismantling.
This is possible since all the cables, limit switches and cabinets
are connected by quick-connect plugs.
Drive units
There are two different types of drive units:
Drive unit A is used on APF (single or twin).
Drive unit B is used only on APF (twin).
Junction box mounted below
platform with outlets X91, X 93
and X 95 attached to the back.
Jumper plug must be inserted
when all of the gate options not
in service.
The drive units, motors, brakes and all electrical components
are wired to a junction box.
Located on the junction box there are three connection plugs for
limit switches from gates/load ramps and also a 22-pole (6+16)
connection plug which connects the drive unit to the platform
electrical M-panel.
Catwalk
A catwalk is an electrical interlocked walk way between two
work platforms.
One platform can have maximum two catwalks, one against
each side of the platform.
The catwalk contains two different electrical components:
1. A catwalk-panel located at the base to interlock the
platforms.
This panel can interlock two catwalks.
2. A master module (1 pce/catwalk) which is located on the
”master” work platform, and ...
On the front of the junction box
there are two buttons to reset the
motor overload.
... a catwalk unit (1 pce/catwalk, unit 1 or unit 2) which is
located on the ”slave” work platform.
The catwalk function makes it also possible to stop one of the
work platforms semi automatically against the other platform,
by using the Stop Next Landing system.
Stop next landing
This function is available on all controllers and it consists of a
proximity switch located on the drive unit. Mechanical cams
must be fitted in the mast for each landing.
d 38
ALIMAK
A 21
Horizontal drive for the mobile chassis
This is a portable module, which can be attached to the mobile
chassis in order to motorize horizontal movement.
The module comes with all the mechanical and electrical
components that are required. To get power to the drive,
disconnect the power cable to the platform and connect it to the
inlet on the junction box for the horizontal drive. Then it is
possible to manoeuvre the chassis from a control unit which is
attached to the controller by a flexible cable.
a 163
Controller
Platform electrical M-panel
In order to use the M-panel for single mast machinery, the
junction box for the drive unit must be plugged into the left
outlet on the bottom of the panel. A jumper plug must be
inserted into the right side outlet on the same panel.
The panel is attached to a special railing which should be
located in the most convenient position on the platform.
The platform M-panel is equipped with both automatic and
manual levelling. The manual levelling consists of two buttons:
”Stop Left Machinery” and ”Stop Right Machinery”. These can
be used during installation and for small adjustments to a
desired level.
Automatic levelling works during normal operation and will
keep the platform within approximately 2° (degrees) of the
horizontal.
Outlet Left Electric operated Outlet for
drive unit
load ramp
base control
Outlet Right
drive unit
Underside of platform electrical M-panel
Buzzer
Outlet for
interlock on
catwalk
Jumper plugs
ALIMAK
A 22
Transport and movement
The machine can be towed or moved by its own drive unit
(option) over short distances. For longer distances it is
recommended that special transport vehicles be used. Only
machine components, e.g. platform parts and mast sections can
be left on the platform. The mast must always be dismantled
during transportation on public roads.
l1
Towing of platform without mast
The outriggers must be completely retracted and locked. The
platform must also be lowered so that it rests on the rubber
buffers.
Maximum allowable speed when towing is 20 km/h (12 mph).
l2
ALIMAK
Towing of platform with erected mast on a mobile single or
twin mast chassis
Platform with erected mast can be towed on the job site if the
following is observed:
IMPORTANT: When a twin masted platform with two,
separate mobile chassis is to be moved around curves the
platform must be divided in to at least two parts. Before
separating, ensure that the blocking pin the push/pull rod
on both drive unit are properly attached.
The numbers of platform sections on each sides of the drive
units must not exceed 3 – 5 pcs. with a maximum of 3 pcs.
on the towing end.
l2
Lifting with crane
A 4.5 m (15 ft.) platform with mobile chassis (base unit) weighs
approx. 5000 kg (11000 lbs.) including 13 mast sections.
A 4.5 m platform with mast pedestal (base unit) weighs approx.
3500 kg (7700 lbs.) including 13 mast sections.
With a suitable crane connected to the lifting yoke at the mast
top, the platform with erected mast can be lifted and moved
with a crane. The lifting yoke is designed for a maximum load
of 6000 kg (13200 lbs.).
The platform must be balanced!
ALIMAK
A 23
Product, information and safety signs
1
5
10
9
2
3
6
4
4
14
13
11
22
7
8
15
21
18
19
20
ALIMAK 00000
B0
TECHNICAL DATA & SPECIFICATIONS
Technical data; Metric units . . . . . . . . . . . . . . . . . . .
Technical data; Imperial units . . . . . . . . . . . . . . . . .
Maximum allowed load . . . . . . . . . . . . . . . . . . . . . . . . .
Maximum no. of people
allowed on the platform . . . . . . . . . . . . . . . . . . . . . . . . .
Stability data . . . . . . . . . . . . . . . . . . . . . . . . . . . . . . . . . . . . . . .
Load signs . . . . . . . . . . . . . . . . . . . . . . . . . . . . . . . . . . . . . . . . . .
Determin mast height . . . . . . . . . . . . . . . . . . . . . . . . . . . .
Noise level at operation . . . . . . . . . . . . . . . . . . . . . . . . . .
Capacity reduction when . . . . . . . . . . . . . . .
platform extended . . . . . . . . . . . . . . . . . . . . .
ALIMAK
B1
B3
B4
B 12
B 13
B 14
B 21
B 22
Drive unit type APF-50A
Drive unit type APF-50B
ALIMAK
B1
Technical data, Metric units (50Hz)
Capacity
APF-50A
Twin
Single
Twin
4.4 m / 19.4 m
11.8 m / 43.3 m
–
6.0 m / 28.5 m
3970 kg at 4.4 m
2490 kg at 19.4 m
7800 kg at 11.8 m
4690 kg at 43.3 m
–
–
8580 kg at 6.0 m
6360 kg at 28.5 m
Min. / Max. platform length
Max. pay-load capacity
APF-50B
Single
Vertical travel speed
12 m/min.
–
12 m/min.
Horizontal travel speed with
optional motor propelled chassis
8 m/min.
–
8 m/min.
Max. lifting height, untied mast
with 4 completely extended
outriggers on mobile chassis.
Outdoor / Indoor installation
22 m outdoors
32 m indoors
–
22 m outdoors
32 m indoors
100 m
–
100 m
15 m each
–
15 m each
–
3 - 6 - 9 and
remaining 15 m
Max. lifting height, tied mast
Increased lifting height on request
Tie distance when installed
on mobile chassis
Tie distance when installed
on pedestal base
1st = 3 m, 2nd = 6 m, 3rd = 9 m
remaining 15 m
Top overhang in Operation.
Wind speed maximum 12.5 m/sec.
6m
–
6m
Top overhang during Erection.
Wind speed maximum 8 m/sec.
15 m
–
15 m
Dimensions and weights
Lowest base unit transport height:
– on pedestal base
– on mobile chassis
2300 mm
2650 mm
2300 mm
2650 mm
Height to platform from ground:
– on pedestal base
– on mobile chassis
1250 mm
1500 mm
1250 mm
1500 mm
1.5 m platform section: weight
0.82 m platform section: weight
135 kg
85 kg
135 kg
85 kg
112 kg / 128 kg
112 kg / 128 kg
Mobile chassis: weight
1940 kg/pce.
1940 kg/pce.
Pedestal base: weight
320 kg/pce.
320 kg/pce.
Drive unit: weight
670 kg/pce.
610 kg/pce.
Mast section weight:
length 1.508 m with 1 rack / 2 racks.
Electrical data
Power – lift machinery
2 x 4.0 kw
4 x 4.0 kw
–
4 x 4.0 kw
Power – travel machinery
1 x 1.5 kw
2 x 1.5 kw
–
–
380 – 420V 50Hz
–
380 – 420V 50Hz
230V 50 Hz
–
230V 50 Hz
Voltage / Frequency
Control voltage / Frequency
Starting current (480V 50Hz)
2 x 40A
4 x 40A
–
4 x 40A
Power consumption
2 x 8kVA
4 x 8kVA
–
4 x 8kVA
Power supply fuses
32 A
63A
–
63A
Outlet for hand tool
1 Phase 110V 16A
–
1 Phase 110V 16A
Outlet for hand tool
1 Phase 240V 10A
–
1 Phase 240V 10A
ALIMAK
B2
Drive unit type APF-50A
Drive unit type APF-50B
ALIMAK
B3
Technical data, Imperial units (60Hz)
Capacity
APF-50A
Twin
Single
Twin
14.5 ft. / 64 ft.
39 ft. / 142 ft.
–
20 ft. / 93.5 ft.
9,040 lbs. at 14.5 ft.
5,780 lbs. at 64 ft.
17,680 lbs. at 39 ft.
10,820 lbs. at 142 ft.
–
–
Min. / Max. platform length
Max. pay-load capacity
APF-50B
Single
19,400 lbs. at 20 ft.
14,510 lbs. at 93.5 ft.
Vertical travel speed
39 fpm.
–
39 fpm.
Horizontal travel speed with
optional motor propelled chassis
30 fpm.
–
30 fpm.
Max. lifting height, untied mast
with 4 completely extended
outriggers on mobile chassis.
Outdoor / Indoor installation
72 ft. outdoors
105 ft. indoors
–
72 ft. outdoors
105 ft. indoors
330 ft.
–
330 ft.
50 ft. each
–
50 ft. each
Max. lifting height, tied mast
Increased lifting height on request
Tie distance when installed
on mobile chassis
Tie distance when installed
on pedestal base
1st = 10’, 2nd = 20’, 3rd =30’
remaining 50 ft.
–
10’ - 20’ - 30’ and
remaining 50 ft.
Top overhang in Operation.
Wind speed maximum 28 mph.
20 ft.
–
20 ft.
Top overhang during Erection.
Wind speed maximum 34 mph.
50 ft.
–
50 ft.
Dimensions and weights
Lowest base unit transport height:
– on pedestal base
– on mobile chassis
7’ 6 5/8’’
8’ 8 3/8’’
7’ 6 5/8’’
8’ 8 3/8’’
Height to platform from ground:
– on pedestal base
– on mobile chassis
4’ 1 1/4’’
4’ 11’’
4’ 1 1/4’’
4’ 11’’
1.5 m platform section: weight
0.82 m platform section: weight
298 lbs.
188 lbs.
298 lbs.
188 lbs.
Mast section weight:
length 1.508 m with 1 rack / 2 racks.
247 / 282 lbs.
247 / 282 lbs.
Mobile chassis: weight
4300 lbs./pce.
4300 lbs./pce.
Pedestal base: weight
706 lbs./pce.
706 lbs./pce.
Drive unit: weight
1478 lbs./pce.
1345 lbs./pce.
Electrical data
Power – lift machinery
2 x 4.6 kw
4 x 4.6 kw
–
4 x 4.6 kw
Power – travel machinery
1 x 1.5 kw
2 x 1.5 kw
–
–
Voltage/Frequency
440 – 480V 60Hz
Control voltage/Frequency
–
–
230V 60 Hz
2 x 40A
4 x 40A
–
4 x 40A
Power consumption
2 x 5kVA
4 x 5kVA
–
4 x 5kVA
Power supply fuses
30A
60A
–
60A
Starting current (480V 60Hz)
230V 60 Hz
440 – 480V 60Hz
Outlet for hand tool
1 Phase 110V 16A
–
1 Phase 110V 16A
Outlet for hand tool
1 Phase 240V 10A
–
1 Phase 240V 10A
ALIMAK
B4
Maximum allowed loading x
according to ISO 16369 (EN 1495))xxx
The following tables show several typical load cases. For other load cases not shown, contact the
nearest Alimak representative.
Note: Loads may not be placed on platform extensions or catwalks.
Maximum load – Single mast configuration and drive unit type APF-50 A
Tc
T
Tos
Tis
Tos
Nc
L
T
Tc
Tos
Tis
=
=
=
=
=
=
Tc
Tis
Number of cantilever platform sections
Platform length
Total payload capacity (optimized load distribution)
Maximum evenly distributed cantilever load on one side
Maximum concentrated load on outermost platform section
Maximum concentrated load on innermost platform section
The sum of the two cantilever loads Tc (Tos or Tis) must never exceed the total payload capacity T
for the platform configuration in question. For this purpose, if a full Tc (Tos or Tis) load is placed
on one side the load on the other must be limited to T minus Tc (Tos or Tis) to avoid T being
exceeded.
ALIMAK
B5
Metric units
Aliclimber APF-50A Single
Nc
left
Nc
right
L
m
T
kg
Without
platform extension
Tc
Tos
kg
kg
Tis
kg
T
kg
With
platform extension
Tc
Tos
kg
kg
Tis
kg
1
1
4.4
3970
2520
2520
2520
3800
2520
2520
2520
1 + 1/2
1 + 1/2
6.0
3770
1830
1570
2370
3510
1830
1570
2370
2
2
7.4
3670
1450
1140
2240
3350
1450
1140
2240
2 + 1/2
2 + 1/2
9.0
3470
1140
850
2100
3060
1140
850
2100
3
3
10.4
3380
940
670
1970
2910
940
670
1970
3 + 1/2
3 + 1/2
12.0
3180
760
530
1820
2620
760
530
1820
4
4
13.4
3080
640
440
1690
2470
640
440
1690
4 + 1/2
4 + 1/2
15.0
2880
520
350
1550
2180
520
350
1550
5
5
16.4
2790
440
290
1420
2020
440
290
1420
5 + 1/2
5 + 1/2
18.0
2590
360
240
1270
1740
360
240
1270
6
6
19.4
2490
300
200
1140
1580
190
120
1140
Imperial units
Aliclimber APF-50A Single
Nc
left
Nc
right
L
ft.
T
lbs.
Without
platform extension
Tc
Tos
lbs.
lbs.
Tis
lbs.
T
lbs.
With
platform extension
Tc
Tos
lbs.
lbs.
Tis
lbs.
1
1
14.44
9040
5550
5550
5550
8660
5550
5550
5550
1 + 1/2
1 + 1/2
19.69
8600
4040
3460
5230
8020
4040
3460
5230
2
2
24.28
8390
3190
2520
4940
7680
3190
2520
4940
2 + 1/2
2 + 1/2
29.53
7950
2500
1870
4620
7050
2500
1870
4620
3
3
34.12
7730
2060
1490
4340
6700
2060
1490
4340
3 + 1/2
3 + 1/2
39.37
7290
1670
1170
4010
6070
1670
1170
4010
4
4
43.96
7080
1400
960
3730
5730
1400
960
3730
4 + 1/2
4 + 1/2
49.21
6640
1150
780
3410
5090
1150
780
3410
5
5
53.81
6430
970
650
3120
4750
970
650
3120
5 + 1/2
5 + 1/2
59.06
5990
800
520
2800
4110
800
520
2800
6
6
63.65
5780
670
430
2520
3770
420
260
2510
The weight of 2 people including equipment 240 kg (530 lbs.) may be added to the above loads.
Allowable personal items, tools, paint etc. for each person is a maximum 40 kg (88 lbs.).
ALIMAK
B6
Maximum load – Twin mast configuration and drive unit type APF-50 Axx
T/2
T/2
Tm
Tc
Tc
Tos
Tos
Tmis
Tmis
Nc
Nm
L
T
Tc
Tm
Tmis
Tos
=
=
=
=
=
=
=
=
Number of cantilever platform sections
Number of midspan platform sections
Platform length
Total payload capacity (optimized load distribution)
Maximum evenly distributed cantilever load on one side
Midspan load, evenly distributed
Maximum concentrated load on midspan innermost platform section
Maximum concentrated load on outermost platform section
The sum of the two cantilever loads Tc (or Tos) and the midspan load Tm, must never exceed the
total payload capacity T for the platform configuration in question.
The weight of 4 people including equipment 400 kg (882 lbs.) may be added to the above loads.
Allowable personal items, tools, paint etc. for each person is 20 kg (44 lbs.).
ALIMAK
B7
Metric units
Aliclimber APF-50A Twin
Nc Nm Nc
left mid. right
1
1
1
2
1
2
1
2
3
1
2
3
1
2
3
4
1
2
3
4
1
2
3
4
1
2
3
4
1
2
3
4
1
2
3
4
1
2
3
4
1
2
3
4
1
2
3
4
1
2
3
4
2
3
4
2
3
4
3
4
3
4
4
4
4
5
6
4
7
5
8
6
4
9
7
5
10
8
6
4
11
9
7
5
12
10
8
6
13
11
9
7
14
12
10
8
15
13
11
9
16
14
12
10
17
15
13
11
18
16
14
12
19
17
15
13
18
16
14
19
17
15
18
16
19
17
18
19
1
1
1
2
1
2
1
2
3
1
2
3
1
2
3
4
1
2
3
4
1
2
3
4
1
2
3
4
1
2
3
4
1
2
3
4
1
2
3
4
1
2
3
4
1
2
3
4
1
2
3
4
2
3
4
2
3
4
3
4
3
4
4
4
L
m.
T
kg
11.8
13.3
14.8
14.8
16.3
16.3
17.8
17.8
17.8
19.3
19.3
19.3
20.8
20.8
20.8
20.8
22.3
22.3
22.3
22.3
23.8
23.8
23.8
23.8
25.3
25.3
25.3
25.3
26.8
26.8
26.8
26.8
28.3
28.3
28.3
28.3
29.8
29.8
29.8
29.8
31.3
31.3
31.3
31.3
32.8
32.8
32.8
32.8
34.3
34.3
34.3
34.3
35.8
35.8
35.8
37.3
37.3
37.3
38.8
38.8
40.3
40.3
41.8
43.3
7800
7650
7500
7500
7360
7360
7210
7210
7210
7060
7060
7060
6910
6910
6910
6910
6760
6760
6760
6760
6620
6620
6620
6620
6470
6470
6470
6470
6320
6320
6320
6320
6170
6170
6170
6170
6020
6020
6020
6020
5880
5880
5880
5880
5730
5730
5730
5730
5580
5580
5580
5580
5430
5430
5430
5280
5280
5280
5140
5140
4990
4990
4840
4690
Without
platform extension
Tm
Tmis
Tc
kg
kg
kg
Tos
kg
T
kg
7800
7650
7500
7500
7360
7360
6430
7210
7210
5400
7060
7060
4550
6430
6910
6910
3830
5400
6760
6760
3210
4550
6430
6620
2670
3830
5400
6470
2190
3210
4550
6320
1760
2670
3830
5400
1360
2190
3210
4550
1000
1760
2670
3830
660
1360
2190
3210
350
1000
1760
2670
660
1360
2190
350
1000
1760
660
1360
350
1000
660
350
3900
3830
3750
3570
3680
3570
3600
3570
1810
3530
3530
1810
3460
3460
1810
1010
3380
3380
1810
1010
3310
3310
1810
1010
3230
3230
1810
1010
3160
3160
1810
1010
3090
3090
1810
1010
3010
3010
1810
1010
2940
2940
1810
1010
2860
2860
1810
1010
2790
2790
1810
1010
2720
1810
1010
2640
1810
1010
1810
1010
1810
1010
1010
1010
7360
7140
6910
6910
6690
6690
6470
6470
6470
6250
6250
6250
6030
6030
6030
6030
5810
5810
5810
5810
5580
5580
5580
5580
5360
5360
5360
5360
5140
5140
5140
5140
4920
4920
4920
4920
4700
4700
4700
4700
4480
4480
4480
4480
4260
4260
4260
4260
4030
4030
4030
4030
3810
3810
3810
3590
3590
3590
3370
3370
3150
3150
2930
2700
3900
3830
3750
3750
3680
3680
3600
3600
3600
3530
3530
3530
3460
3460
3460
3460
3380
3380
3380
3380
3310
3310
3310
3310
3230
3230
3230
3230
3160
3160
3160
3160
3090
3090
3090
3090
3010
3010
3010
3010
2940
2940
2940
2940
2860
2860
2860
2860
1970
2790
2790
2790
2720
2720
2720
1970
2640
2640
2570
2570
1970
2490
2420
1970
3900
3830
3750
3750
3680
3680
3600
3600
2620
3530
3530
2620
3460
3460
2620
1540
3380
3380
2620
1540
3310
3310
2620
1540
3230
3230
2620
1540
3160
3160
2620
1540
3090
3090
2620
1540
3010
3010
2620
1540
2940
2940
2620
1540
2860
2860
2620
1540
2790
2790
2620
1540
2720
2620
1540
2640
2620
1540
2570
1540
2490
1540
1540
1540
ALIMAK
With
platform extension
Tm
Tmis
Tc
kg
kg
kg
Tos
kg
7360
7140
6910
6910
6690
6690
5940
6470
6470
4840
6250
6250
3930
5940
6030
6030
3160
4840
5810
5810
2480
3930
5580
5580
1870
3160
4840
5360
1330
2480
3930
5140
840
1870
3160
4840
380
1330
2480
3930
NA
840
1870
3160
NA
380
1330
2480
NA
NA
840
1870
NA
380
1330
NA
NA
840
NA
380
NA
NA
NA
NA
3680
3570
3460
3460
3350
3350
3240
3240
1680
3120
3120
1680
3010
3010
1680
840
2900
2900
1680
840
2790
2790
1680
840
2680
2680
1680
840
2570
2570
1680
840
2460
2460
1680
840
2350
2350
1680
840
2240
2240
1680
840
2130
2130
1680
840
2020
2020
1680
840
1910
1680
840
1800
1680
840
1680
840
1570
840
840
840
3680
3570
3460
3460
3350
3350
3240
3240
3240
3120
3120
3120
3010
3010
3010
3010
2900
2900
2900
2900
2790
2790
2790
2790
2680
2680
2680
2680
2570
2570
2570
2570
2460
2460
2460
2460
1820
2350
2350
2350
NA
2240
2240
2240
NA
1820
2130
2130
NA
NA
2020
2020
NA
1820
1910
NA
NA
1800
NA
1680
NA
NA
NA
NA
3680
3570
3460
3460
3350
3350
3240
3240
2430
3120
3120
2430
3010
3010
2430
1290
2900
2900
2430
1290
2790
2790
2430
1290
2680
2680
2430
1290
2570
2570
2430
1290
2460
2460
2430
1290
2350
2350
2350
1290
2240
2240
2240
1290
2130
2130
2130
1290
2020
2020
2020
1290
1910
1910
1290
1800
1800
1290
1680
1290
1570
1290
1290
1290
B8
Maximum load – Twin mast configuration and drive unit type APF-50 Axx
T/2
T/2
Tm
Tc
Tc
Tos
Tos
Tmis
Tmis
Nc
Nm
L
T
Tc
Tm
Tmis
Tos
=
=
=
=
=
=
=
=
Number of cantilever platform sections
Number of midspan platform sections
Platform length
Total payload capacity (optimized load distribution)
Maximum evenly distributed cantilever load on one side
Midspan load, evenly distributed
Maximum concentrated load on midspan innermost platform section
Maximum concentrated load on outermost platform section
The sum of the two cantilever loads Tc (or Tos) and the midspan load Tm, must never exceed the
total payload capacity T for the platform configuration in question.
The weight of 4 people including equipment 400 kg (882 lbs.) may be added to the above loads.
Allowable personal items, tools, paint etc. for each person is 20 kg (44 lbs.).
ALIMAK
B9
Imperial units
Aliclimber APF-50A Twin
Nc Nm Nc
left mid. right
1
1
1
2
1
2
1
2
3
1
2
3
1
2
3
4
1
2
3
4
1
2
3
4
1
2
3
4
1
2
3
4
1
2
3
4
1
2
3
4
1
2
3
4
1
2
3
4
1
2
3
4
2
3
4
2
3
4
3
4
3
4
4
4
4
5
6
4
7
5
8
6
4
9
7
5
10
8
6
4
11
9
7
5
12
10
8
6
13
11
9
7
14
12
10
8
15
13
11
9
16
14
12
10
17
15
13
11
18
16
14
12
19
17
15
13
18
16
14
19
17
15
18
16
19
17
18
19
1
1
1
2
1
2
1
2
3
1
2
3
1
2
3
4
1
2
3
4
1
2
3
4
1
2
3
4
1
2
3
4
1
2
3
4
1
2
3
4
1
2
3
4
1
2
3
4
1
2
3
4
2
3
4
2
3
4
3
4
3
4
4
4
L
ft.
T
lbs.
38.71
43.64
48.56
48.56
53.48
53.48
58.4
58.4
58.4
63.32
63.32
63.32
68.24
68.24
68.24
68.24
73.16
73.16
73.16
73.16
78.08
78.08
78.08
78.08
83.01
83.01
83.01
83.01
87.93
87.93
87.93
87.93
92.85
92.85
92.85
92.85
97.77
97.77
97.77
97.77
102.69
102.69
102.69
102.69
107.61
107.61
107.61
107.61
112.53
112.53
112.53
112.53
117.45
117.45
117.45
122.38
122.38
122.38
127.3
127.3
132.22
132,22
137,14
142,06
17680
17350
17020
17020
16700
16700
16370
16370
16370
16040
16040
16040
15720
15720
15720
15720
15390
15390
15390
15390
15070
15070
15070
15070
14740
14740
14740
14740
14410
14410
14410
14410
14090
14090
14090
14090
13760
13760
13760
13760
13430
13430
13430
13430
13110
13110
13110
13110
12780
12780
12780
12780
12450
12450
12450
12130
12130
12130
11800
11800
11480
11480
11150
10820
Without
platform extension
Tm
Tmis
Tc
lbs.
lbs.
lbs.
17190
16870
16540
16540
16210
16210
14170
15890
15890
11900
15560
15560
10030
14170
15240
15240
8450
11900
14910
14910
7080
10030
14170
14580
5890
8450
11900
14260
4830
7080
10030
13930
3870
5890
8450
11900
3000
4830
7080
10030
2200
3870
5890
8450
1460
3000
4830
7080
760
2200
3870
5890
1460
3000
4830
760
2200
3870
1460
3000
760
2200
1460
760
8600
8430
8270
8270
8110
8110
7940
7940
7940
7780
7780
7780
7620
7620
7620
7620
7450
7450
7450
7450
7290
7290
7290
7290
7130
7130
7130
7130
6970
6970
6970
6970
6800
6800
6800
6800
6640
6640
6640
6640
6480
6480
6480
6480
6310
6310
6310
6310
4350
6150
6150
6150
5990
5990
5990
4350
5820
5820
5660
5660
4350
5500
5330
4350
8600
8430
8270
8270
8110
8110
7940
7940
5780
7780
7780
5780
7620
7620
5780
3400
7450
7450
5780
3400
7290
7290
5780
3400
7130
7130
5780
3400
6970
6970
5780
3400
6800
6800
5780
3400
6640
6640
5780
3400
6480
6480
5780
3400
6310
6310
5780
3400
6150
6150
5780
3400
5990
5780
3400
5820
5780
3400
5660
3400
5500
3400
3400
3400
Tos
lbs.
T
lbs.
8600
8430
8270
7870
8110
7870
7940
7870
3990
7780
7780
3990
7620
7620
3990
2230
7450
7450
3990
2230
7290
7290
3990
2230
7130
7130
3990
2230
6970
6970
3990
2230
6800
6800
3990
2230
6640
6640
3990
2230
6480
6480
3990
2230
6310
6310
3990
2230
6150
6150
3990
2230
5990
3990
2230
5820
3990
2230
3990
2230
3990
2230
2230
2230
16700
16210
15730
15730
15240
15240
14750
14750
14750
14260
14260
14260
13770
13770
13770
13770
13280
13280
13280
13280
12790
12790
12790
12790
12310
12310
12310
12310
11820
11820
11820
11820
11330
11330
11330
11330
10840
10840
10840
10840
10350
10350
10350
10350
9860
9860
9860
9860
9370
9370
9370
9370
8890
8890
8890
8400
8400
8400
7910
7910
7420
7420
6930
6440
ALIMAK
With
platform extension
Tm
Tmis
Tc
lbs.
lbs.
lbs.
16220
15730
15240
15240
14750
14750
13080
14270
14270
10680
13780
13780
8670
13080
13290
13290
6960
10680
12800
12800
5460
8670
12310
12310
4130
6960
10680
11820
2930
5460
8670
11340
1840
4130
6960
10680
840
2930
5460
8670
NA
1840
4130
6960
NA
840
2930
5460
NA
NA
1840
4130
NA
840
2930
NA
NA
1840
NA
840
NA
NA
NA
NA
8110
7870
7620
7620
7380
7380
7130
7130
7130
6890
6890
6890
6640
6640
6640
6640
6400
6400
6400
6400
6160
6160
6160
6160
5910
5910
5910
5910
5670
5670
5670
5670
5420
5420
5420
5420
4010
5180
5180
5180
NA
4940
4940
4940
NA
4010
4690
4690
NA
NA
4450
4450
NA
4010
4200
NA
NA
3960
NA
3710
NA
NA
NA
NA
8110
7870
7620
7620
7380
7380
7130
7130
5360
6890
6890
5360
6640
6640
5360
2830
6400
6400
5360
2830
6160
6160
5360
2830
5910
5910
5360
2830
5670
5670
5360
2830
5420
5420
5360
2830
5180
5180
5180
2830
4940
4940
4940
2830
4690
4690
4690
2830
4450
4450
4450
2830
4200
4200
2830
3960
3960
2830
3710
2830
3470
2830
2830
2830
Tos
lbs.
8110
7870
7620
7620
7380
7380
7130
7130
3700
6890
6890
3700
6640
6640
3700
1860
6400
6400
3700
1860
6160
6160
3700
1860
5910
5910
3700
1860
5670
5670
3700
1860
5420
5420
3700
1860
5180
5180
3700
1860
4940
4940
3700
1860
4690
4690
3700
1860
4450
4450
3700
1860
4200
3700
1860
3960
3700
1860
3700
1860
3470
1860
1860
1860
T/2
Maximum load – Twin mast configuration and drive unit type APF-50 Bxx
T/2
B 10
Tm
Tmis
Tmis
Nc
Nm
L
T
Tm
Tmis
=
=
=
=
=
=
Number of cantilever platform sections
Number of midspan platform sections
Platform length
Total payload capacity (optimized load distribution)
Midspan load, evenly distributed
Maximum concentrated load on midspan innermost platform section
The sum of the two cantilever loads Tmis must never exceed the total payload capacity T for the
platform configuration in question.
ALIMAK
B 11
Metric units
Aliclimber APF-50B Twin
Nc Nm Nc
left mid. right
L
m
T
kg
0
0
0
0
0
0
0
0
0
0
0
0
0
0
0
0
6.0
7.5
9.0
10.5
12.0
13.5
15.0
16.5
18.0
19.5
21.0
22.5
24.0
25.5
27.0
28.5
8580
8430
8290
8140
7990
7840
7690
7550
7400
7250
7100
6950
6810
6660
6510
6360
4
5
6
7
8
9
10
11
12
13
14
15
16
17
18
19
0
0
0
0
0
0
0
0
0
0
0
0
0
0
0
0
Without
platform extension
Tm
Tmis
Tc
kg
kg
kg
8580
8430
8290
7710
6420
5390
4550
3830
3210
2670
2190
1750
1360
1000
660
350
4290
4220
4140
4070
3990
3920
3850
3770
3700
3620
3550
3480
3400
3330
3250
1970
Tos
kg
T
kg
0
0
0
0
0
0
0
0
0
0
0
0
0
0
0
0
8290
8070
7840
7620
7400
7180
6960
6740
6510
6290
6070
5850
5630
5410
5180
4960
0
0
0
0
0
0
0
0
0
0
0
0
0
0
0
0
With
platform extension
Tm
Tmis
Tc
kg
kg
kg
8290
8070
7840
7280
5930
4840
3930
3150
2480
1870
1330
830
380
NA
NA
NA
4140
4030
3920
3810
3700
3590
3480
3370
3260
3150
3040
2920
1810
NA
NA
NA
0
0
0
0
0
0
0
0
0
0
0
0
0
0
0
0
Tos
kg
0
0
0
0
0
0
0
0
0
0
0
0
0
0
0
0
Imperial units
Aliclimber APF-50B Twin
Nc Nm Nc
left mid. right
0
0
0
0
0
0
0
0
0
0
0
0
0
0
0
0
4
5
6
7
8
9
10
11
12
13
14
15
16
17
18
19
0
0
0
0
0
0
0
0
0
0
0
0
0
0
0
0
L
ft.
T
lbs.
19.69
24.61
29.53
34.45
39.37
44.29
49.21
54.13
59.06
63.98
68.90
73.82
78.74
83.66
88.58
93.50
19400
19070
18750
18420
18090
17770
17440
17120
16790
16460
16140
15810
15480
15160
14830
14510
Without
platform extension
Tm
Tmis
Tc
lbs.
lbs.
lbs.
18920
18590
18260
17000
14160
11890
10020
8440
7080
5890
4820
3870
3000
2200
1450
760
9460
9300
9130
8970
8810
8640
8480
8320
8150
7990
7830
7660
7500
7340
7170
4340
0
0
0
0
0
0
0
0
0
0
0
0
0
0
0
0
Tos
lbs.
T
lbs.
0
0
0
0
0
0
0
0
0
0
0
0
0
0
0
0
18750
18260
17770
17290
16800
16310
15820
15330
14840
14350
13870
13380
12890
12400
11910
11420
With
platform extension
Tm
Tmis
Tc
lbs.
lbs.
lbs.
18270
17780
17290
16050
13080
10670
8670
6950
5460
4130
293
1840
830
NA
NA
NA
9130
8890
8650
8400
8160
7910
7670
7420
7180
6940
6690
6450
4000
NA
NA
NA
0
0
0
0
0
0
0
0
0
0
0
0
0
0
0
0
Tos
lbs.
0
0
0
0
0
0
0
0
0
0
0
0
0
0
0
0
The weight of 4 people including equipment 400 kg (882 lbs.) may be added to the above loads.
Allowable personal items, tools, paint etc. for each person is 20 kg (44 lbs.).
ALIMAK
B 12
Maximum no. of persons allowed on the
Work Platform
With loads according to load tables the number of persons
allowed on the platform is:
– single mast platform = two (2)
– twin mast platform = four (4)
Single mast platform
A maximum of four (4) people are allowed on the platform
provided that the load T is reduced by 115 kg (250 lbs.) and Tc
by 210 kg (460 lbs.) for each person exceeding two (2).
Twin masted platform
A maximum of six (6) people are allowed on the platform
provided that the load T and Tc are reduced by 230 kg (500 lbs.)
and Tm by 250 kg (550 lbs.) for each person exceeding four
(4).
Load on work platform when crane is used
Max. load on work platform, when erection crane is used shall
be reduced by the weight of the crane;
78 kg (172 lbs.) for manually or
85 kg (188 lbs.) for electrically operated crane.
Free standing on mobile chassis
The work platform may be used free standing on mobile chassis
under the following conditions:
In service maximum wind speed 12.7 m/sec. (28 mph)
Out of service maximum wind speed 40 m/sec. (90 mph)
exposure A and B according to EN 1495 and ASCE 7-93.
ALIMAK
B 13
Allowed max. freestanding mast height
– In service / Out of service
CAUTION: Note that the outriggers on the opposite side of
the face of the structure must always be completely
extended and locked.
The mast MUST ALWAYS be tied when using the canopy.
Outriggers
extended
length a
0.0 m
0.5 m (1.5 ft.)
1.0 m ( 3 ft.)
Mast turned FROM the structure face
without
with maximum
platform extension
platform extension
8.5 m (28 ft.)
13.0 m (43 ft.)
18.0 m (60 ft.)
8.5 m (28 ft.)
13.0 m (43 ft.)
18.0 m (60 ft.)
a
Face of structure
CAUTION: If the structure is ”open” and the wind
direction can be the opposite, the following values must
be used.
1.0 m ( 3 ft.)
1.0 m ( 3 ft.)
18.0 m (60 ft.)
14.5 m (48 ft.)
18.0 m (60 ft.)
14.5 m (48 ft.)
Wind
direction
Wind
direction
Outriggers
extended
length a
0.0 m
0.5 m (1.5 ft.)
1.0 m ( 3 ft.)
Mast turnedTOWARDS the structure face
without
with maximum
platform extension
platform extension
5.5 m (18 ft.)
10.0 m (33 ft.)
14.5 m (48 ft.)
–
10.0 m (33 ft.)
14.5 m (48 ft.)
ALIMAK
a
Face of structure
B 14
Load signs
Rated load sign on the platform
Copy of each of following signs showing platform configuration, rated load and outrigger arrangements, must be
completed by user or authorized installer of the platform and be
mounted in a prominent place on the platform, near the platform
control panel.
Load sign for APF-50 A, single mast platform
To enable re-use of the data sign it is adviseable to fill in the
data with a lead pencil or erasable instrument.
ALIMAK
B 15
Data on information sign must be in accordance with technical
data and additional technical information presented in this
manual.
Load sign for APF-50 A, dual mast platform
Load signs are available for both Metric and Imperial units.
ALIMAK
ALIMAK
B 16
Load sign for APF-50 B, dual mast platform
ALIMAK
B 17
Base arrangement sign – mobile chassis
ALIMAK
B 18
Base arrangement sign – pedestal base
ALIMAK
B 19
Example:
Drive unit type APF-50A. Dual mast installation.
Platform length 78 ft. Load capacity according to page B 9.
Freestanding mast with outriggers partly extended.
Mast turned from the structure face. See page B 13.
Maximum 6 ft. platform extension.
43
15070
7290
7290
7290
7290
7290
10030
78
ALIMAK
7290
B 20
Example continue
6
✔
1.5
3.0
✔
✔
ALIMAK
B 21
Determin mast height
Lh = Lifting height
Mast section length
= 1.508 meter
= (59.37’’)
N = No. of mast sections = Lh + 1.3 meter = (Lh + 39.37’’)
1.508
(59.37’’)
Mh = Mast height
= h + N x 1.508 meter
= (h1 + N x 59.37’’)
Working height
= Lh + 1.5 meter = (Lh + 59.37’’)
Alternative
height
h1
height
h2
1550 mm
(61 in.)
1250 mm (49-1/4 in.)
465 mm (19 in.)
275 mm (11 in.)
mobile chassis
pedestal base
1
Mh
N
Lh
h1
h2
ALIMAK
B 22
Tightening torque:
1508 mm
(4 ft. 11 3/8 in.)
112 / 128 kg
(247 / 282 lbs.)
1’’ UNC – quality minimum 8.8
or (A325)
350 Nm
(258 lbf x ft)
Mast expansion/contraction
650
Length/height:
Weight:
Mast bolt dimensions:
726
Data – mast
650
The expansion/contraction of the mast is: 0.012 mm/m and
degree °C ( or 0.000008 in./ft. and degree °F).
764
Plan
Noise level at operation
Measuring standard: IEC 651
Less than 85 dB(A).
ALIMAK
IMPORTANT SAFETY INSTRUCTIONS
Operating requirements . . . . . . . . . . . . . . . . . . . . . . . . . C 1
Operator requirements . . . . . . . . . . . . . . . . . . . . . . . . . . C 2
Important safety instructions . . . . . . . . . . . . . . . . . . C 3
ALIMAK
C0
Operating personnel requirements
User Requirements
The information in this manual must be supplemented with
good job management, site safety regulations, training, proper
installation, inspections, maintenance, consistent with all
available technical data found in this manual. Since the
user/owner has direct control over the application and operation
of the Alimak Work Platform, conformance with good safety
practices is the direct responsibility of the user/owner and
operating personnel. As the Mast Climbing Work Platform will
be carrying personnel, decisions on the use and operation of the
equipment must take this into account relative to their safety.
Maintenance training
The user must train their maintenance personnel in inspection,
erection and maintenance of the Alimak Platform in accordance
with this Instruction Manual and with the manufacturer´s
recommendations.
Operator training
Whenever a user directs an individual to operate a Alimak
Platform, they shall ensure that the individual has been trained in
accordance with the manufacturer´s Operating and Maintenance
Manual, and the user´s work instructions and requirements listed
in sections of this Instruction Manual before operating the
Alimak Platform.
Model training
The user shall be responsible for the operator being trained on
the model of the Alimak Platform that will be operated. Such
training shall be in an area free of obstructions, under the
direction of a qualified person to determine that the trainee
displays full knowledge in the operation of the Alimak
Platform. Only authorized and properly trained personnel shall
be permitted to operate the Alimak Platform. Such a person
must always be located on the platform during its use.
Before operation
Before authorizing an operator to operate a Alimak Platform,
the user shall ensure that the operator has:
– been instructed by a qualified person in the intended purpose
and function of each control;
– has read and understood the latest manufacturer´s
operating instructions and user´s safety rules, or been trained
by a qualified person on the contents of the manufacturer´s
operating instructions and user´s safety rules;
ALIMAK
C1
C2
– understood all decals, warnings, and instructions signs
displayed on the Alimak Platform;
– determined that the purpose for which the Alimak
Platform is to be used is within the scope of the intended
applications defined by the manufacturer.
Operator Requirements
The information in this Instruction Manual must be supplemented by good judgement, site safety regulations, and
caution in evaluating each situation. Since the operator has
direct control of the Alimak Platform, strict conformance with
good safety practices in this area is the responsibility of the
operator. The operator must make decisions on the use and
operation of the Alimak Platform with due consideration that
his own safety as well as the safety of other personnel on and
around the platform is dependent on these decisions.
Instruction Manual
The operator shall be aware that the Instruction Manual is
stored on the Alimak Platform and the location where it is
stored. The operator shall be familiar with this and consult the
manual when questions arise with respect to the Alimak
Platform.
Training
The operator shall have been trained either on the same model
of a Alimak Platform or one having operating characteristics
and controls consistent with the one to be used during actual
work site operation. The operator trainee shall operate the
Alimak Platform in an area free of obstructions under the
direction of a qualified person for a sufficient time to determine
that the trainee displays proficiency in knowledge and actual
operation of the Alimak Platform. Only authorized properly
trained personnel shall be permitted to operate the Alimak
Platform.
Before operation
Before being authorized to operate the Alimak Platform, the
operator shall have:
– been instructed by a qualified person in the intended purpose
and function of each of the controls
– read and understood the manufacturer´s/owner´s operating
instructions and safety rules, or been trained by a qualified
person on the contents of the manufacturer´s/owner´s
operating instructions and safety rules.
– understood by reading or having a qualified person explain
all decals, warnings, and instructions signs displayed on the
Alimak Platform.
ALIMAK
C3
Important Safety Instructions
Over the years serious accidents have occurred during the
erection and dismantling of rack and pinion equipment.
Common to these accidents has been the ”human factor”, i.e.
non adherence to proper safety procedures and common sense.
Some examples:
Leaning over the safety railing while the platform is moving
upwards can cause you to be struck by a tie or other protruding
objects.
Incomplete installation of mast bolts can cause separation of the
mast sections, leading to the fall of the platform with
subsequent loss of life or serious injuries.
Avoid the risk of accidents by carefully studying these
instructions regularly. Think clearly! Do not rush the work
and always check to make certain that the work is being done
properly.
c5
SAFETY FIRST!
Safety Instructions
Local Safety Regulations
– All local regulations shall apply.
Weather Conditions
– Do not erect or dismantle if wind speed exceed 12 m/s.
(26 mph) or as governed by local regulations where more
stringent.
Preparation
– Read and understand the Instruction Manual before work
begins.
– Barricade or rope off the area before erecting or dismantling.
c6
– Do not allow unauthorized personnel on or around the
platform during erection or dismantling.
ALIMAK
C4
Safety Equipment and Protective Clothing
– Prescribed safety equipment and clothing such as hard hat,
safety shoes, fall arresting device shall be used.
– Loose fitting clothes such as scarves must not be used as they
might become entangled in moving parts.
General
– Read all Warning and Instruction Signs.
– Keep the work area clean. Any oil spillage must be removed
immediately to avoid the risk of slipping.
– Never climb on the mast.
– During mast erection, dismantling or hoistway inspection,
the machine must always be operated from the platform.
When working from the platform take precautions to avoid
being struck by balconies, scaffolds and other similar
obstructions while platform is moving.
– When the control equipment on the platform is to be left
temporarily during installation/dismantling or service, the
main switch on the electric panel must be switched off
locked, and tagged in order to ensure no accidental
movement of the platform.
– Under no circumstances shall the platform be driven if there
is any one on the mast or below the platform.
– Complete each item of work before starting a new one or
taking a break. This is especially important when bolting
mast sections and installing ties.
Mast and Mast Ties
– The maximum tie distance must not be exceeded.
Always lock the main ”ON/OFF” switch
with a padlock and tag to prevent
unintentional operation while service/
inspection work is carried out.
– The platform shall not be clad or encumbered with signs,
banners and similar items which will increase the wind area of
the platform, and thereby negatively affect its stability.
– Bolted joints shall always be tightened to the required torque
as prescribed in the Instruction Manual.
– If any structural damage or severe corrosion is seen on such
items as mast sections, mast ties or other load carrying
members, the platform must be immediately taken out of
service and the extent of the damage be determined.
Corrective action must be taken before the platform is put
into service again.
Electrical Power
c3
The main ”ON/OFF” switch must be in
the ”OFF” position before the panel
door can be opened.
– Work performed on electrical equipment must be carried out
by competent personnel, trained for such work. The power
supply must be switched off locked and tagged, before work
is performed.
ALIMAK
C5
Safe distance to dangerous high voltage cables
– Follow the table below to find the minimum allowed
safe distance between any part of the machine and any
current carrying high voltage power cable. Also conform to
local regulations where more stringent.
Voltage range
(phase to phase)
0 to 300V
Over 300V to 50kV
Over 50kV to 200kV
Over 200kV to 350kV
Over 350kV to 500kV
Over 500kV to 750kV
Over 750kV to 1000kV
Minimum safe approach distance
meters
feet
Avoid contact
3.0
4.5
6.0
8.0
11.0
14.0
10
15
20
25
35
45
Illumination
– Adequate lighting shall be provided to illuminate the site
over the full travelling height of travel of the platform.
Lightning
– The work platform shall be earthed (grounded) so that the
charge from a lightning strike is connected to earth. Personnel
shall not be on the platform during such weather.
Spare Parts
– Unauthorized spare parts are not to be used. Only ”Alimak
Genuine Spare Parts” are to be installed.
ALIMAK
12. Door circuit indication
5. Phase failure indication
1. Up/Down lever
Power ”OK”
indication
Bypass circuit
indication
By pass switch
Safety circuit
indication
Selector switch
Manual/Remote
control
”SLAVE”
9. Stop left motor
High motor temp. indication
8. Stop right motor
Stop Next Landing button
Emergency Stop switch
Main switch
Power connection
”MASTER”
D0
INSTRUCTIONS FOR USE
Instructions for use . . . . . . . . . . . . . . . . . . . . . . . . . . . . . . .
Operating instructions . . . . . . . . . . . . . . . . . . . . . . . . . . .
At the end of the shift . . . . . . . . . . . . . . . . . . . . . . . . . . . .
If the platform does not start . . . . . . . . . . . . . . . . . . .
If the platform suddenly stops . . . . . . . . . . . . . . . . .
If the platform has been driven . . . . . . . . . . . . . . . .
on the final limit cam
ALIMAK
D1
D2
D3
D3
D4
D7
12. Door circuit indication
5. Phase failure indication
1. Up/Down lever
Power ”OK”
indication
Bypass circuit
indication
By pass switch
Safety circuit
indication
Selector switch
Manual/Remote
control
”SLAVE”
9. Stop left motor
High motor temp. indication
8. Stop right motor
Stop Next Landing button
Emergency Stop switch
Main switch
Power connection
”MASTER”
M-panel located on platform
ALIMAK
D1
Instructions for use
Instructions for the user/operator on how the equipment is to be
operated are presented below. These instructions will also be
found on a sign on the platform.
Illegible and missing signs must be replaced!
SAFETY INSTRUCTIONS
Before using this platform, carry out the following safety procedures, as well as any
maintenance and lubrication specified in the Operator’s Manual.
DAILY PRE-OPERATION CHECKS
1. Hand rails and guards are securely fastened.
2. Chassis / pedestal base is level.
3. Outriggers are fully extended and locked.
4. Jacks are down and stand on firm ground or support plates.
5. No unauthorized persons are in the vicinity of the machine when it is in
operation.
6. All emergency stop switches are working.
Test run with each one of the switches in ”Off”-position.
7. Final limit switch is working.
Test run to check for proper function.
8. Also check attachment of all limit cams and switches.
SPECIAL WEATHER CONDITIONS
1. Following any severe weather, i.e. storms, tornados, hurricanes or
earthquakes, all vital parts of the platform must be inspected and tested by
an expert or authorized local inspector prior to reuse of the platform.
Remove any accumulated ice or snow before reusing platform.
2. Platform with mast tied to building must not be used when wind velocity
exceeds15.5 m/sec. (35 mph).
3. Free-standing platform must not be used when wind velocity exceeds
12.7 m/sec. (28 mph).
4. The platform must be locked out of service at the base landing on completion of
work.
DAILY POST OPERATION CHECKS
1. Work platform has been driven to base landing.
2. Main switch is switched off and locked out.
3. Freestanding mast height does not exceed value on load sign.
Note that the operator/user is responsible for ensuring that the
daily ”Safety Inspection” has been carried out BEFORE the
platform is put into service.
ALIMAK
D2
Operating instructions
.
Operating instructions for Work Platform
1. Observe and study the safety instructions.
2. Take necessary measures to avoid risks of slipping if the
working platform floor, staircase etc. is covered with oil,
snow/ice or frost.
3. The area below the platform must be barricaded to
prevent injury to personnel on the ground due to the
possibility of falling objects.
4. Unlock and remove the padlock from the main switch.
5. Turn the main ON/OFF switch(es) on the platform to
position ”ON”.
6. Load the platform. Do not overload and do not place the
load outside platform railing.
7. Make certain that the load signs show the actual platform
configuration.
8. Close the safety railing gate(s) fully.
9. Check for obstacles in the path of travel of the platform.
When extension parts are used in connection with tied mast,
special attention must be observed so that the passage is
free for the platform.
Keep this constantly under observation.
10. Move the lever to the symbol for the desired direction of
travel. The platform will now start moving.
Stop the platform by carefully moving the lever to the
Neutral” position
At the top and bottom the platform will stop automatically
by means of the normal limit switches.
11. On the way down check that the machine´s audible warning
signal is in operation.
12. Turn the main ON/OFF switch(es) on the platform to
position ”OFF”.
At the end of the shift
1. Drive the platform to the base.
2. Switch off and lock the main switch with a padlock to
prevent unauthorized use.
Operating instructions for mobile chassis
– see chapter L ”Transports and movements”
ALIMAK
D3
Platform with mast tied to building
The work platform may be used under the following conditions:
In service maximum wind speed 15.5 m/sec. (35 mph).
Out of service maximum wind speed 36 m/sec. (90 mph)
exposure A and B according to ASCE 7-93.
Free standing on mobile chassis
The work platform may be used free standing on mobile chassis
under the following conditions:
In service maximum wind speed 12.7 m/sec. (28 mph)
Out of service maximum wind speed 40 m/sec. (90 mph)
exposure A and B according to ASCE 7-93.
DANGER !
Tipping hazard.
Never use the work platform with free standing
mast when wind velocity exceeds 12.7 m/sec
(28 mph).
Will cause severe injury or death.
Enlarged wind areas
d 39
No foreign material or accessories should be attached
temporarily or permanent to any component of this equipment.
If the platform does not start – check:
–
that the main ON/OFF switch (switches) on the platform is
in the ON position and that the platform is supplied with
electric power.
–
that no “Emergency Stop Push Button” is in their depressed
position.
–
that the entrance gate(s)/load ramp(s) are closed.
–
that the final limit switch (switches) are not activated. If a
final limit switch is activated – see heading “If the platform
has been driven against the lower final limit cam”.
–
that the circuit breaker (breakers) for control power have
not tripped out.
–
that the phase sequence is correct (the lamp on the M-panel
should not be lit).
If the platform still does not start, see the instructions in the
section ”Electrical trouble-shooting”.
ALIMAK 2
D4
If the platform suddenly stops
If the platform stops due to a power failure or any other electric
failure, such as blown fuses, tripped motor overload protector,
etc., it can be manually lowered for unloading.
d7
Slide the platform only short distances at very low speed in
order not to exceed the normal operating speed of the platform.
If excess speed occurs, the platform’s safety device will
automatically trip and stop the platform.
If the safety device trips during sliding
There is NO power to the drive motor
1. Crank the platform approximately 20 cm (8 in.) upwards
according to the instructions ”Cranking” to release the
mechanism of the safety device.
2. Try to slide the platform again.
There is power to the drive motor – or power is back after a
short interruption
1. Run the platform up approximately 20 cm (8 in.) according
to the instructions ”Emergency Electrical Operation” to
release the mechanism of the safety device.
2. Try to slide the platform again.
The safety device can be allowed to trip 2 to 3 times – before
it MUST be reset to neutral position
The reason why the safety device must be reset is that the brake
cone after each tripping will be forced tighter against the brake
lining, stopping distance will be decreased and braking more
abrupt.
Note that the safety device MUST be reset at the ground
landing !
See next page for sliding instructions.
ALIMAK
D5
Sliding
1. First check applicable items under the heading ”If the
platform doesn’t start – check”.
2. Turn off the main ON/OFF switch on the electrical M-panel.
Work platform in single configuration
–
Squeeze the handle underneath the rubber protection on top
of the drive unit to lift the motor brakes and start sliding.
The platfrom will stop as soon as you release the handle.
Brake release handle
–
Work platform in twin configuration
Squeeze the handle to slide – until the horizontal levelling
equipments’ Teleflex cable activates the brake. Follow the
same procedure with the other drive unit, and continue this
(back and forth) until the desired level is reached.
If there is more than one person on the platform it is
possible to slide both drive units at the same time. The
horizontal levelling equipment will automatically compensate for speed differences by setting the corresponding brake
until the other drive unit catches up.
CAUTION: Only slide short distances with maximum 1/3 of
normal operating speed. Stop at least1 minute
every 20 meters (65 ft.) so that the brakes have
time to cool off.
Overheating can cause the brake function to
deteriorate.
ALIMAK
d1
D6
5. If sliding of the platform is not possible – stay on the
platform and call for assistance.
DANGER !
Falling hazard.
Do not leave the platform – wait for qualified
assistance.
Will cause severe personal injury or death.
d 34
If the machine has been driven against
the lower final limit cam
Heavy load and/or poor brake function can cause the platform
to activate the final limit switch at the bottom landing. This
disconnects power to the drive unit. The platform can be
cranked back manually to the normal landing level.
Motor brake should be checked by trained/authorized service
personnel, before the platform is put back into service.
Manual cranking
To be carried out by trained service personnel.
OFF
WARNING !
Chrushing hazard.
ON
Always disconnect the power by means of the main
switch on the M-panel before working on the
machinery.
Can cause severe personal injury.
d1
1. Apply a 24 mm socket and ratchet spanner on the hexagon
shaft end inside the upper motor brake.
ALIMAK
2. Push the ratchet spanner counterclockwise and lift both
motor brakes at the same time using the brake release
handle.
D7
The platform will then move upwards. Reapply the brake
between each turn of the spanner.
Also raise the platform’s other drive unit (if twin configured) in the same manner.
3. Remove the ratchet spanner and socket when the cranking is
completed.
Bypass switch
located on the M-panel
”Emergency Electrical Operation”
The following instructions are used to drive the platform up
above the final level and is only to be used if the platform has
driven onto the final limit cam at the bottom landing because of
worn brakes, or if the safety device has activated.
Motor brake should be checked by trained/authorized service
personnel, before the platform is put back into service.
– Turn the Bypass switch to position ”2” and hold it in this
position.
– Pull the Up/Down lever in upwards direction and the
platform will proceed in the up direction.
NOTE: Only drive the platform for short distances using
this method.
– The Bypass switch is spring loaded to return automatically
to position ”1”, which will prevent the platform from being
operated.
– Turn the Bypass switch to ”0” position upon completition
of this function
ALIMAK
d 75
E0
SERVICE AND MAINTENANCE
Service and maintenance . . . . . . . . . . . . . . . . . . . . . . . .
Adjustments and wear limits . . . . . . . . . . . . . . . . . . .
Drop test . . . . . . . . . . . . . . . . . . . . . . . . . . . . . . . . . . . . . . . . . . . . .
Lubrication diagram . . . . . . . . . . . . . . . . . . . . . . . . . . . . .
Safety and instruction signs . . . . . . . . . . . . . . . . . . . .
ALIMAK
E1
E4
E8
E 11
E 14
E1
Service and maintenance
In order to avoid unnecessary breakdowns, those responsible for
the service and maintenance of this equipment must regularly
ensure that all scheduled maintenance work is carried out at the
recommended intervals according to the maintenance program
below.
Adjustments and replacement as a result of inspection, must be
carried out by trained/authorized service personnel.
Only ALIMAK Genuine Spare Parts must be used.
WARNING!
Unintended operation.
Always switch OFF lock and tag the main switch
when leaving the platform even without having
completed the service work.
Can cause severe injury or death.
Checklists
e1
Checklists, with room for notes on maintenance executed, will
be found at the end of this manual. Use them!
Service and maintenance schedule
See heading ’’Technical data & specifications’’ for bolt tightening torques.
Interval
40 operating
hours or at least
every month
Part
Instructions
1.
Sign plates/
instruction
manuals
Check that all signs are legible. Check if actual figures on
load sign are correct and that documentation box contains
manuals.
2.
Safety device
Check with the user/users if the safety device has been
tripping without cause or if noise can be heard from the
device during operation. For further details, see the
instructions for checking wear on the safety device under
the heading ”Adjustment and wear limits”.
3.
Gear box
Check the oil level and refill if necessary. Leaking seals
must be replaced by trained/authorized personnel.
4.
Lockings of
safety railing
Check that all locks for platform safety railing are intact.
5.
Locating pins
on outriggers
Check that all locating pins are intact.
6.
Wheels/tires,
where applicable
Check tire pressure. Check tires for damage and wheel
nuts for tightness.
7.
Tow bar,
where applicable
Check tow bar for damages and that wiring, plug and
socket are intact.
ALIMAK
E2
Interval
120 operating
hours or at least
6 times a year
Part
Instructions
8.
Steering equipment,
where applicable
Check rods for damage.
9.
Guide rollers
Check that all bolts are properly tightened.
10.
Attachment of
machinery plate
Check that all bolts are properly tightened.
11.
Electric motor
brakes
Check that the platform stops within acceptable limits,
specified later in this chapter. See also the special
instructions for checking.
12.
Trailing cable
Check the cable for wear and to ensure that no kinks exist.
13.
Entrance gate
mechanical latch and
electrical interlock.
Check the function of the latch and the interlock.
14.
Platform floor
Clean floor and check condition of floor plates and
missing bolts. Replace if necessary.
15.
Lubricating
See the instructions in the ”Lubricating diagram”.
Also check racks for possible damage and attachment
when lubricating.
16.
Optional under platform obstruction
protection system,
where applicable
Check attachment and wiring. Also make certain that the
work platform cannot start with an obstruction between
the transmitter and receiver.
21.
Mast
Check visually that all mast bolts are properly tightened.
Also check the bolts for attaching the mast to the pedestal
base / mobile chassis.
22.
Mast ties,
where applicable
Check that all bolts in all mast ties are properly tightened.
Also check attachment to structure.
23.
Limit switches and
cams, and final limit
switch with associated
cams
24.
Gates, railings and
protection covers
Check the function and attachment.
25.
Buffers for platform
Check that the buffers are in position and are in proper
condition.
26.
Signal equipment
and lighting
Check the function of the control device, alarm signal,
and, where applicable, voice communication system.
27.
Rack and pinion
Check the wear on the rack and pinion according to the
instructions under the heading ”Adjustment and wear
limits”.
28.
Horizontal levelling
equipment – for twin
mast configuration
Check the attachment and function of the switches and
cams. Check the mechanical function by sliding. See
heading ”Horizontal levelling equipment”.
Check attachment and function.
ALIMAK
E3
Interval
Part
Instructions
29.
Scaffolding adjacent to platform
Check that the distance from the platform hoistway to
landings, scaffolding, balconies, windows or any other
location where persons may find themselves, are not less
than regulations dictate.
Point out any infringements and risks of injuries to the
site manager.
30.
Lubricating
See the instructions in the ”Lubricating diagram”.
40.
Guide and counter
rollers
Check wear and bearing play of the platform guide
rollers. Also check that the rollers can move axially.
Adjustment and replacement, when required, must be
carried out by trained/authorized service personnel.
41.
Safety device
Test the safety device according to the instructions under
the heading ”Drop test”.
42.
Electric motor
If necessary, clean the cooling flanges of the motor.
43.
Contactors
Check the condition of the contact points in the contactors.
44.
Lubricating
See the instructions in the ”Lubricating diagram”.
50.
Electric wiring
Check all wires, sealing glands and connections.
51.
Motor overload
protectors
Check that the motor overload protector is set to the
rated current on the data plate for the electric motor.
52.
Deformations/
mechanical damage
Inspect the equipment visually in its entirety for
deformation/mechanical damage to mast tubes, diagonal
members of the mast sections, gates, protective rails,
floors, mast ties, etc.
This inspection and any actions which may be necessary
after the inspection must be performed by trained/
authorized service personnel.
53.
Corrosion, damage
and wear
Inspect the equipment in its entirety for corrosion and
wear on loadbearing and force-absorbing components
with the aid of an ultrasonic thickness measuring
instrument. This inspection and any actions which may
need to be taken after the inspection must be performed
by trained/authorized service personnel.
A method for internal corrosion protection of the mast
tubes is available. Please contact your ALIMAK
representative.
54.
Mast
Check that all mast bolts are properly tightened.
Also check the bolts for attaching the mast to the chassis.
55.
Lubricating
See the instructions in the ”Lubricating diagram”.
Annually
60.
Complete platform
Have the complete equipment checked by a qualified
technician.
Every 4th year or
according to sign on the
safety device
61.
Safety device
Replace the complete safety device. Contact your Alimak
representative.
400 operating
hours or at least
4 times a year
1000 operating
hours or at least
once a year
ALIMAK
E4
Adjustment and wear limits
Platform stopping positions
If the distance between actual stopping positions empty/fully
loaded platform exceeds 50 mm (2 in.), the brakes must be
checked by trained/ authorized service personnel.
(.024 in.)
max. 0.6 mm
min. 9 mm
(.35 in.)
min. 0.25 mm
(.01 in.)
Brake inspection
To be carried out by trained service personnel.
WARNING!
Unintended operation
Pressure plate
Brake disc
Brake
coil
body
Bring the platform down to rest on the buffer springs.
Switch off, lock and tag the main switch before
inspection can take place.
Can cause severe bodily injury or death.
Inspecting brake condition
Check airgap between pressure plate and brake coil body with
the aid of a feeler gauge.
Sealing ring
1. Tighten hexagon nuts on stud bolts until minimum permissible airgap is obtained, between brake coil body and
pressure plate.
2. Measure rotating brake disc. Replace disc when it is worn
down to 9 mm (.35 in.).
At the same time remember to readjust the horizontal levelling
equipment for the platform in twin mast configuration.
If the brake cannot be electrically released, check:
– that the rectifier is in order and energized.
– that the brake contactor is in order.
– the voltage to the magnet coil (nom. 195V DC).
– the resistance of the coil (nom. approximately 121 Ohm).
Replace electromagnet housing with coil if the coil is
detective.
mm
25
.
0
n.
mm
mi
0.6
.
x
ma
ALIMAK0235
E5
B
Guide roller
Wear limits
Dimensions
A
New roller
(mm)
Worn-out roller
(mm)
Ø 74
(Ø 2.91 in.)
min. Ø 68
(min. Ø 2.68 in.)
B
A
Measure with sliding caliper.
min. 2
(min. .08 in.)
Note that the ”wear” on the roller face must be equal – all
around.
e 52
Adjustment of guide rollers
CAUTION! Rollers must only be adjusted when there is no
load on the platform.
The following adjustments are carried out by freeing the
attaching bolt/nut of the roller and rotating the eccentric shaft
with the tool provided until the correct setting is attained. Then
retighten the bolt.
Support rollers
Wedge
Side roller
Support rollers
1. Adjust the upper support rollers so that the platform
structure is parallel to the front edge of the mast frame.
e 100
2. Adjust the lower support rollers so that the frame is parallel
to the mast tubes in the vertical plane.
Side rollers
Machinery frame
CAUTION! The side rollers must be adjusted when they are
level with a horizontal frame of the mast and always
adjusted in pairs.
3. Loosen the side guide rollers and center the platform
frame between the mast tubes using wedges as shown.
4. Single roller:
– Adjust both side rollers with air gap 0.7 mm (.027”) and
lock them in this position.
With a roller assembly:
–
Push bottom roller of the assembly against the mast
tubes and adjust the air gap between the top roller and
mast tube to 0.7 mm (.027”) and lock the assembly in
this position.
Note! The side rollers must NOT be adjusted closer than 0.7 mm
(.027”). Only occasional contact between roller and mast tube
is allowed during operation.
ALIMAK
Air gap 0.7 mm (.027”) must be done on
both side rollers AT THE SAME TIME
and be adjusted with the side rollers in
level with one horizontal mast frame.
E6
Pinion
Max. worn gear
Check the wear with the aid of sliding caliper.
New gear
New gear = 38.5 mm (1.51 in.)
Max worn gear = 37.1 mm (1.46 in.)
The counter roller for the pinion must be changed when the
pinion is replaced.
e 53
(.31”)
ø 8 mm
Max. worn rack
New rack
Rack
Measure with a dia. 8 mm (.31 in.) gauge rod and sliding caliper.
New rack = 39.9 mm (1.57 in.)
Max worn rack = 38.2 mm (1.50 in.)
e9
Mast tubes
Checking of wear and corrosion of the mast sections is carried
out by means of an Alimak ultrasonic tester, P/N.3001 991-301.
The bottom mast section is throughly checked.
New mast tubes ( t ) = 4.2 mm (.165 in.) nom.
e 11
Max. worn mast tubes ( t ) = 3.6 mm (.142 in.) – approximately
15% reduction of wall thickness.
ALIMAK
E7
Measuring the radial play of the rotating shaft on
the safety device
CAUTION! Do not lubricate the safety device before test.
1. Clamp a support ( A ) on the rack with the aid of a C-clamp –
approximately 1 mm (.039 in.) above the safety device
pinion.
2. Measure the play with a feeler gauge.
3. Lift the pinion with the aid of the cranking lever from the
tool kit or some other suitable tool and measure the play
again.
Note that the pinion may not be turned but must remain in
precisely the same position during both measurements.
4. The difference between the two measured values is the radial
play in the safety device shaft.
5. If the radial play is greater than 0.6 mm (.024 in.), the safety
device must be replaced.
ALIMAK
e 15
E8
Drop test
To be carried out by trained service personnel.
A drop test with full load shall be carried out for each new
installation and then at least once every 3 months – or in
accordance with local safety regulations.
DANGER!
Brake malfunction hazard
No one is allowed on the platform during a drop test.
Will cause severe bodily injury or death.
If the safety device begins to trip or if noise occurs in the safety
device during operation, the platform must be taken out of
service immediately and the local ALIMAK representative
notified for action.
e 16
CAUTION! In twin configuration both drive units must
be tested at the same time, mechanically
connected.
1. Testrun the platform in upwards and downwards direction to
ensure that the brakes have sufficient brake torque.
2. Connect the drop test cable to the terminal block marked
”Drop test” inside the platform electric M-panel.
3. Attach the cable to the railing adjacent to the electric panel
and lower the pushbutton box outside the railing to the
ground. At the same time, check that the cable is suspended
in such a way that it cannot be crushed or be obstructed when
the drop test is carried out.
e 17
Drop test must be carried
out with full load.
4. Load the platform with full load. Switch on the main
ON/OFF switch and run the platform from the ground level
up approximately 1.5 meters (5 ft.) by means of the button on
the pushbutton box on the testing cable.
ALIMAK2017
E9
5. Press the button on the drop test pushbutton box marked with
an arrow symbol and maintain it in the depressed position.
This releases the motor brakes and the platform will drop
until it reaches the tripping speed and the safety device is
actuated.
Release the pushbutton immediately if the safety device
does not function and stop the platform – at least 0.5 meters
(approximately 2 ft.) above lower normal landing level.
The brake(s) is applied when the pushbutton is released.
6. Run the platform upwards 0.2 meters (8 in.) to release the
mechanism of the safety device. Slide the platform to the
normal lower landing level with the drop test equipment and
the pushbutton with the arrow symbol.
7. Remove the test cable.
8. Check that the microswitch in the safety device functions by
test running the platform downwards with ordinary operating
equipment.
9. Reset the safety device in accordance with instructions to be
found on next page:
Indicating pin
Calculating the stopping distance before resetting
The safety device stopping distance can be measured between
the end face of the safety device and the end of the indicating
pin – measure ”L”, see figure.
Multiply measure ”L” with factor 118 for safety device type GF.
CAUTION! The safety device must be exchanged if
measure ”L” exceeds the value stated on the
safety’s sign.
ALIMAK
L
e 19
E 10
Resetting the safety device
If the safety device trips during normal operation, a careful
check must be made of the motor brake(s), transmission, pinion,
rack and all guide and counter rollers by trained /authorized
service personnel, before the safety device can be reset. The
cause of the tripping must be determined and rectified.
The safety device may be reset after a drop test, without having
to carry out the checks listed above.
Exchange intervals, see sign on safety device!
WARNING!
Falling hazard
Never reset the safety device above ground landing.
Tightening
torque 20 Nm
(14.8 lbf x ft.)
Can cause severe injury or death.
Resetting
To be carried out by trained service personnel.
1. Switch off the main switch.
2. Unscrew the bolts (1) and remove the cover (2).
3. Unscrew the bolts (3).
4. Use the sleeve (5) and the cranking lever (4) to
back off the nut (7) until the end of the pin (6)
is on a level with the end surface of the safety
device.
5. Install the bolts (3) and the cover (2) with the
bolts (1).
6. Remove the protective cover (9).
7. Tighten the bolt (8) by hand as far as
possible and then a further 30° with aid of the
sleeve and the cranking lever (4) – in the
direction indicated by the arrow on the cover.
8. Reinstall the protective cover (9).
9. Switch on the main switch and run the
platform up approximately 20 cm (8 in). upward
to reset the centrifugal weight of the safety
device in its neutral position.
10. Make a test run.
From a safety point of view the safety device must
never be dismantled more than is necessary to reset
it as described above. For this reason the safety
device is sealed.
ALIMAK
e 21
E 11
.INTERVAL
40 operating hours
or at least once a
month
1000 operating
hours or at least
once a year
Lubrication diagram
ITEM
LUBRICATING POINT
LUBRICANT VOLUME INSTRUCTIONS
1
Gear box
Check oil level.
2
Rack
Alilube
Part No 3001 396-201
Lubricate during lowering
and take platform out of
operation for 2-3 hours to
permit the spray to
congeal.
3
Safety device
Grease
Grease nipple.
4
Pedestal base mechanical jacks Lube oil
Lubricate threads.
5
Outrigger mechanical jacks
Grease
Grease nipples.
6
Chassis steering link rods
Grease
Grease nipples.
7
Chassis travel machinery
transmission
Grease
Grease nipples and
slide surfaces.
8
Gate lock, mechanical
interlock and Teleflex cable
– where applicable
Lube oil
Lubricate bearings and
slide surfaces.
9
Mech. horizontal levelling
equipment and Teleflex cable
Lube oil
Lubricate bearings and
slide surfaces.
20
Helical gear
Alioil HD
3.7 lit.
Part No 9040 996-000
Change oil.
(0.92 US.gallon)
The lubricating oil grades indicated above have been used when the equipment is delivered from the factory. Only oil
recommended by ALIMAK shall be used. If for some reason this is not possible, please contact ALIMAK or ALIMAK
representative for advice.
If changing to another oil, the gear box and air filter must first be carefully cleaned.
WARNING!
Lubricant harmful in contact with skin and
lungs.
Always use protective gloves and dust mask.
Possible risks of irreversible effects.
See applicable MSDS located in document box
located on the platform.
WARNING!
Falling hazard.
Always use a fall arresting device if there is a need
to climb above the safety railing to reach the rack or
items to grease or inspect.
Can cause severe injury or death.
ALIMAK 3
E 12
2
8
6
7
4
5
3
20
1
20
1
9
9
ALIMAK
E 13
Greasing the manual screw jacks – applicable for
pedestal base only
1. Remove the plastic plug on the jack case.
2. Insert the tip of the lubricating can into the hole as shown
( A ) and generously lubricate both the screw threads and
axial bearing.
3. Extend jack piston until there is a play between the jack case
and the spanner grip.
B
4. Fill oil in this space as shown ( B ).
5. Reinstall the plastic plug and reset the jack to retracted
position.
ALIMAK
e 44
A
E 14
Safety, information and product signs
Item Description
Designation
Part No.
1
2
3
Identification /Type sign
Safety instructions:
Danger sign:
Aluminum
Instructions for use
The use of this equipment by untrained
personnel can cause
serious hazards.
9032 855-101
9064 425-101
9064 426-101
4
Warning sign
Warning sign
Hazardous voltage EU
Hazardous voltage US
9032 789-000
9028 518-101
5
Danger sign
Platform extension
collapse hazard
9064 427-101
6
7
Warning sign
Danger sign
No foreign material ...
Tipping hazard when
using pedestal base
9064 428-101
9064 429-101
8
9
10
11
Danger sign
Danger sign
Danger sign
Danger sign
Tipping hazard
Missing bolt hazard
Crushing hazard
Platform collapse
hazard
9064 430-101
9064 431-101
9064 432-101
9064 433-101
Load sign, platform
Sign base arrangement
Instruction sign
Plastic
9064 434-000
Plastic
9064 435-000
Notice – before towing... 9032 862-101
IInstruction sign
Instruction sign
IInstruction sign
Pictorial disengaged
9032 867-100
Pictorial engaged
9032 867-200
Pictorial, driving around 9040 718-100
curves
12
13
14
15
16
17
18
19
20
21
22
Aliclimber sticker
Alimak sticker
ALIMAK
E 15
Location of safety, information and product signs
1
5
10
9
2
3
6
4
4
14
13
11
22
7
8
15
21
18
19
20
ALIMAK
ELECTRICAL TROUBLESHOOTING
Electrical troubleshooting . . . . . . . . . . . . . . . F 1
Example . . . . . . . . . . . . . . . . . . . . . . . . . . . F3
Circuit diagram . . . . . . . . . . . . . . . . . . . . . . .
.
ALIMAK
F0
F1
Electrical troubleshooting
All forms of troubleshooting require adapting the procedure to
the function and structure of the equipment and to other
conditions which may be local in nature. For example, the
erection site, maintenance, previous operational problems, etc.
The main principles of all forms of troubleshooting in electric
systems are presented below. Troubleshooting is carried out with
the aid of a test lamp or voltmeter. A voltmeter is recommended,
preferably a universal instrument, for rapid and reliable troubleshooting.
f1
WARNING!
Hazardous voltage.
Only authorized electricians or authorized service
personnel can carry out work on electrical equipment.
Can cause severe injury or death.
f4
Procedures for troubleshooting
1. Use the circuit diagram. This diagram is located in a box
on the platform. The diagram indicates how the electrical
equipment should function, how it is built and connected.
2. Begin by checking that power is supplied on all three phases
of the incoming main voltage.
3. Check that the outgoing power cable receives power when
the main switch is switched on.
4. Now begin troubleshooting on the platform by checking that
the power reaches the platform.
5. Check that the stop circuit is not open, in other words that
thermal relays and phase failure relays have not been actuated
and that the limit switches for the safety device, final limit
switch, and other limit switches have closed contacts. Make
sure that the stop button is not in the depressed position.
When the stop circuit is closed, the main contactor will be in
the ”On” position.
6. Check with a voltmeter/test lamp that the limit switches for
”Up” and ”Down” function properly.
7. Connect the voltmeter/test lamp between the zero terminal
and the terminal as indicated on the circuit diagram, and
check that power is supplied where it should be supplied.
Go through each terminal, one by one, and work
methodically so that the circuits which function correctly
can be eliminated and the fault can be localized.
ALIMAK
F2
8. Check in the electrical M-panel to ensure that power occurs on all three phases of the incoming
cable.
9. Check that the “Up” and “Down” pulses from the pushbuttons and control devices reaches the
electric cabinet on the platform in the intended manner.
10. Make a trial run and check that the coil on the relevant contactor (Up, Down) receives power
and that it is actuated. Check that the brake contactor is actuated and that the brake coil is
energized so that the brake releases.
11. If the fault does not occur in the platform operating system but in its lighting or signal system,
carry out fault-tracing in a manner similar to that described above. Check the circuits
methodically one by one until you have narrowed down the fault and localized it.
Experience shows that certain faults have symptoms which, may indicate the cause and the
probable location of the fault:
Example:
Symptom
Probable cause
Probable fault location
a) Control fuses blow
immediately.
Short-circuit,
equipment grounded.
Damaged power cable, damaged
pushbutton, limit switchs etc. externally located.
b) Fuse blows after a short
period of time.
Equipment partially grounded, Dampness or water in junction box,
overload.
limit switch etc. due to damaged
electrical components.
Improperly connected equipment.
c) Platform stops or cannot
be started.
Limit switch in stop circuit
has tripped/been actuated,
blown fuse.
Stop pushbutton depressed, thermal
relay actuated due to overload or
careless operation, *switch in safety
device actuated, power failure from
supply. See also a) and b) above.
d) Platform stops and can
be restarted, but then
stops again.
Switch actuated in the
stop circuit.
Switch in stop circuit improperly
positioned.
*The switch is set at the factory and may not be adjusted.
ALIMAK
G0
ASSEMBLY
Before assenbly . . . . . . . . . . . . . . . . . . . . . . . . . . . . . . . . . . . . . . . . . . . . . . . . . . .
Pedestal arreangements . . . . . . . . . . . . . . . . . . . . . . . . . . . . . . . . . . . . . . . .
Connection to power supply . . . . . . . . . . . . . . . . . . . . . . . . . . . . . . . . . . .
Ground pressure . . . . . . . . . . . . . . . . . . . . . . . . . . . . . . . . . . . . . . . . . . . . . . . . .
Erection of single mast platform with pedestal base . . . .
Erection of twin masted platform . . . . . . . . . . . . . . . . . . . . . . . . . . . .
Electrical/mechanical horisontal levelling equipment . .
ALIMAK 33870 -1/01
G1
G2
G4
G5
G6
G8
G9
G1
Before assembly
Delivery inspection
Check the delivery against shipping lists and look for transport
damages. Should there be any damage, report same to the
responsible transport insurance company within 7 days from the
date of arrival of the goods.
Other claims should be made to ALIMAK representative
within the same period.
Permission
Make sure the chosen erection site meets the requirements set
by safety and regulatory authorities and that where required,
authorization to install and use has been granted.
Also check that the erection site is suitable with regard to local
wind conditions – if structures nearby create tunnel effects.
Erection site
Prepare installation so that electric power, light, lifting
equipment and tools are available, and that roads and the site
can receive the platform and the platform transport.
The A-System Platforms MUST NEVER be installed on mud,
snow, ice, or on unsuitable footings.
Where possible, preassemble of mast ties. Suitable places for
attaching the ties are balconies or other concrete or steel
structural members. Remember that these structures must be
strong enough to withstand the force of the ties and it is the
responsibility of the user / owner to ensure that in fact is xxxx
Height of guards rails for platform / extension facing the
structure must be according to local regulations.
Note that the distance between the work platform and another
machine MUST NOT be less 0.5 meter (1 ft. 8 in.)
Safety Equipment and Protective Clothing
Regulated safety equipment and clothing such as hard hat,
safety shoes, fall arresting devices, etc. shall be used.
ALIMAK 33871 -1/01
G2
Electrical power supply
Prepare for the power supply from its source. Make sure that the
power supply cable is properly sized so that voltage drop is
minimized.
Maximum permitted voltage drop, measured at motor, at 480V =
24V, which is equal to 5%.
Minimum required conductor size and fuse specifications are
indicated in the table below.
No. of motors
on the same
power outlet
Conductor
size
sq. mm
Fuse*
Amp. delay
action
2(2 x 4 kW)
4 x 10.0
(AWG No. 6)
63
* In order to avoid single phasing, if main
fuse should blow, we recommend use of
three- phase circuit breaker.
Pedestal base arrangements
See values for free-standing, tie distances and free untied mast
top on separate data sheet for respective machine.
Pedestal base for work platform with drive unit type A
Location of mast section and rubber buffers.
Pedestal base for work platform with drive unit type A.
Location of mast section and buffers.
ALIMAK 33872 -1/01
G3
Pedestal base for work platform with drive unit type B.
Location of mast section and buffers.
ALIMAK 33873 -1/03
G4
Connection to power supply
Power input connection to the work platform electrical M-panel
should be made with a minimum of 4 x 10.0 mm 2 (approx.
AWG No. 6 ) cable.
Turn on the main switch and check the phase failure indication
light on the outside of the panel that the machine has been
connected properly with correct phase sequence.
If the phase indication light is illuminated, change to the correct
phase sequence by means of the phase inverter inside the panel.
Locate cables for platform electrical components in suitable
hollow profiles located underneath the platform.
L = ”Master” equipment in a twin mast installation.
R = ”Slave” equipment in a twin mast installation.
Platform electrical M-panel
Underside of platform electrical M-panel
Outlet Left Electric operated Outlet for
drive unit
load ramp
base control
Outlet Right
drive unit
Power supply
Buzzer
Outlet for
interlock on
catwalk
Jumper plugs
ALIMAK
G5
Ground Pressure
Maximum ground force P with 100 m (330 ft.) mast for:
pedestal base:
mobile chassis:
48 kN (10 800 lbf.).
64 kN (14 400 lbf.).
Minimum required soil bearing pressure.
Class of material
Allowable foundation
pressure Pf
1. Massive crystalline bedrock
192 kPA
(4 000 psf.)
2. Sedimentary and foliated rock
96 kPA
(2 000 psf.)
3. Sandy gravel and/or gravel (GW and GP)
96 kPA
(2 000 psf.)
4. Sand, silty sand, clayey sand, silty gravel and
clayey gravel (SW, SP, SM, SC. GM and GC).
72 kPA
(1 500 psf.)
5. Clay, sandy clay, silty clay and clayey silt (CL,
ML, MH and CH).
48 kPA
(1 000 psf.)
Required size of the support plate or timber blocking is
calculated as follows:
A=
√ P / Pf
(m)
or
A=
√ P / Pf
x 12 (in.)
Example:
ALICLIMBER APF-50A on pedestal base.
The ground consists of gravel, with allowable ground bearing
pressure Pf = 96 kPA (2000 psf.)
g 20
Required size of the support plate is then:
A=
√ 48000 / 96000
A=
√ 10800 / 2000
= 0.7 m or
Support plate
x 12 = 27.9 in.
ALIMAK
G6
Erection of single mast platform with pedestal base
Note that mast with a pedestal base must always be tied.
The first tie shall be mounted at a maximum height of 3 m
(10 ft.) from the ground/foundation.
1. Check under the heading ”Ground pressure” – to determine
if the ground has the required bearing capacity. Level the
ground and if required insert blocking under the jack feet.
2. Plumb the mast by means of the jacks and a plumb line or
spirit level in 2 directions.
3. Check that the jacks are equally loaded by comparing the
resistance in the respective jack handle.
CAUTION: Ensure that the founda tion or bedding has the
necessary bearing resistance. Install support
timber under the pedestal base plate. Note that
the pedestal base MUST NOT rest on the
levelling jacks alone.
This lock pin must be
installed when erecting a
single mast platform
ALIMAK 33878 -1/01
G7
4. Install the platform sections, railing and gates in accordance
with the instructions under the heading ”Assembling platform and railings”.
5. Install the stair assembly, if used, onto the brackets on the
pedestal base.
6. Connect the power cable to the inlet on the platform
electrical M-panel. The trailing power cable should be
installed with a cable bracket and placed as far out as
possible from the mast along the platform center line.
Then place the cable on the ground/ alternately into the
cable basket by twisting it so it falls by itself in spirals
forming a ring with the same diameter on every coil. Try to
form equal diameters and smaller then the inner diameter of
the cable basket.
g 88
7. Drive the machine up in accordance with the instructions
under heading ”Emergency Electrical Operation” so that the
lower final limit switch leaves the cam.
Note that when the drive unit rests on its rubber buffers the
final limit switch rests on the lower final limit cam and the
platform cannot be operated.
Erect the mast and mast ties in accordance with the
instructions under the heading ”Erection of mast”.
CAUTION: Barricade the restricted area on the ground
according to local regulations.
Contact ALIMAK or ALIMAK representative if mast heights
above 100 meters (330 ft.) are required or if special wind
conditions will require cable guides.
ALIMAK 33879 -1/01
g 27
Trailing power cable
G8
Erection of twin masted platform
DANGER!
Missing bolt hazard.
ONE person is to be made responsible for mast
bolting to ensure that ALL mast bolts are installed
and properly tightened.
Will cause severe injury or death.
h 44
The erection is made in accordance with the instructions for
single mast applications with the following additions:
1. Place both the single mast platforms on prepared sites close
to the face of the structure and in line.
The distance between the masts shall be approximately 0.5 m
(1 ft. 8 in.) longer than the complete installation will be, so
that there will be sufficient space and it will be possible to
assemble all the platform sections.
2. Align and connect the platforms to each other by moving one
of the drive units.
Necessary adjustments upwards are made with the jacks or
by cranking the drive unit – if there is sufficient mast height.
CAUTION: The platforms must be in alignment when
the platform ends are bolted together.
3. Prepare respective horizontal levelling equipment in accordance
with the instructions below.
4. Erect both masts simultaneously.
APF-50A drive unit to the left in a twin mast installation
Platform end in this direction
ALIMAK 33880 -1/01
G9
Electrical and mechanical horizontal levelling
equipment for twin mast installations
During twin configurations both drive units must be
synchronized with a special electrical equipment intended for
twin masts installations.
The lock pins of the pull/push rods on a drive unit type APF50A must be removed so that the electrical and mechanical
horizontal levelling equipment can work.
Mechanical connection to drive unit APF-50A
and work platform
CAUTION: The cams in the electrical / mechanical levelling
device must be relocated and adjusted according
to the following in a twin mast installation.
This lock pin must be
dismantled when erecting
a twin mast platform
APF-50A drive unit to the right in a twin mast installation
Platform end in this direction
ALIMAK 33881 -1/01
G 10
Mechanical connection to drive unit APF-50B
and work platform
APF-50B drive unit to the left in a twin mast installation
Note: Male and female
ends of the platform
sections.
This figure continues on the following page
ALIMAK 33882 -1/01
G 11
APF-50B drive unit to the right in a twin mast installation
Push/pull rod connected to
the platform and the mechanical
electrical levelling equipment.
Teleflex cable arrangement for corner platform
ALIMAK 33883 -1/01
G 12
Mechanical Horizontal Levelling Equipment
– for twin masted platforms with drive unit type B
(The type A drive unit is adjusted in a similar manner)
Adjustment
1. Check that the platform is level between the masts.
If necessary slide one of the drive units to achieve this.
See instruction under the headline ”Sliding”.
2. Adjust the Teleflex cable by means of the nuts (A) so that the
space between linkarm (B) and push rod (C) is 2 mm (.08 in.).
If the space between (B) and (C) is too small sliding cannot
take place.
Increase
A
Reduce
C
Press
2 mm
(.08 in.)
B
B
D
3. Release the link system and rotate down the linkarm (B) until
it contacts the rod. Loosen and slide the cam (D) up
against the linkarm. Tighten the cam in this position.
A similar adjustment shall be done with the other linksystem
on the other drive unit.
ALIMAK
Functional test of mechanical horizontal levelling equipment
1. Drive the platform upwards approximately 2 m (6.5 ft.) and
then switch off the main power.
2. Check that the platform is level between the masts.
3. Mark the positions of the drive units on the mast.
a
c
Horizontal plane
g 36
Platform
4. Carefully slide one of drive units downwards until its link
system is forced back so that the motor brake is locked.
Check by means of the mark on the mast (c) that ”max.
allowable difference in height” ± 2° is maintained.
CAUTION: Immediately interrupt the function test if
the platform tends to exceed the prescribed
value for maximum allowable difference in
height. Repeat the adjustment of arm (B)
and test once again.
5. Dismantle the release levers after finishing the function test
and return these to the document boxes.
6. Reinstall all covers that have been removed.
ALIMAK 33886 -1/01
G 13
G 14
Electrical Horizontal Levelling Equipment
Adjustment
Adjust switches (E) so that their operators are just touching the
cams (D).
Drive unit type A levelling equipment
Drive unit type B levelling equipment
D
E
D
g 74
E
Functional test
Test run and check that the inclination (b) of the platform does
not exceed ± 2°.
If the measures cannot be maintained – adjust the positions of
the electrical switches (E).
a
c
bo
Horizontal plane
g 39
Platform
ALIMAK 33887 -1/01
H0
MAST AND PLATFORM
Caution . . . . . . . . . . . . . . . . . . . . . . . . . . . . . . . . . . . . . . . . . . . . . .
Assembling work platform and railings . . . . .
1.8 m (6 ft.) extension of work platform . . . . .
Extension structural tubes . . . . . . . . . . . . . . . . . . . . . .
Extra long 2.7m (9 ft.) extension . . . . . . . . . . . . . . .
Railing cross members . . . . . . . . . . . . . . . . . . . . . . . . . . .
Erection of mast . . . . . . . . . . . . . . . . . . . . . . . . . . . . . . . . . . .
Canopy/Weather protection . . . . . . . . . . . . . . . . . . . .
Final operation before inspections . . . . . . . . . . . .
ALIMAK
H1
H2
H3
H3
H4
H5
H6
H 15
H 12
H1
CAUTION:
Before installation of the mast, mast ties and platform
sections, visually check for structural damage such as
deformation, cracks and corrosion.
If any structural damage or severe corrosion is seen on such
items as mast sections, mast ties or other load carrying
members, the platform must be immediately taken out of
service and the extent of the damage be determined.
Corrective action must be taken before the platform is put
into service again.
1
Equal
1
3
2
4
h 28
ALIMAK
H2
Assembling work platform and railings
A-50 System Mast Climbing Work Platforms (APF) can be
erected as a single or twin masted platform. By a combination of
1.5 (4 ft. 11 in.) and/or 0.82 m (2 ft. 8 in.) platform length
sections the platform can be adapted for most installations.
a 71
To outlet X91, X93
or X95 on the junction
box on the nearest
drive unit.
However, the following conditions must always be fulfilled:
– For single masts the platform length on each side of the mast
shall be equal if possible. The difference may only be one
platform section of 1.5 m (4 ft. 11 3/8 in.). The longer end
shall be dimensioned with regard to allowable max. load.
– The shortest distance between the masts for a twin mast
work platform is 3 platform sections.
a 72
Details for assembling platform sections
– For twin mast platforms with drive unit type A:
Only 2 1/2 platform sections are allowed on the outside end
of each mast.
– For twin mast platforms with drive unit type B:
Platform sections are not allowed on the outside end of each
mast.
CAUTION: If a type A drive unit is combined with a type B
– always start the platform assembling from
the type A drive unit first, due to the fixed
platform male/female platform brackets on the
drive unit.
ALIMAK
H3
Max. 1.8 m (6 ft.) extension of platform
Extension of the platform is made by extension beams, post
brackets and posts according to the figure below.
The extension platform is built to accept planks of pine or
spruce dimension 32 x 125 mm (1 1/4 x 5 in.) or wider.
Alternatively water resistant plywood minimum thickness 12 mm
(1/2 in.) can be used.
When extending the platform the maximum allowable live
load on the platform must be reduced by the total dead weight
of the extension.
h 55
IMPORTANT!
Do not forget to
secure railings with lock bolts.
a 73
Post
Post bracket
IMPORTANT!
The extension beams must
be secured with lock bolts.
Extension of work platform with tied mast
Platforms extension cannot be located directly behind the mast.
Extension structural tubes
Extension structural tubes must be of quality of at least SS 2134
(ASTM A500 Grade B) and color marked according to the
figure below to indicate when the max. allowable extension is
reached
Maximum allowable extension
Color marking
h 37
Maximum allowable extension
ALIMAK
Color marking
H4
Extra long 2.7 m (9 ft.) extension
h 48
Reinforcement for extra 2.7 m (9 ft.) long extension
h 55
IMPORTANT!
Do not forget to
secure railings with lock bolts.
Height of guard rails according to EN 1495
Local regulations must govern if more stringent.
Wall
Guard rail
d (m) ≤ 0.3 m
(≤ 12 in.)
0.3 ≤ d ≤ 0.5 m
(12 in. ≤ d ≤ 20 in.)
> 0.5 m
(> 20 in.)
h (m)
≥ 0.7 1)
(≥ 27.5 in.1) )
≥ 1.1 2)
(≥ 43 in. 2) )
0
(0)
1)
without midrail
2)
with midrail
h
h 31
d
Work platform
Height of guard railing according to
ANSI/SIA A92. 9 - 1993 (or OSHA)
On all exposed sides ”h” = 42” ± 3” (1070 ± 75 mm).
Distance ”d” determines the use of guard railing according
to local regulations.
ALIMAK
H5
Railing Cross Members
The railing cross members shall be of high quality (for example
pine or spruce) with dimensions as per figures below for
different distances between the posts. Ensure the wood is in
good condition (i.e. no cracks, warps, knot holes).
Note! The height of the toeboard shall not be less than:
minimum height 150 mm (6 in.) according to EN 1495.
minimum height 4 in. (100 mm) according to OSHA (or
ANSI/SIA A92.9-1993).
IMPORTANT!
Secure with
nail/wood screw.
height
min. height
see above.
Joint
h 38
h
w
The loop must
rest on the socket
and the locking
bolt tightened
Railing cross members according to EN 1495:
Maximum distance
between the posts
1.5 m ( 5 ft.)
2.5 m ( 8 ft.)
3.5 m (11.5 ft.)
Minimum dimension.
Top rail, midrail and toeboard w x h
25 x 100 mm (1 x 4 in.)
25 x 125 mm (1 x 5 in.)
32 x 125 mm (1- 1/4 x 5 in.)
Railing cross members according to OSHA:
Bevel
Maximum distance Minimum top rail, midrail and toeboard
between the posts
wxh
wxh
wxh
8 ft. (2.5 m)
h 73
ALIMAK
2 x 4 in.
2 x 4 in.
1 x 4 in.
H6
Erection of mast
To be carried out by trained service personnel.
The erection crane is mounted into one of the two sleeves on the
drive unit. The mast sections can then be lifted to the platform
from the ground level. Always have the mast sections close to
the site of erection, and on dry firm ground.
Note that the maximum allowable load of the erection crane
can only be lifted vertically. Do not exceed the maximum
allowable load of the platform.
During mast installation cable guides and ties should be
installed at prescribed elevations. See chapter K.
DANGER !
Crushing hazard.
When platform is moving, always stand inside
platform railing to avoid being crushed by balconies,
scaffolds or other protruding structures.
Will cause severe injury or death.
h 40
1. Lift one mast section with the erection crane and grease the
guiding cones. Swing the section over the mast top, lower
and install mast bolts, tighten them. Insert mast bolts with the
nut located on top.
Tightening torque: 350 Nm (258 lbf x ft).
Use the lift sling as illustrated.
h 41
h 42
2. Drive the platform up so that the final limit switch leaves the
cam. See instructions under the heading ”Safety limit
override operation” – chapter D in this manual.
ALIMAK
H7
3. Check that the normal lower limit and final lower limit cams
are correctly mounted and that their attachment bolts are
properly tightened. Make a function test by driving downwards onto the cam.
Lower normal and final limit cams
Lower limit cams settings.
NOTE! These are only preliminary adjustments.
To be re-adjusted after final commissioning.
Measure
G
Work platform
APF-50A & APF-50B
LN
LF
LR
1235 mm
– 110 mm – 150 mm
(48.62 in.) (– 4.33 in.) (– 5.90 in.)
(+) = above bottom landing level.
(–) = below bottom landing level.
Rack
210
Bottom landing level
LN
LF
Normal lower &
upper limit switch
Final limit
switch
G
Base pedestal lower edge
ALIMAK
H8
4. Drive the platform carefully up as close to the mast top as
possible in order to install the next mast section.
Connect and lift one mast section, grease and swing the
section out, lower and bolt.
Note that mast sections must not hang from the erection
crane during operation of the platform.
5. Erect the remaining mast sections until required mast height
is achieved. Tie the mast as prescribed.
h 43
IMPORTANT: Always install mast
bolts so that the nut is on top as shown.
CAUTION: Safety device test with erection load on the
platform must be performed as soon as a
mast height of 5 m (17 ft.) is reached.
See instructions for safety test execution in
chapter “Safety device test” in this
manual.
DANGER !
Missing bolt hazard.
Tighten all mast bolts on previously installed mast
sections before disconnecting mast section from
erection crane.
Will cause death or personal injury.
h 44
Emergency stop button located
on platform electrical M-panel.
WARNING!
Unintentional moving.
Always depress the red ”Emergency stop”-button to
prevent unintentional moving while work is carried
out on the mast.
h 31
Can cause severe personal injury or death.
Turn the button to reset the switch.
ALIMAK
H9
6. Install the upper normal limit and final limit cams in the
pre-drilled holes on the top mast section
7. Put covers on the top mast section tubes.
8. Make a function test of the normal limit switch by driving
onto the limit cam located on the top mast section.
9. Retighten all mast bolts on the way down. Tightening
torque 350 Nm (258 lbf x ft).
10. Install the mast protection screens on the drive unit/-s.
Upper normal and final limit cams
Upper limit cams settings.
Measure
Work platform
APF-50A & APF-50B
UN
UF
– 150 mm
(– 5.90 in.)
– 110 mm
(– 4.33 in.)
(+) = above desired final elevation.
(–) = below desired final elevation.
Rack
210
Note: Minimum 1250 mm
(49.21 in.) to top of mast.
Upper final
limit cam
Top desired final elevation
UF
UN
Normal upper
limit cam
Final limit switch
Normal upper &
lower limit switch
ALIMAK
H 10
Perpendicularity of the mast
Straight-edge
Check possible out-of plumbness of the mast with a plumb line,
spirit level or a theodolite, when installing the first tie. If a
correction required, adjust it by means of the mast tie.
When installing additional ties check verticality with a long
straight-edge rule, using the ground level plan and first tie as
references. Use a theodolite if desired, but never use a spirit
level above the first tie.
h 46
The use of a straight-edge will also indicate if the mast is
twisted.
Straight-edge
Try to use the same or as few references as possible for the
entire mast installation.
Straight-edge rules may be fabricated on site. As an example,
they can be a 2” x 4” x 1.5 m (5 ft) long piece of timber and be
attached to the mast with tie wire. The straight-edge must be
properly attached.
CAUTION: Remove straight-edges after the mast has
been installed.
Straight-edge
ALIMAK
H 11
Canopy/Weather protection
The weather protection frame is assembled in accordance with
the figure below and covered with reinforced plastic cloth.
Anchor alt. plug with sealing for roof
The cloth is attached with rubber straps and anchors into
existing reinforced grommets in four rows at a distance of l m
(3 ft.) along the cloth. Holes in the cloth for mast(-s) and gate
are cut with a knife.
Note – If the plastic cloth is properly stretched the wind forces
will be reduced.
It is forbidden to use the canopys/weather protection with free
standing Aliclimbers.
h 77
Rubber strap
The roof cross members are constructed of wood 1 1/2" x 3"
(Not part of Alimak’s delivery)
Telescoping pipe
ALIMAK
H 12
Final operation before inspection
1. Remove the erection crane and all erection equipment from
the platform.
2. Execute service according to ”Service and Maintenace”
Schedule with the exception of items 2, 27, 28, 40, 41, 50,
52, 53 and 54 according to chapter “Service and Maintenance”.
3. Instruct the operator/-s regarding safety, safety regulations,
operating instructions, service and maintenance.
THE PLATFORM IS NOW READY FOR INSPECTION !
ALIMAK
PROJECTING HOIST MAST
Mast ties . . . . . . . . . . . . . . . . . . . . . . . . . . . . . . . . . . . . . . . . . . . . . I 1
Tie forces . . . . . . . . . . . . . . . . . . . . . . . . . . . . . . . . . . . . . . . . . . . . I 2
Tie distances . . . . . . . . . . . . . . . . . . . . . . . . . . . . . . . . . . . . . . . . I 4
ALIMAK 30502
I0
I1
Mast ties
Tying of the mast is dependent upon the desired mast height. If
the platform is equipped with mobile chassis, pedestal base or
protective canopy the mast must be tied in accordance with
instructions listed above. For each installation and set-up, the
type of tie must be chosen to suit the particular installation.
When using mast ties the mast must ALWAYS be facing the
structure face,
Where ties are to be attached to cast in place inserts, this must
take place early enough to ensure the concrete is cured and at its
required strength. Inserts must be suitably placed in the concrete
with proper reinforcing steel.
Owner/user is responsible for ensuring that the structure can
safely withstand tie forces.
Only Alimak genuine pipe clamps are to be installed.
ALIMAK
I2
Mast tie type R2A
The tie is preferably intended for single and twin mast
installations with drive unit type A. The tie can also be used
with drive unit type B – but only with one drive unit on the
mast!
L min. – max.
k 35
F
The distance between the wall and the mast center for this tie
type is anywhere from a minimum of 650 mm to a maximum of
2050 mm.
Max wall force P is calculated according to the following
formula:
B
P
P
Mast tie
Part. No.
The tie is steplessly variable in vertical direction. The tie width
varies depending upon chosen length of the tie.
L mm
min. – max.
B
mm
9069 199-080
min. 650
max. 900
700 – 760
830 – 1100
9069 199-115
min. 900
max. 1250
830 – 1110
1000 – 1450
9069 199-155
min. 1250
max. 1650
1000 – 1450
1250 – 1650
9069 199-195
min. 1650
max. 2050
1250 – 1650
1500 – 1650
P = L x 12000 Newton (L and B in mm) F = 12000 Newton
B
Mast tie type 31A
– to be used with drive unit Type B only!
This tie is primarily used for twin masted installations. The tie
is variable in the vertical direction. The tie width varies
depending upon the chosen length of the tie, which is variable
within 690 mm (27.2 in.). The distance between the face ot the
structure and the platform for this tie type is a minimum of 1130
mm to a maximum of 1820 mm (min. 44.6 in. – max.71.6 in.).
L
k 26
F
B
min.
mm
Mast tie
Part number
Embedment set
Part number
1165 (45.8 in.)
1300 (51.2 in.)
1400 (55.1 in.)
1500 (59.0 in.)
1600 (59.0 in.)
1700 (66.9 in.)
1855 (73.0 in.)
625 (24.6 in.)
696 (27.4 in.)
750 (29.5 in.)
804 (31.6 in.)
858 (33.8 in.)
911 (35.8 in.)
995 (39.2 in.)
9050 264-100
–”–
–”–
–”–
–”–
–”–
–”–
9002 931-000
–”–
–”–
–”–
–”–
–”–
–”–
Max force P. is calculated according to the following formula:
P = L x 10600 x R1 x R2 x R3 [Newton (x 0.225 = lbf.)]
B
P
L
mm
P
As this tie cannot take up the torsional
force from the mast it shouldn´t be used
for single mast platforms at heights above
30 m (100 ft.).
B
Max force in bolt PS = 0.66 x P
Force F, parallel to the structures face
F = 10600 x R1 x R2 x R3 [Newton (x 0.225 = lbf.)]
R1, R2 and R3 are reduction factors as a result of overhang, tie
ALIMAK
I3
Mast tie type S4A (ø 48.3 mm)
– to be used with drive unit Type B only!
This tie is used for single masted installations – but only with
one drive unit on the mast! The tie takes up the torsion stresses
of the mast.
The tie is steplessly variable in vertical direction. The tie width
varies depending upon chosen length of the tie.
k 38
The distance between the wall and the mast center for this tie
type is anywhere from a minimum of 600 mm to a maximum of
2050 mm
L min. – max.
Max wall force P is calculated according to the following
formula:
P = L x 12000 Newton (L and B in mm) F = 12000 Newton
B
Mast tie
Part No.
L mm
min. – max.
B
mm
9069 193-080
min. 600
max. 850
500 – 950
600 – 900
9069 193-120
min. 850
max. 1250
700 – 1200
900 – 1100
9069 193-160
min. 1250
max. 1650
800 – 1500
1000 – 1300
9069 193-200
min. 1650
max. 2050
1100 – 1900
1400 – 1600
F
B
P
ALIMAK
P
I6
Tie distances – Mobile chassis
1st tie installed at 15 m (50 ft.) height.
Subsequent ties at max. 15 m (50 ft.) intervals.
Max. overhang 6 m (20 ft.).
If the protective canopy is used:
1st tie installed at 9 m (30 ft.) height.
Subsequent ties at max. 9 m (30 ft.) intervals.
Max. overhang 6 m (20 ft.).
max. 6 m (20 ft.)
max. 15 m (50 ft.)
max. 15 m (50 ft.)
max. 15 m (50 ft.)
k 29
ALIMAK
I7
Tie distances – Pedestal base
1st tie installed at 3 m (10 ft.) height.
2nd and 3rd at 6 m (20 ft.) and 9 m (30 ft.) intervals respectively.
Subsequent ties at 15 m (50 ft.) intervals.
Max. overhang 6 m (20 ft.).
If the protective canopy is used:
1st tie installed at 3 m (10 ft.) height.
2nd tie installed at 6 m (20 ft.) interval.
Subsequent ties at max. 9 m (30 ft.) intervals.
Max. overhang 6 m (20 ft.).
max. 6 m (20 ft.)
max. 15 m (50 ft.)
max. 15 m (50 ft.)
max. 9 m (30 ft.)
max. 6 m (20 ft.)
max. 3 m (10 ft.)
k 30
ALIMAK
INSTALLATION AND REMOVAL OF MAST TIE
Installation of mast tie . . . . . . . . . . . . . . . . . . K 1
ALIMAK 30502
K0
K1
Installation and removal of mast tie
First ensure that the structure to be tied into can withstand the
maximum reaction forces that can occur in the ties. This is
the responsibility of the Owner/User.
Weather conditions
When installing and dismantling the ties the overhang must not
be greater than the tie distance plus an additional 1.5 m (5 ft.).
This only when the wind is not greater than 12 m/sec. (27 mph)
and any load on the platform is evenly distributed on each side
of the mast.
CAUTION: Install scaffold or similar equipment if tie
cannot be installed from the platform or the
structure due to excessive length.
Local safety regulations must apply.
CAUTION !
Tipping hazard with base pedestal.
Always dismantle the platform to a maximum
transport length of 4.5 m (15 ft.) before disconnecting the lowest (1st) mast tie.
Will cause severe injury or death.
WARNING!
Unintentional moving.
Always depress the red "Emergency Stop"-button to
prevent unintentional moving while work is carried
out on the mast.
Can cause severe personal injury or death.
ALIMAK
Turn the button to reset the switch.
K2
Installation of mast tie
1. Install the adaptor plate and brackets inside the mast.
2. Attach the tie brackets.
3. Adjust the length of the tie pipes and install them with the
erection crane or other lifting device.
The pipe adjusting link screws must be screwed out to a
length of approximately 110 mm (4.3 in.) before installation
(See illustration).
Maximum length of adjusting link screws 130 mm (5.2 in.).
4. Straighten the mast. By adjusting the length of the tie
pipes the mast can be turned or adjusted sideways.
5. Tighten all bolts and ensure that the platform clears the
structure and the tie.
CAUTION: The maximum allowable horizontalinclination
of the mast tie is up/down 5°, i.e. 88 mm/m
(1.85 in./ft.).
This must never be exceeded.
max 13
0 mm (
5.2 in.)
before
installa
tion 11
0 mm (
4.3 in.)
Tie bracket
Adjust the length of the tie pipes as close to the tie length as possible,
moving the two pipes so that the holes coincide. Lock the pipes with bolts
and lock nuts.
Adjust the length ± 40 mm (1.6 in.) by turning the link screws in or out.
(Adjust equally on both sides). By adjusting the tie pipes, the length can be
adjusted further – even after the tie pipe has been anchored into mast and
wall (without having to remove the ends). Note that the link screws are
mechanically ”secured” and cannot be screwed off.
ALIMAK
L0
TRANSPORT AND MOVEMENT
Transportation on public roads . . . . . . . . . . . . . . .
Towing of platform without mast . . . . . . . . . . . . .
Towing with erected mast . . . . . . . . . . . . . . . . . . . . . . .
Lifting with crane . . . . . . . . . . . . . . . . . . . . . . . . . . . . . . . . .
Movement with self-powered machinery . . .
ALIMAK
L1
L1
L2
L2
L3
L1
Transport and movement
The machine can be towed or moved by its own drive unit over
short distances. For longer distances it is recommended that
special transport vehicles be used. Only machine components,
e.g. platform parts and mast sections can be left on the platform.
The mast must always be dismantled during transportation on
public roads.
Remember to always disconnect and remove the power cable
before transportation.
l1
Towing of platform without mast
The outriggers must be retracted completely and locked. The
platform must also be lowered so that it rests on the rubber
buffers.
Maximum allowable speed when towing is 20 km/h (12 mph).
l2
When parked – always use the stop lugs to avoid unintentional
movements.
When towing – be sure of that the machine is properly connected to
the towing vehicle before the stop lugs are removed.
ALIMAK
L2
Towing of platform with erected mast on a mobile
single or twin mast chassis
Platform with erected mast can be towed on the job site only if
the following is observed:
1. The platform is run down to bottom position an is sitting
on top of the rubber buffers.
2.
Maximum 13 mounted mast sections.
3.
Ensure that there are no high voltage lines or other
obstacles present in the area of movement.
4.
The wind speed must not exceed 8 m/sec (18 mph).
5.
The outriggers shall be completely extended and locked
and the jacks screwed down as near to the ground as
possible. i.e. within 25 mm (1 in.) of the ground.
6.
Maximum allowable inclination of the ground = 1:25
or 2.3°.
7.
It is prohibited to drive over ground obsticals larger than
10 cm (4 in.).
8.
Maximum allowable towing speed is 8 m/min (25 ft./min.).
9.
Ensure that the ground has the necessary bearing
capacity. Refer to the chapter entitled "Setting up" for
information on ground pressure.
CAUTION: When a twin masted platform with two,
separate mobile chassis to be moved around curves the
platform must be divided in at least two sections. Before
separating, ensure that the connection links on both sides of
each drive unit are properly mounted.
The numbers of platform sections on each sides of the drive
units must not exceed 3 – 5 pcs. with a maximum of 3 pcs on
the towing end.
ALIMAK279
L3
Lifting with crane
A 4.5 m (15 ft.) platform with mobile chassis (base unit) weighs
approx. 5000 kg (11000 lbs.) including 13 mast sections.
A 4.5 m platform with mast pedestal (base unit) weighs approx.
3500 kg (7700 lbs.) including 13 mast sections.
With a suitable crane connected to the lifting yoke at the mast
top, the platform with erected mast can be lifted with a crane.
The lifting yoke is designed for a maximum load of 6000 kg
(13200 lbs.).
l3
The platform must be balanced.
Horizontal movement with self-powered machinery
The mobile chassis for single mast platform can be provided
with its own drive unit intended for moving over short distances
on the job site. The platform with erected mast can be moved if
the requirements under the heading “Towing of platform with
erected mast” are fulfilled.
During transport no other load, other than platform parts and
mast sections are allowed on the platform. The platform must
be lowered to its bottom position and rest on the rubber buffers.
The drive wheels can be individually engaged and disengaged
by means of two levers connected to the drive shaft.
l4
CAUTION: When driving around curves only ONE
drive wheel is to be engaged as the drive
wheels are not equipped with differential
gearing.
ALIMAK280
L4
To ensure that the work platfrom can not be operated while the
self-powered machinery is used, the main power cable must be
disconnected from the platform electrical M-panel and
connected to the power connector of the self-powered
machinery.
a 163
The drive unit is operated by pendant remote control with
pushbuttons for Forward – Stop – Reverse. The buttons are of
type ”hold to run”.
WARNING!
Kick-back hazard.
Always use the extra support wheel for the chassis
tow bar and do not walk next to the tow bar.
Can cause severe personal injury.
l6
ALIMAK
Appendix
Tightening torque
Recommendations according to the chart on the following page
applies in general except for:
ALIMAK Mast bolt, dim. 1 ”UNC
– Torque
: 350 Nm (258 lbf x ft)
– Spanner size
: 1 1/2”
ALIMAK Scaffold clamp Ø 76 mm
– Torque
: 150 Nm (110 lbf x ft)
– Spanner size
: 28 mm
ALIMAK Scaffold clamp Ø 76 mm
– Torque
: 220 Nm (163 lbf x ft)
– Spanner size
: 24 or 27 mm
Recommended torques
The chart applies to galvanized screw and nut of strength class
8.8 – dry surface.
Dimension
M6
M8
M 10
M 12
M 14
M 16
M 20
Spanner size
10 mm
13 mm
17 mm
19 mm
22 mm
24 mm
30 mm
Torque
10 Nm
24 Nm
47 Nm
81 Nm
128 Nm
198 Nm
385 Nm
(7 lbf x ft)
(18 lbf x ft)
(35 lbf x ft)
(60 lbf x ft)
(95 lbf x ft)
(146 lbf x ft)
(285 lbf x ft)
ASSEMBLY CONTROL – CHECK LIST
The assembly is to be carried out by trained/authorized personnel only.
The assembly is to be carried out by trained/authorized personnel only.
Please mark with a cross to the right to confirm that:
1. the installation as in accordance with the latest instruction manual as it pertains to:
a) Foundation for outriggers.
b) That the outriggers are extended and locked.
c) The length of the platform.
d) The platform´s widening regarding performance and choice of material.
e) Safety railings.
f) Mast ties.
2. the load sign agrees with the actual installation (see Instruction Manual).
3. all signs are legible (see Instruction Manual).
4. visual inspection is carried out regarding mechanical damages on structural parts such as;
a) Outriggers with jacks.
b) Chassis.
c) Platform.
d) Extending parts.
e) Machinery frame with machinery.
f) Mast.
g) Mast tie.
5. mast protection is installed.
6. service and maintenance is carried out according to latest Instruction Manual.
7. drop test is performed.
8. test run and inspection is performed on:
a) Limit cams in mast top.
b) Limit cams at ground landing.
c) Stop button(s).
d) Gate switch.
e) Horizontal levelling device – on twin mast installation.
f) No obstacles within the working area of the platform. (There MUST NOT be any obstacles).
9. test sliding is carried out.
10. Check that:
a) there is an Instruction Manual/Operator’s Manual in the documentation box.
b) there are cranking tools in the box.
c) there are sliding tools.
11. Check that the area is barricaded and a sign displaying ”Working Area” is in place.
12. Check that the user has received information about safety and operating
instructions, service and maintenance.
Yes