1
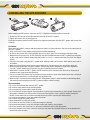
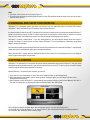
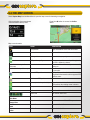
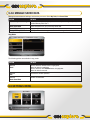
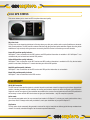
User Manual
English
PLEASE READ BEFORE USING GO!EXPLORE™
Please ensure that your PSP™ system has the correct date and time and time zone settings and system software
version 3.90 or higher. For further information on changing date and time settings or updating system software, please
refer to the PSP™ system Instruction Manual.
Your PSP™ system must be outdoors and stationary to locate your first position. Before using Go!Explore™ for the first
time, the GPS receiver will need to register its position. This can usually take between 5 and 15 minutes. Make sure that
you are stationary and in an open space where your view of the sky is not obscured by tall buildings or trees.
The GPS receiver requires an unobstructed view of the sky and must face towards the sky to receive the signal. When
used in a car it must be positioned at an angle that points away from the PSP™ system, with a clear view of the sky.
Sometimes the GPS signal may be lost if travelling between tall buildings or through a tunnel.
USEFUL TIPS
• When not using Go!Explore™ for a short period of time, leave the software running and put your PSP™ system into
Sleep Mode. This will make it quicker to gain a GPS signal when usage is resumed.
• To avoid interference with the GPS signal, always slide your PSP™ system’s WLAN switch to the OFF position.
• During initial set up, copy your map data to Memory Stick Duo™. This will speed up loading times.
• If you want to check your GPS reception status and quality, an overview can be found by selecting GPS from the
Settings Menu.
WELCOME TO GO!EXPLORE™
Thank you for choosing Go!Explore™ as your satellite navigation system. Read the Quick Start Guide first to start using
Go!Explore™ right away; this document contains more detailed reference information and description of Go!Explore™’s
features. You can easily discover Go!Explore™ for yourself whilst on the go; however, reading this manual is still
recommended in order to fully understand the individual screens and features of Go!Explore™.
PLEASE NOTE: the information in this manual was correct at the time of publication, but some minor changes may
have been made late in the product’s development. Screenshots for this manual may have been taken from the English
version of this product and some screenshots might have been taken from pre-completion screens that differ slightly
from those in the finished product.
CONTENTS
1
2
3
3.1
3.1.1
3.2
3.2.1
3.2.2
3.2.3
3.2.4
3.2.5
3.3
3.3.1
3.3.2
3.3.2.1
3.3.2.2
3.3.2.3
3.3.3
3.3.4
3.3.5
3.3.6
3.3.7
3.3.8
3.3.9
4
4.1
4.1.1
4.1.2
4.1.2.1
4.1.2.2
4.1.2.3
4.1.2.4
4.1.2.5
4.1.2.6
4.1.3
4.1.4
4.1.5
4.1.6
4.1.7
4.1.8
Installing the GPS receiver
Warnings and safety information
Getting started
Using the PSP™ system
Using the smart keyboard
Using the map
Checking the details of a map location
Manipulating the map
Status information
Using the cursor (the selected map location)
Action Menu options
Go!Explore™ concepts
Smart Zoom
Position markers
Current GPS position and Lock-on-Road
Returning to normal navigation
Selected location (cursor)
Daytime and night colour schemes
Route calculation and recalculation
Itinerary
Track Logs
Route simulation
Places
Speed limit warning
Navigating with Go!Explore™
Selecting the destination of a route
Selecting a destination with the cursor
Entering an address or part of an address
Entering an address
Entering an address if house numbering is restarted
Selecting an intersection as the destination
Selecting a city centre as the destination
Finding an address with a post code
Tips on entering addresses quickly
Selecting a destination from your Favourites
Selecting a destination from Places
Selecting a destination with a saved Place search query
Selecting a destination from History
Selecting a destination using coordinates
Selecting Home as the destination
4.2
4.3
4.4
4.5
4.6
4.7
4.8
4.9
4.10
4.11
4.12
5
5.1
5.2
5.3
5.3.1
5.3.2
5.3.2.1
5.3.2.2
5.3.2.3
5.3.3
5.3.4
5.4
5.4.1
5.4.2
5.4.3
5.4.4
5.4.5
5.4.6
5.5
5.5.1
5.5.2
5.5.3
5.5.4
5.5.5
5.5.6
6
7
8
Creating a waypoint
Editing the route
Viewing the whole route (Fit to Screen)
Changing between 2D and 3D map views
Watching the simulation of the route
Enabling Safety Mode
Pausing the active route
Deleting the active route
Saving a route
Editing the saved route
Using Track Logs
Reference
The Main Menu
Find & Go Menu
The map screen
Next route events
Objects on the map
Streets and roads
3D object types
Elements of the active route
Action Menu
Route Menu
My Data Menu
Manage Favourites
Manage Places
Manage Saved Routes
Manage Saved Queries
Manage Track Logs
Manage Saved Data
Settings Menu
Visual settings
Audio settings
Regional settings
Route Planning options
Warning settings
GPS status
Glossary
Copyright notices
Terms of use
1 INSTALLING THE GPS RECEIVER
Before installing the GPS receiver, make sure the PSP™ (PlayStation®Portable) system is turned off.
1. Connect the GPS receiver to the USB connector on the top of the PSP™ system.
2. Tighten the screw to fix it in place (Figure A).
For the best reception, position the GPS receiver at an angle that points away from the PSP™ system, with a clear view
of the sky.
Precautions
Before using this product, carefully read this manual and retain it for future reference. Also refer to the instructions for
your PSP™ system.
• Keep out of reach of small children to help prevent accidental swallowing.
• Do not use this product as the main navigation device on a ship or plane or when mountain climbing or skiing.
• Measurement errors may occur, or GPS positioning may not be possible because the PSP™ system may lose power,
as this could lead to accidents. When using the product in a car, it is recommended that the official Car Adaptor
is used.
• Take extra care when using the PSP™ system while walking. Looking at the screen while walking may result in
an accident.
• When using Bicycle Mode, do not use this product whilst riding. Plot and refer to your route before setting off.
• When using the product with navigation software, disregard any unsafe, hazardous or illegal route suggestions.
• The PSP™ system should never be operated by a driver whilst the vehicle is in motion.
• When used in a vehicle, the PSP™ system and GPS receiver must be mounted in the official In-car Cradle and in
accordance with cradle mounting instructions.
• The use of certain GPS features may be prohibited in some countries or areas. Users should check laws in country of
use and only operate device in conformity with any applicable rules.
• When driving it is recommended that the product’s “Safety Mode” feature is used. Accessed via the Settings Menu,
this feature prevents operation of the PSP™ system whilst the vehicle is moving.
Use and handling
• Do not use with products other than the PSP™ system.
• Do not allow small particles to get into this product.
• Do not expose this product to dust, smoke or steam.
• Do not expose this product to high or low temperatures, high humidity, condensation or direct sunlight. Do not leave
this product unattended in a vehicle, where it may become susceptible to these conditions and also a target for
thieves. Circular marks left on a vehicle’s window surfaces by suction cups may also attract thieves.
• Do not allow this product to come into contact with liquids.
• Do not place any objects on this product.
• Never disassemble or modify this product.
• Do not throw or drop this product, or physically damage it in any way.
• Do not allow this product to come into prolonged contact with rubber or vinyl products.
• Do not use solvents, other chemicals or a chemically-treated dust cloth to clean this product.
• Do not use excessive force on the connector, as doing so may cause the connector to bend or cause damage to the
internal part of the connector.
Limited Warranty
Where a 1-year warranty is supplied with your PSP™ system, such warranty also applies to this product. For details
please see the manual that came with your PSP™ system or call the PSP™ customer service helpline which can be
found within every PSP™ format software manual. Please also refer to the Terms Of Use at the end of this manual.
GPS
GPS (Global Positioning System) is a system that uses high-precision U.S. navigation satellites to enable you to identify
your location wherever you are on Earth. There are a total of around 30 GPS satellites positioned in six orbits at an
altitude of approximately 20,000 kilometres (approx. 12,400 miles). Wherever you are on Earth, there are generally at
least three satellites that can identify your location.
Positioning
The GPS receiver receives radio waves from the GPS satellites. The process of calculating a location from satellite orbit
information and radio wave transmission time data is known as “positioning”. Positioning requires that the receiver
receives signals from three to four GPS satellites.
When using the GPS receiver for the first time on a given day
The initial positioning can usually take between 5-15 minutes as the GPS receiver is located. If it takes longer, ensure
that you are in an open place where your view of the sky is not obscured by tall buildings or trees. Also, when using the
GPS receiver again after several hours have passed, the locations of the GPS satellites will have changed, so positioning
will again take several minutes.
Issues with receiving GPS signals
In locations such as those listed below, the radio waves may not be received and there may be a difference between
the actual location and the positioning results. When positioning is difficult, try moving to a location in the open air away
from sheltering objects. The following objects/locations may obstruct positioning:
• Buildings
• Inside a tunnel
• Indoors or in the shadow of a building
• Between high-rise buildings
• In narrow streets between buildings
• Underground
• Among dense trees
• Under a bridge
• Near high-voltage electric wires or magnetic objects
• Near mobile phones operating in the 1.5 GHz range or objects emitting radio waves of the same frequency
• Behind heat-reflecting glass
• It is also very important that the PSP™ system’s time, date and time zone settings are set correctly.
NOTE: depending on the locations of the satellites, positioning may take time or may not be possible.
Errors
GPS satellite errors
Errors made by the GPS satellites are approximately ±10 metres (33 feet), but depending on the surroundings, errors of
several hundred metres may occur. In some cases, positioning is possible with only three satellites, but accuracy may
be reduced.
Errors in receiving
Depending on the location and time, inaccuracies in the GPS positioning information may occur. In such cases, an
accurate position may not be displayed even with correct operation. This is not a malfunction.
Basic operations
Operating methods vary depending on the software in use. For details, refer to the instructions supplied with the software.
Hints
• The angle of the receiver can be changed (Figure B).
• To improve the conditions for receiving radio waves from the GPS satellites, adjust the angle of the receiver so that it
faces the sky (Figure C).
2 WARNINGS AND SAFETY INFORMATION
Go!Explore™ is a navigation system that helps you find your way to a destination using a connected GPS receiver.
Go!Explore™ does not transmit your GPS position; others cannot track you.
It is important that you look at your PSP™ system’s screen only when it is safe to do so. Drivers must operate Go!Explore™
before commencing a journey; the PSP™ system should never be operated by a driver whilst the vehicle is in motion.
Plan the route before your departure and stop if you need to change something during the journey.
Go!Explore™ features a Safety Mode – if you turn Safety Mode on, you cannot adjust settings whilst the vehicle is
moving at a speed of 10 km/h (6 mph) or higher. Unless Go!Explore™ is being operated by a passenger, using Safety
Mode is strongly encouraged.
You must obey all traffic signs and follow the rules of the road. If you deviate from the route that Go!Explore™ recommends,
a new route will be calculated and instructions amended accordingly.
Never place the PSP™ system where it obstructs the driver’s view, where it is in the deployment zone of an airbag or
where it might cause injuries in an accident.
3 GETTING STARTED
Go!Explore™ is optimised for in-car use but can also be used by pedestrians and cyclists. Go!Explore™ can plan routes
throughout the whole installed map set; if you have the relevant maps on your PSP™ system, you do not need to change
maps to navigate between map segments or countries.
When Go!Explore™ is started for the first time, you need to:
1. Select the on-screen language to be used. This can be readjusted later via the Settings Menu.
2. Select the language and speaker used for voice guidance messages. Again, you can change this later via the
Settings Menu if necessary.
3. Select whether to allow Go!Explore™ to automatically save program settings on the inserted Memory Stick Duo™.
This can be change later by choosing My Data from the Main Menu, then Saved Data.
After setting these options, the Main Menu will be displayed and you can start using Go!Explore™.
The simplest way of using Go!Explore™ is to choose Find & Go, pick a destination and start navigating towards it.
You can select your destination in the following ways:
• Use the selected location on the map (the cursor) – see section 4.1.1 of this manual for more information.
• Enter a full address or part of an address, for example a street name without a house number or the names of two
intersecting streets – see section 4.1.2 of this manual.
• Find an address with a post code.
• Use a previously saved location, either a Favourite, a Place, or a destination from the History of previously set
destinations and waypoints – see sections 4.1.3 to 4.1.6 of this manual.
• Use coordinates – see section 4.1.7 of this manual.
3.1 USING THE PSP™ SYSTEM
When your PSP™ system is switched off, Go!Explore™ does not calculate your GPS position and it does not update the
route or driving instructions. When the PSP™ system is turned on again, Go!Explore™ continues navigating as soon as
the GPS receiver has determined your position.
1
2
8
18
23
17
19
12
3
20
4
21
5
6
7
22
9
10
11
13 14
15
16
NUMBER
COMPONENT NAME
USAGE IN GO!EXPLORE™
1
< button
Zoom out when on the map screen.
2
> button
Zoom in when on the map screen.
3
CVZX
Navigate Menus/tilt and rotate the map when on the
map screen.
4
Memory Stick Duo™ access
indicator
Lights up when saving and loading data.
5
WLAN access indicator
No function. Go!Explore™ does not support Wireless (WLAN) features.
6
analog stick
Moves the map in four directions.
7
strap holder
8
left speaker
9
HOME button
Quits Go!Explore™ after confirmation.
10
volume - button
Turns the volume down.
11
volume + button
Turns the volume up.
12
LCD screen
13
display button
Adjusts screen brightness.
14
sound button
Adjusts the tone.
15
SELECT button
Change status information displayed on-screen.
16
START button
Return to position.
17
F button
Depends on the Go!Explore™ screen.
18
D button
Depends on the Go!Explore™ screen.
19
A button
Cancels the selected operation or returns to the previous Go!Explore™
screen.
20
S button
Confirms the selection that you made on the screen.
21
POWER indicator
Lights up, flashes, or changes colour to indicate system status.
22
HOLD indicator
Turns yellow when in hold mode.
23
right speaker
3.1.1 USING THE SMART KEYBOARD
Sometimes, you will need to enter letters and numbers (for example, when entering an address or post code) using the
smart keyboard. With the keyboard displayed, press C, V, Z or X to move the yellow highlight across the characters
on the keyboard and press the S button to select a character.
Using a different keyboard layout (ABC, QWERTY, AZERTY)
Select Change Keys. Go!Explore™ remembers your last keyboard layout choice and offers it the next time you need to
enter data.
Correcting a keyboard entry
Press the F button or the < button to delete the last character entered. Press and hold the F button to delete the
entire input string.
Entering a space
Either press the > button or highlight the SPACE button on the smart keyboard and press the S button
Entering lower case or capital letters
Go!Explore™ will capitalise the first letter of each word, leaving all other letters in lower case.
Using the smart keyboard to find a location
As you enter characters on the keyboard, the number of results will decrease. When there are four or less potential
locations that match your text entry, the Select Location screen will be displayed, allowing you to pick your destination.
If searching for an address or a Place, you do not always need to finalise your input; whilst entering text, you can view
the results at any point – press the D button to view the Select Location screen then press the < button or Z and
the > button or X to scroll through the pages of results.
3.2 USING THE MAP
The map screen is the most frequently used screen and can be accessed from the Main Menu by selecting Explore Map.
For further information about the map screen, see section 5.3 of this manual.
3.2.1 CHECKING THE DETAILS OF A MAP LOCATION
Details of your current position during navigation are displayed in the top left corner of the map. The current street name
or location is always displayed.
You can check the details of any other location by selecting it on the map:
1. Use the analog stick to move the map.
2. The cursor moves as you move the analog stick. The city/town, street or address of the selected location (depends on
the zoom level) is displayed in the top left corner of the map.
To check the list of Places nearby:
1. Press the S button to open the Action Menu.
2. Highlight More Options and press the S button.
3. Highlight Nearby Places and press the S button.
4. Pick a category to see a list of the types of place you are looking for. Each category may be broken down further
into groups (subcategories) of specific types of place, for example, if you select Accommodation, facilities in the
area might be categorised as ‘Hotels or Motels’ or ‘Camping Grounds’ – if you are looking for a hotel, choose ‘Hotels
or Motels’ to view a list of places in the vicinity. Pick a hotel and its location will be displayed on the map. Whilst
searching for places, press the F button to View All, showing a list of all places in the vicinity. When within a category
or subcategory, selecting View All will display a list of local places relevant to that specific category or subcategory.
If you know the name of a place, press the D button and then use the smart keyboard to search for it.
3.2.2 MANIPULATING THE MAP
Position markers on the map:
Current GPS position
Last known GPS position
Selected location (cursor)
The following controls allow the map to be manipulated according to your needs.
ACTION
CONTROLS
DETAILS
Moving the map
analog stick
You can move the map in any direction. After moving the map,
press the START button to return to the GPS position or to the last
known GPS position if there is no valid GPS position.
Zooming in and out
> button / < button
Changes how much of the map is displayed on the screen.
Go!Explore™ uses high-quality vector maps that let you see
the map at various zoom levels, always with optimised content.
It always displays street names and other text with the same
font size, never upside-down, and you only see the streets and
objects that you need.
Map scaling has different limits in 2D and in 3D map view
modes.
Tilting up and down
C/V
Changes the vertical view angle of the map in 3D mode.
Rotating left
and right
Z/X
Changes the horizontal view angle of the map in 3D mode.
When a GPS position is available, Go!Explore™ always rotates
the map so its top faces your direction of travel (Track-Up
orientation). You can turn away from Track-Up orientation by
pressing Z or X.
If you have rotated the map, press the START button to re-enable
the automatic map rotation.
Viewing modes
F Button
(Change View)
Toggles between two map perspectives – classic top-down view
(2D) and perspective view (3D).
Returning to normal
navigation
START button
Returns the map to the current GPS position (or the last
known GPS position). If the map has been rotated in 3D mode,
automatic map rotation is also re-enabled.
3.2.3 STATUS INFORMATION
In the top left corner of the map screen, a preview area provides information about the type and distance of the
next manoeuvre to be encountered on your route, for example, a turn or a roundabout. ‘Second manoeuvres’ are also
displayed in a smaller box alongside the next manoeuvre to give you advanced warning about the next manoeuvre.
If you don’t want to be informed of second manoeuvres, access the Map Settings Menu and turn ‘Display Second
Manoeuvre’ off.
If the GPS signal has been lost, a message ‘Waiting for GPS position’ will flash in the bottom right corner of the screen.
Messages will also flash if the GPS receiver is disconnected or if you stray from the current GPS position for too long
when exploring the map.
The following information can be seen in the three data fields shown on the map screen for an active route:
TYPE
DETAILS
Time remaining
The estimated time remaining to reach the destination.
Distance remaining
Distance remaining to reach the destination.
Current speed
The current speed.
There are also status icons on the right:
ICON
STATUS
Compass
Shows the direction of the map both when the map is
automatically rotated (3D) and when the map is always facing
North (2D).
Satellite icon
The colour of the satellite icon shows the strength of the GPS
position.
Black – no GPS receiver attached/functioning.
Red – no GPS position detected.
Yellow – GPS position detected, but weak signal.
Green – GPS position detected, strong signal.
Battery status
This icon shows the status of the internal battery.
Current zoom level
Press the < button or the > button to modify
the zoom level.
3.2.4 USING THE CURSOR (THE SELECTED MAP LOCATION)
Place the cursor at the desired map location with one of the following options:
• Use the Find & Go Menu to select a location. The map returns with the selected point (the cursor) in the middle, and
the Action Menu is displayed with the available options.
• Use the analog stick to place the cursor at the desired location, then press the S button to open the Action Menu.
3.2.5 ACTION MENU OPTIONS
Go!
In the active route, head to the destination/point on the map indicated by the cursor.
Explore
Opens the map screen with the cursor in the middle.
Save As Favourite
Save the place currently highlighted by the cursor as a Favourite destination. Select the
desired position in the Favourites list, enter the name of the Favourite on the smart
keyboard, and finally press the S button to save the Favourite in the selected position.
More Options
Opens a page of secondary Action Menu options:
Nearby Places
Check the list of Places that are near the cursor.
Set As Start
The cursor becomes the start point of the route. This means that the
route will not be started from the current GPS position.
Save This Place
Save the cursor as a Place. Name the Place using the smart
keyboard, and press the S button to save it as a Favourite.
Add Pin
Mark the map with a Pin at the cursor. A Pin has no name or other
details, only a colour so you can tell one from another.
Insert Waypoint
In the active route, the location currently marked by the cursor
will be used as a waypoint (an intermediate destination) preceding
the final destination.
3.3 GO!EXPLORE™ CONCEPTS
3.3.1 SMART ZOOM
Smart Zoom is a lot more than just an automatic zoom:
• When approaching a turn, Go!Explore™ will zoom in and raise the viewing angle to help you recognise your manoeuvre
at the next junction. If the next turn is at a distance, it will zoom out and lower the viewing angle so you can better see
the road in front of you.
• While driving without an active route, Smart Zoom will zoom in if you drive slowly and zoom out when you drive at
high speed.
Enabling Smart Zoom
Smart Zoom can be turned on and off via the Camera Settings option, found under Visual Settings in the Settings
Menu.
Fine-tuning Smart Zoom
On the same Camera Settings page you can also adjust the value of Automatic Repositioning, automatically permitting
Go!Explore™ to re-enable Smart Zoom a few seconds after the map has been moved, tilted, scaled or rotated. Smart
Zoom stops working if you move, tilt or rotate the map.
3.3.2 POSITION MARKERS
3.3.2.1 CURRENT GPS POSITION AND LOCK-ON-ROAD
When a GPS position is available, Go!Explore™ marks your current position with this icon on the map:
The GPS position icon is aligned to the nearest road to suppress GPS position errors. The direction of the icon follows one
of the directions of the route.
A grey GPS position indicates your last known GPS position – this means that the GPS signal has currently been lost.
When driving, the GPS position icon may occasionally turn from blue to grey whilst you are moving. In these situations, the
GPS signal has been temporarily lost, but Go!Explore™ will simulate your travel for a number of seconds. This is likely to
occur when travelling through a tunnel – the GPS signal may be lost, but Go!Explore™ will use your travelling speed to
simulate your journey for a short period. After emerging from the tunnel, Go!Explore™ will attempt to regain the GPS signal.
3.3.2.2 RETURNING TO NORMAL NAVIGATION
When a GPS position is available and you have moved the map (the GPS position icon is moving or is not visible), or you
have rotated the map in 3D mode, press the START button to move the map back to the GPS position and re-enable
Track-up map orientation (automatic map rotation).
NOTE: even if you move the map whilst driving, Go!Explore™ continues to navigate if there is an active route; voice
instructions will still be given and turn preview icons displayed according to your current GPS position.
3.3.2.3 SELECTED LOCATION (CURSOR)
If you select a location in the Find & Go Menu, or use the analog stick on the map screen, the cursor appears at the
selected point on the map. The cursor is visible at all zoom levels, even in dense areas of the map.
When the cursor is set, press the S button to open the Action Menu. Use this menu to mark the cursor as:
• The start point of a route.
• A waypoint in a route.
• The destination of a route.
You can also search for Places around the cursor, or choose to save the location of the location as:
• A Favourite.
• A Place.
• A map marker Pin.
3.3.3 DAYTIME AND NIGHT COLOUR SCHEMES
Go!Explore™ uses different colour schemes during the day and night. Daytime colours are similar to those used in paper
road maps. The night colour schemes use dark colours for large objects to keep the average brightness of the screen low.
Go!Explore™ can switch automatically between the day and night schemes based on the current time and GPS position a few
minutes before sunrise, when the sky has already turned bright, and a few minutes after sunset, before it becomes dark.
3.3.4 ROUTE CALCULATION AND RECALCULATION
Go!Explore™ calculates the route based on your preferences:
• Route calculation method
• Fast
• Short
• Economical
• Vehicle types
• Car
• Taxi
• Bicycle
• Pedestrian
• Road types
• Unpaved Roads
• Permit Needed
• Motorways
• Toll Roads
• U-Turns
• Ferries
Go!Explore™ automatically recalculates the route if you deviate from the proposed itinerary.
3.3.5 ITINERARY
The Itinerary is a list of the route events for a journey, or in other words, the driving instructions.
Display the Itinerary by pressing the D button on the map screen to access the Route Menu; highlight Itinerary and
then press the S button. The Itinerary replaces the Route Menu on the right side of the screen. Select an item on the
Itinerary and press the S button to view it.
3.3.6 TRACK LOGS
A Track Log is a recording (maximum three hours) of how your GPS position has changed during a journey and is
independent of the route calculated by Go!Explore™. Track Logs can be recorded, renamed, replayed and shown on
the map. Please note that the recording occurs automatically, but do not forget to save your track log at the end of the
journey if you would like to keep it, otherwise it will be overwritten with the next journey.
3.3.7 ROUTE SIMULATION
A simulation takes you through the route, following the driving instructions.
Route simulation can be started as follows:
1. On the map screen, press the D button to choose Route. The Route Menu will be displayed.
2. Highlight Route Summary and press the S button to open the Route Summary screen.
3. Press the D button to Simulate the route.
During the simulation you have the following options:
• Press the D button to pause the simulation. Press the D button again to resume the demonstration.
• Press the A button to quit the simulation, and return to the Route Summary screen.
3.3.8 PLACES
A Place is a location that someone might find useful or interesting. Go!Explore™ includes thousands of Places and you
can also add your own Places to the list.
Places are grouped into several levels of categories and subcategories. The icon of a Place indicates its category as a
Point of Interest (POI).
Saving a Place
To save a Place, move the cursor to the desired location, then press the S button, choose More Options and then Save
This Place.
Managing Places
A saved Place can be renamed, and a phone number and additional information can be added to it by choosing
My Data, Places then My Folder.
NOTE: Places icons are not displayed by default. To display Places icons on the maps, choose My Data, then Places
and highlight a category or subcategory. Press the F button to access the Visibility option, then press the S button
to toggle visibility on/off.
3.3.9 SPEED LIMIT WARNING
Maps sometimes contain information about the speed limits of the road segments.
IMPORTANT NOTE: this information may not be available for your region or may not be fully correct for all roads on the
map. Do not use this as an alternative to the speedometer of your vehicle.
You can configure Go!Explore™ to warn you if you exceed the current limit; select Settings, followed by Warnings, then
Speed Limit Warnings.
When the Speed Limit Warning is turned on, you can set the Speeding Tolerance; this is the threshold of the warning
(0% initiates a warning at the current speed limit of the road).
When you exceed the speed limit, the following occurs:
• Visible Warning: a symbol with the speed limit appears at the side of the map.
• Audible Warning: a voice message is played using the selected voice guidance profile.
4 NAVIGATING WITH GO!EXPLORE™
You can set up your route in Go!Explore™ in several ways:
• If you need a simple route (a route with only one destination, without any intermediate via points), you can select the
destination and start navigating to it right away.
• You can plan a multi-point route.
• You can also plan a route independently of your current GPS position or even without GPS reception.
4.1 SELECTING THE DESTINATION OF A ROUTE
Go!Explore™ offers several ways of choosing your destination and waypoints (intermediate destinations):
• Use the selected location on the map (the cursor).
• Enter a full address or a part of an address, for example a street name without a house number or the names of two
intersecting streets.
• Enter an address with a post code. This way you do not need to select the name of the city/town and the search for
street names might be faster as well.
• Use a previously saved location, either a Favourite, a Place, or a destination from the History of previously set
destinations and waypoints.
• Use coordinates.
TIP: If you are going to use a route later, save it before you start navigating – press the D button, then choose
Edit Route followed by Save This Route.
4.1.1 SELECTING A DESTINATION WITH THE CURSOR
1. Locate your destination on the map by moving and scaling the map as required.
2. Move the cursor over the location that you want to select as your destination.
3 Press the S button to access the Action Menu. Highlight Go!, and then press the S button. The route is automatically
calculated and you can start your journey.
4.1.2 ENTERING AN ADDRESS OR PART OF AN ADDRESS
If you know at least part of an address, it is the quickest way to select a destination.
Using the same screen, you can find an address by entering:
•
•
•
•
•
The exact address, including house number.
The centre of a city/town.
An intersection.
The midpoint of a street.
Any of the above, starting the search with the post code.
NOTE: if a point in a city is recognised as the centre, a ‘red dot’ icon will be displayed next to the city name on the Select
Location screen. If a city/town has no recognisable centre, no red dot will be displayed.
4.1.2.1 ENTERING AN ADDRESS
1. Select Find & Go, then Enter Address.
2. By default, Go!Explore™ proposes the country you are currently in. If needed, select Change Country and select a
different one from the list of those available.
3. Use the smart keyboard to enter the city/town name. The number of results will decrease as you enter characters. Press
the D button to view results; when there are four or fewer matching results, these will be displayed automatically.
Alternatively, select History to access a list of previously searched for locations.
4. Pick the correct city/town from the list of results.
5. Follow the same process to enter a street name, or choose to go directly to the City Centre (if available).
6. Enter the house number or choose to go to the Street Centre and select Find to locate the address on the map. Select
Intersection to enter a second street name and head to the point where the two streets cross.
7. The Action Menu will be displayed. Highlight Go! and then press the S button. The route is automatically calculated
and you can start navigating.
4.1.2.2 ENTERING AN ADDRESS IF HOUSE NUMBERING IS RESTARTED
On some long roads, house numbering may be restarted at some point, meaning the same house number can appear
twice or even more times on the same road. If this is the case, after giving the house number, you need to select the
appropriate address.
After searching, a list of matching addresses will be displayed, so you need to select the correct one before navigating.
4.1.2.3 SELECTING AN INTERSECTION AS THE DESTINATION
If only a few intersecting streets exist, press the D button and select the desired intersecting street directly from the
list. For longer streets, start entering the name of the intersecting street on the keyboard. A list of intersecting streets
will be displayed as you type.
4.1.2.4 SELECTING A CITY CENTRE AS THE DESTINATION
The city centre is not necessarily the geometric centre of the city (or town) but an arbitrary point the map creators have
chosen. It is usually a location thought of as the most important intersection.
NOTE: if a point in a city is recognised as the centre, a ‘red dot’ icon will be displayed next to the city name on the Select
Location screen. If a city/town has no recognisable centre, no red dot will be displayed.
4.1.2.5 FINDING AN ADDRESS WITH A POST CODE
Where applicable, you can find locations quickly if you know the post code. Change the country map if necessary, then
simply enter the post code and select the location.
4.1.2.6 TIPS ON ENTERING ADDRESSES QUICKLY
Go!Explore uses a ‘smart keyboard’ to simplify the text entry process – when entering the name of a city/town or a
street, Go!Explore™ only displays those characters that appear in possible search results. The other characters are
greyed out.
When entering a city/town or street name, press the D button after a couple of letters; Go!Explore™ lists the items that
contain that character set.
To speed up finding an intersection:
• If possible, search first for the street with a less common or more unusual name; fewer letters will be required to find it.
• If one of the streets is shorter, search for that one first. You can then find the second one faster.
You can search for both the type and the name of a road. If the same word appears in several names, for example in
the name of streets, roads and avenues, you can obtain the result faster if you enter the first letter of the street type. For
example, enter Pi A to obtain Pine Avenue and skip all Pine Streets and Pickwick Roads.
You can also search within post codes. This is useful when a street name is common and it is used in several districts of a city.
4.1.3 SELECTING A DESTINATION FROM FAVOURITES
You can select a location that you have already saved as a Favourite to be your destination.
1. Select Find & Go then Favourites.
2. Choose the Favourite that you want to set as your destination.
3. Highlight Go! and then press the S button. The route is automatically calculated, and you can start navigating.
4.1.4 SELECTING A DESTINATION FROM PLACES
You can select your destination from the Places included with Go!Explore™ or from any you have additionally created.
1. Select Find & Go then Places.
2. Select the area in which the POI should be searched for:
• Around Cursor: search around the previously selected map location.
• Around Current Position: search around the current GPS position.
• Along Current Route: search not around a given point, but by the size of detour required to get to a place. This can
be useful if you search for a place later that causes only a minimal detour. For example upcoming petrol stations
or restaurants.
3.You can narrow the search with the following:
• Select a Place category (e.g. Accommodation), and after that, if needed, select the Place subcategory (e.g. Hotel or Motel).
• To find the Place by its name, press the D button to select Search.
• To list all Places in a given category, press the F button to View All.
4. The list of matching Places will be displayed. Select the desired Place from the list.
The map will be displayed with the details of the selected Place.
• Press the A button to return to the list for selecting another Place, or press the S button to select Action and confirm
the selection of the displayed Place.
5. The Action Menu will be displayed. Highlight Go! and then press the S button. The route is automatically calculated, and
you can start navigating.
4.1.5 SELECTING A DESTINATION WITH A SAVED PLACE SEARCH QUERY
Search queries can be saved while searching for a Place.
• With any of the lists of Place categories or subcategories displayed, press the F button to View All, then press the
D button to Save Query.
• Select one of the locations on the list.
• Enter a name for the search query and press the D button to Save.
Use a search query to find Places:
1. Select Find & Go, then Places followed by Saved Searches.
2. Select one of the saved queries and the list of matching Places will be displayed.
3. Select the desired Place from the list.
4. The map will be displayed with the details of the selected Place.
• Press the A button to return to the list and choose another Place, or press the S button to select Action and
confirm selection of the displayed Place.
5. The Action Menu will be displayed. Highlight Go! and then press the S button to start navigating.
4.1.6 SELECTING A DESTINATION FROM HISTORY
The destinations that you have set earlier are kept under History.
1. Select Find & Go, followed by History.
2. If necessary, scroll through the History pages and select the desired location from the list.
3. The Action Menu will be displayed. Highlight Go! and then press the S button. The route is automatically calculated,
and you can start navigating.
4.1.7 SELECTING A DESTINATION USING COORDINATES
1. Select Find & Go, then Coordinates.
2. Select Change Format to change the format of the displayed coordinates (optional).
3. Enter the latitude in WGS84 format: use N/S to change the hemisphere. Press the D button.
4. Enter the longitude in WGS84 format: use E/W to change the hemisphere. Press the D button.
5. The Action Menu will be displayed. Highlight Go! and press the S button to start navigating.
4.1.8 SELECTING HOME AS THE DESTINATION
The most frequently used destination, for example, your main place of residence, should be saved as Home.
If you have not set a Home address yet, Go!Explore™ will ask you to define one if you choose Home from the Find &
Go! Menu. The smart keyboard will be displayed:
• Enter the Home address as you would when you search for an address, or select History to select a recently used
location.
Once a Home address has been set, you can quickly use it as a route destination by selecting Find & Go then Home.
4.2 CREATING A WAYPOINT
This procedure explains how to expand an active route using a waypoint (an intermediate destination) while keeping the
existing destination:
1. Select an additional location following the usual procedure – this will become the waypoint on the route.
2. The map will be displayed with the selected location in the middle.
3. Select More Options from the Action Menu and then Insert Waypoint to add the point as an intermediate destination
preceding the final destination of the route.
4. You can add even more points to the route; repeat the above steps as many times as necessary.
5. Every time a new point is added, the route is automatically recalculated and you can continue navigating right away.
4.3 EDITING THE ROUTE
The route editing screen can be accessed from the map screen:
1. Press the D button to select Route.
2. Select Edit Route.
3. Select Edit Waypoints.
The list of route points are displayed with the start point at the top of the list and the final destination at the bottom. If
several waypoints exist, you might need to skip between pages. Highlight one of the route points on the list to access
the following options:
BUTTON
ACTION
S button
Grab a waypoint to move it up or down the list. When the point has reached the desired place
in the Itinerary, press the S button again to Release it.
Optimise a route. The start point and the destination remain at their positions, but the
waypoints are reordered to make the shortest possible route.
The highlighted waypoint is removed from the route.
Grab
D button
Optimise
F button
Remove
As soon as you leave this screen, the route is recalculated automatically, and you can start navigating right away.
4.4 VIEWING THE WHOLE ROUTE (FIT TO SCREEN)
View the outline of your entire route on one screen. With the map screen open:
1. Press the D button to select Route or the S button to select Action.
2. Select Fit To Screen.
4.5 CHANGING BETWEEN 2D AND 3D MAP VIEWS
The map can be displayed in a classic top-down view (2D mode) with North-up orientation (the top of the map is always
facing North), or in a perspective view (3D mode) with Track-up orientation (the map is automatically rotated so that
its top keeps on facing the direction of travel). To toggle between the two map views, press the D button to select
Change View.
4.6 WATCHING THE SIMULATION OF THE ROUTE
The active route can be simulated on-screen, showing you what you would see during navigation. To start the route
simulation, with the map screen open:
1. Press the D button to select Route.
2. Choose Route Summary.
3. Press the D button to Simulate.
4. Press the D button to pause the simulation and press the A button to abort it.
4.7 ENABLING SAFETY MODE
Safety Mode disables the PSP™ system’s buttons when travelling at speeds above 10 km/h (6 mph) to keep your
attention on the road. While driving, you will not be able to set a new destination or to change settings.
To enable Safety Mode, choose Settings, then Warnings followed by Safety Mode.
4.8 PAUSING THE ACTIVE ROUTE
There is no need to pause the active route if you stop. As soon as you start moving again, Go!Explore™ will continue
providing instructions from your position.
4.9 DELETING THE ACTIVE ROUTE
To delete the active route, with the map screen open:
1. Press the D button to select Route.
2. Choose Edit Route.
3. Select Delete Route.
4.10 SAVING A ROUTE
The active route can be saved for later use. With the map screen open:
1. Press the D button to select Route.
2. Choose Edit Route.
3. Select Save This Route.
4. Give the route a name.
5. Press the D button to Save.
6. Go!Explore™ asks if you want to save the settings to Memory Stick Duo™.
Select Yes to save the route.
4.11 EDITING THE SAVED ROUTE
You can load a previously saved route and use it for navigation. With the map screen open:
1. Press the A button to return to the Main Menu.
2. Select My Data.
3. Choose Saved Routes.
4. Highlight the desired route in the list and press the S button.
5. The route is displayed on the map in 2D mode, so that you can review the whole route before navigating.
4.12 USING TRACK LOGS
Go!Explore™ can track and record your GPS position as you move. You do not need to select a destination and create a
route to do this; you can record your driving path while cruising.
Recording the travelled path (creating a Track Log)
1. Press the A button on the map screen to return to the Main Menu then select My Data, followed by Track Logs.
2. Press the D button to select Record Track and start the recording.
3. Return to the map and start/continue driving.
4. Return to Track Logs and choose Stop Recording when required to stop the recording. Go!Explore™ labels the Track
Log with a time stamp.
Simulating a Track Log on the map
1. Press the A button to return to the Main Menu, then select My Data followed by Track Logs.
2. Highlight the desired Track Log and then press the S button.
3. Select Replay.
4. The map screen is displayed and the Track Log simulation begins.
5. You can stop the replay at any time by pressing the A button.
Changing the colour of a Track Log
1. Press the A button to return to the Main Menu, then select My Data, followed by Track Logs.
2. Highlight the desired Track Log and then press the S button.
3. Highlight Track Colour and press the S button repeatedly to choose the desired colour in which to display the track
log on the map.
5 REFERENCE
The following pages contain descriptions of the different screens found in Go!Explore™.
5.1 THE MAIN MENU
OPTION
DESCRIPTION
Find & Go
Select and locate a destination (for example, an address or a type of Place) or find further
information stored for a particular Point of Interest (POI).
Open the map screen for navigation or for map browsing.
Manage your data, such as saved locations (Places and Favourites), saved queries, saved
routes and track logs.
Adjust various settings, for example, the language settings, the map layout during navigation
or warnings.
Explore Map
My Data
Settings
5.2 FIND & GO MENU
OPTION
DESCRIPTION
Address
If you know at least a part of an address, this is the quickest way to locate it.
Home
History
Quickly select this previously defined special location as your destination (likely to be your
main place of residence).
Select a destination from the thousands of Places included with Go!Explore™, or from any
you have additionally created.
The destinations that you have already entered in Go!Explore™ are available in the History list.
Coordinates
Select a destination by entering its coordinates.
Favourites
Select a destination from a list of locations previously saved as Favourites.
Places
5.3 THE MAP SCREEN
Select Explore Map from the Main Menu to open the map screen for browsing or navigation.
During navigation, the screen shows
route information and trip data:
Press the S button to access the Action
Menu:
Map screen elements
ICON
NAME
DESCRIPTION
Turn preview
Type and distance of the next route event.
Route data
Some useful data about the current route.
Battery status
Current battery capacity.
GPS position quality
The accuracy of the current position given by
the GPS is shown by colours.
The name of the street or road you are currently
driving on.
The name of the street or road that comes next
in your route.
The position and the direction of the arrow is
aligned with the nearest route to suppress GPS
position errors.
The last known position.
Data field in the top left corner Current street
of the map
Data field at the top of the map Next street
Current GPS position
Last known GPS position
Cursor (selected map location)
Green line
A button
Main Menu
F button
Change View
D button
Route
S button
Action
Compass
When the selected location is not the current
GPS position, this rotating cursor is shown.
Shows the direction of the map.
Active route
The line of the recommended route.
Zoom level
The current zoom level.
Main Menu
Opens the Main Menu.
Map view modes
Switches between 2D and 3D map modes.
Route Menu
Opens the Route Menu.
Action Menu
Opens the Action Menu.
5.3.1 NEXT ROUTE EVENTS
One section of the map screen is used to display the next manoeuvre (the next route event that is listed in the Itinerary).
Both the type of the event (a turn, roundabout, motorway exit, etc.) and its distance from the current GPS position
are displayed.
Examples of turn preview icons include:
Right turn ahead.
Enter roundabout. The number of the exit is shown in the circle.
5.3.2 OBJECTS ON THE MAP
5.3.2.1 STREETS AND ROADS
Go!Explore™ shows streets and roads in a similar way to traditional road maps; their width and colours correspond to
their importance – you can easily tell a motorway from a backstreet.
5.3.2.2 3D OBJECT TYPES
To enable or disable 3D visualisation on the map, select Settings from the Main Menu followed by Visual, then
3D Settings.
Go!Explore™ supports the following 3D object types:
TYPE
DETAILS
3D landmarks
Landmarks are 3D representations of prominent or well-known objects.
3D landmarks are only available in certain cities and countries.
Hills and mountains are shown in the background of the 3D map view, and are
illustrated by colour on the 2D map.
Complex intersections and vertically isolated roads (such as overpasses or
underground tunnels) are displayed in 3D.
Full 3D city building data that represents actual building size and position on the
map. Building data is limited to the city centre of major cities.
3D terrain map data shows changes in terrain, including elevations or depressions
in the land.
Elevation model
Elevated roads
3D buildings
3D terrain
5.3.2.3 ELEMENTS OF AN ACTIVE ROUTE
ELEMENT
DETAILS
Current GPS position
Your current position displayed on the map. In pedestrian mode it is the exact GPS position.
If a vehicle is selected for route calculation, the arrow is put on the nearest road.
The location selected in the Find Menu, or a map point selected from the map.
Cursor (selected map location)
Start point
The first point of the route. Normally, if a GPS position is available, it is the start
point of the route. If there is no valid GPS position, Go!Explore™ uses the last
known GPS position as the start point.
When you are using a saved route, Go!Explore™ asks you if you want to use your GPS
position or the first point in the saved route as the start point. You can also modify the
start point using the Action Menu. If you do so, the automatic off-route recalculation
needs to be turned off to keep the selected point as the start point.
If the automatic off-route recalculation is disabled, selecting the icon in the Turn
Preview field not only initiates a route recalculation from the current GPS position,
but will re-enable the automatic off-route recalculation as well.
Waypoint
A waypoint is an intermediate destination. You can place as many of these as you
want.
Destination (end point)
The last point of the route, the final destination.
Route colour
The route stands out in colour on the map, both in daytime and in night mode. The
active leg of the route is always displayed in a brighter shade than the inactive
(upcoming) legs.
Active leg of the route
The section of the route on which you are driving.
If you have not added any waypoints (only a destination), the entire route is the
active leg. If you have added waypoints, the active leg is the part of the route from
your current location to the next route point (the next waypoint, or the destination
if there are no more waypoints to reach).
Inactive legs of the route
The future sections of the route. Each of them becomes active when you reach the
waypoint at its beginning.
Streets and roads that are excluded You can choose whether you want to use or avoid certain road types. However,
from the navigation
when Go!Explore™ cannot avoid such roads, the route will include them and it will
show them in a colour that is different from the usual route colour.
5.3.3 ACTION MENU
When you select a location via the Find & Go Menu, the map screen is displayed with the Action Menu alongside.
Alternatively, when you move the map, place the cursor at a particular point and press the S button to open the
Action Menu.
See section 3.2.5 for a breakdown of Action Menu options.
5.3.4 ROUTE MENU
When the map is open, Press the D button to save, load or edit your routes.
OPTION
DETAILS
Fit To Screen
The map screen displays the whole route in 2D mode.
Route Summary
Opens a screen with useful route and travel data:
Itinerary
Edit Route
Find Alternative Route
Route Settings
Route Line – The route is represented by a horizontal line.
Arrival – The estimated time of arrival at the destination.
Route Length – The distance remaining on the route.
Time Remaining – The estimated time yet to travel.
Preference – The method (fast, short or economical) used in route planning.
Warning Icons – Warnings and useful information about certain parts of the route.
Simulate – Run a demonstration of the route at normal speed.
Browse the driving instructions followed during navigation. Select one of the items
on the list to see it on the map.
Select from the following options:
Edit Waypoints – Modify the route by removing route points or changing their
order.
Save this Route – Save the active route for later use.
Delete Route – Erase the active route with all its route points (start point, waypoints
and destination). If you later decide that you need the same route, you will have to
rebuild it from scratch.
Reverse Route – The route is reversed; the start point and the destination change
places, and the waypoints are to be reached in the opposite order.
Select a distance to tell Go!Explore™ how much of the route to bypass starting
from the current position.
Adjust settings to modify the transportation mode, the road types used for route
calculation, or the route preference.
5.4 MY DATA MENU
Manage stored Go!Explore™ data. Select My Data from the Main Menu.
OPTION
DETAILS
Favourites
Rename or delete Favourites.
Places
Create, update or delete Places. Create, update or delete Place categories, or
modify Place visibility settings.
Rename or delete saved routes.
Create, rename or delete Saved Queries.
Record, simulate, rename or delete track logs, or assign colours to them.
Manage data previously saved to Memory Stick Duo™.
Saved Routes
Saved Queries
Track Logs
Saved Data
5.4.1 MANAGE FAVOURITES
To manage your Favourites, select My Data, followed by Favourites.
OPTION
DETAILS
S button
Opens the map with the selected Favourite in the middle.
Select
D button
Rename
F button
Delete
Opens the selected Favourite for editing.
Deletes the selected item from the list of Favourites.
5.4.2 MANAGE PLACES
Select the following options to manage data on the Places found in Go!Explore™ plus any added by yourself. Choose
My Data and select Places.
OPTION
DETAILS
S button
When a Place category is highlighted:
Opens the list of the subcategories of this Place category.
When a Place is highlighted:
Opens the selected Place for editing. Only Places you have created are available
in this list.
Select whether to show Places in the highlighted Place category shown on
the map.
Select
F button
Visibility
When a Place is open for editing:
OPTION
DETAILS
Edit the name of the Place
Rename the Place.
Edit additional info
Edit phone number
Delete
Enter additional information for the Place.
Enter a telephone number for the Place.
Delete the selected Place.
5.4.3 MANAGE SAVED ROUTES
Manage previously saved routes by selecting My Data then Saved Routes.
OPTION
DETAILS
S button
Shows the selected route on the map screen.
Select
F button
Deletes the selected route.
Delete
D button
Delete All
Clears the list of saved routes.
5.4.4 MANAGE SAVED QUERIES
Manage the list of previously saved search criteria to make it easy to find frequently searched Place types. Select My
Data, then Saved Queries.
OPTION
DETAILS
S button
Shows the list of nearest Places matching the saved query.
Select
F button
Delete
D button
Rename
Deletes the selected item from the list.
Rename the saved query.
5.4.5 MANAGE TRACK LOGS
You can record Track Logs, then play them back, display them on the map and see their details. Select My Data, then
Track Logs.
OPTION
DETAILS
D button
Record Track
D button
Stop Recording
S button
Select
Starts recording the track as you drive.
Stops the ongoing Track Log recording.
Shows the details of the selected Track Log.
When Track Log details are shown:
OPTION
DETAILS
S button
Track Colour – Find the desired colour for the Track Log. When a horizontal line is
shown, the Track Log is not displayed on the map.
Rename – Opens the smart keyboard so you can rename the Track Log.
Replay – Starts a simulated playback of the selected Track Log on the map.
Deletes the selected Track Log.
Select
F button
Delete
5.4.6 MANAGE SAVED DATA
Manage the saved data and settings, and how they are saved. Select My Data, then Saved Data.
OPTION
DETAILS
Automatically Save Settings
Delete Saved Data
Save Settings Now
Manage Memory Stick Data
Turn this feature on and Go!Explore™ will save your settings frequently to the
inserted Memory Stick Duo™.
Select and delete from your previously saved data.
Save your data.
Go!Explore™ restarts in copy mode. See the following section of this manual.
Copy Mode
The following options are available in copy mode:
OPTION
DETAILS
S button
When a data item without status is highlighted:
Marks the data for installation.
When a data item with Installed status is highlighted:
Marks the data for removal.
Executes the chosen operation.
Select
D button
Start
F button
Delete Saved Data
Deletes all saved data.
5.5 SETTINGS MENU
OPTION
DETAILS
Visual
Fine-tune the appearance and content of the map screen.
Audio
Regional
Adjust the sound effects used in Go!Explore™.
Choose your language, measurement units, time and date and their formats, as
well as your preferred voice guidance profile.
Determine how routes will be calculated.
Enable Safety Mode and some handy warnings features.
Check the GPS signal reception strength.
Route
Warnings
GPS
5.5.1 VISUAL SETTINGS
OPTION
DETAILS
Map Settings
These settings modify the appearance of the map:
Map Colours – Go!Explore™ is able to show the map and the menus in different
colours during the day and during the night. Select automatic or manual switching
of the day and night colour profiles.
Indicate One Way Streets – One way streets can be marked with small arrows
on the map.
Display Second Manoeuvre – The next route event is shown on the map
screen during navigation. Turn this feature on to also show the second upcoming
route event.
Display Lane Information – Some maps contain lane information to help you
position your car in the upcoming intersection.
Choose the image to be used as the menu background image.
Use 3D settings to determine which of the present 3D objects are shown on the
map, and adjust the level of 3D visual detail. The options are as follows:
3D Landmarks – Landmarks are 3D representations of prominent or well-known
objects. 3D landmarks are only available in selected cities and countries.
Elevated Roads – Complex intersections and vertically isolated roads (such as
overpasses or underground tunnels) are displayed in 3D.
Building Visibility – Full 3D city building data that represents actual building size
and position on the map. Building data is limited to the city centre of major cities.
Elevated Terrain – 3D terrain map data shows changes in terrain including
elevations or depressions in the land.
These settings modify the map view:
Smart Zoom – Turn the automatic map scaling and tilting function on or off.
Overview Mode – This feature switches the map view to Overview mode when the
next route event is at a distance. Overview is a zoomed out 2D view to let you see
the surrounding area.
Automatic Repositioning – If you have moved or rotated the map during navigation,
this feature moves the map back to your current GPS position and
re-enables automatic map rotation after the given period of inactivity.
Themes
3D Settings
Camera Settings
5.5.2 AUDIO SETTINGS
OPTION
DETAILS
Voice Volume
The slider adjusts the loudness of voice prompts. Press the S button to turn voice
guidance on or off.
Key sounds are audible confirmations of buttons presses. Adjust the volume using
the slider.
Press the S button to turn key sounds on or off.
Keys
5.5.3 REGIONAL SETTINGS
OPTION
DETAILS
Program Language
Select the on-screen language from the list of those available. After confirmation,
the application will restart if you change this setting.
Select a new voice guidance profile from the list of available languages and
speakers. Press the D button to hear a sample voice prompt. Press the S button
when you have selected the spoken language.
Set the distance units to be used. Go!Explore™ may not support all the listed units
in some voice guidance languages.
Set the date and time format. Various international formats are available.
Voice Guidance
Distance Units
Date & Time Format
5.5.4 ROUTE PLANNING OPTIONS
OPTION
DETAILS
Route Preference
Choose from different route types.
Transportation Mode
Set the type of vehicle you will use to navigate the route. Based upon this setting,
some of the road types will be excluded from the route (e.g. motorways
for pedestrians), or some of the restrictions may not be taken into account
(e.g. emergency vehicles have only a few restrictions).
Road Types Used for Route Set which road types are to be considered for or to be excluded from the route,
Planning
if possible.
Excluding a type of route may be preferable, but it does not necessarily mean total
prohibition. If your destination can only be accessed using some of the excluded
road types, they will be used, but only as much as necessary. In this case a warning
icon will be shown on the Route Summary screen, and the part of the route not
matching your preference will be displayed in a different colour on the map.
Transportation modes
•
•
•
•
Car
Taxi
Bicycle
Pedestrian
Road types
TYPE
DETAILS
Unpaved Roads
Go!Explore™ excludes unpaved roads by default.
Motorways
You might need to avoid motorways when you are driving a slow car or are towing
another vehicle.
Go!Explore™ includes ferries in a planned route by default. However, a map does
not necessarily contain information about the accessibility of temporary ferries. You
might also need to pay a fare on ferries.
U-turns are avoided by default.
You might need a permit or permission to use certain roads or to enter certain
areas. Go!Explore™ excludes these roads from the route calculation by default.
By default Go!Explore™ includes toll roads (pay roads where there is a per-use
charge) and charge roads (pay roads where you can purchase a pass to use
the road) in the routes. If you disable toll roads, Go!Explore™ plans the best
toll-free route.
Ferries
U-turns
Permit Needed
Toll Roads
Route preferences
OPTION
Fast
Short
Economical
DETAILS
Gives the quickest possible route if you can travel at or near the speed limit on all
roads. Usually the best selection for fast and normal cars.
Gives a route that has the smallest total distance of all possible routes between the
route points. Usually practical for pedestrians, cyclists or slow vehicles.
Combines the benefits of fast and short route preferences: Go!Explore™ calculates
as if plotting the quicker route, but takes other roads into account to save fuel.
5.5.5 WARNING SETTINGS
OPTION
DETAILS
Safety Mode
Safety Mode disables the PSP™ system’s buttons when travelling at speeds above
10 km/h (6 mph) to keep your attention on the road. While driving, you will not be
able to set a new destination or to change settings.
Maps may contain information about the speed limits of the road segments.
Go!Explore™ is able to warn you if you exceed the current limit. This information
may not be available for your region, or may not be fully correct for all roads in the
map. Do not use this as an alternative to the speedometer of your vehicle. Use this
option to turn Speed Limit Warnings on or off.
You can adjust the limit at which the application warns you of a broken speeding
restriction. Do not use this as an alternative to the speedometer of your vehicle.
Speed Limit Warnings
Speeding Tolerance
5.5.6 GPS STATUS
This screen allows you to check the GPS reception status and quality.
Sky view circle
The sky view circle shows the visible part of the sky above you, with your position as the centre. Satellites are shown at
their current positions. The GPS receiver receives data from both the green and yellow satellites. Signals from the yellow
satellites are only received, while green ones are used by the GPS receiver to calculate your current location.
Green GPS position quality indicator
Go!Explore™ has a connection to the GPS receiver and GPS position information is available in 3D. Go!Explore™ can
calculate both your horizontal and vertical GPS position.
Yellow GPS position quality indicator
Go!Explore™ has a connection to the GPS receiver and GPS position information is available in 2D. Only the horizontal
position is calculated, Go!Explore™ cannot calculate your vertical GPS position.
Red GPS position quality indicator
Go!Explore™ has a connection to the GPS receiver but GPS position information is not available.
Black GPS position quality indicator
Go!Explore™ has no connection to the GPS receiver.
6 GLOSSARY
2D/3D GPS reception
The GPS receiver uses satellite signals to calculate its position and need at least four signals to give a three-dimensional
position, including elevation. As the satellites are moving and because objects can block the signals, your GPS device
might not receive four signals. If three satellites are available, the receiver can calculate the horizontal GPS position but
the accuracy is lower and the GPS device does not give you elevation data – only 2D reception is possible.
Active route
The currently navigated route. You can save and load routes in Go!Explore™, but only one route can be active at any
given time, and it is always active until you delete it, reach your destination or you quit Go!Explore™.
City Centre
The city centre is not necessarily the geometric centre of the city (or town) but an arbitrary point the map creators have
chosen. It is usually a location thought of as the most important intersection.
NOTE: if a point in a city is recognised as the centre, a ‘red dot’ icon will be displayed next to the city name on the Select
Location screen. If a city/town has no recognisable centre, no red dot will be displayed.
GPS accuracy
Several factors impact on the deviation between your real position and the one given by the GPS device. For example,
signal delay in the ionosphere or reflecting objects near the GPS device have a different and varying impact on how
accurately the GPS device can calculate your position.
Map
Go!Explore™ works with advanced digital maps. The 2D mode shows you streets, roads and elevation is indicated using
colour. In 3D mode, you can see altitude differences, for example valleys and mountains, elevated roads, and in selected
cities, 3D landmarks and buildings.
You can use digital maps interactively; you can zoom in and out (increase or decrease the scale), tilt them up and down
and turn them left and right. In GPS-supported navigation, digital maps facilitate route planning.
North-up map orientation
In North-up mode the map is rotated so its top always faces North. This is the orientation in 2D map view mode and in
Overview mode.
Overview mode
You can instruct Go!Explore™ to automatically switch to Overview mode if the next route event is in the distance. In
Overview mode the map is shown in 2D but scaled down to a predefined zoom level. When you approach the next route
event, the previous 2D or 3D map view returns automatically.
Route
A series of destinations to be reached one after the other. A simple route contains one start point and only one destination.
Multi-point routes contain one or more waypoints (intermediate destinations). The last route point is the final destination
and the route is cut into different legs (from one destination to the next).
Track-up map orientation
In Track-up mode the map is rotated so its top always points in the current driving direction. This is the default orientation
in 3D map view mode.
7 COPYRIGHT NOTICES
Data Source © 2007 Tele Atlas N.V. Based upon:
Topografische onderground Copyright © dienst voor het kadaster en de openbare registers, Apeldoorn 2007
© BEV, GZ 1368/2003.
© DAV.
© IGN France.
© Ordnance Survey of Northern Ireland.
© Norwegian Mapping Authority, Public Roads Administration/© MMapsolutions.
© Roskartographia.
© Swisstopo.
2-D city maps © INCREMENT P CORP. 2007 Tele Atlas N.V. 2007. All Rights Reserved.
This product includes mapping data licensed from Ordnance Survey with the permission of the Controller of Her
Majesty’s Stationery Office. © Crown Copyright and/or database right 2007. All Rights Reserved. Licence number
100026920.
Go! Explore ©2008 Sony Computer Entertainment Europe. Published by Sony Computer Entertainment Europe.
Developed by Nav n Go. Go! Explore is a trademark of Sony Computer Entertainment Europe. All rights reserved.
8 TERMS OF USE
ACCESS TO OR USE OF THE GO!EXPLORE™ SOFTWARE OR ANY PART OF THE SAME (“the Software”) IS EXPRESSLY
CONDITIONED UPON ACCEPTANCE OF THESE TERMS OF USE AS SET OUT BELOW (“Terms Of Use”).
These Terms Of Use are a contract between you and Sony Computer Entertainment Europe Limited (“SCEE”). These
Terms Of Use apply to the Software and any updates, upgrades, or new versions of the Software provided or made
available through any SCEE service, online network, website, PSP™ disc or other PSP™ format and used in conjunction
with the PSP™ system and the GPS receiver in accordance with the directions contained in this manual.
1. Licence Grant
Subject to these Terms Of Use, the Software is licensed to you solely for personal, non-commercial use. You do not have
any ownership rights of interests in the Software. All intellectual property rights in the Software belong to SCEE and its
licensors, and all use or access to such Software shall be subject to these Terms Of Use and all applicable copyright and
intellectual property laws. Except as expressly granted in these Terms Of Use, SCEE and its Licensors reserve all rights,
interests and remedies.
2. Restrictions
You may not lease, rent, sub-license, publish, modify, adapt, or translate any portion of the Software. To the fullest extent
permitted by law, you may not reverse engineer, decompile, or disassemble any portion of the Software.
3. Warranty Disclaimer and Limitation of Liability
No warranty is given about the quality, usability, or functionality of the Software.
NEITHER SCEE NOR ITS LICENSORS SHALL BE LIABLE FOR ANY LOSS OF DATA, LOSS OF PROFIT, OR ANY OTHER LOSS
OR DAMAGE SUFFERED BY YOU OR ANY OTHER THIRD PARTY, WHETHER DIRECT, INDIRECT, INCIDENTAL, SPECIAL,
OR CONSEQUENTIAL HOWEVER ARISING, AS A RESULT OF ACCESSING OR USING THE SOFTWARE. THE FOREGOING
LIMITATIONS SHALL APPLY TO THE EXTENT PERMITTED BY APPLICABLE LAW.
4. Termination
If SCEE determines that you have violated these Terms Of Use, SCEE may take all actions to protect its interests,
including denial of any services such as the provision of updates, upgrades and supplemental services provided to you
or made available to you through the use of the Software.
SCEE may update these Terms Of Use from time to time. Users may access a current printable version of these terms
at eu.playstation.com/terms.