1
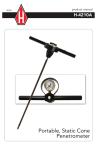
105 Harrison Street, American Falls, Idaho 83211 U.S.A. 800.635.7330 • 208.226.2017 • www.ams-samplers.com Static Cone Penetrometer Use and operating guidelines General Information: The Static Cone Penetrometer is an unparalleled device for measuring soil consistency. It is specifically designed for use in fine grained, soft soils to depths as much as 30 feet. The basic unit is totally self-contained, weighs 5 lb., and is set up for a 2-ft maximum depth. It is intended to be operated by one person and requires no auxiliary equipment. The device is extremely rugged and is built for day-in, day-out use. Items included: Item 1 - Head Assembly Item 18 - Cone Assembly Item 8 or 11 - Outer/Inner Rod Assembly S-215-IM User Manual Practical Applications: • Rapid Selection of locations for field density tests • Evaluating backfills in trenches and behind walls • Light foundation investigations • For rapid correlation of field CBR tests • Earthwork control for embankments • Muck and soft soil probes • Probing shallow marine deposits • Probing beneath existing shallow foundations • Pavement subgrade evaluation Practical Applications Dual rods enable the cone stress to be measured directly. Soil friction on the outer rod does not influence the reading. Depending upon the application, either the maximum bearing for an increment of push or the least bearing for an increment can be reported. If you were investigating for soft spots, you would take the least reading. In typical use, you would force the cone into the soil 6 inches, retract the cone slightly until the gauge reads zero, then advance an additional 6 inch increment. If you meet with refusal, the cone can be removed and the hole opened with a hand auger to permit a continuation of measurements against depth. The tool has been designed to allow a maximum force of 250 foot pounds to be applied, somewhat more than the average weight of an operator. The unit can be operated in a vertical or horizontal position. The cone tip has an included angle of 60º. The cone has a section area of 1.5cm2. The maximum total bearing is (Qc) is 70 kg/cm2. The penetrometer assembly comes standard with a 2-ft “extension” Inner/Outer Rod assembly. Note: Starter Inner Rods are 0.875 inch longer than the similar-looking Extension Inner Rods (i.e., the overall length for the 2-ft Starter Inner Rods is 24.875 in. and for the Extension Inner Rods is 24 inches: the Starter and Extension Outer Rods have the same length). Simple determination of approximate unconfined compression strength, standard penetration test “N” and CBR values can be derived from the cone index. How to use the cone index The reading (Qc) is in kg/cm2 which is essentially equal to ton/ft2. The cone index (Qc) is read directly. The correlation between he cone index and soil constants is not absolute. Generally, the following results have been determined through extensive field use of the unit. Further verification of correlation in your local soil types is essential. AMS accepts no liability for the accuracy of the suggested correlations. Standard Penetration Test “N” Value Qc = 4 “N” Strength and Cohesion Qc - Unconfined compression (kg/cm2) c – Cohesion (kg/cm2) Uniform clay and silty clays: Qc = 5 Qu Qc = 10 c Clayey Silts: Qc = (10 to 20) Qu Qc = (20 to 40) c CBR Value (1%) Qc = (2.5 to 3.3) CBR Assembly and Adjustment To assemble your Penetrometer, screw the Cone Assembly (Item 18) into the Outer/Inner Rod Assembly (Item 8 or 11) and tighten with a wrench. Next, screw this sub-assembly into the Head Assembly (Item 1) and tighten with a wrench. Check to be sure the system is properly adjusted by pressing the Penetrometer down on to a board or rubber mat. The needle on the gauge should move as soon as pressure is applied. After pressure is removed, the needle should return to zero. If the gauge does not respond when force is applied to the Cone, turn the brass Adjustment Screw (Item 4) in the Head Assembly (Item 1) clockwise until the needle moves. This is the zero point to the system. If the gauge will not return to zero, turn the brass Adjustment Screw counter clockwise until the needle returns to zero. You should now be ready to use your Static Cone Penetrometer. Borehole Preparation Kit Improve effectiveness of geotechnical testing and sampling with a pre-bored hole. Includes: 2 1/4" 5/8" regular auger, 2 1/4" 5/8" planer auger, one (1) 4' 5/8" extension, one (1) 3' 5/8" extension, rubber-coated cross handle, black poly-canvas bag. Borehole Preparation Kit 400.78 Borehole Preparation Kit Replacement Parts AUGERS 400.08 2 1/4" Regular Auger 400.53 2 1/4" Planer Auger EXTENSIONS 408.02 3' Extension 408.03 4' Extension MISCELLANEOUS 406.04 16" Rubber Coated Cross Handle 430.32 4" Signature Poly-Canvas Case 105 Harrison Street, American Falls, Idaho 83211 U.S.A. 800.635.7330 • 208.226.2017 • www.ams-samplers.com Static Cone Penetrometer Maintenance, Repair, and Replacement Maintenance Your Cone Penetrometer is a ruggedly-designed device intended to tolerate a reasonable amount of field abuse. The most critical requirement is keeping foreign matter outside the annulus between the Inner and Outer Rods. It is recommended that a drop or two of lightweight machine oil be applied frequently to the annulus. (A schedule of every 2-3 days is recommended if the unit is being used daily). The Inner Rod is a surface-ground stainless steel rod which will not rust. The Outer Rod is made of a high-strength alloy steel tubing which is subject to rusting. The machine oil will curb that tendency. Always make an attempt to apply a normal (vertical or in-line) thrust on the assembly as it is pushed into the ground. A severe horizontal thrust coupled to a normal, vertical thrust could produce a situation in which the rods could be bent. It is infinitely easier to avoid bending the rod than to straighten the rod. Periodically inspect the Cone Assembly. If the Cone Assembly has suffered excessive wear, it needs to be replaced. The original diameter of the Cone is 0.544”. When the outer diameter is reduced to a diameter of 0.520”, it is recommended that the point be replaced. Repair and Replacement Repair If you notice that your penetrometer is leaking or will not hold pressure, you will need to replace the “O” ring (Item 5) on the Adjustment Screw (Item 4) and/or the piston (Item 6). Adjustment Screw “O” Ring Replacement: a) Remove the Outer Rod Assembly (Item 8 or 11) from the head Assembly (Item 1) b) Clamp the Head Assembly in a vise with the brass Adjustment Screw pointing up. c) Remove the Adjusting Screw from the Head Assembly and discard the “O” ring. d) Install the new “O” ring – being careful not to damage it. e) Fill the reservoir with automatic transmission oil until flush with the top. f) Drop in the Adjustment Screw and thread clockwise until flush with the top. (Note: Oil will run out during this step preventing air from being trapped inside). g) Screw the Outer Rod Assembly into the Head Assembly. h) Continue to screw the brass Adjustment Screw clockwise until the needle on the gauge begins to move. At this time, back off the screw until the gauge reads zero. i) The Static Cone Penetrometer is now ready for use. Piston “O” Ring Replacement: a) Remove the Inner/Outer Rod Assembly (Item 8 or 11) from the head Assembly (Item 1) b) Remove the Insert (Item 7) from the Head Assembly. (Note: For this procedure, you will need a 3/8”-16 x 2” long bolt and nut. Screw the bolt and nut into the insert and use the nut to jam the bolt; this will prevent the bolt from backing out of the Insert. Now, use c) d) e) f) g) h) i) j) k) l) the bolt to screw the Insert out of the Head. This procedure can be made easier if the Head Assembly is slightly heated at the Insert. Leaving the nut and bolt in the Insert will facilitate reassembly). Remove the Adjustment Screw (Item 4) and drain the oil from the unit. Using a long screw driver, or similar tool, press the Piston (Item 6) out of the bottom of the Head. Replace the “O” ring (Item 5) – being careful not to damage it. Replace the Piston from the bottom of the Head, with the drilled hole facing outward. CAUTION: The Piston must be inserted from the bottom of the Head to prevent damage to the “O” ring and should not be pushed above the Gauge opening. Reinstall the Insert in the bottom of the Head Assembly, using the bolt and nut. (Note: Loctite® thread fastener is recommended to insure the Insert does not unthread during use). Using a long screw driver or similar tool, press the Piston from the top (or Adjustment Screw end) of the Head down against the Insert – being careful not to damage the bore. Refill the Head with Automatic Transmission oil until flush with the top. Drop in the brass Adjustment Screw and thread clockwise until flush with the top. (Note: Oil will run out during this step, preventing air from being trapped inside). Screw the Outer Rod Assembly in to the Head Assembly, watching the needle of the Gauge. If the Gauge needle begins to move, back out the Adjustment Screw to allow the excess oil to escape. CAUTION: Failure to allow excess oil to escape will over-pressurize and damage the Gauge. Once the Outer Rod Assembly is tight, the Adjustment Screw is turned clockwise until the needle on the Gauge begins to move. At this time, back off the Screw until the Gauge reads zero. Static cone Penetrometer Part List Item 1 2 3 4 5 6 7 8 9 10 11 12 13 14 15 16 17 Description Head Assembly Handle (2 required) Body Adjustment Screw “O” Ring (2 required) Piston Insert 2-ft Starter Rod Assembly (includes items 9 & 10) 2-ft Starter Inner Rod 2-ft Outer Rod 2 ft Extension Rod Assembly (includes items 12 & 13) 2 -ft Extension Inner Rod 2-ft Outer Rod Cone Assembly Gauge Guard (not shown) Gauge Assembly (not shown) “O” ring Packing Kit (not shown) (includes 2 each of item 5) Helpful Hint: Starter Inner Rods are 0.875” longer than the similar-looking Extension Inner Rods (i.e., 2-ft Starter Inner Rods are 24.875” OAL. The Extension Inner Rods are 24” OAL).