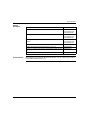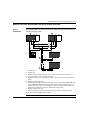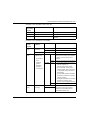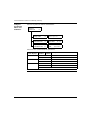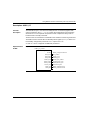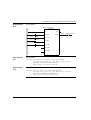
1
Modicon Quantum
Hot Standby
with Unity Pro
User Manual
35010533_00
eng
June 2005
2
Table of Contents
Safety Information . . . . . . . . . . . . . . . . . . . . . . . . . . . . . . . . . . . . 7
About the Book . . . . . . . . . . . . . . . . . . . . . . . . . . . . . . . . . . . . . . . 9
Part I Introducing the Modicon Quantum Hot Standby with
Unity System. . . . . . . . . . . . . . . . . . . . . . . . . . . . . . . . . . . 13
At a Glance . . . . . . . . . . . . . . . . . . . . . . . . . . . . . . . . . . . . . . . . . . . . . . . . . . . . . 13
Chapter 1
Modicon Quantum Hot Standby with Unity Overview . . . . . . . 15
Introduction . . . . . . . . . . . . . . . . . . . . . . . . . . . . . . . . . . . . . . . . . . . . . . . . . . . . .
Overview of the Modicon Quantum Hot Standby with Unity System. . . . . . . . . .
Modicon Quantum Hot Standby with Unity 140 CPU 671 60 Module Overview . .
Modicon Quantum Hot Standby with Unity System Overview. . . . . . . . . . . . . . .
Modicon Quantum Hot Standby with Unity 140 CPU 671 60 Components. . . . .
Operating the Modicon Quantum Hot Standby with Unity 140 CPU 671 60
Keypad . . . . . . . . . . . . . . . . . . . . . . . . . . . . . . . . . . . . . . . . . . . . . . . . . . . . . . . .
Using the Modicon Quantum Hot Standby with Unity 140 CPU 671 60 LED
Indicators. . . . . . . . . . . . . . . . . . . . . . . . . . . . . . . . . . . . . . . . . . . . . . . . . . . . . . .
Using the Modicon Quantum Hot Standby with Unity 140 CPU 671 60
LCD Display Screens . . . . . . . . . . . . . . . . . . . . . . . . . . . . . . . . . . . . . . . . . . . . .
Chapter 2
23
25
27
Modicon Quantum Hot Standby with Unity Compatibility,
Differences, and Restrictions . . . . . . . . . . . . . . . . . . . . . . . . . . 39
Introduction . . . . . . . . . . . . . . . . . . . . . . . . . . . . . . . . . . . . . . . . . . . . . . . . . . . . .
Compatibility with Installed Systems . . . . . . . . . . . . . . . . . . . . . . . . . . . . . . . . . .
Understanding System Words and System Bits . . . . . . . . . . . . . . . . . . . . . . . . .
Understanding Multitasking Restrictions . . . . . . . . . . . . . . . . . . . . . . . . . . . . . . .
Local I/O and Distributed I/O Restrictions . . . . . . . . . . . . . . . . . . . . . . . . . . . . . .
Understanding Other Module Restrictions . . . . . . . . . . . . . . . . . . . . . . . . . . . . .
Understanding USB Link Restrictions . . . . . . . . . . . . . . . . . . . . . . . . . . . . . . . . .
Understanding Application Restrictions. . . . . . . . . . . . . . . . . . . . . . . . . . . . . . . .
Chapter 3
15
16
18
19
21
39
40
41
42
43
44
45
46
Using IEC Logic and Modicon Quantum Hot Standby with
Unity. . . . . . . . . . . . . . . . . . . . . . . . . . . . . . . . . . . . . . . . . . . . . . . 47
3
Introduction . . . . . . . . . . . . . . . . . . . . . . . . . . . . . . . . . . . . . . . . . . . . . . . . . . . . . 47
Modicon Quantum Hot Standby with Unity and IEC Logic. . . . . . . . . . . . . . . . . . 48
Understanding the Modicon Quantum Hot Standby with Unity State RAM
Transfer Process . . . . . . . . . . . . . . . . . . . . . . . . . . . . . . . . . . . . . . . . . . . . . . . . . 49
Understanding System Scan Time in Modicon Quantum Hot Standby with
Unity Systems . . . . . . . . . . . . . . . . . . . . . . . . . . . . . . . . . . . . . . . . . . . . . . . . . . . 50
Transferring Application Data in a Modicon Quantum Hot Standby with Unity
System . . . . . . . . . . . . . . . . . . . . . . . . . . . . . . . . . . . . . . . . . . . . . . . . . . . . . . . . . 54
Part II Setting up and Maintaining a Modicon Quantum Hot
Standby with Unity System. . . . . . . . . . . . . . . . . . . . . . . . 55
At a Glance . . . . . . . . . . . . . . . . . . . . . . . . . . . . . . . . . . . . . . . . . . . . . . . . . . . . . 55
Chapter 4
Setting up, Installing, and Cabling a Modicon Quantum Hot
Standby with Unity System . . . . . . . . . . . . . . . . . . . . . . . . . . . . 57
Introduction . . . . . . . . . . . . . . . . . . . . . . . . . . . . . . . . . . . . . . . . . . . . . . . . . . . . . 57
Setting Up the Modicon Quantum Hot Standby with Unity System . . . . . . . . . . . 58
Mapping the Backplane Extension. . . . . . . . . . . . . . . . . . . . . . . . . . . . . . . . . . . . 60
Connecting Two Modicon Quantum Hot Standby with Unity HE CPU 671 60s. . 62
Connecting the Remote I/O . . . . . . . . . . . . . . . . . . . . . . . . . . . . . . . . . . . . . . . . . 63
Testing the Modicon Quantum Hot Standby with Unity System . . . . . . . . . . . . . 66
Chapter 5
5.1
5.2
4
Configuring a Modicon Quantum Hot Standby with Unity
System . . . . . . . . . . . . . . . . . . . . . . . . . . . . . . . . . . . . . . . . . . . . 69
Introduction . . . . . . . . . . . . . . . . . . . . . . . . . . . . . . . . . . . . . . . . . . . . . . . . . . . . . 69
Configuring a System with the Unity Pro Tabs and Dialogs . . . . . . . . . . . . . . . . 70
At a Glance . . . . . . . . . . . . . . . . . . . . . . . . . . . . . . . . . . . . . . . . . . . . . . . . . . . . . 70
Introducing Unity Pro . . . . . . . . . . . . . . . . . . . . . . . . . . . . . . . . . . . . . . . . . . . . . . 71
Accessing the Base Configuration . . . . . . . . . . . . . . . . . . . . . . . . . . . . . . . . . . . . 74
Using the Summary Tab . . . . . . . . . . . . . . . . . . . . . . . . . . . . . . . . . . . . . . . . . . . 75
Using the Overview Tab. . . . . . . . . . . . . . . . . . . . . . . . . . . . . . . . . . . . . . . . . . . . 76
Using the Configuration Tab . . . . . . . . . . . . . . . . . . . . . . . . . . . . . . . . . . . . . . . . 77
Using the Modbus Port Tab . . . . . . . . . . . . . . . . . . . . . . . . . . . . . . . . . . . . . . . . . 80
Using the Animation Tab and PLC Screen Dialogs . . . . . . . . . . . . . . . . . . . . . . . 82
Using the Hot Standby Tab . . . . . . . . . . . . . . . . . . . . . . . . . . . . . . . . . . . . . . . . . 86
Configuring the PCMCIA Cards . . . . . . . . . . . . . . . . . . . . . . . . . . . . . . . . . . . . . . 88
Configuring the Modbus Plus Communication Type . . . . . . . . . . . . . . . . . . . . . . 90
Setting the Invalidate Keypad Option. . . . . . . . . . . . . . . . . . . . . . . . . . . . . . . . . . 92
Swapping Network Addresses at Switchover . . . . . . . . . . . . . . . . . . . . . . . . . . . 94
Configuring a NOE with Unity Pro . . . . . . . . . . . . . . . . . . . . . . . . . . . . . . . . . . . . 99
At a Glance . . . . . . . . . . . . . . . . . . . . . . . . . . . . . . . . . . . . . . . . . . . . . . . . . . . . . 99
Overview of Modicon Quantum Hot Standby with Unity Solution for NOEs . . . 100
NOE Operating Modes and Modicon Quantum Hot Standby with Unity . . . . . . 102
IP Address Assignment . . . . . . . . . . . . . . . . . . . . . . . . . . . . . . . . . . . . . . . . . . . 106
Address Swap Times . . . . . . . . . . . . . . . . . . . . . . . . . . . . . . . . . . . . . . . . . . . . . 108
5.3
Chapter 6
Network Effects of Modicon Quantum Hot Standby with Unity Solution . . . . . .
Configuring Registers with Unity Pro. . . . . . . . . . . . . . . . . . . . . . . . . . . . . . . . .
At a Glance . . . . . . . . . . . . . . . . . . . . . . . . . . . . . . . . . . . . . . . . . . . . . . . . . . . .
Understanding the Non-Transfer Area, Transferring State RAM, and Reverse
Transfer Words . . . . . . . . . . . . . . . . . . . . . . . . . . . . . . . . . . . . . . . . . . . . . . . . .
Understanding the Unity Command Register . . . . . . . . . . . . . . . . . . . . . . . . . .
Understanding the Unity Status Register . . . . . . . . . . . . . . . . . . . . . . . . . . . . .
Transferring User Data . . . . . . . . . . . . . . . . . . . . . . . . . . . . . . . . . . . . . . . . . . .
Using Initialized Data. . . . . . . . . . . . . . . . . . . . . . . . . . . . . . . . . . . . . . . . . . . . .
Synchronizing Time-of-Day Clocks . . . . . . . . . . . . . . . . . . . . . . . . . . . . . . . . . .
109
112
112
113
114
117
119
120
121
Maintaining a Modicon Quantum Hot Standby with Unity
System . . . . . . . . . . . . . . . . . . . . . . . . . . . . . . . . . . . . . . . . . . . . 123
Introduction . . . . . . . . . . . . . . . . . . . . . . . . . . . . . . . . . . . . . . . . . . . . . . . . . . . .
Verifying the Health of a Modicon Quantum Hot Standby with Unity System . .
Detecting and Diagnosing Failures in a Modicon Quantum Hot Standby with
Unity System . . . . . . . . . . . . . . . . . . . . . . . . . . . . . . . . . . . . . . . . . . . . . . . . . .
Detecting Primary Controller, Copro, and RIO Head Failures. . . . . . . . . . . . . .
Detecting Standby Controller, Copro, and RIO Head Failures . . . . . . . . . . . . .
Detecting High-Speed Data Link (HDSL) Failures . . . . . . . . . . . . . . . . . . . . . .
Detecting Remote I/O (RIO) Link Failures. . . . . . . . . . . . . . . . . . . . . . . . . . . . .
Checking for Identical Application Programs—Checksum . . . . . . . . . . . . . . . .
Replacing a Faulty Module . . . . . . . . . . . . . . . . . . . . . . . . . . . . . . . . . . . . . . . .
Troubleshooting the Primary Controller. . . . . . . . . . . . . . . . . . . . . . . . . . . . . . .
Troubleshooting the Standby Controller . . . . . . . . . . . . . . . . . . . . . . . . . . . . . .
123
124
125
127
129
130
133
135
136
137
138
Part III Understanding the Modicon Quantum Hot Standby
with Unity System Special Features. . . . . . . . . . . . . . . 139
At a Glance . . . . . . . . . . . . . . . . . . . . . . . . . . . . . . . . . . . . . . . . . . . . . . . . . . . . 139
Chapter 7
Enabling EXEC Upgrade with Unity Pro . . . . . . . . . . . . . . . . . 141
Introduction . . . . . . . . . . . . . . . . . . . . . . . . . . . . . . . . . . . . . . . . . . . . . . . . . . . . 141
Overview of Modicon Quantum Hot Standby with Unity EXEC Upgrade . . . . . 142
Executing the EXEC Upgrade Procedure . . . . . . . . . . . . . . . . . . . . . . . . . . . . . 143
Chapter 8
Handling Logic Mismatch with Unity Pro . . . . . . . . . . . . . . . . 145
Introduction . . . . . . . . . . . . . . . . . . . . . . . . . . . . . . . . . . . . . . . . . . . . . . . . . . . .
Understanding Modicon Quantum Hot Standby with Unity Logic Mismatch . . .
Understanding Switchover Behavior during Logic Mismatch . . . . . . . . . . . . . .
Online or Offline Modifications and Logic Mismatch . . . . . . . . . . . . . . . . . . . . .
Online Modifications to an Application Program in the Standby and Logic
Mismatch . . . . . . . . . . . . . . . . . . . . . . . . . . . . . . . . . . . . . . . . . . . . . . . . . . . . . .
Online Modifications to an Application Program in the Primary and Logic
Mismatch . . . . . . . . . . . . . . . . . . . . . . . . . . . . . . . . . . . . . . . . . . . . . . . . . . . . . .
Offline Modification of an Application Program and Logic Mismatch . . . . . . . .
145
146
150
152
153
154
155
5
Switchover Methods and Logic Mismatch . . . . . . . . . . . . . . . . . . . . . . . . . . . . . 157
Application Program Transfer Method and Logic Mismatch . . . . . . . . . . . . . . . 159
Recommendations for Using Logic Mismatch . . . . . . . . . . . . . . . . . . . . . . . . . . 160
Chapter 9
Transferring an Application Program with Unity Pro . . . . . . 163
Introduction . . . . . . . . . . . . . . . . . . . . . . . . . . . . . . . . . . . . . . . . . . . . . . . . . . . . 163
Overview of Application Program Transfer . . . . . . . . . . . . . . . . . . . . . . . . . . . . 164
Executing the Application Program Transfer Procedure Using the Command
Register . . . . . . . . . . . . . . . . . . . . . . . . . . . . . . . . . . . . . . . . . . . . . . . . . . . . . . . 166
Automatic Application Program Transfer . . . . . . . . . . . . . . . . . . . . . . . . . . . . . . 167
Executing the Application Program Transfer Procedure Using the Keypad . . . 168
Chapter 10
Using the Modicon Quantum Hot Standby with Unity EFBs 171
Introduction . . . . . . . . . . . . . . . . . . . . . . . . . . . . . . . . . . . . . . . . . . . . . . . . . . . . 171
Description: HSBY_RD . . . . . . . . . . . . . . . . . . . . . . . . . . . . . . . . . . . . . . . . . . . 172
Description: HSBY_ST. . . . . . . . . . . . . . . . . . . . . . . . . . . . . . . . . . . . . . . . . . . . 175
Description: HSBY_WR . . . . . . . . . . . . . . . . . . . . . . . . . . . . . . . . . . . . . . . . . . . 178
Description: REV_XFER . . . . . . . . . . . . . . . . . . . . . . . . . . . . . . . . . . . . . . . . . . 181
Appendices
. . . . . . . . . . . . . . . . . . . . . . . . . . . . . . . . . . . . . . . . . . . . . . 185
Appendices for Quantum Hot Standby Planning and Installation Guide . . . . . . 185
Appendix A
Modicon Quantum Hot Standby with Unity Additional
Information . . . . . . . . . . . . . . . . . . . . . . . . . . . . . . . . . . . . . . . . 187
Introduction . . . . . . . . . . . . . . . . . . . . . . . . . . . . . . . . . . . . . . . . . . . . . . . . . . . . 187
Fiber Optic Cable . . . . . . . . . . . . . . . . . . . . . . . . . . . . . . . . . . . . . . . . . . . . . . . . 188
140 CPU 671 60 Specifications for Modicon Quantum Hot Standby with
Unity. . . . . . . . . . . . . . . . . . . . . . . . . . . . . . . . . . . . . . . . . . . . . . . . . . . . . . . . . . 189
CRP Remote I/O Head Processor Error Patterns . . . . . . . . . . . . . . . . . . . . . . . 191
TextIDs. . . . . . . . . . . . . . . . . . . . . . . . . . . . . . . . . . . . . . . . . . . . . . . . . . . . . . . . 193
6
Glossary
. . . . . . . . . . . . . . . . . . . . . . . . . . . . . . . . . . . . . . . . . . . . . . 195
Index
. . . . . . . . . . . . . . . . . . . . . . . . . . . . . . . . . . . . . . . . . . . . . . 211
Safety Information
§
Important Information
NOTICE
Read these instructions carefully, and look at the equipment to become familiar with
the device before trying to install, operate, or maintain it. The following special
messages may appear throughout this documentation or on the equipment to warn
of potential hazards or to call attention to information that clarifies or simplifies a
procedure.
The addition of this symbol to a Danger or Warning safety label indicates
that an electrical hazard exists, which will result in personal injury if the
instructions are not followed.
This is the safety alert symbol. It is used to alert you to potential personal
injury hazards. Obey all safety messages that follow this symbol to avoid
possible injury or death.
DANGER
DANGER indicates an imminently hazardous situation, which, if not avoided, will
result in death, serious injury, or equipment damage.
WARNING
WARNING indicates a potentially hazardous situation, which, if not avoided, can result
in death, serious injury, or equipment damage.
CAUTION
CAUTION indicates a potentially hazardous situation, which, if not avoided, can result
in injury or equipment damage.
7
Safety Information
PLEASE NOTE
Electrical equipment should be serviced only by qualified personnel. No responsibility is assumed by Schneider Electric for any consequences arising out of the use
of this material. This document is not intended as an instruction manual for untrained
persons.
© 2005 Schneider Electric. All Rights Reserved.
8
About the Book
At a Glance
Document Scope
This guide describes the Modicon Quantum Hot Standby with Unity system
consisting of the Unity Pro software, the Modicon Quantum Hot Standby with Unity
140 CPU 671 60, power supplies, and remote I/O (RIO).
This guide describes how to build a Modicon Quantum Hot Standby with Unity
system. Users of legacy Quantum Hot Standby systems should note that significant
differences exist between Unity and legacy systems, and where important, this
guide identifies those differences.
Note: Software Requirements
Required to use a Quantum Modicon Hot Standby with Unity system:
z Unity Pro 2.0 or higher
z CRA firmware: Release 1.25 or higher
z CRP firmware: Release 1.14 or higher
Note: Who should use this document?
Anyone who uses a Hot Standby system or needs fault-tolerant availability through
redundancy in an automation system.
You should have knowledge of programmable logic controllers (PLCs). Familiarity
with automation controls is expected.
You should possess a working knowledge of the Unity Pro software. Familiarity
with Concept, ProWORX, or Modsoft will help.
9
About the Book
Note: Terminology
This guide uses the following terminology.
z application program = a project or logic program
z controller = a Unity Programmable Logic Controller (PLC), module, which
contains both
1. a CPU
2. a Copro
z CPU = (Central Processing Unit) a microprocessor in the controller, which
processes the application program
z copro = a microprocessor in the controller, which communicates between two
controllers
z modify = to edit or to change an application program
z module = any unit either a controller, NOE, RIO, CRP, CRA, DDI, AVO
z scan = program cycle
Because Modicon Quantum Hot Standby with Unity systems deliver fault-tolerant
availability through redundancy, use a Modicon Quantum Hot Standby with Unity
system when downtime cannot be tolerated. Redundancy means that two
backplanes are configured identically. A Modicon Quantum Hot Standby with Unity
system must have identical configurations:
z
z
z
z
z
z
z
Validity Note
10
identical 140 CPU 671 60s which contain both a CPU and a Copro
identical versions of the EXEC
identical power supplies
identical RIO Heads
identical cabling and cabling systems
identical I/O drops
identical sequential placement on the backplane
The data and illustrations found in this book are not binding. We reserve the right to
modify our products in line with our policy of continuous product development. The
information in this document is subject to change without notice and should not be
construed as a commitment by Schneider Electric.
About the Book
Related
Documents
Title of Documentation
Reference Number
Quantum with Unity Pro Hardware Reference Manual
Electronic
Documentation CD:
UNYUSE909CDM
Quantum with Unity Pro Discrete and Analog I/O Reference Manual Electronic
Documentation CD:
UNYUSE909CDM
User Comments
Quantum with Unity Pro Experts and Communication Reference
Manual
Electronic
Documentation CD:
UNYUSE909CDM
Quantum Automation Series Hardware Reference Manual
840USE10000
Modbus Plus Network I/O Servicing Guide, Version 2.0
840USE10400
Remote I/O Cable System Planning and Installation Guide, Version
3.0
890USE10100
Modbus Plus Network Planning and Installation Guide, Version 4.0
890USE10000
We welcome your comments about this document. You can reach us by e-mail at
[email protected]
11
About the Book
12
Introducing the Modicon Quantum
Hot Standby with Unity System
I
At a Glance
Purpose
This part introduces the Modicon Quantum Hot Standby with Unity system. The
content describes the hardware available, the compatibility of Modicon Quantum
Hot Standby with Unity system with legacy systems, and using IEC logic and Unity.
What's in this
Part?
This part contains the following chapters:
Chapter
Chapter Name
Page
1
Modicon Quantum Hot Standby with Unity Overview
15
2
Modicon Quantum Hot Standby with Unity Compatibility,
Differences, and Restrictions
39
3
Using IEC Logic and Modicon Quantum Hot Standby with Unity
47
13
Introducing Modicon Quantum Hot Standby with Unity
14
Modicon Quantum Hot Standby
with Unity Overview
1
Introduction
Overview
In this chapter you will find a brief overview of the Modicon Quantum Hot Standby
with Unity system, the module, and the indicators.
What's in this
Chapter?
This chapter contains the following topics:
Topic
Page
Overview of the Modicon Quantum Hot Standby with Unity System
16
Modicon Quantum Hot Standby with Unity 140 CPU 671 60 Module Overview
18
Modicon Quantum Hot Standby with Unity System Overview
19
Modicon Quantum Hot Standby with Unity 140 CPU 671 60 Components
21
Operating the Modicon Quantum Hot Standby with Unity 140 CPU 671 60
Keypad
23
Using the Modicon Quantum Hot Standby with Unity 140 CPU 671 60 LED
Indicators
25
Using the Modicon Quantum Hot Standby with Unity 140 CPU 671 60 LCD
Display Screens
27
15
Overview Modicon Quantum Hot Standby with Unity
Overview of the Modicon Quantum Hot Standby with Unity System
Purpose of a Hot
Standby System
Use a Modicon Quantum Hot Standby with Unity system when downtime cannot be
tolerated. Hot standby systems deliver high availability through redundancy. A hot
standby system consists of two identical configurations.
z Modicon Quantum 140 CPU 671 60
z Modicon Quantum Power Supply Module
z Modicon Quantum RIO Head
z Modicon Optional Modules (NOE, NOM)
One of the 140 CPU 67160’s acts as the Primary controller, and the other acts as
the Standby controller. The Primary controller runs the application program and
operates the remote I/O.
Identical
Configurations
Two backplanes are configured with identical hardware and software.
One of the programmable logic controllers (PLCs) functions as the Primary
controller and the other as a Standby controller, and either controller can be put in
the Primary state, but the other must be in the Standby state or offline.
Primary and
Standby
Controllers
The Primary controller executes the application program, controls the remote I/O,
and updates the Standby controller after every scan (program cycle). If the Primary
controller fails, the Standby controller takes control within one scan. To determine if
the Primary controller failed, note controller’s status displayed in the HE CPU LCD
screen and the RIO Head’s status displayed by the RIO Head’s LEDs. (See
Troubleshooting the Primary, p. 137)
The Standby controller does not execute the full application program but only the
first section, and the Standby controller does not control the remote I/O but checks
out the availability of the Modicon Quantum Hot Standby with Unity equipment.
Switchover
Capability
Either of the two controllers may function as the Primary controller and the other as
the Standby controller.
Primary and Standby states are switchable.
Therefore, if one of the two controllers is functioning as the Primary controller, the
other must be in Standby mode. Otherwise, the second controller is in the default
mode, which is offline.
The remote I/O is always controlled by the Primary controller.
16
Overview Modicon Quantum Hot Standby with Unity
Monitoring the
System
The Primary and the Standby controllers communicate with each other constantly to
monitor the functionality of the system.
z If the Primary controller fails, the state of the controllers is switched.
The Standby controller becomes the Primary, executes the application program,
and controls the remote I/O.
z
Power Cycle
If the Standby controller fails, the Primary controller continues to run without
redundancy and acts as a stand alone system.
On power cycle, the controller that has the lowest MAC address will become the
Primary. The second system automatically becomes the Standby.
Handling I/O
Note: The Modicon Quantum Hot Standby with Unity system supports I/O
connected to a Remote I/O network and Ethernet I/O scanning.
Handling Local
I/O
Local I/O is not supported in a Modicon Quantum Hot Standby with Unity system
environment. However, local I/O can be configured and run but will not have any
corresponding backup.
Software
Requirements
Required to use a Quantum Modicon Hot Standby with Unity system:
z Unity Pro 2.0 or higher
z CRA firmware: Release 1.25 or higher
z CRP firmware: Release 1.14 or higher
Configuring
Modbus Plus
(MB+) Addresses
Note: Configure MB+ address first time
1. Default MB+ address = 1 (new 140 CPU 671 60 from factory)
2. Change MB+ address at first configuration (on both controllers)
Schneider Electric recommends: do not change MB+ address after first
configuration because unintended operation may result.)
(See Configuring a System with the Unity Pro Tabs and Dialogs, p. 70)
17
Overview Modicon Quantum Hot Standby with Unity
Modicon Quantum Hot Standby with Unity 140 CPU 671 60 Module Overview
Illustration
The following figure shows the Modicon Quantum Hot Standby (with Unity)
140 CPU 671 60 module and its components. Its HSBY fiber optic communications
port differentiates this High End CPU module from the 140 CPU 651 60.
1
140
CPU 671 60
2
3
12
Batt
RESTAR
MO
ENT
Mem. Extract Rdy
5
MOD-
PC CardA
ESC
4
6
Modbus Plus
USB
13
7
8
HSBY Link
PC CardB
9
COM
10
ST
11
Mac Address
1
2
3
4
5
6
7
8
9
10
11
12
13
Model number, module description, color code
Lens cover (open)
LCD Display (here covered by lens cover)
Key switch
Keypad (with 2 red LED indicators)
Modbus port (RS-232) (RS-485)
USB port
Modbus Plus port
PCMCIA slots A and B (Type II, Type III)
LED indicators (yellow) for Ethernet communication
HSBY fiber optic communications port
Restart button
Battery (user installed)
Note: Unity Quantum High End CPUs are equipped with two receptacles (A and
B) in which to install PCMCIA cards. PCMCIA is a standard type of memory card.
18
Overview Modicon Quantum Hot Standby with Unity
Modicon Quantum Hot Standby with Unity System Overview
System
Components
The following graphic shows the components required for a Modicon Quantum Hot
Standby with Unity system.
1
5
2
3
6
10
5
3
AB
6
10
AB
4
7
9A
7A
9
8
7C
8
7B
1
Primary PLC
2
Standby PLC
3
Modicon Quantum Hot Standby with Unity controller with integrated coprocessor
4
Fiber Optic Cable to connect to both controllers
5
Modicon Quantum power supply module: Install power supply in first slot for better rack
layout.
6
Modicon Quantum RIO head
7
Coaxial cable with splitters (7A) (MA-0186-100), trunk terminators (7B) (52-0422-000), and
tap (7C) (MA-0185-100) for connecting the RIO heads (6) with the RIO drops (8). The
dashed connections represent a redundant connection in the RIO network, which is not
required for the Modicon Quantum Hot Standby with Unity system.
8
Modicon Quantum RIO drop
9
Unity Pro computer connected to both controllers via Modbus or Modbus Plus (9A)
10 Optional modules (NOMs, NOEs) if required
19
Overview Modicon Quantum Hot Standby with Unity
Software
Requirements
20
Please note
z CRA modules must have V1.25 or higher of the firmware
The Unity Hot Standby system is NOT compatible with previous versions of CRA
modules.
z CRP modules must have V1.14 or higher of the firmware
The Unity Hot Standby system is NOT compatible with previous versions of CRP
modules.
Overview Modicon Quantum Hot Standby with Unity
Modicon Quantum Hot Standby with Unity 140 CPU 671 60 Components
Lens Cover
Protects and provides access to
z Key Switch
z Battery
z Reset Button
Open the lens cover by sliding upwards.
LCD Display
Has a 2 lines by 16 characters LCD display with a backlight (dims) and adjustable
contrast.
The backlight turns on when
z keypad driver detects a key press
z key switch state is changed
z error message is displayed on the LCD
The backlight dims if
z no key switch or keypad activity
Backlight dims in 5 seconds.
z error message is generated
Backlight remains on until the error is corrected and the error message stops.
2 Lines by 16 characters LCD
21
Overview Modicon Quantum Hot Standby with Unity
Key Switch
Use the key switch as a security feature and memory protection switch.
The key switch has two positions: locked and unlocked.
Key position
PLC operation
unlocked
z all system menu operations are able to be invoked and all
changeable module parameters are able to be modified by the
operator via the LCD and keypad
z memory protection is OFF
locked
z no system menu operations are able to be invoked and all module
parameters are read only
z memory protection is ON
Switching the key switch position from locked to unlocked or vice versa will turn on the LCD's
backlight.
Keypad
The Modicon Quantum Hot Standby with Unity 140 CPU 671 60 keypad consists of
five keys that are mapped to a hardware address.
5-key keypad with 2 LEDs
1
ESC
MOD
ENTER
2
1
5 keys
2
2 LEDs
Use the keys on the keypad to access the Modicon Quantum Hot Standby with Unity
set of system menus, which enable you to
z perform PLC operations
for example: Start PLC, Stop PLC
z display module parameters
for example, communications parameters
Reset Button
22
Forces a cold start of the PLC.
Overview Modicon Quantum Hot Standby with Unity
Operating the Modicon Quantum Hot Standby with Unity 140 CPU 671 60 Keypad
Using the Keys
Functionality
Key
ESC
Function
To cancel an entry, or suspend or stop an action in progress
To display the preceding screens successively (step up the menu tree)
To confirm a selection or an entry
ENTER
To set a field on the display into modify mode
MOD
LED: on
key active
z To scroll through menu options
z To scroll through modify mode field options
LED: flashing
key active
z Field in modify mode has options to scroll through
LED: off
key inactive
z No menu options, no field options
LED on
key active
z To move around in a screen, field to field
z To go to the sub-menu
LED flashing
key active
z To move around in a field that is in modify mode, digit
to digit
LED off
key inactive
z No sub-menu for menu option
z No moving around in a screen
z No moving around in a field
23
Overview Modicon Quantum Hot Standby with Unity
Adjusting the
Contrast
The contrast is adjustable from the keypad when the Default screen is displayed as
follows:
Step
1
Action
Press the MOD key:
MOD
2
To adjust the contrast darker press:
3
To adjust the contrast lighter press:
4
To confirm the setting press:
ENTER
Using the
Backlight
24
Pressing a key will turn on the LCD backlight (if it was off). When the user presses
the ESC key and the LCD backlight was off, the LCD backlight will turn on and the
Default Screen will stay as the displayed screen.
If at any time the executive detects an error in the CPU it will display an error
message to the LCD and the LCD's backlight will turn on until the error condition
disappears
Overview Modicon Quantum Hot Standby with Unity
Using the Modicon Quantum Hot Standby with Unity 140 CPU 671 60 LED
Indicators
The Modicon Quantum Hot Standby with Unity 140 CPU 671 60 offers two
indicators:
1. LCD display screen
(See Using the Modicon Quantum Hot Standby with Unity 140 CPU 671 60 LCD
Display Screens, p. 27)
The default display screen serves as a controller status screen. (See
Understanding the Default Screen, p. 29)
2. LED Indicators
(See Interpreting the LED Indicators, p. 26)
Position of indicators on Modicon Quantum Hot Standby with Unity 140 CPU 671 60
140
CPU 671 60
HOT STANDBY CONTROLLER
1
Batt
RESTART
ESC
MOD
ENTER
COM
USB
Modbus Plus
PC CardA
MODBUS
Mem. Extract Rdy
2
STS
COM
STS
HSBY Link
PC CardB
Overview
Mac Address
00:00:##:##:##:##
1
LCD Display (lens cover closed)
2
LED Indicators
25
Overview Modicon Quantum Hot Standby with Unity
Interpreting the
LED Indicators
The LEDs provide information
CPU 671 60 (HSBY)
LEDs
Color
Description
Indicates
COM
Yellow
Controlled by the
Communication activity between Primary and
Standby controllers
Coprocessor1 hardware
STS
Yellow
Controlled by the
Status of Copro
Coprocessor1
z Blinking
firmware
system is redundant and data are
exchanged from the Primary to Standby
controller
z Steady on
z system is NOT redundant
z Copro booting from power-on to end of
self-tests
z Steady off
z Copro auto tests failed
z
Note: No activity returns the LEDs to the default.
1 The Modicon Quantum Hot Standby with Unity HE CPU uses an embedded coprocessor
(Copro) to provide a dedicated communications link, which transfers data between the
Primary and Standby controllers.
26
Overview Modicon Quantum Hot Standby with Unity
Using the Modicon Quantum Hot Standby with Unity 140 CPU 671 60 LCD
Display Screens
Overview
The controller’s LCD displays messages. These messages indicate the controller’s
status. There ae four levels of menus and submenus. All menus are accessed using
the keypad on the front of the controller.
For detailed information about the menus and submenus see:
z Using the PLC Operations Menus and Submenus, p. 30
z Using the Communications Menus and Submenus, p. 33
z Using the System Info Menus and Submenus, p. 36
z Using the LCD Settings Menus and Submenus, p. 37
Structure: LCD display menus and submenus
Mode
1
2
State
Bat L
port
Quantum
PLC Operations =>
Quantum
Communications =>
Quantum
System Info =>
Quantum
LCD Settings =>
3
4
1
Default Screen
2
System Menus
3
Sub Menus
4
Sub Screens
27
Overview Modicon Quantum Hot Standby with Unity
Accessing the
Screens
Use the keys on the keypad to access the system menus and submenus.
Step
Action
1
To access the screens, ensure that the key switch is in the unlocked position .
2
To step down to a lower menu, operate one of the following keys:
ENTER
3
To return to the previous menu, press:
ESC
28
Overview Modicon Quantum Hot Standby with Unity
Understanding
the Default
Screen
Default screen displays the following information
Mode
State
port
Bat L
PCM
The default screen is read only.
Default
Screen
Displays
Fields Available
Options
Available
Description
Default
State
RUN
Application program is running
RUN Primary
RUN Standby
RUN Offline
STOP
Application program is NOT running
STOP Offline
No Conf
BatL
CPU has no application program
Indicates health of battery
z Steady = Battery is low
z No message = Battery is OK
Port
USB
Indicates that port has activity
Modbus
Plus
MB+
Indicates Modbus Plus activity
mb+
No activity
Modbus
232
Serial port activity for RS-232
485
Serial port activity for RS-485
1
Indicates the card in slot 1 is being
accessed
The status displayed indicates the health
of the battery
z Steady = Battery is OK
z No message = Batery is low
2
Blinks, when the card in slot 2 is being
accessed
The status displayed indicates the health
of the battery
z Steady = Battery is OK
z No message = Batery is low
PCM
29
Overview Modicon Quantum Hot Standby with Unity
Using the PLC
Operations
Menus and
Submenus
Structure: PLC Operations menu and submenus
Quantum
PLC Operations =>
PLC Operations
Start PLC
=>
Press <ENTER> to
confirm Start
=>
PLC Operations
Stop PLC
=>
Press <ENTER> to
confirm Stop
=>
PLC Operations
Init PLC
=>
Press <ENTER> to
confirm Init
=>
PLC Operations
Hot Standby
=>
Hot Standby
State: State
Hot Standby
Mode: Mode
Hot Standby
Order: OOOOOO
Hot Standby
Transfer
Hot Standby
Diag:
=>
=>
Press <ENTER> to
confirm Transfer =>
Hot Standby
diag: halt
Hot Standby
diag: rio fails
Hot Standby
diag: hsby fails
Hot Standby
diag: stop
Hot Standby
diag: off keypad
Hot Standby
diag: off %sw60
Hot Standby
diag: takeover
Hot Standby
diag: run
Hot Standby
diag: plug&run
Hot Standby
diag: power up
30
Overview Modicon Quantum Hot Standby with Unity
Submenu: PLC Operations: Start, Stop, Init
Start, Stop,
Init Screens
Display
Fields Available
Description
Start PLC
Press <ENTER> to confirm Start Pressing <ENTER> starts the controller
Stop PLC
Press <ENTER> to confirm Stop Pressing <ENTER> stops the controller
Init PLC
Press <ENTER> to confirm Init
Pressing <ENTER> initializes the
controller
Submenu: PLC Operations: Hot Standby
Hot Standby Fields
Screen
Available
Displays
Options Available
Description
Hot Standby
State:
State
(read only)
PRIMARY
Controller serves as Primary
STANDBY
Controller serves as Standby
Hot Standby
Mode:
Mode
modifiable only
if
z key switch is
in the
unlocked
position
z Invalidate
Keypad is
not selected
RUN
Off Line
Controller is offline
steady
Controller is active and is either
serving as the Primary or is capable
of taking over the Primary role if
needed
blinking
Controller is waiting for configuration
OFFLINE steady
without stopping it or
disconnecting it from power
z If the controller is the Primary
when the Mode state is changed
to OFFLINE, control switches to
the Standby
z If the Standby is taken OFFLINE,
the Primary continues to operate
without a backup
z OFFLINE mode does not manage
the Remot I/O (RIO). (Only
Primary state manageds the RIO)
blinking
Hot Standby
Order:
OOOOOO
(read only)
z Controller is taken out of service
A
B
Controller is waiting for configuration
Hot Standby Power Order
The order comes from the MAC
address. The controller with the
lowest MAC address is A.
31
Overview Modicon Quantum Hot Standby with Unity
Hot Standby Fields
Screen
Available
Displays
32
Options Available
Description
Hot Standby
Transfer:
Mode
modifiable only if
z key switch is in the unlocked
position
z Invalidate Keypad is not selected
Hot Standby
Diag
Order of diagnostic screens varies with the operation; therefore your order
may be different from the list here.
Pressing the <ENTER> key confirms
the Transfer. The transfer initiates
the request for an application
program update from the Primary
controller.
Pressing any other key cancels the
Transfer request and returns the Hot
Standby Transfer menu option
screen to the display.
Halt
User’s task in halt mode
RIO fails
Error reported by RIO head
HSBY fails
Error reported by optical link
Stop
Stop command ordered
Off keypad
Offline command entered on keypad
Off %sw60
Offline command set in command
register
Take over
Standby switched to Primary mode
Run
Run command ordered
Plug & Run
Standby plugged and started
Power up
User powered up controller
Overview Modicon Quantum Hot Standby with Unity
Using the
Communications
Menus and
Submenus
Structure: Communications menu and submenus structure
Quantum
PLC Communications =>
Communications
TCP/IP Ethernet =>
TCP/IP Ethernet
IP Address
=>
IP Address:
###.###.###.###
TCP/IP Ethernet
Subnet Mask
=>
Subnet Mask:
###.###.###.###
TCP/IP Ethernet
IP Gateway
=>
IP Gateway:
###.###.###.###
TCP/IP Ethernet
MAC Address =>
MAC Address:
Communications
Modbus Plus
=>
MB+ Address:
Communications
Serial Port
=>
Mode Protocol: Adr
##.##.##.##.##.##
##
Modbus Plus State
Rate,Par,DB,SB
=>
Serial Port
RS-Mode: RS-232
Serial Port
Protocol: Modbus
Serial Port
Unit Address:
1
Serial Port
Baudrate:
9600
Serial Port
Parity:
Even
Serial Port
Databits:
RTU - 8
Serial Port
RS-Mode: RS-232
Serial Port
Stopbits:
1
33
Overview Modicon Quantum Hot Standby with Unity
Submenu: PLC Communications: TCP/IP Ethernet
TCP/IP Ethernet
Screen Displays
Fields Available
Options Available
Description
TCP/IP Ethernet
###.###.###.###
(not modifiable)
decimal numbers
displays IP address
###.###.###.###
(not modifiable)
decimal numbers
displays Subnet
Mask address
###.###.###.###
(not modifiable)
decimal numbers
displays Ethernet IP
Gateway address
##.##.##.##.##.##
(read only)
hexadecimal numbers
displays MAC
(Medium Access
Control) address
IP Address1,2
TCP/IP Ethernet
Subnet Mask1
TCP/IP Ethernet
IP
Gateway1
TCP/IP Ethernet
MAC Address
Submenu: PLC Communications: Modbus Plus
Modbus Plus
Screen Displays
Fields Available
Options Available
Description
Modbus Plus
Address
##
(modifiable only if the
key switch is in the
unlocked position)
1-64
to enter a valid
Modbus Plus
address
Modbus Plus State
Monitor Link
Modbus Plus State
Normal Link
Sole Station
Duplicate address
No Token
34
Overview Modicon Quantum Hot Standby with Unity
Submenu: PLC Communications: Serial Port
Seriial Port
Screen Displays
Fields Available* Options Available
Description
Serial Port
Mode
RS mode
232
485
Protocol
ASCII
Protocols available
RTU
Adr
1 - 247
Unit address
for Modbus switchover
Primary 1-119
Standby 129 - 247
Rate
50, 75, 110, 134.5, 150,
300, 600, 1200, 1800,
2400, 3600. 4800, 7200,
9600, 19200 bits/s
Baud rate
Par
NONE
Parity
ODD
EVEN
DB
SB
*
7,8
Databits:
if Protocol is Modbus
then RTU-8 or ASCII-7
1,2
Stopbits
If the key switch is in the unlocked position, all fields are modifiable.
35
Overview Modicon Quantum Hot Standby with Unity
Using the
System Info
Menus and
Submenus
Structure: System Info menus and submenus
Quantum
System Info
=>
System Info
Stop Code
=>
Stop Code: ####
Description
System Info
Firmware Info
=>
OS Ldr Rev: ##.##
Exec Rev: ##.##
System Info
Hardware Info
=>
HW Rev:
Rev
SN:
########
Submenu: PLC Communications: System Info
System Info
Fields
Screen Displays Available*
Stop Code
Firmware Info
Hardware Info
####
shows the machine stop code
Description
shows the description to the machine stop code
##.##
shows the number of OS Loader Revision
##.##
shows the number of Exec Revision
Rev
shows the number of Hardware Revision
########
*
36
Option
Description
Available
shows the serial number of Hardware
All fields are read only.
Overview Modicon Quantum Hot Standby with Unity
Using the LCD
Settings Menus
and Submenus
Structure: LCD Settings menus and submenus
Quantum
LCD Settings
=>
LCD Settings
LCD Contrast: ###
0% is black
100% is green
LCD Settings
LCD Light:
time
On
Off
1 Min
5 Min
10 Min
15 Min
Submenu: LCD Settings: LCD Contrast
LCD Screen
Contrast Screen
Displays
Fields
Description
Available
LCD Contrast:
####
A lower percent is darker. A higher percent is brighter.
Use the arrow keys to adjust the setting.
z Up arrow increases percent
z Down arrow decreases percent
Submenu: LCD Settings: LCD Light
Screen Displays
Fields Available
Description
LCD Light:
On
LCD light remains on permanently or until changed
Off
LCD light remains off permanently or until changed
1 Min
LCD light remains on for one minute
5 Min
LCD light remains on for five minutes
10 Min
LCD light remains on for ten minutes
15 Min
LCD light remains on for fifteen minutes
37
Overview Modicon Quantum Hot Standby with Unity
38
Modicon Quantum Hot Standby
with Unity Compatibility,
Differences, and Restrictions
2
Introduction
Overview
In this chapter you will find an overview of compatibilities within a system that has
already been installed, differences from Legacy Hot Standby systems, and
restrictions for the Modicon Quantum Hot Standby with Unity system.
What's in this
Chapter?
This chapter contains the following topics:
Topic
Compatibility with Installed Systems
Page
40
Understanding System Words and System Bits
41
Understanding Multitasking Restrictions
42
Local I/O and Distributed I/O Restrictions
43
Understanding Other Module Restrictions
44
Understanding USB Link Restrictions
45
Understanding Application Restrictions
46
39
Compatibility, Differences, Restrictions
Compatibility with Installed Systems
Modicon
Quantum Legacy
Systems
If you install a Unity Pro executive, you have to replace the Legacy CPU (16 and 32
bit) and the CHS option module with a Modicon Quantum Hot Standby with Unity
140 CPU 671 60. Otherwise, Modicon Quantum Hot Standby with Unity will not be
available.
Note: EXISTING FIBER CONNECTIONS
Fiber connections used on the CHS module will NOT work with the Modicon
Quantum Hot Standby with Unity 140 CPU 671 60.
Note: CHANGING FROM LEGACY
To install a Modicon Quantum Hot Standby with Unity 140 CPU 671 60 controller
in the backplane requires two sequential slots.
Legacy systems required two slots in the backplane, but the two slots did not need
to be sequential.
Copro and
Remote I/O Head
40
Instead of a Modicon Quantum Hot Standby Option Module (140 CHS 110 00), an
embedded coprocessor (Copro) provides a dedicated communications link
transferring data between the Primary and Standby controllers. This dedicated link
cannot be used for any other communications.
S908 Remote I/O Head Option Modules (140 CRP 93 x00) are required in the
system for communicating with the remote I/O drops and exchanging status
between the Primary and Standby controllers.
Compatibility, Differences, Restrictions
Understanding System Words and System Bits
Overview
In conforming with IEC standards, Unity uses global objects called system bits and
system words. Users of legacy Schneider Electric products may be familiar with
registers (984LL notation). Regardless of notation, the behavior remains the same.
System Word
%SW60
System Word %SW60 can be used to read from and to write to the Modicon
Quantum Hot Standby with Unity Command Register.
Note: %SW60 is described using the IEC convention.
System Word
%SW61
System Word %SW61 can be used to read the contents of the Modicon Quantum
Hot Standby with Unity Status Register.
Note: %SW61 is described using the IEC convention.
System Word
%SW62 and
%SW63
System Words %SW62 and %SW63 are reverse registers reserved for the Reverse
Transfer process. Both reverse registers can be written to the application program
(first section) of the Standby controller and are transferred at each scan to the
Primary controller.
41
Compatibility, Differences, Restrictions
Understanding Multitasking Restrictions
General
In a Modicon Quantum Hot Standby with Unity system, the Standby controller is kept
ready to assume the role of the Primary controller by having the same application
loaded (in the Standby) and by receiving from the Primary—once per scan—a copy
of the Primary's data. During the scan, there is a tight synchronization between the
Primary and Standby.
MAST
Schneider Electric recommends using only MAST to transfer data during a scan.
Tasks are handled singly and sequentially. Using MAST is consistent with current
Modicon Quantum Hot Standby systems because multi-tasking is not provided, and
data transfer will be synchronized with MAST.
Asynchronous
Events
Using a Modicon Quantum Hot Standby with Unity system in a multitasking
environment may cause data to change between scans. Because in a multi-tasking
system, events may occur asynchronously to the normal scan. Those events may
happen at a faster rate, the same rate, or at a slower rate. The result is that data
modified by these events can be changed during a transfer.
FAST and AUX
Note: FAST and AUX can be used.
Ensure that you both analyze your system needs and account for problems that
may arise if you use FAST or AUX.
42
Compatibility, Differences, Restrictions
Local I/O and Distributed I/O Restrictions
General
Note the two following restrictions:
z Although local I/O and distributed I/O (DIO) can be used in a Modicon Quantum
Hot Standby with Unity system, they are not considered as part of the redundant
system.
z When either local I/O and/or distributed I/O (DIO) are used in a Hot Standby
system, each controller in the configured Hot Standby system controls ONLY its
own local I/O and/or DIO respectively.
43
Compatibility, Differences, Restrictions
Understanding Other Module Restrictions
General
44
The Modicon Quantum Hot Standby with Unity, V2.0 does not support the following
modules.
Model
Support Provided
140 NOE 771 00
Module NOT supported in Unity V2.0
140 NOE 771 10
Module NOT supported in Unity V2.0
140 NOE 311 00
Module NOT supported in Unity V2.0
140 NOE 351 00
Module NOT supported in Unity V2.0
140 CHS 110 00
Module NOT supported in Unity V2.0
140 NOA 611 10
Module NOT supported in Unity V2.0
140 NOA 622 00
Module NOT supported in Unity V2.0
140 NOL 911 10
Module NOT supported in Unity V2.0
140 CRP 811 00
Module NOT supported in Unity V2.0
140 HLI 340 00
Module NOT supported in Unity V2.0
Compatibility, Differences, Restrictions
Understanding USB Link Restrictions
No Hot Standby
Switchover
through the USB
Link
USB link switchover is not available in a Modicon Quantum Hot Standby with Unity
system because the USB link is connected to only one CPU, allowing Unity Pro to
communicate only to this local controller.
Therefore, USB cannot be used for transparent access to the Primary controller.
45
Compatibility, Differences, Restrictions
Understanding Application Restrictions
Timer Events and
I/O Errors
Timer events are NOT synchronized in Modicon Quantum Hot Standby with Unity
applications. Schneider Electric recommends not using timer events.
Note: NOT EXCHANGING I/O ERRORS
If timer events are used, I/O errors are not exchanged between Primary and
Standby.
46
Using IEC Logic and Modicon
Quantum Hot Standby with Unity
3
Introduction
Overview
This chapter provides information about using IEC Logic with a Modicon Quantum
Hot Standby with Unity system.
What's in this
Chapter?
This chapter contains the following topics:
Topic
Page
Modicon Quantum Hot Standby with Unity and IEC Logic
48
Understanding the Modicon Quantum Hot Standby with Unity State RAM
Transfer Process
49
Understanding System Scan Time in Modicon Quantum Hot Standby with
Unity Systems
50
Transferring Application Data in a Modicon Quantum Hot Standby with Unity
System
54
47
IEC Logic
Modicon Quantum Hot Standby with Unity and IEC Logic
Overview
A Modicon Quantum Hot Standby with Unity system requires two backplanes
configured with identical hardware, software, and firmware. One of the controllers
(PLC) functions as the Primary controller and the other as a Standby controller.
z The Primary updates the Standby after every scan.
z The Primary and Standby communicate constantly monitoring the health of the
system.
z If the Primary fails, the Standby takes control within one scan.
Data Transfer
and User Data
In a Modicon Quantum Hot Standby with Unity system, data is transferred from
Primary to Standby after every scan.
The following data transfers after every scan:
z Located Variables (State RAM 128 Kb)
z all Unlocated variables up to 512 Kb
z All instances of the DFB and EFB type
z SFC variable area
z System Bits and Words
Note: Forced Bits at Transfer
At each scan, all forced bits are transferred from the Primary to the Standby.
State RAM
Definition
48
State RAM is the memory range, which is used for
z word-orientated input and output components (for example, analog modules)
z bit oriented input and output components (for example, digital modules)
z binary and word variables for the application program
State RAM is assigned the four reference types: %IW, %QW, %I and %Q.
IEC Logic
Understanding the Modicon Quantum Hot Standby with Unity State RAM
Transfer Process
The following illustrates the transfer of data from the Primary to the Standby Copro:
Hot Standby
Transfer
Diagram
Scan n
Primary PLC
CPU
IEC Logic Solve Comm Diag
IEC Logic Solve Comm Diag
IEC Logic Solve Diag
User Data
State RAM: Located + Unlocated Data
(max. 128 + max. 512 kByte)
640K
bytes
640K
bytes
640K
bytes
Copro
Standby PLC
User Data
State RAM: Located + Unlocated Data
(max. 128 + max. 512 kByte)
640K
bytes
Copro
CPU
640K
bytes
640K
bytes
User Data
State RAM: Located + Unlocated Data
Diag
Comm
Diag
Comm
Diag
Scan n-1
49
IEC Logic
Understanding System Scan Time in Modicon Quantum Hot Standby with Unity
Systems
Effect on System
Scan Time
The scan time of any Modicon Quantum Hot Standby with Unity system depends on
the amount of data transferred.
Because data must be transferred from Primary to Standby, any Modicon Quantum
Hot Standby with Unity system always has a higher scan time than a comparable
standalone system.
Note: CHANGING FROM LEGACY
In legacy systems, the CPU performed both
z application program (project) processing
z communication transfer
In a Modicon Quantum Hot Standby with Unity system, in parallel
z CPU performs application program processing
z Copro performs communication transfer
Result: Greatly reduced transfer time with Unity
50
IEC Logic
Performance
Considerations
A Modicon Quantum Hot Standby with Unity system increases the length of a MAST
scan, creating system overhead.
Note: System Overhead
System overhead is the time required to copy the application data to the
communication link layer.
The network scan (communication between Primary and Standby copros)
1. exchanges data between both controllers
2. runs in parallel with the application program
A Hot Standby system
Input
Input
HSBY
HSBY
Scan Time of MAST Scan
Logic
Data
(Copro)
Output
Primary
Data
(Copro)
5 ms
per 100 Kb
of Overhead
First
Section
30 ms
per 100 Kb
Output
Standby
Most of time, the MAST scan hides the network scan.
51
IEC Logic
Examples
However, when processing some application programs, additional system overhead
may occur.
Example #1
z Standalone application scan time: 80 ms
z Data (state RAM + unlocated variables): 100 Kb
Standalone scan time: 80 ms
100 KB data to exchange
Input
HSBY
Primary
Scan time in a HSBY system: 85 ms
100 KB data exchanged
Result
5 ms per 100 Kb of overhead
Scan Time of MAST Scan
Data
Transfer
30 ms
No impact on scan time
data exchange (30 < 80 ms)
Logic
Exec
Output
Example #2
Standalone application scan time: 80 ms
z Data (state RAM + unlocated variables): 300 Kb
z
52
IEC Logic
Standalone scan time: 80 ms
300 KB data to exchange
Scan time with HSBY: 105 ms
300 KB data exchanged
Result
Input
HSBY
Primary
15 ms per 100 Kb of overhead
Scan Time of MAST Scan
90 ms
Logic
Exec
HSBY impact on scan time = 25ms
= 15 ms + (90 - 80 ms)
= 25 ms
Data
Transfer
Output
53
IEC Logic
Transferring Application Data in a Modicon Quantum Hot Standby with
Unity System
Changing from
Legacy
Current Modicon Quantum controllers that use the Concept software have an
application data transfer limit of approximately 128 Kb. This limit includes located
data (in state RAM) and unlocated data. To transfer the unlocated data, the system
must use a part of the 3x area in the state RAM. Schneider Electric chose this
method to be compatible with the existing CHS option module (140 CHS 110 00).
Thus, a trade-off is necessary: the more unlocated data, the less state RAM and vice
versa.
Modicon
Quantum Hot
Standby with
Unity
In the Modicon Quantum Hot Standby with Unity 140 CPU 671 60, the CHS option
module is no longer used. Both the controller and Hot Standby functions are in the
same unit. Thus, there is no need to force unlocated data through the 3x area. Not
forcing means that all of the state RAM can be used as state RAM (up to 128 Kb).
In addition to the state RAM, you may have a maximum of 512 Kb of unlocated data.
Memory
Consumption
The amount of data to be transferred is automatically adjusted by the system.
For Information on the size of the memory consumption, select PLC → Memory
Consumption.
54
Setting up and Maintaining a
Modicon Quantum Hot Standby
with Unity System
II
At a Glance
Purpose
This part describes three important processes in using a Modicon Quantum Hot
Standby with Unity system.
z setting up, installing, and cabling a Modicon Quantum Hot Standby with Unity
system
z configuring a Modicon Quantum Hot Standby with Unity system using the Unity
Pro software
z maintaining a Modicon Quantum Hot Standby with Unity system once installed
What's in this
Part?
This part contains the following chapters:
Chapter
Chapter Name
Page
4
Setting up, Installing, and Cabling a Modicon Quantum Hot
Standby with Unity System
57
5
Configuring a Modicon Quantum Hot Standby with Unity
System
69
6
Maintaining a Modicon Quantum Hot Standby with Unity
System
123
55
Maintaining Modicon Quantum Hot Standby with Unity
56
Setting up, Installing, and Cabling
a Modicon Quantum Hot Standby
with Unity System
4
Introduction
Overview
This chapter provides an overview of setting up, installing, and cabling a Modicon
Quantum Hot Standby with Unity system.
What's in this
Chapter?
This chapter contains the following topics:
Topic
Page
Setting Up the Modicon Quantum Hot Standby with Unity System
58
Mapping the Backplane Extension
60
Connecting Two Modicon Quantum Hot Standby with Unity HE CPU 671 60s
62
Connecting the Remote I/O
63
Testing the Modicon Quantum Hot Standby with Unity System
66
57
Installation and Cabling
Setting Up the Modicon Quantum Hot Standby with Unity System
Overview
Schneider Electric is a leader in offering fault-tolerant, redundant systems, Hot
Standby. Setting up a Modicon Quantum Hot Standby with Unity system involves a
number of processes, summarized in the following paragraphs here and explained
in detail elsewhere.
Mapping the
Backplane
Extensions
A Modicon Quantum Hot Standby with Unity requires two backplanes with at least
four slots.
You must map the two backplanes in an identical manner:
z same Modicon Quantum Hot Standby with Unity HE CPU with integrated
coprocessor (Copro)
z same firmware
z same revision level
z same Modicon Quantum power supply module
z same Modicon Quantum RIO Head
And, if other modules are used, for example local I/Os, NOMs, NOEs, those
modules must be identical.
Connecting Two
High End CPUs
Connect the two Modicon Quantum Hot Standby with Unity High End CPUs with a
fiber optic cable as described in Connecting Two Modicon Quantum Hot Standby
with Unity HE CPU 671 60s, p. 62.
Establishing the
Primary and
Standby
Controllers
The system determines that one of the two Modicon Quantum Hot Standby with
Unity HE CPUs will be the Primary controller and the second controller as the
Standby.
The Keypad may provide status information. Therefore, to view the status, use the
Modicon Quantum Hot Standby with Unity HE CPU’s keypad by selecting Quantum
PLC Operations => → PLC Operations Hot Standby => → Hot Standby Order.
See Using the Modicon Quantum Hot Standby with Unity 140 CPU 671 60 LCD
Display Screens, p. 27.
Connecting the
Remote I/O
Connect the Modicon Quantum RIO Heads with each other and with the RIO drops
as described in Connecting the Remote I/O, p. 63.
Configuring in
Unity Pro
Using Unity Pro, configure a network that is appropriate for the installed backplanes
and the cabling.
Configure the Hot Standby Register for the Modicon Quantum Hot Standby with
Unity HE CPU in Unity Pro as described in Accessing the Base Configuration, p. 74.
58
Installation and Cabling
Transferring and
Sending the
Program from
Primary to
Standby
Transfer the program from your PC to High End CPU using the Unity Pro command
PLC → Transfer program to PLC.
See Overview of Application Program Transfer, p. 164.
Send your program from the Primary to the Standby using the Primary’s keypad.
Select Quantum PLC Operations => → PLC Operations Hot Standby => → Hot
Standby Transfer => → Press <ENTER> to confirm Transfer =>.
See Using the Modicon Quantum Hot Standby with Unity 140 CPU 671 60 LCD
Display Screens, p. 27.
Note: A program can be sent only from the Primary controller to the Standby
controller.
59
Installation and Cabling
Mapping the Backplane Extension
Requiring
Identical
Backplanes
Two backplanes must be configured with identical hardware, software, and firmware
in identical order. Then, both controllers may function either as a Primary controller
or as a Standby controller.
Note: INSTALLING CONTROLLERS
Schneider Electric recommends referring to Schneider Electric planning and
installation guidelines. You will find more information in the Quantum Automation
Series Hardware Reference Guide 840 USE 100 00 and in Remote I/O Cable
System Planning and Installation Guide 840 USE 101 00 .
Noting the
Module Version
60
The Primary and Standby must belong to the Modicon Quantum Hot Standby with
Unity product family.
The Modicon Quantum RIO drops can be from Schneider Electric’s 800 series of
modules.
Installation and Cabling
Installing
Components and
Modules
A Modicon Quantum Hot Standby with Unity system requires two backplanes with
at least four slots.
The backplanes (1, 2) must be identically equipped with:
z Modicon Quantum Hot Standby with Unity 140 CPU 671 60 with integrated
coprocessor (Copro) (3)
z Modicon Quantum power supply module (4)
z Modicon Quantum RIO Head (5)
z Other modules for example, Modicon Quantum NOMs, NOEs (6)
Note: The sequence of the modules on the backplane is not predefined, but the sequence of
the modules on the backplanes of the Primary and the Standby must be identical. Otherwise,
a Modicon Quantum Hot Standby with Unity system does not exist.
The following graphic shows a possible scheme for components and their
connectors.
1
4
2
3
5
6
4
A B
3
5
6
A B
7
8A
9
1
2
3
4
5
6
7
8
9
8
Primary controller backplane
Standby controller backplane
Modicon Quantum Hot Standby with Unity 140 CPU 671 60 with integrated coprocessor
(Copro)
Modicon Quantum power supply module: Install power supply in first slot for better rack
layout.
Modicon Quantum RIO head
Other modules, for example Modicon Quantum NOMs, NOEs
Fiber Optic Cable to connect to both Modicon Quantum Hot Standby with Unity 140 CPU
671 60s.
Coaxial cable with splitters (8A) for connecting the RIO heads (5) with the RIO drops in the
network. The dashed connection represents a redundant connection in the RIO network,
which is not required for the Modicon Quantum Hot Standby with Unity system.
Connection to the Unity Pro computer via Modbus or Modbus Plus
61
Installation and Cabling
Connecting Two Modicon Quantum Hot Standby with Unity HE CPU 671 60s
Handling Cable
Connections
If the cable is not connected properly, the Modicon Quantum Hot Standby with Unity
HE CPU 671 60s cannot communicate, and the Hot Standby system will not
function. Therefore, the Primary operates without a backup, and the Standby
remains offline.
Fiber optic cables are sold separately.
Model
Description
490NOR0003
3 m MTRJ/ MTRJ
490NOR0005
5 m MTRJ/ MTRJ
490NOR0015
15 m MTRJ/ MTRJ
Controllers connected by a crossed fiber optic cable.
COM
STS
HSBY Link
PC CardB
STS
HSBY Link
PC CardB
COM
Mac Address
Mac Address
00:00:##:##:##:##
00:00:##:##:##:##
Note: REDUCING FAILED COMPONENTS
Hubs and switches are not allowed as part of the fiber optic link.
Therefore, the fiber connection between Primary and Standby must be a direct cable
connection, which reduces the components that could fail in the redundant system.
Connecting Two
Backplanes
62
However, the Primary and Standby backplanes may be placed as much as 2 km
apart. If you will be placing the modules more than 15 m apart, use 62.5/125
micrometer cable with MTRJ type connectors. Refer to Modicon Quantum Hot
Standby with Unity Additional Information, p. 187 for details.
Installation and Cabling
Connecting the Remote I/O
Connecting
Cables to
Remote I/O
In each configuration:
z The cables connecting the RIO head processors to the RIO network have to be
fitted with self-terminating F adapters.
z An MA-0186-100 coaxial splitter has to be installed between the RIO head
processors and the RIO network.
z The remote drops have to be connected to the trunk cable via an MA-0185-100
tap and a drop cable.
z The last tap on a trunk cable has to be terminated with a 52-0422-000 trunk
terminator. Remote drops have not be connected directly to the trunk cable.
z An optional 60-0545-000 Ground Block at the head will provide earth ground
connection when the cable and RIO processor are disconnected. Ground blocks
may also be used at other ground points along the trunk cable, as required.
Refer to the Remote I/O Cable System Planning and Installation Guide, 890 USE
101 00 for details.
Note: CABLING REQUIREMENTS
z If you are using a Modicon Quantum Hot Standby with Unity system for data
logging, the RIO heads have to be configured and connected with coaxial cable,
and you have to configure one (1) or more RIO drops.
63
Installation and Cabling
The following diagram shows the hardware required for the Remote I/O cabling.
1
2
3
3
A B
A B
6
5
7
4
8
4
9
64
1
Primary controller
2
Standby controller
3
Modicon Quantum RIO head
4
Modicon Quantum RIO drop
5
Coaxial cable (components shown with dashed lines are not mandatory)
6
Self-terminating F adapter
7
Splitter (MA-0186-100)
8
Tap (MA-0185-100)
9
Trunk Terminator (52-0422-000)
Installation and Cabling
Connecting over
Long Distances
If you intend to place the units more than 3 meters apart, you have to consider the
effect on the RIO network and any Modbus Plus network.
The controllers are linked to the RIO network by coaxial cable. The longer the
distance between the controllers, the higher the grade of trunk cable required to
maintain signal integrity.
Refer to the Remote I/O Cable System Planning and Installation Guide, 890 USE
101 00 for details regarding cable grades, distances, and signal integrity.
If no coaxial cable will be sufficient to maintain signal integrity throughout the RIO
network, fiber optic repeaters may be used to boost the signal.
Refer to the Modbus Plus Network Planning and Installation Guide, UNY USE 10410
V10E for details on extending a Modbus Plus network.
65
Installation and Cabling
Testing the Modicon Quantum Hot Standby with Unity System
Testing Methods
(First Time)
Follow these steps to conduct tests to observe
z Hot Standby start-up
z automatic Application Program Transfer
z switchover of control from Primary to Standby
These tests are not necessary but helpful. If your backplanes are horizontally
parallel and within 1 meter (3 feet) apart, the transfer process is easier to observe.
Hot Standby
Start-up and
Application
Program
Transfer
Follow these steps.
66
Step
Action
1
Configure two backplanes with identical hardware and firmware in identical
order.
2
Connect to a Remote I/O (RIO) drop. Establishing the Primary and Standby
Controllers, p. 58
Note: Ensure that the fiber optic cable is connected between the controllers.
3
Start Unity Pro software and configure the local rack and the Remote I/O drop as
per your physical configuration.
4
After completing Step 3, execute the Build Project command, and save your
application program.
5
Power up and connect to one controller.
Note: The front panel keypad will display No Conf.
6
Download your application program and RUN the controller.
Note: The controller will become RUN Primary.
7
Power up the other controller.
Note: Application Program Transfer will occur automatically. The "other"
controller will become RUN Standby.
8
Ensure the Primary and Standby controllers are in RUN Primary and RUN
Standby mode.
Installation and Cabling
Preparing to
Switchover
After completing the preceding steps, your Modicon Quantum Hot Standby with
Unity system is ready to perform a switchover. Perform the switchover using either:
z Hot Standby submenu on the front panel keypad
z Command Register, system bit %SW60.1 or %SW60.2
Note: Observing the Switchover
If you would like to observe a switchover effect on the I/O modules, configure the
Remote I/O (RIO) drop with a discrete output module during your initial start-up.
Before performing a switchover, connect to the Primary and force the output bits in
the module. Perform the switchover and take note of the bumpless switchover
effect on the forced bits.
Switchover Test
Using Front
Panel Keypad
To force a switchover using the front panel keypad, do the following:
Step
Action
1
Access the front panel keypad of the Primary controller.
2
Go to PLC Operation menu.
3
Go to Hot Standby submenu.
4
Go to Hot Standby mode
5
Modify Run to Offline.
Note: Ensure that Standby switched to Primary.
6
Modify offline to run.
Note: Ensure that the LCD displays Run Standby.
67
Installation and Cabling
Switchover Test
Using Command
Register
68
Follow these steps.
Step
Action
1
Connect to the Primary.
2
Observe whether the controller order on the Primary is A or B.
Note: Observe using either of the following methods:
z Front panel keypad of the Primary
PLC Operation | Hot Standby | Hot Standby Order
z Unity Pro status dialog
Refer to the bottom of the Unity Pro window when connected online
3
Access the Command Register system bit
z %SW60.1
(If the connected Primary order is A.)
z %SW60.2
(If the connected Primary order is B.)
4
Set bit to 0.
Note: Ensure that the Standby switched to Primary
5
Connect to the new Primary.
6
Access the Command Register system bit. Choose the same bit selected in Step
3.
7
Set bit to 1.
Note: Ensure Standby displays RUN Standby.
8
Ensure the Primary and Standby controllers are in RUN Primary and RUN
Standby mode.
Configuring a Modicon Quantum
Hot Standby with Unity System
5
Introduction
Overview
This chapter describes configuring the Modicon Quantum Hot Standby with Unity
140 CPU 671 60 module.
What's in this
Chapter?
This chapter contains the following sections:
Section
Topic
Page
5.1
Configuring a System with the Unity Pro Tabs and Dialogs
70
5.2
Configuring a NOE with Unity Pro
99
5.3
Configuring Registers with Unity Pro
112
69
Configuring a Modicon Quantum Hot Standby with Unity System
5.1
Configuring a System with the Unity Pro Tabs and
Dialogs
At a Glance
Purpose
Use the Unity Pro editor dialog tabs to
1. select options for configuring the Modicon Quantum Hot Standby with Unity 140
CPU 671 60
2. obtain system status information
This material describes how you can
z
z
z
What's in this
Section?
Accessing the Base Configuration, p. 74, including Modbus Ports and HSBY
Configuring with Unity Pro, p. 88
Configuring with Unity Pro, p. 90
This section contains the following topics:
Topic
Introducing Unity Pro
70
Page
71
Accessing the Base Configuration
74
Using the Summary Tab
75
Using the Overview Tab
76
Using the Configuration Tab
77
Using the Modbus Port Tab
80
Using the Animation Tab and PLC Screen Dialogs
82
Using the Hot Standby Tab
86
Configuring the PCMCIA Cards
88
Configuring the Modbus Plus Communication Type
90
Setting the Invalidate Keypad Option
92
Swapping Network Addresses at Switchover
94
Configuring a Modicon Quantum Hot Standby with Unity System
Introducing Unity Pro
Overview
Unity Pro software is a fully Windows compatible application. Unity Pro supports
only the IEC method of configuration with some simplifications:
z
z
No Loadables
Needed
Removes the legacy requirement to reserve the 3xxxx area for transferring
unlocated variables
(Unlocated variables are transferred with the State RAM).
Uses system words for the command and status registers, which are removed
from the State Ram.
Note: CHANGING FROM LEGACY
The current Modicon Quantum Hot Standby loadable (CHS) is no longer needed.
For Unity Pro Modicon Quantum Hot Standby with Unity systems, the control
functionality will be embedded in the executive.
For legacy Modicon Quantum Hot Standby systems (Modsoft, Concept, or
ProWORX), the CHS module owns the control functionality.
Command
Register
The Command Register defines the basic operational parameters of a Modicon
Quantum Hot Standby with Unity solution. The command register’s functionality is
described in Understanding the Unity Command Register, p. 114.
Changes from
Concept
z
z
z
z
z
Command and Status Registers are no longer stored in the State RAM.
Command and Status Registers are accessible in the system words %SW60 and
%SW61.
Reverse Transfer registers are no longer stored in the State RAM.
System automatically allocates system words %SW62 and %SW63 as Reverse
Transfer words.
Reverse Transfer words are no longer part of the Non-Transfer Area of the 4xxxx
registers.
71
Configuring a Modicon Quantum Hot Standby with Unity System
Changes from
LL984
Note: CHANGING FROM LEGACY
z There is no longer a Non-Transfer Area for the 0xxx, 1xxx, and 3xxx registers.
z Transferring over multiple scans is no longer available.
In current Modicon Quantum Hot Standby Systems using the CHS option
module, additional state RAM could be transferred over multiple scans. Not
transferring over multiple scans minimizes the impact of state RAM transfers.
In the Unity Pro Modicon Quantum Hot Standby with Unity 140 CPU 671 60,
transfer speeds will be much faster, and the amount of state RAM used for
transfers will be smaller since unlocated data will be used instead.
Opening the
Editor Dialog
After starting Unity Pro, go to the Local Bus in the Structural View of the Project
Browser.,
Step
72
Action
1
Open the Local configuration editor either by double-clicking on the Local Bus or
by selecting the Local Bus and executing right-click Open
A graphical representation of the local bus appears in the configuration editor.
2
Select the Modicon Quantum Hot Standby with Unity 140 CPU 671 60 module
and right-click.
The context menu appears.
3
Select Open Module.
4
The editor appears. The Summary tab is the default.
Configuring a Modicon Quantum Hot Standby with Unity System
Unity Pro Hot
Standby Editor
Dialog
The editor with the Hot Standby tab selected
NA
CPU
1.2 : 140 CPU 671 60
P266 CPU Hot-Standby, 1Mb Program + PCMCIA, Ethernet-HSBY Fiber optic, USB, MB, MB+
Over...
Confi... MB Modb...
Sum...
Run Mode
Anima...
Hot St...
I/O objects
Invalidate Keypad
Controller A
Online
Controller B
Online
Standby On Logic Mismatch
Offline
Online
Yes
Swap Address At Switchover
Modbus Port 1
Modbus Port 2
Modbus Port 3
State RAM
Non-Transfer Area
Start: %MW
0
Length: 0
73
Configuring a Modicon Quantum Hot Standby with Unity System
Accessing the Base Configuration
Accessing with
Unity Pro
After starting Unity Pro, go to the Local Bus in the Structural View of the Project
Browser.
Step
Action
1
Open the Local Bus configuration editor either by double-clicking on the Local
Bus or by selecting the Local Bus and executing right-click Open.
A graphical representation of the local bus appears in the configuration editor.
2
Select the Modicon Quantum Hot Standby with Unity HE CPU module and rightclick.
The context menu appears.
Local Bus
Bus:
1
1
2
CPS CPUCPUACI
111 671671 030
00
60 60 00
140 CPU 671 60 01.00
4
5
6
7
8
9
10
1
Cut
Copy
Paste
Delete Module
Open Module
Move Module
Replace Processor...
Power Supply and IO Budget...
74
3
Select Open Module.
The editor appears. The Summary tab is default.
4
Choose one of these tabs:
z Summary (See Using the Summary Tab, p. 75)
z Overview (See Using the Overview Tab, p. 76)
z Configuration (See Using the Configuration Tab, p. 77)
z Modbus Port (See Using the Modbus Port Tab, p. 80)
z Animation (See Using the Animation Tab and PLC Screen Dialogs, p. 82)
z Hot Standby (See Using the Hot Standby Tab, p. 86)
Configuring a Modicon Quantum Hot Standby with Unity System
Using the Summary Tab
Viewing
Use the Summary tab of the Unity Pro editor to determine if Peer Cop and Hot
Standby are enabled.
NA
CPU
1.2 : 140 CPU 671 60
P266 CPU Hot-Standby, 1 Mb Program + PCNCIA, Ethernet-HSBY Fiber optic, USB, MB, MB+
Over...
Describing
Sum...
Confi...
M B Modb...
Anima...
CPU Name/Model
Quantum CPU
Peer Cop:
Enabled
Hot Standby:
Enabled
Hot St...
I/O objects
Summary tab:
Item
Option
Value
Description
CPU Name/Model:
Quantum CPU
N/A
Read Only
Peer Cop:
Disabled
Enabled
Read Only
Peer Cop="Enabled" if
the function is valid in the
Modbus Plus menu
Hot Standby:
Enabled
Enabled
Read Only
75
Configuring a Modicon Quantum Hot Standby with Unity System
Using the Overview Tab
Viewing
The read only Overview tab of the editor displays detailed information about the
module’s specifications.
NA
CPU
1.2 : 140 CPU 671 60
P266 CPU Hot-Standby, 1 Mb Program + PCMCIA, Ethernet-HSBY Fiber optic, USB, MB, MB+
Over...
Sum...
Confi...
M B Modb...
Anima...
Hot St...
I/O objects
P266 CPU MB MB+ USB ETHERNET HSBY 1024K IEC AND PCMCIA
SPECIFICATIONS
CPU
671
60
ACI
030
00
Model
140-CPU-671-60
Description
P266 CPU MB MB
General Specifications
Communications ports
1 Modbus (RS-232
1 Modbus Plus (R
1 USB
1 Ethernet (used
Bus Current required
-
Max. number of NOM, NOK, CRP 811 and
MMS modules supported (any combination)
6
Key switch
Yes
Processor
76
Configuring a Modicon Quantum Hot Standby with Unity System
Using the Configuration Tab
Viewing
Change values using the Configuration tab of the editor.
NA
CPU
1.2 : 140 CPU 671 60
P226 CPU Hot-Standby, 1 Mb Program + PCMCIA, Ethernet-HSBY Fiber optic, USB, MB, MB+
Over...
Sum...
Confi...
M B Modb...
Operating Mode On Cold Start
Hot St...
I/O objects
State RAM
Mem usage
Automatic start in Run
%MWi Reset
Memory Card
A: TSX MCP C 002M
Usage:
Anima...
4%
%M
0x
256
%MW
4x
1024
%I
1x
256
%IW
3x
1024
Data Storage
Size
1,024
KBytes
Application Size
2,048
KBytes
Viewer
B: TSX MRP F 008M
Usage:
Size
Data Storage
8,192
KBytes
77
Configuring a Modicon Quantum Hot Standby with Unity System
Describing
Configuration tab:
Item
Option
Value
Description
Operating Mode On
Cold Start
Automatic start in Run
x
%MWi Reset on cold start x
Determines the operating
condition during Cold Start
Memory Cards
State RAM
A:
N/A
B:
N/A
Mem usage
1.
A bar displays percent of
memory used.
%M-0x
2.
%MW-4x
2.
%I-1x
2.
Size of the different memory
areas
Note: The values for %IW and
%MW have to be divisible by 8.
%IW-3x
2.
Viewer
N/A
Displays the configuration in the
PCMCIA Slots
Opens the State RAM Viewer
tab, which displays the
allocation of used memory.
(See the illustration following.)
1. The value (expressed as a percentage and displayed on the scale) depends on the
memory usage of the Hot Standby configuration.
2. Enter the appropriate values. All values depend on Hot Standby configuration.
78
Configuring a Modicon Quantum Hot Standby with Unity System
Using the State
RAM Viewer
The State RAM Viewer dialog
State Ram Viewer
1 2 3 4 5 6 7 8 9 10 11 12 13 14 15 16 17 18 19
0
100
200
300
400
500
600
700
800
900
1000
1100
Modules
Variables
Modules
Address Information
Address
%M
0
Language
Module Address
Legend
Language
Go To
Variables
Memory Area
%M (0x)
%I (1x)
%IW (3x)
%MW (4x)
Each cell in the grid represents an address location and displays the entity stored in that
location. The contents of the grid may be changed by selecting options in either of two filters:
1. Memory used grid options
Select one—or all—of the three options (using the check box) and one to three
bar graphs appear.
z Modules
Indicates the topological address used in the modules. Address appears as a
bar graph in the grid.
z Language
Indicates the topological address used in the program. Address appears as a
bar graph in the grid.
z Variables
Indicates the topological address used in the variables. Address appears as a
bar graph.
2. Memory Area options
Using this option, you designate a state RAM address. Select one of four
reference types.
z %M
z %I
z %IW
z %MW
Your choice appears in the Address field of the Address Information area.
79
Configuring a Modicon Quantum Hot Standby with Unity System
Using the Modbus Port Tab
Viewing
You may change Modbus communication options using the Modbus Port tab of the
Unity Pro editor:
NA
CPU
1.2 : 140 CPU 671 60
P266 CPU Hot-Standby, 1Mb Program + PCMCIA, Ethernet-HSBY Fiber optic, USB, MB, MB+
Over...
Sum...
Confi...
M B Modb...
Anima...
Hot St...
I/O objects
Bridge Mode
Modbus Port
Baud
Data
Bits
Stop Bits
Parity
Delay (ms) Address Head Slot
Mode
Protocol
1 9600
8 1
Even
10
1
0 RTU
RS232
2 9600
8 1
Even
10
1
0 RTU
RS232
3 9600
8 1
Even
10
1
0 RTU
RS232
Note: FINDING MODBUS ADDRESS
If you need the Modbus address of the controller, go to the 140 CPU 671 60 module
and find the address using the keypad. (See Understanding the Default Screen,
p. 29)
80
Configuring a Modicon Quantum Hot Standby with Unity System
Describing
Modbus Port tab:
Item
Option
Value
Description
Modbus Port
Baud
9600
Data must be specified for
every link.
50-19200 kBit/s
Data Bits
8
Stop Bits
1 or 2
Parity
EVEN
ODD
NONE
Delay (ms)
1 ms
Address
1 -247
for Modbus switchover
1 - 119 (Primary)
129 - 247 (Standby)
Head Slot
0
Mode
RTU
ASCII
Protocol
RS232
RS485
81
Configuring a Modicon Quantum Hot Standby with Unity System
Using the Animation Tab and PLC Screen Dialogs
Accessing the
PLC Screen
Dialogs
To access the Task, Realtime clock, and Information tabs of the Unity Pro Animation
tab,
Step
Action
1
Select the Animation tab.
2
The PLC screen tab appears automatically.
Note: The dialogs illustrated here are depicted in offline mode. When Unity Pro is
connected to a PLC, the information displayed in these tabs changes.
Viewing the Task
Tab
Unity Pro Task tab dialog:
PL
CS
PLC Screen
Task
Realtime clock
Events
Activate or
Disable all
Last Stop
82
Start/reStart
State:
Number:
i
Information
Output Fallback
Warm restart
Applied Outputs
Cold start
Output Fallback
Configuring a Modicon Quantum Hot Standby with Unity System
Describing the
Task Tab
Description of the Task tab:
Item
Option
Value
Description
Events
State:
xxx
Status information of
events available
Online
Number:
xxx
N/A
Activate or Disable all
Click button
Button to control the
events
Start/reStart
Warm Start
Click button
To initialize Warm
Start
Cold Start
Click button
To initialize Cold Start
Output fallback
Applied Outputs
N/A
Output Fallback
N/A
Not used in Modicon
Quantum Hot
Standby with Unity
system
Read only
z Day
Last Stop
z DD/MM/YY
z Time
Viewing the
Realtime Clock
Tab
Indicates the day,
date, time, and cause
of the last controller
stop
Unity Pro Realtime clock tab dialog:
i PLCScreen
Task
Realtime clock
PLC Date and Time
Tuesday, 01. January 2002
12:00:00 AM
PC Date and Time
Thursday, 25. September 2003
2:38:05 PM
1 2
Update :
PC -> PLC
i
Information
User Date and Time
September, 2003
Sun
31
7
14
21
28
5
Mon
1
8
15
22
29
6
Tue
2
9
16
23
30
7
Wed
3
10
17
24
1
8
Thu
4
11
18
25
2
9
Fri
5
12
19
26
3
10
Today: 9/25/2003
Sat
6
13
20
27
4
11
Date:
25/09/2203
Time:
2:36:42 AM
Update :
User -> PLC
Error PLC Data
83
Configuring a Modicon Quantum Hot Standby with Unity System
Describing the
Realtime Clock
Tab
Viewing the
Information Tab
Description of the Realtime clock tab:
Item
Option
Description
PLC Date and Time
Read only
Indicates the current PLC date and time
PC Date and Time
Update PC->PLC
Updates the PLC with the PC system
time
User Date and Time
Update User->PLC
Updates the PLC with the time set by the
user
Unity Pro Information tab dialog:
PL
CS
PLC Screen
Task
SYSTEM INFORMATION
PLC
IDENTIFICATION
MEMORY
APPLICATION
IDENTIFICATION
OPTION
HOTSTANDBY
84
Realtime clock
i
Information
Configuring a Modicon Quantum Hot Standby with Unity System
Describing the
Information Tab
Description of the Information tab:
Item
Option
Value
Description
System
Information
PLC / Identification
PLC Range
Only Online
available
Hardware ID
Processor Name
Processor Version
Network address
PLC / Memory
Application / Identification
Name
Creation Product
Date
Modification Product
Date
Version
Signature
Application / Option
Empty Terminal Support
Upload Information
Comments
Animation Table
Global Protection
Section Protection
Application Diagnostic
Forced Bits
Hot Standby
Bit Number
Status Register
PLC Mode
Other PLC Mode
PLCs matching Logic
PLC switch
Copro Health
Hot Standby Capability
85
Configuring a Modicon Quantum Hot Standby with Unity System
Using the Hot Standby Tab
Viewing the Hot
Standby Tab
Configure Hot Standby values in the Hot Standby tab of the Unity Pro editor:
NA
CPU
1.2 : 140 CPU 671 60
P266 CPU Hot-Standby, 1Mb Program + PCMCIA, Ethernet-HSBY Fiber optic, USB, MB, MB+
Over...
Confi... MB Modb...
Sum...
Run Mode
Online
Controller B
Online
Standby On Logic Mismatch
Offline
Online
Yes
Swap Address At Switchover
Modbus Port 1
Modbus Port 2
Modbus Port 3
State RAM
Non-Transfer Area
86
Hot St...
Invalidate Keypad
Controller A
Start:
Anima...
%M 1
Length: 0
I/O objects
Configuring a Modicon Quantum Hot Standby with Unity System
Describing the
Hot Standby Tab
Description of the Hot Standby tab:
Item
Option
Value
Description
Run Mode
Controller A
Offline/Online
Controller B
Offline/Online
Indicates which
controller will be
offline and online at
the next start.
Disable
Yes is NOT
selected
Enable
Yes is selected
(Check mark
displays)
Offline
Default
Offline button
selected
If mismatch is
detected, Standby
goes Offline
Online
-
If button is selected
and mismatch is
detected, Standby
remains Standby
Swap Address At
Switchover
Modbus Port 1
x
When selected,
enables Modbus
switchover to occur.
State RAM: NonTransfer Area
Start: %MW
1.
%MW is not
transferred.
Length:
1.
Specify the range of
the length.
Invalidate Keypad
Standby On Logic
Mismatch
When selected, you
prevent keypad
changes to the Hot
Standby submenu.
1. Enter the appropriate values. All values depend on Hot Standby configuration.
87
Configuring a Modicon Quantum Hot Standby with Unity System
Configuring the PCMCIA Cards
Configuring with
Unity Pro
Allocating memory to the memory card
Step
Action
1
If not opened, open the Local Bus configuration editor.
2
Go to the local bus in the Structural View of the Project Browser.
3
Open the local bus either by double-clicking on the Local Bus or by selecting the
Local Bus and executing right-click Open.
A graphical representation of the local bus appears.
4
Point to and select either PC CardA (1 slot) or PC CardB (2 slot).
1
2
CPS CPUCPUACI
111 671671 030
00
60 60 00
4
5
6
7
8
9
10
11
12
13
14
1
2
1
2
5
Memory configuration of the PCMCIA card 1
Memory configuration of the PCMCIA card 2
Double-click or right-click either PCMCIA card.
The New/Replace Submodule dialog appears.
New/Replace Submodule
PartNumber
ATA FLASH DISK
TSX MDP F 032M
FLASH EPROM
SRAM
TSX MRP F 0128P
TSX MRP F 0256P
TSX MRP C 001M
TSX MRP C 002M
TSX MRP C 003M
TSX MRP C 007M
TSX MRP C 768K
SRAM Data or Files
TSX MRP F 002M
TSX MRP F 004M
TSX MRP F 008M
88
Description
ATA FLASH DISK
ATA PCMCIA, Files 32768kb
FLASH EPROM
SRAM
SRAM PCMCIA, Prog 192kb
SRAM PCMCIA, Prog 384kb
SRAM PCMCIA, Prog 1024kb, Data 1600kb
SRAM PCMCIA, Prog 2048kb, Data 1856kb
SRAM PCMCIA, Prog 3072kb, Data 2880kb
SRAM PCMCIA, Prog 7168kb, Data 6976kb
SRAM PCMCIA, Prog 768kb, Data 576kb
SRAM Data or Files
SRAM PCMCIA, Data or Files 2048kb
SRAM PCMCIA, Data or Files 4096kb
SRAM PCMCIA, Data or Files 8192kb
OK
Cancel
Configuring a Modicon Quantum Hot Standby with Unity System
Step
6
Action
Add or replace the desired memory.
89
Configuring a Modicon Quantum Hot Standby with Unity System
Configuring the Modbus Plus Communication Type
Configuring with
Unity Pro
Configuring the Modbus Plus communication type
Step
Action
1
If not opened, open the Local Bus configuration editor.
2
Go to the local bus in the Structural View of the Project Browser.
3
Open the Local Bus editor either by double-clicking on the Local Bus or by
selecting the Local Bus and executing right-click Open.
A graphical representation of the local bus appears.
4
Point to the Modbus Plus port, No. 3.
1
2
CPS CPUCPUACI
111 671671 030
00
60 60 00
4
5
6
7
8
9
10
11
12
3
5
Double-click or right-click on the Modbus Plus port.
The Submodule dialog appears. The General tab is default.
1.2 : MBP
MBP
Overview
General
Communication Type
DIO Bus
Peer Cop
Please choose a link:
No Link
90
I/O objects
13
14
Configuring a Modicon Quantum Hot Standby with Unity System
Step
6
Action
Select one or both Communication Type:
z DIO bus
z Peer Cop
91
Configuring a Modicon Quantum Hot Standby with Unity System
Setting the Invalidate Keypad Option
Overview
The keypad is located on the front panel of the Modicon Quantum Hot Standby with
Unity 140 CPU 671 60 module.
Setting the Invalidate Keypad option can disable the Hot Standby submenu (PLC
Operations | Hot Standby). (See Accessing the Screens, p. 28) When the
Invalidate Keypad option is selected, the Hot Standby submenu is read only.
You may choose to prevent access to the Hot Standby control through the keypad
z
z
Methods for
Selecting the
Invalidate
Keypad Option
to avoid the possibility of accidental (or malicious) state changing
for security or convenience
There are two methods for selecting/enabling this option:
Method Used
Description
Hot Standby tab
Select the Invalidate Keypad option in the Hot Standby tab using
the Unity Pro software. (See Using the Hot Standby Tab, p. 86)
Selecting the Invalidate Keypad option requires that the application
program be downloaded to the CPU.
Command Register
Set the system bit, %SW60.0 to 1.
Selecting the system bit %SW60.0 must be performed online in the
Primary controller.
Note: By setting the Invalidate Keypad option, the Run/Stop PLC control option on
the PLC Operation menu is NOT disabled.
92
Configuring a Modicon Quantum Hot Standby with Unity System
Disabling
Options
Two Hot Standby options/controls are disabled using the front panel keypad
z
z
Changing the HSBY mode (Run/Offline)
Application program transfer to/from Standby
Note: CHANGING FROM LEGACY
In the legacy Quantum Hot Standby system, setting command register bit 16
affects both the mode (offline or run) of controllers A and B and affects the state of
bit 14 and bit 15
z Bit 16 set to 0
z disables (overrides) Command Register bit 14 and bit 15 state
z enables key switch state
z Bit 16 set to 1
z enables Command Register bit 14 and bit 15 state
z disables key switch state
In Unity,
z
z
z
the state/condition of system bit %SW60.0 ONLY disables/enables the Hot
Standby submenu option in the front panel keypad.
setting system bit %SW60.0 does NOT affect the state of system bits %SW60.1
and %SW60.2
regardless of the setting for system bit %SW60.0, system bits %SW60.1 and
%SW60.2 control the mode (offline or run) of controllers A and B. (See Setting
the Bits in the Command Register, p. 114)
93
Configuring a Modicon Quantum Hot Standby with Unity System
Swapping Network Addresses at Switchover
Overview
The following material describes handling network addresses at Switchover. A
Modicon Quantum Hot Standby with Unity system can communicate data over
different network protocols:
z
z
z
Handling
Modbus
Addresses at
Switchover
Modbus
Modbus Plus
TCP/IP
In a Modicon Quantum Hot Standby with Unity system, the Modbus port addresses
are:
z
z
z
Primary: 1-119
Standby: Offset +128
Maximum address: 247
Range 1-247
The Modbus port addresses can be changed using one of two methods:
z
z
Communication menu in the front panel keypad
Modbus Port tab in the Unity Pro editor
Changing addresses:
Using the Communication menu in the Front Panel Keypad
Change address on either
Primary
1. Access the front panel keypad of the
Primary.
2. Go to Communication menu
3. Go to Serial Port submenu
4. Select address
5. Change address
6. Perform application program transfer
7. Verify Standby Modbus address is +128.
Standby
1. Access the front panel keypad of the
Standby.
2. Go to Communication menu
3. Go to Serial Port submenu
4. Select address
5. Change address
6. Perform switchover
7. Ensure Standby switched to Primary
8. Perform application program transfer
9. Verify Standby Modbus address is +128
Using the Modbus Port Tab in Unity Pro Editor
To change address, download application
program. (See Offline Modification of an
Application Program and Logic Mismatch,
p. 155)
94
Configuring a Modicon Quantum Hot Standby with Unity System
Using the Communication menu in the Front Panel Keypad
Note: If the Modbus address is changed in the Primary using the front panel keypad, ensure
that application program transfer is made to enable the corresponding Modbus switchover in
the Standby.
Note: CHANGING FROM LEGACY
In a Modicon Quantum Hot Standby with Unity system only one port is available for
Modbus.
By default address swap at switchover is maintained between the Primary and
Standby Modbus ports. This default condition can be changed using the following
two methods:
z
z
Using Hot Standby menu in the Unity Pro editor
This choice requires the application program to be downloaded.
Using the Command Register system bit %SW60.8
This choice MUST be performed online in the Primary.
Selecting/deselecting address swap at Switchover
Using Hot Standby Menu in Editor
Using the Command Register system bit
%SW60.8
Open Hot Standby menu in Unity Pro
Go to Swap Address at Switchover area
Deselect Modbus Port 1
Verify modifications
Download application program to
controller. (See Offline Modification of an
Application Program and Logic Mismatch,
p. 155)
6. Perform switchover
7. Ensure Standby switch to Primary
8. Perform application program transfer
1. Connect to Primary
2. Access the Command Register System
bit %SW60.8
3. Set bit to 1
Default is 0
1.
2.
3.
4.
5.
Swap Modbus
Addresses at
Switchover
If controller A is the Primary controller and its Modbus port has an address of 1, then
the default addresses for the comparable port on controller B, the Standby, is 129,
which is 1 plus the offset of 128.
If controller B becomes the Primary controller as the result of a switchover, its
Modbus port assumes the address of 1, and the comparable port on controller A
assumes the address of 129.
95
Configuring a Modicon Quantum Hot Standby with Unity System
No Swap Modbus
Addresses at
Switchover
Important
Information
Handling
Modbus Plus
Addresses at
Switchover
If controller A is the Primary controller and its Modbus port 1 address is 1, then that
port address remains at 1 after the switchover occurs. Likewise, if controller B
becomes the Primary controller as a result of a switchover, its Modbus port 1
address is remains at 1.
Note: Important Information
1. If you change the options, the port addresses are not affected until a switchover
occurs.
2. If NOM modules are used in the configuration, the offset of the Modbus address
is +/-32 following the Modbus Plus address switchover.
In a Modicon Quantum Hot Standby with Unity system, the Modbus Plus port
addresses on the Standby controller are offset +/-32 from the comparable ports on
the Primary controller.
Modbus Plus address swap behavior at switchover
Default Behavior at Switchover
z Controller A = Primary
MB+ address = 1
z Controller B = Standby
MB+ address = 33 (1 +32)
(+32 = Offset)
Switchover occurs.
z Controller A = new Standby
MB+ address = 33 (1 +32)
z Controller B = new Primary
MB+ address = 1
Note: Numerical address of both ports (A and B) range: 1 - 64.
If Primary address = 50, corresponding Standby = 18 (50 - 32)
The Modbus Plus address of the controllers can be changed using the front panel
keypad: Communication | Modbus Plus | Modify Address
Modbus Plus address swap behavior when addressed is changed
Forced Behavior at Switchover
z Controller A = Primary
MB+ address = 1
z Controller B = Standby
MB+ address = 33 (1 +32)
(+32 = Offset)
Change address of Primary = 5.
96
Configuring a Modicon Quantum Hot Standby with Unity System
Forced Behavior at Switchover
z Controller A = Primary
MB+ address = 5
z Controller B = Standby
MB+ address = 33
Perform Application Program Transfer.
z Controller A = Primary
MB+ address = 5
z Controller B = Standby
MB+ address = 37 (5 +32)
Force switchover.
z Controller A = new Standby
MB+ address = 37 (5 +32)
z Controller B = new Primary
MB+ address = 5
If he Modbus Plus address is modified, perform an Application Program Transfer. (See
Transferring an Application Program with Unity Pro, p. 163) Failure to perform a transfer
creates a different offset address in the Standby.
Note: SWAPPING ADDRESSES
At switchover, the Modicon Quantum Hot Standby with Unity system and NOMs
swap Modbus Plus addresses almost instantaneously (within one or two
milliseconds). This almost instantaneous switchover means that host devices
which are polling the controller should be talking to the Primary controller and that
the network should have minimal network interruption during switchover.
Note: EXEC UPGRADE USING OSLOADER
When using Modbus Plus communication and OSLoader, only address 1 is valid.
(See Executing the EXEC Upgrade Procedure, p. 143)
97
Configuring a Modicon Quantum Hot Standby with Unity System
Handling TCP/IP
Addresses at
Switchover
When used in a Modicon Quantum Hot Standby with Unity system, the Modicon
Quantum Ethernet TCP/IP network option modules NOE 771 01 and 11 support
address swapping at switchover. The swapping of IP addresses behaves much like
the address swap of the Modbus Plus ports, except that the offset is 1 instead of 32.
At switchover, the modules exchange their IP addresses. NOE 771 address
swapping occurs automatically and can not be controlled by options selected in any
of the tabs of the editor or controlled by turning ON/OFF any of the bits in the
command register.
All standard rules apply to IP addressing with the additional restriction that the IP
address cannot be greater than 253 or the broadcast address minus 2. Also, no
other device should be assigned the configured IP +1 address.
Note: NOE 771 01 and 11 ADDRESS SWAP
z NOE 771 01 and 11 are the only Ethernet option modules that support the IP
address swap in Modicon Quantum Hot Standby with Unity system V2.0.
z NOE 77101 and 11 modules must be configured in the same slot of the Primary
and Standby backplanes.
z NOE 771 01, 11 requires minimum firmware revision 2.0 or higher.
98
Configuring a Modicon Quantum Hot Standby with Unity System
5.2
Configuring a NOE with Unity Pro
At a Glance
Purpose
This material describes configuring a NOE, a Quantum Ethernet module, using Unity
Pro. For a complete description of all models of the NOE, see the Quantum NOE
771 xx Ethernet Modules User Guide, 840 USE 116 00.
What's in this
Section?
This section contains the following topics:
Topic
Page
Overview of Modicon Quantum Hot Standby with Unity Solution for NOEs
100
NOE Operating Modes and Modicon Quantum Hot Standby with Unity
102
IP Address Assignment
106
Address Swap Times
108
Network Effects of Modicon Quantum Hot Standby with Unity Solution
109
99
Configuring a Modicon Quantum Hot Standby with Unity System
Overview of Modicon Quantum Hot Standby with Unity Solution for NOEs
Please Note
The Modicon Quantum Hot Standby with Unity system supports up to six NOE 771
Ethernet adapters on bus controllers.
Description of
the Hot Standby
Solution
The NOE Hot Standby allows automatic IP Address swap. Both controllers are
configured identically. One controller is the Primary NOE; the other controller, the
Secondary NOE. In case of a failure, the controllers switchover and the system
recovers.
The NOEs coordinate the swapping of IP addresses. After closing both the client
and the server connections, each NOE sends a swap UDP message to its peer
NOE. The sending NOE then waits a specified timeout (500 ms) for the peer swap
of UDP messages. Either after receiving the messages or after a timeout, the NOE
changes its IP address.
Note: NOEs must communicate with each other in order to swap IP Addresses.
Schneider Electric recommends that you connect the primary and Secondary
NOEs to the same switch because
z Communication failures between the NOEs increases the time to swap
z Connecting two NOEs to the same switch, minimizes the probability of a
communication failure
Note: Schneider Electric recommends that a switch (not a hub) is used to connect
the NOEs to each other or to the network. Schneider Electric offers switches;
please contact a local sales office for more information.
The NOE waits for either a change in the controller’s Hot Standby state or the swap
of UDP messages. Then the NOE performs one of two Hot Standby actions.
If the NOE:
1. Detects that the new Hot Standby state is either primary or standby:
The NOE changes the IP address
2. Receives a swap UDP message:
The NOE transmits a Swap UDP message and swaps the IP address
All client/server services (I/O Scanner, Global Data, Messaging, FTP, SNMP, and
HTTP) continue to run after the switchover from the old to the new Primary NOE.
Note: Failure of an NOE module is not a condition for the primary system to leave
the primary state.
100
Configuring a Modicon Quantum Hot Standby with Unity System
Hot Standby and
NOE Module
Functionality
The NOE 771 family provides different Ethernet services. Some services are
enabled or disabled in a Modicon Quantum Hot Standby with Unity system. The
following table shows which services are enabled and disabled.
Service
NOE 771 x1
I/O Scanning
Enabled
Global Data
Enabled
Modbus Messaging
Enabled
FTP/TFTP
Enabled
SNMP
Enabled
HTTP Server
Enabled
DHCP
Disabled
Note: Only the 140 NOE 771 01 or 140 NOE 771 11 (TCP/IP Ethernet Modules)
support a Modicon Quantum Hot Standby with Unity V2.0 system.
101
Configuring a Modicon Quantum Hot Standby with Unity System
NOE Operating Modes and Modicon Quantum Hot Standby with Unity
The NOE Modes
The NOE modes are
z Primary Mode
The Hot Standby state is primary, and all client/server services are active.
z Secondary Mode
The Hot Standby state is standby, and all server services are active except
DHCP.
z Standalone Mode
Occurs when NOE is in a nonredundant system, or if the HE CPU module is not
present or is not healthy.
z Offline Mode
CPU is stopped.
CPU module is in Offline mode.
The Modicon Quantum Hot Standby with Unity and the NOE operating modes are
synchronized by the conditions described in the following table.
HE CPU Module Status
HSBY State
NOE Operating Mode
Present and Healthy
Primary
Primary
Present and Healthy
Standby
Secondary
Present and Healthy
Offline
Offline
Present and Healthy
Unassigned
Standalone
Not present or unhealthy
N/A
Standalone
Any one of four events will affect the NOE operating mode. These four events occur
when the NOE is powered-up, when an NOE executes a Hot Standby switchover,
when an NOE goes to offline mode, or when a new application is downloaded to the
NOE.
102
Configuring a Modicon Quantum Hot Standby with Unity System
Power-Up and IP
Address
Assignment
An NOE obtains its IP Address assignment at power-up as follows:
If the HSBY state is ...
Then the IP Address assigned is ...
Unassigned
Configured IP Address
Primary
Configured IP Address
Secondary
Configured IP Address + 1
Unassigned to Offline
See the Offline Mode at Power-up Sequence table following
If two NOEs power-up simultaneously, a "resolution algorithm" determines the
Primary NOE, and after determining the Primary NOE, the "resolution algorithm"
assigns the configured IP Address to the Primary NOE and then assigns the
configured IP Address + 1 to the Secondary NOE.
Offline Mode at Power-up Sequence table:
Offline Mode at Power-up Sequence
Result
Controller A powers-up before controller B
z IP Address of controller A is configured IP
Address
z IP Address of controller B is the configured
IP Address + 1
Both controller A and controller B power-up The resolution algorithm will assign controller A
a the same time
the configured IP address and will assign
controller B the configured IP address + 1.
The NOE performs a "duplicate IP" test by issuing an ARP request to the configured
IP Address. If a response is received within 3 seconds, the IP Address remains at
the Default IP and blinks a diagnostic code.
If no IP configuration exists, the NOE remains in standalone mode, and the IP
Address must be obtained from either a BOOTP server or from a MAC address.
103
Configuring a Modicon Quantum Hot Standby with Unity System
Power-Up and
Ethernet
Services
The following table shows how the status of an NOE service is affected by the
Modicon Quantum Hot Standby with Unity HSBY state.
HSBY State
Status of NOE Services
Client Services
104
Client/
Server
Services
Server Services
I/O Scanner Global Data Modbus
Messaging
FTP
SNMP
HTTP
Unassigned
Run
Run
Run
Run
Run
Run
Primary
Run
Run
Run
Run
Run
Run
Secondary
Stop
Stop
Run
Run
Run
Run
Offline
Stop
Stop
Run
Run
Run
Run
Configuring a Modicon Quantum Hot Standby with Unity System
Hot Standby
Switchover
The following steps describe how NOEs coordinate the Hot Standby switchover.
Step
1
NOE A (installed in a HSBY rack) detects that its local controller changed from
Primary to Offline.
2
NOE A changes its HSBY state from Primary to Offline with the same Ethernet
services running, starts its watch-dog timer (with 500 ms timeout setting), and
expects from its peer NOE a UDP request to swap the IP Address.
3
NOE B (installed in peer HSBY rack) detects that its local controller changed
state from Secondary to Primary.
4
NOE B stops all Ethernet services, sends a UDP request to its peer NOE (NOE
A) for the synchronization of the IP Address swap, starts its watch-dog timer
(with 500 ms timeout setting), and then waits for an UDP response from its peer
NOE.
5
Once NOE A receives the UDP request from NOE B (or after its watch-dog timer
times out), it stops all Ethernet services, sends a UDP response to NOE B (no
UDP response is sent to NOE B for watch-dog timeout case), swaps IP Address
as Secondary, and starts Secondary services.
6
As soon as NOE B receives the UDP response from NOE A (or after its watchdog timer times out), it swaps IP Addresses and starts Ethernet services as
Primary.
7
After NOE A senses that its local controller changes state from Offline to
Standby, it changes to Secondary accordingly.
8
The Secondary NOE now becomes the Primary NOE.
9
Primary NOE opens all client connections and listens for all server connections
and re-establishes those connections.
10
Going to Offline
Action
Simultaneously, Secondary NOE listens for all server connections and reestablishes those connections.
When either the CPU stops or the Hot Standby state goes to offline mode, two
events occur:
1. NOE mode goes to Offline
2. NOE uses the IP Address of the present configuration
IP Address Assignment and Going Offline
HSBY State
IP Address Assigned Is ...
Primary to Offline
Configured IP Address, if other controller does not go to
Primary
Standby to Offline
Configured IP Address + 1
105
Configuring a Modicon Quantum Hot Standby with Unity System
IP Address Assignment
Configuring the
NOE
The NOE can be configured to work in conjunction with the Modicon Quantum Hot
Standby with Unity controller. Since the Primary and Secondary controllers must
have an identical configuration, the configured IP Addresses will be the same. The
NOE’s IP Address is either the configured IP Address or the configured IP Address
+1. The IP Address is determined by the current local Hot Standby state.
In the Offline state, the IP Address is determined by whether or not the other
controller is in transition to the Primary state.
Note: For a Modicon Quantum Hot Standby with Unity system, the two IP
Addresses will be consecutive.
The following table shows the IP Address assignments.
Hot Standby State
IP Address
Primary
Configured IP Address
Standby
Configured IP Address + 1
Transition from Primary to Offline
Configured IP Address, if peer controller does not
go to Primary
Transition from Standby to Offline
Configured IP Address + 1
Note: Offline - Results depend on whether or not the other controller is detected as
in transition into the primary state. If Current IP is the configured IP Address, then
change the IP Address to the configured IP Address + 1.
IP Address
Restriction
106
Note: Configuring NOE
Do not use either broadcast IP Address or broadcast IP Address - 2 to configure a
NOE.
Configuring a Modicon Quantum Hot Standby with Unity System
IP Address
Transparency
For continued Ethernet communication, the new Primary NOE must have the same
IP Address as the former Primary NOE. The IP Address in the Secondary NOE (an
NOE in the secondary state) is IP Address + 1.
The NOEs integrated into the Modicon Quantum Hot Standby with Unity
configuration coordinate this swapping IP Address with the management of Ethernet
services used.
Note: Do not use the address IP + 1. For a Modicon Quantum Hot Standby with
Unity system, do not use consecutive addresses of the configured IP Address. If
you configure the last IP Address (255), NOE returns diagnostic code "Bad IP
configuration".
107
Configuring a Modicon Quantum Hot Standby with Unity System
Address Swap Times
Description
The following table details what the "time for an Address swap" comprises, such as
the time to close connections, time to swap IP addresses, or time to establish
connections.
The following table shows the swap time for each of the Ethernet services.
108
Service
Typical Swap Time
Maximum Swap Time
Swap IP Addresses
6 ms
500 ms
I/O Scanning
1 initial cycle of I/O Scanning 500 ms + 1 initial cycle of I/O
scanning
Global Data
For swap times, please see
the 840USE11600, Quantum
NOE 771 xx Ethernet
Modules User Guide
500 ms + 1 CPU scan
Client Messaging
1 CPU scan
500 ms + 1 CPU scan
Server Messaging
1 CPU scan + the time of the
client reestablishment
connection
500 ms + the time of the client
reestablishment connection
FTP/TFTP Server
The time of the client
reestablishment connection
500 ms + the time of the client
reestablishment connection
SNMP
1 CPU scan
500 ms + 1 CPU scan
HTTP Server
The time of the client
reestablishment connection
500 ms + the time of the client
reestablishment connection
Configuring a Modicon Quantum Hot Standby with Unity System
Network Effects of Modicon Quantum Hot Standby with Unity Solution
Overview
The Modicon Quantum Hot Standby with Unity solution is a powerful feature of
NOEs, a feature that increases the reliability of your installation. Hot Standby uses
a network, and using the Hot Standby feature over a network can affect the behavior
of:
z
z
z
z
z
Browsers
Remote and Local clients
I/O Scanning service
Global Data service
FTP/TFTP server
The following are factors you may encounter while using the Modicon Quantum Hot
Standby with Unity solution.
Browsers
Note: In Modicon Quantum Hot Standby with Unity configuration the NOE’s I/O
scanner is enabled.
If a browser requests a page and during the process of downloading that page an IP
Address swap occurs, the browser will either hang or time out. Click the Refresh or
Reload button.
Remote Clients
Hot Standby swaps affect remote clients.
An NOE will reset under the following conditions:
z
z
z
Remote Connection Request during Hot Standby Swap
If a remote client establishes a TCP/IP connection during a Hot Standby swap,
the server closes the connection using a TCP/IP reset.
Hot Standby Swap during Remote Connection Request
If a remote client makes a connection request and a Hot Standby swap occurs
during the connection request, the sever rejects the TCP/IP connection by
sending a reset.
Outstanding Requests
If there is an outstanding request, the NOE will not respond to the request, but
the NOE will reset the connection.
The NOE will do a Modbus logout if any connection has logged in.
Local Clients
During a swap, the NOE will reset all client connections using a TCP/IP reset.
109
Configuring a Modicon Quantum Hot Standby with Unity System
I/O Scanning
Service
The I/O Scanning provides the repetitive exchange of data with remote TCP/IP
nodes I/O devices. While the PLC is running the Primary NOE sends Modbus Read/
Write, read or write request to remote I/O devices, and transfer data to and from the
PLC memory. In the secondary controller, the I/O scanning service is stopped.
When the Hot Standby swap occurs, the Primary NOE closes all connections with I/
O devices by sending a TCP/IP reset. The I/O scanning service in this NOE is
standby.
After the swap, the new Primary NOE re-establishes the connection with each I/O
devices. It restarts the repetitive exchange of data with these re-connections.
The NOE 771 01 and 11 provides the I/O scanning feature. Configure using either
z
z
Unity Pro software
Internal I/O Scanner Web page
Using either method, the configuration and transfer of data between network
addresses can be done without using the MSTR/IEC function block.
Note: I/O SCANNING AND SWITCHOVER WITH CRITICAL APPLICATIONS
Account for the following Ethernet I/O scanning considerations during a
switchover.
z If MSTR/IEC function block is used for TCP/IP, only some of the Op Code will
be used. Therefore, the block will not complete its transaction and returns error
code 0x8000.
z While the NOE is in the process of performing the transaction, a new MSTR/IEC
function block may become active.
z The output states of the scanned I/Os will follow the state defined in the last
value option configured in the I/O scanning table of the NOE module (in Unity
Pro software).
These two states are either
1. set to 0
2. Hold last
With the above considerations, Schneider Electric recommends using switchover
with Ethernet I/O scanning for less critical applications.
110
Configuring a Modicon Quantum Hot Standby with Unity System
Global Data
(Publish/
Subscribe)
Service
The Hot Standby NOE is one station within a distribution group. Distribution groups
exchange application variables. Exchanging application variables allows the system
to coordinate all the stations in the distribution group. Every station publishes local
application variable in a distribution group for all other stations and can subscribe to
remote application variables independent of the location of the producer.
The communication port has only one multicast address.
In this network service, the Modicon Quantum Hot Standby with Unity controllers are
viewed like only one station. The Primary NOE publishes the Hot Standby
application variables and receives the subscription variables. The Secondary NOE
global data service is in a stopped state.
When the Hot Standby swap occurs, the Primary NOE stops the Global Data
service. The NOE does not publish the local variable during a swap. And after the
swap, the new Primary NOE starts to publish application variables and to receive the
subscription variables.
FTP/TFTP Server
The File Transfer Protocol/Trivial File Transfer Protocol (FTP/TFTP) server is
available as soon as the module receives an IP address. Any FTP/TFTP client can
logon to the module. Access requires the correct user name and password. Modicon
Quantum Hot Standby with Unity allows only one active FTP/TFTP client session
per NOE module.
When the Hot Standby swap occurs, the Primary and Secondary NOEs close the
FTP/TFTP connection. If a user sends an FTP/TFTP request during the swap, the
communication is closed.
Whenever you re-open communication, you must re-enter a user name and a
password.
111
Configuring a Modicon Quantum Hot Standby with Unity System
5.3
Configuring Registers with Unity Pro
At a Glance
Purpose
This material describes configuring a Modicon Quantum Hot Standby with Unity
system by selecting options that affect the registers. You may want to use this
method if your system has specific configuration needs.
What's in this
Section?
This section contains the following topics:
112
Topic
Page
Understanding the Non-Transfer Area, Transferring State RAM, and Reverse
Transfer Words
113
Understanding the Unity Command Register
114
Understanding the Unity Status Register
117
Transferring User Data
119
Using Initialized Data
120
Synchronizing Time-of-Day Clocks
121
Configuring a Modicon Quantum Hot Standby with Unity System
Understanding the Non-Transfer Area, Transferring State RAM, and Reverse
Transfer Words
Designating a
Non-Transfer
Area
Non-Transfer
Area of State
RAM
Using the Hot Standby tab of the editor dialog, you may designate a block of %MW
words as a Non-Transfer area.
Step
Action
1
Ensure that the Hot Standby tab is selected.
If you want to review the process for starting Unity Pro and opening the editor
dialog, please see Accessing the Base Configuration, p. 74.
2
Enter the starting address in the system word field, %MW.
The field is located in the Non-Transfer Area of the Hot Standby tab.
3
Enter the number of contiguous registers in the Length: field.
The field is located in the Non-Transfer Area of the Hot Standby tab.
The designated registers will be ignored when state RAM values are transferred
from the Primary controller to the Standby. Placing registers in the Non-Transfer
Area is one way to reduce scan time.
Note: With the new hardware design of the Modicon Quantum Hot Standby with
Unity 140 CPU 671 60s, the scan time optimization provided by the Non-Transfer
area may be very low.
Transferring
Data to the
Primary
A pair of system words,%SW62 and %SW63, are dedicated to transfer data from the
Standby controller to the Primary.
These system words can be used by the application program (in the first section) to
register diagnostic information.
The data coming from the Standby are transferred at each scan and are available to
the Primary.
113
Configuring a Modicon Quantum Hot Standby with Unity System
Understanding the Unity Command Register
Setting the Bits
in the Command
Register
The Command Register defines the operating parameters of a Hot Standby
application for both the Primary and Standby and is located at system word %SW60.
At each scan, the Command Register is replicated and transfers data from the
Primary to the Standby. Transfer occurs only from Primary to Standby. Any changes
made to the Command Register on the Standby will have no effect because the
values transferred from the Primary overwrite the values in the Standby.
The following illustration identifies the operating options provided by the Command
Register.
Disables LCD Invalidate Keypad = 0
Enables LCD Invalidate Keypad = 1
Sets Controller A to OFFLINE mode = 0
Sets Controller A to RUN mode = 1
Sets Controller B to OFFLINE mode = 0
Sets Controller B to RUN mode = 1
Forces Standby offline if there is a logic mismatch = 0
Does not force Standby offline if there is a logic mismatch = 1
Allows exec upgrade only after application stops = 0
Allows exec upgrade without stopping application = 1
MSB
15 14
13
12 11 10
9
8
7
6
5
4
3
2
1
0
LSB
0 = No application program transfer
1 = Application program transfer requested
0 = Swaps Modbus port 1 address during switchover
1 = Does not swap Modbus port 1 address on switchover
System Word
%SW60.0
Invalidate Keypad is an option that allows a controller to accept or refuse commands
from the Hot Standby submenu in the front panel keypad.
z
z
%SW60.0 = 1
Invalidate Keypad enabled.
The Modicon Quantum Hot Standby with Unity system refuses all changes from
the Hot Standby submenu in the front panel keypad.
%SW60.0 = 0
Invalidate Keypad disabled.
The Modicon Quantum Hot Standby with Unity system accepts all changes from
the Hot Standby submenu in the front panel keypad.
(See Setting the Invalidate Keypad Option, p. 92)
114
Configuring a Modicon Quantum Hot Standby with Unity System
System Word
%SW60.1
Controller A OFFLINE/RUN mode
z
z
System Word
%SW60.2
Controller B OFFLINE/RUN mode
z
z
System Word
%SW60.3
%SW60.1 = 1
Controller A goes to Run mode
%SW60.1 = 0
Controller A goes to Offline mode
%SW60.2 = 1
Controller B goes to Run mode
%SW60.2 = 0
Controller B goes to Offline mode
Logic mismatch
z
z
%SW60.3 = 0
If a logic mismatch is detected, Standby forced to Offline mode.
%SW60.3 = 1
Standby operates normally even if a mismatch occurs.
(See Handling Logic Mismatch with Unity Pro, p. 145)
System Word
%SW60.4
EXEC upgrade
z
z
%SW60.4 = 1
Allows the executive to be upgraded on the Standby and the Primary continues
to control the process.
%SW60.4 = 0
Allows the executive to be upgraded and to stop the Primary’s control of the
process.
Upgrading allows
z
z
a Hot Standby system to operate with different versions of the OS running on the
Primary and Standby
upgrades without shutting down the process
To perform the executive upgrade, the Standby must be stopped. When started
again, the Standby operates as a valid Standby. (See Enabling EXEC Upgrade with
Unity Pro, p. 141)
115
Configuring a Modicon Quantum Hot Standby with Unity System
System Word
%SW60.5
Commands Standby to initiate an application transfer.
z
z
%SW60.5 = 1 means Standby requests an application program transfer from
Primary
%SW60.5 = 0 is default and no transfer occurs
Note: %SW60.5 is a Monitor Bit
%SW60.5 monitors an action. Once the action occurs, %SW60.5 returns to the
default, which is zero (0).
System Word
%SW60.8
116
Swap Modbus port
z
%SW60.8 = 1
Swaps Modbus addresses on port 1when a switchover occurs.
Note: In a Modicon Quantum Hot Standby with Unity system only Modbus port 1
is available for use.
Configuring a Modicon Quantum Hot Standby with Unity System
Understanding the Unity Status Register
Bits in the Hot
Standby Status
Register
The Hot Standby Status Register is a readable register located at system word
%SW61 and is used to monitor the current machine status of the Primary and
Standby.
Both the Primary and the Standby/Offline have their own copy of the Status register.
The Status register is not transferred from Primary to Standby. Each PLC must
maintain its local Status Register based on the regular communication between the
two controllers.
The following illustration identifies the operating options provided by the Status
Register.
This PLC in OFFLINE mode = 0 1
This PLC running in primary mode =1 0
This PLC running in standby mode = 1 1
Other PLC in OFFLINE mode = 0 1
Other PLC running in primary mode =1 0
Other PLC running in standby mode = 1 1
PLCs have matching logic = 0
PLCs do not have matching logic = 1
This PLC’s switch set to A = 0
This PLC’s switch set to B = 1
MSB
15 14 13 12 11 10
9
8
7
6
5
4
3
2
1
0
LSB
0 = Unlocated Variables being transferred Primary to Standby
1 = Unlocated Variables not being transferred Primary to Standby
0 = The hot standby has not been activated
1 = The hot standby is active
117
Configuring a Modicon Quantum Hot Standby with Unity System
System Words
%SW61.0 to
%SW61.3
These four bits display the states of the local and remote Hot Standby controllers.
Status of local PLC
z
z
z
%SW61.1 = 0 and %SW61.0 = 1means local PLC is in OFFLINE mode
%SW61.1 = 1 and %SW61.0 = 0 means local PLC is running in Primary mode
%SW61.1 = 1 and %SW61.0 = 1 means local; PLC is running in Standby mode
Status of remote PLC
z
z
z
System Word
%SW61.4
%SW61.3 = 0 and %SW61.2 = 1means remote PLC is in OFFLINE mode
%SW61.3 = 1 and %SW61.2 = 0 means remote PLC is running in Primary mode
%SW61.3 = 1 and %SW61.2 = 1 means remote PLC is running in Standby mode
%SW61.4 is set = 1 whenever a logic mismatch is detected between the Primary
and Standby controllers.
%SW61.4 depends on %SW60.3 (Command Register) set = 1.
System Word
%SW61.5
%SW61.5 identifies the Order reported by the Copro at start time.
The order depends on the range of the MAC addresses.
z
z
If the A/B designation is A, then bit 5 will be set = 0.
If the A/B designation is B, then bit 5 will be set = 1.
Note: On controller LCD displays
z A
z B
System Word
%SW61.14
If %SW61.14 is set = 1, the setting indicates that a logic mismatch has been
detected, which prevents Unlocated Variables to be transferred from the Primary to
Standby.
System Word
%SW61.15
If %SW 61.15 is set = 1, the setting indicates that the Copro device is set up correctly
and working.
118
Configuring a Modicon Quantum Hot Standby with Unity System
Transferring User Data
General
At end of scan in a redundant system the Primary must send its data to the Standby
in order to keep in ready to assume the role of Primary if the need arises.
Variables,
Instances, Bits,
Words
The user data that will be transferred includes:
z
z
z
z
z
Located variables (in state RAM)
All unlocated variables
All instances of DFB and EFB data
SFC states
System Bits and Words
119
Configuring a Modicon Quantum Hot Standby with Unity System
Using Initialized Data
Loading at Coldstart Time
The Modicon Quantum Hot Standby with Unity 140 CPU 671 60 supports initialized
data.
Initialized data allows you to specify initial values for the data that are to be loaded
at cold-start time. Declare the variables before a cold start.
Updating Online
In addition to declaring values before a cold start, you can update the initial values
online.
Updating the initial values online creates a mismatch situation in a redundant
system.
Handling
Problems at
Switchover
Updating the initial values online presents a problem: if a switchover occurs to the
non-updated PLC, then you execute a cold-start, the older initial values will be used.
Note: WINDOW OF TIME
Pay attention to the fact that there is a window of time during which a mismatch can
occur. Mismatches may cause inconsistent operations.
Solving
Mismatch
Problems
120
However, logic mismatches cause the same problems. Thus, value mismatches will
be treated in the same way as logic mismatches. Value mismatches give the same
indications and the same update requirements.
Configuring a Modicon Quantum Hot Standby with Unity System
Synchronizing Time-of-Day Clocks
Setting the Timeof-Day Clocks in
the Primary and
Standby
Controllers
In a Modicon Quantum Hot Standby with Unity system, the Primary and Standby
controllers have their own Time-of-Day clocks, which are not implicitly synchronized.
If the clocks are not synchronized, then at switchover, the Time-of-Day would
change by the difference between the two clocks. Non synchronization of the clocks
could cause problems if you are controlling a time critical application.
121
Configuring a Modicon Quantum Hot Standby with Unity System
122
Maintaining a Modicon Quantum
Hot Standby with Unity System
6
Introduction
Overview
This chapter provides information about maintaining a Modicon Quantum Hot
Standby with Unity system.
What's in this
Chapter?
This chapter contains the following topics:
Topic
Page
Verifying the Health of a Modicon Quantum Hot Standby with Unity System
124
Detecting and Diagnosing Failures in a Modicon Quantum Hot Standby with
Unity System
125
Detecting Primary Controller, Copro, and RIO Head Failures
127
Detecting Standby Controller, Copro, and RIO Head Failures
129
Detecting High-Speed Data Link (HDSL) Failures
130
Detecting Remote I/O (RIO) Link Failures
133
Checking for Identical Application Programs—Checksum
135
Replacing a Faulty Module
136
Troubleshooting the Primary Controller
137
Troubleshooting the Standby Controller
138
123
Maintaining a Modicon Quantum Hot Standby with Unity System
Verifying the Health of a Modicon Quantum Hot Standby with Unity System
Generating and
Sending Health
Messages
The Modicon Quantum Hot Standby with Unity modules exchange a health
message approximately every 10 ms.
If the Primary has an error, the Standby is notified and assumes the Primary role.
If the Standby has an error, the Primary continues to operate as a standalone.The
RIO head processors periodically verify communication with one another.
The Primary sends a health message to the Standby either
1. every 10 milliseconds when no other data is being sent on the high speed Copro
link
2. every 5 milliseconds if no communication is required with any drop on RIO link.
If the Standby never receives any message on either link, the Standby will try to
determine the cause of the failure and assumes control if necessary.
If the Primary does not receive a valid response from the Standby, the Primary will
operate as if there was no back up available as if the Primary were a standalone.
Performing
Automatic
Confidence
Tests
The system automatically performs two kinds of confidence tests on the Modicon
Quantum Hot Standby with Unity Copro:
z Startup tests
z Run time tests
Conducting
Startup Tests
Startup confidence testing on the Modicon Quantum Hot Standby with Unity Copro
attempt to detect hardware errors in the module before the application is allowed to
run.
If the module fails any of its tests, it will remain offline and will not communicate with
the other Modicon Quantum Hot Standby with Unity module.
Conducting Run
Time Tests
Run time tests are performed whenever the Copro is in the operational state. Run
time tests are executed in small slices to prevent delays in scan time.
If the module fails any of its tests, the module remains offline and will not
communicate with the other module.
124
Maintaining a Modicon Quantum Hot Standby with Unity System
Detecting and Diagnosing Failures in a Modicon Quantum Hot Standby with
Unity System
Important
Information
Understanding
Health Messages
Please note.
If...
Then ...
Component of Primary fails
Control shifts to Standby
Component of Standby fails
Standby goes offline
Fiber optic cable link fails
Standby goes offline
The Primary sends a health message to the Standby every 10 milliseconds.
If ...
Then Primary Sends Health Message ...
No communication is required with any drop
on RIO link
every 5 milliseconds
All systems OK
every scan
Exceptions
Finding
Diagnostic
Information with
Unity Pro
If ...
Then ...
Standby never receives any message on
either link
1. Standby determines cause of failure
2. Standby assumes control
Primary does not receive a valid response
from the Standby
Primary operates as if
1. no back up available
2. Primary were a standalone
Standalone = 1) no working Copro 2) no Hot
Standby Functionality
Errors and switchovers are logged in the diagnostic buffer. To view the log,
Step
1
Action
Select Tools → Diagnostic Viewer from the main menu.
125
Maintaining a Modicon Quantum Hot Standby with Unity System
Finding More
Information in
this Manual
Refer to the following sections
Type of failure
Refer to section
Primary controller
Detecting Primary Controller, Copro, and
RIO Head Failures, p. 127
Primary Copro
Primary RIO head
Standby controller
Standby Copro
Detecting Standby Controller, Copro, and
RIO Head Failures, p. 129
Standby RIO head
126
High speed data link failures
Detecting High-Speed Data Link (HDSL)
Failures, p. 130
Remote I/O link
Detecting Remote I/O (RIO) Link Failures,
p. 133
Application program checksum failures
Checking for Identical Application
Programs—Checksum, p. 135
Maintaining a Modicon Quantum Hot Standby with Unity System
Detecting Primary Controller, Copro, and RIO Head Failures
Understanding
CPU to Copro
Communication
Failure Detection
between Two
Controllers
Facts
1
On every scan, CPU communicates with Copro.
2
Main CPU executes the Hot Standby control at the start of the scan, the main CPU
asks the Copro to service its requests.
3
CPU reports any errors detected.
4
If Primary Copro fails, Primary Controller operates as a standalone.
Standalone = 1) no working Copro 2) no Hot Standby functionality
If an error occurs in either one of two controllers,
Situation
Response
Controller with error
Reports error to other controller by sending a message through
either
1. high speed Copro transfer link
2. RIO link
Controller without error
Detects error from a timeout which occurs because of no activity
on link
Note: Primary maintains continuous activity on link, which ensures Standby can
detect an error as soon as possible.
Failure Detection
within
One CPU —
Hard Errors
Facts
1
RAM failure is a hard error.
2
Copro detects hard errors.
Detecting failures:
If ...
Then ...
Hard error occurs
1. Copro sends a take control command to the Standby
2. Primary Copro stops because of an interface error
127
Maintaining a Modicon Quantum Hot Standby with Unity System
Failure Detection
in Either Copro
Detecting failures
If ...
Then ...
Primary Copro reports any error
1. Primary controller acknowledges the error
2. Primary controller attempts to transfer control to
the other controller by sending a take
control command to the Standby through the
RIO link
Primary Copro does not respond within 1. Primary controller acknowledges the error
5 milliseconds
2. Primary controller attempts to transfer control to
the other controller by sending a take
control command to the Standby through the
RIO link
Primary Copro sends a take control 1. Primary Copro relinquishes control
command to the other Copro
2. Primary Copro does not expect any response
Standby copro experiences an error
Failure Detection
by an RIO Head
Understanding
RIO Head Failure
128
1. Standby controller reports the error by sending
a No Standby message
2. Standby controller goes offline
Table with two columns
If ... RIO Head
Then ... Primary Controller
Responds
Releases control and the Standby station becomes a Standalone.
Standalone = 1) no working Copro 2) no Hot Standby functionality
Does NOT respond
Continues to scan the I/O.
If the RIO Head fails,
1
Main CPU times out when it fails to communicate with the RIO Head.
2
Main CPU stops.
3
Main CPU reports RIO failure to log.
4
Main CPU reports RIO failure error to the Copro.
5
Copro goes offline.
Maintaining a Modicon Quantum Hot Standby with Unity System
Detecting Standby Controller, Copro, and RIO Head Failures
Standby CPU
Failure
Standby Copro
Failure
Standby RIO
Head Failure
When Standby CPU fails,
Stage
Description
1
The Standby CPU reports errors to the Standby Copro.
2
The Standby Copro sends a No Standby message to the Primary Copro.
3
The Standby CPU and the standby copro go offline.
When Standby Copro fails,
Stage
Description
1
When the Primary CPU communicates with the Standby, the Standby Copro
reports its error to the Primary.
2
The Primary requests the Copro to go offline.
3
The Standby Copro will also report its error to the Primary Copro by sending a
No Standby message.
4
Standby goes offline.
When the Remote IO Head fails,
Step
Description
1
The CPU stops and reports a RIO failure.
2
The CPU reports the error to the Copro
3
The Copro sends a No Standby command to the Primary.
4
The Standby goes offline.
129
Maintaining a Modicon Quantum Hot Standby with Unity System
Detecting High-Speed Data Link (HDSL) Failures
Important
Information
Facts
1
High-speed data link connects the two Copros.
2
Using the high-speed data link, the Primary controller communicates with the
Standby every 10 milliseconds.
3
Primary sends either
1. data message
2. health message
Note: If both the Primary and Standby do not hear from each other, either station
can detect a high speed data link failure.
130
Maintaining a Modicon Quantum Hot Standby with Unity System
Standby Detects
a Failure
At first,
Step
Action
Result
1
Standby does not hear from the
1. Standby requests the Primary CPU to
Primary on the high-speed data link
monitor the RIO link
2. Primary CPU sends a request to the RIO
Head
When the RIO Head receives the request,
If ...
Then ...
RIO Head finds the
RIO link not active
1. RIO Head assumes that the Primary must be down
2. Standby assumes control
RIO Head finds the
RIO link is active
Message received from Primary CPU must be either
1. health message
Messages are sent every 5 milliseconds from Primary RIO Head to
Standby RIO Head.
2. I/O transaction data message
Messages are sent from the Primary RIO Head to the I/O drops at
the request of the controller.
Facts about the I/O
1
If the message is an I/O transaction, the RIO Head
1. concludes the failure occurred on the high-speed data link
2. informs the Primary controller to go to offline
2
If you never configure an I/O drop, the failure on the high-speed data link could
cause the Standby to assume control since the Standby RIO head will never receive
any I/O transaction message.
3
After any CPU fails,
1. RIO Head will not perform drop communication
2. RIO Head sends only health messages
131
Maintaining a Modicon Quantum Hot Standby with Unity System
Standby
Assumes
Control
132
The Standby becomes Primary
Step
Action
Result
1
After the Primary controller goes offline, A health message from the Standby
controller is the only message received
by the Standby RIO Head.
2
Standby controller listens to the highspeed data link for one scan.
3
If Standby controller hears nothing,
4
Standby assumes control.
Standby knows that the failure must be
on both the Primary Copro and Primary
CPU.
Maintaining a Modicon Quantum Hot Standby with Unity System
Detecting Remote I/O (RIO) Link Failures
Important
Information
Standby
Controller and
Messages
Facts
1
Remote I/O (RIO) Link connects the two RIO Heads.
2
Primary RIO Head performs a health check on the RIO link by sending health
messages.
3
Primary RIO Head sends a health message every 5 milliseconds.
4
Unlike the health communication check performed on the Copro link, the Primary
Copro does not wait for a response from the Standby Copro. Instead the Primary
Copro expects a reply every second. Expecting a reply every second minimizes
the impact on the Primary's performance.
How the Standby handles messages depends on:
If Standby ...
Then ...
Action
Never Responds to any
message
Primary assumes that the
Standby RIO Head failed.
Standby continues to
control the drops.
Never Receives a message
from the Primary
Standby assumes failure may be Standby cannot
in the RIO link.
assume control.
133
Maintaining a Modicon Quantum Hot Standby with Unity System
Standby
Monitors RIO and
Copro Links
To start the process,
Step
Action
Result
1
Standby RIO Head sends a
request to the Primary RIO
Head.
Confirm whether Primary RIO
1. Head failed or
2. link failed
2
Standby requests that the Main
CPU monitor the Copro link.
Main CPU passes this request to Copro either as a
1. monitor RIO request
2. Copro link request
To complete the process, the Standby determines
Understanding
Communication
Status to the
Drops
134
If ...
Then ...
Copro link is down and the
Primary is down
Standby assumes control
Copro link is up
Standby Copro sends a message to the Primary Copro and
1. Primary Copro passes this request to the Primary CPU
2. Primary checks the Primary RIO link
Depending on the status, the Primary RIO Head continues either to operate as the
Primary or goes offline.
If communication Then
to drops is
Action
Healthy
RIO link failure must 1. The station continues to operate as the
be on Standby side.
Primary
2. Standby RIO Head shows the link error pattern
on the LEDs
Not healthy
RIO link failure is on
Primary side.
1. The Primary RIO Head displays a link error
2. Standby assumes control
Maintaining a Modicon Quantum Hot Standby with Unity System
Checking for Identical Application Programs—Checksum
Important
Information
Please note
Fact
Result
A Hot Standby system requires that both
stations must have the same application
program.
This requirement prevents the Standby from
executing a different application program if
transfer of control occurs.
Note: OVERRIDING SAME APPLICATION PROGRAM REQUIREMENT
To override the requirement that both controllers have the same application
program, ensure that the Command Register’s %SW60.3 is set = 1. (See System
Word %SW60.3, p. 115)
Standby Checks
for Mismatches
Checking for identical application programs
Step
Action
Result
1
At each scan, the application
program's instruction, checksum
(CKSM), is transferred from the
Primary to the Standby along with any
other necessary data.
The Standby validates the new
checksum (CKSM) against its existing
checksum (CKSM).
2
Standby determines if mismatch
occurs.
1. Mismatch: Standby goes Offline
2. No mismatch: system operates
normally
3
The controller returns to Online and is the Standby as soon as the application
programs are identical.
135
Maintaining a Modicon Quantum Hot Standby with Unity System
Replacing a Faulty Module
Important
You may replace a faulty module while a system is running.
Ensure that the module being replaced:
1. installs into the Standby backplane
2. resides in the same position in both backplanes
3. is same type of module
Same type of module means NOE replaces NOE, CRP replaces CRP.
Note: IMPORTANT INFORMATION
1. Perform a switchover if replacing a Primary.
2. Do NOT remove a Primary controller under power supply (Hot Swap).
136
Maintaining a Modicon Quantum Hot Standby with Unity System
Troubleshooting the Primary Controller
Troubleshooting
the Primary
To determine which component failed, note controller’s status displayed in the HE
CPU LCD screen and the RIO Head’s status displayed by the RIO Head’ LEDs.
Controller Status
RIO Head Status
Failure Type
Description
Stop
All LEDs off except
READY on and Com
Act blinks four times
Controller
An Interface error occurred.
Offline
All LEDs off except
READY on
Fiber Optic
connection
between both
controllers
A Com Act error occurred.
Stop
All LEDs off except
READY on and Com
Act displays error
pattern
RIO Head
A Com Act error occurred.
Stop
READY on and Com
Act blinks four times
RIO Cable
Failure at
Primary End
In a dual cable system, if only
one cable fails, the Error A or
Error B indicator on the RIO
Head lights instead of stopping
the system, and the system
continues to operate. When
the RIO cable fails at the
Primary end, input data may be
reset to 0 for one scan because
the communication failure to
the drop occurs before the
broken link is detected.
137
Maintaining a Modicon Quantum Hot Standby with Unity System
Troubleshooting the Standby Controller
Troubleshooting
the Standby
138
To determine which component failed, note controller’s status displayed in the HE
CPU LCD screen and the RIO Head’s status displayed by the RIO Head’s LEDs.
Controller
Status
RIO Head Status
Failure Type
Description
Stop
All LEDS off except
READY on or READY
on and Com Act blinks
once a second
Controller
An Interface error occurred.
Offline
READY on and Com
Act stops blinking
Fiber Optic
A Com Act error occurred.
connection between
both controllers
Stop
Com Act displays error RIO Head
pattern
Stop
READY on and Com
Act blinks four times
Offline
Com Act stops blinking Fiber Link failures:
z from Standby
Transmit to
Primary Receive
z from Primary
Transmit to
Standby Receive
After you have replaced the
module and cycled power, to
ensure that the controllers
have identical application
programs, you must perform
an application program update.
RIO Cable Failure at In a dual cable system, the RIO
Standby end
Head gives no indication if only
one cable has failed.
Understanding the Modicon
Quantum Hot Standby with Unity
System Special Features
III
At a Glance
Purpose
This part describes the special features of a Modicon Quantum Hot Standby with
Unity system.
z enabling an EXEC upgrade
z handling logic mismatch
z transferring application programs
What's in this
Part?
This part contains the following chapters:
Chapter
Chapter Name
Page
7
Enabling EXEC Upgrade with Unity Pro
141
8
Handling Logic Mismatch with Unity Pro
145
9
10
Transferring an Application Program with Unity Pro
163
Using the Modicon Quantum Hot Standby with Unity EFBs
171
139
Understanding Modicon Quantum Hot Standby with Unity Special Features
140
Enabling EXEC Upgrade with
Unity Pro
7
Introduction
Overview
In this chapter you will find information regarding the EXEC upgrade method for a
Modicon Quantum Hot Standby with Unity system. Upgrading allows you to update
the EXEC for the standby controller while the process is still controlled by the
primary controller.
What's in this
Chapter?
This chapter contains the following topics:
Topic
Page
Overview of Modicon Quantum Hot Standby with Unity EXEC Upgrade
142
Executing the EXEC Upgrade Procedure
143
141
Enabling EXEC Upgrade
Overview of Modicon Quantum Hot Standby with Unity EXEC Upgrade
Upgrading while
Process is
Running
The Executive Upgrade feature allows upgrading the EXEC of the Standby
controller while the Primary controller continues to control the process. However,
during the upgrade, the system can no longer be considered redundant. That is,
there is no Standby available to assume control if the Primary should fail before the
Standby upgrade is complete.
Upgrading EXEC
without Stopping
Under normal operating conditions, both controllers in a redundant system must
have the same versions of firmware.
In fact, there are checks by the controllers to detect if there is a mismatch in
firmware.
Normally, when a mismatch exists, performing a switchover would not be possible
because the Standby controller would not be allowed to go online.
However, to allow an EXEC Upgrade without stopping the application, overriding is
possible by setting the Command Register system bit %SW60.4. Details of the
Modicon Quantum Hot Standby with Unity command register can be found in
Understanding the Unity Command Register, p. 114.
Note: Enabling EXEC upgrade without stopping the application overrides the
process of checking whether the Primary and Standby are configured identically.
Disable the upgrade without stopping bit as soon as the EXEC upgrade is finished.
Note: IMPORTANT INFORMATION
EXEC upgrade is possible only with compatible firmware.
142
Enabling EXEC Upgrade
Executing the EXEC Upgrade Procedure
General
Perform an EXEC upgrade using the installed OSLoader tool. Use one of two
communication methods available in the OSLoader:
z Modbus RTU
z Modbus Plus
Using Modbus
RTU
Follow these steps.
Important
Step
Action
1
Connect to the Primary.
2
Access the Command Register system bit %SW60.4; set bit to 1.
3
Disconnect the fiber optic cable on both controllers.
4
Open the OSLoader tool.
5
Select the Modbus communication option.
6
Stop the Standby.
7
Connect to the Standby using Modbus.
Note: Use the Standby’s Modbus address.
8
Download the OS to the Standby.
9
After completing the OS download, perform application program transfer to the
Standby.
10
Reconnect the fiber optic cables.
11
Put in RUN mode.
Note: Ensure Primary and Standby are in RUN Primary and RUN Standby mode.
12
Perform a switchover.
Note: Ensure Standby becomes Primary.
13
Repeat Steps 4 through 9 on the new Standby.
14
Connect to the new Primary.
15
Access Command Register system bit %SW60.4; set bit to 0).
If you upgrade using Modbus Plus, only address 1 is allowed for downloading.
Otherwise, there is no communication.
Ensure that no device in the Modbus Plus network is using the address ‘1’. (See
Handling Modbus Plus Addresses at Switchover, p. 96)
143
Enabling EXEC Upgrade
Using Modbus
Plus
Compatibility
Issues
144
Follow these steps.
Step
Action
1
Connect to the Primary.
2
Access the Command Register system bit %SW60.4; set bit to 1.
3
Note: Before stopping the Standby, note the Modbus Plus address.
Stop the Standby.
4
Disconnect the fiber optic cable from both controllers.
Note: Primary operates without a Standby.
5
Switch off power, and switch on power to the Standby.
6
If not set to 1, change the Modbus Plus address of the Standby to 1.
7
Open the OSLoader tool.
8
Connect the Standby using Modbus Plus.
Note: Use the Standby’s Modbus Plus address.
9
Download the OS to the Standby.
10
Download application program to the Standby.
Note: Ensure that you download a valid application program.
11
Ensure that the Modbus Plus address is the same as the address noted in Step
3.
12
Reconnect fiber optic cable to both controllers.
Note: Primary operates with a Standby.
13
Put in RUN mode.
Ensure Primary and Standby are in RUN Primary and RUN Standby mode.
14
Perform switchover.
Note: Ensure Standby becomes Primary.
15
Repeats Steps 3 through 12 to the new Standby.
Ensure Primary and Standby are in RUN Primary and RUN Standby mode.
16
Connect to the new Primary, and access the Command Register system bit
%SW60.4; set to 0.
To upgrade a Modicon Quantum Hot Standby with Unity EXEC without shutting
down the process, the current application program must be executable by the new
EXEC.
Observe this requirement when installing minor revisions targeted for bug fixes or
minor enhancements.
When a major function enhancement needs to be made, maintaining this
compatibility may not be possible.
In this case, to perform an EXEC upgrade requires a system shut down.
Handling Logic Mismatch with
Unity Pro
8
Introduction
Overview
This chapter provides information about using the Logic Mismatch feature available
in Unity Pro.
What's in this
Chapter?
This chapter contains the following topics:
Topic
Page
Understanding Modicon Quantum Hot Standby with Unity Logic Mismatch
146
Understanding Switchover Behavior during Logic Mismatch
150
Online or Offline Modifications and Logic Mismatch
152
Online Modifications to an Application Program in the Standby and Logic
Mismatch
153
Online Modifications to an Application Program in the Primary and Logic
Mismatch
154
Offline Modification of an Application Program and Logic Mismatch
155
Switchover Methods and Logic Mismatch
157
Application Program Transfer Method and Logic Mismatch
159
Recommendations for Using Logic Mismatch
160
145
Logic Mismatch
Understanding Modicon Quantum Hot Standby with Unity Logic Mismatch
Needing
Identical
Application
Programs
In a fault-tolerant redundant system and under normal operating conditions, both
controllers must load the identical application program (also called a logic program).
The application program is updated every scan by transferring data from the Primary
to the Standby. Both controllers conduct tests to detect if a mismatch exists between
the application programs.
The following conditions cause a mismatch in the application program: a difference
between:
z programs
z animation tables
z comments (on variables)
Note: Animation Tables and Comments
Both animation tables and comments (on variables) may be excluded from the
mismatch by not including in the upload information.
z Exclude by selecting Tools | Project Settings | Build tabs (default).
In the Upload Information area, select without.
z Not including requires downloading application program
When a mismatch exists, a switchover is not possible, and the Standby controller
would NOT go online. However, there are situations when you may want to allow a
mismatch between the application programs. To enable this condition, use the
Modicon Quantum Hot Standby with Unity Logic Mismatch feature.
Note: Switchover can NOT occur while the Standby controller is offline.
Defining Logic
Mismatch
Using the Build
Project Function
146
Logic Mismatch is a Modicon Quantum Hot Standby with Unity feature that allows a
mismatch between the application programs of the Primary and Standby controllers.
Use the Logic Mismatch feature to modify an application program without stopping
the process.
Note: Build Project vs. Rebuild All Project
1. Use the Build Project function to perform a logic mismatch with Unity Pro.
Schneider Electric recommends do not use Rebuild All Project to create a logic
mismatch because the Rebuild All Project function creates a completely new
project even if nothing has been changed in the application.
Logic Mismatch
Causing a
Mismatch
Note: CHANGING FROM LEGACY
Legacy Hot Standby systems reserved areas of the State RAM for user data, which
was transferred from the Primary to the Standby during scans. Because of the
transfer process, legacy Hot Standby systems could support different application
programs in the two controllers. One application program resided in one controller,
and a different application program resided in the other controller.
In the legacy system, the user could program the logic (now called application
program) and decide where to store the data. With this method of programming,
the memory is known as static data memory layout and is necessary to have
different user data accessing the same variables.
In the Modicon Quantum Hot Standby with Unity system, all memory is allocated by
a memory manager, which automatically transfers the logical memory to a physical
memory location.
This dynamic data memory layout is the heart of the programming flexibility and
platform independence that Unity Pro provides, but on a Modicon Quantum Hot
Standby with Unity system with different user logic, dynamic data memory layout
makes a cyclical data update very difficult. Therefore, mismatches occur.
Allowing a
Mismatch
In a Modicon Quantum Hot Standby with Unity system, Logic Mismatch allows the
following without stopping the application program process.
z modify (edit) online an application program in the Standby while the Primary
controls the process
(See Online Modifications to an Application Program in the Standby and Logic
Mismatch, p. 153)
z modify online an application program in the Primary while the Primary controls
the process
(See Online Modifications to an Application Program in the Primary and Logic
Mismatch, p. 154)
z download an offline-modified application program to the Standby and perform a
switchover to run the modified application program
(See Offline Modification of an Application Program and Logic Mismatch, p. 155)
Creating a
Mismatch
Use one of two methods to create a Logic Mismatch condition:
1. select Standby on Logic Mismatch; select online
(Hot Standby Tab in the Unity Pro dialog)
This action requires the application program to be downloaded to the controller.
2. set to 1 the Command Register system bit %SW60.3
This action MUST be performed online in the Primary controller.
147
Logic Mismatch
Transferring
User Data during
a Mismatch
Using Care with
Logic Mismatch
The table following shows which user data is transferred when a mismatch occurs
Data Type
Transferred on Logic Mismatch
Located variables (State RAM)
Yes
Unlocated global variables
Yes
unless variables exist ONLY in modified controller
DFB & EFB instance data
Yes
unless data exist ONLY in modified controller
SFC variable area
Yes
unless associated-SFC section is modified
System Bits and Words
Yes
WARNING
I/O MAP HAZARD; CONFIGURATION HAZARD
A mismatch in either the I/O map or the configuration is not allowed
under any circumstances.
z Ensure that both I/O maps are identical.
z Ensure that both configurations are identical.
Failure to follow this precaution can result in death, serious injury,
or equipment damage.
Selecting the Standby On Logic Mismatch option, allows you to override this default
condition (Standby going offline).
If you change the parameter in this field from Offline to Running, the Standby
remains online if a logic mismatch is detected between the application program of
the Standby and the application program of the Primary.
Updating Section
Data in an
Application
Program
148
All data of a section will be fully updated during every scan if the data in the Standby
is equal to the counterpart data on the Primary. Section data will not be updated if it
is not equal to its counterpart on the Primary.
If the sections are equal on the Primary and the Standby, the section data that is
updated is:
z Internal states of Elementary Function Blocks (EFBs) used in the section
For example, Timers, Counters, PID
z All Derived Function Block (DFB)-Instance data blocks of each DFB instantiated
in the section including nested DFBs.
Logic Mismatch
Updating Global
Data in an
Application
Program
With the Logic Mismatch enabled, application program global data will be updated
with every scan. Global data that does not exist on both controllers is not updated.
The application program’s updated global data includes both:
1. All declared variables in the Variable-Editor.
2. All section and transition variables.
The process of updating the application program global data in a Hot Standby
system affects:
z Declared variables
All declared variable will be updated on every scan as long as they are declared
on both controllers.
z Updating Standby
If a complete application program transfer is done to the controller that did not
receive the modified changes, then both controllers will have equal application
programs, and the Standby controller is fully updated.
z Deleted and redeclared variables
If, due to a modification, a global variable has been deleted first, and then
redeclared, this variable would be treated as a NEW variable, even if the same
name is used. The update procedure must be followed to bring the controllers to
an equalized state.
Note: GLOBAL DATA VARIABLES
The system reserves space for these variables whether they are used in the
controller’s application program or not.
Unused variables consume space and require time to be transferred from the
Primary to the Standby. Therefore, in the Primary’s application program, Schneider
Electric does not recommend using variables that are defined but not used.
149
Logic Mismatch
Understanding Switchover Behavior during Logic Mismatch
Modifying the
Application
Variables
150
If a switchover occurs during logic mismatch, the new Primary will execute its own
application program with the data received from the other controller.
Depending on the modification, different behaviors occur:
Modification
Effect
Only code changed (same variables).
All the variables exchanged between the
controllers are equal.
Variables added to the initial Primary
Variables are not used by the new Primary.
Variables deleted from the initial Primary
New Primary executes application program
using the latest values for these variables.
Variables added to the initial Standby
New Primary executes application program
using initial values for these variables.
Variables deleted from the initial Standby
New Primary will not use these variables
Logic Mismatch
Modifying an
SFC Section with
Unity Pro
The SFC code-generation process does not generate direct executable code but
generates a set of data used by the SFC interpreter in the controller’s OS to compute
the next state.
As with Concept, Unity Pro
z does not maintain the equality between the two application programs when a
modification of a SFC section occurs
z does execute an SFC section by restarting the controller from its initial state after
a switchover
When a SFC section is modified in the Primary, its data are not transferred to the
Standby. When a transfer of logic occurs from the Primary to the Standby, the first
section of the logic is diagnostic information.
Note: SFC Programming Language
Schneider Electric recommends not using the SFC programming language.
WARNING
SWITCHOVER HAZARD
If switchover occurs when the Run mode is selected and there is a logic
mismatch between the two controllers, the Standby assumes Primary
responsibilities and starts solving a different application program from
the previous Primary.
z After completing modifications, perform application program transfer
to ensure controllers contain the same application and remove logic
mismatch.
Failure to follow this precaution can result in death, serious injury,
or equipment damage.
151
Logic Mismatch
Online or Offline Modifications and Logic Mismatch
Modifying
Application
Programs
Normally, once a fault-tolerant redundant system is configured, programmed, and
controlling its process, the system is not shut down—not even for periodic
maintenance. However, there may be situations when you may need to make
modifications to the application program and continue to control the process.
The logic mismatch feature allows you to modify application programs online or
offline while controlling the process.
WARNING
IMMEDIATE CONTROL OF PROCESS
Once a new application program is switched to the Standby, the
Standby takes control of the process.
z Ensure that you understand the
1. operation of your process
2. modifications made
z Monitor all modifications to the application program
Failure to follow this precaution can result in death, serious injury,
or equipment damage.
152
Logic Mismatch
Online Modifications to an Application Program in the Standby and
Logic Mismatch
Executing the
Procedure
To make online modifications to an application program (logic program or project) in
the Standby controller, follow these steps.
Step
Important
Reference
Action
1
Ensure both Primary and Standby controllers are in Run Primary and Run
Standby mode.
2
Connect to the Primary controller and access the Command Register system bit
%SW60.3.
3
Set to 1 the Command Register system bit %SW60.3
4
Connect to the Standby controller.
5
Modify online the application program.
6
After completing the modifications, perform Build Project.
7
Ensure both Primary and Standby controllers are in Run Primary and Run
Standby mode.
8
Perform a switchover. (See Switchover Methods and Logic Mismatch, p. 157)
Note: Standby will change to Primary.
9
Perform application transfer to Standby. Application Program Transfer Method
and Logic Mismatch, p. 159
10
Connect to the new Primary controller and access the Command Register
system bit%SW60.3.
11
Set to 0 the Command Register system bit %SW60.3
Note: Command Register is returned to 0 from 1.
(See Recommendations for Using Logic Mismatch, p. 160)
153
Logic Mismatch
Online Modifications to an Application Program in the Primary and Logic
Mismatch
Executing the
Procedure
To make online modifications to an application program (logic program or project) in
the Primary controller, follow these steps.
Step
Important
Reference
154
Action
1
Ensure both Primary and Standby controllers are in Run Primary and Run
Standby mode.
2
Connect to the Primary controller and access the Command Register system bit
%SW60.3.
3
Set to 1 the Command Register system bit %SW60.3
4
Modify online the application program.
5
After completing the modifications, perform Build Project.
6
Ensure both Primary and Standby controllers are in Run Primary and Run
Standby mode.
7
Perform an application transfer to the Standby. Application Program Transfer
Method and Logic Mismatch, p. 159
8
Connect to the new Primary controller and access the Command Register
system bit %SW60.3.
9
Set to 0 the Command Register system bit %SW60.3
Note: Command Register is returned to 0 from 1.
(See Recommendations for Using Logic Mismatch, p. 160)
Logic Mismatch
Offline Modification of an Application Program and Logic Mismatch
Executing the
Procedure
To make offline modifications to an application program in either controller, follow
these steps.
Step
Important
Reference
Action
1
Modify offline the application program.
2
After completing the modifications, perform Build Project and save.
Note: Do NOT use the Rebuild All Project option because using Rebuild
All Project will cause the Standby to go offline when the application program
is downloaded.
3
Ensure both Primary and Standby controllers are in Run Primary and Run
Standby mode.
4
Connect to the Primary controller and access the Command Register system bit
%SW60.3.
5
Set to 1 the Command Register system bit %SW60.3
6
Open the modified program and connect to the Standby controller.
7
Download the program and select RUN.
Note: Check your controller’s state and ensure state is Run | Standby.
8
Ensure both Primary and Standby controllers are in Run Primary and Run
Standby mode.
9
Perform a switchover. (See Switchover Methods and Logic Mismatch, p. 157)
Note: Ensure Standby switched to Primary.
10
Perform application transfer to Standby. Application Program Transfer Method
and Logic Mismatch, p. 159
11
Connect to the new Primary controller and access the Command Register
system bit %SW60.3.
12
Set to 0 the Command Register system bit %SW60.3
Note: Command Register is returned to 0 from 1.
(See Recommendations for Using Logic Mismatch, p. 160)
155
Logic Mismatch
Important
WARNING
IMMEDIATE CONTROL OF PROCESS
Once a new application program is switched to the Standby, the
Standby takes control of the process.
z Ensure that you understand the
1. operation of your process
2. modifications made
z Monitor all modifications to the application program
Failure to follow this precaution can result in death, serious injury,
or equipment damage.
156
Logic Mismatch
Switchover Methods and Logic Mismatch
General
Switchover can be performed using one of two methods:
z Hot Standby submenu on the front panel keypad
z Command Register either system bit %SW60.1 or %SW60.2
Switchover
Using Front
Panel Keypad
To force a switchover using the front panel keypad, do the following:
Important for
Command
Register
Switchover
Step
1
Action
Access the front panel keypad of the Primary controller.
2
Go to PLC Operation menu.
3
Go to Hot Standby submenu.
4
Go to Hot Standby mode
5
Modify Run to Offline.
Note: Ensure that Standby switched to Primary.
6
Modify offline to run.
Note: Ensure that the LCD displays Run Standby.
To perform the switchover using Command Register system bit %SW60.1 or
%SW60.2, ensure that following are considered:
z application program is saved twice. Each save uses a different file name.
z file 1
Saved before modification
z file 2
Saved after modification
z order of the controller is [(A) or (B)]; use one of two methods:
z Hot Standby submenu on the front panel keypad (PLC Operation | Hot
Standby | Hot Standby Order).
z Unity Pro status dialog (refer to the bottom of the Unity Pro window when
connected online)
157
Logic Mismatch
Switchover
Using Command
Register System
Bit %SW60.1 or
%SW60.2
To force a switchover by setting the bits in the Command Register, do the following:
Step
1
Open file 1.
2
Connect to the Primary.
3
Ensure the controller order of the Primary is A or B.
4
Access
z Command Register system bit %SW60.1
If the connected controller order is A.
z Command Register system bit %SW60.2
If the connected controller order is B.
5
Set bit to 0.
Note: Ensure that the Standby switched to Primary.
6
Open file 2.
7
Connect to the new Primary controller.
8
Access the Command Register system bit used in Step 4.
9
Set bit to 1.
Note: Ensure Standby controller is now online.
10
158
Action
Ensure both Primary and Standby controllers are in Run Primary and Run
Standby mode.
Logic Mismatch
Application Program Transfer Method and Logic Mismatch
General
Application Program Transfer can be performed using one of two methods:
z Hot Standby submenu on the front panel keypad
z Command Register system bit %SW60.5
Application
Program
Transfer Using
Front Panel
Keypad
To transfer an application program (logic program or project) to either the Primary
or Standby controller using the front panel keypad, do the following>
Application
Program
Transfer Using
Command
Register System
Bit %SW60.5
Step
1
Action
Access the front panel keypad of any controller (Primary or Standby)
2
Go to PLC Operations menu
3
Go to Hot Standby submenu
4
Go to Hot Standby transfer and press ENTER to confirm the transfer.
Note: Ensure transfer to Standby occurs.
To transfer an application program (logic program or project) to either the Primary
or Standby controller using Command Register system bit %SW60.5, do the
following.
Step
Action
1
Connect to the Primary controller.
2
Access Command Register system bit %SW60.5.
3
Set bit to 1.
Note: The process of setting the bit toggles the bit from 0 to 1 and back to 0.
159
Logic Mismatch
Recommendations for Using Logic Mismatch
General
When using the Logic Mismatch feature, Schneider Electric recommends noting that
the following are affected
z Upload Information Management
z Online modifications to the Standby
z Application Program Transfer
z Setting the Command Register system bit %SW60.3
Upload
Information
Management
Feature—
General
During online modifications, your system detects that the application-program
information in the controller differs from the application-program information in the
computer. Because this information will be used later when an upload is performed,
the system requires you to update this information and constantly presents a
confirmation dialog. To avoid constant display of the dialog, use the Upload
Information Management feature.
Using the Upload
Information
Management
Feature
Before doing any modifications and at the initial start up of your system, do the
following:
Handling Online
Modifications to
the Standby
Step
Action
1
From the menu, select Tools | Option.
2
In the Options window, select the General tab (default).
3
Select Automatic in the Upload Information Management area.
4
Press OK to close the window.
5
Save the program and download to the controller.
For major modifications to the application program on the Standby, ensure the
Standby is in offline mode.
Two benefits result from this action:
z Run process continues
z Primary does NOT perform a switchover during modification of the Standby
Note: SWITCHOVER DURING MODIFICATION
If the Standby is online during modifcations, there is a possibilty of switchover
occuring. If a switchover occurs, the Standby becomes Primary, and the process
may run with incomplete modifications.
160
Logic Mismatch
Performing
Application
Program
Transfer
When performing an application program transfer, you want to avoid the possibility
of having two different application programs running in the Primary and Standby.
Resetting
Command
Register System
Bit %SW60.3
When resetting the Command Register system bit %SW60.3 to 0, you want to avoid
the possibility of having two different application programs running in the Primary
and Standby.
Step
1
Step
Action
Perform Application program transfers after completing online modifications with
Logic Mismatch.
Action
1
Connect to Primary.
2
Access the Command Register system bit %SW60.3.
3
Reset bit to 0.
161
Logic Mismatch
162
Transferring an Application
Program with Unity Pro
9
Introduction
Overview
This chapter provides information about the Application Program Transfer feature
that enables you to configure the Standby controller from the Primary controller.
What's in this
Chapter?
This chapter contains the following topics:
Topic
Page
Overview of Application Program Transfer
164
Executing the Application Program Transfer Procedure Using the Command
Register
166
Automatic Application Program Transfer
167
Executing the Application Program Transfer Procedure Using the Keypad
168
163
Application Program Transfer
Overview of Application Program Transfer
Overview
The Application Program Transfer feature provides you with the ability to configure
the Standby from the Primary controller.
Use this feature when you reprogram the Primary controller or replace the Standby
controller because the process copies the full application program of the Primary to
the Standby. This feature not only saves time but ensures that the controllers have
identical configurations.
The system transfers the application program over the dedicated Modicon Quantum
Hot Standby with Unity communications link. In a redundant system, this link
connects the two Copros.
Methods of
Transferring
Programs
Application transfer is always from the Primary to the Standby. There are three
methods of transferring application programs:
z Hot Standby submenu on the front panel keypad
z Command Register system bit %SW60.5
z Automatic transfer (Occurs when you start a Hot Standby system for the first
time.) Therefore, the Primary automatically transfers the application program to
the Standby. (See Automatic Application Program Transfer, p. 167)
Validating
Transfer
The Standby validates the transferred application program. After validating, the
Standby starts automatically.
Understanding
Transfer Time
Application Program Transfer time depends on the size of the application program,
the larger the program, the longer the time. Application Program Transfer takes a
few seconds.
Note: During application program transfer, the system can no longer be considered
redundant.
If the Primary should fail before the Standby is ready to assume the role of Primary,
there is no Standby available.
Updating from
the Primary
An application program update may only be performed from the Primary to the
Standby.
Note: UPDATING STANDBYS
The Standby controller cannot update the Primary.
164
Application Program Transfer
Understanding
Transfer Size
Limits
Note: CHANGING FROM LEGACY
Legacy Modicon Quantum controllers running Concept have an Application
Program Transfer limit of 1 megabyte.
In the Modicon Quantum Hot Standby with Unity 140 CPU 671 60 transfer size
depends on the configuration. For example, using a card bridge you may transfer
up to 7 Mb.
Therefore, transfer the complete application program regardless of the size. This
transfer takes place over multiple scans, thus will be broken up into multiple transfer
packets.
165
Application Program Transfer
Executing the Application Program Transfer Procedure Using the Command
Register
Overview
To transfer, use the command register in the Unity Pro software tools. The Primary
copies the complete application program and data to the Standby.
Transferring the
Application
Program Using
Command
Register System
Bit %SW60.5
To transfer an application program (logic program or project) to either the Primary
or Standby controller using Command Register system bit %SW60/5, do the
following.
166
Step
Action
1
Connect to the Primary controller.
2
Access Command Register system bit %SW60.5.
3
Set bit to 1.
Note: The process of setting the bit toggles the bit from 0 to 1 and back to 0.
Application Program Transfer
Automatic Application Program Transfer
Overview
New in a Modicon Quantum Hot Standby system with Unity is automatic application
program transfer.
As soon as a Primary controller detects a blank controller, the Primary transfers the
program to the blank controller, which becomes the Standby. After application
program transfer both controllers have identical application programs.
This new feature works well when two controllers are at a maximum of 2 Km apart.
Note: Same Configuration
The controllers need to have the same configuration (with the same PCMCIA cards
or without cards).
167
Application Program Transfer
Executing the Application Program Transfer Procedure Using the Keypad
Overview
For specifics on setting Modicon Quantum Hot Standby with Unity state, mode,
order, and transfer from the keypad, see Configuring a Modicon Quantum Hot
Standby with Unity System, p. 69.
Using the
Keypad
To transfer, use the front panel keypad on the controller unit (Primary or Standby).
The Primary copies the complete application program and data to the Standby.
Note: CHANGING FROM LEGACY
In legacy Quantum Hot Standby systems, an application program transfer could be
performed ONLY on the Standby controller.
The Standby requested from the Primary an application transfer. The process was
performed on the CHS module and required setting the key in the Xfer key position
while pushing the update button.
In Modicon Quantum Hot Standby with Unity, an application transfer is performed
either
z using the command register
An application program transfer can be performed at any time.
z automatically
Transfer occurs first time Primary finds an empty Standby
z using the keypad
Use either the Primary or Standby.
Transferring the
Application
Program
168
The following table shows the Application Program Transfer Procedure.
Step
Action
1
Ensure the Primary Controller is in RUN PRIMARY mode.
Result: The LCD on the PLC will display the mode as RUN PRIMARY.
2
Check that both
1. Invalidate Keypad option is NOT selected
2. the key switch is unlocked
3
Go to the submenu Hot Standby | Transfer.
4
Push Enter to execute the application program transfer from the Primary to the
Standby.
5
Note: The Hot Standby | Transfer command can be performed either in the
Primary or Standby controller, BUT only the Standby controller will be updated.
Application Program Transfer
Identical
Configurations
and Application
Programs
After the transfer, the Primary and Standby have identical configurations and
application programs.
In the event of a failure in the Primary and depending on the mode selected for the
Standby (Run or Offline), the Standby may or may not be ready to assume the role
of Primary.
169
Application Program Transfer
170
Using the Modicon Quantum Hot
Standby with Unity EFBs
10
Introduction
Overview
This chapter describes the Modicon Quantum Hot Standby with Unity elementary
function blocks (EFBs)
z
z
z
z
What's in this
Chapter?
HSBY_RD
HSBY_ST
HSBY_WR
REV_XFER
This chapter contains the following topics:
Topic
Page
Description: HSBY_RD
172
Description: HSBY_ST
175
Description: HSBY_WR
178
Description: REV_XFER
181
171
Using Modicon Quantum Hot Standby with Unity HSBY EFBs
Description: HSBY_RD
Function
description
This EFB allows you to use the Hot Standby function. It searches (together with
other EFBs in the Hot Standby family) the configuration of the respective
Quantum PLC for the required components. These components always refer to
hardware that is actually connected.
Therefore the correct behavior of this EFB on the simulators cannot be guaranteed.
The HSBY_RD EFB independently checks if a Hot Standby configuration exists.
(%SW60). If a configuration is present the contents of the command register are given
and the HSBY output is set to "1". If there is no Hot Standby configuration present
the HSBY_ConfigurationFound output is set to "0".
EN and ENO can be configured as additional parameters.
Representation
in FBD
Representation:
HSBY_RD_Instance
HSBY_RD
HSBY
INV_KEY
PCA_RUN
PCB_RUN
SBY_OFF
EXC_UPD
SWP_MB1
SWP_MB2
SWP_MB3
172
HSBY_ConfigurationFound
InvalidateKeypad
PLC_A_Running
PLC_B_Running
StandbyOff
ExecUpdate
SwapAddressModbusPort1
Using Modicon Quantum Hot Standby with Unity HSBY EFBs
Representation
in LD
Representation:
HSBY_RD_Instance
HSBY_RD
EN
ENO
HSBY_ConfigurationFound
HSBY
InvalidateKeypad
INV_KEY
PLC_A_Running
PCA_RUN
PLC_B_Running
PCB_RUN
StandbyOff
SBY_OFF
ExecUpdate
EXC_UPD
SwapAddressModbusPort1
SWP_MB1
SWP_MB2
SWP_MB3
Representation
in IL
Representation:
Representation
in ST
Representation:
CAL HSBY_RD_Instance (HSBY=>HSBY_ConfigurationFound,
INV_KEY=>InvalidateKeypad, PCA_RUN=>PLC_A_Running,
PCB_RUN=>PLC_B_Running, SBY_OFF=>StandbyOff,
EXC_UPD=>ExecUpdate, SWP_MB1=>SwapAddressModbusPort1)
HSBY_RD_Instance (HSBY=>HSBY_ConfigurationFound,
INV_KEY=>InvalidateKeypad, PCA_RUN=>PLC_A_Running,
PCB_RUN=>PLC_B_Running, SBY_OFF=>StandbyOff,
EXC_UPD=>ExecUpdate,
SWP_MB1=>SwapAddressModbusPort1);
173
Using Modicon Quantum Hot Standby with Unity HSBY EFBs
Parameter
description
Description of the output parameters:
Parameter
Data type
Meaning
HSBY
BOOL
"1" = Hot Standby configuration found
INV_KEY
BOOL
"1" = The submenu for the Hot Standby PLC button
is disabled.
PCA_RUN
BOOL
"1" = The PLC with the Hot Standby CPU
1. function is "A" on local rack
2. Command Register is selected RUN
"0" = The PLC with the Hot Standby CPU
1. function is "A" on local rack
2. Command Register is selected OFFLINE
PCB_RUN
BOOL
"1" = The PLC with the Hot Standby CPU
1. function is "B" on local rack
2. Command Register is selected RUN
"0" = The PLC with the Hot Standby CPU
1. function is "B" on local rack
2. Command Register is selected OFFLINE
174
SBY_OFF
BOOL
"1" = The standby PLC switches to the offline mode
as soon as both PLCs receive a different program.
EXC_UPD
BOOL
"1" = Exec-(Operating system-)Update in the
Standby-PLC is possible with the primary PLC still
running.
(After Exec-Update the standby PLC changes back
to the online mode.)
SWP_MB1
BOOL
If a switchover has occurred,
"1" = No Swap address of Modbus ports 1.
"0" = Swap address of Modbus ports 1.
SWP_MB2
BOOL
Not used. Reserved
SWP_MB3
BOOL
Not used. Reserved
Using Modicon Quantum Hot Standby with Unity HSBY EFBs
Description: HSBY_ST
Function
description
This EFB allows you to use the Hot Standby function. It searches (together with
other procedures in the Hot Standby family) the configuration of the respective
Quantum PLC for the required components. These components always refer to
hardware that is actually connected.
Therefore the correct behavior of this EFB on the simulators cannot be guaranteed.
The EFB is used to read the IEC Hot Standby status register (%SW61). If there is no
Hot Standby configuration present the HSBY output is set to "0".
EN and ENO can be configured as additional parameters.
Representation
in FBD
Representation:
HSBY_ST_Instance
HSBY_ST
HSBY
THIS_OFF
THIS_PRY
THIS_SBY
REMT_OFF
REMT_PRY
REMT_SBY
LOGIC_OK
THIS_ISA
THIS_ISB
HSBY_ConfigurationFound
PLC_Offline
Primary_PLC
Standby_PLC
Remote_PLC_Offline
PrimaryRemote_PLC
StandbyRemote_PLC
IdenticalPrograms
HSBY_ModuleSwitchA
HSBY_ModuleSwitchB
175
Using Modicon Quantum Hot Standby with Unity HSBY EFBs
Representation
in LD
Representation:
HSBY_ST_Instance
HSBY_ST
EN
ENO
HSBY_ConfigurationFound
HSBY
PLC_Offline
THIS_OFF
Primary_PLC
THIS_PRY
Standby_PLC
THIS_SBY
Remote_PLC_Offline
REMT_OFF
PrimaryRemote_PLC
REMT_PRY
StandbyRemote_PLC
REMT_SBY
IdenticalPrograms
LOGIC_OK
HSBY_ModuleSwitchA
THIS_ISA
HSBY_ModuleSwitchB
THIS_ISB
Representation
in IL
176
Representation:
CAL HSBY_ST_Instance (HSBY=>HSBY_ConfigurationFound,
THIS_OFF=>PLC_Offline, THIS_PRY=>Primary_PLC,
THIS_SBY=>Standby_PLC,
REMT_OFF=>Remote_PLC_Offline,
REMT_PRY=>PrimaryRemote_PLC,
REMT_SBY=>StandbyRemote_PLC,
LOGIC_OK=>IdenticalPrograms,
THIS_ISA=>HSBY_ModuleSwitchA,
THIS_ISB=>HSBY_ModuleSwitchB)
Using Modicon Quantum Hot Standby with Unity HSBY EFBs
Representation
in ST
Representation:
Parameter
description
Description of output parameters:
HSBY_ST_Instance (HSBY=>HSBY_ConfigurationFound,
THIS_OFF=>PLC_Offline, THIS_PRY=>Primary_PLC,
THIS_SBY=>Standby_PLC,
REMT_OFF=>Remote_PLC_Offline,
REMT_PRY=>PrimaryRemote_PLC,
REMT_SBY=>StandbyRemote_PLC,
LOGIC_OK=>IdenticalPrograms,
THIS_ISA=>HSBY_ModuleSwitchA,
THIS_ISB=>HSBY_ModuleSwitchB);
Parameter
Data type
Meaning
HSBY
BOOL
"1" = Hot Standby configuration found
THIS_OFF
BOOL
"1" = This PLC is offline
THIS_PRY
BOOL
"1" = This PLC is the primary PLC
THIS_SBY
BOOL
"1" = This PLC is the standby PLC
REMT_OFF
BOOL
"1" = The other (remote) PLC is offline
REMT_PRY
BOOL
"1" = The other PLC is the primary PLC
REMT_SBY
BOOL
"1" = The other PLC is the standby PLC
LOGIC_OK
BOOL
"1" = The programs for both PLCs are identical and
Logic Mismatch is active.
THIS_ISA
BOOL
"1" = This PLC chose the CPU with the lower IP
address between both Hot Standby CPUs. This is
the Hot Standby CPU "A".
THIS_ISB
BOOL
"1" = This PLC chose the CPU with the higher IP
address between both Hot Standby CPUs. This is
the Hot Standby CPU "B".
177
Using Modicon Quantum Hot Standby with Unity HSBY EFBs
Description: HSBY_WR
Function
description
This EFB allows you to use the Hot Standby function. It searches (together with
other EFBs in the Hot Standby family) the configuration of the respective
Quantum PLC for the required components. These components always refer to
hardware that is actually connected.
Therefore the correct behavior of this EFB on the simulators cannot be guaranteed.
The EFB HSBY_WR is used to set different Hot Standby Modes permitted for Hot
Standby. Setting the respective modes means a change in the Hot Standby
command register (%SW60), which is carried out automatically by the function block.
If there is no Hot Standby configuration, the HSBY_ConfigurationFound output
is set to "0", otherwise it is set to "1".
Note: This function only affects the primary CPU.
EN and ENO can be configured as additional parameters.
Representation
in FBD
Representation:
HSBY_WR_Instance
HSBY_WR
InvalidateKeypad
PLC_A_Running
PLC_B_Running
SwapAddressModbusPort1
INV_KEY
PCA_RUN
PCB_RUN
SWP_MB1
SWP_MB2
SWP_MB3
178
HSBY
HSBY_ConfigurationFound
Using Modicon Quantum Hot Standby with Unity HSBY EFBs
Representation
in LD
Representation:
HSBY_WR_Instance
HSBY_WR
EN
ENO
InvalidateKeypad
HSBY_ConfigurationFound
INV_KEY
HSBY
PLC_A_Running
PCA_RUN
PLC_B_Running
PCB_RUN
SwapAddressModbusPort1
SWP_MB1
SWP_MB2
SWP_MB3
Representation
in IL
Representation:
Representation
in ST
Representation:
CAL HSBY_WR_Instance (INV_KEY:=InvalidateKeypad,
PCA_RUN:=PLC_A_Running, PCB_RUN:=PLC_B_Running,
SWP_MB1:=SwapAddressModbusPort1,
HSBY=>HSBY_ConfigurationFound)
HSBY_WR_Instance (INV_KEY:=InvalidateKeypad,
PCA_RUN:=PLC_A_Running, PCB_RUN:=PLC_B_Running,
SWP_MB1:=SwapAddressModbusPort1,
HSBY=>HSBY_ConfigurationFound);
179
Using Modicon Quantum Hot Standby with Unity HSBY EFBs
Parameter
description
Description of the input parameters:
Parameter
Data type
Meaning
INV_KEY
BOOL
In the submenu for the Hot Standby PLC button
"1" = Changes are disabled.
"0" = Changes are allowed.
PCA_RUN
BOOL
"1 -> 0" = The Hot Standby CPU with ‘A’ function on
the local rack is forced into OFFLINE mode.
"0 -> 1" = The Hot Standby CPU with "A" function is
forced into RUN mode if its own button mode is in
RUN mode.
PCB_RUN
BOOL
"1 -> 0" = The Hot Standby CPU with "B" function on
the local rack is forced into OFFLINE mode.
"0 -> 1" = The Hot Standby CPU with the "B" function
is forced into RUN mode if its own button mode is in
RUN mode.
SWP MB1
BOOL
"0" and a switchover happened: The Modbus
address on port 1 of the NEW primary PLC changes.
z new primary PLC address = old primary address
z new standby PLC address = new primary
address + 128.
"1" and a switchover happened: The Modbus
address on Port 1 of the PLC don’t changes.
z new primary PLC address = old primary address
z new standby PLC address = old primary address
SWP_MB2
BOOL
Not used. Reserved
SWP MB3
BOOL
Not used. Reserved
Description of the output parameters:
180
Parameter
Data type
Meaning
HSBY
BOOL
"1" = Hot Standby configuration found.
Using Modicon Quantum Hot Standby with Unity HSBY EFBs
Description: REV_XFER
Function
description
This EFB allows you to use the Hot Standby function. It searches (together with
other EFBs in the Hot Standby family) the configuration of the respective
Quantum PLC for the required components. These components always refer to
hardware that is actually connected.
Therefore the correct behavior of this EFB on the simulators cannot be guaranteed.
The EFB REV_XFER provides the option of transferring two 16 bit words from the
standby PLC to the primary PLC. The two registers transferred by this procedure are
%SW62 and %SW63.
REV_XFER must be called up absolutely in the first section of the project executed.
The parameter addresses TO_REV1 and TO_REV2 must be in the non-transfer area
to prevent an overwriting by the Primary PLC.
Note: In the old (Concept) Hot Standby System these two registers (Reverse
Transfer Registers) are the first addresses in the non-transfer area.
As additional parameters, EN and ENO are projected.
Appearance in
FBD
Appearance:
REV_XFER_Instance
REV_XFER
Standby_PLC_FirstReg
Standby_PLC_SecondReg
TO_REV1
TO_REV2
PRY
SBY
FR_REV1
HSBY_ConfFlag
Primary_PLC_Flag
Standby_PLC_Flag
FirstRevTransReg
FR_REV2
SecondRevTransReg
HSBY
181
Using Modicon Quantum Hot Standby with Unity HSBY EFBs
Appearance in
LD
Appearance:
REV_XFER_Instance
REV_XFER
EN
ENO
HSBY_ConfFlag
Standby_PLC_FirstReg
TO_REV1
HSBY
Standby_PLC_SecondReg
TO_REV2
PRY
Primary_PLC_Flag
Standby_PLC_Flag
SBY
Appearance in IL
FR_REV1
FirstRevTransReg
FR_REV2
SecondRevTransReg
Appearance :
CAL REV_XFER_Instance (TO_REV1:=Standby_PLC_FirstReg,
TO_REV2:=Standby_PLC_SecondReg, HSBY=>HSBY_ConfFlag,
PRY=>Primary_PLC_Flag, SBY=>Standby_PLC_Flag,
FR_REV1=>FirstRevTransReg,
FR_REV2=>SecondtRevTransReg)
Appearance in
ST
182
Appearance:
REV_XFER_Instance (TO_REV1:=Standby_PLC_FirstReg,
TO_REV2:=Standby_PLC_SecondReg, HSBY=>HSBY_ConfFlag,
PRY=>Primary_PLC_Flag, SBY=>Standby_PLC_Flag,
FR_REV1=>FirstRevTransReg,
FR_REV2=>SecondtRevTransReg);
Using Modicon Quantum Hot Standby with Unity HSBY EFBs
Parameter
description
Description of input parameters:
Parameter
Data type
Description
TO_REV1
INT
Describes the first reverse transfer register if this
PLC is the standby PLC.
TO_REV2
INT
Describes the second reverse transfer register if this
PLC is the standby PLC.
Description of the output parameters:
Parameter
Data type
Meaning
HSBY
BOOL
1= Hot Standby configuration
PRY
BOOL
1 = This PLC is the primary PLC.
SBY
BOOL
1 = This PLC is the standby PLC.
FR_REV1
INT
Content of first reverse transfer register (%SW62).
Output only if HSBY is "1".
FR_REV2
INT
Content of second reverse transfer register
(%SW63). Output only if HSBY is "1".
183
Using Modicon Quantum Hot Standby with Unity HSBY EFBs
184
Appendices
Appendices for Quantum Hot Standby Planning and Installation Guide
At a Glance
The appendices for the Quantum Hot Standby Planning and Installation Guide are
included here.
What's in this
Appendix?
The appendix contains the following chapters:
Chapter
A
Chapter Name
Modicon Quantum Hot Standby with Unity Additional Information
Page
187
185
Appendices
186
Modicon Quantum Hot Standby
with Unity Additional Information
A
Introduction
Overview
This chapter describes the necessary cables, design specifications, error codes.
What's in this
Chapter?
This chapter contains the following topics:
Topic
Page
Fiber Optic Cable
188
140 CPU 671 60 Specifications for Modicon Quantum Hot Standby with Unity
189
CRP Remote I/O Head Processor Error Patterns
191
TextIDs
193
187
Additional Information
Fiber Optic Cable
Schneider
Electric
Recommends
Cables Available
188
Recommendations
1
Use up to 2 km of 62.5/125 μm graded index, duplex, multimode glass fiber for all
applications because of the relatively low loss of signal and signal distortion.
Note: Most 62.5/125 μm cables are rated at 3.5 dB loss per km.
2
Use a 3 mm diameter cable for your Modicon Quantum Hot Standby with Unity
system.
Note: The fiber cable clasps used to maneuver the cable into the ports are
designed to be used with 3 mm cable.
3
Select the cable that meets the demands of your application.
4
Wherever possible, use a multiconductor cable since the cable is inexpensive and
provides a backup in case the cable is cut in the process of pulling.
From Schneider Electric
Part Number
Maximum Length
490 NOR 000 03
3 meters
490 NOR 000 05
5 meters
490 NOR 000 15
15 meters
Additional Information
140 CPU 671 60 Specifications for Modicon Quantum Hot Standby with Unity
Module
Specifications
Component
Description
Communication ports
1 Modbus (RS-232/RS-485)
1 Modbus Plus (RS-485)
1 USB
1 Ethernet (used as HSBY port)
Bus current required
1800 mA
Max. number of NOM, NOE, CRP 811 and
MMS modules supported (any combination)
6
Key switch
Yes
Keypad
Yes
Feature
Description
Model
Pentium
Clock speed
266 MHz
Processor
Coprocessor
Yes, Built-in Ethernet
Watchdog timer
250 ms S/W adjustable
Memory
Reference
Capacity
RAM
Description
768 kbytes
memory for on board program and unlocated
data, extensible to 7,168 Mb by PCMCIA
128 kbytes
max memory for configuration
64 kwords
memory for located data (state RAM)
8.192 kbytes
PCMCIA extension for data storage
Discrete (bits)
64 k (any combination)
Registers (words)
64 k max.
189
Additional Information
Remote I/O
Max. I/O words/drop
64 in / 64 out*
Max. number of remote drops
31
*
Battery and
Clock
This information can be a mix of discrete or register I/O. For each word of configured I/O,
one of the I/O words must be subtracted from the total available.
Battery type
3 V Lithium
Service life
1200 mAh
Shelf life
10 years with 0.5% loss of capacity/year
Battery load current @ power-off
typical: 14 μA
max. 420 μA
TOD clock
+/-8.0 s/day @ 0 ... 60 °C
Diagnostic
190
Power-up
RAM
RAM address
Executive Checksum
User Logic Check
Processor
Run Time
RAM
RAM address
Executive Checksum
User Logic Check
Additional Information
CRP Remote I/O Head Processor Error Patterns
Error Patterns
The following table displays both
z number of times the Com Act indicator blinks for each type of error
z possible codes for each type of blink
191
Additional Information
All codes are in hex.
Number of blinks on
Com Act Indicator
Code in hex
Error
Slow (steady)
0000
requested kernel mode
2
6820
hcb frame pattern error
6822
head control block diag error
6823
mod personality diag error
682A
fatal start IO error
bad read IO pers request
682C
bad execute diag request
6840
ASCII input xfer state
6841
ASCII output xfer state
6842
IO input comm state
6843
IO output comm state
6844
ASCII abort comm state
6845
ASCII pause comm state
6846
ASCII input comm state
6847
ASCII output comm state
6849
building 10 byte packet
684A
building 12 byte packet
684B
building 16 byte packet
684C
illegal IO drop number
3
6729
984 interface bus ack stuck high
4
6616
coax cable initialization error
6617
coax cable dma xfer error
6619
coax cable dumped data error
681A
coax cable DRQ line hung
681C
coax cable DRQ hung
5
6503
RAM address test error
6
6402
RAM data test error
7
6300
PROM checksum error (exec not loaded)
6301
PROM checksum error
8001
kernel PROM checksum error
8
192
682B
8002
flash prog / erase error
8003
unexpected executive return
Additional Information
TextIDs
TextIDs
TextIds define the warning messages written in the diagnostic buffer.
TextIDs switching from Primary to Offline
TextID
Warning message
13001
System halt
13002
Remote IO failure
13003
ETH device failure
13004
ETH communication problem
13005
Stop PLC command
13006
Offline keypad switch
13007
Offline Command register request
TextIDs switching from Standby to Offline
TextID
Warning message
13008
System halt
13009
Remote IO failure
13010
ETH device failure
13011
ETH communication problem
13012
Stop PLC command
13013
Offline keypad switch
13014
Offline Command register request
TextIDs switching from Standby to Primary
TextID
Warning message
13015
Control command over ETH
13016
Control command over RIO
TextIDs switching from Offline to Primary/Standby
TextID
Warning message
13017
Switch from Offline to Primary
13018
Switch from Offline to Standby BY
193
Additional Information
194
Glossary
!
%I
According to the IEC standard, %I indicates a discrete input-type language object.
%IW
According to the IEC standard, %IW indicates an analog input -type language object.
%KW
According to the IEC standard, %KW indicates a constant word-type language object.
%M
According to the IEC standard, %M indicates a memory bit-type language object.
%MW
According to the IEC standard, %MW indicates a memory word-type language object.
%Q
According to the IEC standard, %Q indicates a discrete output-type language object.
%QW
According to the IEC standard, %QW indicates an analog output-type language
object.
A
ADDR_TYPE
This predefined type is used as output for ADDR function. This type is ARRAY[0..5]
OF Int. You can find it in the libset, in the same family than the EFs which use it.
ANL_IN
ANL_IN is the abbreviation of Analog Input data type and is used when processing
analog values. The %IW adresses for the configured analog input module, which
were specified in the I/O component list, are automatically assigned data types and
should therefore only be occupied with Unlocated Variables.
195
Glossary
ANL_OUT
ANL_OUT is the abbreviation of Analog Output data type and is used when
processing analog values. The %MW adresses for the configured analog input
module, which were specified in the I/O component list, are automatically assigned
data types and should therefore only be occupied with Unlocated Variables.
ANY
There is a hierarchy between the different types of data. In the DFB, it is sometimes
possible to declare which variables can contain several types of values. Here, we
use ANY_xxx types.
The following diagram shows the hierarchically-ordered structure:
ANY
ANY_ELEMENTARY
ANY_MAGNITUDE_OR_BIT
ANY_MAGNITUDE
ANY_NUM
ANY_REAL
REAL
ANY_INT
DINT, INT, UDINT, UINT
TIME
ANY_BIT
DWORD, WORD, BYTE, BOOL
ANY_STRING
STRING
ANY_DATE
DATE_AND_TIME, DATE, TIME_OF_DAY
EBOOL
ANY_DERIVED
ANY_ARRAY
ANY_ARRAY_ANY_EDT
ANY_ARRAY_ANY_MAGNITUDE
ANY_ARRAY_ANY_NUM
ANY_ARRAY_ANY_REAL
ANY_ARRAY_REAL
ANY_ARRAY_ANY_INT
ANY_ARRAY_DINT
ANY_ARRAY_INT
ANY_ARRAY_UDINT
ANNY_ARRAY_UINT
ANY_ARRAY_TIME
ANY_ARRAY_ANY_BIT
ANY_ARRAY_DWORD
ANY_ARRAY_WORD
ANY_ARRAY_BYTE
ANY_ARRAY_BOOL
ANY_ARRAY_ANY_STRING
ANY_ARRAY_STRING
ANY_ARRAY_ANY_DATE
ANY_ARRAY_DATE_AND_TIME
ANY_ARRAY_DATE
ANY_ARRAY_TIME_OF_DAY
ANY_ARRAY_EBOOL
ANY_ARRAY_ANY_DDT
ANY_STRUCTURE
ANY_DDT
ANY_IODDT
ANY_FFB
ANY_EFB
ANY_DFB
196
Glossary
ARRAY
An ARRAY is a table of elements of the same type.
The syntax is as follows: ARRAY [<terminals>] OF <Type>
Example:
ARRAY [1..2] OF BOOL is a one-dimensional table made up of two BOOL-type
elements.
ARRAY [1..10, 1..20] OF INT is a two-dimensional table made up of 10x20
INT-type elements.
B
Base 10 literals
A literal value in base 10 is used to represent a decimal integer value. This value can
be preceded by the signs "+" and "-". If the character "_" is employed in this literal
value, it is not significant.
Example:
-12, 0, 123_456, +986
Base 16 Literals
An literal value in base 16 is used to represent an integer in hexadecimal. The base
is determined by the number "16" and the sign "#". The signs "+" and "-" are not
allowed. For greater clarity when reading, you can use the sign "_" between bits.
Example:
16#F_F or 16#FF (in decimal 255)
16#F_F or 16#FF (in decimal 224)
Base 2 Literals
A literal value in base 2 is used to represent a binary integer. The base is determined
by the number "2" and the sign "#". The signs "+" and "-" are not allowed. For greater
clarity when reading, you can use the sign "_" between bits.
Example:
2#1111_1111 or 2#11111111 (in decimal 255)
2#1110_0000 or 2#11100000 (in decimal 224)
Base 8 Literals
A literal value in base 8 is used to represent an octal integer. The base is determined
by the number "8" and the sign "#". The signs "+" and "-" are not allowed. For greater
clarity when reading, you can use the sign "_" between bits.
Example:
8#3_77 or 8#377 (in decimal 255)
8#34_0 or 8#340 (in decimal 224)
BCD
BCD is the abbreviation of Binary Coded Decimal format
BCD is used to represent decimal numbers between 0 and 9 using a group of four
bits (half-byte).
In this format, the four bits used to code the decimal numbers have a range of
unused combinations.
197
Glossary
Example of BCD coding:
z the number 2450
z is coded: 0010 0100 0101 0000
BOOL
BOOL is the abbreviation of Boolean type. This is the elementary data item in
computing. A BOOL type variable has a value of either: 0 (FALSE) or 1 (TRUE).
A BOOL type word extract bit, for example: %MW10.4.
BYTE
When 8 bits are put together, this is callad a BYTE. A BYTE is either entered in
binary, or in base 8.
The BYTE type is coded in an 8 bit format, which, in hexadecimal, ranges from
16#00 to 16#FF
D
DATE
The DATE type coded in BCD in 32 bit format contains the following information:
z the year coded in a 16-bit field,
z the month coded in an 8-bit field,
z the day coded in an 8-bit field.
The DATE type is entered as follows: D#<Year>-<Month>-<Day>
This table shows the lower/upper limits in each field:
Field
Limits
Comment
Year
[1990,2099]
Year
Month
[01,12]
The left 0 is always displayed, but can be omitted at the
time of entry
Day
[01,31]
For the months 01\03\05\07\08\10\12
[01,30]
For the months 04\06\09\11
[01,29]
For the month 02 (leap years)
[01,28]
For the month 02 (non leap years)
DATE_AND_TIM
E
see DT
DBCD
Representation of a Double BCD-format double integer.
The Binary Coded Decimal (BCD) format is used to represent decimal numbers
between 0 and 9 using a group of four bits.
In this format, the four bits used to code the decimal numbers have a range of
unused combinations.
198
Glossary
Example of DBCD coding:
z the number 78993016
z is coded: 0111 1000 1001 1001 0011 0000 0001 0110
DDT
DDT is the abbreviation of Derived Data Type.
A derived data type is a set of elements of the same type (ARRAY) or of various types
(structure)
DFB
DFB is the abbrevation of Derived Function Block.
DFB types are function blocks that can be programmed by the user ST, IL, LD or
FBD.
By using DFB types in an application, it is possible to:
z simplify the design and input of the program,
z increase the legibility of the program,
z facilitate the debugging of the program,
z reduce the volume of the generated code.
DINT
DINT is the abbrevation of Double Integer format (coded on 32 bits).
The lower and upper limits are as follows: -(2 to the power of 31) to (2 to the power
of 31) - 1.
Example:
-2147483648, 2147483647, 16#FFFFFFFF.
DT
DT is the abbreviation of Date and Time.
The DT type coded in BCD in 64 bit format contains the following information:
z The year coded in a 16-bit field,
z the month coded in an 8-bit field,
z the day coded in an 8-bit field,
z the hour coded in a 8-bit field,
z the minutes coded in an 8-bit field,
z the seconds coded in an 8-bit field.
Note: The 8 least significant bits are unused.
The DT type is entered as follows:
DT#<Year>-<Month>-<Day>-<Hour>:<Minutes>:<Seconds>
This table shows the lower/upper limits in each field:
Field
Limits
Comment
Year
[1990,2099]
Year
Month
[01,12]
The left 0 is always displayed, but can be omitted at
the time of entry
199
Glossary
DWORD
Field
Limits
Comment
Day
[01,31]
For the months 01\03\05\07\08\10\12
[01,30]
For the months 04\06\09\11
[01,29]
For the month 02 (leap years)
[01,28]
For the month 02 (non leap years)
Hour
[00,23]
The left 0 is always displayed, but can be omitted at
the time of entry
Minute
[00,59]
The left 0 is always displayed, but can be omitted at
the time of entry
Second
[00,59]
The left 0 is always displayed, but can be omitted at
the time of entry
DWORD is the abbreviation of Double Word.
The DWORD type is coded in 32 bit format.
This table shows the lower/upper limits of the bases which can be used:
Base
Lower limit
Upper limit
Hexadecimal
16#0
16#FFFFFFFF
Octal
8#0
8#37777777777
Binary
2#0
2#11111111111111111111111111111111
Representation examples:
Data content
Representation in one of the bases
00000000000010101101110011011110
16#ADCDE
00000000000000010000000000000000
8#200000
00000000000010101011110011011110
2#10101011110011011110
E
EBOOL
EBOOL is the abbrevation of Extended Boolean type. It can be used to manage rising
or falling edges, as well as forcing.
An EBOOL type variable takes up one byte of memory.
EF
Is the abbreviation of Elementary Function.
This is a block which is used in a program, and which performs a predefined
software function.
200
Glossary
A function has no internal status information. Multiple invocations of the same
function using the same input parameters always supply the same output values.
Details of the graphic form of the function invocation can be found in the "[Functional
block (instance)] ". In contrast to the invocation of the function blocks, function
invocations only have a single unnamed output, whose name is the same as the
function. In FBD each invocation is denoted by a unique [number] via the graphic
block, this number is automatically generated and can not be altered.
You position and set up these functions in your program in order to carry out your
application.
You can also develop other functions using the SDKC development kit.
EFB
Is the abbreviation for Elementary Function Block.
This is a block which is used in a program, and which performs a predefined
software function.
EFBs have internal statuses and parameters. Even where the inputs are identical,
the output values may be different. For example, a counter has an output which
indicates that the preselection value has been reached. This output is set to 1 when
the current value is equal to the preselection value.
Elementary
Function
see EF
EN
EN means ENable, this is an optional block input. When EN is activated, an ENO
output is automatically drafted.
If EN = 0, the block is not activated, its internal program is not executed and ENO ist
set to 0.
If EN = 1, the internal program of the block is executed, and ENO is set to 1 by the
system. If an error occurs, ENO is set to 0.
ENO
ENO means Error NOtification, this is the output associated to the optional input EN.
If ENO is set to 0 (caused by EN=0 or in case of an execution error),
z the outputs of function blocks remain in the status they were in for the last correct
executed scanning cycle and
z the output(s) of functions and procedures are set to "0".
F
FBD
FBD is the abbreviation of Function Block Diagram.
201
Glossary
FBD is a graphic programming language that operates as a logic diagram. In
addition to the simple logic blocks (AND, OR, etc.), each function or function block of
the program is represented using this graphic form. For each block, the inputs are
located to the left and the outputs to the right. The outputs of the blocks can be linked
to the inputs of other blocks to form complex expressions.
FFB
Collective term for EF (Elementary Function), EFB (Elementary Function Block) and
DFB (Derived Function block)
Function
see EF
Function Block
Diagram
see FBD
G
GRAY
Gray or "reflected binary" code is used to code a numerical value being developed
into a chain of binary configurations that can be differentiated by the change in
status of one and only one bit.
This code can be used, for example, to avoid the following random event: in pure
binary, the change of the value 0111 to 1000 can produce random numbers between
0 and 1000, as the bits do not change value altogether simultaneously.
Equivalence between decimal, BCD and Gray:
Decimal
0
1
2
3
4
5
6
7
8
9
BCD
0000 0001 0010 0011 0100 0101 0110 0111 1000 1001
Gray
0000 0001 0011 0010 0110 0111 0101 0100 1100 1101
I
IEC 61131-3
International standard: Programmable Logic Controls
Part 3: Programming languages.
IL
IL is the abbreviation of Instruction List.
This language is a series of basic instructions.
This language is very close to the assembly language used to program processors.
202
Glossary
Each instruction is composed of an instruction code and an operand.
INF
Used to indicate that a number overruns the allowed limits.
For a number of Integers, the value ranges (shown in gray) are as follows:
-INF
-3.402824e+38
INF
-1.1754944e-38
0.0
1.1754944e-38
3.402824e+38
When a calculation result is:
z less than -3.402824e+38, the symbol -INF (for -infinite) is displayed,
z greater than +3.402824e+38, the symbol INF (for +infinite) is displayed.
INT
INT is the abbreviation of single integer format (coded on 16 bits).
The lower and upper limits are as follows: -(2 to the power of 15) to (2 to the power
of 15) - 1.
Example:
-32768, 32767, 2#1111110001001001, 16#9FA4.
Integer Literals
Integer literal are used to enter integer values in the decimal system. The values can
have a preceding sign (+/-). Individual underlines (_ ) between numbers are not
significant.
Example:
-12, 0, 123_456, +986
IODDT
IODDT is the abbreviation of Input/Output Derived Data Type.
The term IODDT designates a structured data type representing a module or a
channel of a PLC module. Each application expert module possesses its own
IODDTs.
K
Keyword
A keyword is a unique combination of characters used as a syntactical programming
language element (See annex B definition of the IEC standard 61131-3. All the key
words used in Unity Pro and of this standard are listed in annex C of the IEC
standard 61131-3. These keywords cannot be used as identifiers in your program
(names of variables, sections, DFB types, etc.)).
203
Glossary
L
LD
LD is the abbreviation of Ladder Diagram.
LD is a programming language, representing the instructions to be carried out in the
form of graphic diagrams very close to a schematic electrical diagram (contacts,
coils, etc.).
Located
variables
A located variable is a variable for which it is possible to know its position in the PLC
memory. For example, the variable Water_pressure, is associated with%MW102.
Water_pressure is said to be localized.
M
Multiple Token
Operating mode of an SFC. In multitoken mode, the SFC may possess several
active steps at the same time.
N
Naming
conventions
(Identifier)
An identifier is a sequence of letters, numbers and underlines beginning with a letter
or underline (e.g. name of a function block type, an instance, a variable or a section).
Letters from national character sets (e.g: ö,ü, é, õ) can be used except in project and
DFB names. Underlines are significant in identifiers; e.g. A_BCD and AB_CD are
interpreted as different identifiers. Multiple leading underlines and consecutive
underlines are invalid.
Identifiers cannot contain spaces. Not case sensitive; e.g. ABCD and abcd are
interpreted as the same identifier.
According to IEC 61131-3 leading digits are not allowed in identifiers. Nevertheless,
you can use them if you activate in dialog Tools → Project settings in tab
Language extensions the ceck box Leading digits.
Identifiers cannot be keywords.
NAN
Used to indicate that a result of an operation is not a number (NAN = Not A Number).
Example: calculating the square root of a negative number.
204
Glossary
Note: The IEC 559 standard defines two classes of NAN: quiet NAN (QNAN) and
signaling NaN (SNaN) QNAN is a NAN with the most significant fraction bit set and a
SNAN is a NAN with the most significant fraction bit clear (Bit number 22). QNANs
are allowed to propagate through most arithmetic operations without signaling an
exception. SNAN generally signal an invalid-operation exception whenever they
appear as operands in arithmetic operations (See %SW17 and %S18).
Network
There are two meanings for Network.
z In LD:
A network is a set of interconnected graphic elements. The scope of a network
is local to the program organization unit (section) in which the network is located.
z With communication expert modules:
A network is a group of stations which communicate among one another. The
term network is also used to define a group of interconnected graphic elements.
This group forms then a part of a program which may be composed of a group of
networks.
P
Procedure
Procedures are functions view technically. The only difference to elementary
functions is that procedures can take up more than one output and they support data
type VAR_IN_OUT. To the eye, procedures are no different than elementary
functions.
Procedures are a supplement to IEC 61131-3.
R
REAL
Real type is a coded type in 32 bits.
The ranges of possible values are illustrated in gray in the following diagram:
-INF
-3.402824e+38
INF
-1.1754944e-38
0.0
1.1754944e-38
3.402824e+38
When a calculation result is:
z between -1.175494e-38 and 1.175494e-38 it is considerd as a DEN,
z less than -3.402824e+38, the symbol -INF (for - infinite) is displayed,
205
Glossary
z
z
greater than +3.402824e+38, the symbol INF (for +infinite) is displayed,
undefined (square root of a negative number), the symbol NAN or NAN is
displayed.
Note: The IEC 559 standard defines two classes of NAN: quiet NAN (QNAN) and
signaling NaN (SNaN) QNAN is a NAN with the most significant fraction bit set and a
SNAN is a NAN with the most significant fraction bit clear (Bit number 22). QNANs
are allowed to propagate through most arithmetic operations without signaling an
exception. SNAN generally signal an invalid-operation exception whenever they
appear as operands in arithmetic operations (See %SW17 and %S18).
Note: when an operand is a DEN (Denormalized number) the result is not
significant.
Real Literals
An literal real value is a number expressed in one or more decimals.
Example:
-12.0, 0.0, +0.456, 3.14159_26
Real Literals with
Exponent
An Literal decimal value can be expressed using standard scientific notation. The
representation is as follows: mantissa + exponential.
Example:
-1.34E-12 or -1.34e-12
1.0E+6 or 1.0e+6
1.234E6 or 1.234e6
S
SFC
SFC is the abbreviation of Sequential Function Chart.
SFC enables the operation of a sequential automation device to be represented
graphically and in a structured manner. This graphic description of the sequential
behavior of an automation device, and the various situations which result from it, is
performed using simple graphic symbols.
Single Token
Operating mode of an SFC chart for which only a single step can be active at any
one time.
ST
ST is the abbreviation of Structured Text language.
Structured Text language is an elaborated language close to computer
programming languages. It enables you to structure series of instructions.
206
Glossary
STRING
A variable of the type STRING is an ASCII standard character string. A character
string has a maximum length of 65534 characters.
T
TIME
The type TIME expresses a duration in milliseconds. Coded in 32 bits, this type
makes it possible to obtain periods from 0 to 2 32-1 milliseconds.
The units of type TIME are the following: the days (d), the hours (h), the minutes (m),
the seconds (s) and the milliseconds (ms). A literal value of the type TIME is
represented by a combination of previous types preceded by T#, t#, TIME# or
time#.
Examples: T#25h15m, t#14.7S, TIME#5d10h23m45s3ms
Time literals
The units of type TIME are the following: the days (d), the hours (h), the minutes (m),
the seconds (s) and the milliseconds (ms). A literal value of the type TIME is
represented by a combination of previous types preceded by T#, t#, TIME# or
time#.
Examples: T#25h15m, t#14.7S, TIME#5d10h23m45s3ms
TIME_OF_DAY
see TOD
TOD
TOD is the abbreviation of Time of Day.
The TOD type coded in BCD in 32 bit format contains the following information:
z the hour coded in a 8-bit field,
z the minutes coded in an 8-bit field,
z the seconds coded in an 8-bit field.
Note: The 8 least significant bits are unused.
The Time of Day type is entered as follows: TOD#<Hour>:<Minutes>:<Seconds>
This table shows the lower/upper limits in each field:
Field
Limits
Comment
Hour
[00,23]
The left 0 is always displayed, but can be omitted at the time of
entry
Minute
[00,59]
The left 0 is always displayed, but can be omitted at the time of
entry
Second
[00,59]
The left 0 is always displayed, but can be omitted at the time of
entry
207
Glossary
Example: TOD#23:59:45.
Token
An active step of an SFC is known as a token.
TOPO_ADDR_TY
PE
This predefined type is used as output for READ_TOPO_ADDR function. This type
is an ARRAY[0..4] OF Int. You can find it in the libset, in the same family than the
EFs which use it.
U
UDINT
UDINT is the abbreviation of Unsigned Double Integer format (coded on 32 bits)
unsigned. The lower and upper limits are as follows: 0 to (2 to the power of 32) - 1.
Example:
0, 4294967295, 2#11111111111111111111111111111111, 8#37777777777,
16#FFFFFFFF.
UINT
UINT is the abbreviation of Unsigned integer format (coded on 16 bits). The lower
and upper limits are as follows: 0 to (2 to the power of 16) - 1.
Example:
0, 65535, 2#1111111111111111, 8#177777, 16#FFFF.
Unlocated
variable
An unlocated variable is a variable for which it is impossible to know its position in
the PLC memory. A variable which have no address assigned is said to be
unlocated.
V
Variable
Memory entity of the type BOOL, WORD, DWORD, etc., whose contents can be modified
by the program during execution.
W
WORD
208
The WORD type is coded in 16 bit format and is used to carry out processing on bit
strings.
This table shows the lower/upper limits of the bases which can be used:
Glossary
Base
Lower limit
Upper limit
Hexadecimal
16#0
16#FFFF
Octal
8#0
8#177777
Binary
2#0
2#1111111111111111
Representation examples
Data content
Representation in one of the bases
0000000011010011
16#D3
1010101010101010
8#125252
0000000011010011
2#11010011
209
Glossary
210
B
AC
Index
Symbols
B
%I, 48, 79
%IW, 48, 79
%M, 79
%MW, 48, 79
%Q, 48
%SW60, 41, 71, 114, 160
%SW61, 41, 71, 118
%SW62, 41, 71
%SW63, 41, 71
backlights, 21, 24
backplanes
configuring, 74
connecting, 62
identical, 16, 19, 58
mapping, 58, 60
base configurations, 19, 74
blinking indicators, 26, 137, 138, 191
Build Project, 146
buttons
ENTER, 23
ESC, 23
MOD, 23
reset, 22
right, 23
up, 23
Numerics
16 bit compatibility, 40
32 bit compatibility, 40
984 Ladder Logic, 72
A
adapters
self-terminating F, 63
addresses
IP, 98, 100
MAC, 98, 118
Modbus, 94
Modbus Plus, 96, 143
swapping, 98, 100
application programs, 116, 135, 161, 164
C
cables
coaxial, 63
connecting, 62
diagrams, 64
fiber optic, 62, 188
topologies, 63
checksums
transferring, 135
validating, 135
CKSM, 135
clasps
fiber optic, 188
211
Index
clocks
real time, 84
time-of-day, 121
coaxial splitters, 63
cold starts, 78, 83, 120
Com Act errors, 137, 138, 192
command registers, 135, 161
diagrams, 114
commands
Copro link, 134
monitor RIO, 134
No Standby, 129
take control, 128
communication types, 90
communications
healthy, 134
not healthy, 134
compatibility
16 bit, 40
32 bit, 40
components
Unity systems, 61
configurations
identical, 148
contrast adjustments, 24
controller failures, 138
Copro link commands, 134
Copro link requests, 134
Copros, 40
CRAs
software requirements, 20
CRPs
software requirements, 20
D
data editor, 86
data logging, 63
data messages, 130
data transfers, 48, 50, 54
data types, 148
DFBs, 148
diagnostics
Hot Standby, 32
Unity Pro, 125
212
diagrams
command registers, 114
Hot Standby systems, 19
MAST scans, 51
remote I/O networks, 64
state RAM, 49
status registers, 117
transfer, 49
drops
remote I/O, 63
E
EFBs, 148, 171
ENTER buttons, 23, 28
error logs, 125
error patterns, 192
errors
checksum, 191
Com Act, 137, 138, 191
detecting, 127
hard, 127
I/O, 46, 191
interface, 137, 138
ESC buttons, 23, 28
events, 83
EXEC upgrades, 115, 142
F
failures
controllers, 138
detecting, 127, 128
dual cables, 137, 138
fiber links, 62, 138
high-speed data links (HSDL), 130
RIO cables, 137, 138
types, 126
fiber optic cables, 62
G
Global Data, 149
green indicators, 26
Index
H
hard errors, 127
health messages, 124, 125, 130
healthy communications, 134
hubs, 62
I
I/O errors, 46
I/O maps, 148
I/O transactions, 131
identical programs, 146
indicators
blinking, 26, 137, 138
green, 26
LED, 25
red, 26
status, 137, 138
steady, 137
steady off, 26
steady on, 26
interface errors, 137, 138
Invalidate Keypad, 92
K
key switches, 22, 28
keypads, 22, 23, 92
L
LCDs
backlights, 24
communications screens, 33
default screens, 29
displays, 21, 25, 27
LCD settings screens, 37
PLC operations screens, 30
system info screens, 36
LED indicators, 25
lens covers, 21
limits
transfer size, 165
located variables, 48
locked key switch, 22
logic mismatches, 118, 146, 150
logs
errors, 125
M
MAST scans, 51
menus
communications, 33
default, 29
LCD display screens, 27
LCD settings, 37
PLC operations, 30
system, 36
messages
health, 124, 125, 130, 133
No Standby, 129
warning, 193
mismatches
checksums (CKSM), 135
logic, 118
MOD buttons, 23
Modbus, 94
Modbus Plus, 90, 94, 96, 143
Modbus ports, 81
Modbus RTU, 143
modes
Hot Standby, 31
OFFLINE, 115, 118
RUN, 115
modifications, 150, 160
offline, 155, 160
online, 153, 154, 160
modules
replacing, 136
monitor RIO commands, 134
monitor RIO requests, 134
multiple transfer packets, 165
multitasking restrictions, 42
N
No Standby commands, 129
No Standby messages, 129
NOE, 16, 58, 98, 102, 109, 189
NOM, 16, 58
213
Index
NOR, 62
not healthy communications, 134
O
offsets, 94
network addresses, 94
order
Hot Standby, 31
OSLoader, 143
overhead, system, 51
P
packets
multiple transfers, 165
PCMCIA cards, 88
Peer Cop, 75
PLC operations screens, 30
Primary controllers
time-of-day clocks, 121
programs
application, 135
identical, 135, 146
transferring, 164, 168
R
Rebuild All Project, 146
red indicators, 26
reference types, 48, 79
registers, 41, 71
command, 114, 135
reverse, 41
status, 117
remote I/O networks, 65
reports, 125
requests
Copro link, 134
monitor RIO, 134
reset buttons, 22
restrictions
DIO, 43
local I/O, 43
multitasking, 42
USB links, 45
214
reverse registers, 41, 71
right buttons, 23, 28
RIO, 63
heads, 131, 133
links, 131, 133
S
S908 modules, 40
scan times, 49, 50, 114, 124, 125, 127, 128,
130, 135, 148
sections
data, 148
SFC, 48, 151
updating, 148
setup methods
Hot Standby System, 58
SFC sections, 151
specifications, 189
splitters
coaxial, 63
standalones, 125, 127, 128
Standby controllers
time-of-day clocks, 121
state RAM, 48, 49, 71, 79, 147
states
Hot Standby, 31
static data memory layout, 147
status registers, 117
steady indicators, 29
steady off indicators, 26
steady on indicators, 26
submenus
default screen, 29
Hot Standby, 31
Init, 31
LCD contrast, 37
LCD display screens, 27
LCD Light, 37
Modbus Plus, 34
PLC operations screens, 30
serial port, 35
Start, 31
Stop, 31
System Info, 36
TCP/IP Ethernet, 34
Index
switches, 62
switchovers, 94, 116, 125
USB, 45
system bits, 41, 114, 118
system information, 84
system words, 41, 114, 118
T
tabs
Animation, 82
Configuration, 77
Hot Standby, 86
Information, 84
Modbus Port, 80
Overview, 76
Realtime clock, 83
Summary, 75
Task, 82
take control commands, 127
TCP/IP, 94
tests
confidence, 124
Hot Standby systems, 66
of the Copro, 124
run time, 124
start-up, 66
startup, 124
switchover, 68
textids, 193
time-of-day clocks, 121
timer events, 46
times, 83
address swaps, 108
transfer, 50, 164
transferring programs, 164
transfer-size limits, 165
trunk terminators, 63
updating
offline, 120
Primarys, 164
Standbys, 164
upgrades, 142
Upload Information Management, 160
user data, 147, 148
V
values
initial, 120
variables, 149
declared, 149
located, 48, 148
redeclared, 149
section, 149
transition, 149
unlocated, 48, 71, 115, 118, 148
W
warm starts, 83
warnings
Configuration Hazard, 148
I/O Map Hazard, 148
Immediate Control of Process, 152, 156
Switchover Hazard, 151
U
unlocated variables, 48, 71, 115, 118
unlocked key switch, 22
up buttons, 23, 28
215
Index
216