1
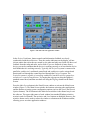
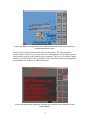
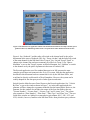
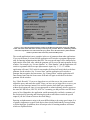
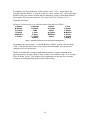
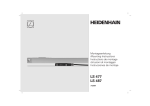
Project54
System Quick-Start
Consolidated Advanced Technologies for Law Enforcement Program (CATlab)
University of New Hampshire
Durham, NH 03824
(603) 862-1272
www.project54.unh.edu
Information within subject to change
Purpose
This document is intended to present a quick introduction to the operation of the
Project54 software. It is divided into two sections. The first summarizes the basic
program operation including navigation through the various screens using the touchscreen buttons. The second section focuses on speech command input, including making
important speech system adjustments and performing simple and more complex
operations using speech.
This document is not intended to give details concerning the use of specific Project54
screens to control specific devices. Detailed descriptions of individual Project54
applications can be found in the Project54 System User Manual.
Basic Program Operation
The installation procedure for the Project54 software places an icon on your Windows
desktop labeled Project54. Double click on the icon to start the software. A dialog box
similar to that in Figure 1 will appear, displaying the program version number and
software copyright notice.
Figure 1. The Project54 initial dialog box
It may take a few seconds before the first full program window appears (Figure 2), as
program modules look for and try to communicate with special devices such as the
lightbar/siren controller, radar unit, VHF radio, and so forth.
The first application window to appear will be the Patrol Screen window (Figure 2)
which combines information from the radar unit, VHF radio, and lights and siren system.
Press the Front Antenna button to activate the radar’s front antenna. Press the Front
Strobes button to activate the light bar front blue strobes. Press these buttons again to
turn these devices off.
2
Figure 2. The Patrol Screen application window.
In the Project54 software, button controls and information feedback are closely
synchronized with the real devices. Thus, the strobes indicators on the display will not
activate unless the real strobes are turned on, the radar and radio text fields will show real
feedback from the radar and radio, and so forth. If you see feedback of status from a
device you can be confident that the device is working correctly or at least that the device
itself thinks that it is working correctly. Typically, the Project54 system is connected in
parallel to each device’s traditional control head and each device can be activated and
deactivated both through the control head and through the Project54 system. The
Project54 system is capable of controlling each device, but the Project54 system does
not take over control of any devices. Try turning the wigwags on using the lightbar’s
standard control head, and then turn them off using the Wigwags button on the Patrol
Screen.
Press the Main Screen button in the Patrol Screen window to activate the Main Screen
window (Figure 3). The Main Screen window has buttons activating other applications,
and has buttons accessing system configuration options (such as the Speech and System
Options buttons). The Exit button in the Main Screen window is the normal way to exit
the software. The upper right corner of each window has standard Windows minimize,
maximize and close buttons. The maximize and close buttons are disabled. However, the
minimize button can be used to reduce the window to a button on the Windows taskbar,
allowing you to see other application windows.
3
Figure3. The Main Screen application window. The Exit button in this window is the normal way to
terminate the Project54 software.
Press the System Options button in the Main Screen window. The System Options
window (Figure 4) allows you to set screen colors and brightness, and to display system
status and the versions of the installed software modules. The Project54 system is highly
modular, and each of these software modules can be individually replaced or upgraded to
accommodate new hardware or additional features.
Figure 4. The System Options application with night colors activated. The text field lists currently
installed modules.
4
Press the Main Screen button to return to the Main Screen application. Practice
navigating through the various windows, activating and deactivating device functions, to
get used to the overall layout. Then proceed to the section on Speech Input-Output to
learn how to use the speech command features of the Project54 system.
Speech Input - Output
Setting Speech Input-Output Parameters
Speech is a central mode of input in the Project54 system. Speech recognition is
performed by the Microsoft SAPI 5.1 speech recognition engine. Recognizer
performance is greatly affected by the quality of the microphone and by the microphone
volume setting. Simply stated, good quality speech input results in highly reliable
recognizer performance, while poor quality speech input results in an unnecessary
decrease in recognizer performance.
The Project54 system includes an application which can be used to test the quality of the
speech input (Figure 5). Press the Main Screen button and then the Speech button to
activate the speech settings screen. Press the Repeat Speech button. This activates a
special mode in which the raw audio input of each spoken command will be played back
to the system speaker before being interpreted as speech input. Also press the Volume
Meter button. This activates the volume meter at the bottom of the application window.
Figure 5. The screen controlling settings for the speech recognition and synthesis module.
5
Press and hold the Listen button. This serves as a push-to-talk button for the speech input
system. Speak a typical command such as “Patrol Screen”, “Strobes”, or “Front Antenna”
while watching the volume meter. Release the Listen button. You should hear a playback
of the speech signal recorded while the button was held in. You can adjust the volume of
the microphone input by changing the numeric volume level setting in the dialog box (0
to 100 percent) and then pushing the Speech Settings button to activate the new value.
Repeat the above procedure, iteratively adjusting the volume setting until the maximum
volume during typical commands activates the maximum OK (rightmost green) light or
the minimum Hi (leftmost red) light. If the volume is set too high the speech input will be
clipped and distorted. If it is set too low the dynamic range will be inadequate for optimal
recognizer performance.
When the volume is set correctly, the playback of your voice should sound clear. If it
does not, your microphone is probably of low quality or damaged. We use and highly
recommend the Andrea Electronics Corporation AutoArray DA300 noise canceling
microphone for use in vehicle applications, however any high quality microphone
compatible with your computer’s audio input will be sufficient if the background noise
level is low. Note that the built-in microphone in laptop computers is almost never
adequate for good speech recognizer performance.
After adjusting the speech input volume, press the Repeat Speech and Volume Meter
buttons again to release them and restore normal speech input operating mode.
It is not generally necessary to change settings for the speech synthesis software, but
some settings are available in the speech settings application window (Figure 5). You can
use the Previous Voice and Next Voice buttons to select a speaking voice (we prefer
Microsoft Mary). You can also set the speaking pace and speaking volume via the
numeric values in the corresponding text fields. As described above, you must press the
Speech Settings button before the new numerical values will take effect.
The Mouse PTT button turns the mouse activated push-to-talk function on or off. When
this button is depressed it is possible to use the right mouse button on the keyboard or
mouse as a push-to-talk button so the computer listens for a voice command. The PTT
Sound button enables the push-to-talk sound shown in the PTT Sound window. The
sound will be played when the push-to-talk button is pressed, and again when it is
released, providing an audio cue for when to say a command. The << PTT Sound and
PTT Sound >> buttons allow you to cycle through the list of available sounds for the
push-to-talk buttons.
Press the Listen button, say “Main Screen” and release the Listen button. The speech
synthesizer should repeat the command “Main Screen” (in the computer’s voice, not
yours) and the Main Screen application should appear.
6
Using Speech Input Commands
The Project54 system utilizes a push-to-talk button to activate the speech recognizer
component, thus avoiding the unintentional interpretation of radio conversations and
other unrelated speech. The speech recognizer records all microphone input while the
push-to-talk button is activated and, after the button is released, tries to interpret the input
as a single command. It is not possible to give multiple commands while holding down
the button. In vehicle installations, a mechanical push-to-talk button is located on the
steering wheel. This may be either a reuse of one of the vehicle’s standard cruise control
buttons, or a special aftermarket button added by the Project54 system installer. In
addition, the right mouse button can serve as a push-to-talk button if this function has
been enabled in the Speech control screen, as described previously.
Successful activation of the speech input system proceeds as follows: press the push-totalk button, start speaking, continue speaking, finish speaking, release the push-to-talk
button. It is a natural human tendency to use the following procedure instead (ask a
dispatcher!): start speaking, press the push-to-talk button, continue speaking, release the
push-to-talk button, finish speaking. Such short-cycling of the push-to-talk button is
common but is not a good practice since it clips off the beginning and ending of each
command. The PTT sound feature of the Speech control screen is a useful way to avoid
this problem.
The Project54 system uses a speaker independent, limited vocabulary, speech command
input system. The list of command words and phrases that the recognizer will recognize
is called the grammar. In the Project54 system the grammar changes whenever you
change application screens. Generally, the button labels provide reminders of the
contents of the corresponding application grammar. For example, when the Patrol Screen
application is activated (Figure 2) the grammar includes “Main Screen”, “Emergency
Signals”, “Records”, “Radar”, and “Radio Controls”. Buttons that latch in position,
turning things on when pressed and off when pressed again, usually have two vocabulary
entries. For example, “Front Antenna” activates the radar front antenna (and leaves the
button depressed) while “Front Antenna Off” deactivates the antenna (and releases the
button). Similarly, “Strobes” activates the lightbar strobes while “Strobes Off”
deactivates the strobes.
Try giving basic speech commands to switch between applications or to turn basic device
functions on and off.
The Radio Control application is an example of an application with a more extensive
grammar (Figure 6). The application grammar is based on the button labels, similar to
other applications, but the grammar also includes the list of the channel names shown in
the text box. Switch from the Main Screen or Patrol Screen to the Radio Control
application. The application shown in the figure utilizes the configuration designed for
the NH State Police, and the channel names are organized by region using the
corresponding troop name (A to F). Your configuration may vary from that described
here. Press the Troop Up button until Troop A appears in the troop name field as in
7
Figure 6. The Patrol Screen application window. The button labels match the currently activated speech
grammar. However, additional grammar items correspond to the radio channel list in the text box.
Figure 6. Say “Seabrook” and the radio will switch to the channel used by the police
department in the town of Seabrook, NH. Say “Troop A Adam” and the radio will switch
to the main channel for the NH State Police Troop A. Say “Switch Troop F Frank” to
change to the channel list used most commonly by officers in Troop F. Say “Moose
Mountain” to access the Troop F repeater on Moose Mountain. Say “Littleton” to switch
to the channel use by the police department in the town of Littleton, NH.
The Records application, used for standard data queries in NH, presents the most
complex speech input environment in the Project54 system. Note that the application
described in this document has been customized for use by the NH State Police, and
would not be directly useful outside of New Hampshire. However, the system can be
readily adapted for the data query needs of other agencies and states.
Switch from the Main Screen or Patrol Screen to the Records application. Say “Vehicle
By Plate” to get to the window shown in Figure 7. As in the other applications, the
grammar will have changed to a grammar modeled after the button labels. However, the
grammar for this window also includes the names of the four data fields at the top:
“License Number”, “License State”, “License Type” and “License Year”. The system
also responds to “Plate Number”, “Plate State”, “Plate Type” and “Plate Year”. The text
fields in the window are labeled in a somewhat cryptic manner (LIC/, LIS/, LIT/, and
LIY/) which is, however, familiar to the NH State Police from prior data query software.
8
Figure 7. The Vehicle Registration Inquiry window in the Records application used by the NH State
Police. The button labels match the currently activated speech grammar. However, additional grammar
items allow information to be entered into the query fields. Note: The data shown is fabricated data
similar in format to that returned by actual NH MV queries.
The records application is more complex in the use of grammars than other applications.
If you say the name of a form field the application will switch to a grammar appropriate
only for entering information into that field. The next speech input will be interpreted as
input into the form field, after which the grammar will revert to the main grammar for the
window. For example, say “License Number” or “Plate Number” and the application will
switch to a grammar which accepts alpha-numeric input. Say “1 2 3 4 5” and the
application will enter 12345 in the license number field and will switch back to the base
grammar for the window. Say “License State” and the application will switch to a
grammar that recognizes the state names. Say “Pennsylvania” and the application will
enter Pennsylvania into the license state field and will again switch back to the base
grammar for the window.
Say “Check Records”. If you were logged on to a real data server, the system would
submit the query and return the results. Since you have not yet logged on to a server, you
will see an error message instead. It is useful to practice basic data query operations
without first logging on, since it is not appropriate to submit arbitrary practice queries to
the state MV data server, NLETS, NCIC etc. Assuming you did perform a real MV data
query in New Hampshire, the application would automatically read back a summary of
the results (quickly pressing and releasing the push-to-talk button cancels the speech
output if you don’t want to listen to the whole thing).
Entering an alpha-numeric string is the most difficult thing to do using speech input. It is
of primary importance to speak each digit or letter clearly and distinctly from preceding
or following digits. In addition, there are unique rules for entering numbers and letters
which are explained below.
9
For numbers, use the normal name of the number (“One”, “Two”, and so forth), but
remember that the number “0” must be entered as “Zero” and not “Oh”. Also, multi-digit
numbers (and years or dates-of-birth) must be entered as a string of individual numbers.
For example, 2003 must be entered as “Two Zero Zero Three” and not as “Two
Thousand And Three”.
For letters, it is necessary to use full letter names from the list in Table 1.
A Adam
B Boston
C Charlie
D David
E Edward
F Frank
G George
H Henry
I Ida
J John
K King
L Lincoln
M Mary
N Nora
O Ocean
P Paul
Q Queen
R Robert
S Sam
T Tom
U Union
V Victor
W Walter
X X Ray
Y Young
Z Zebra
Table 1. Full letter names have to be used when entering letters.
For example, the speech input “A Adam B Boston C Charlie” produces the text string
“ABC”. Note that the letter names above follow the NH standard, but can easily be
changed to fit local conventions.
Finally, remember that a complete alpha numeric string is a single command to the
speech recognizer. In other words, to enter 12A3H7 you would say “One, Two, A Adam,
Three, H Henry, Seven”. The commas reflect slight pauses in the speech to assist the
recognizer in parsing the long duration speech input string.
10