1
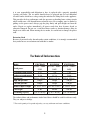
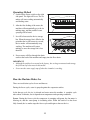
Automatic Ice Maker Máqina Automática para Hacer Hielo User’s Manual (pages 1-28) Manualdelusario (páginas 29a 58) Be sure ice maker is standingupright 24hours prior to plug-in Asegúrese que la máquina estéparade en posición vertical24horas antes que sea conectada. Model s/Model os EW CIM65S EW CIM90S EW CIM120S 4!",%/&#/.4%.43 )#%-!+%23!&%49 qqqqqqqqqqqqqqqqqqqqqqqqqqqq 0AGE q q )-0/24!.43!&%'5!2$3 qqqqqqqqqqqqqqqqqqqqqqqq q q 4%#(.)#!,).&/2-!4)/. qqqqqqqqqqqqqqqqqqqqqqqq q q ).42/$5#4)/. qqqqqqqqqqqqqqqqqqqqqqqqqqqqqqq q q #/-0/.%.4,/#!4)/.3 qqqqqqqqqqqqqqqqqqqqqqqqq q q )#%-!+%2).34!,,!4)/. qqqqqqqqqqqqqqqqqqqqqqqq 5NPACKING qqqqqqqqqqqqqqqqqqqqqqqqqqqqqqq ,OCATION2EQUIREMENTSqqqqqqqqqqqqqqqqqqqqqqqqq %LECTRICAL2EQUIREMENTS qqqqqqqqqqqqqqqqqqqqqqqq ,EVELINGTHE)CE-AKERqqqqqqqqqqqqqqqqqqqqqqqqq 7ATER3UPPLYAND$RAIN#ONNECTIONS qqqqqqqqqqqqqqqqq )NSTALLATION4YPESqqqqqqqqqqqqqqqqqqqqqqqqqqqq q q q q q q q q q q q q q q /0%2!4)/.qqqqqqqqqqqqqqqqqqqqqqqqqqqqqqqqqq &INAL#HECKLISTBEFORE/PERATIONqqqqqqqqqqqqqqqqqqqq /PERATING-ETHOD qqqqqqqqqqqqqqqqqqqqqqqqqqq (OWTHE-ACHINE-AKES)CE qqqqqqqqqqqqqqqqqqqqqq .ORMAL3OUNDS qqqqqqqqqqqqqqqqqqqqqqqqqqqqq 0REPARINGTHE)CE-AKERFOR,ONG3TORAGE qqqqqqqqqqqqqqq q q q q q q q q q q q q #,%!.).'!.$-!).4%.!.#% qqqqqqqqqqqqqqqqqqqqq %XTERIOR#LEANINGqqqqqqqqqqqqqqqqqqqqqqqqqqqq #ONDENSER#LEANING qqqqqqqqqqqqqqqqqqqqqqqqqq )NTERIOR#LEANING qqqqqqqqqqqqqqqqqqqqqqqqqqqq )CE-AKING3YSTEM#LEANINGqqqqqqqqqqqqqqqqqqqqqq #ONTROL"OX qqqqqqqqqqqqqqqqqqqqqqqqqqqqqq q q q q q q q q q q q q -!*/2&5.#4)/.3 qqqqqqqqqqqqqqqqqqqqqqqqqqqqq q q 42/5",%3(//4).' qqqqqqqqqqqqqqqqqqqqqqqqqqqq q q ,)-)4%$7!22!.49qqqqqqqqqqqqqqqqqqqqqqqqqqqq q q 30!.)3(6%23)/./&4()3-!.5!, qqqqqqqqqqqqqqqqqq q q 7ERESERVETHERIGHTTOMAKECHANGESINSPECIFICATIONSANDDESIGNWITHOUTPRIOR NOTICE 1 ICE MAKER SAFETY Your safety and the safety of others are very important. We have provided many important safety messages in this manual and on your appliance. Always read and obey all safety messages. This is the Safety Alert Symbol. This symbol alerts you to potential hazards that can injure or kill you and others. All safety messages will follow the Safety Alert Symbol and either the words “DANGER”, “WARNING” OR “CAUTION”. DANGER means that failure to heed this safety statement may result in severe personal injury or death. WARNING means that failure to heed this safety statement may result in extensive product damage, serious personal injury, or death. CAUTION means that failure to heed this safety statement may result in minor or moderate personal injury, or property or equipment damage. All safety messages will alert you to what the potential hazard is, tell you how to reduce the chance of injury, and let you know what can happen if the instructions are not followed. IMPORTANT SAFETY INSTRUCTIONS W ARNING: To reduce the risk offire,electric shock or injury whenusingyour ice maker,follow these basic precautions: • • • • • • • • Plug into grounded 3-prong outlet Do not remove grounding prong Do not use an adapter Do not use an extension cord Disconnect power before cleaning Disconnect power before servicing Replace all panels before operating Use 2 or more people to move & install ice maker SAVE THESE INSTRUCTIONS 2 )-0/24!.43!&%'5!2$3 "EFORETHEICE MAKERISUSEDITMUSTBEPROPERLYPOSITIONEDANDINSTALLED ASDESCRIBEDINTHISMANUALSOREADTHEMANUALCAREFULLY-# !PPLIANCE#ORPSTRONGLYRECOMMENDSTHATYOUHAVEAPROFESSIONALINSTALL YOURNEWMACHINE4HEWARRANTYMAYBEAFFECTEDORVOIDEDBYANINCORRECT INSTALLATION4OREDUCETHERISKOFFIREELECTRICALSHOCKORINJURYWHEN USINGTHEICE MAKERFOLLOWBASICPRECAUTIONSINCLUDINGTHEFOLLOWING • 0LUGINTOAGROUNDEDPRONGOUTLETDONOTREMOVEGROUNDINGPRONGDONOTUSEAN • • • • • • • ADAPTERANDDONOTUSEANEXTENSIONCORD )TISRECOMMENDEDTHATASEPARATECIRCUITSERVINGONLYYOURICEMAKERBEPROVIDED 5SERECEPTACLESTHATCANNOTBETURNEDOFFBYA SWITCHORPULLCHAIN $ONOTCONNECTORDISCONNECTTHEELECTRICPLUGWHENYOURHANDSAREWET .EVERCLEANICEMAKERPARTSWITHFLAMMABLEFLUIDS4HESEFUMESCANCREATEAFIRE HAZARDOREXPLOSION$ONOTSTOREORUSEGASOLINEOROTHERFLAMMABLEVAPORSAND LIQUIDSINTHEVICINITYOFTHISORANYOTHERAPPLIANCE4HEFUMESCANCREATEAFIRE HAZARDOREXPLOSION "EFOREPROCEEDINGWITHCLEANINGANDMAINTENANCEOPERATIONSMAKESURETHEPOWER LINEOFTHEUNITISDISCONNECTEDANDTHEWATERLINEISSHUTOFF %8#%04)/.WHEN CLEANINGTHEMACHINESICEMAKINGANDWATERSYSTEMSnSEEPAGES "EFOREOPERATINGPUTALLPANELSBACKINTOPLACE 5NPLUGTHEICEMAKERORDISCONNECTPOWERBEFORECLEANINGORSERVICING&AILURETODO SOCANRESULTINELECTRICALSHOCKORDEATH $ONOTATTEMPTTOREPAIRORREPLACEANYPARTOFYOURICEMAKERUNLESSITISSPECIFICALLY RECOMMENDEDINTHISMANUAL!LLOTHERSERVICINGSHOULDBEREFERREDTOAQUALIFIED TECHNICIAN • 7HENYOUDISASSEMBLETHEFRONTCOVERDONOTUSETOOMUCHFORCEASTHEWIRELEADS • • CONNECTEDTOTHEPOWERSWITCHCANBEINADVERTENTLYDISCONNECTED 5SETWOORMOREPEOPLETOMOVEANDINSTALLICEMAKER&AILURETODOSOCANRESULTIN BACKOROTHERINJURY 4OENSUREPROPERVENTILATIONFORYOURICEMAKERTHEFRONTOFTHEUNITMUSTBE COMPLETELYUNOBSTRUCTED#HOOSEAWELLVENTILATEDAREAWITHTEMPERATURESABOVE &#ANDBELOWHISUNIT-534BEINSTALLEDINANAREAPROTECTED FROMTHEELEMENTSSUCHASWINDRAINWATERSPRAYORDRIPS 3 • The ice maker should not be located next to ovens, grills or other sources of high heat. • The ice maker must be installed with all electrical, water and drain connections in • • • • • • • • • • • • • • accordance with state and local codes. A standard electrical supply (115VAC only, 60Hz, 15A), properly grounded in accordance with the National Electrical Code and local codes and ordinances is required. Do not kink or pinch the power supply cord or drain lines between the ice maker and the cabinet. The fuse (or circuit breaker)size should be 15amperes. It is important for the ice maker to be leveled in order to work properly. You may need to make several adjustments to level it. All installations must be in accordance with local plumbing code requirements. Make certain that the hoses are not pinched or kinked or damaged during installation. Check for leaks after connection. Never allow children to operate, play with or crawl inside the ice maker. Although the unit has been tested at the factory, due to long-term transit and storage, the first batch of cubes must be discarded. Never turn the water supply tap off when the ice maker is working. If the ice maker will not be used for a long time, before the next use it must be thoroughly cleaned. Follow carefully any instructions provided for cleaning or use of sanitizing solution. Do not leave any solution inside the ice maker after cleaning. DO NOT touch the condenser fins. The condenser fins are sharp and can be easily damaged. DO NOT use solvent-based cleaning agents or abrasives on the interior. These cleaners may transmit taste to the ice cubes, or damage or discolor the interior. The ice machine cleaner contains acids. DO NOT use or mix with any other solvent-based cleaner products. Use rubber gloves to protect hands. Carefully read the material safety instructions on the container of the ice machine cleaner. Do not use this apparatus for other than its intended purpose. SAVE THESE INSTRUCTIONS ElectricalConnection Do not, under any circumstances, cut or remove the third (ground)prong from the power cord. For personal safety, this appliance must be properly grounded. The power cord of this appliance is equipped with a 3-prong grounding plug that mates with a standard 3-prong grounding wall outlet to minimize the possibility of electric shock hazard from the appliance. Have the wall outlet and circuit checked by a qualified electrician to make sure the outlet is properly grounded. When a standard 2-prong wall outlet is encountered, 4 ITISYOURRESPONSIBILITYANDOBLIGATIONTOHAVEITREPLACEDWITHAPROPERLYGROUNDED PRONGWALLOUTLET4HEICE MAKERSHOULDALWAYSBEPLUGGEDINTOITSOWNINDIVIDUAL ELECTRICALOUTLETWHICHHASAVOLTAGERATINGTHATMATCHESTHERATINGLABELONTHEAPPLIANCE 4HISPROVIDESTHEBESTPERFORMANCEANDALSOPREVENTSOVERLOADINGHOUSEWIRINGCIRCUITS WHICHCOULDCAUSEAFIREHAZARDFROMOVERHEATEDWIRES.EVERUNPLUGYOURICE MAKERBY PULLINGONTHEPOWERCORD!LWAYSGRIPTHEPLUGFIRMLYANDPULLSTRAIGHTOUTFROMTHE OUTLET2EPAIRORREPLACEIMMEDIATELYALLPOWERCORDSTHATHAVEBECOMEFRAYEDOR OTHERWISEDAMAGED$ONOTUSEACORDTHATSHOWSCRACKSORABRASIONDAMAGEALONGITS LENGTHORATEITHEREND7HENMOVINGTHEICE MAKERBECAREFULNOTTODAMAGETHEPOWER CORD %XTENSION#ORD "ECAUSEOFPOTENTIALSAFETYHAZARDSUNDERCERTAINCONDITIONSITISSTRONGLYRECOMMENDED THATYOUDONOTUSEANEXTENSIONCORDWITHTHISICE MAKER 4ECHNICAL)NFORMATION -ODEL 2ATEDPOWER %7#)-3 %7#)-3 %7#)-3 6!#^(Z^ 6!#^(Z^ 6!#^(Z^ 7 7 7 )CEMAKINGRATEDCURRENT ! ! ! )CEHARVESTRATEDCURRENT ! ! ! 2AOZ 2AOZ 2AOZ (IGHSIDEPRESSURE PSI PSI PSI ,OWSIDEPRESSURE PSI PSI PSI 2EFRIGERANT 7IDTHXDEPTHXHEIGHT 5NITWEIGHT )CEMAKINGCAPACITY vXvXv vXvXv vXvXv LBS LBS 5PTOLBSDAY LBS 5PTOLBSDAY 5PTOLBSDAY 4HETECHNICALDATAANDPERFORMANCEINDEXLISTEDABOVESHOULDBEUSEDFORREFERENCEONLY 4HEYARESUBJECTTOCHANGE 4HEACTUALQUANTITYOFICEPRODUCEDPERDAYCANVARYWITHROOMANDWATERCONDITIONS 5 ).42/$5#4)/. 4HE.ORPOLE§%7#)-3ERIESOF)CE-AKERSFINDSWIDEAPPLICATIONINHOUSEHOLDS BARSRESTAURANTSHOTELSSUPERMARKETSETC4HESEUNITSPRODUCECRYSTALCLEARGOURMET CUBEICEANDOFFERCONVENIENCEFORHOMEOWNERSANDHOTELGUESTS!NINSULATEDICE STORAGEBINISBUILTINTOEACHICE MAKER 4HISUSERSMANUALISINTENDEDASARESOURCEFORPERSONSINSTALLINGUSINGANDSERVICING MODELS%7#)-3%7#)-3%7#)-3)TCONTAINSVALUABLEINFORMATIONON SAFETYANDMAINTENANCE-#!PPLIANCE#ORPSTRONGLYRECOMMENDSTHATTHISMANUALBE KEPTINAPLACEWHERE ITCANBEACCESSEDWHENNEEDED %VERY.ORPOLE§ )CE -AKERISDESIGNEDANDMANUFACTUREDACCORDINGTOTHEHIGHEST STANDARDSOFSAFETYANDPERFORMANCE -#!PPLIANCE#ORPA SSUMESNOLIABILITYORRESPONSIBILITYOFANYKINDFORPRODUCTS MANUFACTUREDFOR-#!PPLIANCE#ORP THATHAVEBEENALTEREDINANYWAYINCLUDING THEUSEOFANYPARTSANDOROTHERCOMPONENTSNOTSPECIFICALLYAPPROVEDBY -#!PPLIANCE #ORP-#!PPLIANCE#ORPRESERVESTHERIGHTTOMAKEDESIGNCHANGESANDORIMPROVEMENTS ATANYTIME3PECIFICATIONSANDDESIGNSARESUBJECTTOCHANGEWITHOUTNOTICE 6 COMPONENT LOCATIONS Top cover Door Ice cube full sensor Right side Front cover Water sump Ice storage bin Ventilation louvers Ice scoop Leveling caster Control box (behind front cover) Power switch 7 ICE MAKER INSTALLATION Unpacking Excessive W eight Hazard Use two or more people to move and install ice maker. Failure to do so can result in back or other injury. Remove packagingmaterials IMPORTANT: Do not remove any permanent instruction labels or the data label on your ice maker. Remove tape and glue from your ice maker before using. • To remove any remaining tape or glue, rub the area briskly with your thumb. Tape or glue residue can also be easily removed by rubbing a small amount of liquid dish soap over the adhesive with your fingers. Wipe with warm water and dry. • Do not use sharp instruments, rubbing alcohol, flammable fluids, or abrasive cleaners to remove tape or glue. These products can damage the surface of your ice maker. Cleaningbefore use After you remove all of the packaging materials, clean the inside of your ice maker before using it. See “Interior Cleaning” in the Cleaning and Maintenance section. Location Requirements INSTALLATION CLEARANCES: TOP VIEW SIDE VIEW 8 • To ensure proper ventilation for your ice maker, the front of the unit must be • • • • • completely unobstructed. Allow at least 101mm (4”)clearance at rear, and 15mm (0.6”)at top and sides for proper air circulation. The installation should allow the ice maker to be pulled forward for servicing if necessary. When installing the ice maker under a counter, follow the recommended spacing dimensions shown. Place electrical and water supplies and drain fixtures in the recommended locations as shown. Choose a well-ventilated area with temperatures above 55ºF (13ºC)and below 90ºF (32ºC). This unit MUST be installed in an area protected from the elements, such as wind, rain, water spray or drips. The unit should not be located next to ovens, grills or other sources of high heat. Installation of the ice maker requires a cold water supply inlet of 6.35mm (1/4 in.) soft copper tubing with a shut-off valve and a gravity-drain system. (NOTE:Runoff water can also be drained into a sink via a pump –not included – when a gravity drain is not available.) The ice maker requires a continuous water supply with a minimum pressure of 20 psig and a static pressure not to exceed 80psig. The temperature of the water feeding into the ice maker should be between 41ºF (5ºC)and 77ºF (25ºC)for proper operation. Normal operating ambient temperature should be between 55ºF (13ºC)to 90ºF ( 32ºC). Normal operating water temperature should be between 41ºF (5ºC)and 77ºF (25ºC). Operation of the ice maker for extended periods outside of these normal temperature ranges may affect production capacity. • In general, it is always a good idea to filter the water. A water filter, if it is of the • • proper type, can remove taste and odors as well as particles. Where water is very hard, softened water may result in white, mushy cubes that stick together. Deionized water is not recommended. The ice maker must be installed with all electrical, water and drain connections in accordance with state and local codes. The unit should be located on a firm and level surface. It is important for the ice maker to be leveled in order to work properly. If needed, you can adjust the height of the ice maker by revolving the feet. See the “ Leveling the Ice Maker” section. 9 • A standard electrical supply (115VAC only, 60Hz, 15A), properly grounded in • accordance with the National Electrical Code and local codes and ordinances is required. IMPORTANT:Do not kink or pinch the power supply cord between the ice maker and wall or cabinet. ElectricalRequirements ElectricalShock Hazard Plug into a grounded 3-prong outlet. Never remove the grounding prong from the plug. Never use an adapter. Never use an extension cord. Failure to follow these instructions can result in fire, electrical shock or death. Before you move your ice maker into its final location, it is important to make sure you have the proper electrical connection. A standard electrical supply (115 VAC only, 60 Hz, 15 A), properly grounded in accordance with the National Electrical Code and local codes and ordinances, is required. It is recommended that a separate circuit, serving only your ice maker, be provided. Use receptacles that cannot be turned off by a switch or pull chain. The fuse (or circuit breaker)size should be 15amperes. Recommendedgroundingmethod For your personal safety, this appliance must be grounded. This appliance is equipped with a power supply cord having a 3-prong grounding plug. To minimize possible shock hazard, the cord must be plugged into a mating 3-pronged and grounding-type wall receptacle, grounded in accordance with the National Electrical Code and local codes and ordinances. If a mating wall receptacle is not available, it is the personal responsibility of the customer to have a properly grounded, 3-prong wall receptacle installed by a qualified electrician. 10 Level ing the Ice M aker It is important for the ice maker to be leveled in order to work properly. It can be raised or lowered by rotating the plastic sheaths around each of the four rolling casters on the bottom of the machine. If you find that the surface is not level, rotate the casters until the ice maker becomes level. You may need to make several adjustments to level it. We recommend using a carpenter’s level to check the machine. You will find that the casters make it easy for one person to move the machine. This is useful for cleaning and sanitizing the surface on which the ice maker is installed because it allows you to move the unit and have easy access to the surface to be cleaned. IMPORTANT: Once you are ready to install the ice maker in a cabinet or directly on the floor,you must adj ust the feet to level the ice maker and lock the rollers. If the floor is level,j ust revolve the two front feet to touch the floor. (See illustration.) W ater SupplyandDrain Connections The water supply and drain should be ready at the point of installation. A wall outlet directly behind the ice maker will make installation easier. IM PORTANT: 1. All installations must be in accordance with local plumbing code requirements. Professional installation is recommended. 2. Make certain that the hoses are not pinched or kinked or damaged during installation. 3. Check for leaks after connection. Tools required: • 1/2in. open-end wrench • Phillips screwdriver 11 #ONNECTINGTHEWATERLINE 4URNOFFMAINWATERSUPPLY4URNONNEARESTFAUCETLONGENOUGHTOCLEARLINEOFWATER &INDA INTOINVERTICALCOLDWATERPIPENEARTHEINSTALLATIONLOCATION4HE DISTANCESHOULDBELESSTHANFEET4HEWATERSUPPLYHOSEPROVIDEDWITHTHEICE MAKERISABOUTFEET !SHUTOFFVALVEMUSTBEINSTALLEDTOTHEMAINWATERSUPPLY)FTHEWATERPIPEHASA PLAINPIECEOFCOPPERTUBINGATTACHAv /$COMPRESSIONUNIONTOTHETUBINGAND REMOVETHENUT #ONNECTNUTSOFWATERSUPPLYHOSETOTAPANDWATERINLETVALVE4IGHTENFIRMLYBY HANDTHENONEHALFTURNWITHWRENCH 4URNONMAINWATERSUPPLYANDTAP#HECKFORWATERSUPPLYCONNECTIONLEAKS4IGHTEN ANYCONNECTIONSINCLUDINGCONNECTIONSATTHEVALVEORNUTSTHATLEAK 7ATERTAPv OD 7ATERINLETVALVE .UTOFWATER DRAININGHOLE $RAINOUTLET 7ATERSUPPLYLINE $RAINLINE &LOORDRAIN ./4%#ONNECTIONTOTHEWATERLINEMAYVARYACCORDINGTOINSTALLATIONREQUIREMENTS #ONNECTINGTHEDRAINLINE !GRAVITYDRAINSYSTEMISUSEDINTHISTYPEICE MAKER%XCESSWATERFLOWSTOTHEDRAIN THROUGHTHEDRAINLINEPROVIDEDWITHTHEICEMAKER &INDTHEFLOORDRAINNEARTHEICE MAKER4HEDISTANCESHOULDBELESSTHANFEETASTHE LENGTHOFTHELONGDRAINLINEPROVIDEDWITHTHEICE MAKERISABOUTFEET &INDTHEDRAINOUTLETONTHEBACKOFICE MAKER #ONNECTONEENDOFTHELONGDRAINLINE TOTHEDRAINOUTLETOFTHEMACHINETHEOTHERENDTOTHEFLOORDRAIN !LLHORIZONTALRUNSOFDRAINLINESMUSTHAVEA FALLOFv PERFOOT!NAIRGAPWILL LIKELYBEREQUIREDBETWEENTHEICEMAKERDRAINTUBEANDTHEDRAINWASTERECEPTACLE! STANDPIPEWITHATRAPBELOWITWOULDBEACCEPTABLEFORTHEDRAINWASTERECEPTACLE ./4%)FYOUCANNOTLOCATEAFLOORORWALLDRAINTHATALLOWSTHEDRAINLINETODESCEND v PERFOOTYOUMAYWISHTOPURCHASEADRAINPUMPFROMYOURLOCAL.ORPOLESUPPLIER 0OURGALLONOFWATERINTOTHEICESTORAGEBINTOCHECKFORLEAKSATALLDRAINCONNECTIONS ANDATTHENUTOFTHEDRAINWATERHOLE4IGHTENANYCONNECTIONSORNUTSTHATLEAK )-0/24!.40OORDRAINAGEWILLCAUSEAHIGHRATEOFICEMELTINGINTHEICESTORAGEBIN 12 Installation Types This ice maker has been designed for Mobile (free-standing)installation. It can also be Enclosed (as under a cabinet)or Built-in (sealed to the floor), although this last option is not the preferred method of installation. In every case, there must be adequate air space around the unit for ventilation purposes (see diagrams on page 8). Mobile Installation: A mobile installation will allow you to install the icemaker free-standing in any place you desire provided you have access to a water supply and drainage facilities. You must follow the stated instructions for a. Electrical requirements b. Water supply and drain connections c. Leveling the icemaker. EnclosedInstallation: An enclosed installation will allow you to install the ice maker under a cabinet, or in a kitchen cabinet provided the required clearance space around the ice maker is respected. This installation has the same requirements as a mobile installation. The unit should be placed in the cabinet by sliding it into the cabinet’s opening and then leveling it properly. IMPORTANT: For Mobile and Enclosed installations you must use flexible water and drain connections to the water supply and drain. This will allow the moving of the ice maker for cleaning. Use the water and drain hoses supplied with the unit for these connections. Built-inInstallation: If this method of installation is chosen, it will still be necessary to allow adequate ventilation space around the unit. The following additional items must be observed. 1. Place the ice maker in front of the installation location. Remove the feet and place the unit flat on the floor or on a platform depending on your installation requirements. 2. The water supply line and drain line must be plumbed before connecting to the ice maker. 3. Turn on the main water supply and tap. Check for water supply connection leaks. Tighten any connections (including connections at the valve)or nuts that leak. 4. Pour 1gallon of water into the ice storage bin to check for leaks at all drain connections and the nut of the drain water hole. Tighten any connections or nuts that leak. (This procedure will also indicate if the drainpipe is kinked or pinched.) 13 5. If the electrical outlet for the ice maker is behind the cabinet, plug in the ice maker. 6. Push the ice maker into position. 7. Seal all around the cabinet to the floor with an approved caulking compound. OPERATION FinalCheck List before Operation 1. Have all packing materials and tape been removed from the interior and exterior of the ice maker? 2. Did you clean the ice storage bin? 3. Have the installation instructions been followed, including connecting the machine to water, drain and electricity? 4. Has the machine been leveled? 5. Is the ice maker in a site where the ambient temperature is between 13º C (55º F)and 32ºC (90ºF)and the water temperature within 5º C (41º F)and 25º C (77º F)all year round? 6. Has the water supply pressure been checked to ensure a minimum of 20psig with a static pressure not to exceed 80psig? 7. Is there a clearance of at least 4 in. (101mm)at the rear, and 0.6in. (15mm)at the sides and top for proper air circulation? 8. Has the power supply voltage been checked or tested against the nameplate rating? And has proper grounding been installed in the ice maker? 9. Is the ice maker plugged in? 10. Did you turn on the main water supply and the tap? 11. Did you check for leaks at all water supply and drainpipe connections? 14 Operating M ethod 1. Switch on the Power switch on the right side panel. The light will be on. The ice maker will start working automatically and feeding water. 2. After the first feeding of the water, the machine will automatically go to the ice making stage, and the sound of water spraying will be heard. 3. Ice will be harvested to the ice storage bin. When the storage bin is filled to the point that the ice-full sensor is covered, the ice maker will automatically stop working. The machine will restart making ice once the storage bin is less than full. 4. Excess water will flow through the drain outlet at the back of the machine and empty into the floor drain. IM PORTANT: • Although the unit has been tested at the factory,due to long-term transit and storage, the first batch of cubes must be discarded. • Never turn the water supply tap off when the icemaker is working. How the M achine M akes Ice There are two distinct cycles:freeze and harvest. During the freeze cycle, water is sprayed against the evaporator surface. In the harvest cycle, the ice is released and water enters the machine. A complete cycle takes about 20minutes, but is dependent on temperature and operating conditions. Freeze:During the freeze cycle the compressor is pumping refrigerant, the fan motor is blowing air, and the water pump is circulating water. When the batch of ice has been fully formed, the ice maker stops the freeze cycle and begins to harvest the ice. 15 Harvest:During the harvest cycle the compressor is still operating, but the water pump has stopped. Two other components have been energized:the hot gas valve and the water inlet valve. These two valves open and warm up the freezing surface, allowing the cubes to fall into the bin. The freeze cycle will restart when all the cubes have been harvested. How the machine uses water: The ice maker begins with a fixed charge of water that is contained in the Water pump water sump. As the water is sprayed against the freezing evaporator surface, Hot gas valve the portion of water Condenser that does not contain Compressor mineral impurities Fan motor will freeze and stick to the ice cube molds. The water containing impurities falls back Water inlet valve into the water sump. Gradually, during the freezing portion of the ice-making cycle, the water in the sump will become highly concentrated with mineral impurities. Evaporator During the harvest cycle, fresh water flows into the machine to dilute the bin water and rinse the concentrated minerals down the drain. NormalSounds Your new ice maker may make sounds that are not familiar to you. Most of the new sounds are normal. Hard surfaces like the floor and walls can make the sounds seem louder than they actually are. The following describes the kinds of sounds that might be new to you and what may be making them. • You will hear a swooshing sound when the water valve opens to fill the water sump • • for each cycle. Rattling noises may come from the flow of the refrigerant or the water line. Items stored on top of the ice maker can also make noises. The high-efficiency compressor may make a pulsating or high-pitched sound. 16 • Water running from the water sump to the evaporator plate may make a splashing • • • • • sound. Water running from the evaporator to the water sump may make a splashing sound. As each cycle ends, you may hear a gurgling sound due to the refrigerant flowing in your ice maker. You may hear air being forced over the condenser by the condenser fan. During the harvest cycle, you may hear the sound of ice cubes falling into the ice storage bin. When you first start the ice maker, you may hear water running continuously. The ice maker is programmed to run a rinse cycle before it begins to make ice. Preparing the Ice M aker for Long Storage If the ice maker will not be used for a long time, or is to be moved to another place, it will be necessary to drain the system of water. 1. Shut off the water supply at the main water source. 2. Disconnect the water supply line from the water inlet valve. 3. Disconnect the drain pipe to the drain line or floor drain. 4. Allow the ice maker to run for an hour or more until all remaining ice cubes have been ejected from the ice maker assembly. 5. Shut off the electric supply at main electrical power source. 6. Screw off the nut of the water drain hole at the back of the machine, drain out water residue completely (do not loosen or screw off the nut at other times), then tighten the nut after finishing. 7. Drop the door open to allow for circulation and prevent mold and mildew. 8. Leave water supply line and power cord disconnected until ready to reuse. 17 CLEANING AND MAINTENANCE If the ice maker is left unused for a long time, before the next use it must be thoroughly cleaned. Follow carefully any instructions provided for cleaning or use of sanitizing solution. Do not leave any solution inside the ice maker after cleaning. Periodic cleaning and proper maintenance will ensure efficiency, top performance, and long life. The maintenance intervals listed are based on normal conditions. You may want to shorten the intervals if you have pets, or the unit is used outdoors, or there are other special considerations. W hat shouldn’t be done Never keep anything in the ice storage bin that is not ice:objects like wine and beer bottles are not only unsanitary, but the labels may slip off and plug up the drain. W hat should be kept clean There are 4 things to keep clean: 1. The exterior 2. The condenser 3. The interior 4. The ice making system Before proceeding with cleaning and maintenance operations, make sure the power line of the unit is disconnected and the water line is shut off (EXCEPTION:Ice maker system cleaning). Exterior Cleaning The door and cabinet may be cleaned with a mild detergent and warm water solution such as 1 oz of dishwashing liquid mixed with 2 gallons of warm water. Do not use solventbased or abrasive cleaners. Use a soft sponge and rinse with clean water. Wipe with a soft clean towel to prevent water spotting. 18 Stainless steel can discolor when exposed to chlorine gas and should be cleaned. Clean stainless steel with a mild detergent and warm water solution and a damp cloth. Never use abrasive cleaning agents. NOTICE:Stainless steel exposed to chlorine gas and moisture,such as in areas with spas or swimming pools,may show some discoloration. Discoloration from chlorine gas is normal. Condenser Cleaning A dirty or clogged condenser prevents proper airflow, reduces ice making capacity, and causes higher than recommended operating temperatures that may lead to component failure. Have the condenser cleaned at least once every six months. 1. Unplug the ice maker or disconnect power. 2. Remove the 2screws at the bottom of the front cover. 3. Grasp the lower edge of the front cover at the right and left sides, raise it a little and then pull down. NOTE:Do not use too much force,as the wire leads connected to the power switch can be inadvertently disconnected. 4. Locate the condenser surface. Condenser surface 5. Remove dirt and lint from the condenser fins and the unit compartment with a brush attachment on a vacuum cleaner. 6. Reassemble the front cover. 7. Plug in the ice maker or reconnect power. DO NOT touch condenser fins. They are sharp and can be damaged easily. 19 Interior Cleaning The ice storage bin should be sanitized occasionally. Clean the bin before the ice maker is used for the first time and reused after stopping for an extended period of time. It is usually convenient to sanitize the bin after the ice making system has been cleaned and the storage bin is empty. 1. Disconnect power to the unit. 2. Open the door and with a clean cloth, wipe down the interior with a sanitizing solution made of 1ounce of household bleach or chlorine and 2gallons of hot water (95º to 115ºF). 3. Rinse thoroughly with clear water. The waste water will be drained off through the drainpipe. 4. Reconnect power to the unit. The ice scoop should be washed regularly. Wash it just like any other food container. DO NOT use solvent-based cleaning agents or abrasives on the interior. These cleaners may transmit taste to the ice cubes, or damage or discolor the interior. IMPORTANT NOTE: The sprinkler should only be cleaned when you find that some of the ice cubes are improperly shaped during ice making. Cleaning the ice making system should follow cleaning of the sprinkler. 1. Disconnect power to the unit and open the door. 20 2. Take out the row of flake covers by snapping one end up and pulling forward. 3. Remove the slideway from the water sump. 4. Find the sprinkler arm and raise it. Disconnect it from the water tube which is connected at the back of the sprinkler arm. 5. A de-scaling solution can be prepared in a plastic basin with Nu-Calgon Nickel-Safe Ice Machine Cleaner. Mix 4 ounces of the ice machine cleaner per gallon of warm water. Remove the sprinkler arm from the interior. Thoroughly clean the sprinkler arm by soaking it in the basin filled with the de-scaling solution until it is free of any deposit; use a soft brush to remove any thick or stubborn residue and to help the dissolving action. Rinse under a stream of tap water. 21 6. Wipe down the interior of the water sump with the de-scaling solution and warm water. Rinse thoroughly with clear water. 7. Reassemble the sprinkler arm, slideway and row of flake covers. 8. Perform steps 1, 3, 6, 7and 8of the Ice Making System Cleaning procedure below. Ice M aking System Cleaning Minerals that are removed from water during the freezing cycle will eventually Inlet water valve form a hard scaly deposit in the water system. Cleaning the system regularly helps remove the mineral scale buildup. How often you need to clean the system depends Water line upon how hard your water is or how Nut of water-draining hole effective your filtration may be. With hard water of 15 to 20 grains/gal. (4 to 5 To drain grains/liter), you may need to clean the system as often as every 6months. 1. Turn off power to the ice maker. Keep the ice maker connected to the water supply and drainpipe. 2. Open the door and scoop out all of the ice cubes. Either discard them or save them in an ice chest or cooler. Control Box 3. Remove the 2screws in the front cover and push forward to remove the front cover. Locate the control box. NOTES: Do not use too much force,as the wire leads connected to the power switch can be inadvertently disconnected. Use care in the area of the control box. Do not expose it to moisture. 4. Turn on the power to the ice maker. Pour 8oz. of Nickel-Safe Ice Machine Cleaner solution into the water sump. Add 8oz. of tap water. After about 5minutes, press down the “Clean” button on the Control Box. (See figures here and on page 24.)The machine will run the Automatic Clean Mode. Water sump 22 5. Allow 30minutes for proper cleaning. After cleaning, shut off the power switch, and unscrew the nut of the water-draining hole on the rear of the unit. Drain off the waste water to some container, and then screw the nut on tightly when the waste water is fully drained off. The ice machine cleaner contains acids. DO NOT use or mix with any other solvent-based cleaner products. Use rubber gloves to protect hands. Carefully read the material safety instructions on the container of the ice machine cleaner. DISCARD the first batch of ice produced after cleaning. 6. Repeat steps 4 and 5(without Ice Maker Cleaning Solution)to rinse the ice making system 3times. NOTE: The use of the Ice Maker Cleaner Solution in the water sump during the rinse is not needed. 7. Prepare a sanitizing solution made of 1ounce of household bleach and 2gallons of hot water (95º to 115º F). Remove the flake covers and slideway from the water sump and wipe the entire bin inside and out, covering the entire surface of the walls. 8. Fill a spray bottle with the sanitizing solution and spray all corners and edges, making sure to cover all surfaces with the solution. Soak the flake covers and slideway in the solution and put back in place after drying. 9. Allow the solution to be in contact for at least 3minutes, then dry. 10. Repeat step 6to rinse the ice making system one more time. 11. Reassemble the front cover. 12. Turn on the power again. The machine will return to the regular ice making mode. Discard the first batch of ice. 23 ControlBox (behind front cover) Red LED Clean Ice full Green LED Ice size adjust Ice making Yellow LED Mode Ice harvest Descriptions ofLEDs andbuttons: 1. Red LED:Ice Full indicator light. When this LED is lit, the ice storage bin is full of ice or there is something between the two arms of the ice-full sensor in the ice storage bin. The unit will stop working. When ice cubes are taken out of the ice storage bin, clearing the sensor, the red LED will keep flashing for 3minutes. Then the unit will restart and return to the ice making mode. 2. Green LED:Ice Making indicator light. When this LED is lit, the unit is working in the Ice Making mode controlled by a temperature probe on the evaporator. When the green LED is flashing, the unit is working in the Ice Making mode controlled by a fixed timer. 24 3. Yel l ow LED:Ice Harvest indicator light. When this LED is lit, the unit is working in the Ice Harvest mode controlled by a temperature probe on the evaporator. When the yellow LED is flashing, the unit is working in the Ice Harvest mode controlled by a fixed timer. 4. Cleanbutton:When this button is pressed, the unit enters the Cleaning mode. The green and yellow LEDs flash together. To stop the Cleaning mode, just press the button again. 5. Mode button:Mainly for service. When this button is pressed, unit can change from Ice Making mode to Ice Harvest mode, or from Ice Harvest mode to Ice Making mode. You can judge the mode from the status of the green and yellow LEDs. 6. Ice size adjust:Turn the screw clockwise, and the size of individual ice cubes will be larger in the next cycle;the cycle time will be longer. Turn the knob counterclockwise, and the ice size will be smaller in the next cycle. It is not recommended that the ice size be adj usted after installation. 7. If the red, green and yellow LEDs are flashing together, the machine is not working. The major fuse of the control box has failed. Call for service. NOTE: Avoid letting water contact the control box. MAJOR FUNCTIONS 1. Completely automatic operating procedure. 2. When the ice storage bin is full of ice cubes, the machine stops working automatically and starts again after the cubes are removed. 3. The different colors of the LED display indicate various work modes. 4. Indication of failure of major control box fuse. 5. The fan motor responds to the ambient temperature. If it is cold, the motor will stop working to keep the cooling system in good working condition. 6. Ice cube size is adjustable. 7. A sensitive probe and accurate timer enhance the performance of the ice maker. 8. Manual Clean mode to start or stop the ice making system cleaning. 9. Built-in compressor protection system. 25 TROUBLESHOOTING Before Calling for Service If the unit appears to be malfunctioning, read through the OPERATION section of this manual first. If the problem persists, check the TROUBLESHOOTING GUIDE below and on the following page. The problem could be something very simple which can be solved without a service call. TroubleshootingGuide Probl em Possible Cause Probable Correction The ice maker is unplugged. Plug the ice maker in. The machine doesn’t operate. The fuse is blown. Replace fuse. If it happens again, call for service to check for a short circuit in the ice maker. The ice maker power switch is OFF. Turn the ice maker power switch ON. The ice storage bin is full of Remove some ice;make sure the ice. ice-full sensor is free of ice. The water supply tap is Turn on the water supply tap. The water doesn’t turned off. feed in after the ice The water supply line is not maker starts. Reconnect the water supply line. connected properly. The bin should fill up and the machine shut off in 9-14 hours. If not, the condenser may be dirty. Clean the condenser. The bin drain may be partially restricted. Clean out the drain;check the installation. Machine makes ice, but ice storage The airflow to the ice bin does not fill up maker may be obstructed. with ice. The ambient temperature and water temperature are high, or machine is near some heat source. 26 Check the installation. Check the installation. Probl em Possible Cause Probable Correction A few water drops fall to Normal condensation on the door or the floor when you open the some water together with ice. Take door to take out ice from care when you take out ice. ice storage bin. Water is leaking from the unit. Water supply connection leaking. Tighten fitting. See “ Connecting the Water Line”. Nut of water drain hole leaking. Tighten the nut. Drain hose connection leaking. Tighten fitting. See “ Connecting the Drain”. Cubes are partially formed or are Not enough water in the white at the water sump. bottom. Check if the water supply pressure is below 20psig. Check water supply;filter may be restricted. Check for a water leak at the water sump. Check if water inlet valve is restricted. The ice cubes are incomplete when being dumped. Noise during operation The sprinkler is blocked. Clean it;see “Interior Cleaning”. The feet are not leveled and Level and lock the feet. See “Leveling locked. the Ice Maker”. Certain sounds are normal. See “ Normal Sounds”. The electricity is off. Reconnect the power supply line. Cut off the electricity;let the ice maker The ice maker The room temperature is stop working till the temperature stops suddenly out of the stated range. returns within the stated range. while making ice. The ventilation louvers are Remove the obstruction. covered. The body of the ice maker is electrified. The grounding line isn’t in Use a socket meeting the required the socket. electrical standard. Scale occurs frequently inside the machine. The hardness of the water is Use a water-softening device installed too high. in front of the water inlet valve. 27 LIMITED WARRANTY MC Appliance Corporation warrants each new Commerci alIce Makerto be free from defects i n materi aland workmanship and agrees to remedy any such defect or to furnish a new part(s) (at the company’s option) for any part(s) of the unit that has failed during the warranty period. Parts and labor expenses are covered on this unit for a period of one year from the date of purchase. In addition, MC Appliance Corporation warrants the compressor (part only) to be free from defects in material and workmanship for a period of 5 years. The consumer is responsible for all labor and transportation expenses related to the diagnosis and replacement of the compressor after the initial one-year warranty expires. A copyofthe dated sales receipt /invoice is required to receive warrantyservice or a refund. This warranty covers appliances in use within the continental United States,Puerto Rico and Hawaii.The warranty does not cover the following: § § § § § § § § § § § § § Damages due to shipping damage or improper installation. Damages due to misuse or abuse. Content losses due to failure of the unit. Inside components such as door panels, door shelves, racks, light bulbs, etc. Punctures to the evaporator system due to improper defrosting of the unit. Repairs performed by unauthorized service agents. Service calls that do not involve defects in material and workmanship such as instruction on proper use of the product, door reversal or improper installation. Replacement or resetting of house fuses or circuit breakers. Failure of this product if used for other than for its intended purpose. Disposal costs for any failed unit not returned to our factory. Any delivery costs incurred as the result of a unit that fails to perform as specified. Expenses for travel and transportation for product service if your appliance is located in a remote area where service by an authorized service technician is not available. The removal and reinstallation of your appliance if it is installed in an inaccessible location or is not installed in accordance with published installation instructions. This warranty is in lieu of all warranties expressed or im plied and no representative or person is authorized to assum e for us any other liability in connection with the sale of this product.Under no circum stances is the consum er perm itted to return this unit to the factory without prior written consent from MC Appliance Corporation. Models Parts Labor Com pressor Type ofService (Part Only) EW CIM65S One-Year One-Year Five Years In-Home EW CIM90S EW CIM120S For Service or Assistance please call 888 775-0202. Or visit us on the web at www.mcappliance.com to request warranty service or order parts.