1
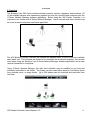
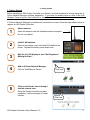
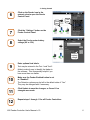
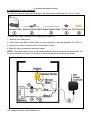
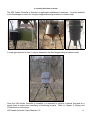
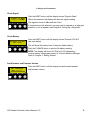
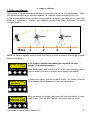
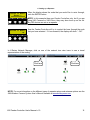
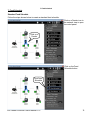
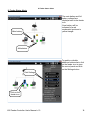
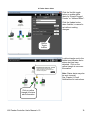
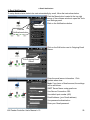
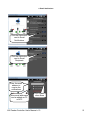
X80 Feeder Controller
User's Manual
Version 1.0
www.buckeyecam.com
Table of Contents
1. Warnings.................................................................................................................................................... 3
2. Overview.................................................................................................................................................... 4
3. Getting Started........................................................................................................................................... 5
4. Installing the Feeder Controller...................................................................................................................7
5. Display and Pushbuttons............................................................................................................................ 9
6. Setting up a Repeater............................................................................................................................... 11
7. Feed Schedule......................................................................................................................................... 13
8. Feeder Status Alerts................................................................................................................................. 18
9. Email Notifications.................................................................................................................................... 20
10. Additional Information............................................................................................................................. 23
11. Warranty and Service............................................................................................................................. 24
X80 Feeder Controller User's Manual v1.0
2
1. Warnings
1. Warnings
Contains FCC ID:MCQ-XBEE09P The enclosed device complies with Part 15 of the FCC Rules.
Operation is subject to the following two conditions: (i.) this device may not cause harmful
interference and (ii.) this device must accept any interference received, including interference that
may cause undesired operation.
If the device is used with any antenna other than the one supplied, the system may not comply
with the FCC regulation Part 15.247, Operation within the license-free band 902 – 928 MHz.
Contact manufacturer regarding use of optional high-gain antennas with the X Series wireless
camera system.
WARNING: To satisfy FCC RF exposure requirements for mobile transmitting devices, a separation
distance of 20 cm or more should be maintained between the antenna of this device and persons
during device operation. To ensure compliance, operations at closer than this distance are not
recommended. The antenna used for this transmitter must not be co-located in conjunction with
any other antenna or transmitter.
WARNING: Before servicing or adjusting a feeder, always disconnect battery power to the X80
Feeder Controller.
X80 Feeder Controller User's Manual v1.0
3
2. Overview
2. Overview
The Buckeye Cam X80 Series includes wireless cameras, sensors, repeaters, and actuators. All
of the available devices work seamlessly together and may be controlled and monitored with the
X-Series Network Manager software application. Before using the X80 Feeder Controller, it is
important to be familiar with X-Series Network Manager. User's manuals and video tutorials may
be found at www.buckeyecam.com/site/support.html.
The X80 Wireless Feeder Controller can replace the standard timer on most commonly available
deer feeder kits. This will allow the feeder to be controlled and monitored wirelessly from several
miles away using the Buckeye Cam X-Series Network Manager software application and a base
receiver connected to a computer.
Using X-Series Network Manager, the daily feed schedule may be modified at any time and
wirelessly transmitted to the feeder. The feeder can also send status alerts for low battery, blown
fuse, jammed motor, or empty feeder. Up to 254 feeders can be controlled and monitored from
one base.
X80 Feeder Controller User's Manual v1.0
4
3. Getting Started
3. Getting Started
Before installing an X80 Feeder Controller on a feeder, it must be registered to a base using the XSeries Network Manager software application. If you have not already done so, refer to the X80
Wireless Camera System User's Manual for instructions on how to connect to a base.
If X-Series Network Manager is installed and connected to a base, follow the steps shown below to
register an X80 Feeder Controller.
1
2
3
4
5
Attach antenna.
Screw the antenna onto the threaded antenna connector.
Do not over-tighten.
Install 5 AA batteries.
Remove the battery cover and install 5 AA batteries as
shown. Replace the battery cover when done.
Wait for the LCD display to read “Not Registered
Waiting for Base”.
Add to X-Series Network Manager.
Click on “Add/Remove Device”.
Click here
Click on the Feeder icon and drag it
into the network view.
Once the Feeder Controller has been
registered, it will be assigned a Feeder
number.
X80 Feeder Controller User's Manual v1.0
Click here
5
3. Getting Started
6
Click on the Feeder icon in the
network view to open the Feeder
Control Panel.
Click
here
7
8
Click
here
Click the “Settings” button on the
Feeder Control Panel.
Select the Feeder motor battery
voltage (6V or 12V).
Select
batttery
voltage
9
10
11
12
Enter optional text labels.
Text may be entered in the Text 1 and Text 2
fields to make it easy to identify the feeder in
the software. This is especially helpful if you
have more than one feeder.
Make sure the Feeder Enabled button is set
to “Enabled”.
The Detection options may be left to the default state of “Yes”.
They may be changed later if necessary.
Click Update to save the changes, or Cancel if no
changes were made.
Repeat steps 1 through 11 for all Feeder Controllers.
X80 Feeder Controller User's Manual v1.0
6
4. Installing the Feeder Controller
4. Installing the Feeder Controller
The following items are provided for wiring to the spinner motor and battery (6 Volt or 12 Volt).
To install the Feeder Controller on an existing spin feeder kit:
1. Remove the existing timer.
2. Drill a hole for the Motor Power Cable (or use existing hole, minimum diameter of 0.3125 in.).
3. Insert the 10 Amp Fuse into the Inline Fuse Battery Pigtail.
4. Make the wiring connections as shown below.
NOTE: If the motor does not turn in the desired direction, reverse the brown and blue wires. For
most spin feeders, the order of connection of the brown and blue wires does not matter.
X80 Feeder Controller User's Manual v1.0
7
4. Installing the Feeder Controller
The X80 Feeder Controller is housed in a watertight, weatherproof enclosure. It may be attached
to the feed hopper or motor kit using the supplied mounting bracket or a ratchet strap.
If a high gain antenna is used, it may be attached to the feed hopper using an antenna mast.
Once the X80 Feeder Controller is installed, it is important to perform a manual feed and do a
signal check to make sure everything is functioning properly. Refer to Chapter 5, Display and
Pushbuttons for instructions.
X80 Feeder Controller User's Manual v1.0
8
5. Display and Pushbuttons
5. Display and Pushbuttons
Release the latch on the side of the Feeder Controller enclosure to access the LCD display and
pushbuttons.
If no buttons have been pushed for some period of time, the LCD display will go blank in order to
save battery power. Pushing any button will wake it up.
Pushing the NEXT button will always advance the display to show the next message.
Pushing the HOME button will always return the display sequence to the first message.
Manual Feed
Manual Feed
HOME
Push the NEXT button until the display shows “Manual Feed”.
Press the ENTER button.
NEXT CHANGE ENTER
`
Manual Feed
Duration: 3 sec
HOME
NEXT CHANGE ENTER
The display will now show the duration of the manual feed.
To change the duration, press the CHANGE button.
Press ENTER when done.
`
Manual Feed
Speed: 40%
HOME
NEXT CHANGE ENTER
The display will now show the motor speed.
To change the motor speed, press CHANGE.
Press ENTER when done.
`
3 sec @ 40%
[ENTER] to run
HOME
The display will now show duration and speed.
To start the manual feed, press ENTER.
NEXT CHANGE ENTER
`
Manual Feed
Start In: 10sec
HOME
NEXT CHANGE ENTER
The display will now start a countdown before the manual feed begins.
Stand back from the feeder!
`
X80 Feeder Controller User's Manual v1.0
9
5. Display and Pushbuttons
Check Signal
Signal to Base
||||||||-40dBm
HOME
NEXT CHANGE ENTER
Push the NEXT button until the display shows “Signal to Base”.
After a few seconds, the display will show the signal reading.
The signal is shown in dBm and also “bars”.
If a signal cannot be obtained, you may need to upgrade to a high-gain
antenna, or use a repeater (see Chapter 6, Setting up a Repeater).
`
Check Battery
External 12V SLA
99% 12.6V
HOME
NEXT CHANGE ENTER
Push the NEXT button until the display shows “External 12V SLA”
(see note below).
This will show the battery level of the main feeder battery.
Push the CHANGE button to see the AA battery reading.
`
NOTE: The display will show 12V SLA or 6V SLA depending
on what battery voltage was chosen in X-Series Network Manager.
Refer to Chapter 3, Getting Started.
Serial Number and Firmware Version
SN: 12345678
Ver. 1.1.0
HOME
Push the NEXT button until the display shows the serial number
and firmware version.
NEXT CHANGE ENTER
`
X80 Feeder Controller User's Manual v1.0
10
6. Setting up a Repeater
6. Setting up a Repeater
One method to extend transmission distance or overcome obstructions is to use repeaters. Every
X80 wireless device may be used as a repeater (i.e. cameras, feeder controllers, Echo, etc.).
In the example shown below, Feeder 2 cannot establish a signal to the base due to a very long
distance or obstructions. Feeder 1 can establish a signal to the base, so Feeder 2 is routed
through Feeder 1.
NOTE: To setup a repeater network, there must first be at least one device that can get a signal
directly to the base.
Routed to Base
… OK
HOME
NEXT CHANGE ENTER
`
Routed to Base
Searching...
HOME
At the Feeder Controller that cannot get a signal to the base
(Feeder 2 in the above example) ...
Open the enclosure and push the NEXT button until the display shows
how the Feeder Controller is currently routed (Base is the default).
To change the routing, push the CHANGE button. The Feeder Controller
will now search for any devices that it can get a signal from.
NEXT CHANGE ENTER
`
3 nodes found
NEXT–view list
HOME
When the search is complete, the display will show the number of nodes
found (if any). Push the NEXT button to view each node on the list.
NEXT CHANGE ENTER
`
X80 Feeder Controller User's Manual v1.0
11
6. Setting up a Repeater
Change to Node1
Feeder 1
HOME
NEXT CHANGE ENTER
`
Routed to Node1
… OK
HOME
When the display shows the node that you would like to route through,
push the ENTER button.
NOTE: In this example there are Feeder Controllers only, but if you are
using X80 Cameras or X80 Echos, they may also show up on the list.
Any X80 device can act as a repeater.
Now the Feeder Controller will try to contact the base through the node
that you have selected. If it is successful, the display will show “...OK”.
NEXT CHANGE ENTER
`
In X-Series Network Manager, click on one of the network tree view icons to see a visual
representation of the routing.
Click here
Click here
NOTE: For more information on the different types of repeater setups and antenna options see the
X80 Wireless Camera System User's Manual available at www.buckeyecam.com.
X80 Feeder Controller User's Manual v1.0
12
7. Feed Schedule
7. Feed Schedule
Standard Feed Schedule
Follow the steps shown below to create a standard feed schedule.
Click on a Feeder icon in
the network view to open
its control panel.
Click on a
Feeder
Click on the Feed
Schedule button.
Click Feed
Schedule
X80 Feeder Controller User's Manual v1.0
13
7. Feed Schedule
Click on Add Feed to add
a scheduled feed.
Click Add
Feed
Click on the up / down
arrows to set the Time,
Duration, and speed.
Click the Add button
when done.
Set Time,
Duration
and Speed
Click Add
when done
X80 Feeder Controller User's Manual v1.0
14
7. Feed Schedule
The feed will happen on
the days that are
checked. If you want to
disable the feed on a
certain day, un-check the
box.
Check the
days you
want to feed
Click Update
when done
Add more feeds if
necessary. Each feed
may have a different
duration and motor
speed. Also, each feed
may be enabled or
disabled on certain days
of the week.
NOTE: To delete a feed
click the red x beside the
feed time.
Add more
feeds
X80 Feeder Controller User's Manual v1.0
Click the red
x to delete a
feed
Click the Update button
when the feed schedule is
complete.
15
7. Feed Schedule
Special Feed Calendar
The Special Feed Calendar may be used to make a unique feed schedule that will only run on the
selected calendar day.
This may be useful for setting up a different feed schedule when hunts are scheduled.
Click the Edit button to
schedule Special Feed
Calendar days.
Edit the
Special Feed
Calendar
Click the date on which you
want to add a special feed
day.
This is
today's date
Click any
date to add a
special feed
X80 Feeder Controller User's Manual v1.0
16
7. Feed Schedule
If there are standard feeds scheduled for the day you have chosen, they will be listed. You may
leave them as they are or delete them by clicking the red x.
Click the Add Feed button
to add feeds that will only
run on the selected
calender day.
Click Add feed
to add feed
times for this
day only
Yellow box
indicates that a
Special Feed
Day was
created
If any changes are made to
the Standard Feed
Schedule either by adding
feeds or deleting feeds, a
yellow box will appear
indicating that this day is a
Special Feed day.
NOTE: To go back to the
Standard Feed Schedule,
click the button.
Click the Done button to save the changes and return to the Special Feed Calender. Click the red
Update button to transfer the schedule to the feeder.
X80 Feeder Controller User's Manual v1.0
17
8. Feeder Status Alerts
8. Feeder Status Alerts
The main battery and AA
battery voltages are
displayed next to the feeder
icon.
A low battery will be
indicated by a red
exclamation point and a
yellow triangle.
Main battery
AA batteries
To enable or disable
additional status alerts, click
on the feeder icon to open
the control panel and click
on the Settings button.
Click Settings
Click on the
feeder icon
X80 Feeder Controller User's Manual v1.0
18
8. Feeder Status Alerts
Click the Yes/No toggle
button to enable status
alerts for “Empty/Clogged
Feeder” or “Jammed Motor”.
Click the Update button
when finished, or cancel to
exit without making
changes.
Yes/No
Toggle
buttons
A yellow triangle next to the
feeder icon indicates that a
status alert has been
detected. Click on the
yellow triangle to see more
information.
Note: Status alerts may also
be sent via email.
See Chapter 9, Email
Notifications for instructions.
Click on yellow
triangle for status
alert information
X80 Feeder Controller User's Manual v1.0
Yes/No
Toggle
buttons
19
9. Email Notifications
9. Email Notifications
To setup feeder status alerts to be sent automatically by email, follow the instructions below.
Click the Menu button located in the top right
corner of the software window to open the Tools
and Settings panel.
Click on the Notifications button.
Menu Button
Click the
Notifications button
Click on the Edit button next to Outgoing Email
Server.
Edit Outgoing Email
Server
Enter the email server information. Click
Update when done.
Note: If you have a Gmail account, the settings
will be as follows:
SMPT Server Name: smtp.gmail.com
Use Secure Connection: SSL
Use default port number (465)
Email Address: (your Gmail address)
Use password authentication
Enter your Gmail password.
X80 Feeder Controller User's Manual v1.0
20
9. Email Notifications
Click the Edit button
next to Email
Notifications
Click the Edit button
next to Email
Recipients
Enter the email
address to
receive the
notifications
More email addresses
can be added as CC
or BCC
Click Update
when done
X80 Feeder Controller User's Manual v1.0
21
9. Email Notifications
Click the Edit button
next to Notification
Types
Select the
notification types
to receive
Click Update
when done
X80 Feeder Controller User's Manual v1.0
22
10. Additional Information
10. Additional Information
Video Tutorials
X-Series Network Manager video tutorials are available at www.buckeyecam.com.
Repeaters and High Gain Antenna Setups
For more information on the different types of repeater setups and high gain antenna options see
the X80 Wireless Camera System User's Manual available at www.buckeyecam.com.
Adding X80 Wireless Cameras
X80 Wireless Cameras can be added to the feeder network. Place the cameras at the feeders - or
anywhere you want - and control everything from one base using the X-Series Network Manager
software application.
●
Control up to 254 devices (feeders + cameras) from one base.
●
Pictures or videos may be automatically emailed.
●
Pictures or videos may be automatically uploaded to LiveCam website.
X80 Feeder Controller User's Manual v1.0
23
11. Warranty and Service
11. Warranty and Service
For service or repair, contact ATSI/Buckeye Cam at:
ATSI
8157 US Hwy 50 • Athens, OH 45701
(866) 325-8172 • (740) 592-2874
Fax (740) 594-2875
www.buckeyecam.com
Athens Technical Specialists, Inc. (ATSI) warrants Products (BuckEye Cam TM ) sold by it and
guarantees to correct, by repair or replacement at our option, any defects of material and
workmanship which develop under normal and proper use within six (6) months from the date of
the original purchase when inspection proves the fault to be of manufacturing. Circuit board
components only receive a twelve (12) month warranty. All such Products must be returned to our
service center, transportation charges prepaid. This warranty does not apply to any of our Products
which have been repaired or altered by unauthorized persons or service centers in any way so as,
in our judgment, to injure their stability or reliability, or which have been subject to misuse,
negligence, or accident or which have had their serial number altered, effaced or removed.
We will not assume any expense or liability for repairs made by other parties without our written
consent. ATSI is not responsible for damage to any associated equipment or apparatus, nor shall
we be held liable for loss of profit or other special damages. There is no other guarantee or
warranty except as herein stated. The Buyer, his employees, or others assumes all risks and
liabilities for the operation, the use and the misuse of the product described herein and agree to
defend and to save the seller harmless from any and all claims arising from any cause whatsoever,
including seller’s negligence for personal injury incurred in connection with the use of the said
product.
ATSI reserves the right to discontinue models at any time or change specifications, price or design
without notice and without incurring any obligation. The express warranties are in lieu of all other
warranties, guarantees, promises, affirmations, or representations, express or implied which would
be deemed applicable to the goods sold hereunder. No express warranties and no implied
warranties, whether of merchantability, fitness for any particular use or purpose, against
infringement, or otherwise (except as to title) other than those expressly set forth herein, shall
apply.
X80 Feeder Controller User's Manual v1.0
24