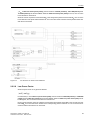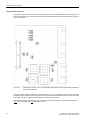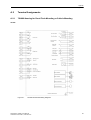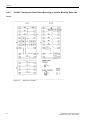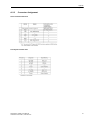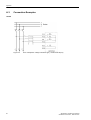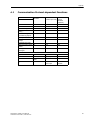
1
Preface
Content
SIPROTEC
Introduction
Functions
Multi-Functional Protective
Relay with Local Control
7SJ689
Mounting and Commissioning
Technical Data
Appendix
V4.60
Literature
User Manual
C53000-G1176-C346-1
Glossry
1
2
3
4
A
Note
For safety purposes, please note instructions and warnings in the Preface.
Disclaimer of liability
Copyright
We have checked the contents of this manual against the hardware
and software described. However, deviations from the description
cannot be completely ruled out, so that no liability can be accepted
for any errors or omissions contained in the information given.
Copyright © Siemens AG 2005. All rights reserved.
The information given in this document is reviewed regularly and
any necessary corrections will be included in subsequent editions.
We appreciate any suggested improvements.
We reserve the right to make technical improvements without
notice.
Dissemination or reproduction of this document, or evaluation and
communication of its contents, is not authorized except where expressly permitted. Violations are liable for damages. All rights reserved, particularly for the purposes of patent application or trademark registration.
Registered Trademarks
Date: 02.2012
SIPROTEC, SINAUT, SICAM and DIGSI are registered trademarks
of Siemens AG. Other designations in this manual might be trademarks whose use by third parties for their own purposes would infringe the rights of the owner.
Siemens Power Automation Ltd.
Order No.: C53000-G1176-C346-1
Release: V04.00.00
Preface
Purpose of this Manual
This manual describes the functions, operation, installation, and commissioning of the device 7SJ689.
In particular, one will find:
Information on the Device Configuration and a description of the device functions and setting options →
Chapter 2;
Instructions for mounting and commissioning → Chapter 3;
For general information on operation and configuration of SIPROTEC® 4 devices, please refer to the SIPROTEC® System Description /1/.
Target Audience
Protection engineers, commissioning engineers, personnel concerned with adjustment, checking, and service
of selective protective equipment, automatic and control facilities, and personnel of electrical facilities and
power plants.
Applicability of this Manual
This manual is valid for: SIPROTEC 4 Remote Trip Release Device 7SJ689; firmware version V4.6.
Indication of Conformity
This product complies with the directive of the Council of the European Communities on the
approximation of the laws of the Member States relating to electromagnetic compatibility (EMC
Council Directive 89/336/EEC) and concerning electrical equipment for use within specified
voltage limits (Low-voltage directive 73/23 EEC).
This conformity is proved by tests conducted by Siemens AG in accordance with Article 10 of
the Council Directive in agreement with the generic standards EN 61000-6-2 and EN 61000-64 for EMC directive, and with the standard EN 60255-6 for the low-voltage directive.
This device is designed and produced for industrial use.
The product conforms with the international standards of the series IEC 60255 and the German
standard VDE 0435.
Further Standards
IEEE 37.90(Detailed find in Chpater 4)
Additional Support
Should further information on the System SIPROTEC® 4 be desired or should particular problems
arise which are not covered sufficiently for the purchaser's purpose, the matter should be referred
to the local Siemens representative.
Our Customer Care Center provides 24-hours service:
Hotline: 8008289887, 4008289887
SIPROTEC, 7SJ689, User Manual
C53000-G1176-C346-1, Date 02.2012
3
Preface
Fax: +86-025-52114978
e-mail: [email protected]
Training Courses
For detail training courses, please refer to our training center:
Siemens Power Automation Ltd.,(SPA)
Building 4, Hua Rui Industry Park,
88 Cheng Xin Avenue,
Jiangning Economic & Technological Development Zone
Tele:+86-025-52120188
Fax:+86-025-52114982
Website: http://www.siemens.com.cn/ea
Instructions and Warnings
The warnings and notes contained in this manual serve for your own safety and for an appropriate lifetime of
the device. Please observe them!
The following indicators and standard definitions are used:
DANGER!
indicates that death, severe personal injury or substantial property damage will result if proper precautions are
not taken.
Warnings!
indicates that death, severe personal injury or substantial property damage can result if proper precautions are
not taken.
Caution!
indicates that minor personal injury or property damage can result if proper precautions are not taken. This particularly applies to damage on or in the device itself and consequential damage thereof.
Note
indicates information about the device or respective part of the instruction manual which is essential to highlight.
4
SIPROTEC, 7SJ689, User Manual
C53000-G1176-C346-1, Date 02.2012
Preface
WARNING!
Qualified Personnel
Commissioning and operation of the equipment (module, device) as set out in this manual may only be carried
out by qualified personnel. Qualified personnel in terms of the technical safety information as set out in this
manual are persons who are authorized to commission, activate, to ground and to designate devices, systems
and electrical circuits in accordance with the safety standards.
Use as prescribed
The operational equipment (device, module) may only be used for such applications as set out in the catalogue
and the technical description, and only in combination with third-party equipment recommended or approved
by Siemens.
The successful and safe operation of the device is dependent on proper handling, storage, installation, operation, and maintenance.
When operating an electrical equipment, certain parts of the device are inevitably subject to dangerous voltage.
Severe personal injury or property damage may result if the device is not handled properly.
Before any connections are made, the device must be grounded to the ground terminal.
All circuit components connected to the voltage supply may be subject to dangerous voltage.
Dangerous voltage may be present in the device even after the power supply voltage has been removed (capacitors can still be charged).
Operational equipment with exposed current transformer circuits may not be operated.
The limit values as specified in this manual or in the operating instructions may not be exceeded. This aspect
must also be observed during testing and commissioning.
SIPROTEC, 7SJ689, User Manual
C53000-G1176-C346-1, Date 02.2012
5
Preface
Typographic and Symbol Convention
The following text formats are used when literal information from the device or to the device appear in the text
flow:
Parameter Names
Designators of configuration or function parameters which may appear word-for-word in the display of the
device or on the screen of a personal computer (with operation software DIGSI), are marked in bold letters in
monospace type style. The same applies to the titles of menus.
1234A
Parameter addresses have the same character style as parameter names. Parameter addresses contain the
suffix A in the overview tables if the parameter can only be set in DIGSI via the option Display additional settings.
Parameter Options
Possible settings of text parameters, which may appear word-for-word in the display of the device or on the
screen of a personal computer (with operation software DIGSI), are additionally written in italics. The same
applies to the options of the menus.
„Messages“
Designators for information, which may be output by the relay or required from other devices or from the switch
gear, are marked in a monospace type style in quotation marks.
Deviations may be permitted in drawings and tables when the type of designator can be obviously derived from
the illustration.
The following symbols are used in drawings:
Device-internal logical input signal
Device-internal logical output signal
Internal input signal of an analog quantity
External binary input signal with number (binary input,
input indication)
External binary input signal with number
(example of a value indication)
External binary output signal with number (device indication) used as
input signal
Example of a parameter switch designated FUNCTION with address
1234 and the possible settings ON and OFF
Besides these, graphical symbols are used in accordance with IEC 60617-12 and IEC 60617-13 or similar.
Some of the most frequently used are listed below:
Input signal of analog quantity
AND-gate operation of input values
6
SIPROTEC, 7SJ689, User Manual
C53000-G1176-C346-1, Date 02.2012
Preface
OR-gate operation of input values
Exklusive OR-gate (antivalence): output is active, if only one of the
inputs is active
Coincidence gate (equivalence): output is active, if both inputs are
active or inactive at the same time
Dynamic inputs (edge-triggered) above with positive, below with negative edge
Formation of one analog output signal from a number of analog input
signals
Limit stage with setting address and parameter designator (name)
Timer (pickup delay T, example adjustable) with setting address and
parameter designator (name)
Timer (dropout delay T, example non-adjustable)
Dynamic triggered pulse timer T (monoflop)
Static memory (RS-flipflop) with setting input (S), resetting input (R),
output (Q) and inverted output (Q)
Technical Terminology and Symbol
IN
Normal Current
UN
Normal Voltage
UNprim
Primary Normal Voltage
UNsec
Secondary Normal Voltage
Ia Phase-A Current
Ib Phase-B Current
Ic Phase-C Current
In Zero-Sequence Current (Measred value from common CT)
Ins
Zero-Sequence Current (Measred value from sensitive CT)
3I0
Zero-Sequence Current (Calculated value from internal programming)
Ua
Phase-A voltage
Ub
Phase-B voltage
Uc
Phase-C voltage
Uab
Line AB voltage
Ubc
Line BC voltage
Uca
Line CA voltage
3U0
Zero-sequence voltge (calculated value from internal programming
SIPROTEC, 7SJ689, User Manual
C53000-G1176-C346-1, Date 02.2012
7
Preface
Un
Zero-sequence voltge (Meaured value from PT)
Ux
Isolated Voltage
Usyn
Synchronization Voltage
Udelta
Open-delta voltage
Uphph
Phase-phase voltage
Uph
Phase voltage
P
Active Power
Q
Reactive Power
S
apparent power
PF
Power Factor
PT
Voltage Transformer
CT
Current Transformer
■
8
SIPROTEC, 7SJ689, User Manual
C53000-G1176-C346-1, Date 02.2012
Contents
1
2
Introduction . . . . . . . . . . . . . . . . . . . . . . . . . . . . . . . . . . . . . . . . . . . . . . . . . . . . . . . . . . . . . . . . . . . . . . . . . . . . .13
1.1
Application Scope . . . . . . . . . . . . . . . . . . . . . . . . . . . . . . . . . . . . . . . . . . . . . . . . . . . . . . . . . . . . . . . . .14
1.2
Characteristics . . . . . . . . . . . . . . . . . . . . . . . . . . . . . . . . . . . . . . . . . . . . . . . . . . . . . . . . . . . . . . . . . . .14
Functions . . . . . . . . . . . . . . . . . . . . . . . . . . . . . . . . . . . . . . . . . . . . . . . . . . . . . . . . . . . . . . . . . . . . . . . . . . . . . . .17
2.1
General . . . . . . . . . . . . . . . . . . . . . . . . . . . . . . . . . . . . . . . . . . . . . . . . . . . . . . . . . . . . . . . . . . . . . . . . .18
2.1.1
2.1.1.1
2.1.1.2
2.1.1.3
Device . . . . . . . . . . . . . . . . . . . . . . . . . . . . . . . . . . . . . . . . . . . . . . . . . . . . . . . . . . . . . . . . . . . . . . .18
General . . . . . . . . . . . . . . . . . . . . . . . . . . . . . . . . . . . . . . . . . . . . . . . . . . . . . . . . . . . . . . . . . . .18
Soft Linking Piece and Control Word . . . . . . . . . . . . . . . . . . . . . . . . . . . . . . . . . . . . . . . . . . . . .18
Information List . . . . . . . . . . . . . . . . . . . . . . . . . . . . . . . . . . . . . . . . . . . . . . . . . . . . . . . . . . . . .20
2.1.2
2.1.2.1
2.1.2.2
2.1.2.3
Power System Data 1 . . . . . . . . . . . . . . . . . . . . . . . . . . . . . . . . . . . . . . . . . . . . . . . . . . . . . . . . . . .21
General . . . . . . . . . . . . . . . . . . . . . . . . . . . . . . . . . . . . . . . . . . . . . . . . . . . . . . . . . . . . . . . . . . .21
Setting Notes . . . . . . . . . . . . . . . . . . . . . . . . . . . . . . . . . . . . . . . . . . . . . . . . . . . . . . . . . . . . . . .21
Settings . . . . . . . . . . . . . . . . . . . . . . . . . . . . . . . . . . . . . . . . . . . . . . . . . . . . . . . . . . . . . . . . . . .22
2.1.3
2.1.3.1
2.1.3.2
Oscillographic Fault Recording . . . . . . . . . . . . . . . . . . . . . . . . . . . . . . . . . . . . . . . . . . . . . . . . . . . .22
General . . . . . . . . . . . . . . . . . . . . . . . . . . . . . . . . . . . . . . . . . . . . . . . . . . . . . . . . . . . . . . . . . . .22
Information List . . . . . . . . . . . . . . . . . . . . . . . . . . . . . . . . . . . . . . . . . . . . . . . . . . . . . . . . . . . . .23
2.1.4
2.1.4.1
2.1.4.2
2.1.4.3
2.1.4.4
Setting Groups . . . . . . . . . . . . . . . . . . . . . . . . . . . . . . . . . . . . . . . . . . . . . . . . . . . . . . . . . . . . . . . .23
General . . . . . . . . . . . . . . . . . . . . . . . . . . . . . . . . . . . . . . . . . . . . . . . . . . . . . . . . . . . . . . . . . . .24
Setting Notes . . . . . . . . . . . . . . . . . . . . . . . . . . . . . . . . . . . . . . . . . . . . . . . . . . . . . . . . . . . . . . .24
Setting Groups . . . . . . . . . . . . . . . . . . . . . . . . . . . . . . . . . . . . . . . . . . . . . . . . . . . . . . . . . . . . .24
Information List . . . . . . . . . . . . . . . . . . . . . . . . . . . . . . . . . . . . . . . . . . . . . . . . . . . . . . . . . . . . .24
2.1.5
2.1.5.1
2.1.5.2
2.1.5.3
2.1.5.4
Power System Data 2 . . . . . . . . . . . . . . . . . . . . . . . . . . . . . . . . . . . . . . . . . . . . . . . . . . . . . . . . . . .25
General . . . . . . . . . . . . . . . . . . . . . . . . . . . . . . . . . . . . . . . . . . . . . . . . . . . . . . . . . . . . . . . . . . .25
Setting Notes . . . . . . . . . . . . . . . . . . . . . . . . . . . . . . . . . . . . . . . . . . . . . . . . . . . . . . . . . . . . . . .25
Settings . . . . . . . . . . . . . . . . . . . . . . . . . . . . . . . . . . . . . . . . . . . . . . . . . . . . . . . . . . . . . . . . . . .25
Information List . . . . . . . . . . . . . . . . . . . . . . . . . . . . . . . . . . . . . . . . . . . . . . . . . . . . . . . . . . . . .25
2.2
Remote Trip Protection . . . . . . . . . . . . . . . . . . . . . . . . . . . . . . . . . . . . . . . . . . . . . . . . . . . . . . . . . . . . .26
2.2.1
Applicaiton . . . . . . . . . . . . . . . . . . . . . . . . . . . . . . . . . . . . . . . . . . . . . . . . . . . . . . . . . . . . . . . . . . . . . .26
2.2.2
2.2.2.1
2.2.2.2
2.2.2.3
2.2.2.4
2.2.2.5
2.2.2.6
2.2.2.7
2.2.2.8
Remote Trip Local Criterions . . . . . . . . . . . . . . . . . . . . . . . . . . . . . . . . . . . . . . . . . . . . . . . . . . . . . . . .26
Zero Sequence Current . . . . . . . . . . . . . . . . . . . . . . . . . . . . . . . . . . . . . . . . . . . . . . . . . . . . . . .26
Negative Sequence Current . . . . . . . . . . . . . . . . . . . . . . . . . . . . . . . . . . . . . . . . . . . . . . . . . . .26
Zero Sequence Voltage . . . . . . . . . . . . . . . . . . . . . . . . . . . . . . . . . . . . . . . . . . . . . . . . . . . . . . .26
Negative Sequence Voltage . . . . . . . . . . . . . . . . . . . . . . . . . . . . . . . . . . . . . . . . . . . . . . . . . . .26
Delta current . . . . . . . . . . . . . . . . . . . . . . . . . . . . . . . . . . . . . . . . . . . . . . . . . . . . . . . . . . . . . . . .27
Low Current . . . . . . . . . . . . . . . . . . . . . . . . . . . . . . . . . . . . . . . . . . . . . . . . . . . . . . . . . . . . . . . .28
Low Active Power . . . . . . . . . . . . . . . . . . . . . . . . . . . . . . . . . . . . . . . . . . . . . . . . . . . . . . . . . . .28
Low Power Factor . . . . . . . . . . . . . . . . . . . . . . . . . . . . . . . . . . . . . . . . . . . . . . . . . . . . . . . . . . .29
2.2.3
2.2.3.1
2.2.3.2
Remote Tripping Logic. . . . . . . . . . . . . . . . . . . . . . . . . . . . . . . . . . . . . . . . . . . . . . . . . . . . . . . . . . . . . .30
Remote Tripping Signal . . . . . . . . . . . . . . . . . . . . . . . . . . . . . . . . . . . . . . . . . . . . . . . . . . . . . . .30
Remote Tripping Logic . . . . . . . . . . . . . . . . . . . . . . . . . . . . . . . . . . . . . . . . . . . . . . . . . . . . . . . .30
2.2.4
Settings . . . . . . . . . . . . . . . . . . . . . . . . . . . . . . . . . . . . . . . . . . . . . . . . . . . . . . . . . . . . . . . . . . . . . . . . .31
2.2.5
Information List . . . . . . . . . . . . . . . . . . . . . . . . . . . . . . . . . . . . . . . . . . . . . . . . . . . . . . . . . . . . . . . . . . .32
SIPROTEC, 7SJ689, User Manual
C53000-G1176-C346-1, Date 02.2012
9
Contents
2.3
2.3.1
Applications . . . . . . . . . . . . . . . . . . . . . . . . . . . . . . . . . . . . . . . . . . . . . . . . . . . . . . . . . . . . . . . . . . 34
2.3.2
Overvoltage Logic . . . . . . . . . . . . . . . . . . . . . . . . . . . . . . . . . . . . . . . . . . . . . . . . . . . . . . . . . . . . . . 34
2.3.3
Settings . . . . . . . . . . . . . . . . . . . . . . . . . . . . . . . . . . . . . . . . . . . . . . . . . . . . . . . . . . . . . . . . . . . . . 35
2.3.4
Information List . . . . . . . . . . . . . . . . . . . . . . . . . . . . . . . . . . . . . . . . . . . . . . . . . . . . . . . . . . . . . . . . 35
2.4
Harware Monitoring . . . . . . . . . . . . . . . . . . . . . . . . . . . . . . . . . . . . . . . . . . . . . . . . . . . . . . . . . . . . . 36
2.4.2
Software Monitoring . . . . . . . . . . . . . . . . . . . . . . . . . . . . . . . . . . . . . . . . . . . . . . . . . . . . . . . . . . . . 37
2.4.3
PT Broken Wire Supervision . . . . . . . . . . . . . . . . . . . . . . . . . . . . . . . . . . . . . . . . . . . . . . . . . . . . . 37
2.4.4
CT Broken Wire Supervision . . . . . . . . . . . . . . . . . . . . . . . . . . . . . . . . . . . . . . . . . . . . . . . . . . . . . . 37
2.4.5
Information List . . . . . . . . . . . . . . . . . . . . . . . . . . . . . . . . . . . . . . . . . . . . . . . . . . . . . . . . . . . . . . . . 38
Device Logic . . . . . . . . . . . . . . . . . . . . . . . . . . . . . . . . . . . . . . . . . . . . . . . . . . . . . . . . . . . . . . . . . . . . . 38
2.5.1
Pickup Logic of the Device . . . . . . . . . . . . . . . . . . . . . . . . . . . . . . . . . . . . . . . . . . . . . . . . . . . . . . . 38
2.5.2
Trip Logic of the Device . . . . . . . . . . . . . . . . . . . . . . . . . . . . . . . . . . . . . . . . . . . . . . . . . . . . . . . . . 39
2.5.3
Setting Notes . . . . . . . . . . . . . . . . . . . . . . . . . . . . . . . . . . . . . . . . . . . . . . . . . . . . . . . . . . . . . . . . . 39
2.6
Auxiliary Functions . . . . . . . . . . . . . . . . . . . . . . . . . . . . . . . . . . . . . . . . . . . . . . . . . . . . . . . . . . . . . . . . 39
2.6.1
2.6.1.1
2.6.1.2
2.6.1.3
Message Processing . . . . . . . . . . . . . . . . . . . . . . . . . . . . . . . . . . . . . . . . . . . . . . . . . . . . . . . . . . . 39
LED Display and Binary Output (output Relays) . . . . . . . . . . . . . . . . . . . . . . . . . . . . . . . . . . . . 40
Information Displayed on LCD or PC . . . . . . . . . . . . . . . . . . . . . . . . . . . . . . . . . . . . . . . . . . . . 40
Information Transmitted to Control Centre . . . . . . . . . . . . . . . . . . . . . . . . . . . . . . . . . . . . . . . . 41
2.6.2
2.6.2.1
2.6.2.2
2.6.2.3
Statistics . . . . . . . . . . . . . . . . . . . . . . . . . . . . . . . . . . . . . . . . . . . . . . . . . . . . . . . . . . . . . . . . . . . . . 41
General . . . . . . . . . . . . . . . . . . . . . . . . . . . . . . . . . . . . . . . . . . . . . . . . . . . . . . . . . . . . . . . . . . . 42
Setting Notes . . . . . . . . . . . . . . . . . . . . . . . . . . . . . . . . . . . . . . . . . . . . . . . . . . . . . . . . . . . . . . 42
Information List . . . . . . . . . . . . . . . . . . . . . . . . . . . . . . . . . . . . . . . . . . . . . . . . . . . . . . . . . . . . . 42
2.6.3
2.6.3.1
2.6.3.2
2.6.3.3
Measurement . . . . . . . . . . . . . . . . . . . . . . . . . . . . . . . . . . . . . . . . . . . . . . . . . . . . . . . . . . . . . . . . . 42
Display of Measured Values . . . . . . . . . . . . . . . . . . . . . . . . . . . . . . . . . . . . . . . . . . . . . . . . . . . 43
Remote Transmission of Measured Values . . . . . . . . . . . . . . . . . . . . . . . . . . . . . . . . . . . . . . . 43
Information List . . . . . . . . . . . . . . . . . . . . . . . . . . . . . . . . . . . . . . . . . . . . . . . . . . . . . . . . . . . . . 44
2.6.4
2.6.4.1
2.6.4.2
2.6.4.3
Set Points for Measured Values (Statistic) . . . . . . . . . . . . . . . . . . . . . . . . . . . . . . . . . . . . . . . . . . . 44
General . . . . . . . . . . . . . . . . . . . . . . . . . . . . . . . . . . . . . . . . . . . . . . . . . . . . . . . . . . . . . . . . . . . 44
Setting Notes . . . . . . . . . . . . . . . . . . . . . . . . . . . . . . . . . . . . . . . . . . . . . . . . . . . . . . . . . . . . . . 44
Information List . . . . . . . . . . . . . . . . . . . . . . . . . . . . . . . . . . . . . . . . . . . . . . . . . . . . . . . . . . . . . 44
2.6.5
2.6.5.1
Commissioning Tool . . . . . . . . . . . . . . . . . . . . . . . . . . . . . . . . . . . . . . . . . . . . . . . . . . . . . . . . . . . . 45
Description . . . . . . . . . . . . . . . . . . . . . . . . . . . . . . . . . . . . . . . . . . . . . . . . . . . . . . . . . . . . . . . . 45
Mounting and Commisioning . . . . . . . . . . . . . . . . . . . . . . . . . . . . . . . . . . . . . . . . . . . . . . . . . . . . . . . . . . . . . . . 47
3.1
Mounting and Connections . . . . . . . . . . . . . . . . . . . . . . . . . . . . . . . . . . . . . . . . . . . . . . . . . . . . . . . . . . 48
3.1.1
Configuration Information . . . . . . . . . . . . . . . . . . . . . . . . . . . . . . . . . . . . . . . . . . . . . . . . . . . . . . . . 48
3.1.2
3.1.2.1
3.1.2.2
3.1.2.3
3.1.2.4
Hardware Modification . . . . . . . . . . . . . . . . . . . . . . . . . . . . . . . . . . . . . . . . . . . . . . . . . . . . . . . . . . 50
General . . . . . . . . . . . . . . . . . . . . . . . . . . . . . . . . . . . . . . . . . . . . . . . . . . . . . . . . . . . . . . . . . . . 50
Disassembly . . . . . . . . . . . . . . . . . . . . . . . . . . . . . . . . . . . . . . . . . . . . . . . . . . . . . . . . . . . . . . . 51
Switching Elements on the Pringts Circuit Boards . . . . . . . . . . . . . . . . . . . . . . . . . . . . . . . . . . 51
Reassembly . . . . . . . . . . . . . . . . . . . . . . . . . . . . . . . . . . . . . . . . . . . . . . . . . . . . . . . . . . . . . . . 57
3.2
10
Supervision Functions . . . . . . . . . . . . . . . . . . . . . . . . . . . . . . . . . . . . . . . . . . . . . . . . . . . . . . . . . . . . . 36
2.4.1
2.5
3
Overvoltage Protection . . . . . . . . . . . . . . . . . . . . . . . . . . . . . . . . . . . . . . . . . . . . . . . . . . . . . . . . . . . . . 34
Checking connections . . . . . . . . . . . . . . . . . . . . . . . . . . . . . . . . . . . . . . . . . . . . . . . . . . . . . . . . . . . . . 58
3.2.1
Checking data connection of a serial port . . . . . . . . . . . . . . . . . . . . . . . . . . . . . . . . . . . . . . . . . . . 58
3.2.2
Checking system connections . . . . . . . . . . . . . . . . . . . . . . . . . . . . . . . . . . . . . . . . . . . . . . . . . . . . 60
SIPROTEC, 7SJ689, User Manual
C53000-G1176-C346-1, Date 02.2012
Contents
3.3
3.3.1
Test Mode and Transmission Block . . . . . . . . . . . . . . . . . . . . . . . . . . . . . . . . . . . . . . . . . . . . . . . .63
3.3.2
Checking System Interface (SCADA) . . . . . . . . . . . . . . . . . . . . . . . . . . . . . . . . . . . . . . . . . . . . . . .63
3.3.3
Checking BinaryInputs and Outputs . . . . . . . . . . . . . . . . . . . . . . . . . . . . . . . . . . . . . . . . . . . . . . . .65
3.3.4
Test Fault Recording . . . . . . . . . . . . . . . . . . . . . . . . . . . . . . . . . . . . . . . . . . . . . . . . . . . . . . . . . . . .67
3.4
4
Final Preparation of Device . . . . . . . . . . . . . . . . . . . . . . . . . . . . . . . . . . . . . . . . . . . . . . . . . . . . . . . . .68
Technical Data . . . . . . . . . . . . . . . . . . . . . . . . . . . . . . . . . . . . . . . . . . . . . . . . . . . . . . . . . . . . . . . . . . . . . . . . . . .71
4.1
General . . . . . . . . . . . . . . . . . . . . . . . . . . . . . . . . . . . . . . . . . . . . . . . . . . . . . . . . . . . . . . . . . . . . . . . . .72
4.1.1
Analog Inputs . . . . . . . . . . . . . . . . . . . . . . . . . . . . . . . . . . . . . . . . . . . . . . . . . . . . . . . . . . . . . . . . .72
4.1.2
Power Supply . . . . . . . . . . . . . . . . . . . . . . . . . . . . . . . . . . . . . . . . . . . . . . . . . . . . . . . . . . . . . . . . .73
4.1.3
Binary Inputs and Outputs . . . . . . . . . . . . . . . . . . . . . . . . . . . . . . . . . . . . . . . . . . . . . . . . . . . . . . . .73
4.1.4
Communication Interfaces . . . . . . . . . . . . . . . . . . . . . . . . . . . . . . . . . . . . . . . . . . . . . . . . . . . . . . . .74
4.1.5
Eletical Tests . . . . . . . . . . . . . . . . . . . . . . . . . . . . . . . . . . . . . . . . . . . . . . . . . . . . . . . . . . . . . . . . . .76
4.1.6
Mechanical Stress Tests . . . . . . . . . . . . . . . . . . . . . . . . . . . . . . . . . . . . . . . . . . . . . . . . . . . . . . . . .77
4.1.7
Climatic Stress Tests . . . . . . . . . . . . . . . . . . . . . . . . . . . . . . . . . . . . . . . . . . . . . . . . . . . . . . . . . . . .78
4.1.8
Service Conditions . . . . . . . . . . . . . . . . . . . . . . . . . . . . . . . . . . . . . . . . . . . . . . . . . . . . . . . . . . . . . .78
4.1.9
Design . . . . . . . . . . . . . . . . . . . . . . . . . . . . . . . . . . . . . . . . . . . . . . . . . . . . . . . . . . . . . . . . . . . . . . .79
4.2
Overvoltage Protection . . . . . . . . . . . . . . . . . . . . . . . . . . . . . . . . . . . . . . . . . . . . . . . . . . . . . . . . . . . . .79
4.3
Remote Trip Protection . . . . . . . . . . . . . . . . . . . . . . . . . . . . . . . . . . . . . . . . . . . . . . . . . . . . . . . . . . . . .80
4.4
Additional Functions . . . . . . . . . . . . . . . . . . . . . . . . . . . . . . . . . . . . . . . . . . . . . . . . . . . . . . . . . . . . . . .82
4.5
Dimensions . . . . . . . . . . . . . . . . . . . . . . . . . . . . . . . . . . . . . . . . . . . . . . . . . . . . . . . . . . . . . . . . . . . . . .84
4.5.1
A
Commissioning . . . . . . . . . . . . . . . . . . . . . . . . . . . . . . . . . . . . . . . . . . . . . . . . . . . . . . . . . . . . . . . . . . .62
Panel Flush and Cubical Mouting (Housing dimensions 1/3) . . . . . . . . . . . . . . . . . . . . . . . . . . . . . .84
Appendix . . . . . . . . . . . . . . . . . . . . . . . . . . . . . . . . . . . . . . . . . . . . . . . . . . . . . . . . . . . . . . . . . . . . . . . . . . . . . . .85
A.1
Ordering Information and Accessories . . . . . . . . . . . . . . . . . . . . . . . . . . . . . . . . . . . . . . . . . . . . . . . . .86
A.1.1
A.1.1.1
Ordering Information . . . . . . . . . . . . . . . . . . . . . . . . . . . . . . . . . . . . . . . . . . . . . . . . . . . . . . . . . . . .86
7SJ689 V4.6. . . . . . . . . . . . . . . . . . . . . . . . . . . . . . . . . . . . . . . . . . . . . . . . . . . . . . . . . . . . . . . .86
A.1.2
Accessories . . . . . . . . . . . . . . . . . . . . . . . . . . . . . . . . . . . . . . . . . . . . . . . . . . . . . . . . . . . . . . . . . . .87
A.2
Terminal Assignments . . . . . . . . . . . . . . . . . . . . . . . . . . . . . . . . . . . . . . . . . . . . . . . . . . . . . . . . . . . . . .89
A.2.1
7SJ689 - Housing for Panel Flush Mounting or Cubicle Mouting. . . . . . . . . . . . . . . . . . . . . . . . . . .89
A.2.2
7SJ689 - Housing for Panel Flush Mounting or Cubicle Mouting, Rear side . . . . . . . . . . . . . . . . . .90
A.2.3
Connectors Assignment . . . . . . . . . . . . . . . . . . . . . . . . . . . . . . . . . . . . . . . . . . . . . . . . . . . . . . . . . .91
A.3
Connection Examples . . . . . . . . . . . . . . . . . . . . . . . . . . . . . . . . . . . . . . . . . . . . . . . . . . . . . . . . . . . . . .92
A.4
Default Settings . . . . . . . . . . . . . . . . . . . . . . . . . . . . . . . . . . . . . . . . . . . . . . . . . . . . . . . . . . . . . . . . . .93
A.4.1
LEDs . . . . . . . . . . . . . . . . . . . . . . . . . . . . . . . . . . . . . . . . . . . . . . . . . . . . . . . . . . . . . . . . . . . . . . . .93
A.4.2
Binary Input . . . . . . . . . . . . . . . . . . . . . . . . . . . . . . . . . . . . . . . . . . . . . . . . . . . . . . . . . . . . . . . . . . .93
A.4.3
Binary Output . . . . . . . . . . . . . . . . . . . . . . . . . . . . . . . . . . . . . . . . . . . . . . . . . . . . . . . . . . . . . . . . .94
A.4.4
Default Display . . . . . . . . . . . . . . . . . . . . . . . . . . . . . . . . . . . . . . . . . . . . . . . . . . . . . . . . . . . . . . . .94
A.5
Communication Protocol-dependent Functions . . . . . . . . . . . . . . . . . . . . . . . . . . . . . . . . . . . . . . . . . .95
A.6
Corresponding List of Writable Parameters And Messages . . . . . . . . . . . . . . . . . . . . . . . . . . . . . . . .96
A.7
Settings . . . . . . . . . . . . . . . . . . . . . . . . . . . . . . . . . . . . . . . . . . . . . . . . . . . . . . . . . . . . . . . . . . . . . . . . .97
A.8
Information List . . . . . . . . . . . . . . . . . . . . . . . . . . . . . . . . . . . . . . . . . . . . . . . . . . . . . . . . . . . . . . . . . . .99
A.9
Group Alarms . . . . . . . . . . . . . . . . . . . . . . . . . . . . . . . . . . . . . . . . . . . . . . . . . . . . . . . . . . . . . . . . . . .104
A.10
Measured Values . . . . . . . . . . . . . . . . . . . . . . . . . . . . . . . . . . . . . . . . . . . . . . . . . . . . . . . . . . . . . . . . .105
SIPROTEC, 7SJ689, User Manual
C53000-G1176-C346-1, Date 02.2012
11
Contents
Literature . . . . . . . . . . . . . . . . . . . . . . . . . . . . . . . . . . . . . . . . . . . . . . . . . . . . . . . . . . . . . . . . . . . . . . . . . . . . . . 107
Glossary. . . . . . . . . . . . . . . . . . . . . . . . . . . . . . . . . . . . . . . . . . . . . . . . . . . . . . . . . . . . . . . . . . . . . . . . . . . . . . . 109
12
SIPROTEC, 7SJ689, User Manual
C53000-G1176-C346-1, Date 02.2012
Introduction
1
The device SIPROTEC 7SJ689 is introduced in the view of the applications, the characteristics and the
functional scopes in this chapter.
1.1
Application Scope
14
1.2
Characteristics
14
SIPROTEC, 7SJ689, User Manual
C53000-G1176-C346-1, Date 02.2012
13
Introduction
1.1 Application Scope
1.1
Application Scope
The device is a digital overvoltage and remote tripping protection, which can be used as a local discriminating
device for overvoltage and remote tripping of 220kV and above voltage long-distance transmission lines.
Protection Functions
Local criterions including zero-sequence and negative-sequence currents and voltages, Fault component
current, low currents, phase low power factors and phase low active power are provided, which can reflect the
fault and abnormal operating conditions of the primary system. After different local criterions are applied
according to the operation requirements, the safety of protection is improved without reducing the reliability
thereof.
When the local overvoltage protection detects the system fault, the tripping operation of the local circuit breaker
is executed, and at the same time the signal transferred to the other side enables the remote trip.
Device Information and Measured Values, Events and Fault Records
The operation information provides the state information of the power system and the device. The measured
values and the calculated values can be directly displayed on the screen of a local device, and further remotely
displayed through communication via a serial interface.
The information of the device can be displayed through a light-emitting diode (LED) mounted on a panel of the
device (the LED is user-defined), which can be externally processed through an output connection point, and
also associated through the user-defined logic (CFC) or transmitted through the serial interface.
If a fault (system fault) occurs, the important event and the state change may be recorded in the fault records
(event records or trip records). The device also records the value of a transient fault for subsequent analysis.
Communications
The service port C can be selected as a cable data line or an optical fibre, or can carry out communication
through MODEM. Therefore, remote access to the device can be realized through a PC installed with
operationing software, for example, a centre PC is capable of operating a plurality of devices.
The system port B guarantees the communication between the device and a remote control centre, and the
transmission medium can be the cable wire or the optical fibre. Data transmission can be in accordance with
the redundant IEC 60870 870-5-103 transmission protocol by which the protection device accesses to SInAUT
LSA and SICAM automatic systems and other systems. IEC61850 protocol also can be realized for the data
transmission through the EN100 module; the protection device provides an access to the 100M Ethernet of the
substation automation system; and simultaneously, the port is also capable of realizing DIGSI communication
and communication based on GOOSE mechanism.
1.2
Characteristics
General Characteristics
• A powerful 32-bit microprocessor is employed.
• The whole process from the acqusition and input of analog quantities to the output of binary is realized
through digital processing.
• Due to binary input/output and the use of a direct-current or alternating-current converter, the internal data
processing module of the device and an external sensor, and a controller and a direct-current power source
can be electrically isolated from each other completely.
14
SIPROTEC, 7SJ689, User Manual
C53000-G1176-C346-1, Date 02.2012
Introduction
1.2 Characteristics
• The device is simple and convinient to operate, which can be operated through the panel of the device or
by using DIGSI software.
• The measured and metered data is continuously calculated, and displayed on the front panel.
• Event information and fault data are recorded, the real-time information of eight system faults (power grid
faults) and instantaneous fault values can be recorded, and the longest recording time is 10 seconds.
• The measured values are continuously monitored, and the software and hardware of the device can be selfchecked continuously.
• Communication can be performed by means of the serial port and SCADA or the station control unit of the
substation via a data cable, a modem or an optical cable.
• The clock power supply of the device is provided by a battery,and the device can keep time synchronization
with IRIG-B (through a satellite) or DCF77 signals through binary input signals or system interface time
setting commands.
• Statistics: the number of trip signals sent by the equipment is recorded; and the last breaking current record
and the accumulation of the short circuit currents of all phases of the circuit breaker are recorded.
• Operating time accumulation: the statistic of the operating hours of the protected equipment.
• A convenient commissioning environment is provided, for example, wire connection examination, direction
determination input/output state examination, and fast examination of system interfaces and system interface information.
Overvoltage Protection
• Three-Phase AND or Three-Phase OR can be selected as a criterion for the Overvoltage Protection.
• The Overvoltage Protection may realize Local Trip and Remote Trip, respectively.
• The Remote Trip can be blocked via the three-phase trip position of the local side circuit breaker.
Remote Trip Protection
• A One-to-One via Local Criterion manner is adopted.
• The local criterions can be switched on or off in groups, respectively.
• The corresponding local criterions are automatically switched off after PT wire break or CT wire break.
Supervision Functions
• As the device can supervise the internal measurement circuits, hardware, software and power supply itself,
the reliability of the equipment is greatly improved.
• The secondary circuits of the current transformer and the voltage transformer can be supervised through the
summation and balance detection technologies.
User-defined Logic Functions
• The user can establish the user-defined logic functions by combining external and internal signals.
• Boolean operation (AND, OR, NOT, XOR and the like) can be used.
• The desired time delay and limit values can be set.
• Measured value processing, including zero point suppression, may increase the inflection points of the
inputs by the sensors and the zero drift supervision.
■
SIPROTEC, 7SJ689, User Manual
C53000-G1176-C346-1, Date 02.2012
15
Introduction
1.2 Characteristics
16
SIPROTEC, 7SJ689, User Manual
C53000-G1176-C346-1, Date 02.2012
2
Functions
This chapter describes the individual functions of the SIPROTEC 4 device 7SJ689. It shows the setting
possibilities for each function in maximum configuration. Guidelines for establishing setting values are given.
Where required, formulae may also be given.
Based on the following information, the user can get to know the specific application functions of the device.
2.1
General
18
2.2
Remote Trip Protection
26
2.3
Overvoltage Protection
34
2.4
Supervision Functions
36
2.5
Function Logic
38
2.6
Auxiliary Functions
39
SIPROTEC, 7SJ689, User Manual
C53000-G1176-C346-1, Date 02.2012
17
Functions
2.1 General
2.1
General
The settings associated with the various device functions may be maintained and operated using the operating
or service interface in DIGSI in conjunction with a personal computer. Some parameters may also be set using
the control keys on the front panel of the device. The specific procedure is explained in detail in the SIPROTEC
4 System Description /1/.
2.1.1
Device
The protection requires some general information.
2.1.1.1 General
Spontaneous Fault Signal
After a fault occurs, the device may be spontaneous to display the most important fault data.
The indication of messages masked to local LEDs and the provision of spontaneous messages can be made
dependent on whether the device has issued a trip signal. The information is then not output if during a system
disturbance one or more protection functions have picked up but no stripping by the 7SJ689 resulted because
the fault was cleared by a different device (e.g. on another line). These messages are then limited to faults in
the line to be protected.
When the device trips to drop out, stationary conditions (Fault Display/Trip Display, Trip/No Trip) decide
whether the new fault information is stored or the record information is reset.
Spontaneous Fault Signal Reset
A new pickup of a protection function may reset any previously stored LED/relay, so that only the information
of the latest fault is displayed.
2.1.1.2 Soft Linking Piece and Control Word
When the remote trip protection function or the overvoltage protection function needs to be ON/OFF, it can be
operated through the soft linking piece; if quick setting of the protection functions is required, it can be operated
through the control word. DIGSI configuration, the human-machine interface of the device and the
communication protocols all can be used for the configuration or operation of the soft linking piece and the
control word.
Soft Linking Piece
A soft linking piece control page, under the control page of Power System Data1, comprises the settings of
the following three functions: 0045 Remote Trip, 0050 Overvoltage Protection, and 0650 Remote Access
Enable. The control options of the soft linking piece can not be changed by the setting group . The following
figure is the Digsi interface of soft linking piece:
18
SIPROTEC, 7SJ689, User Manual
C53000-G1176-C346-1, Date 02.2012
Functions
2.1 General
Figure 2-1
DIGSI Soft Linking Piece Control Interface
Control Word
Control Word page is under a Setting Group page. A control word dialog box lists all the criterion options and
the overvoltage protection function-dependent settings of the Remote Trip Protection functions of the 7SJ689
device according to the control range of each function. The ON and OFF of the options will correspond to the
ON and OFF of the corresponding functions included in the Setting Group . For example, the changes of such
options as 4500 Remote trip without local criterion, 4501 PT switch off LC with voltage, 4510 Fault
current/voltage criterion, 4530 Low current/low active power criterion, 4540 Low power factor criterion
all may simultaneously appear under the parameter setting page of Remote Trip Protection; and the left four
items are the settings of Overvoltage Protection. The following figure is a DIGSI control word configuration
interface:
Figure 2-2
DIGSI Control Word Interface
SIPROTEC, 7SJ689, User Manual
C53000-G1176-C346-1, Date 02.2012
19
Functions
2.1 General
The setup ranges of the control word and the soft linking piece are correspondingly as follows:
Type
Control Word
Protection Function
Remote Trip Protection
Overvoltage Protection
Soft Linking Piece
Remote Trip Protection
Overvoltage Protection
Remote Setting
Modification
Setting Name
Failure Current Voltage Pickup
Low Current Low Active Power Pickup
Low Power Factor Pickup
Remote Trip not via Fault Criterion
PT Broken Wire OFF Voltage Dependence
Local Criterion
Overvoltage One-Out-Of-Three Mode
Local Side Circuit Breaker Trip upon
Overvoltage
Overvoltage Pickup Remote Trip
Overvoltage Remote Trip is blocked via Trip
Position
Remote Trip Protection
Overvoltage Protection
Remote Setting Modification
2.1.1.3 Information List
No.
1
2
3
5
15
16
51
52
55
56
67
68
69
70
71
72
110
113
125
20
Information
>Back Light on
>Reset LED
>DataStop
Test mode
Feeder gnd
Brk OPENED
HWTestMod
SynchClock
Distur.CFC
Not configured
Non Existent
>Time Synch
>Reset LED
>Test mode
>DataStop
Device OK
ProtActive
Device Reset
Initial Start
Resume
Clock Synch. Error
DayLightSavTime
Settings Calc.
Settings Check
Level-2 change
Event Lost
Flag Lost
Chatter ON
Type of Information
SP
IntSP
IntSP
IntSP
IntSP
IntSP
IntSP
IntSP_Ev
OUT
SP
SP
SP_Ev
SP
SP
SP
OUT
IntSP
OUT
OUT
OUT
OUT
OUT
OUT
OUT
OUT
OUT_Ev
OUT
OUT
Comments
>Back Light on
>Reset LED
>Stop data transmission
Test mode
Feeder GROUNDED
Breaker OPENED
Hardware Test Mode
Clock Synchronization
Disturbance CFC
No Function configured
Function Not Available
>Synchronize Internal Real Time Clock
>Reset LED
>Test mode
>Stop data transmission
Device is Operational and Protecting
At Least 1 Protection Funct. is Active
Device Reset
Initial Start of Device
Resume
Clock Synchronization Error
Daylight Saving Time
Setting calculation is running
Settings Check
Level-2 change
Event lost
Flag Lost
Chatter ON
SIPROTEC, 7SJ689, User Manual
C53000-G1176-C346-1, Date 02.2012
Functions
2.1 General
2.1.2
No.
140
144
145
146
147
160
177
178
181
183
191
192
193
194
220
301
302
303
320
321
Information
Error Sum Alarm
Error 5V
Error 0V
Error -5V
Error PwrSupply
Alarm Sum Event
Fail Battery
I/O-Board error
Error A/D-conv.
Error Board 1
Error Offset
Error1A/5Awrong
Alarm adjustm.
Error neutralCT
CT Ph wrong
Pow.Sys.Flt.
Fault event
sens Gnd flt
Warn Mem. Data
Warn Mem. Para.
Type of Information
OUT
OUT
OUT
OUT
OUT
OUT
OUT
OUT
OUT
OUT
OUT
OUT
OUT
OUT
OUT
OUT
OUT
OUT
OUT
OUT
322
Warn Mem. Oper.
OUT
323
502
510
545
546
Warn Mem. New
Relay Drop Out
Relay CLOSE
PU Time
TRIP Time
OUT
SP
SP
VI
VI
Comments
Error with a summary alarm
Error 5V
Error 0V
Error -5V
Error Power Supply
Alarm Summary Event
Failure: Battery empty
I/O-Board Error
Error: A/D converter
Error Board 1
Error: Offset
Error:1A/5Ajumper different from setting
Alarm: Analog input adjustment invalid
Error: Neutral CT different from MLFB
Error: Range CT Ph wrong
Power System fault
Fault event
sensitive Ground fault
Warn: Limit of Memory Data exceeded
Warn: Limit of Memory Parameter exceeded
Warn: Limit of Memory Operation exceeded
Warn: Limit of Memory New exceeded
Relay Drop Out
General CLOSE of relay
Time from Pickup to drop out
Time from Pickup to TRIP
Power System Data 1
2.1.2.1 General
The protection device requires certain basic parameters regarding the protected equipment so that the device
can adapt to its desired application. These may be, for instance, the rated value parameters of the power
system and the transformer etc. There are also some parameters that are common to all functions, i.e. not
associated with a specific protection, control or monitoring function. The following section discusses these
parameters.
2.1.2.2 Setting Notes
General
The data can be entered at a panel embedded in the protection device or an external user operating panel
connected to the protection device. Press the MENU key to open the Main Menu. Apply
to select ETTINGS
, and then press the to navigate to the SETTINGS display. To enter the Power System Data, select the
P.System Data 1 in the SETTINGS menu.
In DIGSI, doubleclick SETTINGS to display relevant selection. A dialog box with tabs Power System, CT Parameters, PT Parameters and Soft Linking Piece will open under P.System Data 1 in which you can configure
the individual parameters. The following descriptions are therefore structured accordingly.
SIPROTEC, 7SJ689, User Manual
C53000-G1176-C346-1, Date 02.2012
21
Functions
2.1 General
Rated Values of Current Transformer (CT)
At addresses 204 CT Rated Primary Current and address 205 CT Rated Secondary Current, information
can be entered regarding the transformation ratio of the current transformer. It must be ensured that the
secondary current rated value of the transformer matches the set current rated value, otherwise an offset of the
primary current value calculated in protection may occur. At addresses 217 IE-CT rated primary current and
218 IE-CT rated secondary current, information is entered regarding the primary and secondary current ratio
of the current transformer. In case of a normal connection (polar end connected to In of the transformer),
address 217 IE-CT rated primary current and address 204 CT Rated Primary Current must be set to the
same value.
Rated Values of Voltage Transformer (PT)
At addresses 202 Rated Primary Voltage, information can be entered regarding the primary rated voltage of
the connected voltage transformer. The Secondary Rated Voltage (phase-to-phase voltage) is set to 100V in
default.
Soft Linking Piece
When the Remote Trip Protection function or the Overvoltage Protection function needs to be switched on/off,
the operation can be performed through the soft linking piece, including settings of the following three functions:
0045 Remote transfer trip function, 0050 Overvoltage Protection, and 0650 Remote Access enable. The
control options of the soft linking piece cannot be changed by the setting group . Please refer to 2.1.1.2.
2.1.2.3 Settings
The table indicates region-specific presettings. The configuration column indicates the corresponding secondary rated current of the current transformer.
Addr.
0045
0050
0650
202
204
205
217
218
2.1.3
Parameter
Remote Trip
FCT 59
Remote Access
Vnom PRIMARY
CT PRIMARY
CT PRIMARY
Ignd-CT PRIM
Ignd-CT SEC
Configu
ration
Setting Options
ON, OFF
ON, OFF
YES/NO
1.0 .. 1200.00 kV
1 .. 9999A
1A ,5A
1 .. 9999 A
1A ,5A
Default Setting
ON
ON
NO
220.0 kV
1200 A
1A
1200 A
1A
Comments
Remote Transfer Trip Function
59 Overvoltage Protection
Remote Access enable
Rated Primary Voltage
CT Rated Primary Current
CT Rated Primary Current
Ignd-CT rated primary current
Ignd-CT rated secondary current
Fault Recording
The Multi-Functional Protection Device 7SJ689 is equipped with a fault record memory, which records, in
addition to measured instantaneous values ia, ib, ic, in and ua, ub, uc, 3. u0, Negative Sequence Current I2,
Negative Sequence Voltage U2, Three-Phase Power Factor Phase Angle PF, Three-Phase Active Power P and
Remote Trip Signal. These parameters are acquired at intervals of 1.25 ms(50 Hz) and stored in a buffer region
(16 sample points per cycle). The storage time of the information of a fault is adjustable within 5 seconds. The
supportable maximum storage time is 10 s, and the longest storage time of a single record signal is 1s in
default. Up to 8 fault records can be recorded in the buffer region. The fault record memory is automatically
updated with every new fault, so that there is no acknowledgment for previously recorded faults required. In
addition to protection pickup, the fault record can also be started via the input and the serial port.
2.1.3.1 General
The record data can be connected to a personal computer via the serial ports, read through the protection data
processing software DIGSI and analyzed by the graphic analysis software SIGRA 4. The latter may graphically
represent the data recorded during the fault and also calculate a lot of additional information from the measured
values. Signals can be additionally recorded as binary marks, e.g. "pickup", "trip".
22
SIPROTEC, 7SJ689, User Manual
C53000-G1176-C346-1, Date 02.2012
Functions
2.1 General
A device having a serial system interface is capable of transmitting the recorded fault data to a control centre
via the port. The data can be processed by application programs in a central device. The current values and
the voltage values are referred to their maximum values, scaled to their rated values and prepared for graphic
representations. The binary signal mark, e.g. "fault detection", "trip", of a special event also can be graphically
displayed.
Transfer to the central device can be polled automatically, either after each fault detection, or only after a trip.
Note
The signals used for binary tracks can be configured in DIGSI.
The fault recording (waveform capture) is started upon the pickup of the protection function. The relevant
parameters of the recording waveform are referred to the following:
Parameter
Default
WAVEFORMTRIGGER
Protection Pickup Trigger and Storage
of Records
WAVEFORM DATA
Power System fault
MAX. LENGTH
1.00 sec
PRE. TRIG. TIME
0.25 sec
POST REC. TIME
0.10 sec
BinIn CAPT.TIME
0.50 sec
2.1.3.2 Information List
No.
2.1.4
Information
Type of Information
Comments
-
FltRecSta
IntSP
Fault Recording Start
4
>Trig.Wave.Cap.
SP
>Trigger Waveform
Capture
203
Wave. deleted
OUT_Ev
Waveform data
deleted
30053
Fault rec. run.
OUT
Fault recording is
running
Setting Goups
Up to four independent setting groups can be created for establishing the device's function settings.
SIPROTEC, 7SJ689, User Manual
C53000-G1176-C346-1, Date 02.2012
23
Functions
2.1 General
Applications
•
Setting groups enable the user to save the corresponding settings for each application so that the settings
can be quickly called up when required. All setting groups are stored in the device. Only one setting group
may be active at a specific time.
2.1.4.1 General
Changing Setting Groups
During operation the user can switch the setting groups, via the human-machine interface of the device, inputs
(if so configured), the service interface of a personal computer or the system interface. For reasons of the
safety, it is not possible to change between the setting groups during a power system fault.
A setting group includes the setting values for all functions. While setting values may vary, the selected
functions of any setting group remain the same.
2.1.4.2 Setting Notes
General
In the 7SJ689 device, there are four setting groups (from A to D). The function parameters of the setting groups
from A to D can be set one by one. At most four groups can be set.The SIPROTEC 4 System Description gives
further information on how to copy the setting groups or reset them to their status at delivery and also how to
change from one setting group to another.
Subsection 3.1 of the manual3.1 tells you how to change between the setting groups via inputs.
2.1.4.3 Setting Groups
Addr.
302
Parameter
CHANGE
Setting Options
Setting Group A
Default Setting
Comments
Setting Group A
Change to Another Setting Group
Setting Group B
Setting Group C
Setting Group D
Inputs
Protocol
2.1.4.4 Information List
No.
Information
Type of
Informatio
n
Comments
-
P-GrpA act
IntSP
Setting Group A is active
-
P-GrpB act
IntSP
Setting Group B is active
-
P-GrpC act
IntSP
Setting Group C is active
-
P-GrpD act
IntSP
Setting Group D is active
7
>Set Group Bit0
SP
>Setting Group Select Bit 0
8
>Set Group Bit1
SP
>Setting Group Select Bit 1
24
SIPROTEC, 7SJ689, User Manual
C53000-G1176-C346-1, Date 02.2012
Functions
2.1 General
2.1.5
Power System Data 2
2.1.5.1 General
The system data (Power System Data 2) includes all function settings. In contrast to the Power System Data 1
as discussed before, the settings can be changed with the setting group.
2.1.5.2 Setting Notes
Definition of Rated Values
Address1101 Measurement: Full Scale Voltage (100%) and 1102 Measurement: Full Scale Current
(100%), the primary reference voltage (Phase-to-Phase) and reference current (phase) of the protected
equipment can be entered. If these reference values match the primary rated values of the PT and CT, the
values correspond to the settings in address 202 and 204 (referring to Subsection 2.1.2.2). The values are
generally displayed in the form of actual values.
2.1.5.3 Settings
The table indicates region-specific presettings. The configuration column indicates the corresponding
secondary rated current of the current transformer.
Addr.
Parameter
Configuration
Setting Options
Default Setting
Comments
1101
FullScaleCurr.
1.0 .. 1200.0 kV
220.0 kV
Measurem:FullScaleCurrent(Equipm.rating)
1102
FullScaleVolt.
1 ..9999A
1200 A
Measurem:FullScaleVoltage(Equipm.rating)
2.1.5.4 Information List
No.
Information
Type of
Informatio
n
IntSP
Comments
126
Protection ON/OFF
Protection ON/OFF (via system port)
356
>Manual Close Signal
SP
>Manual close signal
501
Protection Pickup
OUT
Relay PICKUP
511
Protection General Trip Command OUT
Relay GENERAL TRIP command
533
Ia :
VI
Primary fault current Ia
534
Ib :
VI
Primary fault current Ib
535
Ic :
VI
Primary fault current Ic
561
Manual Close Signal Detected
OUT
Manual close signal detected
4601
>Brk Aux NO
SP
>Breaker contact (OPEN, if bkr is open)
4602
>Brk Aux NC
SP
>Breaker contact(OPEN, if bkr is closed)
SIPROTEC, 7SJ689, User Manual
C53000-G1176-C346-1, Date 02.2012
25
Functions
2.2 Remote Trip Protection
2.2
Remote Trip Protection
2.2.1
Application
In case of an overvoltage of the opposite side of the line, a failure of the circuit breaker or a fault of a reactor
without independent circuit breaker, a remote Tripping signal can be always sent out through a remote
protection system, so that the functions in local device trip the local circuit breaker according to the settings
after receiving the remote trip signal.
2.2.2
Remote Tripping Local Criterions
The remote tripping function of the device includes three local criterion groups: Fault Current Voltage Criterions,
Low Current Low Active Criterions and Low Power Factor Criterions, and each criterion group can be decided
to be ON or OFF through the setting of the control word.
The Fault Current Voltage Criterions include elements, e.g. delta current, Zero Sequence Current, Negative
Sequence Current, Zero Sequence Overvoltage And Negative Sequence Overvoltage, etc.;
The Low Current Low Active Criterions include a Low Current element and a Low Active Power element.
The Low Power Factor Criterions includes a Low Power Factor element.
2.2.2.1 Zero Sequence Current
When the Zero Sequence Current 3I0(calculated value, 3I0=Ia+Ib+Ic) is greater than the 4512 3I0 pickup, The
annunciation 17466 3I0 picked up is issued in 40 ms, and the Zero Sequence Current Criterion will be
automatically OFF after CT wire break.
2.2.2.2 Negative Sequence Current
When the negative sequence current I2 is greater than the 4513 I2 pickup,the annunciation 17467 I2 picked
up is issued in 40 ms and the Negative Sequence Current Criterion will be automatically OFF after CT wire
break.
2.2.2.3 Zero Sequence Voltage
When the Zero Sequence Voltage 3U0 (calculated value, 3U0=Ua+Ub+Uc) is greater than the 4514 3U0 pickup,
the annunciation 17468 3U0 picked up is issued in 40 ms and the Zero Sequence Voltage Criterion is
automatically OFF after PT wire break.
2.2.2.4 Negative Sequence Voltage
When the negative sequence voltage U2 is greater than the 4515 U2 pickup, the annunciation 17469 U2
picked up is issued in 40 ms and the Negative Sequence Voltage Criterion will be automatically OFF after PT
wire break.
26
SIPROTEC, 7SJ689, User Manual
C53000-G1176-C346-1, Date 02.2012
Functions
2.2 Remote Trip Protection
2.2.2.5 Delta Current
A delta current element measures the amplitude of a phase-to-phase current variation according to the
following criterions:
The Delta Current criterion works on three phase-phase currents respectively.
When the criterion is fulfilled on a phase-phase current, the related pickup signal will be released. The pickup
signals include 17470 Delta IAB PU, 17471 Delta IBC PU and 17472 Delta ICA PU. And the released pickup
signal(s) will be latched for 5S automatically. The details of the pickup logics are shown in below figure.
SIPROTEC, 7SJ689, User Manual
C53000-G1176-C346-1, Date 02.2012
27
Functions
2.2 Remote Trip Protection
Figure 2-3
Fault Current Voltage Criterions
2.2.2.6 Low Current
When the current of any phase is lower than the 4531 Low current pickup, the annunciation 17473 IA picked
up, 17474 IB picked up and 17475 IC picked up are issued in 40 ms. When the 4531 Low current pickup
is set to 0, the Low Current element is switched off, and the Low Current Criterion will be OFF after the CT wire
break.
2.2.2.7 Low Active Power
When the active power of any phase is satisfied UI cos Φ < P SET
28
SIPROTEC, 7SJ689, User Manual
C53000-G1176-C346-1, Date 02.2012
Functions
2.2 Remote Trip Protection
, (PSET is 4532 Low active power pickup), the annunciation 17476 PA picked up, 17477 PB picked up and
17478 PC picked up are issued in 40 ms. When the 4532 Low active power pickup is set to 0, the Low Active
Power element is switched off.
When the current of a phase is lower than 0.03IN or the voltage of the phase is lower than 0.3UN, the Low Active
Power element of the phase will be switched off. The Low Active Power Criterions of three phases will be OFF
after the PT wire break.
Figure 2-4
Low Current Low Active Power Criterions
2.2.2.8 Low Power Factor
When the power factor of any phase is satisfied
Provided that ϕSET is the 4541 Low power factor pickup, the annunciation 17479 PFA picked up , 17480 PFB
picked up and 17481 PFC picked up are issued in 40 ms. When the 4541 Low power factor pickup is set
to 90 degrees, the Low Power Factor element is switched off.
During normal operation, when the voltages of three phases are all lower than 0.3UN or the currents are lower
than 0.05IN, the Low Power Factor element of the corresponding phase is switched on. The Low Power Factor
Criterions will be OFF after the PT wire break.
SIPROTEC, 7SJ689, User Manual
C53000-G1176-C346-1, Date 02.2012
29
Functions
2.2 Remote Trip Protection
Figure 2-5
2.2.3
Low Power Factor Criterions
Remote Tripping Logic
2.2.3.1 Remote Tripping Signal
In case of an overvoltage of the opposite side of the line, a failure of the circuit breaker or a fault of a reactor
without independent circuit breaker, a remote tripping signal can be always sent out through a remote
protection system, so that the device trips the local circuit breaker according to the corresponding local criterion
action relay after receiving the remote tripping signal 17431 >RT signal.
If the device receives a channel fault signal 17504 >FAIL:RMT.Sig, Channel Receiving is blocked and an alarm
signal 17503 Error RMT.Sig is sent out; The Channel Receiving is restarted through a time delay of 200 ms
after the channel fault signal disappears.
When the receiving channel continues receiving for more than 10.1 s, it is considered that the receiving channel
is abnormal, and then an alarm signal is sent out while the channel receiving is blocked. The channel receiving
is restarted through a time delay of 200ms after the channel signal disappears.
2.2.3.2 Remote Tripping Logic
When 4500 Remote trip without local criterion is set to OFF, the Local Criterion is active. When any local
criterion pickup signal 17438 FltCurVol PU, 17439 LowCurP PU, or 17441 LowPF PU acts, and the remote
Tripping signal 17431 >RT signal is received, the Remote Tripping Protection is tripped via a 4502 Remote
trip with criterion time delay relay. If a PT broken wire fault occurs, and when the 4501 PT switch off LC
with voltage is set to ON, The Remote Tripping Protection is switched OFF from the Zero Sequence Voltage,
Negative Sequence Voltage, Low Active Power and Low Power Factor Criterions and turned to No Local
Criterion Operating mode, and at this moment, if the 17431 >RT signal is received, tripping is performed via a
4503 Remote trip without criterion time delay relay. When the 4500 Remote trip without local criterion is
30
SIPROTEC, 7SJ689, User Manual
C53000-G1176-C346-1, Date 02.2012
Functions
2.2 Remote Trip Protection
set to ON, and if the 17431 >RT signal is received, tripping is performed via a 4503 Remote Trip nit via Fault
Criterion Time relay.
Trip Command Dropout Conditions:
1) Shortest Trip Command Holding Time(0.15s) to
2) 17431 >RT signal disappears
3) the currents of three phases are all lower than the Breaker Close Current Criterion (0.04IN)
When the above conditions are satisfied simultaneously, the Trip Command is dropped out.
Figure 2-6
2.2.4
Addr.
Remote Trip Logic
Settings
Parameter
Setting Options
Default Setting
Comments
0045
Remote Trip
ON/OFF
ON
Remote Transfer Trip
Function
4500
Without LC
ON/OFF
ON
Remote trip without
local criterion
4501
PT OFF LC
ON/OFF
OFF
PT switch off LC with
voltage
SIPROTEC, 7SJ689, User Manual
C53000-G1176-C346-1, Date 02.2012
31
Functions
2.2 Remote Trip Protection
Addr.
Parameter
Setting Options
Default Setting
Comments
4510
Flt Cur/Vol
ON/OFF
OFF
Fault current/voltage
criterion
4530
Low I/P
ON/OFF
OFF
Low current/low active
power criterion
4540
Low PF
ON/OFF
OFF
Low power factor criterion
4511
Delta I pickup
0.05 - 0.50 A, ∞
0.20 A
Delta I pickup
4512
3I0 pickup
0.05 - 20.00 A, ∞
1.00 A
3I0 pickup
4513
I2 pickup
0.05 - 20.00 A, ∞
1.00 A
I2 pickup
4514
3U0 pickup
2.0 - 57.7 V, ∞
10.0 V
3U0 pickup
4515
U2 pickup
2.0 - 57.7 V, ∞
10.0 V
U2 pickup
4531
I pickup
0 , 0.05 - 0.50 A
0.05 A
Low current pickup
4532
P pickup
0 , 2.0 - 200.0 W
8.0 W
Low active power
pickup
4541
PF pickup
30 ~ 90°
45°
Low power factor
pickup
4502
T RT with LC
0.01 - 10.00 s
0.10 s
Remote trip with criterion time delay
4503
T RT without LC
0.01 - 10.00 s
0.20 s
Remote trip without criterion time delay
2.2.5
Information List
No.
Information
Type of
Information
Comments
17430
>Block RT
SP
>Block remote trip
17431
>RT signal
SP
>Remote trip signal
17432
RT OFF
OUT
Remote trip is switched OFF
17433
RT blocked
OUT
Remote trip is blocked
17434
RT active
OUT
Remote trip is active
17440
Remote Trip
IntSP
Remote Transfer Trip Function
17442
wtLC ON/OFF
IntSP
Without local criterion ON/OFF
17444
FltIU ON/OFF
IntSP
Fault cur/vol ON/OFF
17446
LowCurPON/OFF
IntSP
Low current/P ON/OFF
17448
PF pickup
IntSP
Low power factor pickup
17466
3I0 picked up
OUT
3I0 picked up
17467
I2 picked up
OUT
I2 picked up
17468
3U0 picked up
OUT
3U0 picked up
17469
U2 picked up
OUT
U2 picked up
17470
Delta IAB PU
OUT
Delta IAB picked up
17471
Delta IBC PU
OUT
Delta IBC picked up
17472
Delta ICA PU
OUT
Delta ICA picked up
17473
IA picked up
OUT
Low current phase A picked up
17474
IB picked up
OUT
Low current phase B picked up
32
SIPROTEC, 7SJ689, User Manual
C53000-G1176-C346-1, Date 02.2012
Functions
2.2 Remote Trip Protection
No.
Information
Type of
Information
OUT
Comments
17475
IC picked up
Low current phase C picked up
17476
PA picked up
OUT
Low active power phase A picked up
17477
PB picked up
OUT
Low active power phase B picked up
17478
PC picked up
OUT
Low active power phase C picked up
17479
PFA picked up
OUT
Low power factor phase A picked up
17480
PFB picked up
OUT
Low power factor phase B picked up
17481
PFC picked up
OUT
Low power factor phase C picked up
17482
Delta I TExt
OUT
ExtTime of current change in progress
17483
RT Signal
OUT
Remote trip signal
17484
CT BLK LC
OUT
I0/I2/I/P/PF blocked after CT broken
17485
PT OFF LC
OUT
U0/U2/P/PF switched off after PT broken
17486
PT BLK LC
OUT
U0/U2/P/PF blocked after PT broken
17487
RT Sig. N. Cfg.
OUT
RT Signal not configured
17488
PTwtLC ON/OFF
IntSP
PT switched off LC ON/OFF
17436
Remote trip PU
OUT
Remote trip picked up
17437
Remote trip
OUT
Remote trip
17438
FltCurVol PU
OUT
Fault current/voltage picked up
17439
LowCurP PU
OUT
Low current/active power picked up
17441
LowPF PU
OUT
Low power factor picked up
17503
Error RMT.Sig
OUT
17504
>FAIL:RMT.Sig
SP
SIPROTEC, 7SJ689, User Manual
C53000-G1176-C346-1, Date 02.2012
Error: remote signal command
>Failure: remote signal trip
33
Functions
2.3 Overvoltage Protection
2.3
Overvoltage Protection
2.3.1
Application
Abnormally high voltages often occur e.g. in low loaded, long distance transmission lines, in islanded systems
when generator voltage regulation fails, or after full load shutdown of a generator from the system.
2.3.2
Overvoltage Logic
When the 5117 One phase over voltage is ON, the Overvoltage Protection responds to any phase
overvoltage; and when the 5117 One phase over voltage is OFF, the Overvoltage Protection responds to the
three phases of overvoltages. The dropout ratio of the overvoltage protection voltage element is 0.98.
The 7SJ689 device responds to the overvoltage of the local end of the line. The protection sends out an alarm
message or trips the local side circuit breaker via 5023 59 Time Delay. Setting is established via the control
word 5021 Overvoltage TRIP Local CB. Besides, the Overvoltage Pickup Remote Trip function can be
blocked via the position of the local side circuit breaker.
Logic Diagram
Figure 2-7
Overvoltage Protection Logic Diagram
After the Overvoltage Local Trip or Remote Trip of 7SJ689 device is triggered.
1, the minimum trip time is satisfied
2, there is no current in three phases
3, the overvoltage protection element is dropped out,
The trip command is dropped out.
34
SIPROTEC, 7SJ689, User Manual
C53000-G1176-C346-1, Date 02.2012
Functions
2.3 Overvoltage Protection
The Overvoltage Pickup Remote Trip function can be blocked via the position of the local side circuit breaker.
When the local side overvoltage element starts to trip the local circuit breaker, and 5118 Send Remote TRIP
CMD is set to ON, Remote Trip is picked up if one of the following conditions is satisfied:
1, the local circuit breaker TWJ is closed, and the line has no current
2, 5119 CB Close Position Block Remote TRIP CMD is set to OFF
The TWJ auxiliary contacts of three phases are connected in series and then connected to the input contact of
the 17495 >CB P (52-b) of the device, see figure 2-8(A). For a half-switch wire connection, the respective TWJ
auxiliary contacts of three phases of a side switch and a middle switch are connected in series with each other
and then connected to the input of the 17495 >CB P (52-b) of the device in a wire connection manner in
accordance with figure 2-8(B).
Figure 2-8
2.3.3
Logic Diagram of Tripping the Local Side Circuit Breaker in Overvoltage Protection
Settings
Addr.
5021
Parameter
59 Trip Loc. CB
5022
5023
5117
59 PICKUP
59 DELAY
1pOV ON/OFF
5118
Send RT. CMD.
5119
CB Pos. Block
2.3.4
No.
6565
6566
6567
6513
17435
17491
Setting Options
ON
OFF
57.7 - 100.0 V
0.01 - 10.00 sec
ON
OFF
ON
OFF
ON
OFF
Default Setting
ON
Comments
Overvoltage TRIP Local CB
60 V
0.50 sec
ON
59 Pickup
59 Time Delay
One phase over voltage ON/OFF
ON
Send Remote TRIP CMD.
ON
CB Close Position Block Remote
TRIP CMD.
Information List
Information
59 OFF
59 BLOCKED
59 ACTIVE
>BLOCK 59
1pOV ON/OFF
59 picked up
SIPROTEC, 7SJ689, User Manual
C53000-G1176-C346-1, Date 02.2012
Type of
Information
OUT
OUT
OUT
SP
IntSP
OUT
Comments
59-Overvoltage protection switched OFF
59-Overvoltage protection is BLOCKED
59-Overvoltage protection is ACTIVE
>BLOCK 59 overvoltage protection
One phase over voltage ON/OFF
59 picked up
35
Functions
2.4 Supervision Functions
No.
17492
17493
17494
17495
17496
17497
17498
17499
Information
59 trip
59 alarm
59 Remote trip
>CB P (52-b)
FCT 59
59trip ON/OFF
59RT ON/OFF
CBBLK ON/OFF
Type of
Information
OUT
OUT
OUT
SP
IntSP
IntSP
IntSP
IntSP
2.4
Supervision Functions
2.4.1
Hardware Monitoring
Comments
59 trip
59 alarm
59 Remote trip
>CB P (52-b) (OPEN, if bkr is closed)
59 Overvoltage Protection
59 trip local CB ON/OFF
Send remote trip CMD ON/OFF
CB block remote trip ON/OFF
Auxiliary and Reference Voltages
The processor voltage of 5 V DC is monitored by the hardware since the processor will no longer be functional
if the voltage falls below the minimum value. In that case, the device is put out of operation. When the supply
voltage returns, the processor system is restarted.
Failure of or switching off the supply voltage removes the device from operation and a message is immediately
generated by a normally closed contact. Brief auxiliary voltage interruptions of less than 50 ms do not disturb
the readiness of the device (for nominal auxiliary voltage > 110 VDC).
The processor monitors the offset and reference voltage of the ADC (analog-digital converter). The protection
is suspended if the voltages deviate outside an allowable range, and lengthy deviations are reported.
Buffer Battery
The buffer battery, which ensures operation of the internal clock and storage of counters and messages if the
auxiliary voltage fails, is periodically checked for charge status. If it is less than an allowed minimum voltage,
then the „Fail:Battery“ message is issued.
Memory Components
All working memories (RAMs) are checked during startup. If a malfunction occurs then, the starting sequence
is interrupted and an LED blinks. During operation the memories are checked with the help of their checksum.
For the program memory, the cross sum is formed cyclically and compared to the stored program cross sum.
For the settings memory, the cross sum is formed cyclically and compared to the cross sum that is freshly generated each time a setting process takes place.
If a fault occurs the processor system is restarted.
Scanning
Scanning and the synchronization between the internal buffer components are constantly monitored. If any deviations cannot be removed by renewed synchronization, then the processor system is restarted.
AD Transformer Monitoring
The digitized sampled values are being monitored in respect of their plausibility. If the result is not plausible,
message 181 „Error A/D -conv.“ is issued. The protection is blocked, thus preventing unwanted operation. Furthermore, a fault record is generated for recording of the internal fault.
36
SIPROTEC, 7SJ689, User Manual
C53000-G1176-C346-1, Date 02.2012
Functions
2.4 Supervision Functions
Monitoring of the Hardware Modules
The device is able to recognize location and malfunctions of hardware modules during operation. In the event
of a fault, messages "Error Board 1“ (FNo. 183) is initiated.
2.4.2
Software Monitoring
Watchdog
For continuous monitoring of the program sequences, a time monitor is provided in the hardware (hardware
watchdog) that expires upon failure of the processor or an internal program, and causes a complete restart of
the processor system.
An additional software watchdog ensures that malfunctions during the processing of programs are discovered.
This also initiates a restart of the processor system.
If such a malfunction is not cleared by the restart, an additional restart attempt is begun. After three unsuccessful restarts within a 30 second window of time, the device automatically removes itself from service and the red
„Error“ LED lights up. The readiness relay drops out and indicates „device malfunction“ with its normally closed
contact.
Offset Monitoring
This monitoring function checks all ring buffer data channels for corrupt offset replication of the analog/digital
transformers and the analog input paths using offset filters. Any possible offset errors are detected using DC
voltage filters and the associated samples are corrected up to a specific limit. If this limit is exceeded, an annunciation is issued (191 Error Offset) that is part of the warn group annunciation (annunciation 160). As increased offset values affect the reliability of measurements taken, we recommend to send the device to the
OEM plant for corrective action if this annunciation continuously occurs.
2.4.3
PT Broken wire supervision
The device 7SJ689 has two PT broken wire associated signals: 170 VT FuseFail and 169 VT FuseFail>10s.
Their determination logic is as follows:
1) a failure voltage (zero sequence voltage 30V) appears while no failure current (zero sequence current
0.06A(In=1 A), 0.3 A(In=5 A)) is present, the 170 VT FuseFail will be present instantaneously.
2) the voltages of three phases are all lower than 5 V while no failure current is present, the 1170 VT FuseFail
will be present instantaneously.
3)170 VT FuseFail is present continously for 10 s, and after that the 169 VT FuseFail>10s signal will be
present.
4) 170 VT FuseFail is instantaneously reset.
5) the signal 169 VT FuseFail>10s is not reset instantaneously; and it disappears only after the signal 170 VT
FuseFail has disappeared for 10 s.
After the 169 VT FuseFail>10s signal is present, the Zero Sequence Voltage, Negative Sequence Voltage, Low
Active Power and Low Power Factor Local Criterions will be OFF.
2.4.4
CT Broken Wire Supervision
CT Broken Wire Detection
When the CT broken wire supervision function is active, and it is detected that the zero sequence current is
greater than 0.1IN and the current of any phase is lower than 0.06IN, CT Broken is switched ON. CT
SIPROTEC, 7SJ689, User Manual
C53000-G1176-C346-1, Date 02.2012
37
Functions
2.5 Device Logic
Broken>12s is switched ON if the alarm is still present after 12S. The negative sequence current, zero
sequence current and low current local criterions are switched off after CT wire break.
2.4.5
Information List
No.
00169
00170
17501
17502
161
2.5
Information
VT FuseFail>10s
VT FuseFail
Type of Information
OUT
OUT
CT Broken>12s
CT Broken
Fail I Superv.
OUT
OUT
OUT
6509
6510
162
163
167
197
>FAIL:FEEDER VT
>FAIL: BUS VT
Failure Σ I
Fail I balance
Fail V balance
MeasSup OFF
SP
SP
OUT
OUT
OUT
OUT
255
259
Fail VT circuit
VTsup. inactive
OUT
OUT
Comments
VT Fuse Failure (alarm >10s)
VT Fuse Failure (alarm
instantaneous)
CT Broken alarm >12s
CT Broken(alarm instantaneous)
Failure: General Current
Supervision
>Failure: Feeder VT
>Failure: Busbar VT
Failure: Current Summation
Failure: Current Balance
Failure: Voltage Balance
Measurement Supervision is
switched OFF
Failure VT circuit
VT circuit supervision inactive
Device Logic
The function logic is used for adjusting the running of the protection function and auxiliary functions, which is
further used for processing results and information sent out from the system. This mainly includes:
-Fault Check/Pickup Logic
-Processing Tripping Logic
2.5.1
Pickup Logic of the Whole Device
General Pickup
The general pickup signals of all protection functions of the device are connected by a logic or gate, which
trigger the general pickup of the device. The general pickup is triggered upon the pickup of the first protection
function and dropped out upon the dropout of the last protection function. At the general pickup of the device,
information "Protection Pickup" will be displayed in Addr.501.
The general pickup of the device is the precondition of the pickup of most internal and external relevant
functions. The general pickup may control the following internal functions:
• Pickup Tripping Logic: all fault information participates in the Tripping logic from the general pickup of the
device to the general dropout thereof.
• Fault Recording Initialization: the storage and mountainous of fault recording also are the same dependent
on the general pickup of the device.
Exception: apart from being set to ON or OFF, some protection functions also can be set to Alarm Only. If being
set to Alarm Only, neither Tripping command or Tripping logic is present, so that the fault recording is inactive
and no fault record is displayed.
The general pickup of the device can also control the external functions with an output contact, for example:
• Automatic Reclose Device,
• Pickup Auxiliary Device, or similar devices.
38
SIPROTEC, 7SJ689, User Manual
C53000-G1176-C346-1, Date 02.2012
Functions
2.6 Auxiliary Functions
2.5.2
Tripping Logic of the Whole Device
General Trip
The general pickup signals of all protection functions are connected by a logic or gate and information
"Protection Trip" is generated in Addr.511.
The information can be defined on the LED indications or the binary output, which is the same as the trip information of other individual protections.
Termination of Trip Signal
Once the protection function outputs a trip command, "Protection General Trip Command" information will be
present (see figure2-9). Meanwhile, the Shortest Trip Command Holding Time and the Shortest Trip
Command Duration Time are picked up. The Shortest Trip Command Holding Time can ensure that there is
enough time to transmit a tripping signal to a circuit breaker even though a function trigging the tripping signal
is quickly dropped out. The tripping command can be terminated only when all protection functions are dropped
out (no function is in the pickup mode) and after the Shortest Trip Command Holding Time expires.
Finally, the tripping signal can be held until manual reset (holding function). The circuit breaker thereby is
allowed to be locked without coincidence until a fault reason is found out and the signal is manually reset. The
manual reset can be realized through a Reset LED key or by activating a specific binary input (">Reset
Indication Lamp"). Of course, the precondition is that the closing coil of the circuit breaker is as usual in an
interlocking state during the presence of the tripping signal and that the current of its trip coil is blocked by the
auxiliary contact of the circuit breaker.
Figure 2-9
2.5.3
Termination of Tripping Signal
Setting Notes
Tripping Signal Duration Time
The settings of the Shortest Tripping Duration Time and the Trip Command Duration Time are suitable for all
protection functions capable of picking up trip. For the 7SJ689 device, the default of the Shortest Trip Duration
Time is 0.15s.
2.6
Auxiliary Functions
The chapter of Auxiliary Functions describes the common functions of the device.
2.6.1
Message Processing
After a system fault occurs, the response data and the measured data of the protection device will be stored
for analysis in the future. For this reason, the device needs to perform Information Processing.
SIPROTEC, 7SJ689, User Manual
C53000-G1176-C346-1, Date 02.2012
39
Functions
2.6 Auxiliary Functions
Applications
• LED Indication Display and binary Output (output device)
• Information Displayed through Display Panel or Personal Computer
• Information Transmitted to Control Centre
Preconditions
SIPROTEC 4 system description document gives the detailed description of the configuration process (see/1/).
2.6.1.1 LED Displays and Binary Output (Output Relays)
Important events and states can be displayed by means of the LED indications on the front panel of the device.
In addition, the device also provides a relay device for remote information. All LED indications and binary
outputs can be freely set for indicating certain explicit information. The device has a default setting at delivery.
The appendix of the manual describes the delivery conditions and the configuration options in detail.
The operating modes of the relay device and the LED indications include two modes of self-holding and nonself-holding (each mode can be set independently).
Signal loss can be avoided at the lost of an auxiliary power supply in the self-holding state. The reset can be
performed by the following method:
• Press the LED key on the device,
• Perform remote reset by means of a binary input,
• Perform reset via a serial port,
• Pick up automatic reset by a new pickup (if Addr.625A LED Minimum Holding Timeis set to 0). If the Addr.625A is set to 0, regardless of pickup, the LED indication is always active.
The state indication information is not self-held. As the same, the reset can be activated after a criterion report
is reset. This is suitable for the information of the supervision function and similar functions.
Green LED indication ("operating") shows that the device is in normal operation, and the LED indication cannot
be reset. The indication is OFF if the microprocessor fails in self-check or an auxiliary voltage disappears.
When the auxiliary voltage is normal, but an internal fault of the device occurs, the red indication ("fault") is ON
and the microprocessor may block the device.
2.6.1.2 Information on the Integrated Display (LCD) or Personal Computer
Time and state information can be read out from the display on the front panel of the device. A personal
computer can be connected to the device via a PC interface on the front or a service interface on the rear,
thereby reading information.
The device provides several event buffer regions for storing the operation information and the circuit breaker
states. These buffer regions are supplied with power by a battery, in order to prevent the information from being
lost along with the loss of the auxiliary voltage. The information can be displayed on LCD at any time through
a key, or transmitted to the personal computer through a serial interface or a PC interface. The operation
specification of reading information during operation is described in detail in System Description SIPROTEC 4.
Information Classification
Information Classification:
• Operating Information (event records); Information generated during the operation of the device: Information
related to the states of the device functions, Measurement Data, Power System Data, Control Command
Records and the like.
• Fault Information (trip records): the protection device is capable of storing the inforamtion of the last 8
network faults.
40
SIPROTEC, 7SJ689, User Manual
C53000-G1176-C346-1, Date 02.2012
Functions
2.6 Auxiliary Functions
• "Statistic" Information: including a device pickup trip command counter, reclose command times and the
values of BLOCK current and accumulated failure currents.
The device is capable of generating a complete list containing all information and relay functions. The maximum
function scope can be found out in the appendix. All functions are associated with an information No.. Each
transmissible information also has a piece of corresponding indication information.
Operating Information(Buffer: Event Records)
The operating information comprises the information related to the operating condition of the device during
operation. About 200 pieces of information can be recorded in the device in a time order. The latest information
is displayed at the end of the list. In case of memory overflow, the old information in the list may be covered
with new information.
Fault Information(Buffer: Trip Records)
After a system fault occurs, important information related to the fault evolution process can be stored and
played back, e.g. the pickup of the protection element or the trigger of the trip signal. The fault start time is
marked by the absolute time of a system internal clock. A disturbance process is output with the relative time
at the moment of the fault occurring, so that the fault duration time before Trip and time until the Trip Command
Reset can be determined. Time Information Resolution is set to 1ms.
Stored Information
The information of the latest eight network faults can be retrieved and read. The nominal definition of the
network fault refers to that the whole process from the detection of a fault to the final elimination of interference
is a network fault. If the automatic reclose takes place, the network fault is ended by the last reclose trial.
Therefore, the whole elimination process comprises a plurality of reclose trials, which only take up one trip
record buffer region. In a network fault, the information of a plurality of faults may be generated (from the pickup
of the first protection function to the dropout of the last protection function). Each fault event without automatic
reclose represents a network fault.
A buffer is capable of recording 600 pieces of information in all. In case of the memory overflow of the buffer,
the oldest data will be covered with the latest data.
General Interrogation
The current state of the SIPROTEC. 4 protection device can be read through the general interrogation retrieved
by DIGSI. The general interrogation displays the current values of all information.
Spontaneous Information
The current state of the introduced information can be reflected through the spontaneous information displayed
by DIGSI. Each new introduced information may be displayed immediately, that is to say, the user has no need
to wait its update and pickup.
2.6.1.3 Information to Control Center
If the device is provided with a serial interface, the stored information can be transmitted to a central control
and storage device through the interface. The transmission can be achieved via different transmission
protocols.
2.6.2
Statistics
The statistics include the trip times of the pickup of the 7SJ689 protection device and the number of its on-load
operation hours. In addition, a further counter is provided which is capable of measure the number of hours of
the circuit breaker being in the "OPEN" state. More statistical data can be obtained by taking full advantage of
the time interval of the maintenance of the circuit breaker.
The counter and the memory can still operate reliably after losing the auxiliary power supply.
SIPROTEC, 7SJ689, User Manual
C53000-G1176-C346-1, Date 02.2012
41
Functions
2.6 Auxiliary Functions
During the first pickup of the protection device, the statistical data is preset to zero.
2.6.2.1 General
Number of Trips
In order to count the number of trips of the 7SJ689 protection device, the position of the circuit breaker must
be monitored through the auxiliary contact of the breaker and by means of the binary input of the 7SJ689
protection device. Therefore, the internal pulse counter must be assigned to the binary input under the control
of the open state of the circuit breaker in a matrix. If only the option "Measured and Metered Values Only" is
active in the configuration matrix, the pulse count value "Total Number of Trip" can be found out in the "statistic
table".
Total Number of Operating Hours
The total number of operating hours under the on-load condition is also stored (when the current value of at
least one phase is greater than the Circuit Breaker Close Current Criterion set in the Addr.212 , the default of
the close current in the 7SJ689 device is 0.04IN).
"Circuit Breaker Open" Hour Number Statistics
A CFC application program is capable of performing counting of statistic similar to the number of operating
hours, thus counting the number of hours of the "Ciruict Breaker Open" state. A general hour number counter
is connected to a corresponding binary input. Counting is started if the corresponding binary input is activated.
Meanwhile, the counter is selected to be picked up while being lower than the current threshold defined in the
parameter 212 BkrClosed I MIN. The counter can be set and reset. An application example for this type of
counter can be obtained on the Internet (SIPROTEX Download Zone).
2.6.2.2 Setting Notes
Read/Setting/Reset Counter
he SIPROTEC 4 system specification describes how to read the statistical counter through the front panel of
the device or DIGSI. In the menu option Record > Statistics, the statistical counter is set and reset through a
counter value which is rewritten and displayed.
2.6.2.3 Information List
No.
Information
409
1020
1021
1022
1023
#of TRIPs=
>BLOCK Op Count
Op.Hours=
Σ Ia =
Σ Ib =
Σ Ic =
2.6.3
Measurement
Type of
Information
PMV
SP
VI
VI
VI
VI
Comments
Number of TRIPs=
>BLOCK Op Counter
Counter of operating hours
Accumulation of interrupted current Ph A
Accumulation of interrupted current Ph B
Accumulation of interrupted current Ph C
A series of measured values and the derived quantities thereof can be used for field interrogation or data
remote transmission.
Applications
• Information of System Actual Condition
• A secondary value is converted into a primary value and a percent
Preconditions
The protection device is further capable of displaying the primary values and the percents of the measured
values in addition to the secondary values thereof.
42
SIPROTEC, 7SJ689, User Manual
C53000-G1176-C346-1, Date 02.2012
Functions
2.6 Auxiliary Functions
The precondition of displaying the primary values and the percents correctly is complete and correct input of
the rated values of the transformer. Moreover, the protection device further requires the transformation ratios
of CT and PT during the configuration of the device. The following table shows a formula for converting a
secondary value into a primary value and a percent.
2.6.3.1 Display of Measured Value
Table 2-1
Conversion Formula between Secondary Values and Primary Values/Percents
Measured
Values
Ia, Ib, Ic,
I1, I2
Secondary
Values
Isec
Primary Values
In =3 · I0
(calculated
value)
In (measured
value)
In sec
Ins
(InS
I3I0real,
I3I0reactive,
Ua, Ub, Uc,
U0, U1, U2,
U4
Uab, Ubc, Uca
InS sec.
Un
Un sec.
Ux
Uxsec
P, Q, S (split
phase)
No Secondary Measured Value
Power Factor
(split phase)
Frequency
Protection
cos ϕ
cos ϕ
f Hz
f Hz
%
In sec
UPh sec.
UPhPh sec.
cos ϕ · 100%
2.6.3.2 Transfer of Measured Values
The measured values can be transmitted to the control centre and a memory unit through a communication
interface.
The measurement scopes of the values are transmitted according to protocols, and if necessary, subsequent
additional settings are provided.
SIPROTEC, 7SJ689, User Manual
C53000-G1176-C346-1, Date 02.2012
43
Functions
2.6 Auxiliary Functions
Protocol
IEC 60870-5-103
IEC 61850
Transmissible Measurement Scopes, Format
Measured Values From 0 to 240 %
The primary values measured are transmitted.
The measured values and the format thereof are explained in PIXIT 7SJ manual.
The measured values are transmitted in a "floating-point number" format. The
measurement scopes transmitted are not affected by the measured values of the
operation. 2.6.3.3 Information List
No.
601
602
603
604
605
606
621
622
623
624
625
626
627
629
630
641
642
645
644
831
832
901
30701
30702
30703
30704
30705
30706
30707
30708
30709
2.6.4
Information
Ia
Ib
Ic
In
I1 =
I2 =
Va =
Vb =
Vc =
Va-b=
Vb-c=
Vc-a=
VN =
V1 =
V2 =
P =
Q =
S =
Freq=
3Io =
Vo =
Power factor
Pa =
Pb =
Pc =
Qa =
Qb =
Qc =
PFa =
PFb =
PFc =
Type of
Information
MV
MV
MV
MV
MV
MV
MV
MV
MV
MV
MV
MV
MV
MV
MV
MV
MV
MV
MV
MV
MV
MV
MV
MV
MV
MV
MV
MV
MV
MV
MV
Comments
Ia
Ib
Ic
In
I1 (positive sequence)
I2 (negative sequence)
Va
Vb
Vc
Va-b
Vb-c
Vc-a
VN
V1 (positive sequence)
V2 (negative sequence)
P (active power)
Q (reactive power)
S (apparent power)
Frequency
3Io (zero sequence)
Vo (zero sequence)
Power Factor
Pa (active power, phase A)
Pb (active power, phase B)
Pc (active power, phase C)
Qa (reactive power, phase A)
Qb (reactive power, phase B)
Qc (reactive power, phase C)
Power Factor, phase A
Power Factor, phase B
Power Factor, phase C
Set Points for Measured Values (statistic)
2.6.4.1 Description
A limit value can be set for a statistical counter, so that a piece of information is triggered immediately when the
count of the counter reaches the limit value. The inform320ation is capable of driving the output of the device
or displayed on LEDs.
2.6.4.2 Setting Notes
Limit Value Of Statistical Counter
The limit value of the statistical counter is performed in the submenu Threshold-Crossing Values (statistics) via
the DIGSI. menu option Record → Statistics.The corresponding contents may be displayed in a new window
44
SIPROTEC, 7SJ689, User Manual
C53000-G1176-C346-1, Date 02.2012
Functions
2.6 Auxiliary Functions
through doubleclicking. The preceding settings can be modified and covered (see SIPROTEC 4 System
Specification).
2.6.4.3 Information List
No.
272
2.6.5
Information
Op Hours>
SP. Op Hours>
Type of
Comments
Information
LV
Expiry of Total Number of Operating Hours
OUT
Set Point Operating Hours
Commissioning Tool
Data transmitted by the device to a master station computer system can be tested during testing or
commissioning. A series of tools are used for testing the communication interface and the binary input/output
interface of the device.
Applications
• Test Mode
• Commissioning
2.6.5.1 Description
Data transmitted to the SCADA system is tested in the test mode.
If the device is connected to a remote control master station through an SCADA communication interface, the
information transmitted by the latter can be tested.
All information and measured values transmitted to the remote master station are attached with test mode flags
if the device is tested in field (namely in the test mode) according to different transmission protocols. The flags
are used for preventing the test information from being wrongly taken as the fault conditions of the actual
system. A further optional operation is to block all information which is normally transmitted to the remote
master station in the test mode.
Data Transmission Block also can be controlled by the binary inputs or set through the operating panel of the
device, or set by a PC or the DIGSI software.
Detailed introductions on entering or quitting the test mode and blocking the data transmission are provided in
the SIPROTEC 4 System Specification.
Check Communication Interface
If the device is equipped with a communication interface and is in communication with the remote master
station, whether the information transmission is correct can be checked via the operation of DIGSI on the
equipment.
All information transmitted to the communication interface via the configuration matrix may be displayed in a
dialog box. In another column of the dialog box, the information can be set in a state expecting to be tested
(e.g. ON/OFF). A piece of information can be sent out by inputting command no.6 (according to a hardware
test menu). The relevant information can be read through the event records of the SIPROTEC. 4 device, or
read in the master station system.
The specific process is described in the chapter "Mounting and Commissioning".
Binary Input Output Check
The binary inputs and outputs and LED indications of the SIPROTEC. 4 device can be controlled by means of
DIGSI. The function can be used for examining, for example, the connection condition of a cable between the
device and substation equipment in the commissioning state.
The current states of all binary inputs and outputs and LE signals are displayed in a dialog box. Operating
equipment, commands or information configured according to the hardware equipment are also displayed
together. The state can be turned over in another column of the dialog box by inputting the command no.6.
Therefore, each output device can be powered up to check the cable connection condition between the
SIPROTEC, 7SJ689, User Manual
C53000-G1176-C346-1, Date 02.2012
45
Functions
2.6 Auxiliary Functions
protected equipment and the system without generating an alarm signal.
The specific process is described in the chapter "Mounting and Commissioning".
Generate Commissioning Recording Diagram
The equipment may be needed to be powered up during commissioning for testing the stability of protection in
the close process. At this moment, the recording diagram or event records may provide detailed information of
the protection actions and behaviors.
In the 7SJ689 device,recording and storage thereof can be triggered by an action of the protection element;
and as the same, the same data can be recorded through a DIGSI command, the communication interface or
the binary inputs. For a case where the recording is triggered by the binary inputs, the ">Trigger Recording
event " must be associate with the binary inputs. At this moment, a trigger signal may be generated to trigger
recording, for example, a binary is shifted to trigger recording when the protected equipment is powered up.
Recording further can be triggered through an external signal in stead of an internal protection element action.
The processing process is the same as the internal trigger and has a sequential number. However, the record
is not displayed in the fault records because the record is a system fault event.
The specific process is described in the chapter "Mounting and Commissioning".
■
46
SIPROTEC, 7SJ689, User Manual
C53000-G1176-C346-1, Date 02.2012
Mounting and Commissioning
3
This chapter is intended for experienced commissioning staff. The related commissioning staff must be familiar
with the commissioning of protection and control systems, the management of power systems and related
safety rules and guidelines. Hardware configurations that may be required in specific cases are described in
this chapter. Protected objects (lines, transformers, etc.) are required to carry load in tests on the primary side.
3.1
Mounting and Connections
48
3.2
Connection Check
58
3.3
Commissioning
62
3.4
Final Preparation of Device
68
SIPROTEC, 7SJ689, User Manual
C53000-G1176-C346-1, Date 02.2012
47
Mounting and Commissioning
3.1 Mounting and Connections
3.1
Mounting and Connections
General
Failure to observe these precautions can result in death, personal injury, or serious material damage.
Trouble-free and safe use of this device depends on proper transport, storage, installation, and assembly of the
device according to the warnings in this device manual.
Of particular importance are the general installation and safety regulations for work in a high-voltage
environment (for example, ANSI, IEC, EN, DIN, or other national and international regulations). These
regulations must be observed.
3.1.1
Configuration Information
Preconditions
For mounting and connections, the following conditions must be satisfied:
The rated data of the device must be tested previously by a method recommended in SIPROTEC 4 System
Description, and furthermore, the data should meet the requirements of power system parameters.
General Connection
Comprehensive diagrams for the protection device 7SJ689 are described in the appendix A.2. The
corresponding connection examples of CT and PT circuits are shown in the appendix A.3 . The mounting
configuration of the power system parameter 1(section2.1.3.2) will be checked to ensure the connection of
the device is satisfied.
Voltage Connection Examples 7SJ689
The voltage connection examples are shown in the appendix A.3.
Binary Inputs and Outputs
The configuration options of the binary in- and outputs, i.e. the procedure for the individual adaptation to the
plant conditions, are described in the SIPROTEC 4 System Description. The connections to the plant are
dependent on this configuration. The presettings of the device are listed in Appendix A.4. Please also check that
the labelling strips on the front panel correspond to the configured message functions.
Setting Group Change
If the setting groups are changed using binary inputs, please observe the following contents:
• Two binary inputs must be dedicated to the purpose of changing setting groups when four groups are to
beswitched. One binary input must be set for ">Set Group Bit0", the other input for ">Set Group Bit1". If either
of these input functions is not assigned, then it is considered as not controlled.
48
SIPROTEC, 7SJ689, User Manual
C53000-G1176-C346-1, Date 02.2012
Mounting and Commissioning
3.1 Mounting and Connections
Setting Group Change
• For the control of 2 setting groups one binary input is sufficient, namely ">Set Group Bit0", since the nonassigned binary input ">Set Group Bit1" is then regarded as not connected.
• The control signals must be permanently active so that the selected setting group is and remains active.
The following table shows the allocation of the binary inputs to the setting groups A to D and a simplified
connection diagram for the two binary inputs is illustrated in the following figure. The figure illustrates an
example in which both Set Group Bits 0 and 1 are configured to be controlled (actuated) when the associated
binary input is energized (high).
wherein:
NO =
not energized or not connected
YES =
energized
Table 3-1
Changing setting groups using binary inputs
Binary Input
Activated Group
>Setting Group 0
>Setting Group 1
NO
NO
Setting Group A
YES
NO
Setting Group B
NO
YES
Setting Group C
YES
YES
Setting Group D
Figure 3-1
Connection Diagram (example) of changing setting groups using binary inputs
SIPROTEC, 7SJ689, User Manual
C53000-G1176-C346-1, Date 02.2012
49
Mounting and Commissioning
3.1 Mounting and Connections
3.1.2
Hardware Modifications
3.1.2.1 General
Hardware modifications concerning, for instance, the control voltage for binary inputs or termination of serial
interfaces might be necessary. Follow the procedure described in this section, whenever hardware modifications are carried out.
Auxiliary Voltage
The power supplies of the variants for DC 110 to 250 V, AC 115 to 230 V are largely interchangeable by modifying the position of the jumpers. The assignment of these jumpers to the nominal voltage ranges and their
spatial arrangement on the PCB for the device 7SJ689 is described in the following sections. Location and
ratings of the miniature fuse and the buffer battery are also shown. When the devices are delivered, these
jumpers are set correctly according to the nameplate stickers and need not be altered.
Live Status Contact
The live contacts of devices 7SJ689 are changeover contacts.
Nominal Currents
The input transformers of the device are set to a nominal current of 1 A or 5 A by means of burden switching.
The jumpers were positioned at the factory according to the specifications on the nameplate sticker. The assignment of the plug-in jumpers to the nominal current and the spatial arrangement of the jumpers are described in the following sections.
Jumpers X61, X62 and X63 must be set for the same nominal current, i.e. there must be one jumper for each
input transformer, and the common jumper X 60.
With standard 1/5 A transformers, jumper X64 for the earth path is set to 1 A or 5 A irrespective of other jumper
positions and depending on the ordered variant.
Note
If nominal current ratings are changed by way of exception, then the new ratings must be registered via the
parameters 205 CT SECONDARY /218 IN CT SEC in the Power System Data (see Section 2.1.3.2).
Control Voltage for Binary Inputs
When the device is delivered from the factory, the binary inputs are set to operate with a voltage that corresponds to the rated DC voltage of the power supply. In general, to optimize the operation of the inputs, the pickup voltage of the inputs should be set to most closely match the actual control voltage being used.
A jumper position must be changed to adjust the pickup voltage of a binary input. The assignment of the
jumpers to the binary inputs and their spatial arrangement are described in the following sections.
Contact Mode for Binary Outputs
Input/output modules can have relays with changeover contacts which can be set as either NO or NC. To do
so, the location of one jumper must be changed. To which relays of which modules this applies, is described in
the following sections.
50
SIPROTEC, 7SJ689, User Manual
C53000-G1176-C346-1, Date 02.2012
Mounting and Commissioning
3.1 Mounting and Connections
Exchanging Interfaces
The serial interface can only be replaced. The following section under margin heading „Rreplacing Interface
Modules“ describes which interfaces can be exchanged, and how this is done.
Termination of Bus-capable Interfaces
If the device is equipped with a serial RS485 interface, they must be terminated with resistors at the last device
on the bus to ensure reliable data transmission. For this purpose, terminating resistors are provided on the PCB
of the CPU processor module and on the RS485 or PROFIBUS interface module which can be connected via
jumpers. Here, only one option can be used. The physical arrangement of the jumpers on the PCB of the corresponding processor board CPU is described in the following sections under margin heading „Processor
Board CPU“. The arrangement of the jumpers on the interface modules is described under margin heading
„RS485/RS232“. Both jumpers must always be plugged identically.
The terminating resistors are disabled on delivery.
Spare Parts
Spare parts can be the buffer battery that provides for storage of the data in the battery-buffered RAM when
the supply voltage fails, and the miniature fuse of the internal power supply. Their physical arrangement is
shown in the figures of the processor boards. The ratings of the fuse are printed on the board next to the fuse.
When exchanging the fuse, please observe the hints given in the SIPROTEC 4 System Description under
„Maintenance“ and „Corrective Action / Repairs“.
3.1.2.2 Disassembly
Work on the Printed Circuit Boards
Note
Before carrying out the following steps, make sure that the device is not operative.
Caution!
Caution when changing jumper settings that affect nominal values of the device
As a consequence, the ordering number (MLFB) and the ratings that are stated on the nameplate do no longer
match the actual device properties.
If such changes are necessary, the changes should be clearly and fully noted on the device. Self adhesive stickers are available that can be used as replacement nameplates.
To perform work on the printed circuit boards, such as checking or moving switching elements or exchanging
modules, proceed as follows:
• Prepare working area. Provide a earthed mat for protecting components subject to damage from electrostatic discharges (ESD). The following equipment is needed:
– screwdriver with a 5 to 6 mm wide tip,
– a Philips screwdriver size 1,
– 5 mm socket or nut driver.
• Unfasten the screw-posts of the D-subminiature connectors on the back panel at location „A“. This is not
necessary if the device is designed for surface mounting.
SIPROTEC, 7SJ689, User Manual
C53000-G1176-C346-1, Date 02.2012
51
Mounting and Commissioning
3.1 Mounting and Connections
• If the device has additional interfaces at locations „B“and „D“ apart from interfaces at locations „A“ and „D“,
the screws located diagonally to the interfaces must be removed. This is not necessary if the device is designed for surface mounting.
• Remove the four or six caps on the front cover and loosen the screws that become accessible.
• Carefully take off the front cover. With device versions with a detached operator panel it is possible to remove
the front cover of the device right after having unscrewed all screws.
Work on the Plug Connectors
Caution!
Mind electrostatic discharges
Non–observance can result in minor personal injury or material damage.
When working on plug connectors, electrostatic discharges must be avoided by previously touching a earthed
metal part.
Do not plug or withdraw interface connections under power!
Here, the following must be observed:
• Disconnect the ribbon cable between the front cover and the CPU board (No. 1 in Figure 3-2) at the front
cover side. Press the top latch of the plug connector up and the bottom latch down so that the plug connector
of the ribbon cable is pressed out. This action does not apply to the device version with detached operator
panel. However, on the central processor unit CPU (No. 1) the 7-pole plug connector X16 behind the D-subminiture connector and the plug connector of the ribbon cable (connected to the 68-pole plug connector on
the rear side) must be removed.
• Disconnect the ribbon cables between the CPU unit (No. 1) and the input/output printed circuit board I/O
(No. 2).
• Remove the boards and set them on the earthed mat to protect them from ESD damage.
• Check the jumpers according to figures to and the following information. Change or remove the jumpers if
necessary.
The arrangement of modules for device types and housing sizes are shown in Figure 3-2.
Module Arrangement
The arrangement of modules for device 7SJ689 is illustrated in the following figure.
52
SIPROTEC, 7SJ689, User Manual
C53000-G1176-C346-1, Date 02.2012
Mounting and Commissioning
3.1 Mounting and Connections
Figure 3-2
Front view of 7SJ689 after removal of the front cover (simplified and scaled down)
3.1.2.3 Switching Elements on the Printed Circuit Boards
Three different releases of the A–CPU board are available. They are shown in the following figures. The location of the miniature fuse (F1) and of the buffer battery (G1) are also shown in the following figures.
SIPROTEC, 7SJ689, User Manual
C53000-G1176-C346-1, Date 02.2012
53
Mounting and Commissioning
3.1 Mounting and Connections
Processor Board A–CPU for 7SJ689
Figure 3-3
Processor printed circuit board A–CPU for 7SJ689 with jumpers settings required for
the module configuration
Power Supply
Table 3-2
Jumper
Jumper settings for the nominal voltage of the integrated power supply on the processor board
A–CPU
Rated Voltage
110 to 250 VDC,
115 to 230 VAC
54
X51
2-3
X52
2-3
X53
2-3
SIPROTEC, 7SJ689, User Manual
C53000-G1176-C346-1, Date 02.2012
Mounting and Commissioning
3.1 Mounting and Connections
Pickup Voltages of BI1 to BI3
Table 3-3
1)
2)
Jumper settings for the pickup voltages of the binary inputs BI1 to BI3 on the processor board
A–CPU
Binary inputs
Jumper
88 VDC threshold 1)
176 VDC threshold 2)
BI1
X21
M
H
BI2
X22
M
H
BI3
X23
M
H
Factory settings for devices with power supply voltages of 110 VDC to 250 VDC, Binary input threshold 88V
DC
Factory settings for devices with power supply voltages of 110 VDC to 250 VDC, Binary input threshold 176
V DC
Contact Mode for Binary Outputs BO1 and BO2
Table 3-4
Jumper settings for the contact mode of relays BO1 and BO2 on the processor board A–CPU
for
Jumper
Open in quiescent state
(NO)
Closed in quiescent state
(NC)
Presetting
BO1
X41
1-2
2-3
1-2
BO2
X42
1-2
2-3
1-2
SIPROTEC, 7SJ689, User Manual
C53000-G1176-C346-1, Date 02.2012
55
Mounting and Commissioning
3.1 Mounting and Connections
Input/Output Board A–I/O-2
The layout of the printed circuit board for the input/output board A–I/O-2 is illustrated in the following figure. The
set nominal currents of the current input transformers and the selected operating voltage of binary inputs BI4
to BI11 are checked.
Figure 3-4
Input/output module A–I/O-2 for 7SJ689 with representation of the jumper settings required for
the board configuration
The jumpers X60 to X63 must all be set to the same rated current, i.e. one jumper (X61 to X63) for each input
transformer and in addition the common jumper X60. The jumper X64 determines the rated current for the input
IE and may thus have a setting that deviates from that of the phase currents.
The measuring range of the voltage inputs is defined via jumpers X80 to X85. For 7SJ689, the range 200 V
must be set. The range may not be changed to 170 V.
56
SIPROTEC, 7SJ689, User Manual
C53000-G1176-C346-1, Date 02.2012
Mounting and Commissioning
3.1 Mounting and Connections
Pickup Voltage of BI4 to BI11
Table 3-5
Jumper settings for pickup voltages of binary inputs BI4 to BI11 on the input/output board
A–I/O-2
Binary inputs
Jumper
88 VDC threshold
176 VDC threshold
1)
1)
2)
2)
BI4
X21
M
H
BI5
X22
M
H
BI6
X23
M
H
BI7
X24
M
H
BI8
X25
M
H
Factory settings for devices with power supply voltages of 110 VDC to 250 VDC, Binary input threshold 88V
DC
Factory settings for devices with power supply voltages of 110 VDC to 250 VDC, Binary input threshold 176
V DC
3.1.2.4 Reassembly
To reassemble the device, proceed as follows:
• Carefully insert the boards into the case. The mounting locations are shown in Figures 3-2 to . For the model
of the device designed for surface mounting, use the metal lever to insert the processor circuit board CPU
board. The installation is easier with the lever.
• First plug the plug connectors of the ribbon cable into the input/output boards I/O and then onto the processor module CPU. Do not bend any connector pins ! Do not use force !
• Insert the plug connector of the ribbon cable between the processor module CPU and the front cover into
the socket of the front cover. This action does not apply to the device version with detached operator panel.
Instead the plug connector of the ribbon cable connected to a 68pole plug connector on the rear side of the
device must be plugged into the plug connector of the processor circuit board CPU. The 7pole X16 connector belonging to the ribbon cable must be plugged behind the D-subminiature female connector. The plugging position is not relevant in this context as the connection is protected against polarity reversal.
• Press the latches of the plug connectors together.
• Replace the front cover and secure to the housing with the screws.
• Put the covers back on.
• Re-fasten the interfaces on the rear of the device housing. This activity is not necessary if the device is designed for surface mounting.
SIPROTEC, 7SJ689, User Manual
C53000-G1176-C346-1, Date 02.2012
57
Mounting and Commissioning
3.2 Checking connection
3.2
Checking connection
3.2.1
Checking data connection of a serial port
Pin Assignment
The following tables illustrate the pin assignments of the various serial device interfaces, of the time
synchronization interface and of the Ethernet interface. The position of the connections can be seen in the
following figure.
Figure 3-5
9-pin D-subminiature female connectors
Figure 3-6
RJ45 Connector
Operation Interface
When the recommended communication cable is used (refer to the Appendix for the ordering number), correct
connection between the SIPROTEC 4 device and the PC or laptop is automatically ensured.
Service Interface
If communications between devices are completed using services (port C) via a fixed wire or a modem, the data
connections thereof need to be checked.
System Interface
When the serial port of a device is connected to a central substation control system, the data connection thereof
must be checked. Visual check for a transmission channel and a receiving channel is very important. For
58
SIPROTEC, 7SJ689, User Manual
C53000-G1176-C346-1, Date 02.2012
Mounting and Commissioning
3.2 Checking connection
RS232 or a fibre optic interface, each connection corresponds to a transmission direction. Therefore, the
output of one device must be connected to that of the other device, vice versa.
For a data cable, the connection manner thereof must refer to DIN 66020 and ISO2110:
• TxD = Data Outputs
• RxD = Data Inputs
• RTS = Request to Send
• CTS = Send Clear
• GND = Signal/Chasis Earthed
The cable shield is to be earthed at both ends. For extremely EMC-prone environments, the GND may be
connected via a separate individually shielded wire pair to improve immunity to interference.
Termination
The RS485 interface can be applied to operating in a half-duplex mode with signals A/A' and B/B', which share
a relative voltage pole C/C' (GND). After being checked, only the last device on the busbar is connected with
a terminal resistor, while the other devices thereon are not. The jumper of the terminal resistor is on the
interface module RS485. The terminal resistor can be also connected externally. In such a case, the terminal
resistors on a module must be separated from the module.
If the busbar extends, please confirm again that only the last device on the busbar is connected with a terminal
resistor, while the other devices thereon are not.
Time Synchronization Interface
It is optionally possible to process 5 V-, 12 V- or 24 V- time synchronization signals, provided that they are
carried to the inputs named in the following table.
Table 3-6
D-SUB socket assignment of the time synchronization interface
Pin Number
Description
Signal Meaning
1
P24_TSIG
Input 24 V
2
P5_TSIG
Input 5 V
3
M_TSIG
Return Wire
4
– 1)
– 1)
5
SHIELD
Shield Potential
6
–
–
1)
7
P12_TSIG
Input 12 V
8
P_TSYNC 1)
Input 24 V1)
9
SHIELD
Shield Potential
distributed, but not used
Fiber-Optical Fibre
WARNING!
Laser Radiation!
Please do not directly look at the interior of an optical fibre component.
Signals transmitted via optical fibers are unaffected by interference. The fibers guarantee electrical isolation
between the connections. Transmit and receive connections are represented by symbols.
SIPROTEC, 7SJ689, User Manual
C53000-G1176-C346-1, Date 02.2012
59
Mounting and Commissioning
3.2 Checking connection
The standard setting of the character idle state for the optical fiber interface is 鉒 ight off“. If the character idle
state is to be changed, use the operating program DIGSI as described in the SIPROTEC 4 System Description.
3.2.2
Checking system connections
WARNING!
Warning of dangerous voltages
Non-observance of the following measures can result in death, personal injury or substantial property damage.
Therefore, only qualified people who are familiar with and adhere to the safety procedures and precautionary
measures should perform the inspection steps.
Caution!
Take care when operating the device without a battery on a battery charger.
Non-observance of the following measures can lead to unusually high voltages and consequently, the
destruction of the device.
Do not operate the device on a battery charger without a connected battery. (For limit values see also Technical
Data, Section 4.1).
If undervoltage protection is configured and enabled in the device and if, at the same time, the current criterion
is disabled, the device picks up right after auxiliary voltage has been connected, since no measuring voltage is
available. To make the device configurable, pickup is to be stopped, i.e. the measuring voltage is connected or
voltage protection is blocked. This can be performed by operation.
Before the device is energized for the first time, it should be in the final operating environment for at least 2
hours to equalize the temperature, to minimize humidity and to avoid condensation. Connections are checked
with the device at its final location. The plant must first be switched off and earthed.
Proceed as follows in order to check the system connections:
• Protective switches for the power supply and the measured voltages must be opened.
• Check the continuity of all current and voltage transformer connections against the system and
connection diagrams:
– Are the current transformers grounded properly?
– Are the polarities of the current transformers the same?
– Is the phase relationship of the current transformers correct?
– Are the voltage transformers grounded properly?
– Are the polarities of the voltage transformers correct?
– Is the phase relationship of the voltage transformers correct?
– Is the polarity for current input I4 correct (if used)?
– Is the polarity for voltage input V4 correct (if used)?
• If check switches are used for secondary testing of the device, their functions also must be
checked, in particular that in the “check“ setting the current transducer secondary lines are automatically
shorted.
• The short-circuit feature of the current circuits of the device are to be checked. This may be performed with an ohmmeter or other test equipment for checking continuity. Make sure that terminal
continuity is not wrongly simulated in reverse direction via current transformers or their short
circuit links.
– Remove the front panel of the device
60
SIPROTEC, 7SJ689, User Manual
C53000-G1176-C346-1, Date 02.2012
Mounting and Commissioning
3.2 Checking connection
– Remove the ribbon cable connected to the I/O board with the measured current inputs (on the
front side it is the right printed circuit board). Furthermore, remove the printed circuit board so
that there is no more contact anymore with the plug-in terminal of the housing.
– At the terminals of the device, check continuity for each pair of terminals that receives current
from the CTs.
– Firmly re-insert the board again. Carefully connect the ribbon cable. Do not bend any connector pins! Do not use force!
– At the terminals of the device, again check continuity for each pair of terminals that receives
current from the CTs.
– Attach the front panel and tighten the screws.
• Connect an ammeter in the supply circuit of the power supply. A range of about 2.5 A to 5 A for
the meter is appropriate.
• Switch on m.c.b. for auxiliary voltage (supply protection), check the voltage level and, if applicable, the polarity of the voltage at the device terminals or at the connection modules.
• The current consumption should correspond to the power input in neutral position of the device.
The measured steady state current should be insignificant. Transient movement of the ammeter
merely indicates the charging current of capacitors.
• Remove the voltage from the power supply by opening the supply circuit of the power supply.
• Disconnect the measuring test equipment; restore the normal power supply connections.
• Remove the voltage from the power supply by closing the supply circuit of the power supply.
• Close the protective switches for the voltage transformers.
• Verify that the voltage phase rotation at the device terminals is correct.
• Open the protective switches for the voltage transformers and the power supply.
• Check the trip and close circuits to the power system circuit breakers.
• Verify that the control wiring to and from other devices is correct.
• Check the signalling connections.
• Close the protective switches.
SIPROTEC, 7SJ689, User Manual
C53000-G1176-C346-1, Date 02.2012
61
Mounting and Commissioning
3.3 Commissioning
3.3
Commissioning
WARNING!
Warning of dangerous voltages when operating an electrical device
Non-observance of the following measures can result in death, personal injury or substantial property damage.
Only qualified people shall work on and around this device. They must be thoroughly familiar with all warnings
and safety notices in this instruction manual as well as with the applicable safety steps, safety regulations,and
precautionary measures.
Before making any connections, the device must be earthed at the protective conductor terminal.
Hazardous voltages can exist in all switchgear components connected to the power supply and to measur ment
and test circuits.
Hazardous voltages can be present in the device even after the power supply voltage has been removed (capacitors can still be charged).
After switching off the auxiliary voltage, wait a minimum of 10 seconds before reconnecting this voltage so thatsteady conditions can be established.
The limit values given in Technical Data (Chapter 4) must not be exceeded, neither during testing nor during
commissioning.
When testing the device with secondary test equipment, make sure that no other measurement quantities are
connected and that the trip and close circuits to the circuit breakers and other primary switches are disco nected
from the device.
Danger!
Hazardous voltages during interruptions in secondary circuits of current transformers
Non-observance of the following measure will result in death, severe personal injury or substantial propertydamage.
Short-circuit the current transformer secondary circuits before current connections to the device are opened.
Switching operations have to be carried out during commissioning. A prerequisite for the prescribed tests is that
these switching operations can be executed without danger. They are accordingly not intended for oper tional
checks.
WARNING!
Warning of dangers evolving from improper primary tests.
Non-observance of the following measures can result in death, personal injury or substantial property damage.
Primary tests are only allowed to be carried out by qualified personnel, who are familiar with the commissioing
of protection systems, the operation of the plant and the safety rules and regulations (switching, earthing, etc.).
62
SIPROTEC, 7SJ689, User Manual
C53000-G1176-C346-1, Date 02.2012
Mounting and Commissioning
3.3 Commissioning
3.3.1
Test Mode and Transmission Block
Activated and Deactivation
If the device is connected to a central or main computer system via the SCADA interface, then the information
that is transmitted can be influenced. This is only possible with some of the protocols available.
If the test mode is switched on, the messages sent by a SIPROTEC 4 device to the main system has an
additional test bit. This bit allows the messages to be recognized as not resulting from actual faults.
Furthermore,
it can be determined by activating the transmission block that no annunciations are transmitted via the system
interface during test mode.
The SIPROTEC 4 System Manual describes in detail how to activate and deactivate the test mode and blocked
data transmission. Please note that when DIGSI is being used for device editing, the program must be in the
online operating mode for the test features to be used.
3.3.2
Checking System Interface (SCADA)
Preface Remarks
If the device features a system interface and this is used to communicate with the control center, the DIGSI
device operation can be used to test if messages are transmitted correctly. This test option should however
definitely not be used while the device is in"real" operation.
WARNING!
Danger evolving from operating the equipment (e.g.circuit breakers, disconnectors) by means of the
test function
Non-observance of the following measure will result in death, severe personal injury or substantial property
damage.
Equipment used to allow switching such as circuit breakers or disconnectors is to be checked only during
commissioning. Do not under any circumstances check them by means of the test function during real oper tion
by transmitting or receiving messages via the system interface.
Note
After termination of the system interface test the device will reboot. Thereby, all annunciation buffers are
erased. If required, these buffers should be extracted with DIGSI prior to the test.
The interface test is carried out using DIGSI in the Online operating mode:
• Open the online directory by double-clicking; the operating functions for the device appear.
• Click on Test; the function selection appears in the right half of the screen.
• Double-click on Generate Annunciations shown in the list view. The dialog box Generate Annunciations
opens (refer to the following figure).
SIPROTEC, 7SJ689, User Manual
C53000-G1176-C346-1, Date 02.2012
63
Mounting and Commissioning
3.3 Commissioning
Structure of Test Dialog Box
In the column Indication the display texts of all indications are displayed which were allocated to the system
interface in the matrix. In the column SETPOINT Status the user has to define the value for the messages to
be tested. Depending on annunciation type, several input fields are offered (e.g. message "ON“ / message
"OFF"). By clicking on one of the fields you can select the desired value from the pull-down menu.
Figure 3-7
System Interface Tests with Dialog Box: generated information - examples
Changing Operating State
When clicking one of the buttons in the column Action for the first time, you will be prompted for the passwordno. 6 (for hardware test menus). After correct entry of the password, individual annunciations can be initiated.To
do so, click on the button Send on the corresponding line. The corresponding message is issued and can be
read out either from the event log of the SIPROTEC 4 device or from the substation control system.
As long as the window is open, further tests can be performed.
Test In Message Direction
For all information that is transmitted to the central station, test the options in the list which appears in
SETPOINT Status:
• Make sure that each checking process is carried out carefully without causing any danger (see above and
refer to DANGER!)
• Click on Send in the function to be tested and check whether the transmitted information reaches the central
station and shows the desired reaction. Data which are normally linked via binary inputs (first character ">")
are likewise indicated to the central power system with this procedure. The function of the binary inputs itself
is tested separately.
Exiting in Test Mode
To end the System Interface Test, click on Close. The device is briefly out of service while the start-up routine
is executed. The dialog box closes.
Test in Command Direction
The information transmitted in command direction must be indicated by the central station. Check whether the
reaction is correct.
64
SIPROTEC, 7SJ689, User Manual
C53000-G1176-C346-1, Date 02.2012
Mounting and Commissioning
3.3 Commissioning
3.3.3
Checking the Status of Binary Inputs and Outputs
Preface Remarks
The binary inputs, outputs, and LEDs of a SIPROTEC 4 device can be individually and precisely controlled in
DIGSI. This feature is used to verify control wiring from the device to plant equipment (operational checks)
during commissioning. This test option should however definitely not be used while the device is in "Real"
operation.
DANGER!
Danger evolving from operating the equipment (e.g. circuit breakers, disconnectors) by means of the
test function
Non-observance of the following measure will result in death, severe personal injury or substantial property
damage.
Equipment used to allow switching such as circuit breakers or disconnectors is to be checked only during commissioning. Do not under any circumstances check them by means of the test function during real operation by
transmitting or receiving messages via the system interface.
Note
After finishing the hardware tests, the device will reboot. Thereby, all annunciation buffers are erased. If
required, these buffers should be read out with DIGSI and saved prior to the test.
The hardware tests can be carried out in the online operating mode using the DIGSI:
• Open the Online directory by double-clicking; the operating functions for the device appear.
• Click on Test; the function selection appears in the right half of the screen.
• Double-click in the list view on Hardware Test. The dialog box of the same name opens (see the following
figure).
Structure of Test Dialog Box
The dialog box is classified into three groups: BI for binary inputs, REL for output relays, and LED for
lightemitting diodes. On the left of each of these groups is an accordingly labelled button. By double-clicking a
button, information regarding the associated group can be shown or hidden.
In the column Status the present (physical) state of the hardware component is displayed. Indication is made
by symbols. The physical actual states of the binary inputs and outputs are indicated by an open or closed
switch symbol, the LEDs by a dark or illuminated LED symbol.
The opposite state of each element is displayed in the column Scheduled. The display is made in plain text.
The right-most column indicates the commands or messages that are configured (masked) to the hardware
components.
SIPROTEC, 7SJ689, User Manual
C53000-G1176-C346-1, Date 02.2012
65
Mounting and Commissioning
3.3 Commissioning
Figure 3-8
Test of the binary Inputs and Outputs — Examples
Changing the Operating State
To change the status of a hardware component, click on the associated button in the Scheduled column.
Password No. 6 (if activated during configuration) will be requested before the first hardware modification is
allowed. After entry of the correct password a status change will be executed. Further status changes remain
possible while the dialog box is open.
Test of the Output Relays
Each individual output relay can be energized allowing to check the wiring between the output relay of the
7SJ689 and the system, without having to generate the message that is assigned to the relay. As soon as the
first status change for any one of the output relays is initiated, all output relays are separated from the internal
device functions, and can only be operated by the hardware test function. This for example means that a
switching command coming from a protection function or a control command from the operator panel to an
output relay cannot be executed.
Proceed as follows in order to check the output relay :
• Ensure that the switching of the output relay can be executed without danger (see above under DANGER!).
• Each output relay must be tested via the corresponding Scheduled-cell in the dialog box.
• Finish the testing (see margin title below "Exiting the Test Mode"), so that during further testings no
unwanted switchings are initiated.
Test of the Binary Inputs
To test the wiring between the plant and the binary inputs of the 7SJ689 the condition in the plant which initiates
the binary input must be generated and the response of the device checked.
To do so, the dialog box Hardware Test must be opened again to view the physical state of the binary inputs.
The password is not yet required.
Proceed as follows in order to check the binary inputs:
66
SIPROTEC, 7SJ689, User Manual
C53000-G1176-C346-1, Date 02.2012
Mounting and Commissioning
3.3 Commissioning
• Activate each of function in the system which causes a binary input to pick up.
• Check the reaction in the Status column of the dialog box. To do this, the dialog box must be updated. The
options may be found below under the margin heading "updating the Display".
• Finish the testing (see margin heading below "Exiting the Test Mode").
If ,however, the effect of a binary input must be checked without carrying out any switching in the plant, it is
possible to trigger individual binary inputs with the hardware test function. As soon as the first state change of
any binary input is triggered and the password No. 6 has been entered, all binary inputs are separated from the
plant and can only be activated via the hardware test function..
Test of the LEDs
The LEDs may be tested in a similar manner to the other input/output components. As soon as the first state
change of any LED has been triggered, all LEDs are separated from the internal device functionality and can
only be controlled via the hardware test function. This means e.g. that no LED is illuminated anymore by a
protection function or by pressing the LED reset button.
Updating the Display
As the Hardware Test dialog opens, the operating states of the hardware components which are current at this
time are read in and displayed.
An update is made:
• for each hardware component, if a command to change the condition is successfully performed,
• for all hardware components if the Update button is clicked,
• for all hardware components with cyclical updating (cycle time is 20 seconds) if the Automatic Update
(20sec) field is marked.
Exiting the Test Mode
To end the hardware test, click on Close. The dialog box is closed. The device becomes unavailable for a brief
start-up period immediately after this. Then all hardware components are returned to the operating conditions
determined by the plant settings.
3.3.4
Test Fault Recording
General
In order to be able to test the stability of the protection during switchon procedures also, switchon trials can also
be carried out at the end. Oscillographic records obtain the maximum information about the behaviour of the
protection.
Requirements
Apart from the capability of storing fault recordings via pickup of the protection function, the 7SJ689 also has
the capability of initiating a measured value recording via the operator program DIGSI, the serial interface or
binary input. In the latter case, the information ">Trig.Wave.Cap." must be allocated to a binary input. Triggering
for the oscillographic recording then occurs, for instance, via the binary input when the protection object is
energized.
Those that are externally triggered (that is, without a protective stage pickup) are processed by the device as
a normal oscillographic record. For each oscillographic record a fault record is created which is given its
individual number to ensure that assignment can be made properly. However, these recordings are not
displayed in the fault indication buffer, as they are not fault events..
Trigger Recording
To trigger test measurement recording with DIGSI, click on Test in the left part of the window. Double click the
entry Test Wave Form in the list of the window.
SIPROTEC, 7SJ689, User Manual
C53000-G1176-C346-1, Date 02.2012
67
Mounting and Commissioning
3.4 Final Preparation of Device
Figure 3-9
Triggering oscillographic recording with DIGSI
Oscillographic recording is started immediately. During recording, a report is given in the left part of the status
bar. Bar segments additionally indicate the progress of the procedure.
SIGRA or COMTRRADE read program is needed to display and analyze the oscillographic data. 3.4
Final Preparation of Device
All screws are tightened firmly. All terminal strip screws are tightened, including those terminals not used.
Caution!
Inadmissable Tightening Torques.
Non -observance of the following measure can result in minor personal injury or property damage.
The tightening torques must not be exceeded as the threads and terminal chambers may otherwise be
damaged!
The settings should be checked again, if they were changed during the tests. Check if all protection, control
and auxiliary functions to be found with the configuration parameters are set correctly (Section 2.1.1, Functional
Scope) and all desired functions are set to ON. Keep a copy of all setting values on a PC.
Check the internal clock of the device. If necessary, set or synchronize the clock if it is not automatically synchronized. For assistance, refer to the SIPROTEC 4 System Description.
The annunciation buffers are deleted under MAIN MENU → Annunciations → Set/Reset, so that future information will only apply to actual events and states (see also SIPROTEC 4 System Description). The counters
in the switching statistics should be reset to the values that were existing prior to the testing (see also
SIPROTEC 4 System Description).
Reset the counter of the operational measured values (e.g. operation counter, if available) under MAIN MENU
→ Measured Values → Reset (also see SIPROTEC 4 System Description).
Press the ESC key (several times if necessary), to return to the default display. The default display appears in
the display box (e.g. the display of operational measured values).
Clear the LEDs on the front panel of the device by pressing the LED key, so that they show only real events
and states in the future. In this context, also output relays probably memorized are reset. Pressing the LED key
also serves as a test for the LEDs on the front panel because they should all light when the button is pushed.
Any LEDs that are lit after the clearing attempt are displaying actual conditions.
68
SIPROTEC, 7SJ689, User Manual
C53000-G1176-C346-1, Date 02.2012
Mounting and Commissioning
3.4 Final Preparation of Device
The green „RUN“ LED must light up, whereas the red „ERROR“ must not light up.
Close the protective switches. If test switches are available, then these must be in the operating position.
The device is now ready for operation.
■
SIPROTEC, 7SJ689, User Manual
C53000-G1176-C346-1, Date 02.2012
69
Mounting and Commissioning
3.4 Final Preparation of Device
70
SIPROTEC, 7SJ689, User Manual
C53000-G1176-C346-1, Date 02.2012
Technical Data
4
This chapter provides the technical data of the device SIPROTEC 7SJ689 and the functions thereof, including
the limit values that may not be exceeded under any circumstance. The mechanical data and the outline
dimensional drawings of the protection device are introduced after the introduction of all electrical parameters
and functional parameters thereof.
.
4.1
General
72
4.2
Overvoltage Protection
79
4.3
Remote Tripping Protection
80
4.4
Additional Functions
82
4.5
Dimensions
84
SIPROTEC, 7SJ689, Manual
C53000-G1176-C346-1, Date 02.2012
71
Technical Data
4.1 General
4.1
General
4.1.1
Analog Inputs
Current Inputs
Rated Frequency
fN
50 Hz or 60Hz
Rated Current
IN
1 A or 5 A
Earth Return Load Per Phase
- Inom = 1 A
- INom = 5 A
Current Overload Capability
- Thermal Stability (effective value)
- Dynamic (peak value)
approx.0.05 VA
approx.0.3 VA
100 Inom 1 s
30 Inom 10 s
4 Inom Continuous
250 Inom (Half-Cycle)
Voltage Input
Rated Current
100 V to 225 B (adjustable)
Measurement Scope
0 V to 200 B (adjustable)
Burden
100V approx. 0.3 VA
AC Voltage Input Overload Capacity
- Thermal (effective value)
72
230 V Continuous
SIPROTEC, 7SJ689, Manual
C53000-G1176-C346-1, Date 02.2012
Technical Data
4.1 General
4.1.2
Power Supply
DCVoltage
Voltage supply via an Integrated coverter
Rated Auxiliary DC Voltage VAux
Permissible Voltage Ranges
Rated Auxiliary DC Voltage VAux
Permissible Voltage Range
AC Ripple Voltage
Peak to Peak Value, IEC 60255-11
Power Input
7SJ689
Fault/Short Circuit Switching Time ‰, IEC
60255-11
(non-excited state)
60/110/125 VDC
48 to 150 VDC
110/125/220/250 VDC
88 to 300 VDC
15 % of the auxiliary voltage
Quiescent
approx. 4 W
≥ 50 ms, at U ≥ 110 VDC
Energized
approx. 7 W
≥ 20 ms, at U ≥ 24 VDC
AC Voltage
Voltage supply via an Integrated coverter
Rated Auxiliary Voltage VAux
Permissible Voltage Range
Power Input(115 VAC / 230 VAC)
7SJ689
Bridging Time for Failure/Short-Circuit (in
not energized operation)
4.1.3
115 VAC
92 to 132 VAC
230 VAC
184 to 265 VAC
Quiescent
approx. 3 VA
200 ms
Energized
approx. 9 VA
Binary Inputs and Outputs
Binary Inputs
Variant
7SJ689*Rated Voltage Range
Current Consumption (independent of the
voltage)
Pickup Time
Secured Switching Threshold
for Rated Voltages
approx. 4 ms
Adjustable with jumpers
60/110/125 VDC
for Rated Voltages
110/125/220/250 VDC
for Rated Voltages
(only for modules with 3 switching thresholds)
Maximum Permissible Voltage
Input Pulse Filter
220/250 VDC and
115/230 VAC
300 VDC
at 220 nF and 220 V, recovery time is >60 ms
SIPROTEC, 7SJ689, Manual
C53000-G1176-C346-1, Date 02.2012
Number
8 (configurable)
24 VDC to 250 VDC, bipolar
approx. 1.8 mA
V high ≥ 19 VDC
V low ≤ 10 VDC
V high ≥ 88 VDC
V low ≤ 44 VDC
V high ≥ 176 VDC
V low ≤ 88 VDC
73
Technical Data
4.1 General
Binary Outputs
Output relay for commands/annunciations, alarm relay
Number and Information
Determined according to the ordering variant
(configurable)
normally open/normally
Order Version
normally open*)
closed, optional*)
7SJ689*8
2
Switching Capability MAKE
1000 W/VA
Switching Capability BRAKE
30 VA 40 W resistive 25 W
at L/R ≤ 50 ms
Switching Voltage
250 VDC / VAC
Admissible Current per Contact
5A
(continuous)
Admissible Current per Contact (generate and
30 A for 0.5 s (NO contact)
hold)
Admissible Total Current on Common Line
5 A continuous, 30 A continuou 0.5 s
AC Load (needing to take the dimensions of internal circuits into account)
Frequency
Impedance
ANSI Capacitance Value
4.70· 10-9 F ± 20%
50 Hz
6.77· 105 Ω ± 20%
4.1.4
Communication Interfaces
Operator Interface
Connection
Operation
Transmission Speed
Maximum Transmission Distance
Front side, non-isolated, RS232, 9-pin DSUB port for connecting a
personal computer
With DIGSI
min. 4,800 Bd; max. 115,200 Bd;
Factory Settings: 115,200 Bd; Parity: 8E1
49.2 feet (15 m)
Service/Modem
Connection
Operation
Transmission Speed
RS232/RS485
Isolated Interface for Data Transmission
With DIGSI
min. 4 800 Bd, max. 115,200 Bd;
Factory Settings: 38 400 Bd
RS232/RS485 according to the ordering
variant
Connection of Flush-Mounted Casing Rear Panel, "C" Groove
9-Hole D-SUB Miniature Connecting Sheet
Connection of Panel Surfaceat the bottom of mounting of the casing;
Mounted Casing
Shielded Data Cable
Test Voltage
500 VAC
RS232
Maximum Transmission Distance
49.2 feet (15 m)
Maximum Transmission Distance
3,280 feet (1,000 m)
RS485
74
SIPROTEC, 7SJ689, Manual
C53000-G1176-C346-1, Date 02.2012
Technical Data
4.1 General
Fibre Optical Link (FO)
FO Connector Type
Connection of Flush-Mounted Casing
Connection of Panel SurfaceMounted Casing
Optical Wavelength
Laser Group 1 according to
EN 60825-1/-2
Permissible Optical Link Signal
Attenuation
Maximum Transmission Distance
No Characteristic Position
ST Connector
Rear Panel, Mounting Position "C"
at the bottom of the casing of a console
λ= 820 nm
using glass fibre 50/125 μm or using glass
fibre 62.5/125 μm
max.8 dB, glass fibre ber 62.5/125 μm
max. 0.93 miles (1.5 km)
Configurable; Factory Setting "Light off"
System Interface
Ethernet
(EN 100) supporting
IEC61850 and DIGSI
Ethernet (EN100)
supporting IEC61850
andDIGSI
Connection of Flush-Mounted Casing Rear Panel, Mounting Position "B"
2 x RJ45 Jack
100BaseT in accordance with IEEE802.3
Connection of Panel SurfaceControl Frame at the bottom of the casing
Mounted Casing
Test Voltage (reg. socket)
500 V; 50 Hz
Transmission Speed
100 MBit/s
Bridging Distance
65.62 feet (20 m)
Connection of Flush-Mounted Casing Rear Panel, Mounting Position "B", STConnector
100BaseT in accordance with IEEE802.3
Connection of Panel Surface(not applicable)
Mounted Casing
Test Voltage (reg. socket)
100 MBit/s
Transmission Speed
1300 nm
Bridging Distance
max. 0.93 miles (1.5 km)
Time Synchronization Interface
Time Synchronization
Connection of Flush-Mounted Casing
Connection of Panel Surface-Mounted
Casing
Signal Rated Voltage
Test Voltage
Signal Level and Load
Rated Signal Voltage
5V
6.0 V
UIHigh
UILow
1.0 V at IILow = 0.25 mA
4.5 mA to 9.4 mA
IIHigh
890 at UI = 4 V
RI
640 at UI = 6 V
SIPROTEC, 7SJ689, Manual
C53000-G1176-C346-1, Date 02.2012
DCF 77/IRIG B Signal
(message format IRIG-B000)
Rear Panel, Mounting Position "A"
9-Pin D-SUB Busbar Connector
Double-layer Terminal in the bottom of the casing
optional 5 V, 12 V or 24 V
500 V; 50 Hz
12 V
15.8 V
1.4 V at IILow = 0.25 mA
4.5 mA to 9.3 mA
1930 at UI = 8.7 V
1700 at UI = 15.8 V
24 V
31 V
1.9 V at IILow = 0.25 mA
4.5 mA to 8.7 mA
3780 at UI = 17 V
3560 at UI = 31 V
75
Technical Data
4.1 General
4.1.5
Electrical Tests
Standards
Standards:
IEC 60255 (product standards)
ANSI/IEEE Std C37.90.0/.1/.2
UL 518
DIN 57435 Part 303
please see special function standards for more standards
Insulation Test
Standards:
High Voltage Test (routine test): all circuits except
the power supply, Inputs, Communication
Interfaces and Time Synchronization Interfaces
High Voltage Test (routine test): Auxiliary Voltages
and Inputs
High Voltage Test (routine test):
only Isolated Communication Interface and Time
Synchronization Interfaces
Pulse Voltage Test (type test): all circuits except
Communication Interfaces and time
Synchronization Interfaces as well as Circuit
Class III
IEC 60255-5 and IEC 60870-2-1
2.5 kV (rms), 50 Hz
3.5 kV 500 kV (rms), 50 Hz
5 kV (peak value); 1.2/50 μs; 0.5 J;
3 positive and 3 negative pulses at intervals of 1 s
EMC Tests for Immunity (type test)
Standards:
IEC 60255-6 and -22 (product standards)
EN 50082-2 (generic standards)
DIN 57435 Part 303
High Frequency Test
2.5 kV (peak value); 1 MHz; τ= 15 μs; 400 Inrush Current
IEC 60255-22-1, Class III and VDE 0435 Part 303, per Second; Test Interval 2s; Ri = 200 Ω
Class III
Electrostatic Discharge
8 kV Contact Discharge; 15 kV Exhaust Bipolarity; 150
IEC 60255-22-2, Class IV and IEC 61000-4-2,
pF; Ri = 330Ω
Class IV
High Frequency Region Irradiation, Pulse
10 V/m; 27 MHz to 500 MHz
Modulation
C 60255-22-3 (report), Class III
High Frequency Region Irradiation, Pulse
10 V/m; 80 MHz to 1000 MHz; 80 % AM; 1 kHz
Amplitude Modulation
IEC 61000-4-3, Class III
High Frequency Region Irradiation, Pulse
10 V/m; 900 MHz: Repetition Frequency
Modulation
200 Hz: Duty cycle of 50 %
IEC 61000-4-3/EN V 50204, Class III
Fast Transient Disturbance Variants/Burst
4 kV; 5/50 ns; 5 kHz;
IEC 60255-22-4 and IEC 61000-4-4, Class IV
Burst time = 15 ms; cycle frequency 300 ms; bipolarity; Ri
= 50 Ω; test duration 1 min
High Energy Surge Voltages (SURGE)
Pulse: 1.2/50 μs
IEC 61000-4-5 Installation Class 3
Auxiliary Voltages
Common Mode: 2 kV; 12 Ω; 9 μF
Different Mode: 1 kV; 2 Ω; 18 μF
Measurement Inputs, Inputs,
Common Mode: 2 kV; 42 Ω; 0.5 μF
Relay Outputs
Different Mode: 1 kV; 42 Ω; 0.5μF
High Frequency Online, Amplitude Modulation
10 V; 150 kHz to 80 MHz; 80 % AM; 1 kHz
IEC 61000-4-6, Class III
30 A/m Continuous ; 300 A/m 3 s; 50 Hz 0.5 mT; 50 Hz
Power System Frequency Magnetic Field
IEC 61000-4-8, Class IV
IEC 60255-6
76
SIPROTEC, 7SJ689, Manual
C53000-G1176-C346-1, Date 02.2012
Technical Data
4.1 General
Oscillatory Surge Withstanding Capability
IEEE Std C37.90.1
Fast Transient Surge Resistance
IEEE Std C37.90.1
Electromagnetic Radiation Interference
IEEE Std C37.90.2
Oscillation Attenuation
IEC 60694, IEC 61000-4-12
2.5 kV (peak value); 1 MHz; τ= 15 µs; 400 Inrush Current
per Second; Test Interval 2s; Ri = 200 Ω
4 kV; 5/50 ns; Cycle Rate 300 ms; Bipolarity; Test Interval
1 mIn; Ri = 50 Ω
35 V/m; 25 MHz to 1000 MHz
2.5 kV (peak value), Polarity Alternation 100 kHz, 1 MHz,
10 MHz and 50 MHz, Ri = 200 Ω
EMC Tests For Noise Emission (type test)
Standards:
Line Radio Noise Voltages, Auxiliary Voltages
Only
IEC-CISPR 22
Interface Magnetic Intensity
IEC-CISPR 22
Harmonic Current on the network at 230 VAC
IEC 61000-3-2
Voltage Fluctuation and Network Input Feeder
Flickering at 230 VAC
IEC 61000-3-3
4.1.6
EN 50081-* (generic technical standards)
150 kHz to 30 MHz
Limited Group B
30 MHz to 1000 MHz Limited Group B
Devices assigned to Group D (only for devices with> 50VA
power consumption)
Limits are observed
Mechanical Stress Tests
Vibration and Shock during Operation
Standards:
Vibration
IEC 60255-21-1, Class II;
IEC 60068-2-6
Shock
IEC 60255-21-2, Class I;
IEC 60068-2-27
Seismic Vibration
IEC 60255-21-3, Class I;
IEC 60068-3-3
IEC 60255-21 and IEC 60068
Sinusoid
10 Hz to 60 Hz: ± 0.075 mm Vibration Amplitude; 60 Hz
to 150 Hz: 1 g acceleration
Frequency Sweep Rate: 1 octave/min 20 cycles in 3
vertical directions
Semi-sinusoid
5 g acceleration, duration time 11 ms, 3 shocks in each
of the three vertical directions
Sinusoid
1 Hz to 8 Hz: ± 3.5 mm vibration Amplitude (horizontal
component)
1 Hz to 8 Hz: ± 1.5 mm vibration amplitude (vertical axis)
8 Hz to 35 Hz: 1 g acceleration (horizontal axis)
8 Hz to 35 Hz: 0.5 g acceleration (vertical axis)
Frequency Sweep Rate: 1 octave/min, 1 cycle in 3
vertical directions
Vibration and Shock Stress during Transport
Standards:
Vibration
IEC 60255-21-1, Class II;
IEC 60068-2-6
Shock
IEC 60255-21-2, Class I;
IEC 60068-2-27
Continuous Shock
IEC 60255-21-2, Class I;
IEC 60068-2-29
SIPROTEC, 7SJ689, Manual
C53000-G1176-C346-1, Date 02.2012
IEC 60255-21 and IEC 60068
Sinusoid
5 Hz to 8 Hz: ± 0.075 mm vibration amplitude;
8 Hz to 150 Hz: 2 g acceleration
Frequency Sweep Rate: 1 octave/min, 20 cycles in 3
vertical directions
Semi-sinusoid
15 g acceleration, interval 11 ms
3 shocks in each of the three vertical directions
Semi-sinusoid
10 g acceleration, duration time 16 ms,
1000 shocks in each of the three vertical directions
77
Technical Data
4.1 General
4.1.7
Climatic Stress Tests
Temperatures1)
Standards:
IEC 60255-6
Type Test (according to IEC 60068 2 1 and -2 test
duration 16 hours)
-25.00 °C to +85 °C or –13 °F to +185 °F
Permissible Temporary Operating Temperature
(test lasting for 96 hours)
–20 °C to +70 °C or –4 °F to +158 °F
(readable display is possibly restricted at +55 °C or +131
°F)
Permanent Operation Recommended Temperature -5 °C to +55 °C or +23 °F to +131 °F
(according to IEC 60255-6)
Temperature Limits for Storage
-25 °C to +55 °C or –13 °F to +131 °F
Temperature Limits for Transport
-25 °C to +70 °C or –13 °F to +158 °F
Using factory packaging to store and transport the device!
1) UL-certified according to Standard 508 (industrial
control equipment)
Temperature Limits for Normal Operation (i.e.
output device not energized)
-20 °C to +70 °C or –4 °F to +158 °F
Temperature Limits at Maximum Load (maximum
–5 °C to +55 °C or+23 °F to +131 °F
permissible constant voltage of inputs and outputs)
Humidity
Permissible Humidity
Mean Value per Year =75 % Relative Humidity
on 56 days of the year up to 93% Relative Humidity;
and condensation must be avoided!
Siemens recommends that all devise be installed such that they are neither exposed to the direct sunlight, nor
subject to large fluctuations in temperature that may cause condensation to occur.
4.1.8
Service Conditions
The protection device is designed for use in an industrial environment and an electrical utility environment.
Proper installation procedures should be followed to ensure electromagnetic compatibility (EMC).
In addition, the following is recommended:
• All contacts and relays that operate in the same cubicle, cabinet, or relay panel as the numerical protective
device should, as a rule, be equipped with suitable surge suppression components.
• For substations with operating voltages of 100 kV and above, all external cables should be shielded with a
conductive shield earthed at both ends. For substations with lower operating voltages, no special measures
are normally required..
• Do not withdraw or insert individual modules or boards while the protective device is energized. In
withdrawn condition, some components are electrostatically endangered; during handling the ESD standards (for Electrostatic Sensitive Devices) must be observed. They are not endangered when inserted into
the.
78
SIPROTEC, 7SJ689, Manual
C53000-G1176-C346-1, Date 02.2012
Technical Data
4.2 Overvoltage Protection
4.1.9
Design
Casing
7XP20
Dimensions
see dimensional drawings, see 4.5
Device Version
7SJ68*-*E
Casing
Flush-Mounted Frame
Dimensions
1
/3
Weight
4 kg or 8.8 lb
Protection Level IEC 60529
for Device with Surface-Mounted Casing
IP 51
in Flush-Mounted Casing and in mode with detachable
console
Front
IP 51
Rear
IP 50
Operating Personnel Protection
4.2
IP 2x with a cover cap
Overvoltage Protection
Setting Scope/Step Length
Operating Mode
3-Phase Overvoltage
Criterion Manner
- Single-Phase Overvoltage
- 3-Phase Overvoltage
Trip Manner
- Local
- Remote
Pickup Current
57.7V to100.0V
Step Length 0.1 V
Action Delay
0.01s to 10.00s
Step Length 0.01s
Pickup Time
2 times setting value, approx. 50ms
Dropout Time
approx. 50ms
Time
Tolerances
Pickup Voltage Range
2% of the setting value or 1V
Action Delay
1% of the setting value or 10 ms
Influencing Variables for Pickup and Dropout
Direct-Current Power Voltage Range 0.8 ≤ UPS/UPSN ≤ 1.15
1%
Temperature Range -5 ℃ (23.00°F) ≤Θ amb ≤ 55 ℃ (131.00° 0.5 %/ 10K
F)
Frequency Range 0.95 ≤ f/fN ≤ 1.05
Harmonics
-10% third harmonic
-10% fifth harmonic
SIPROTEC, 7SJ689, Manual
C53000-G1176-C346-1, Date 02.2012
1%
1%
1%
79
Technical Data
4.3 Remote Tripping Protection
4.3
Remote Tripping Protection
Setting Ranges / Increments
Remote Trip Mode
- not via Fault Criterion
- via Fault Criterion
PT Broken Wire
OFF Voltage Dependence Local Criterion
Local Criterion
Failure Current Voltage
Low Current and Low Active Power
Low Power Factor
Remote Trip Protection
Time of Remote Trip via Fault Criterion
0.01s to 10.00s
Step Length 0.01s
Time of Remote Trip not via Fault Criterion
0.01s to 10.00s
Step Length 0.01s
Step Length 0.01A
Failure Current Voltage Local Criterion
Current variant setting
Zero Sequence Current Setting
IN = 1A
0.05A to 0.5A or ∞ (disabled)
IN = 5A
0.25A to 2.5A or ∞ (disabled)
IN = 1A
0.05A to 20.00A or ∞ (disabled)
IN = 5A
0.25A to 100.00A or ∞ (disabled)
0.05A to 20.00A or oo(disabled) Step Length 0.01A
Negative Sequence Current Setting IN = 1A
IN = 5A
Step Length 0.01A
0.25A to 100.00A or oo(disabled)
Zero Sequence Voltage Setting
2.0V to 57.7V or oo(disabled)
Step Length 0.1V
Negative Sequence Voltage Setting
2.0V to 57.7V or oo(disabled)
Step Length 0.1V
Low Current and Low Active Power Local Criterions
Low Current Setting
IN = 1A
IN = 5A
0.25A to 2.5A or 0 (disabled)
Low Active Power
IN = 1A
2.0W or 200.0W or 0 (disabled)
IN = 5A
10.0W or 1000.0.0W or 0
(disabled)
0.05A to 0.5A or 0 (disabled)
Step Length 0.01A
Step Length 0.1W
Low Power Factor Local Criterion
Low Power Factor Setting
30° to 89° or 90° (disabled)
Step Length 1°
Time
Pickup Time
delta current
2 times setting value
approx. 10ms
Zero Sequence Current
2 times setting value
approx. 30ms
Negative Sequence
Current
2 times setting value
approx. 35ms
Zero Sequence Voltage
2 times setting value
approx. 30ms
Negative Sequence
Voltage
2 times setting value
approx. 30ms
Low Current
0.5 times setting value
approx. 30ms
Low active power
0.5 times setting value
approx. 40ms
Low Power Factor
0.5 times setting value
approx. 40ms
Remote Trip Signal
Dropout Time
80
delta current
approx. 10ms
Zero Sequence Current
approx. 30ms
Negative Sequence Current
approx. 35ms
Zero Sequence Voltage
approx. 30ms
Negative Sequence Voltage
approx. 30ms
SIPROTEC, 7SJ689, Manual
C53000-G1176-C346-1, Date 02.2012
Technical Data
4.3 Remote Tripping Protection
Low Current
approx. 30ms
Low active power
approx. 20ms
Low Power Factor
approx. 20ms
Remote Trip Signal
approx. 10ms
Tolerances
Zero Sequence Current
5% or 10 mA at IN=1 A or 50 mA at IN=5 A
Negative Sequence Current
5% or 10 mA at IN=1 A or 50 mA at IN=5 A
Zero Sequence Voltage
5% or 1 V
Negative Sequence Voltage
5% or 1 V
Low Current
5% or 10 mA at IN=1 A or 50 mA at IN=5 A
Low active power
5% or 0.5 W
Low Power Factor
3°
Delay Time
1% or 10 ms
Influencing Variables for Pickup and Dropout
1%
Direct-Current Power Voltage Range 0.8 ≤ UPS/UPSN ≤ 1.15
Temperature Range -5 ℃ (23.00°F) ≤Θ amb ≤ 55 ℃ (131.00° 0.5 %/ 10K
F)
Frequency Range 0.95 ≤ f/fN ≤ 1.05
Harmonics
-10% third harmonic
-10% fifth harmonic
SIPROTEC, 7SJ689, Manual
C53000-G1176-C346-1, Date 02.2012
1%
1%
1%
81
Technical Data
4.4 Additional Functions
4.4
Additional Functions
Operation Measured Values
represented by A (kA) Primary or A Secondary or by % of IN
Current
Ia; Ib; Ic
Positive Sequence Component I1
Negative Sequence Component I2
Zero Sequence Component
In/3I0
Scope
Error
1)
Phase Voltage
Ua, Ub, Uc
Phase-to-Phase Voltage
Uab, Ubc, Uca, USYN
Un
Positive Sequence Voltage U1
Negative Sequence Voltage U2
Scope
Error
1)
S, apparent power
represented by kV Primary and V Secondary or by UN's %
10 % - 120 % of UNom
1% of the measured value, or 0.5% of UN
Primary side kVA (MVA or GVAR), represented by SN's %
Scope
Error
1)
P, Active Power
0 % to 120 % SN
SN's 1 %
for U/UN and I/IN = 50 to 120 %
with Symbols, Sum/Split Phase, Primary Side KW (MW or GW) SN%
Scope
Error
1)
Q, Reactive Power
0 % to 120 % SN
SN's 1 %
for U/UN and I/IN = 50 to 120 % and | cos ϕ | = 0.707 to 1
wherein SN=°Ã3 · UN · IN
with Symbols, Sum/Split Phase, Primary Side KVAr (MVAr or GVAr)
and % SN
Scope
Error
1)
cos ϕ, Power Factor
0 % to 120 % SN
SN's 1 %
For U/UN and /IN = 50 to 120 % and | sIn ϕ | = 0.707 to 1
wherein SN=°Ã3 · UN · IN
Sum and Phase Separation
Scope
Error
1)
Frequency
1 to +1
1 % at | cos ϕ | ≥ 0.707
with Hz
Scope
Error 1)
1)
10 % - 200 % Inom
1% of the measured value or 0.5 % IN
fN ± 5 Hz
20 mHz
at the Rated Frequency
PT Broken Wire Supervision
Operating Mode
82
- in an Earth System
only for voltage connection to earth
SIPROTEC, 7SJ689, Manual
C53000-G1176-C346-1, Date 02.2012
Technical Data
4.4 Additional Functions
Local Measured Value Supervision
Unbalanced Current
Imax/ImIn > balance factor, at I >Ilimit, the delay time can be set
Unbalanced Voltage
Umax/UmIn > balance factor, at U > Ulimit, the delay time can
be set
Current Sum, Fast Supervision Function with
Protection Block
| ia + ib + ic + in | >limit value
Fault Recording
The information of the latest 8 power system faults is recorded
Time Indication
Resolution of Event Log (operation alarm)
1 ms
Resolution of Trip Log (fault alarm)
1 ms
Maximum Time Offset (internal clock)
0.01 %
Battery
Lithium Battery 3 V/1 Ah, Type CR 1/2 AA
Information" Alarm: Battery Fault " Low Battery
Fault Recording
At most 8 fault records are stored. The storage is maintained by a buffer battery at the loss of the power supply.
Storage Time
10 s
in all
Records before and after Events and Adjustable Storage Time
Sampling Cycle
Each Cycle with 16 points (instantaneous values)
Statistics
Total Number of Trips
Max. 9 digits
Accumulated Breaking Current (split phase)
Max. 4 digits
Operating Time Calculation
Display Scope
Max. up to 7 digits
Standards
Exceeding Settable Current Setting (I> component, minimum breaker close
current)
Clock
Clock Synchronization
DCF 77/IRIG Signal (telegram format IRIG-B000)
Input
Communications
Operating Mode of Time Tracking
No.
Operating Mode
Explanation
1
Internal
Internal Synchronization with RTC (preset)
2
IEC 60870-5-103
External Synchronization with System Interfaces (IEC 608705-103)
3
Time Signal IRIG B
External Synchronization with IRIG B
SIPROTEC, 7SJ689, Manual
C53000-G1176-C346-1, Date 02.2012
83
Technical Data
4.5 Dimensions
4
Time Signal DCF77
External Synchronization with DCF 77
5
Time Signal sync.box
External Synchronization with Time Signal SIMEAS-Synch.Box
6
via Input Pulses
External Synchronization with Input Pulses
7
Field Busbar (Redundance 103)
External Synchronization via the Field Busbar
8
NTP (IEC 61850)
External Synchronization with System Interfaces (IEC 61850)
Setting Group Change of Parameters
Number of Available Setting Groups
4 (Setting Groups A, B, C and D)
Change Execution
with the keyboard of the device
Device Pre-Service Port for DIGSI
Protocols via System (SCADA) Interfaces
Inputs
IEC 61850 GOOSE (internal device communication)
The GOOSE communication services of IEC 61850 can be used for interlocking of switchgears. The
transmission time of the GOOSE information depends on the number of IEC 61850 clients and relay pickup
conditions.
For the devices of versions V4.6 and above, the related desired action time must be checked in the application
of the protection functions. In a particular case, necessary consultant must be performed to the manufactures
in order to guarantee the application safety.
4.5
Dimensions
4.5.1
Panel Flush and Cubicle Mounting(housing dimensions 1/3)
Figure 4-1
Dimensional Drawings of 7SJ689 for the Cubicle Mounting or the Flush Mounting of Switch Cubicle (casing
dimensions 1/3)
■
84
SIPROTEC, 7SJ689, Manual
C53000-G1176-C346-1, Date 02.2012
A
Appendix
The appendix provides a basic reference for the experienced user. The appendix provides the ordering information of device modules. The appendix further comprises diagrams showing the terminal connection of the
device modules. The following diagrams are the correct connection diagrams showing the connection between
the device and primary equipment in some typical power system structures. Furthermore, all device arrangement selecting items further provide all setting tables and available information tables. Meanwhile, the appendix
provides default setting values.
A.1
Ordering Information and Accessories
86
A.2
Terminal Distributing Diagrams
89
A.3
Connection Examples
92
A.4
Default Settings
93
A.5
Communication Protocol-dependent Functions
95
A.6
Correspondence List of Writable Parameters And Messages
96
A.7
Settings
97
A.8
Information List
99
A.9
Group Alarms
104
A.10
Measured Values
105
SIPROTEC, 7SJ689, User Manual
C53000-G1176-C346-1, Date 02.2012
85
Appendix
A.1 Ordering Information and Accessories
A.1
Ordering Information and Accessories
A.1.1
Ordering Information
A.1.1.1 7SJ689
Multi-Functional
Protective Relay with
Local Control
6
7
S
J
6
8
7
9
8
9
10 11 12
–
13 14 15 16
–
3
Housing, BinaryInput and Output,Measuring Transducer
+
Position
6
9
Frame1/319’’ 8 BI,8 BO, 1 Life Contact,4CT/4PT
Measuring Inputs
Position
7
1
5
Auxiliary Voltage (Power Supply, Pickup Threshold of Binary Input)
Position
8
5
6
IPh = 1 A,IN = 1 A
IPh = 5 A,IN = 5 A
110 to 250 VDC, 115 to 230 VAC, Input threshold 88 VDC
110 to 250 VDC, 115 to 230 VAC, Input threshold 176 VDC
Construction:
Position
9
E
Region-specific Default/Language Settings and Function Versions
Position
10
B
W
Flush Mounting Case Ring Lugs
Region Worldwide, 50/60Hz, Language English
China, 50Hz, Language Chinese
System Interface (Rear Side, Port B)
Position
11
0
9
No system interface
Other interfaces L
Additional Information for Further System Interfaces (Rear side,Port B)
IEC60870-5-103, RS485 Double Network
IEC61850, EN100 Module RJ45 Port
IEC61850, EN100 Modular optical fibre double network
DIGSI/Modem Interface (Rear side,Port C)
No Interface
DIGSI4/Modem, RS232
DIGSI4/Modem, RS485
86
0
Supplement
ary
Suppleme
ntary
+L0P
+L0R
+L0S
Position12
0
1
2
SIPROTEC, 7SJ689, User Manual
C53000-G1176-C346-1, Date 02.2012
Appendix
A.1 Ordering Information and Accessories
ANSI No.
Protection functions
Positions 14 and 15
59
Overvoltage protection
AA
Local criterion
Remote trip protection
Fault recording
A.1.2
Accessories
Exchangeable Interface Modules
Name
Order No.
RS232
C53207-A351-D641-1
RS485
C53207-A351-D642-1
FO 820 nm
C53207-A351-D643-1
Ethernet electrical (EN 100)
C53207-351-675-2
Ethernet Optical (EN 100)
C53207-351-676-1
IEC 60870-5-103 Protocol, Redundancy RS485
C53207-351-644-1
RS485/Fibre Optic Converter
RS485/Fibre Optic converter
Order No.
820 nm; FC-Connector
7XV5650-0AA00
820 nm; with ST-Connector
7XV5650-0BA00
Terminal Block Cover Plate
Terminal block cover plate type
Order No.
18-pin voltage terminal, 12-pin current terminal
C73334-A1-C31-1
12-pin voltage terminal, 8-pin current terminal
C73334-A1-C32-1
Terminal link bar type
Order No.
Voltage terminal, 18-terminal, or 12-terminal
C73334-A1-C34-1
Current terminal, 12-terminal, or 8-terminal
C73334-A1-C33-1
Link Bar
SIPROTEC, 7SJ689, User Manual
C53000-G1176-C346-1, Date 02.2012
87
Appendix
A.1 Ordering Information and Accessories
Female Plugs
Port type
Order No.
2-pin
C73334-A1-C35-1
3-pin
C73334-A1-C36-1
19"-Guide Rail for Subrack
Name
Order No.
Angle bead (Guide Rail)
C73165-A63-C200-4
Lithium battery 3 V/1 Ah, type CR 1/2 AA
Order No.
VARTA
6127 101 501
Battery
Interface Cable
Interface cable between PC and SIPROTEC device
Order No.
Cable with 9-pin male/female connections
7XV5100-4
RS485 Adapter Cable
Name
Order No.
Y-adapter cable for devices with IEC 60870-5-103 RS485 interface and sub-D
connector on 2xRJ45 sub-miniature connector for a RS485 bus setup with
network cables.2-core twisted, shielded, length 0.3 m; 1x RJ45 pin 9-pole on 2x
RJ45 sub-miniature connector 8-pole
7XV5103-2BA00
IEC 60870-5-103 redundant, RS485 adapter cable
Name
Order No.
Y-shaped adapter cable of 2xRJ45 subminiature sub-D connector which is
provided with IEC 60870-5-103 RS485 interface, is provided with network cable,
and is used for setting RS485 bus.
7XV5103-2CA00
RS485 terminal resistor of RJ45 joint
Name
Order No.
Terminal resistor with RJ45 joint having the resistance of 120 (between pin 1 of
8-pin and pin
7XV5103-BA00 Terminal
88
SIPROTEC, 7SJ689, User Manual
C53000-G1176-C346-1, Date 02.2012
Appendix
A.2 Terminal Assignments
A.2
Terminal Assignments
A.2.1
7SJ689-Housing for Panel Flush Mounting or Cubicle Mounting
7SJ689
Figure A-1
7SJ689 Terminal Distributing Diagrams
SIPROTEC, 7SJ689, User Manual
C53000-G1176-C346-1, Date 02.2012
89
Appendix
A.2 Terminal Assignments
A.2.2
7SJ689 - Housing for Panel Flush Mounting or Cubicle Mouting, Rear side
7SJ689
Figure A-2
90
Back view of 7SJ689
SIPROTEC, 7SJ689, User Manual
C53000-G1176-C346-1, Date 02.2012
Appendix
A.2 Terminal Assignments
A.2.3
Connector Assignment
Serial Communication Port
Time Synchronization Port
SIPROTEC, 7SJ689, User Manual
C53000-G1176-C346-1, Date 02.2012
91
Appendix
A.3 Connection Examples
A.3
Connection Examples
7SJ689
Figure A-3
92
Three Y-shaped PT voltage connection type ( normal circuit layout)
SIPROTEC, 7SJ689, User Manual
C53000-G1176-C346-1, Date 02.2012
Appendix
A.4 Default Settings
A.4
Default Settings
A large number of LED indicating lamps, binary input and output and function keys are preset when the device
is manufactured. The setting situation is illustrated as shown in the following tables.
A.4.1
LEDs
Table A-1
Display of Preset LED Lamps
LEDLamps
LED1
LED2
LED3
LED4
Allocated Function
Remote trip
59 trip
59 Remote trip
CT Broken
Fail I Superv.
Fail VT circuit
Error Sum Alarm
Alarm Sum Event
RT Sig. N. Cfg.
Error RMT.Sig
FltCurVol PU
LowCurP PU
LowPF PU
Fail Ph. Seq. V
Not configured
LED5
LED6
LED7
A.4.2
Function No.
17437
17492
17494
17502
161
255
140
160
17487
17503
17438
17439
17441
176
1
Description
Latched
Latched
Latched
Binary Input
Table A-2
Input
BI1
BI2
BI3
BI4
BI5
BI6
BI7
BI8
Presetting of Input
Allocated Function
>BLOCK 59
>Block RT
>CB P (52-b)
>RT signal
>FAIL:RMT.Sig
>Test mode
>Reset LED
Not configured
SIPROTEC, 7SJ689, User Manual
C53000-G1176-C346-1, Date 02.2012
Function No.
6513
17430
17495
17431
17504
15
5
1
Description
Low level active
Low level active
93
Appendix
A.4 Default Settings
A.4.3
Binary Output
Table A-3
Output
BO1
BO2
BO3
BO4
BO5
BO6
BO7
BO8
A.4.4
Output device presettings for all devices and ordering variants
Default Function
Error Sum Alarm
Error Sum Alarm
Alarm Sum Event
CT Broken
Fail I Superv.
Fail VT circuit
Error Sum Alarm
Alarm Sum Event
CT Broken
Fail I Superv.
Fail VT circuit
Relay TRIP
Relay TRIP
59 Remote trip
Relay TRIP
Not configured
Function No.
140
140
160
17502
161
255
140
160
17502
161
255
511
511
17494
511
1
Description
Latched
Latched
Default Display
7SJ689
The default display for the graphics performance characteristic of equipment 7SJ689 is the graphical solution
of the current running state and/or the selected measured value. The displayed parameter can be selected
during configuration.
Figure A-4
94
Default display of the 7SJ689
SIPROTEC, 7SJ689, User Manual
C53000-G1176-C346-1, Date 02.2012
Appendix
A.5 Communication Protocol-dependent Functions
A.5
Communication Protocol-dependent Functions
IEC 60870-5-103,
redundant
IEC 61850
Additional
Ethernet (EN 100) service
interface
(optional)
Measured Values
Yes
Yes
Yes
Metered values
Yes
Yes
Yes
Fault recording
Yes
Yes
Remote protection
setting
—
Yes
/
User-defined signals
and switching objects
Yes
Yes
Yes
Clock synchronization Yes
Yes
—
Messages with time
stampe
Yes
Yes
Yes
Measured value signal Yes
module
Yes
Yes
Creating test
messages
Yes
Yes
Yes
Physical mode
Asynchronous
Synchronous
—
Transmission Mode
Cyclically/Event
Cyclically/Event
—
Baud rate
2400 to
57600
Up to 100 MBaud
4800 to 115200
Type
-RS485
Ethernet TP
Fiber-optic
-RS232
-RS485
Protocal →
Function ↓
Commissioning aids
SIPROTEC, 7SJ689, User Manual
C53000-G1176-C346-1, Date 02.2012
95
Appendix
A.6 Corresponding List between Writable Parameter and Message
A.6
Corresponding List between Writable Parameter and Message
Parameter
Addre Parameter Description
sses
Message
Function
Group
No.
Comments
Message Description
Type of
Informat
ion
0045
Remote Transfer Trip
Function
System
Parameter1
17440
Remote trip ON/OFF
IntSP
Flexible pressing
plate
4500
Remote trip without local Remote trip
criterion
protection
17442
Without local criterion
ON/OFF
IntSP
Control Word
4501
PT switch off LC with
voltage
Remote trip
protection
17488
PT switched off LC ON/OFF
IntSP
Control Word
4510
Fault current/voltage cri- Remote trip
terion
protection
17444
Fault cur/vol ON/OFF
IntSP
Control Word
4530
Low current/low active
power criterion
Remote trip
protection
17446
Low current/P ON/OFF
IntSP
Control Word
4540
Low power factor criteri- Remote trip
on
protection
17448
Low power factor ON/OFF
IntSP
Control Word
0050
59 Overvoltage Protection
System
Parameter1
17496
59 overvoltage ON/OFF
IntSP
Flexible pressing
plate
5021
Overvoltage TRIP Local
CB
Overvoltage
protection
17497
59 trip local CB ON/OFF
IntSP
Control Word
5117
One phase over voltage
ON/OFF
Overvoltage
protection
17435
One phase over voltage
ON/OFF
IntSP
Control Word
5118
Send Remote TRIP
CMD.
Overvoltage
protection
17498
Send remote trip CMD
ON/OFF
IntSP
Control Word
5119
CB Close Position Block Overvoltage
Remote TRIP CMD.
protection
17499
CB block remote trip ON/OFF IntSP
Control Word
96
SIPROTEC, 7SJ689, User Manual
C53000-G1176-C346-1, Date 02.2012
Appendix
A.7 Settings
A.7
Settings
Addresses with suffixes ‘A’ only can be changed by DIGSI under `setting for displaying additional
information`.
The following table shows region fault setting values. Column C (setting) shows secondary current rated values
relevant to the current transformer.
Addresses.
Parameter
Function
C
Setting options
Default Setting
Comments
45
Remote Trip
Power system
data1
ON
OFF
ON
Remote Transfer Trip Function
50
FCT 59
Power system
data1
ON
OFF
ON
59 Overvoltage Protection
202
Vnom PRIMARY
Power system
data1
1.0 .. 1200.0 kV
220.0 kV
Rated Primary Voltage
204
CT PRIMARY
Power system
data1
1 .. 9999 A
1200 A
CT Rated Primary Current
205
CT PRIMARY
Power system
data1
1A
1A
5A
1A
CT Rated Primary Current
5A
1A
5A
5A
1 .. 9999 A
1200 A
Ignd-CT rated primary current
1A
1A
5A
1A
Ignd-CT rated secondary current
5A
1A
5A
5A
217
Ignd-CT PRIM
Power system
data1
218
Ignd-CT SEC
Power system
data1
650
Remote Access
Power system
data1
NO
YES
NO
Remote Access enable
1101
FullScaleCurr.
Power system
data2
1.0 .. 1200.0 kV
220.0 kV
Measurem:FullScaleCurrent(Equipm.rating)
1102
FullScaleVolt.
Power system
data2
1 .. 9999 A
1200 A
Measurem:FullScaleVoltage(Equipm.rating)
4500
Without LC
Remote trip
protection
ON
OFF
ON
Remote trip without local criterion
4501
PT OFF LC
Remote trip
protection
ON
OFF
OFF
PT switch off LC with voltage
4502
T RT with LC
Remote trip
protection
0.01.. 10.00 sec
0.10 sec
Remote trip with criterion time
delay
4503
T RT without LC
Remote trip
protection
0.01.. 10.00 sec
0.20 sec
Remote trip without criterion time
delay
4510
Flt Cur/Vol
Remote trip
protection
ON
OFF
OFF
Fault current/voltage criterion
4511
Delta I pickup
Remote trip
protection
1A
0.05 .. 0.50; ∞
0.20 A
Delta I pickup
5A
0..25..2.5,A
1.00 A
Remote trip
protection
1A
0.05 .. 20.00; ∞
1.00 A
5A
0..25..100.00, ∞
5.00 A
Remote trip
protection
1A
0.05 .. 20.00; ∞
1.00 A
5A
0..25..100.00, ∞
5.00 A
4512
4513
3I0 pickup
I2 pickup
3I0 pickup
I2 pickup
4514
3U0 pickup
Remote trip
protection
2.0 .. 57.7 , ∞
10.0 V
3U0 pickup
4515
U2 pickup
Remote trip
protection
2.0 .. 57.7 , ∞
10.0 V
U2 pickup
4530
Low I/P
Remote trip
protection
ON
OFF
OFF
Low current/low active power
criterion
4531
I pickup
Remote trip
protection
0.05 .. 0.50; 0
0.05 A
Low current pickup
0..25..2.50, 0
0.25 A
1A
2.0 .. 200.0, 0
8.0 W
5A
10.0 .. 1000.0, 0
40.0 W
ON
OFF
OFF
4532
4540
P pickup
Low PF
Remote trip
protection
Remote trip
protection
SIPROTEC, 7SJ689, User Manual
C53000-G1176-C346-1, Date 02.2012
Low active power pickup
Low power factor criterion
97
Appendix
A.7 Settings
Addresses.
Parameter
Function
C
Setting options
Default Setting
Comments
4541
PF pickup
Remote trip
protection
30 .. 90°
45°
Low power factor pickup
5117
1pOV ON/OFF
Overvoltage
protection
ON
OFF
ON
One phase over voltage ON/OFF
5118
Send RT. CMD.
Overvoltage
protection
ON
OFF
ON
Send Remote TRIP CMD.
5119
CB Pos. Block
Overvoltage
protection
ON
OFF
ON
CB Close Position Block Remote
TRIP CMD.
5021
59 Trip Loc. CB
Overvoltage
protection
ON
OFF
ON
Overvoltage TRIP Local CB
5022
59 PICKUP
Overvoltage
protection
57.7.. 100.0 V
60.0 V
59 Pickup
5023
59 DELAY
Overvoltage
protection
0.01.. 10.00 sec
0.50 sec
59 Time Delay
98
SIPROTEC, 7SJ689, User Manual
C53000-G1176-C346-1, Date 02.2012
Appendix
A.8 Information List
A.8
Information List
The information of IEC 60 870-5-103 is reported as ON/OFF if the IEC 60 870-5-103 is general inquiry. The
information of IEC 60 870-5-103 is reported as ON if the IEC 60 870-5-103 is not general inquiry.
The information which is user-defined by the new user or the information of the IEC 60 870-5-103 can be set
as ON/OFF if information types are not from uploaded event types (‘.._Ev’). The information types of more
messages are described with reference to a SIPROTEC4 system, wherein Order No.: E50417-H1100-C151.
columns such as 'Event Log' 'Trip Log' and 'Ground Fault Log' are described according to the following rules:
UPPER CASE NOTATION ON/OFF:. definitely set, not allocatable
lower case notation On/off:.
preset, allocatable
*: .
not preset, allocatable
<blank>:.
neither preset nor allocatable
Column I ‘whether the faults recorder mark is available’ uses the following rules:
*: .
not preset, allocatable
<blank>:.
neither preset nor allocatable
SP
on
off
*
Configurable in Matrix
*
Comments
LED
Marked in Oscill.Rescord
Log Buffers
-
>Back Light on
-
>Reset LED
Device Universal
IntSP
on
*
*
LED
BO
-
>DataStop
Device Universal
IntSP
on
off
*
*
LED
BO
-
Test mode
Device Universal
IntSP
on
off
*
*
LED
BO
-
HWTestMod
Device Universal
IntSP
on
off
*
*
LED
BO
-
SynchClock
Device Universal
IntSP
*
*
*
-
Distur.CFC
Device Universal
OUT
on
off
*
LED
BO
-
FltRecSta
Fault recording
IntSP
on
off
*
m
LED
BO
-
P-GrpA act
Setting changing
IntSP
on
off
*
*
LED
BO
160
-
P-GrpB act
Setting changing
IntSP
on
off
*
*
LED
BO
160
-
P-GrpC act
Setting changing
IntSP
on
off
*
*
LED
BO
160
-
P-GrpD act
Setting changing
IntSP
on
off
*
*
LED
BO
160
3
>Time Synch
Device Universal
SP_E
v
*
*
LED BI
BO
4
>Trig.Wave.Cap.
Fault recording
SP
*
*
m
LED BI
BO
5
>Reset LED
Device Universal
SP
*
*
*
LED BI
BO
7
>Set Group Bit0
Setting changing
SP
*
*
*
LED BI
BO
8
>Set Group Bit1
Setting changing
SP
*
*
*
LED BI
BO
15
>Test mode
Device Universal
SP
*
*
*
LED BI
BO
16
>DataStop
Device Universal
SP
*
*
*
LED BI
BO
SIPROTEC, 7SJ689, User Manual
C53000-G1176-C346-1, Date 02.2012
Device Universal
Type
of
Infor
matio
n
Ground Fault Log ON/OFF
Function
Trip (Fault)Log ON/OFF
Description
Event Log ON/OFF
No.
LED BI
Chatter Suppression
preset, allocatable
Device
lower case notation ‘m‘:.
Function Key
definitely set, not allocatable
Input
UPPER CASE NOTATION ‘M‘:.
BO
99
Appendix
A.8 Information List
Log Buffers
Configurable in Matrix
51
Device OK
Device Universal
OUT
on
off
*
*
LED
BO
52
ProtActive
Device Universal
IntSP
on
off
*
*
LED
BO
55
Reset Device
Device Universal
OUT
on
*
*
LED
BO
56
Initial Start
Device Universal
OUT
on
*
*
LED
BO
67
Resume
Device Universal
OUT
on
*
*
LED
BO
68
Clock Synch. Error
Device Universal
OUT
on
off
*
*
LED
BO
69
DayLightSavTime
Device Universal
OUT
on
off
*
*
LED
BO
70
Settings Calc.
Device Universal
OUT
on
off
*
*
LED
BO
71
Settings Check
Device Universal
OUT
*
*
*
LED
BO
72
Level-2 change
Device Universal
OUT
on
off
*
*
LED
BO
74
Remote Access
Device Universal
OUT
on
off
*
*
LED
BO
110
Event Lost
Device Universal
OUT_ on
Ev
*
LED
BO
113
Flag Lost
Device Universal
OUT
on
*
m
LED
BO
125
Chatter ON
Device Universal
OUT
on
off
*
*
LED
BO
126
Protection ON/OFF
Power system data2
IntSP
on
off
*
*
LED
BO
140
Error Sum Alarm
Device Universal
OUT
on
off
*
*
LED
BO
144
Error 5V
Device Universal
OUT
on
off
*
*
LED
BO
145
Error 0V
Device Universal
OUT
on
off
*
*
LED
BO
146
Error -5V
Device Universal
OUT
on
off
*
*
LED
BO
147
Error PwrSupply
Device Universal
OUT
on
off
*
*
LED
BO
160
Alarm Sum Event
Device Universal
OUT
on
off
*
*
LED
BO
161
Fail I Superv.
Measurement
Supervision
OUT
on
off
*
*
LED
BO
162
Failure Σ I
Measurement
Supervision
OUT
on
off
*
*
LED
BO
163
Fail I balance
Measurement
Supervision
OUT
on
off
*
*
LED
BO
167
Fail V balance
Measurement
Supervision
OUT
on
off
*
*
LED
BO
169
VT FuseFail>10s
Measurement
Supervision
OUT
on
off
*
*
LED
BO
170
VT FuseFail
Measurement
Supervision
OUT
on
off
*
*
LED
BO
177
Fail Battery
Device Universal
OUT
on
off
*
*
LED
BO
183
Error Board 1
Device Universal
OUT
on
off
*
*
LED
BO
191
Error Offset
Device Universal
OUT
on
off
*
*
LED
BO
193
Alarm adjustm.
Device Universal
OUT
on
off
*
*
LED
BO
194
Error neutralCT
Device Universal
OUT
on
off
*
*
LED
BO
100
Chatter Suppression
Device
Function Key
Input
Comments
LED
Marked in Oscill.Rescord
Type
of
Infor
matio
n
Ground Fault Log ON/OFF
Function
Trip (Fault)Log ON/OFF
Description
Event Log ON/OFF
No.
SIPROTEC, 7SJ689, User Manual
C53000-G1176-C346-1, Date 02.2012
Appendix
A.8 Information List
Log Buffers
197
MeasSup OFF
Measurement
Supervision
OUT
on
off
*
203
Wave. deleted
Fault recording
OUT_ on
Ev
*
220
CT Ph wrong
Device Universal
OUT
on
off
*
255
Fail VT circuit
Measurement
Supervision
OUT
on
off
259
VTsup. inactive
Measurement
Supervision
OUT
272
SP. Op Hours>
Threshold-crossing
value(statistic)
320
Warn Mem. Data
301
Configurable in Matrix
*
LED
BO
LED
BO
*
LED
BO
*
*
LED
BO
on
off
*
*
LED
BO
OUT
on
off
*
*
LED
BO
Device Universal
OUT
on
off
*
*
LED
BO
Pow.Sys.Flt.
Device Universal
OUT
on
off
*
*
LED
BO
320
Warn Mem. Data
Device Universal
OUT
on
off
*
*
LED
BO
321
Warn Mem. Para.
Device Universal
OUT
on
off
*
*
LED
BO
322
Warn Mem. Oper.
Device Universal
OUT
on
off
*
*
LED
BO
323
Warn Mem. New
Device Universal
OUT
on
off
*
*
LED
BO
356
>Manual Close
Power system data2
SP
*
*
409
>BLOCK Op Count
Statistic
SP
on
off
501
Relay PICKUP
Power system data2
OUT
511
Relay TRIP
Power system data2
OUT
533
IL1:
Power system data2
VI
on off
534
IL2:
Power system data2
VI
on off
535
IL3:
Power system data2
VI
on off
545
PU Time
Device Universal
VI
546
TRIP Time
Device Universal
VI
561
Man.Clos.Detect
Power system data2
OUT
*
LED BI
BO
*
LED BI
BO
on
m
LED
BO
on
m
LED
BO
on
off
*
*
LED
BO
1020
Op.Hours=
Statistic
VI
1021
Σ Ia =
Statistic
VI
1022
Σ Ib =
Statistic
VI
1023
Statistic
VI
4601
Σ Ic =
>Brk Aux NO
4602
>Brk Aux NC
Power system data2
6509
>FAIL:FEEDER VT
Measurement
Supervision
SP
on
off
*
*
LED BI
BO
6510
>FAIL: BUS VT
Measurement
Supervision
SP
on
off
*
*
LED BI
BO
6513
>BLOCK 59
Overvoltage
SP
on
off
*
*
LED BI
BO
6565
59 OFF
Overvoltage
OUT
on
off
*
*
LED
BO
6566
59 BLOCKED
Overvoltage
OUT
on
off
*
*
LED
BO
6567
59 ACTIVE
Overvoltage
OUT
on
off
*
*
LED
BO
17430
>Block RT
Remote trip protection
SP
on
off
*
*
LED BI
BO
SIPROTEC, 7SJ689, User Manual
C53000-G1176-C346-1, Date 02.2012
Chatter Suppression
Device
Function Key
Input
Comments
LED
Marked in Oscill.Rescord
Type
of
Infor
matio
n
Ground Fault Log ON/OFF
Function
Trip (Fault)Log ON/OFF
Description
Event Log ON/OFF
No.
Power system data2
*
101
Appendix
A.8 Information List
Log Buffers
Configurable in Matrix
17431
>RT signal
Remote trip protection
SP
on
off
*
*
LED BI
BO
17432
RT OFF
Remote trip protection
OUT
on
off
*
*
LED
BO
17433
RT blocked
Remote trip protection
OUT
on
off
*
*
LED
BO
17434
RT active
Remote trip protection
OUT
on
off
*
*
LED
BO
17440
Remote Trip
Remote trip protection
IntSP
on
off
*
*
LED
BO
17442
wtLC ON/OFF
Remote trip protection
IntSP
on
off
*
*
LED
BO
17444
FltIU ON/OFF
Remote trip protection
IntSP
on
off
*
*
LED
BO
17446
LowCurPON/OFF
Remote trip protection
IntSP
on
off
*
*
LED
BO
17448
PF pickup
Remote trip protection
IntSP
on
off
*
*
LED
BO
17466
3I0 picked up
Remote trip protection
OUT
*
on off
*
LED
BO
17467
I2 picked up
Remote trip protection
OUT
*
on off
*
LED
BO
17468
3U0 picked up
Remote trip protection
OUT
*
on off
*
LED
BO
17469
U2 picked up
Remote trip protection
OUT
*
on off
*
LED
BO
17470
Delta IAB PU
Remote trip protection
OUT
*
on off
*
LED
BO
17471
Delta IBC PU
Remote trip protection
OUT
*
on off
*
LED
BO
17472
Delta ICA PU
Remote trip protection
OUT
*
on off
*
LED
BO
17473
IA picked up
Remote trip protection
OUT
*
on off
*
LED
BO
17474
IB picked up
Remote trip protection
OUT
*
on off
*
LED
BO
17475
IC picked up
Remote trip protection
OUT
*
on off
*
LED
BO
17476
PA picked up
Remote trip protection
OUT
*
on off
*
LED
BO
17477
PB picked up
Remote trip protection
OUT
*
on off
*
LED
BO
17478
PC picked up
Remote trip protection
OUT
*
on off
*
LED
BO
17479
PFA picked up
Remote trip protection
OUT
*
on off
*
LED
BO
17480
PFB picked up
Remote trip protection
OUT
*
on off
*
LED
BO
17481
PFC picked up
Remote trip protection
OUT
*
on off
*
LED
BO
17482
Delta I TExt
Remote trip protection
OUT
*
on off
*
LED
BO
17483
RT Signal
Remote trip protection
OUT
*
on off
*
LED
BO
17484
CT BLK LC
Remote trip protection
OUT
*
on off
*
LED
BO
17485
PT OFF LC
Remote trip protection
OUT
*
on off
*
LED
BO
17486
PT BLK LC
Remote trip protection
OUT
*
on off
*
LED
BO
17487
RT Sig. N. Cfg.
Remote trip protection
OUT
*
on off
*
LED
BO
17488
PTwtLC ON/OFF
Remote trip protection
OUT
*
on off
*
LED
BO
17491
59 picked up
Overvoltage
OUT
*
on off
*
LED
BO
17492
59 trip
Overvoltage
OUT
*
on
*
LED
BO
17493
59 alarm
Overvoltage
OUT
*
on off
*
LED
BO
17494
59 Remote trip
Overvoltage
OUT
*
on
*
LED
BO
17495
>CB P (52-b)
Overvoltage
OUT
*
on
*
LED
BO
17496
FCT 59
Overvoltage
IntSP
on
off
*
*
LED
BO
17497
59trip ON/OFF
Overvoltage
IntSP
on
off
*
*
LED
BO
17498
59RT ON/OFF
Overvoltage
IntSP
on
off
*
*
LED
BO
17499
CBBLK ON/OFF
Overvoltage
IntSP
on
off
*
*
LED
BO
102
Chatter Suppression
Device
Function Key
Input
Comments
LED
Marked in Oscill.Rescord
Type
of
Infor
matio
n
Ground Fault Log ON/OFF
Function
Trip (Fault)Log ON/OFF
Description
Event Log ON/OFF
No.
SIPROTEC, 7SJ689, User Manual
C53000-G1176-C346-1, Date 02.2012
Appendix
A.8 Information List
17501
CT Broken>12s
Measurement
Supervision
17502
CT Broken
17503
OUT
Log Buffers
Configurable in Matrix
on
off
on
*
LED
BO
Measurement
Supervision
on
off
on
*
LED
BO
Error RMT.Sig
Remote trip protection
on
off
*
*
LED
BO
17504
>FAIL:RMT.Sig
Remote trip protection
on
off
*
*
LED
BO
17435
1pOV ON/OFF
Overvoltage protection
IntSP
on
off
*
*
LED
BO
17436
Remote trip PU
Remote trip protection
OUT
on
off
*
*
LED
BO
17437
Remote trip
Remote trip protection
OUT
on
off
*
*
LED
BO
17438
FltCurVol PU
Remote trip protection
OUT
*
on off
*
LED
BO
17439
LowCurP PU
Remote trip protection
OUT
*
on off
*
LED
BO
17441
LowPF PU
Remote trip protection
OUT
*
on off
*
LED
BO
30053
Fault rec. run.
Fault Recording
SIPROTEC, 7SJ689, User Manual
C53000-G1176-C346-1, Date 02.2012
Chatter Suppression
Device
Function Key
Input
Comments
LED
Marked in Oscill.Rescord
Type
of
Infor
matio
n
Ground Fault Log ON/OFF
Function
Trip (Fault)Log ON/OFF
Description
Event Log ON/OFF
No.
103
Appendix
A.9 Group Alarms
A.9
Group Alarms
No.
Description
Function No.
Description
140
Failure alarm groups
144
145
146
147
177
178
183
191
193
5V Fault
0V Fault
-5V Fault
Power Supply Failure
Alarm: Battery
Input/Output Signal Panel
Fault
Plugin1 Faults
Alarm: Offset
Alarm: Analog Quantity Input
Calibration Invalid
160
Event alarm groups
162
163
167
Current and supervision
alarm
Current Symmetric
Supervision Alarm
Voltage Symmetric
Supervision Alarm
161
Current circuit supervision
alarm
162
163
Current and supervision
alarm
Current Symmetric
Supervision Alarm
255
PT Circuit Alarm
170
PT Broken Wire
Instantaneous Alarm
104
SIPROTEC, 7SJ689, User Manual
C53000-G1176-C346-1, Date 02.2012
Appendix
A.10 Measured Values
A.10
Measured Values
Name
Description
Function
Type
Total Number of Trips
Statistic
PMV
601
Ia
Measurement
MV
602
Ib
Measurement
MV
603
Ic
Measurement
MV
604
In
Measurement
MV
605
I1(Positive Sequence)
Measurement
MV
606
I2(Negative Sequence)
Measurement
MV
621
Phase Voltage Ua
Measurement
MV
622
Phase Voltage Ub
Measurement
MV
623
Phase Voltage Uc
Measurement
MV
624
Phase Voltage Ua-b
Measurement
MV
625
Phase Voltage Ua-c
Measurement
MV
626
Phase Voltage Ua-a
Measurement
MV
627
Zero Sequence Voltage UN
Measurement
MV
629
Positive Sequence Voltage U1
Measurement
MV
630
Negative Sequence Voltage U2
Measurement
MV
641
Active Power P
Measurement
MV
642
Active Power Q
Measurement
MV
645
S (apparent power)
Measurement
MV
644
Frequencyf
Measurement
MV
831
3Io(zero sequence)
Measurement
MV
832
Uo(zero sequence)
Measurement
MV
901
Power Factor
Measurement
MV
30701
Pa (phase A active power)
Measurement
MV
30702
Pb (phase B active power)
Measurement
MV
30703
Pc (phase C active power)
Measurement
MV
30704
Qa (phase A reactive power)
Measurement
MV
30705
Qb (phase B reactive power)
Measurement
MV
30706
Qc (phase C reactive power)
Measurement
MV
Comments
*
30707
A Phase Power Factor
Measurement
MV
*
30708
B Phase Power Factor
Measurement
MV
*
30709
C Phase Power Factor
Measurement
MV
*
*)
If the measured values are needed to be sent via IEC 60 870-5-103, ‘scaling index’of the information
attribute is set to 7
■
SIPROTEC, 7SJ689, User Manual
C53000-G1176-C346-1, Date 02.2012
105
Appendix
A.10 Measured Values
106
SIPROTEC, 7SJ689, User Manual
C53000-G1176-C346-1, Date 02.2012
Literature
/1/
SIPROTEC 4 System General; E50417-H1176-C151-B1
/2/
SIPROTEC DIGSI, Start UP; E50417-G1176-C152 -A3
/3/
DIGSI CFC, Manual; E50417-H1176-C098 -A9
/4/
SIPROTEC SIGRA 4, Manual; E50417-H1176-C070
SIPROTEC, 7SJ689, User Manual
C53000-G1176-C346-1, Date 02.2011
107
Literature
108
SIPROTEC, 7SJ689, User Manual
C53000-G1176-C346-1, Date 02.2011
Glossary
Battery
The buffer battery ensures that specified data areas, flags, timers and counters are retained retentively.
Bay controllers
Bay controllers are devices with control and monitoring functions without protective functions.
Bit pattern indication
Bit pattern indication is a processing function by means of which items of digital process information
applying across several inputs can be detected together in parallel and processed further. The bit
pattern length can be specified as 1, 2, 3 or 4 bytes.
BP_xx
Æ Bit pattern indication (Bitstring Of x Bit), x designates the length in bits (8, 16, 24 or 32 bits).
C_xx
Command without feedback
CF_xx
Command with feedback
CFC
Continuous Function Chart. CFC is a graphics editor with which a program can be created and configured by using ready-made blocks.
CFC blocks
Blocks are parts of the user program delimited by their function, their structure or their purpose.
Chatter blocking
A rapidly intermittent input (for example, due to a relay contact fault) is switched off after a configurable monitoring time and can thus not generate any further signal changes. The function prevents
overloading of the system when a fault arises.
Combination devices
Combination devices are bay devices with protection functions and a control display.
SIPROTEC, 7SJ689, User Manual
C53000-G1176-C346-1, Date 02.2012
109
Glossary
Combination matrix
DIGSI V4.6 and higher allows up to 32 compatible SIPROTEC 4 devices to communicate with each
other in an inter-relay communication network (IRC). The combination matrix defines which devices
exchange which information.
Communication branch
A communications branch corresponds to the configuration of 1 to n users which communicate by
means of a common bus.
Communication reference CR
The communication reference describes the type and version of a station in communication by
PROFIBUS.
Component view
In addition to a topological view, SIMATIC Manager offers you a component view. The component
view does not offer any overview of the hierarchy of a project. It does, however, provide an overview
of all the SIPROTEC 4 devices within a project.
COMTRADE
Common Format for Transient Data Exchange, format for fault records.
Container
If an object can contain other objects, it is called a container. The object Folder is an example of
such a container.
Control display
The image which is displayed on devices with a large (graphic) display after pressing the control key
is called control display. It contains the switchgear that can be controlled in the feeder with status
display. It is used to perform switching operations. Defining this diagram is part of the configuration.
Data pane
Æ The right-hand area of the project window displays the contents of the area selected in the Æ
navigation window, for example indications, measured values, etc. of the information lists or the
function selection for the device configuration.
DCF77
The extremely precise official time is determined in Germany by the "Physikalisch-TechnischenBundesanstalt PTB" in Braunschweig. The atomic clock unit of the PTB transmits this time via the
long-wave time-signal transmitter in Mainflingen near Frankfurt/Main. The emitted time signal can
be received within a radius of approx. 1,500 km from Frankfurt/Main.
110
SIPROTEC, 7SJ689, User Manual
C53000-G1176-C346-1, Date 02.2012
Glossary
Device container
In the Component View, all SIPROTEC 4 devices are assigned to an object of type Device container.
This object is a special object of DIGSI Manager. However, since there is no component view in
DIGSI Manager, this object only becomes visible in conjunction with STEP 7.
Double command
Double commands are process outputs which indicate 4 process states at 2 outputs: 2 defined (for
example ON/OFF) and 2 undefined states (for example intermediate positions)
Double-point indication
Double-point indications are items of process information which indicate 4 process states at 2
inputs: 2 defined (for example ON/OFF) and 2 undefined states (for example intermediate positions).
DP
Æ Double-point indication
DP_I
Æ Double point indication, intermediate position 00
Drag-and-drop
Copying, moving and linking function, used at graphics user interfaces. Objects are selected with
the mouse, held and moved from one data area to another.
Electromagnetic compatibility
Electromagnetic compatibility (EMC) is the ability of an electrical apparatus to function fault-free in
a specified environment without influencing the environment unduly.
EMC
Æ Electromagnetic compatibility
ESD protection
ESD protection is the total of all the means and measures used to protect electrostatic sensitive devices.
ExBPxx
External bit pattern indication via an ETHERNET connection, device-specific Æ Bit pattern indication
ExC
External command without feedback via an ETHERNET connection, device-specific
ExCF
External command with feedback via an ETHERNET connection, device-specific
SIPROTEC, 7SJ689, User Manual
C53000-G1176-C346-1, Date 02.2012
111
Glossary
ExDP
External double point indication via an ETHERNET connection, device-specific Æ Double-point indication
ExDP_I
External double-point indication via an ETHERNET connection, intermediate position 00, Æ
Double-point indication
ExMV
External metered value via an ETHERNET connection, device-specific
ExSI
External single-point indication via an ETHERNET connection, device-specific Æ Single-point indication
ExSI_F
External single point indication via an ETHERNET connection, device-specific, Æ Fleeting indication, Æ Single-point indication
Field devices
Generic term for all devices assigned to the field level: Protection devices, combination devices, bay
controllers.
Floating
Æ Without electrical connection to the Æ ground.
FMS communication branch
Within an FMS communication branch the users communicate on the basis of the PROFIBUS FMS
protocol via a PROFIBUS FMS network.
Folder
This object type is used to create the hierarchical structure of a project.
General interrogation (GI)
During the system start-up the state of all the process inputs, of the status and of the fault image is
sampled. This information is used to update the system-end process image. The current process
state can also be sampled after a data loss by means of a GI.
GOOSE message
GOOSE-messages (Generic Object Oriented Substation Event) are data packets which will be
transferred via the Ethernet-communication system in case of event-controlled. They serve to the
direct information exchange of the device to each other. The cross-communication between the bay
devices is implemented via this mechanism.
112
SIPROTEC, 7SJ689, User Manual
C53000-G1176-C346-1, Date 02.2012
Glossary
GPS
Global Positioning System. Satellites with atomic clocks on board orbit the earth twice a day in different parts in approx. 20,000 km. They transmit signals which also contain the GPS universal time.
The GPS receiver determines its own position from the signals received. From its position it can
derive the running time of a satellite and thus correct the transmitted GPS universal time.
Ground
The conductive ground whose electric potential can be set equal to zero in any point. In the area of
ground electrodes the ground can have a potential deviating from zero. The term "Ground reference
plane" is often used for this state.
Grounding
Grounding means that a conductive part is to connect via a grounding system to Æ ground.
Grounding
Grounding is the total of all means and measured used for grounding.
Hierarchy level
Within a structure with higher-level and lower-level objects a hierarchy level is a container of equivalent objects.
HV field description
The HV project description file contains details of fields which exist in a ModPara project. The actual
field information of each field is memorized in a HV field description file. Within the HV project description file, each field is allocated such a HV field description file by a reference to the file name.
HV project description
All data are exported once the configuration and parameterization of PCUs and sub-modules using
ModPara has been completed. This data is split up into several files. One file contains details about
the fundamental project structure. This also includes, for example, information detailing which fields
exist in this project. This file is called a HV project description file.
ID
Internal double-point indication Æ Double-point indication
ID_S
Internal double point indication intermediate position 00 Æ Double-point indication
IEC
International Electrotechnical Commission
IEC Address
Within an IEC bus a unique IEC address has to be assigned to each SIPROTEC 4 device. A total
of 254 IEC addresses are available for each IEC bus.
SIPROTEC, 7SJ689, User Manual
C53000-G1176-C346-1, Date 02.2012
113
Glossary
IEC communication branch
Within an IEC communication branch the users communicate on the basis of the IEC60-870-5-103
protocol via an IEC bus.
IEC61850
Worldwide communication standard for communication in substations. This standard allows devices
from different manufacturers to interoperate on the station bus. Data transfer is accomplished
through an Ethernet network.
Initialization string
An initialization string comprises a range of modem-specific commands. These are transmitted to
the modem within the framework of modem initialization. The commands can, for example, force
specific settings for the modem.
Inter relay communication
Æ IRC combination
IRC combination
Inter Relay Communication, IRC, is used for directly exchanging process information between
SIPROTEC 4 devices. You require an object of type IRC combination to configure an Inter Relay
Communication. Each user of the combination and all the necessary communication parameters are
defined in this object. The type and scope of the information exchanged among the users is also
stored in this object.
IRIG-B
Time signal code of the Inter-Range Instrumentation Group
IS
Internal single-point indication Æ Single-point indication
IS_F
Internal indication fleeting Æ Fleeting indication, Æ Single-point indication
ISO 9001
The ISO 9000 ff range of standards defines measures used to ensure the quality of a product from
the development to the manufacturing.
Link address
The link address gives the address of a V3/V2 device.
List view
The right pane of the project window displays the names and icons of objects which represent the
contents of a container selected in the tree view. Because they are displayed in the form of a list,
this area is called the list view.
114
SIPROTEC, 7SJ689, User Manual
C53000-G1176-C346-1, Date 02.2012
Glossary
LV
Limit value
LVU
Limit value, user-defined
Master
Masters may send data to other users and request data from other users. DIGSI operates as a
master.
Metered value
Metered values are a processing function with which the total number of discrete similar events
(counting pulses) is determined for a period, usually as an integrated value. In power supply companies the electrical work is usually recorded as a metered value (energy purchase/supply, energy
transportation).
MLFB
MLFB is the acronym of "MaschinenLesbare FabrikateBezeichnung" (machine-readable product
designation). It is equivalent to the order number. The type and version of a SIPROTEC 4 device
are coded in the order number.
Modem connection
This object type contains information on both partners of a modem connection, the local modem and
the remote modem.
Modem profile
A modem profile consists of the name of the profile, a modem driver and may also comprise several
initialization commands and a user address. You can create several modem profiles for one physical
modem. To do so you need to link various initialization commands or user addresses to a modem
driver and its properties and save them under different names.
Modems
Modem profiles for a modem connection are saved in this object type.
MV
Measured value
MVMV
Metered value which is formed from the measured value
MVT
Measured value with time
SIPROTEC, 7SJ689, User Manual
C53000-G1176-C346-1, Date 02.2012
115
Glossary
MVU
Measured value, user-defined
Navigation pane
The left pane of the project window displays the names and symbols of all containers of a project in
the form of a folder tree.
Object
Each element of a project structure is called an object in DIGSI.
Object properties
Each object has properties. These might be general properties that are common to several objects.
An object can also have specific properties.
Off-line
In offline mode a link with the SIPROTEC 4 device is not necessary. You work with data which are
stored in files.
OI_F
Output indication fleeting Æ Transient information
On-line
When working in online mode, there is a physical link to a SIPROTEC 4 device which can be implemented in various ways. This link can be implemented as a direct connection, as a modem connection or as a PROFIBUS FMS connection.
OUT
Output indication
Parameter set
The parameter set is the set of all parameters that can be set for a SIPROTEC 4 device.
Phone book
User addresses for a modem connection are saved in this object type.
PMV
Pulse metered value
Process bus
Devices featuring a process bus interface can communicate directly with the SICAM HV modules.
The process bus interface is equipped with an Ethernet module.
116
SIPROTEC, 7SJ689, User Manual
C53000-G1176-C346-1, Date 02.2012
Glossary
PROFIBUS
PROcess FIeld BUS, the German process and field bus standard, as specified in the standard EN
50170, Volume 2, PROFIBUS. It defines the functional, electrical, and mechanical properties for a
bit-serial field bus.
PROFIBUS Address
Within a PROFIBUS network a unique PROFIBUS address has to be assigned to each SIPROTEC
4 device. A total of 254 PROFIBUS addresses are available for each PROFIBUS network.
Project
Content-wise, a project is the image of a real power supply system. Graphically, a project is represented by a number of objects which are integrated in a hierarchical structure. Physically, a project
consists of a series of folders and files containing project data.
Protection devices
All devices with a protective function and no control display.
Reorganizing
Frequent addition and deletion of objects creates memory areas that can no longer be used. By
cleaning up projects, you can release these memory areas. However, a clean up also reassigns the
VD addresses. As a consequence, all SIPROTEC 4 devices need to be reinitialized.
RIO file
Relay data Interchange format by Omicron.
RSxxx-interface
Serial interfaces RS232, RS422/485
SCADA Interface
Rear serial interface on the devices for connecting to a control system via IEC or PROFIBUS.
Service port
Rear serial interface on the devices for connecting DIGSI (for example, via modem).
Setting parameters
General term for all adjustments made to the device. Parameterization jobs are executed by means
of DIGSI or, in some cases, directly on the device.
SI
Æ Single point indication
SI_F
Æ Single-point indication fleeting Æ Transient information, Æ Single-point indication
SIPROTEC, 7SJ689, User Manual
C53000-G1176-C346-1, Date 02.2012
117
Glossary
SICAM SAS
Modular substation automation system based on the substation controller Æ SICAM SC and the
SICAM WinCC operator control and monitoring system.
SICAM SC
Substation Controller. Modularly substation control system, based on the SIMATIC M7 automation
system.
SICAM WinCC
The SICAM WinCC operator control and monitoring system displays the condition of your network
graphically, visualizes alarms and indications, archives the network data, allows to intervene manually in the process and manages the system rights of the individual employee.
Single command
Single commands are process outputs which indicate 2 process states (for example, ON/OFF) at
one output.
Single point indication
Single indications are items of process information which indicate 2 process states (for example,
ON/OFF) at one output.
SIPROTEC
The registered trademark SIPROTEC is used for devices implemented on system base V4.
SIPROTEC 4 device
This object type represents a real SIPROTEC 4 device with all the setting values and process data
it contains.
SIPROTEC 4 variant
This object type represents a variant of an object of type SIPROTEC 4 device. The device data of
this variant may well differ from the device data of the source object. However, all variants derived
from the source object have the same VD address as the source object. For this reason, they always
correspond to the same real SIPROTEC 4 device as the source object. Objects of type SIPROTEC
4 variant have a variety of uses, such as documenting different operating states when entering parameter settings of a SIPROTEC 4 device.
Slave
A slave may only exchange data with a master after being prompted to do so by the master. SIPROTEC 4 devices operate as slaves.
Time stamp
Time stamp is the assignment of the real time to a process event.
118
SIPROTEC, 7SJ689, User Manual
C53000-G1176-C346-1, Date 02.2012
Glossary
Topological view
DIGSI Manager always displays a project in the topological view. This shows the hierarchical structure of a project with all available objects.
Transformer Tap Indication
Transformer tap indication is a processing function on the DI by means of which the tap of the transformer tap changer can be detected together in parallel and processed further.
Transient information
A transient information is a brief transient Æ single-point indication at which only the coming of the
process signal is detected and processed immediately.
Tree view
The left pane of the project window displays the names and symbols of all containers of a project in
the form of a folder tree. This area is called the tree view.
TxTap
Æ Transformer Tap Indication
User address
A user address comprises the name of the station, the national code, the area code and the userspecific phone number.
Users
DIGSI V4.6 and higher allows up to 32 compatible SIPROTEC 4 devices to communicate with each
other in an inter-relay communication network. The individual participating devices are called users.
VD
A VD (Virtual Device) includes all communication objects and their properties and states that are
used by a communication user through services. A VD can be a physical device, a module of a
device or a software module.
VD address
The VD address is assigned automatically by DIGSI Manager. It exists only once in the entire project
and thus serves to identify unambiguously a real SIPROTEC 4 device. The VD address assigned
by DIGSI Manager must be transferred to the SIPROTEC 4 device in order to allow communication
with DIGSI Device Editor.
VFD
A VFD (Virtual Field Device) includes all communication objects and their properties and states that
are used by a communication user through services.
SIPROTEC, 7SJ689, User Manual
C53000-G1176-C346-1, Date 02.2012
119
Glossary
120
SIPROTEC, 7SJ689, User Manual
C53000-G1176-C346-1, Date 02.2012